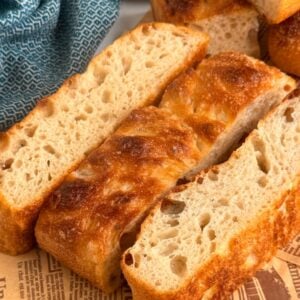
Same-Day Sourdough Focaccia
INGREDIENTS
Feed Your Starter
- 20 g sourdough starter
- 100 g water
- 100 g bread flour
Main Dough
- 390 g warm water
- 200 g active sourdough starter that you made from above
- 15 g extra virgin olive oil or avocado oil
- 10 g sugar
- 500 g bread flour
- 10 g sea salt
Added Later
- 40 g extra virgin olive oil* divided; can substitute avocado oil
- 30 g water
- 1 tsp coarse sea salt
Before You Begin

This dough is very wet and sticky — this is normal, so don't panic. Using a wet bowl scraper and wet hands will help prevent sticking. Re-wet between every single use.Also, your pan material really matters. This recipe is written for a USA 9x13-inch pan with a nonstick coating. However, you can use cast iron, glass, ceramic, or aluminum — you'll just need to make some minor modifications. Please note that testers had the most issues with glass and ceramic. See Recipe Notes!
Equipment
- Warming mat or proofing box or DIY option – see Recipe Notes
Instructions
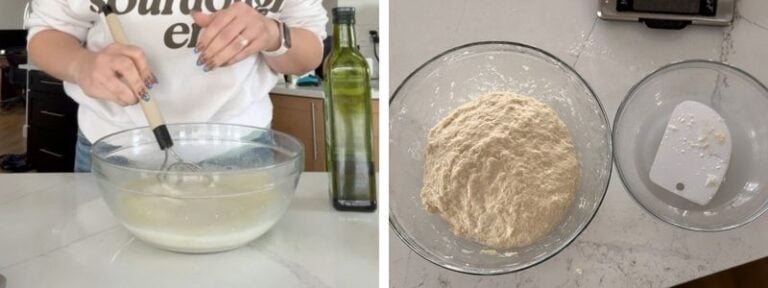
- Feed your starter: Before bed, in a 3/4 L Weck jar (or similar-sized glass jar), mix together 20 g sourdough starter and 100 g water. Then, mix in 100 g bread flour until smooth. Loosely cover and let ferment on the counter overnight [10-12 hours at 68-75°F (20-24°C)].
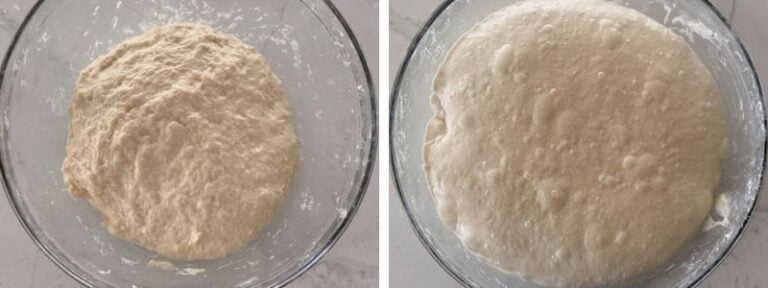
- Mix the dough: In the morning, in a large mixing bowl, combine 390 g warm water, 200 g active sourdough starter from above, 15 g extra virgin olive oil, and 10 g sugar. Add the 500 g bread flour and 10 g sea salt. Mix until no dry flour remains, using a Danish dough whisk or a wet bowl scraper. (Note: Bulk fermentation starts as soon as the ingredients are mixed.)
- Put in a warm spot: Cover the bowl and place it in a warm spot, ideally around 80°F (27°C). A proofing box or a warming mat works well, but you could also use your oven with the light on or your microwave with a cup of boiling water inside. Let the dough rest for 30–40 minutes.
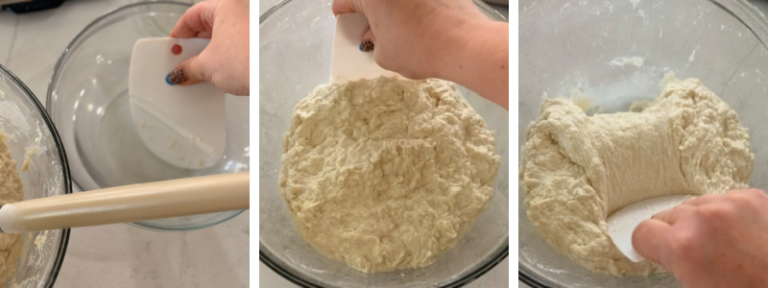
- Stretch and folds (beginning 30–40 minutes after mixing and repeating every 30–45 minutes for a total of 3 rounds): Using a wet bowl scraper, lift and fold the dough over itself from four points around the bowl, rotating as you go. Cover and rest between rounds. Keeping your scraper wet makes this much less messy than using your hands!
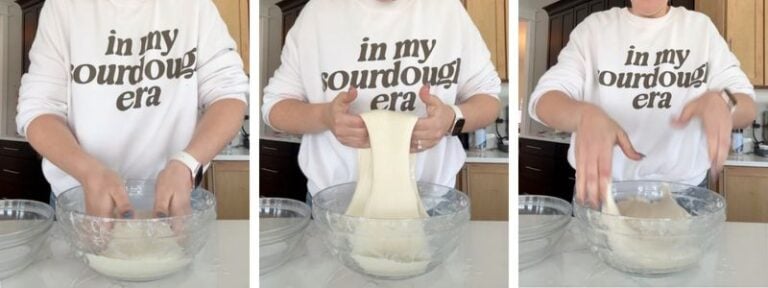
- Coil folds (beginning 30–40 minutes after the last stretch and fold and repeating every 30 minutes for a total of 4 rounds): With wet hands (seriously — dunk them in water), slide your hands under the center of the dough, lift it up, and let the ends fold under themselves. Rotate the bowl 90° and repeat, wetting your hands often. Cover and rest between rounds.You don't have to do this many rounds of coil folds, but wet dough benefits greatly from handling throughout bulk fermentation.
- Finish bulk fermentation: Bulk fermentation began when we first mixed our dough — we're ready to transfer it to our pan when it has approximately doubled in size and is covered with bubbles. For me, bulk fermentation took a total of 5.5-6 hours at about 80°F (27°C), but timing can vary, so pay more attention to visual cues.
- Optional — overnight cold proof: You can put your dough in the fridge until tomorrow. The focaccia will develop a more sour, complex flavor profile and may be easier to digest for those sensitive to gluten. When you're ready, remove the bowl from the fridge, let the dough warm up slightly for 1–2 hours, then continue with Step 8.
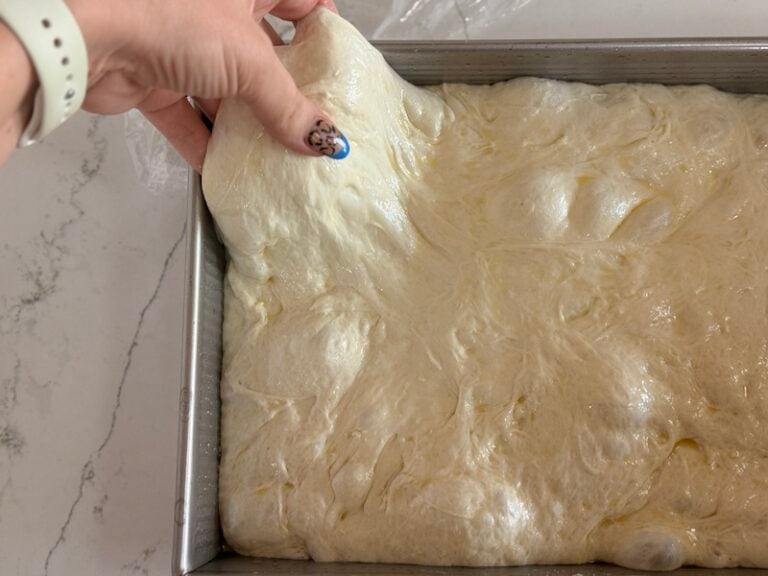
- Transfer to pan. If using glass, ceramic, cast iron, or aluminum, please see Recipe Notes as the prep here is slightly different. Drizzle 10 g extra virgin olive oil into your 9x13-inch pan and rub it all over the bottom and sides. Gently dump the dough in the pan. Flip the dough over so the smoothest side is facing up. Do not dimple yet – that's in the next step!Gently stretch the dough to fill the pan. If it springs back, leave it uncovered and let it rest for 10–15 minutes , then gently stretch it again. Cover the pan and return it to your warm spot for the final proof.
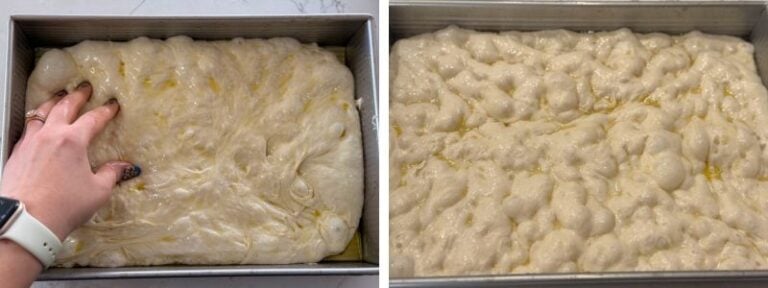
- Pre-bake prep and preheat: Approximately 2–3 hours after transferring to the pan, or once the dough looks super puffy and roughly 50% larger, drizzle the remaining 30 g extra virgin olive oil and 30 g water evenly over the surface. Sprinkle generously with 1 tsp coarse sea salt. Dimple the entire surface deeply with your fingers, pressing all the way down to the pan. Move your oven rack to the lower third and preheat to 500°F (260°C) conventional.
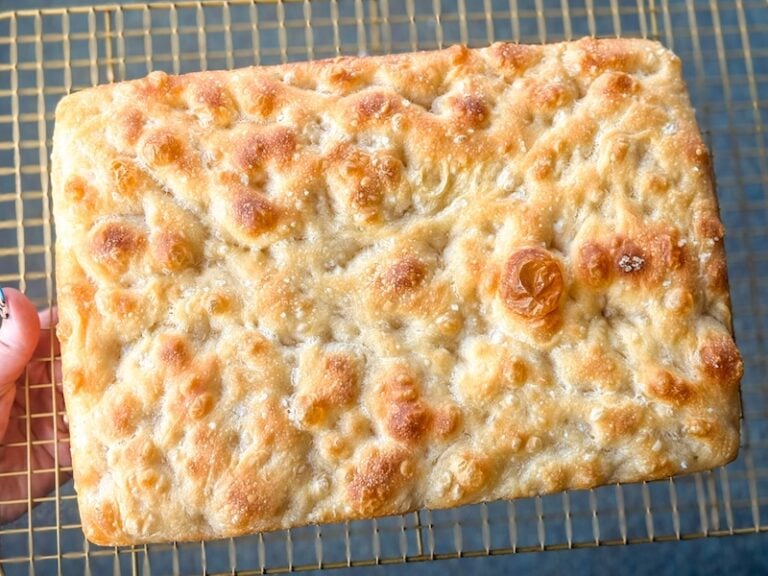
- Bake. Once the oven is fully preheated, place the focaccia on the lower third rack. Immediately reduce the oven temperature to 450°F (232°C). Bake for 30 minutes, rotating the pan halfway through, until the top is deep golden brown and the interior temperature is 205-210°F (96-99°C).
- Cool. Let the focaccia cool in the pan for 5 minutes, then transfer to a cooling rack. Allow to cool for at least 1 hour before slicing — this helps the interior finish setting and gives you cleaner slices.
Video
Notes
Pan material guide (glass and ceramic not recommended):
Other great options include:
- Cast iron or aluminum: coat bottom of pan with butter (thoroughly). Add 30g olive oil over the butter and proceed like normal.
- Glass: Preheat oven to 425°F. Spray pan with a non-stick oil spray or coat with butter. Line with parchment. Add 20g olive oil on top of the parchment and proceed like normal. Your baking time may be slightly longer due to the reduced oven temperature.
- Ceramic: spray pan with a non-stick oil spray or coat with butter. Line with parchment. Add 20g olive oil on top of the parchment and proceed like normal.
Other great options include:
- Ballerina Farms farm flour (14%)
- King Arthur bread flour (12.7%)
- Bob's Red Mill bread flour (12.5–13.5%)
- Cozy Bread Original Proofing Mat — Use code THATSOURDOUGHGAL for 10% off
- Brod & Taylor Folding Proofer
- Giyudot Folding Bread Proofing Box
- DIY — Your oven with the light on
- DIY — Your microwave with a cup of boiling water inside
