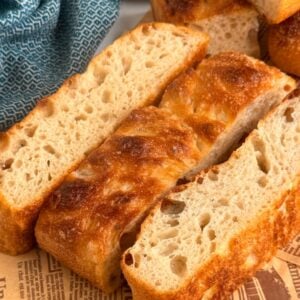
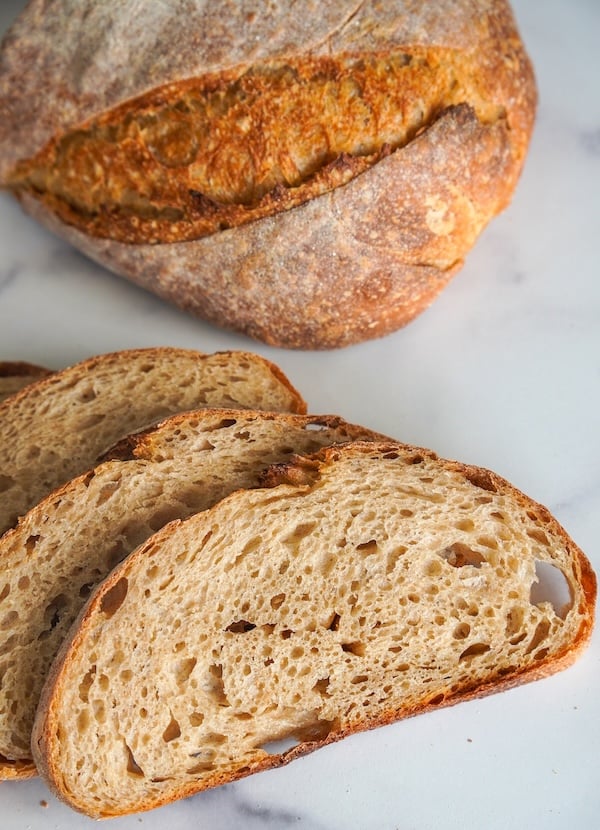
I never thought you could get super bubbly, jiggly focaccia without the help of commercial yeast, but boy was I wrong! This is the best sourdough focaccia recipe I’ve ever tried, but I didn’t get here without some help.
This same-day focaccia recipe took months of testing plus feedback from 627 home bakers. At this point, I can confidently say: this is one of the most crowd-pleasing, accessible sourdough recipes on this site.
“OMG. Why have I been sleeping on focaccia?!? This was the most delicious thing I’ve ever made. My entire family devoured it immediately (including picky kids). I ate 3 pesto chicken sandwiches.” -Recipe tester from Greensboro, NC
Disclaimer: Some of the products I recommend in this post are affiliate links – if you choose to purchase after clicking one of my links, I may earn a small commission, which helps fund this website, recipe development, and monthly giveaways. I sincerely appreciate your support.
Why You’ll Love This Same-Day Sourdough Focaccia
It was tested — a lot: 627 home bakers tested this recipe and gave it an average rating of 4.69/5, with 93% saying they’d make it again (this was before I incorporated their feedback into this final version). Those who used the same pan material as I did rated the recipe a 4.82/5. Pan type matters, but we’ll get into that later!
Mix in the morning, eat focaccia with dinner: I love a good same-day recipe, and this sourdough focaccia delivers. No overnight wait required, but you can add an overnight cold proof step if you want a deeper flavor and potentially easier digestion.
“The same-day aspect to it! Granted, I started it after work on Friday and did put it in the fridge between 10pm–7am after proofing so that I wasn’t making midnight bread. This really can be ready for dinner.” –Recipe tester from Franklin, Indiana
Super simple ingredients: All you need is sourdough starter, flour, water, salt, olive oil, and sugar. A high-quality flaky sea salt is also nice to have, but not required.
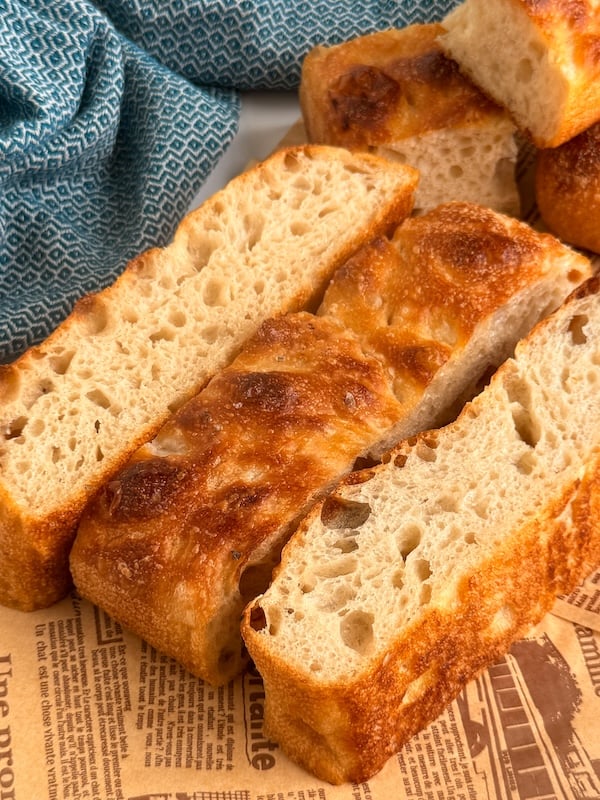
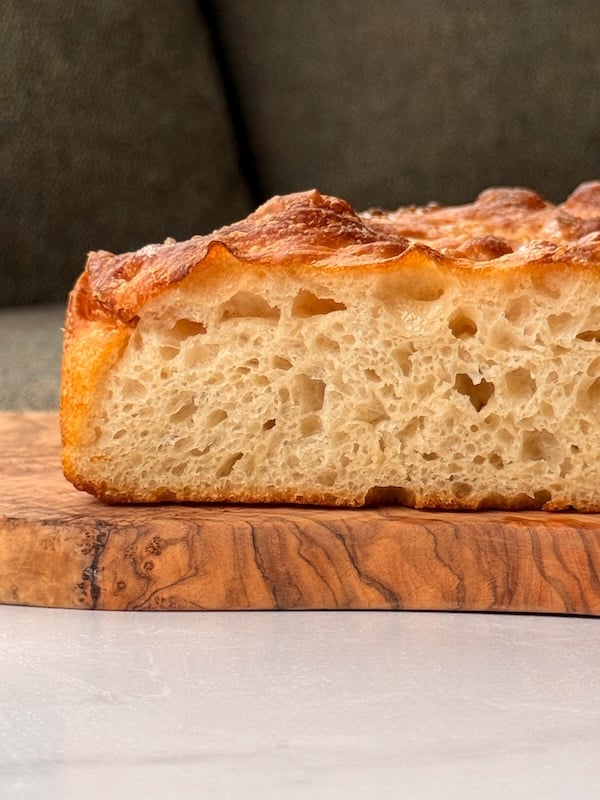
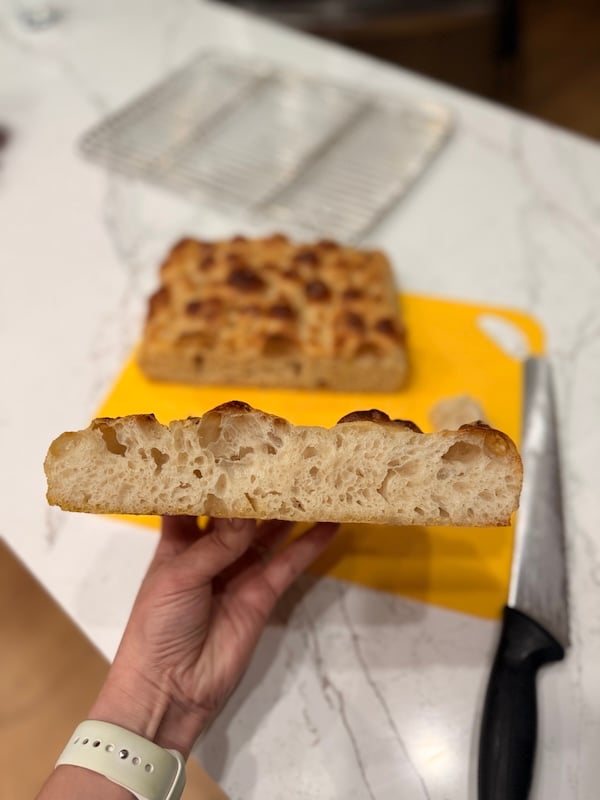
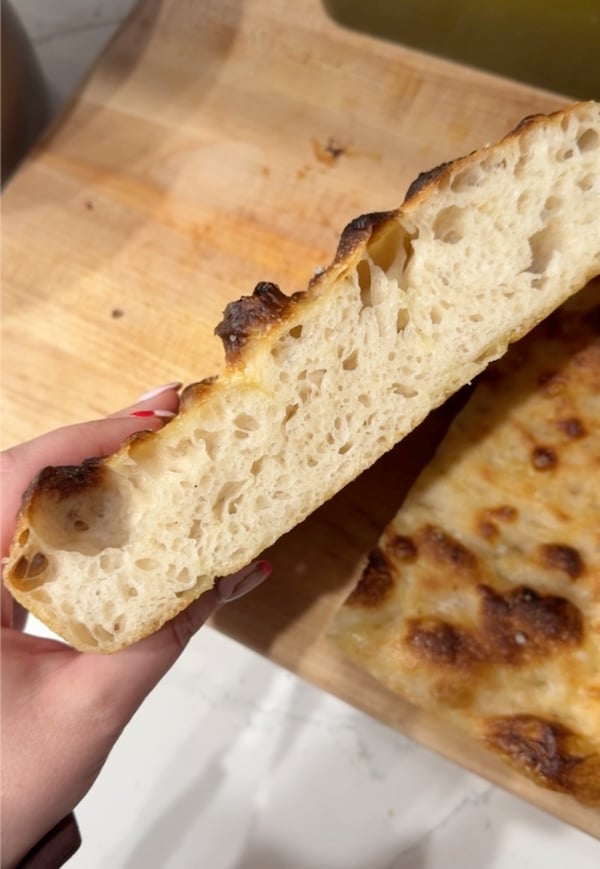
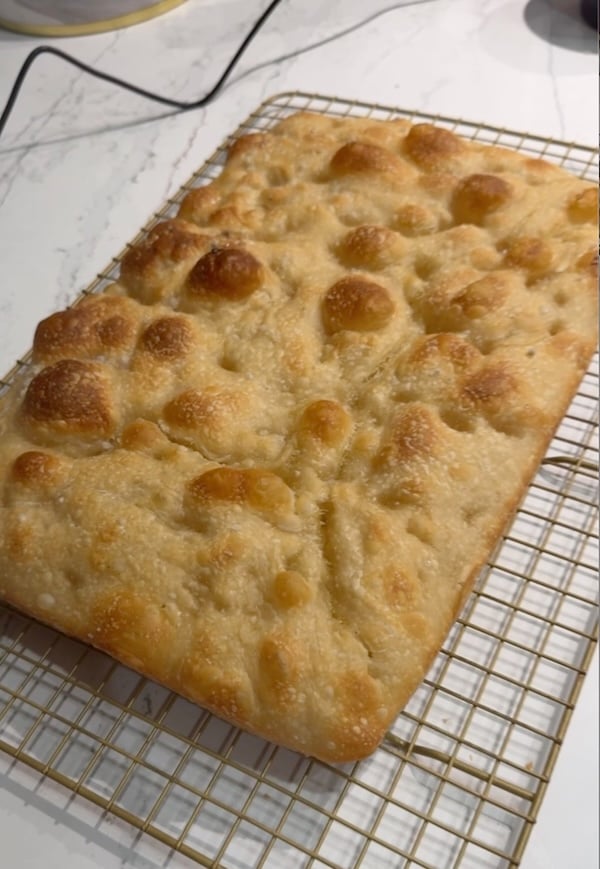
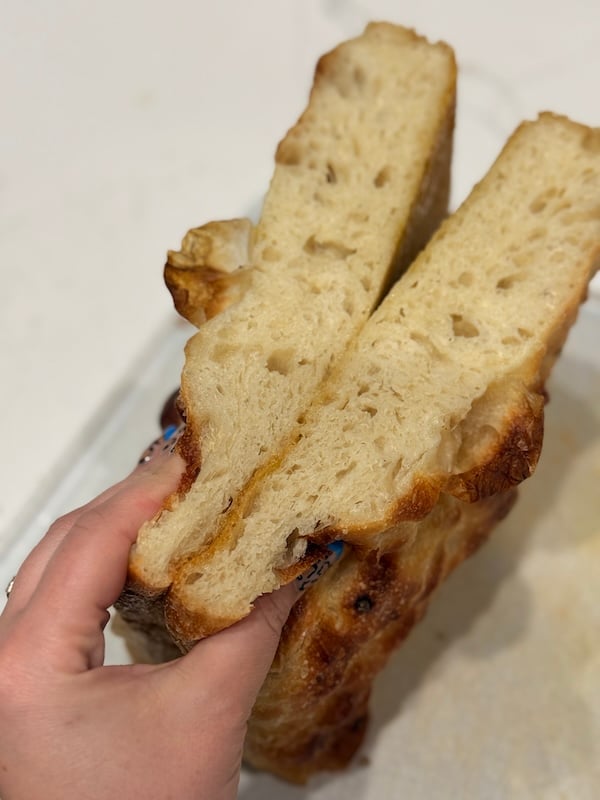
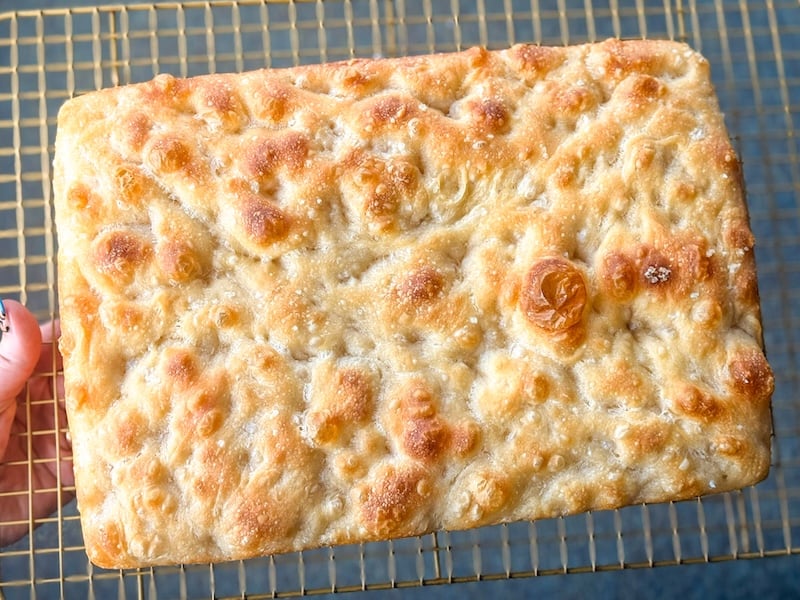
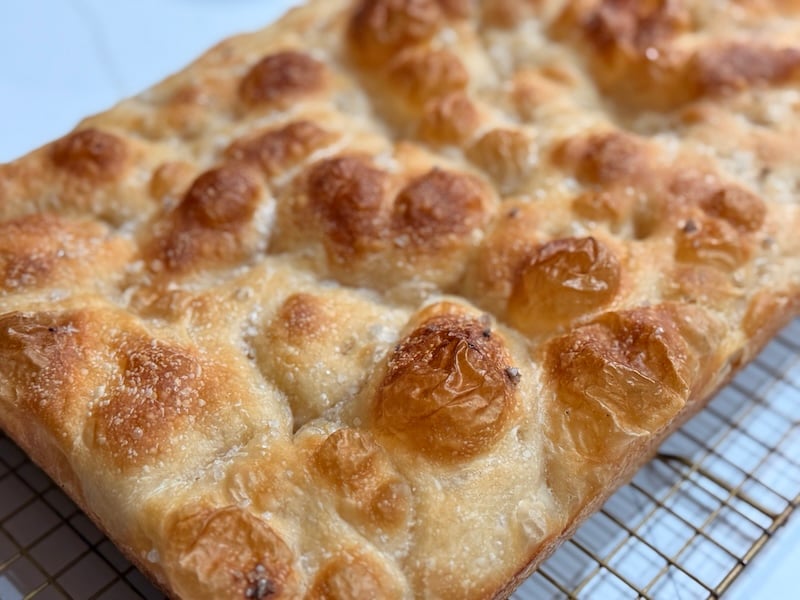
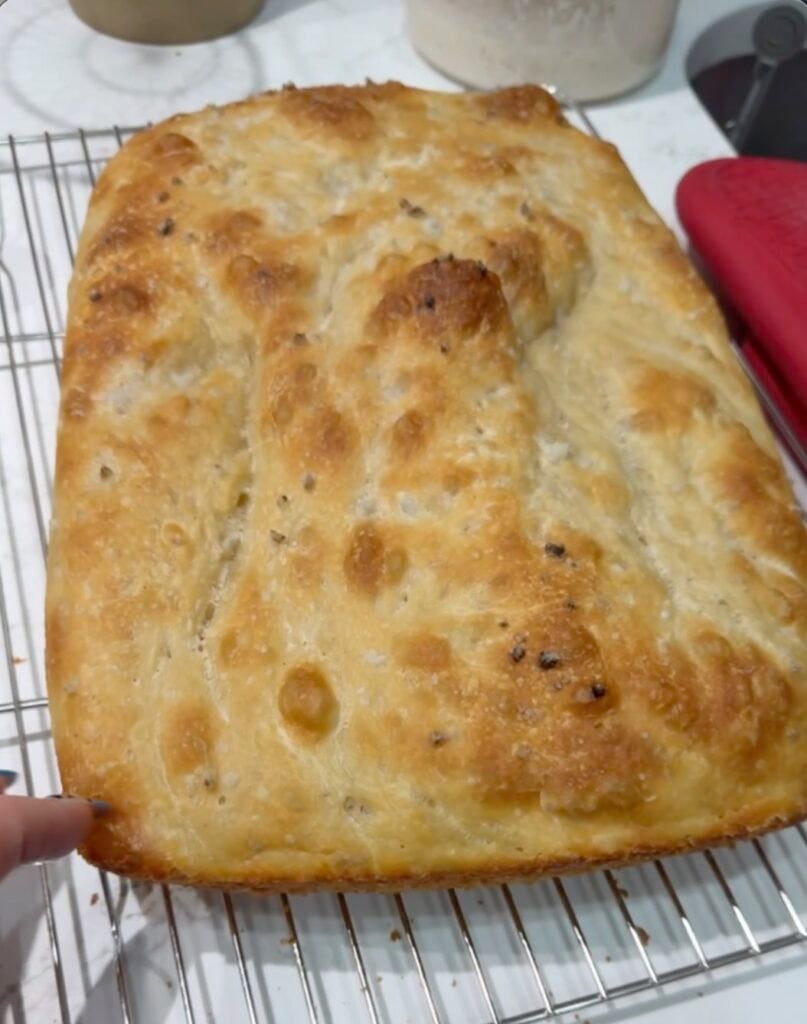
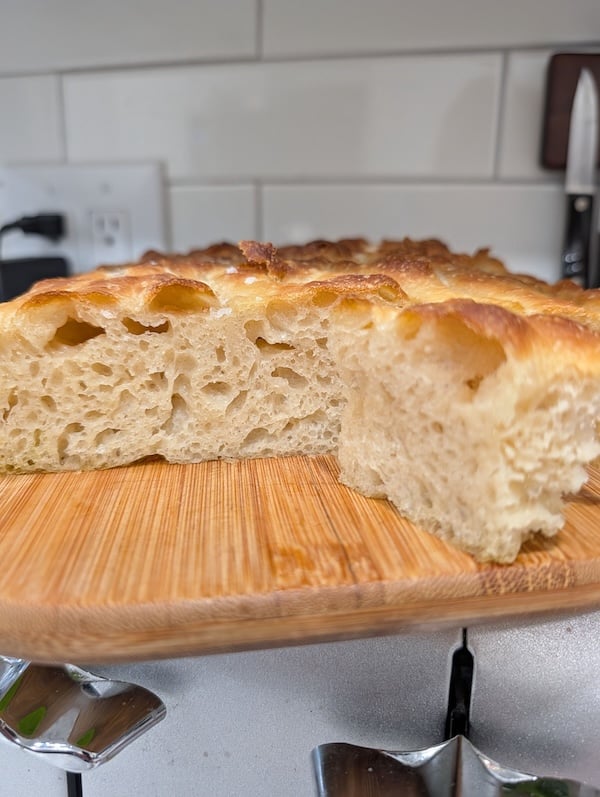
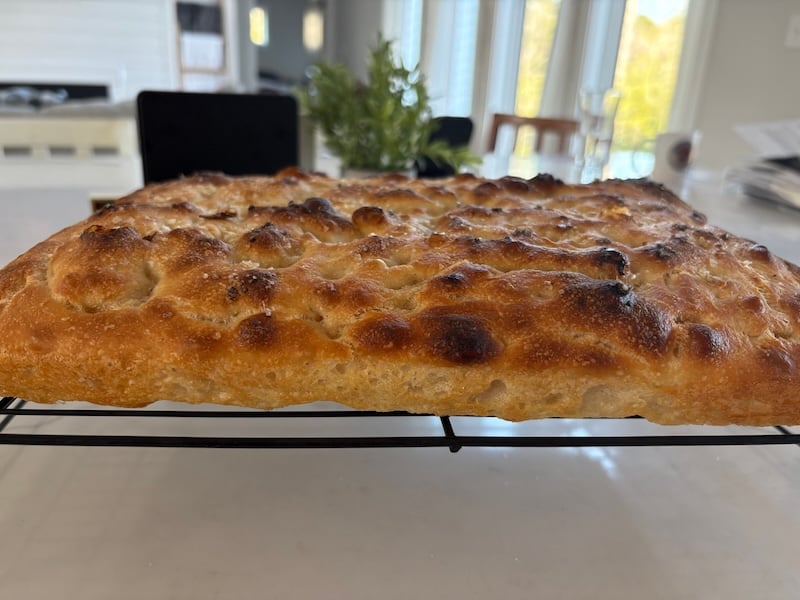
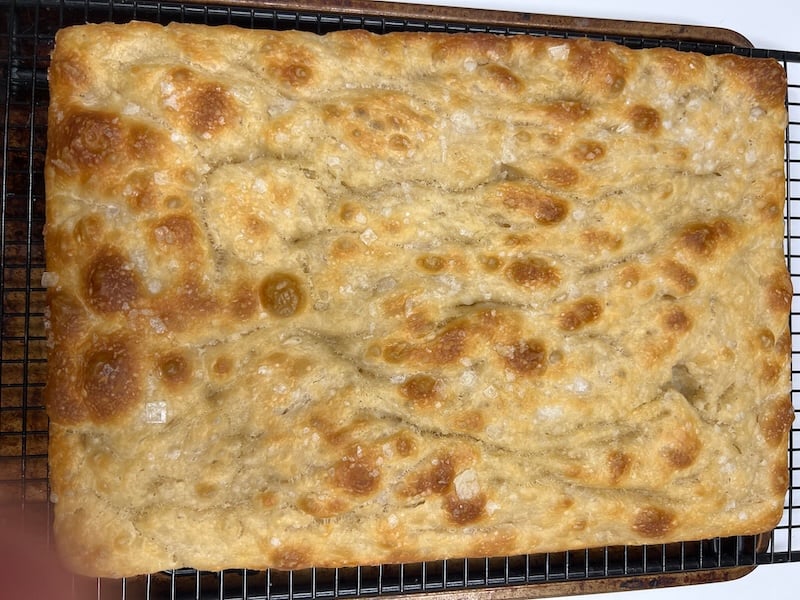
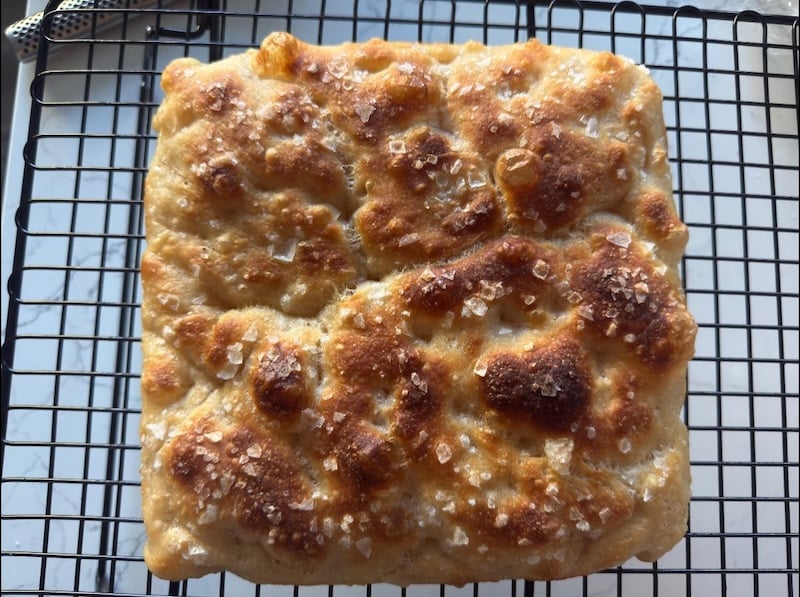
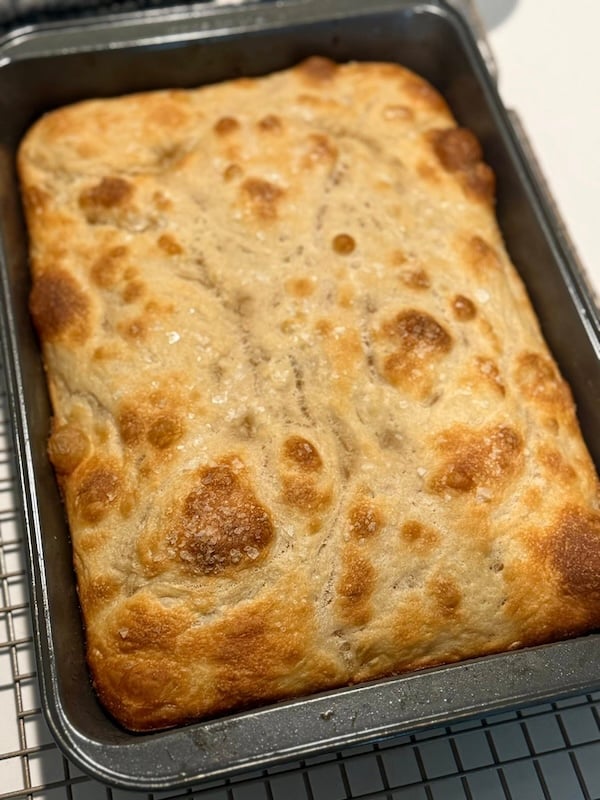
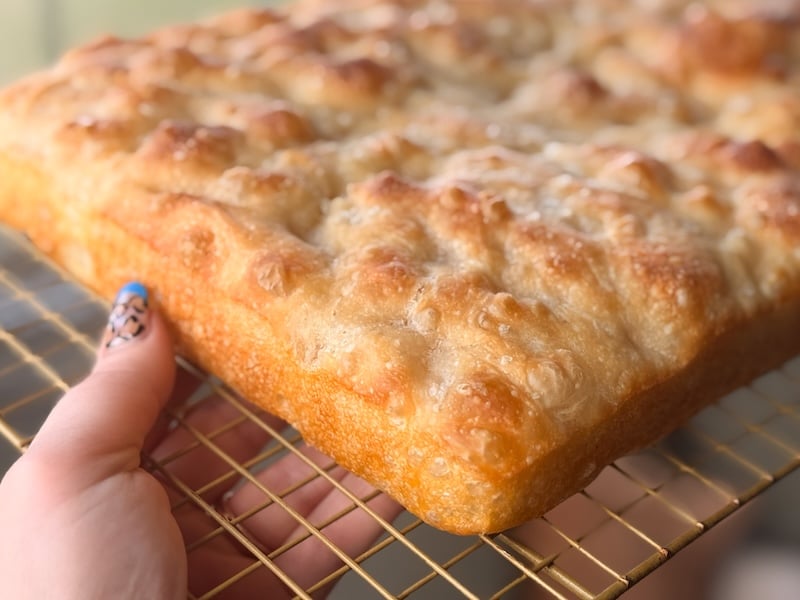
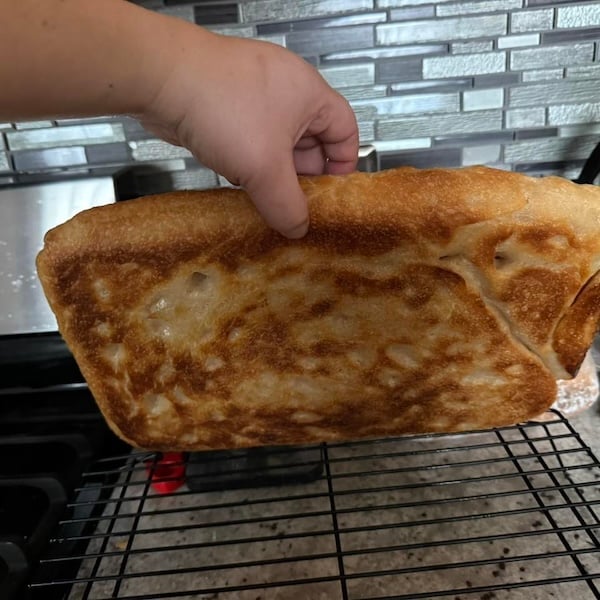
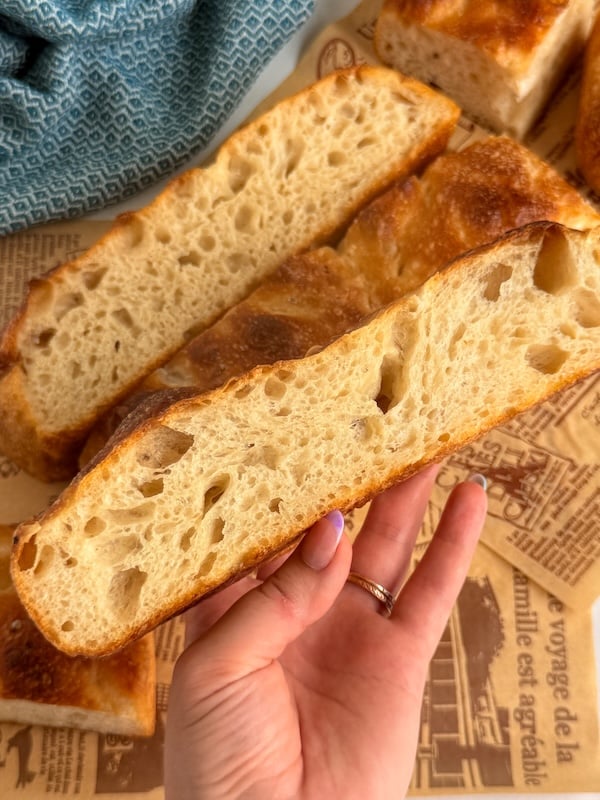
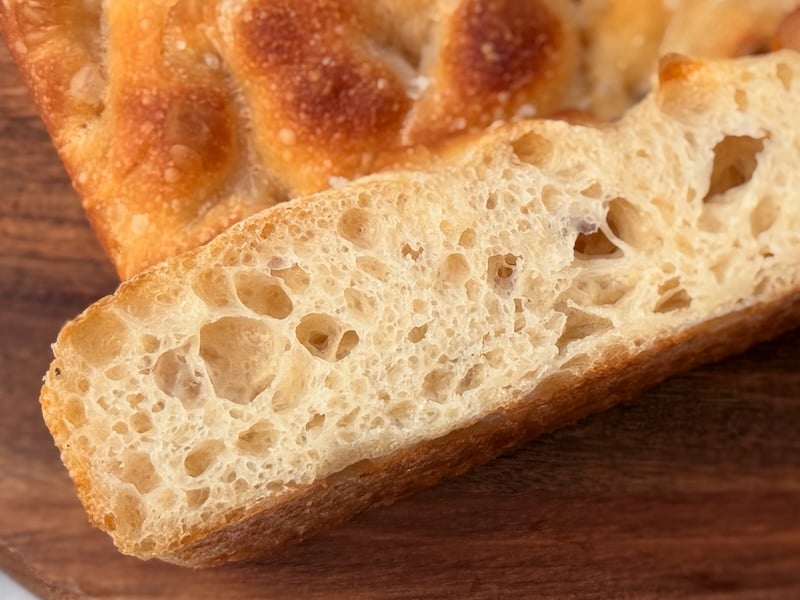
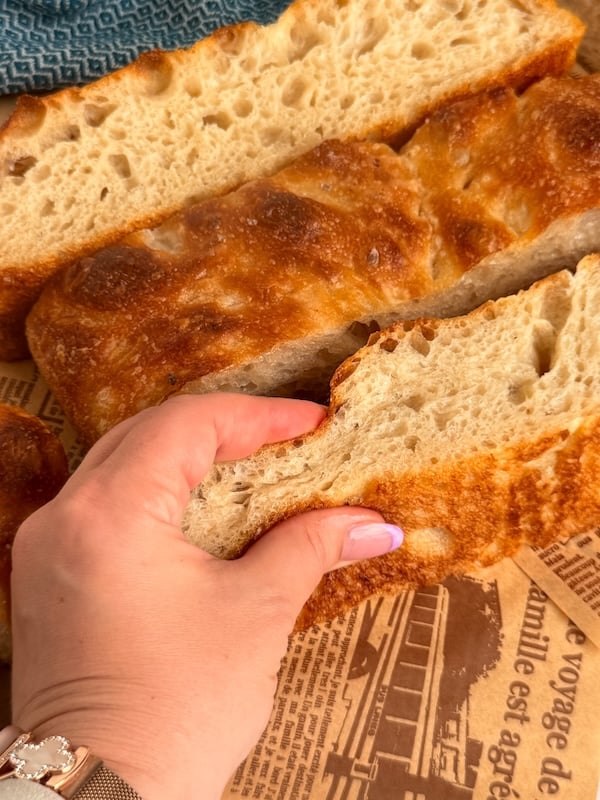
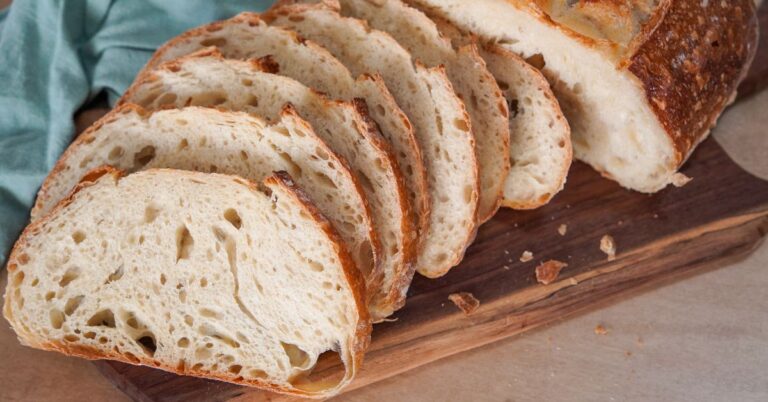
Incredible texture: Soft and squishy on the inside. Crispy and golden on the outside. It’s exactly the combination I was after, and this recipe nails it.
“It’s so delicious — fluffy and crispy.” –Recipe tester from Prince Edward Island, Canada
A genuinely FUN recipe to make: Despite being high hydration, this dough is a dream. The coil folds are akin to adult slime — it’s so therapeutic and fun. So many testers commented on just how satisfying it was to handle this dough.
“After the initial 40-minute rest, the dough was so silky and smooth to work with. I loved the higher hydration!!!” –Recipe tester from Washington State
No shaping required: No scoring, no Dutch oven, no perfect shaping needed. You dump the dough in a pan, stretch it out, dimple it, and bake it. Super beginner-friendly.
“Easy, no difficult shaping.” –Recipe tester from Eastern Cape, South Africa
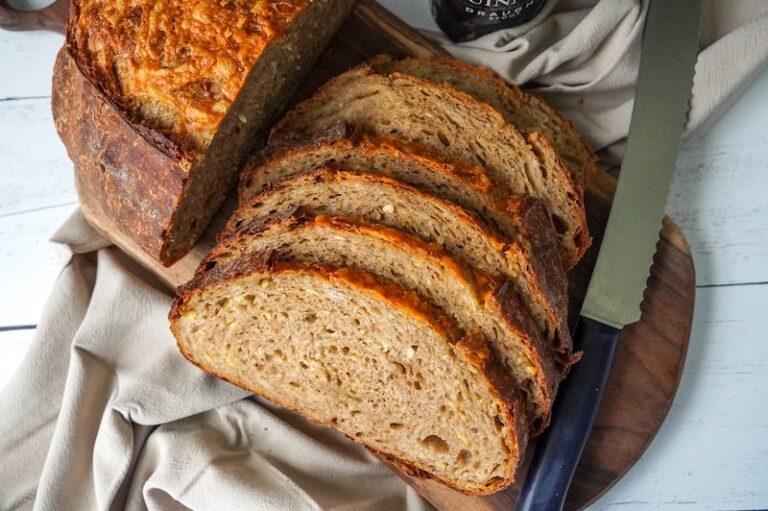
It’s wildly versatile: Eat it plain with flaky sea salt. Slice it in half for sandwiches — our personal favorite. Top it with roasted garlic and rosemary. The plain version is a perfect base, and testers got creative with it! I will definitely be making fun flavor variations in the future, but in the meantime, go crazy!!
“This focaccia recipe has the perfect texture of crunch, chewiness and sourdough taste that you can make sandwiches with or eat all by itself!” –Recipe tester from Vacaville, CA
I did a total of 9 recipe tests — the first 5 were to nail down the ingredient mix and oven times and temps.
Recipe Test 1 ResultRecipe Test 2 ResultRecipe Test 3 ResultRecipe Test 4 ResultRecipe Test 5 Result
I then sent it off to recipe testers. Their feedback was detailed, honest, and incredibly helpful. A few key insights came out of it:
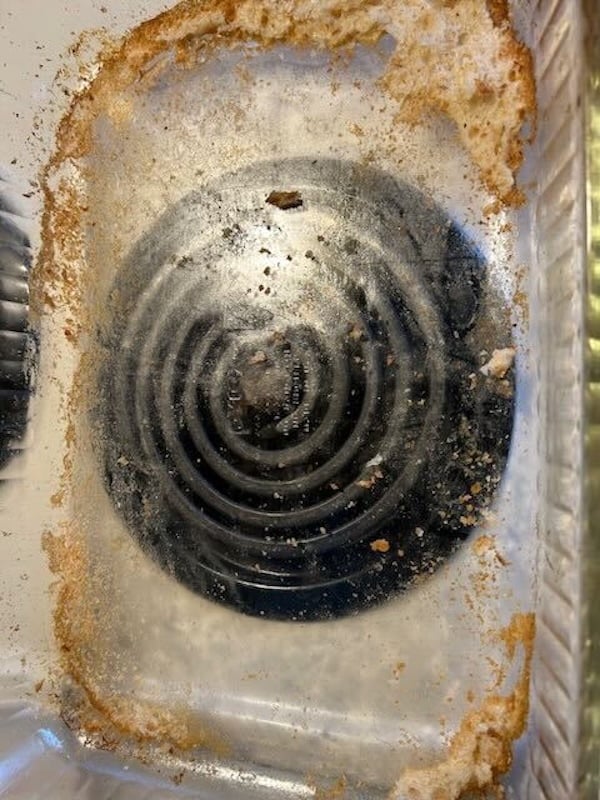
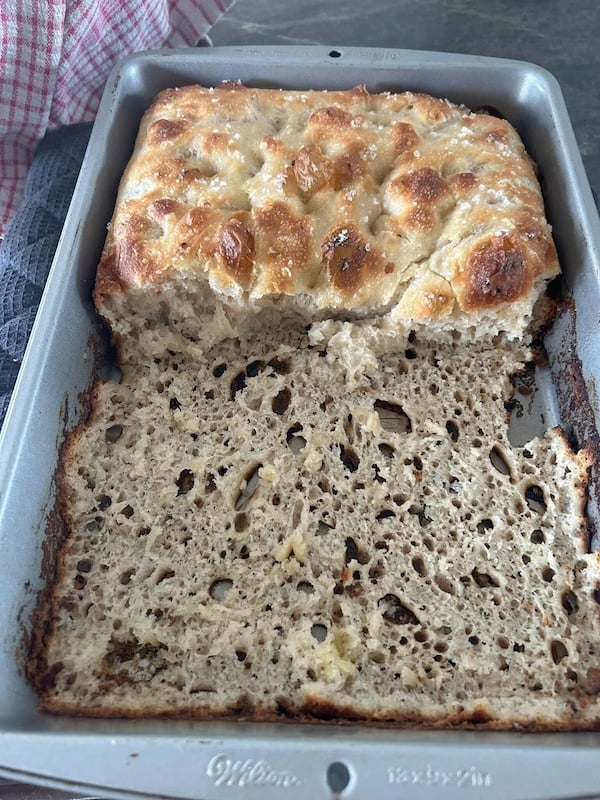
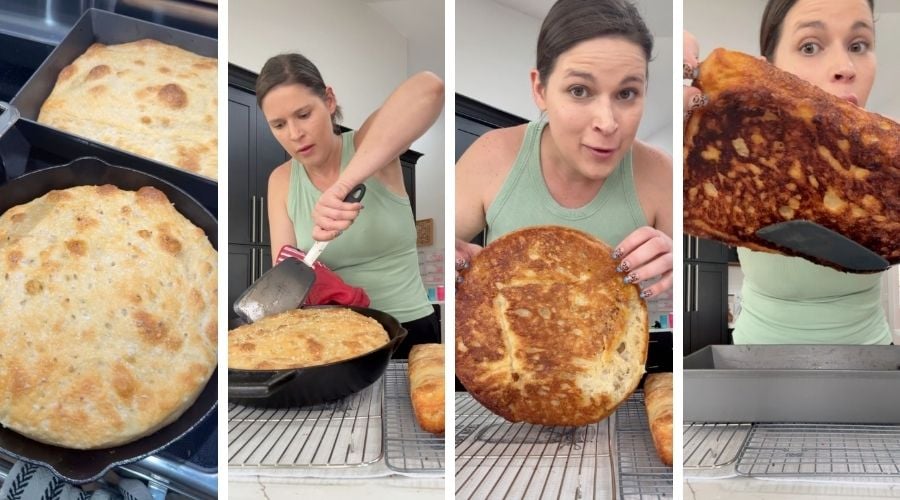
Pan material matters more than I expected. This was the single biggest variable in the results. Testers who used a USA 9×13-inch nonstick pan had dramatically better results — specifically when it came to the #1 complaint across the board: sticking. More on this in the Equipment section.
After seeing this consistent feedback, I spent the rest of my recipe testing trying different pans — aluminum, cast iron, and glass. More info is in the Equipment section.
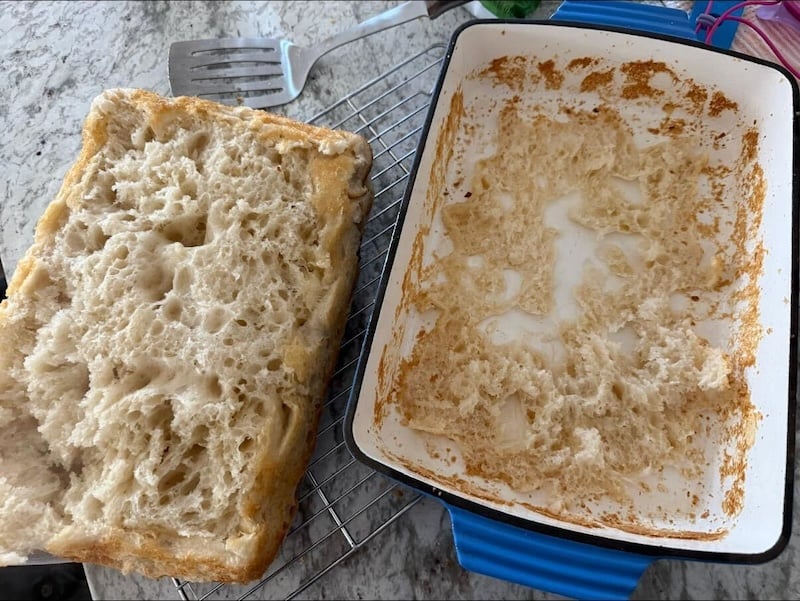
Recipe Test 6 Result – Baked In Lloyd Pans Detroit-Style Pizza PanRecipe Test 7 Result – Half Batch Baked In Glass DishTest 8 Result – Baked In Large Cast Iron SkilletTest 9 Result – Baked In Glass DishGlass always produced the worst results for me — you can see the lack of browning. The Lloyd Pan was awesome, and my cast-iron skillet produced a killer crust.
The water on top confused a lot of people. Nearly everyone who mentioned it said they were nervous to add water directly on top of their beautiful dough right before baking — but almost universally, those who trusted the process were glad they did. I’ve added more explanation of what this step does and why it matters.
The fold count felt like a lot. Several testers noted that all the stretch and folds and coil folds made this recipe more “babysitting-intensive” than they expected. I want to be upfront about that — this is not a set-it-and-forget-it bread. But I’ve clarified in the instructions that you don’t have to do every single coil fold, and the testers who skipped one or two still had great results.
The flaky salt needed a measurement. A lot of testers either over-salted or under-salted the top of their focaccia because I didn’t give a specific amount. That’s now fixed in the recipe.
The good news? Even with these issues, the recipe was well-received, with 93% of testers saying they’d make it again.
“I feel like a professional baker now. My kids think I’m amazing. My husband loves me more. Worth it.” –Recipe tester from Greensboro, NC
“Easy to follow focaccia recipe with fluffy texture and incredible flavor!” –Recipe tester from Milwaukee, WI
“This recipe is beginner-friendly and hard to mess up.” –Recipe tester from Saginaw, TX
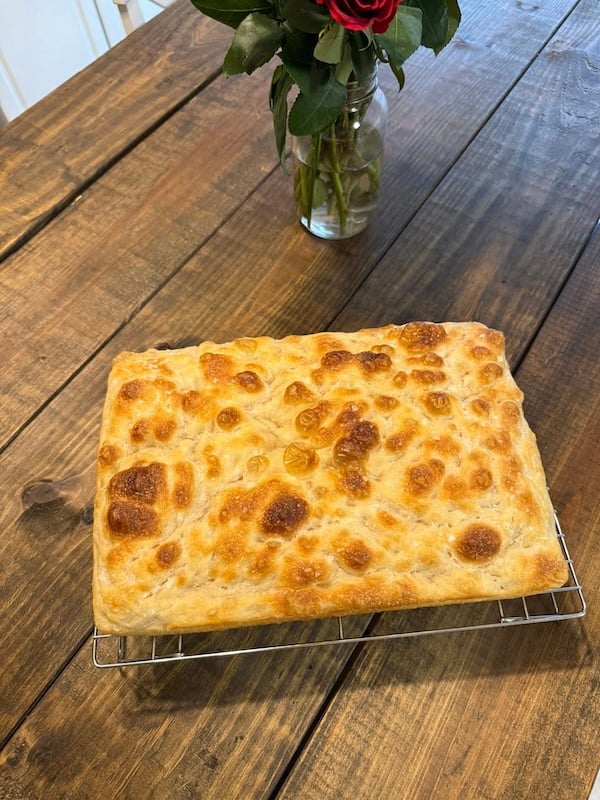
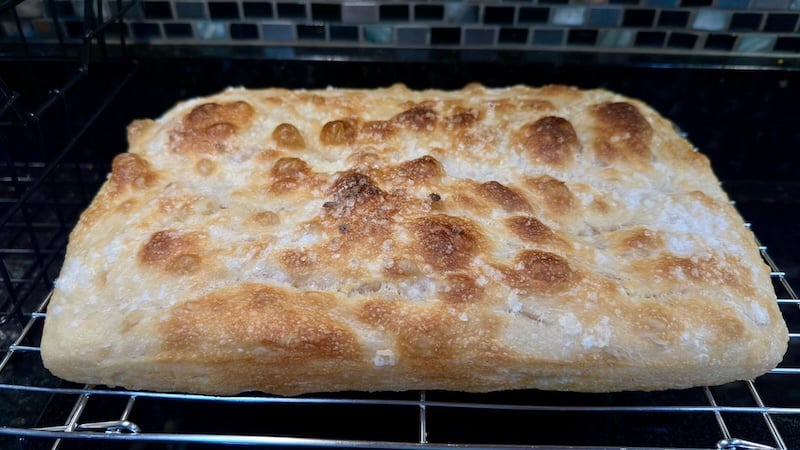
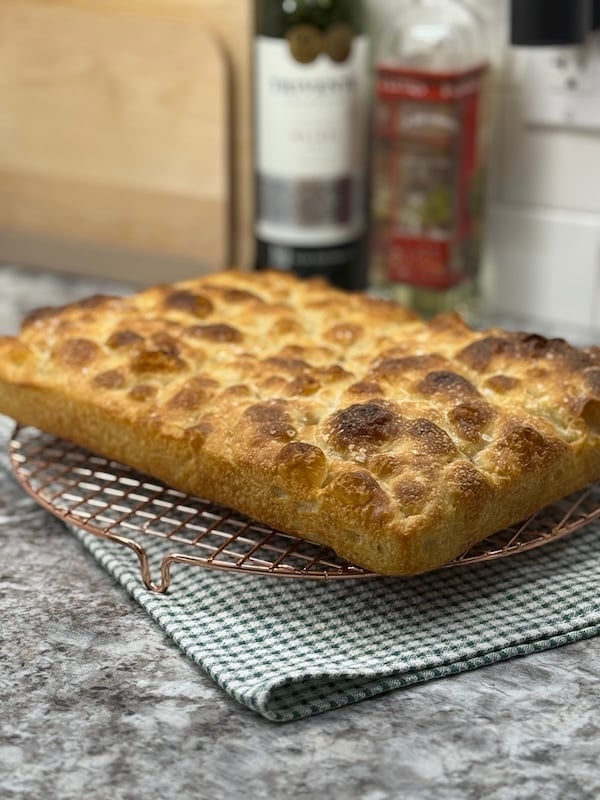
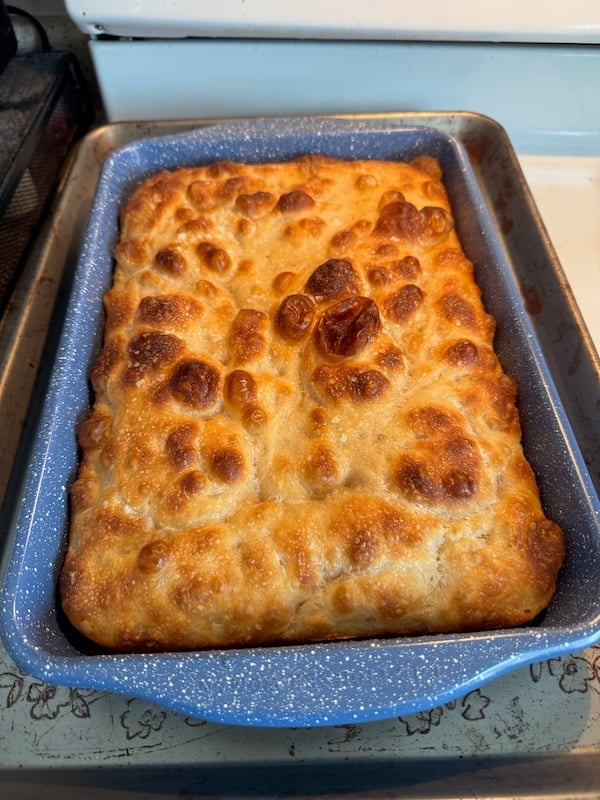
Take a look at some of their bakes!
Baker’s Timeline
Same-Day Timeline
Stage
Step
Before bed (8–9 PM)
Feed your starter
8 AM
Mix the dough
8:30 AM
Stretch and fold #1 (using a wet bowl scraper)
9 AM
Stretch and fold #2 (using a wet bowl scraper)
9:30 AM
Stretch and fold #3 (using a wet bowl scraper)
10 AM
Coil fold #1 (with wet hands)
10:30 AM
Coil fold #2 (with wet hands)
11 AM
Coil fold #3 (with wet hands)
11:30 AM
Coil fold #4 (with wet hands)
1:30 PM — this time may vary
When bulk fermentation is done, transfer to an oiled pan
4:30 PM — this time may vary
Preheat oven; then dimple focaccia and bake
After baking
Let cool in pan for 5 minutes; then turn out onto a cooling rack. Wait 1 hour before slicing
If you prefer an overnight cold proof, here is an alternative timeline:
Two-Day Timeline (With Cold Proof)
Stage
Step
Day 1
Before bed (8-9 PM)
Feed your starter
Day 2
8 AM
Mix the dough
8:30 AM
Stretch and fold #1 (using a wet bowl scraper)
9 AM
Stretch and fold #2 (using a wet bowl scraper)
9:30 AM
Stretch and fold #3 (using a wet bowl scraper)
10 AM
Coil fold #1 (with wet hands)
10:30 AM
Coil fold #2 (with wet hands)
11 AM
Coil fold #3 (with wet hands)
11:30 AM
Coil fold #4 (with wet hands)
1:30 PM — this time can vary
When bulk fermentation is done, transfer bowl to the fridge
Day 3
8 AM
Bring bowl out of the fridge to warm up
9 AM
Transfer dough to an oiled pan
12 PM — this time can vary
Pre-heat oven; then dimple focaccia and bake
After baking
Let cool in pan for 5 minutes; then turn out onto a cooling rack. Wait 1 hour before slicing
Equipment You’ll Need
Kitchen scale: This recipe is written in grams and was developed using metric measurements. Volume conversions are untested — use a scale for best results.
9×13-inch baking pan: This is the baking pan size we need, but we need a deeper discussion about pan material, because it really makes a difference.
The recipe is written for a USA Pan 9×13-inch nonstick pan. Out of 627 testers, 224 used this pan — and their results were noticeably better across every single metric:
USA Pan (224)
Other pans (254)
Glass (133)
Cast iron (16)
Overall rating
4.82/5
4.64/5
4.58/5
4.56/5
Texture rating
4.87/5
4.76/5
4.63/5
4.69/5
Recommend score
4.92/5
4.78/5
4.68/5
4.69/5
Would make again
96%
92%
89%
94%
“Other” is a mixed bag of nonstick pans, Caraway, Lloyd pans, stoneware, etc.
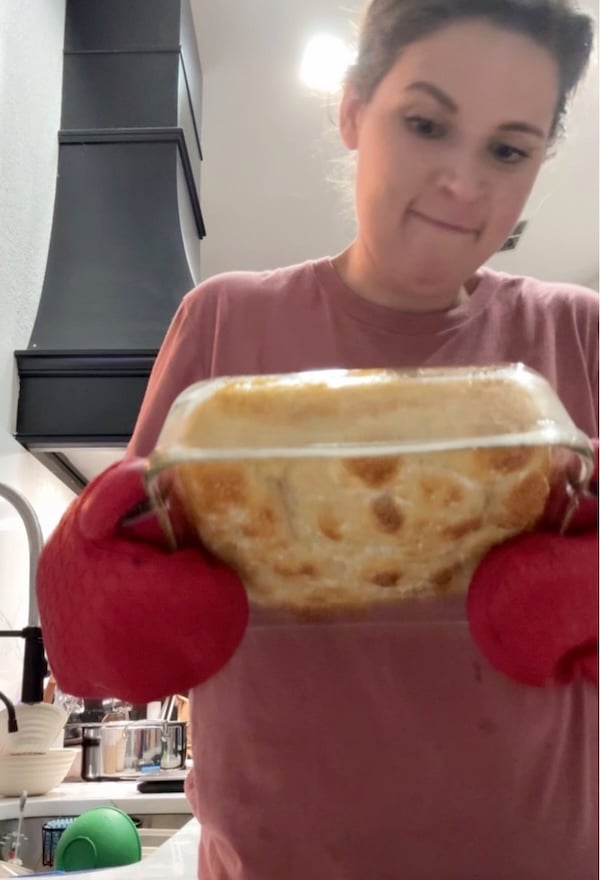
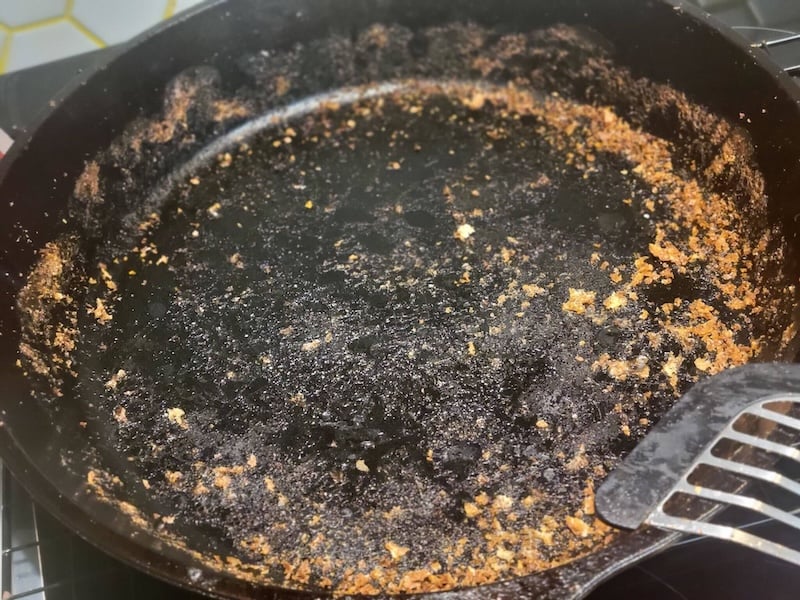
The sticking issue — by far the most common complaint in the overall group — was a non-issue with the USA Pan.
“So many people were complaining about sticking, but I had no problem. I was worried but it popped right out.” –Recipe tester using a USA Pan
But for those using other pan types, it often ruined their results. Glass was the worst in this regard.
Here’s a sad little collection of stuck focaccia photos from recipe testers:
If you have a different pan, you can absolutely still make this recipe. Let’s get into the best techniques for preventing sticking.
No-Stick Tips for Different Pan Materials
If you’re not using a USA Pan, three techniques work best for preventing sticking:
Coating the pan with softened butter before adding the olive oil
Lining the pan with parchment paper
Spraying the pan with nonstick cooking spray before adding the olive oil
Of the three, softened butter got the best results across the widest variety of pan types. Be generous with it — testers who used it liberally had the least sticking. Cold butter straight from the fridge doesn’t work as well.
“I used glass and lightly buttered and then added the suggested amt of oil. NO sticking and was nice and crispy! I made mine late in the testing so used others’ recommendations.” –Carol Luskey Rosenthal, recipe tester
Parchment is the most foolproof option, but you may sacrifice some browning on the bottom. A tip: add a little oil to the pan first so the parchment doesn’t slide around.
“I used Pyrex glass. I oiled the bottom and used about 15-20g oil on the parchment. It came out crispy, not oily and in one piece. I’ve made it a few times so it’s not a fluke.” –Michelle Ann-Marie, recipe tester
Nonstick cooking spray worked for some testers but was the least reliable of the three — I personally still had sticking in a glass pan using this method.
“I originally used a “nonstick” Wilton pan and it stuck the first time, the second time I sprayed it lightly with cooking spray (concentrating on the corners) then used the recommended amt of olive oil and it came out perfect!” –Sandra Thompson Needham, recipe tester
The recipe was originally developed using the 9×13-inch USA Pan, and it remains my personal favorite. It browns reliably, releases cleanly, and is coated with Americoat® — a silicone-based nonstick coating with no PTFE, PFOA, or BPA.
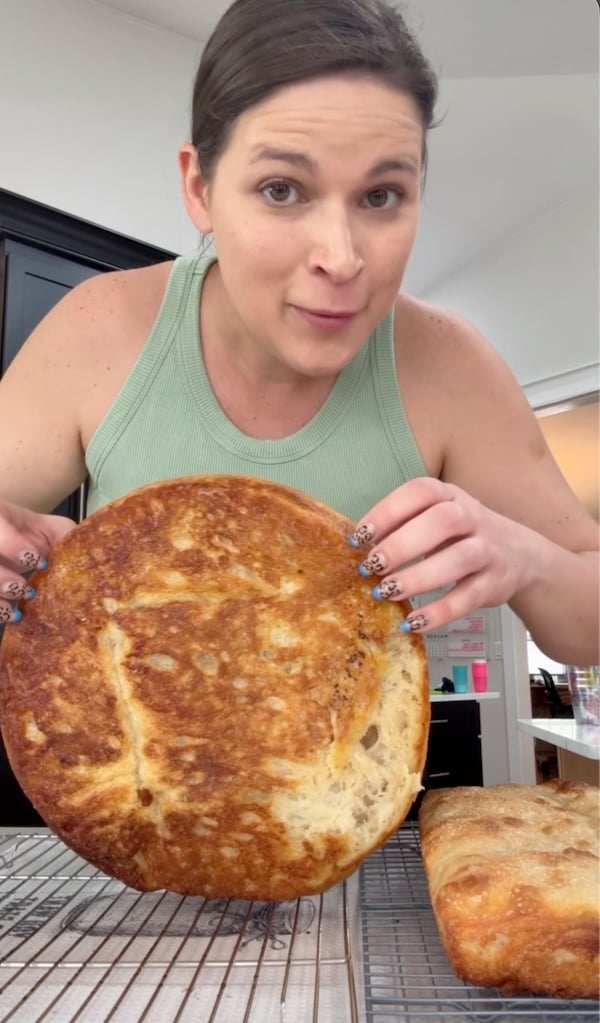
However, cast iron is phenomenal for this recipe. It produces amazing browning, though you should lather it with butter and use extra oil to help prevent sticking.
The round pan is the cast iron skillet; the rectangular pan is the Lloyd Pan
Finally, a follower suggested this Lloyd Pans Detroit-Style Pizza pan — it’s aluminum, made in the USA, and features their proprietary Pre Seasoned Tuff Kote (PSTK) finish, which is a permanent, PTFE-free non-stick coating that requires zero seasoning (no Teflon).
That’s a mouthful, but the point is the pan is awesome. It gave some of the best bottom browning of any test batch I made.
Ingredients
Sourdough starter: The first step of this recipe explains how to feed your starter so it’s active and ready to use. Discard won’t cut it here — an active, healthy starter is essential for raising this dough.
Warm water: Warm, not hot — you don’t want to damage your starter. We also add some water on top of the dough before baking. Sounds weird, but trust me on this one!
Olive oil: Some goes in the dough, some goes in the pan before the dough is added, and the rest gets drizzled on top before baking. The oil helps give focaccia its signature crispy bottom. I use and love California Olive Ranch.
Sugar: Just a small amount — it helps with browning and adds a faint sweetness.
Bread flour: We need a good, strong bread flour for this dough. I tested this recipe with flours in the 12.7-14% protein range. See the Substitutions section for flour options and notes.
Salt: I use Redmond’s Real Salt (15% off with code TSG15), but any salt will work.
83% of testers used bread flour, and it produced the best results overall. You want a high-protein flour — I tested with Central Milling High Mountain (13.5% protein). King Arthur bread flour (12.7%) and Bob’s Red Mill bread flour (12.5–13.5%) also worked well.
17% of testers used all-purpose flour, and it worked, but the structure wasn’t quite as strong. If you’re using Costco Kirkland AP flour (11.5% protein), add about 15–25g extra flour or 1 tbsp of vital wheat gluten.
Ingredient Substitutions
Olive oil → avocado oil: Swap 1:1. One tester noticed a difference in how bubbly her dough became — the avocado oil version performed better for her. Your results may vary.
Sugar → honey: Several testers made this swap with great results.
Bread flour → all-purpose flour: Works with minor adjustments. See About the Flour above.
How to Make Same-Day Sourdough Focaccia (Step by Step)
Step 1: Feed Your Starter (The Night Before)
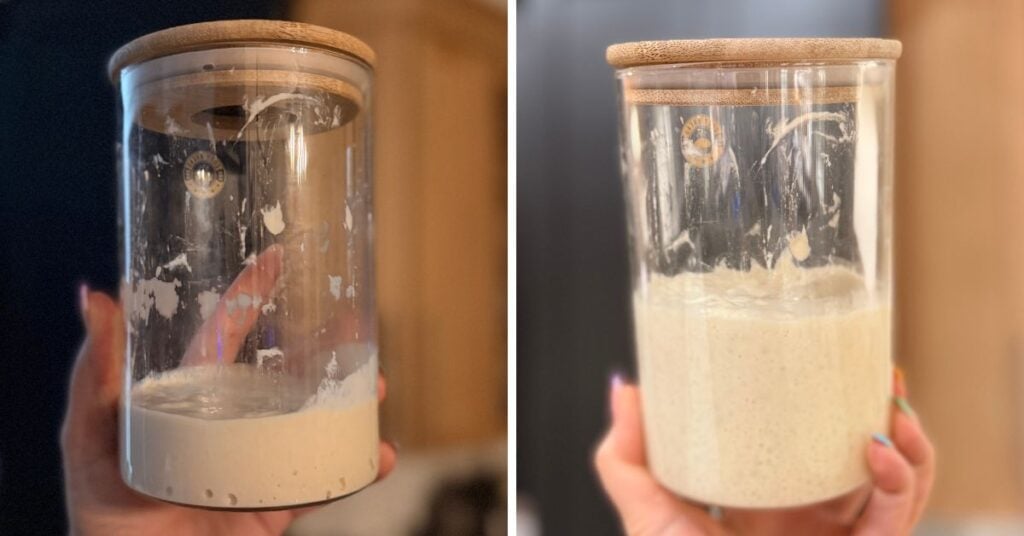
Before bed, mix 20g of sourdough starter, 100g water, and 100g bread flour in a jar. Loosely cover and let ferment overnight at 68–75°F (20–24°C) for 10–12 hours.
By morning, it should be active, bubbly, and peaked. If it is still rising (domed on top), put it in a warm place and wait for it to flatten.
If it is starting to deflate (you see drag lines on the jar), proceed with the recipe — your starter is slightly past peak, but it should still be fine.
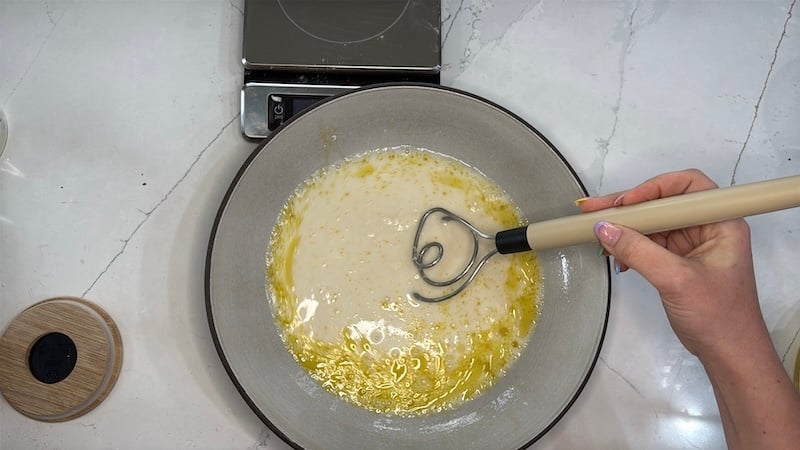
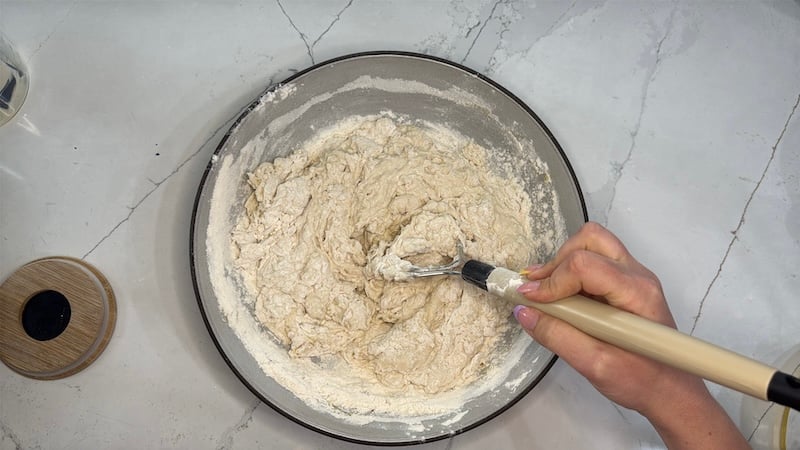
Step 2: Mix the Dough (The Next Morning)
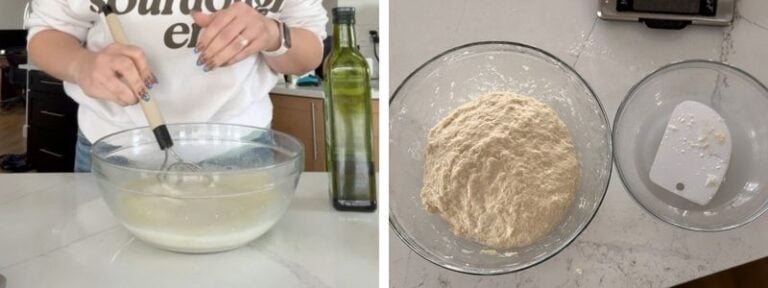
In a large mixing bowl, combine 390g warm water, 200g active starter, 15g olive oil, and 10g sugar using a Danish dough whisk.
Then add 500g bread flour and 10g salt.
Continue mixing with your Danish dough whisk or a wet bowl scraper until no dry flour remains.
Don’t worry about how this looks. It will be very wet and shaggy, and that’s exactly what you want. If it looks much wetter or looser than mine in the photos, add a touch more flour.
More than anything, I want you to match my dough’s texture — flour types and brands vary widely, so minor adjustments may be needed.
This is the start of bulk fermentation.
Step 3: Put Dough in a Warm Place
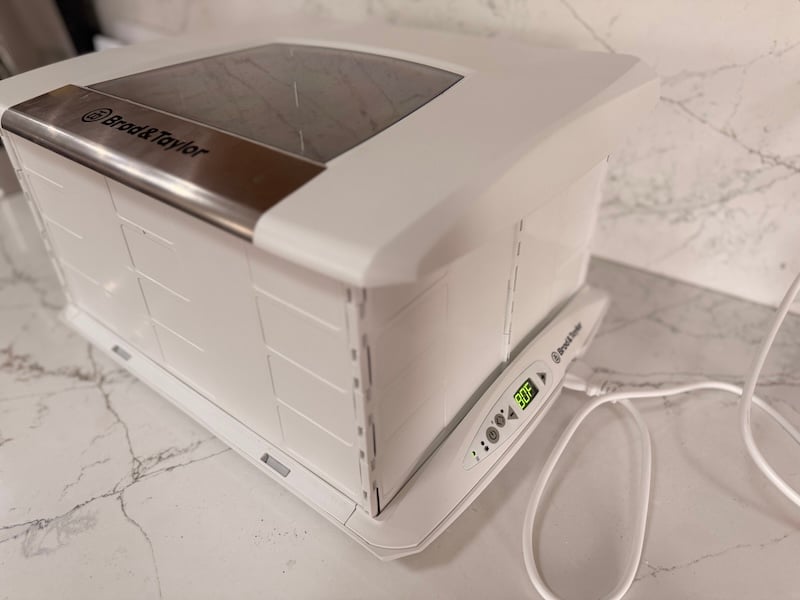
Cover and place it in a proofing box or on a warming mat set to approximately 80°F (27°C). An oven with the light on or a microwave with a cup of boiling water inside can also work well.
Note: Do not let the dough get above 85°F (30°C). Keeping the dough between 78–82°F (25.5–27.5°C) is ideal. Warmer temperatures favor lactic acid bacteria over yeast, so your dough can become loose and acidic if kept too warm. Cooler temps are totally fine — just note that fermentation will take longer!
Let the dough rest in your warm spot, covered, for 30–40 minutes before starting the folds.
Don’t have a proofing box? Here are 10 ways to keep your sourdough in a warm spot.
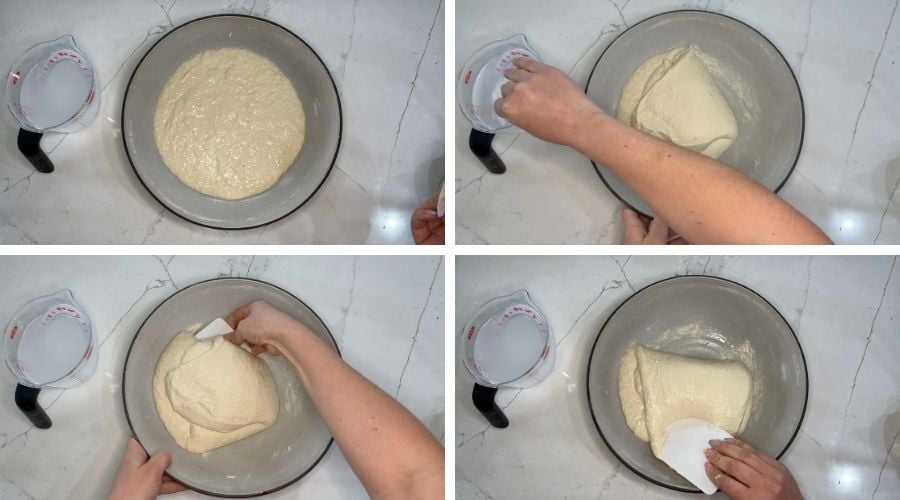
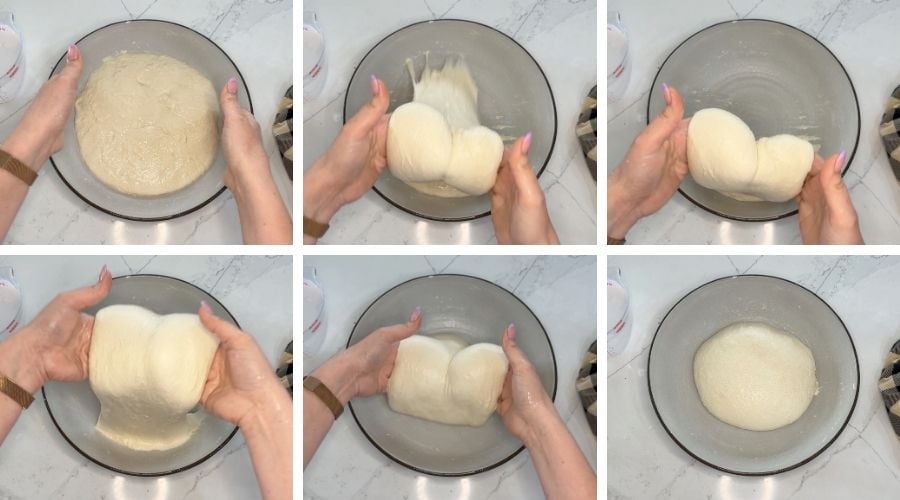
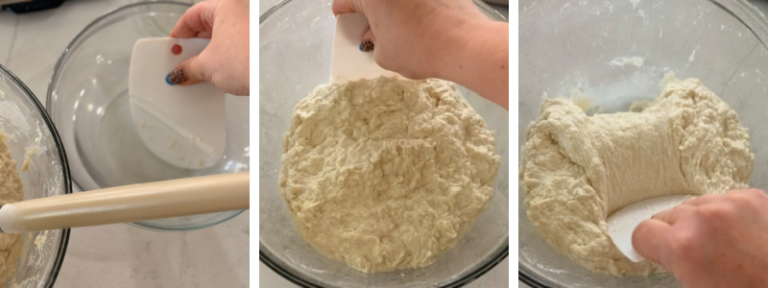
Step 4: Stretch and Folds (3 Rounds)
Starting 30–40 minutes after mixing and repeating every 30–45 minutes for 3 rounds total: using a wet bowl scraper, lift and fold the dough over itself from four points around the bowl, rotating as you go.
Cover and rest between rounds.
Keeping your scraper wet is key — it’s much cleaner than using your hands at this stage.
“This was the highest hydration dough I’ve ever worked with but watching your highlights reels on IG helped tremendously!” –Recipe tester from Mansfield, Texas
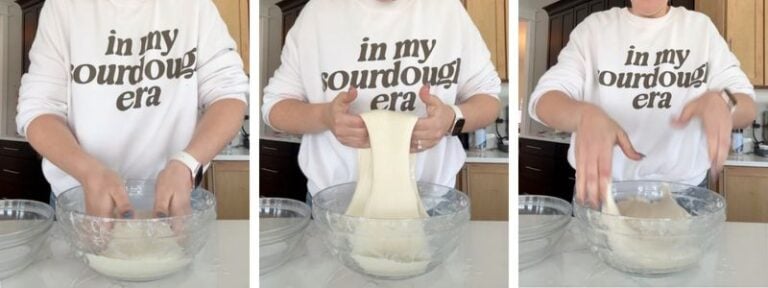
Step 5: Coil Folds (4 Rounds)
Starting 30–40 minutes after the last stretch and fold, use very wet hands to slide underneath the center of the dough, lift it up, and let the ends fold under themselves.
Rotate the bowl 90° and repeat on the other side. Keep wetting your hands. Repeat every 30 minutes for a total of 4 rounds.
Wet dough benefits a lot from handling, but if life interrupts, doing 2–3 rounds is still better than none.
Step 6: Finish Bulk Fermentation
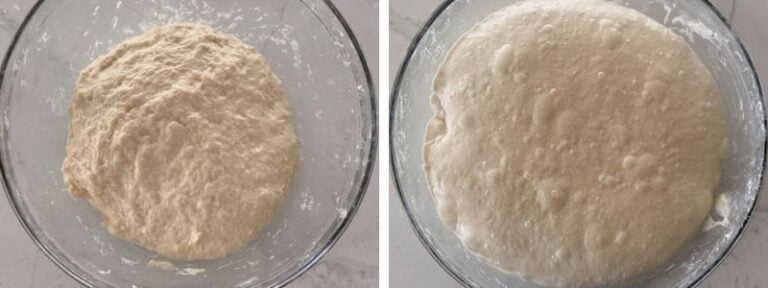
Bulk fermentation began when you first mixed the dough. You’re ready to move on when the dough has approximately doubled in size and is covered with bubbles.
It should look airy and extremely jiggly, with bubbles across the surface. Those bubbles may have a slightly grayish tone — that’s just the CO2 pocket underneath, and it’s exactly what you want to see.
For me, this takes about 5.5–6 hours at 80°F (27°C). Your timing may vary, especially if your dough was cooler or warmer than mine.
Optional overnight cold proof: If you want a more sour flavor and potentially easier digestion, cover and refrigerate the dough after bulk fermentation is complete. Pull it out the next day, let it warm up for 1–2 hours, then continue with Step 7.
Note: A few testers who did the overnight cold proof found the flavor too sour for their family’s taste. If that’s a concern, stick to the same-day timeline.
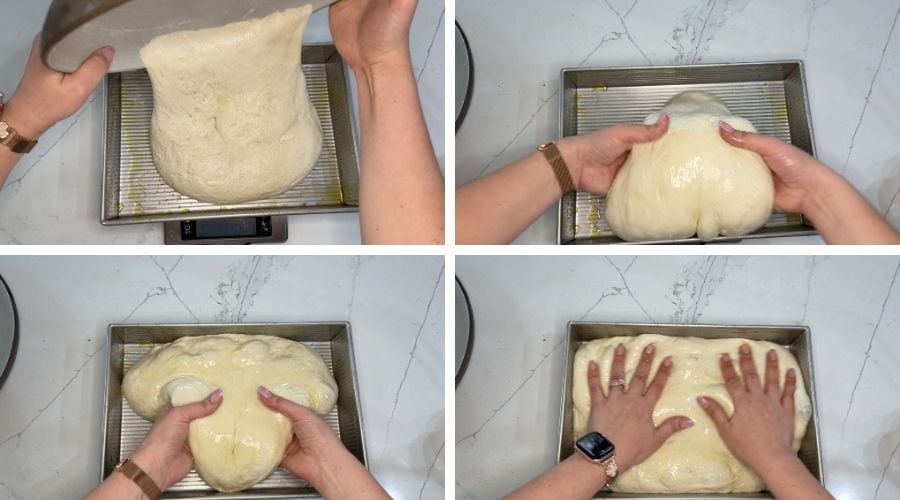
Step 7: Transfer to Pan
How you prep your pan depends on the type of pan you’re using. Find your pan type below before you begin.
USA Pan (or equivalent nonstick): Drizzle 10g of olive oil into the pan and rub it all over the bottom and sides.
Cast iron or aluminum: Coat the bottom of the pan thoroughly with softened butter, then drizzle 30g of olive oil over the butter and proceed as normal.
Glass or ceramic (lowest-rated by testers): Spray the pan with nonstick cooking spray or coat it with softened butter, then line with parchment. Drizzle 20g of olive oil over the parchment and proceed as normal.
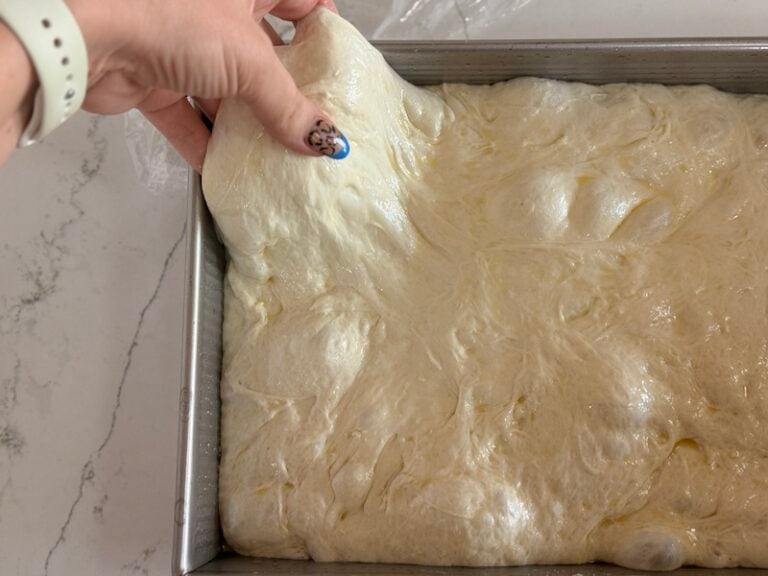
Once your pan is prepped, gently dump the dough into the pan. Flip the dough over so both sides are coated in oil, and position it so the smoothest side is facing up. Do not dimple yet.
Stretch the dough to fill the pan — if it springs back, let it rest for 10–15 minutes, then gently stretch it again. Cover and return the pan to your warm spot for the final proof.
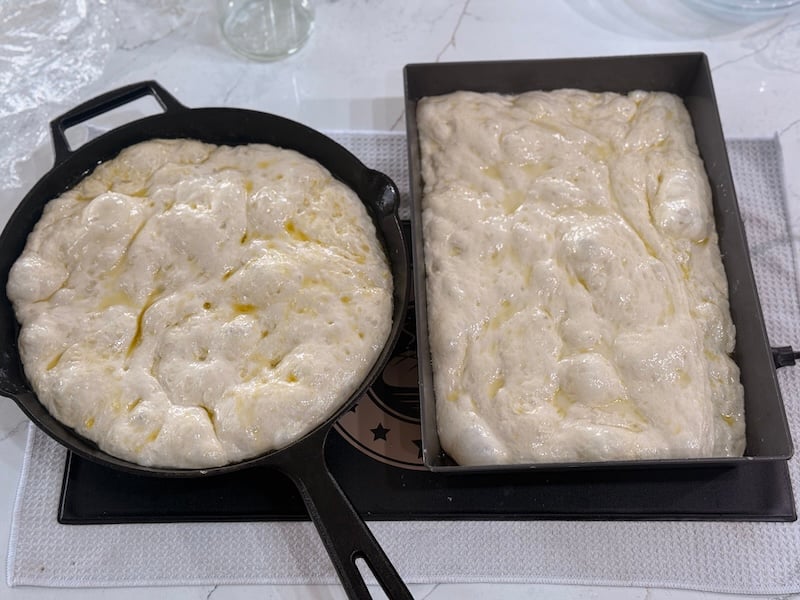
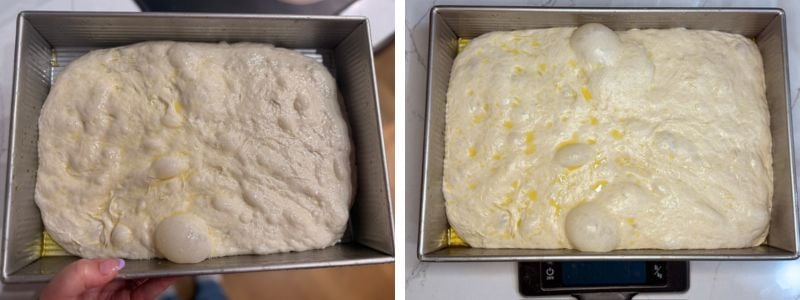
Step 8: Pre-Bake Prep (About 2–3 Hours Later)
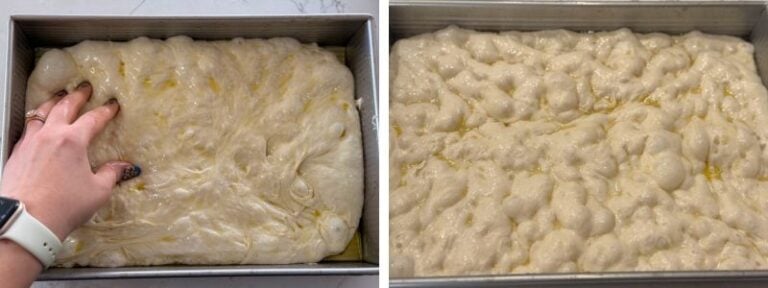
About 2–3 hours after transferring to the pan, the dough should look puffy and airy. It’s time to prep for baking.
Left: when I dumped the dough into the pan; Right: about two hours later
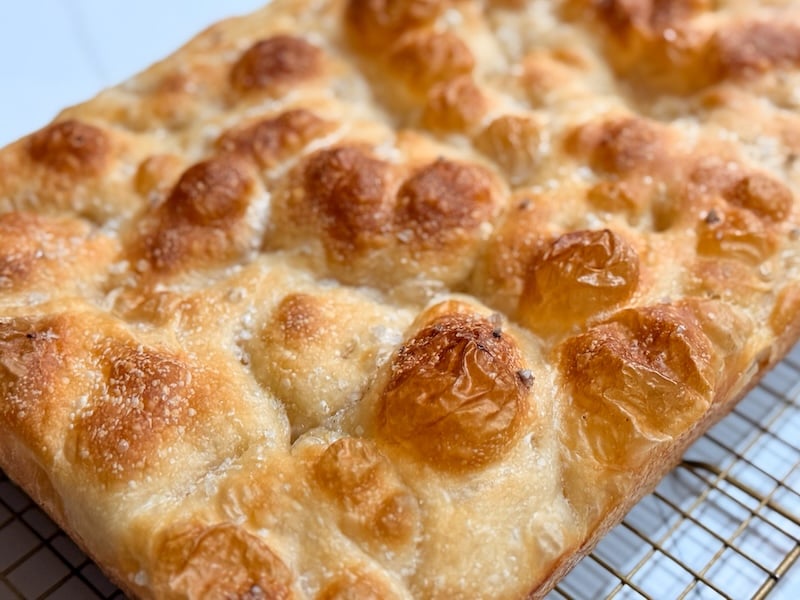
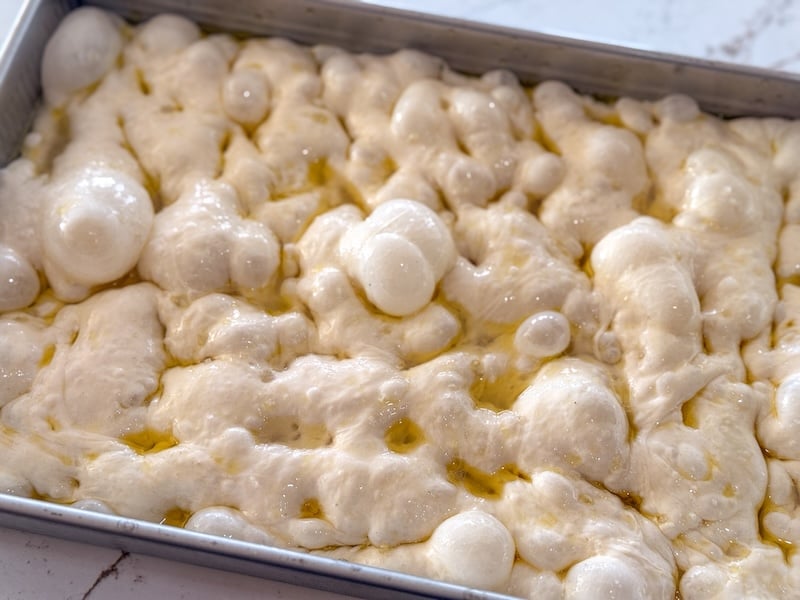
Drizzle 30g of olive oil and 30g of water evenly over the surface. Sprinkle with 1 tsp (about 3–4g) coarse sea salt.
Dimple the entire surface deeply with your fingers, pressing all the way to the bottom of the pan.
Why water on top?
Believe it or not, this technique is actually rooted in Italian tradition. In Liguria, the birthplace of focaccia, bakers have long used a technique called salamoia — a mixture of water and olive oil poured over the dough before baking. The salamoia creates steam in the oven, keeping the focaccia extremely soft as it rises. Once the water evaporates, only the oil remains in the deep valleys of the focaccia.
A follower tipped me off to this trick, and once I tried it, I never went back. Trust the process — nearly every tester who was nervous about it came back saying they were so glad they did it.
“Not going to lie, the water on top threw me off at first. But I followed the recipe, and it turned out amazing!” —Recipe tester from Dakota, Illinois
Move your oven rack to the lower third. Preheat to 500°F (260°C) conventional. (Note: if using glass, preheat your oven to 425°F instead.)
Why dimple 20-30 minutes before putting it in the oven? Allowing the dough to rest after dimpling gives it time to set in that shape. If you dimple and bake immediately, the high oven heat forces the bubbles to expand and fill the dimples back in, and you lose those beautiful pockets that hold the oil and salt. That’s why some of my test bakes lost their dimples!
Step 9: Bake
Once the oven is fully preheated, place the focaccia on the lower third rack.
Immediately reduce the temperature to 450°F (232°C). Bake for 30 minutes, rotating the pan halfway through, until deep golden brown on top and the interior temperature reaches 205–210°F (96–99°C).
Note: The focaccia might reach that ideal internal temperature early, but continue baking until it browns fully.
Step 10: Cool
Let the focaccia cool in the pan for 5 minutes, then transfer it to a cooling rack.
Let it cool for at least 1 hour before slicing — this lets the interior finish setting and gives you cleaner slices.
Storage & Reheating
Best on day 1: Focaccia is at its absolute peak the day it’s baked — crispy on the outside and pillowy in the middle. Day 2 is still great, and day 3 is fine.
Room temperature: Store in a bread bag or an airtight container for 2–3 days.
Freezer (recommended for longer storage): Let the focaccia cool completely, then slice and freeze in a sealed bag.
Reheating: Warm slices in a toaster or a 300°F (150°C) oven for 5–7 minutes, until warmed through and crisp again. It comes back beautifully.
Dough sticking to the pan was the #1 issue overall — and it almost always came down to pan choice and oil amount. If you’re not using a nonstick pan, see the Recipe Notes for prep adjustments. Glass and ceramic pans do best with parchment plus extra oil. Cast iron needs butter plus extra oil.
The water you add on top is actually a traditional Italian technique called salamoia — a mixture of water and olive oil that creates steam in the oven, keeping the focaccia extremely soft as it rises. Once the water evaporates, only the oil remains pooled in the dimples. If you ended up with gummy spots, the water likely didn’t fully evaporate — simply bake a little longer next time.
A very wet, sticky dough is normal for focaccia. It’s a high-hydration dough — much wetter than a standard artisan loaf. 94% of testers had no issues working with it once they trusted their wet scraper and wet hands. If it’s truly like soup – one tester said hers seemed like a batter almost — add more flour until the texture matches mine in the photos.
Oven temperatures vary. If yours runs hot, tent with foil partway through or drop to 425°F (218°C). A few testers needed this adjustment.
Salt amount is a big variable here — if you were light on the flaky salt on top, that’s likely the culprit. Toppings also make a big difference. Several testers added rosemary, roasted garlic, Italian seasoning, or cheese and loved the result. The plain version is intentionally neutral as a base.
Make sure your rack is in the lower third of the oven. If you’re using glass or a lighter pan, the bottom needs more direct heat. Cast iron and the USA Pan both give better bottom browning than glass. At the end of baking, you can also remove the focaccia from the pan and bake it directly on the oven grates – several testers did this to achieve a more browned bottom.
A handful of testers who did the overnight cold proof found the tang too strong. If your family is sensitive to sourdough flavor, stick with the same-day timeline.
Frequently Asked Questions
If I do the cold proof, do I put the dough in the fridge in the bowl or transfer it to the pan first?
For the cold proof, simply cover your bowl of dough and refrigerate it overnight — no need to transfer it to the pan first. When you’re ready to bake the next day, bring it out and let it come to room temperature, turn it out into your oiled pan, and proceed as normal.
Do I need to cover the bowl and pan during proofing?
Yes, always keep your bowl or baking pan covered while the dough is rising. You can use a bowl cover or plastic wrap. Too much airflow can cause the top of the dough to dry out.
What’s the point of pouring water on the dough before baking?
Pouring water on the dough before baking is actually a traditional Italian technique called salamoia — a mixture of water and olive oil that creates steam in the oven, keeping the focaccia extremely soft as it rises. Once the water evaporates, only the oil remains pooled in the dimples, giving you a lovely crisp crust. Trust the process — nearly every tester who was nervous about it came back saying they were glad they did it!
How do I know when bulk fermentation is done?
Bulk fermentation is done when the dough has approximately doubled in size and is covered in tiny bubbles. It should look airy and extremely jiggly — the bubbles may have a slightly grayish tone, which is just CO2 underneath. Timing begins when you first mix the dough; at 80°F (27°C), this takes about 5.5–6 hours, but your timing will vary depending on your dough temperature.
Same-Day Sourdough Focaccia
Servings 12pieces
This same-day sourdough focaccia is a total staple recipe! The interior is soft and squishy, and the exterior is crisp and golden. Enjoy it as a side, sliced in half for sandwiches (our fav!), or just torn off and eaten as-is.
This dough is very wet and sticky — this is normal, so don't panic. Using a wet bowl scraper and wet hands will help prevent sticking. Re-wet between every single use.Also, your pan material really matters. This recipe is written for a USA 9×13-inch pan with a nonstick coating. However, you can use cast iron, glass, ceramic, or aluminum — you'll just need to make some minor modifications. Please note that testers had the most issues with glass and ceramic. See Recipe Notes!
Instructions
Feed your starter: Before bed, in a 3/4 L Weck jar (or similar-sized glass jar), mix together 20 g sourdough starter and 100 g water. Then, mix in 100 g bread flour until smooth. Loosely cover and let ferment on the counter overnight [10-12 hours at 68-75°F (20-24°C)].
Mix the dough: In the morning, in a large mixing bowl, combine 390 g warm water, 200 g active sourdough starter from above, 15 g extra virgin olive oil, and 10 g sugar. Add the 500 g bread flour and 10 g sea salt. Mix until no dry flour remains, using a Danish dough whisk or a wet bowl scraper. (Note: Bulk fermentation starts as soon as the ingredients are mixed.)
Put in a warm spot: Cover the bowl and place it in a warm spot, ideally around 80°F (27°C). A proofing box or a warming mat works well, but you could also use your oven with the light on or your microwave with a cup of boiling water inside. Let the dough rest for 30–40 minutes.
Stretch and folds (beginning 30–40 minutes after mixing and repeating every 30–45 minutes for a total of 3 rounds): Using a wet bowl scraper, lift and fold the dough over itself from four points around the bowl, rotating as you go. Cover and rest between rounds. Keeping your scraper wet makes this much less messy than using your hands!
Coil folds (beginning 30–40 minutes after the last stretch and fold and repeating every 30 minutes for a total of 4 rounds): With wet hands (seriously — dunk them in water), slide your hands under the center of the dough, lift it up, and let the ends fold under themselves. Rotate the bowl 90° and repeat, wetting your hands often. Cover and rest between rounds.You don't have to do this many rounds of coil folds, but wet dough benefits greatly from handling throughout bulk fermentation.
Finish bulk fermentation: Bulk fermentation began when we first mixed our dough — we're ready to transfer it to our pan when it has approximately doubled in size and is covered with bubbles. For me, bulk fermentation took a total of 5.5-6 hours at about 80°F (27°C), but timing can vary, so pay more attention to visual cues.
Optional — overnight cold proof: You can put your dough in the fridge until tomorrow. The focaccia will develop a more sour, complex flavor profile and may be easier to digest for those sensitive to gluten. When you're ready, remove the bowl from the fridge, let the dough warm up slightly for 1–2 hours, then continue with Step 8.
Transfer to pan. If using glass, ceramic, cast iron, or aluminum, please see Recipe Notes as the prep here is slightly different. Drizzle 10 g extra virgin olive oil into your 9×13-inch pan and rub it all over the bottom and sides. Gently dump the dough in the pan. Flip the dough over so the smoothest side is facing up. Do not dimple yet – that's in the next step!Gently stretch the dough to fill the pan. If it springs back, leave it uncovered and let it rest for 10–15 minutes , then gently stretch it again. Cover the pan and return it to your warm spot for the final proof.
Pre-bake prep and preheat: Approximately 2–3 hours after transferring to the pan, or once the dough looks super puffy and roughly 50% larger, drizzle the remaining 30 g extra virgin olive oil and 30 g water evenly over the surface. Sprinkle generously with 1 tsp coarse sea salt. Dimple the entire surface deeply with your fingers, pressing all the way down to the pan. Move your oven rack to the lower third and preheat to 500°F (260°C) conventional.
Bake. Once the oven is fully preheated, place the focaccia on the lower third rack. Immediately reduce the oven temperature to 450°F (232°C). Bake for 30 minutes, rotating the pan halfway through, until the top is deep golden brown and the interior temperature is 205-210°F (96-99°C).
Cool. Let the focaccia cool in the pan for 5 minutes, then transfer to a cooling rack. Allow to cool for at least 1 hour before slicing — this helps the interior finish setting and gives you cleaner slices.
Video
Notes
Pan material guide (glass and ceramic not recommended):
Cast iron or aluminum: coat bottom of pan with butter (thoroughly). Add 30g olive oil over the butter and proceed like normal.
Glass: Preheat oven to 425°F. Spray pan with a non-stick oil spray or coat with butter. Line with parchment. Add 20g olive oil on top of the parchment and proceed like normal. Your baking time may be slightly longer due to the reduced oven temperature.
Ceramic: spray pan with a non-stick oil spray or coat with butter. Line with parchment. Add 20g olive oil on top of the parchment and proceed like normal.
Bread flour: Use a high-protein bread flour for best results. I tested this recipe with Central Milling High Mountain (13.5% protein). Other great options include:
Ballerina Farms farm flour (14%)
King Arthur bread flour (12.7%)
Bob’s Red Mill bread flour (12.5–13.5%)
If you’re working with a lower-protein flour like Costco All-Purpose (11.5%), you’ll likely need to add about 15–25g more flour, or toss in 1 tbsp of vital wheat gluten to compensate.Wet tools are your best friend: Keep a small bowl of water nearby throughout the folding process. A wet bowl scraper and wet hands prevent sticking without adding extra flour.Best on day 1: Focaccia is definitely the best the day it’s baked. If you don’t plan to eat it within 2–3 days, slice it and freeze it as desired. It reheats beautifully.Proofing mat and box options:
DIY — Your microwave with a cup of boiling water inside
Did you make this recipe?Rate this recipe, leave a comment below, and share a photo on Instagram! Tag me @thatsourdoughgal so I can see it!
Course: Bread
Cuisine: Italian
Conclusion
This focaccia took a lot of hands — 627 pairs of them — to get right, and I’m so grateful for every single tester who participated.
“5 stars is not enough for this recipe — it needs at least 10 if not more!” –Recipe tester from Lawrenceburg, TN
“It’s the last focaccia recipe you’ll ever use!” –Recipe tester from Melbourne, Victoria, Australia
If you make it, I’d love to see it. Tag me on Instagram @thatsourdoughgal — and if you’re a focaccia sandwich person like me, please show me what you put in it!
Amazing recipe! I keep making it again and again! Thanks Rebekah for all your hard work to bring this focaccia recipe to perfection! Flour makes all the difference!!! My first bake i used High protein flour from Central Milling High Mountain (13.5% protein). Bread was super soft and yummy! Was a pleasure to work with the dough. 2nd bake i used also Central Milling but type 80 Weath Flour. The dough was nice and easy to work with, flavor good but the result wasn’t quite the same. Love all your recipes! Looking forward to see cinnamon recipe posted😊🤩!
Hi, I love your recipes and the fact that every detail is said, makes me feel more confident while being in the process. This focaccia recipe was awesome its just that I mismeasured my pan and the thickness of my bread is too much I have to reduce some to make it sandwich material:)
I have been searching for a recipe to make a thin focaccia pizza. I wanted my crust to be about a half inch thick after baking. I was only able to find one so I decided to use your focaccia recipe, but split the dough. 770g went into a 12×17 pan and the rest into a smaller pan. I pre-baked the dough until it was almost done, took it out and topped it and then cooked it for about another 10 minutes until the toppings were done. It was perfect!
This recipe makes the best pizza dough I’ve ever made! I use half a recipe for pizza and parbake before adding sauce/toppings. Lovely crust, full of air pockets!
This is by far the best focaccia recipe I’ve tried. It was so easy, soft inside, crispy on the outside, just wow! Thank you for repeated testing so all of us can make amazing focaccia on the first go around!
I’ve made focaccia before and’soth a different recipe and it’s been pretty decent. This was so nice to work with and rose better and got more dimply. I’m going to experiment with different add ons for sure.
I made this for the first time today. I cut it in half and gave half to my neighbors. They said “it’s the best bread I’ve ever had”. I would say it’s a hit! Recipe very easy to follow. Used the USA pan, no sticking. Thank you!
This looked like a good focaccia bread to try. Easy enough, but for the many foldings and coilings as mentioned by others. Success the first time and no sticking to the pan! I used an 8×12 French made pan and didn’t have any issues. I kept an eye on it and it was done after 25 minutes and pretty medium brown. Maybe a little too brown for me. It registered 210f.
I’ve made this focaccia recipe a couple of times, and decided to turn it into an Everything Bagel focaccia..absolutely amazing results! Take this base recipe and make it!!! Whether you make a plain focaccia or an inclusion focaccia, this is the recipe to keep! My first attempt, I received a comment from a coworker that it tasted like it came from a professional bakery! Don’t NOT make this!! 🤍
Another well designed and tested recipe, Rebekah. This was my very first focaccia bake and the photos, meticulous instructions, timeline and tips made it very easy for beginners to follow. As a heads up for others, while it is a same day recipe, the stretch/coil folds, the BF, final proofing and cooling effectively take up a full day. I started at 9 and it was cooled a little past 6 (in case anyone missed the extra hour at the end in the timeline :-)). I found with the bread flour that it makes the focaccia a little doughy/heavy for my taste and the amount of olive oil a bit too oily however, I will make this again with just a couple of minor adjustments for our family.
This recipe was glorious! I’ve only ever made foccacia with yeast but this is the only way I will make it going forward. It was crispy and springy on the inside. This dough was so fun to work with. Will see how much further I can decrease the olive oil to get a fairly similar result. I did decrease the olive oil on the surface by half and it was still perfect.
I was wondering if this recipe would work as a high hydration bread baked in a loaf tin? With gratitude from South Africa 🇿🇦
Absolutely, I’ve even shaped the dough into a batard and baked it like an artisan loaf of bread, it turned out great! It’s just a bit wobbly and requires quick, confident movements while shaping
Fantastic! I used this recipe to make my first focaccia. It was fun to make, beautiful to look at, and tasted amazing. We loved it!
I want to make it again, but want to experiment with adding cheddar and Jalapeños. Would I make any adjustments to the recipe? Do I add some of the ingredients during the stretch and folds, and the rest on the top before baking? Do I still put water on top before baking? Thanks for your guidance!
So glad you enjoyed!! So those are questions I’d try to iron out during recipe testing. I don’t honestly know! But probably a combination of all of the above.
I love this recipe!! I have made it so many times and it’s our family’s favorite. I was wanting to make it in a 8 x 8 pan so I could gift them to wishing our church and wondering if I keep the same measurements on everything or would they need to be adjusted. (By the way your recipes are awesome keep it up!!!)😊


Amazing recipe! I keep making it again and again! Thanks Rebekah for all your hard work to bring this focaccia recipe to perfection! Flour makes all the difference!!! My first bake i used High protein flour from Central Milling High Mountain (13.5% protein). Bread was super soft and yummy! Was a pleasure to work with the dough. 2nd bake i used also Central Milling but type 80 Weath Flour. The dough was nice and easy to work with, flavor good but the result wasn’t quite the same. Love all your recipes! Looking forward to see cinnamon recipe posted😊🤩!
Awesome, so glad you enjoyed the focaccia!
Hi, I love your recipes and the fact that every detail is said, makes me feel more confident while being in the process. This focaccia recipe was awesome its just that I mismeasured my pan and the thickness of my bread is too much I have to reduce some to make it sandwich material:)
Yay, so glad you enjoyed the focaccia recipe!
OMG! I made this as my first attempt at Focaccia. It was so delicious that there are no words to adequately describe it. The best!
Yay, so glad you enjoyed it so much Ann!!
I have been searching for a recipe to make a thin focaccia pizza. I wanted my crust to be about a half inch thick after baking. I was only able to find one so I decided to use your focaccia recipe, but split the dough. 770g went into a 12×17 pan and the rest into a smaller pan. I pre-baked the dough until it was almost done, took it out and topped it and then cooked it for about another 10 minutes until the toppings were done. It was perfect!
Yum!! Looks so good!
This recipe makes the best pizza dough I’ve ever made! I use half a recipe for pizza and parbake before adding sauce/toppings. Lovely crust, full of air pockets!
I made this recipe for the first time this weekend and it was so good. I added my own herbs on top. Will definitely make it again.
So glad you enjoyed it!!
This is by far the best focaccia recipe I’ve tried. It was so easy, soft inside, crispy on the outside, just wow! Thank you for repeated testing so all of us can make amazing focaccia on the first go around!
You’re so welcome! So happy you enjoyed it!
I’ve made focaccia before and’soth a different recipe and it’s been pretty decent. This was so nice to work with and rose better and got more dimply. I’m going to experiment with different add ons for sure.
Yay, so glad you enjoyed the focaccia recipe!
I would like to make a half recipe. What size pan should I use?
8″ square pan! I’ve done this a lot during recipe testing and use this pan: https://shop.thatsourdoughgal.com/amzn/8-inch-square-usa-pan
I made this for the first time today. I cut it in half and gave half to my neighbors. They said “it’s the best bread I’ve ever had”. I would say it’s a hit! Recipe very easy to follow. Used the USA pan, no sticking. Thank you!
Happy to hear it!!
I thought all the folds and time between folds was ridiculous until I tasted the end product. Totally worth it. I’ll be making this again and again.
So glad you ended up loving it Heather!
This looked like a good focaccia bread to try. Easy enough, but for the many foldings and coilings as mentioned by others. Success the first time and no sticking to the pan! I used an 8×12 French made pan and didn’t have any issues. I kept an eye on it and it was done after 25 minutes and pretty medium brown. Maybe a little too brown for me. It registered 210f.
Glad you enjoyed the recipe!
I’ve made this focaccia recipe a couple of times, and decided to turn it into an Everything Bagel focaccia..absolutely amazing results! Take this base recipe and make it!!! Whether you make a plain focaccia or an inclusion focaccia, this is the recipe to keep! My first attempt, I received a comment from a coworker that it tasted like it came from a professional bakery! Don’t NOT make this!! 🤍
Love that!! Looks so yummy!
absolutely stunning, my first successfull focaccia!! 😋
Great job!!!
Another well designed and tested recipe, Rebekah. This was my very first focaccia bake and the photos, meticulous instructions, timeline and tips made it very easy for beginners to follow. As a heads up for others, while it is a same day recipe, the stretch/coil folds, the BF, final proofing and cooling effectively take up a full day. I started at 9 and it was cooled a little past 6 (in case anyone missed the extra hour at the end in the timeline :-)). I found with the bread flour that it makes the focaccia a little doughy/heavy for my taste and the amount of olive oil a bit too oily however, I will make this again with just a couple of minor adjustments for our family.
Glad to hear it went well and appreciate the honest feedback!
Delicious and super fun to make!
This recipe was glorious! I’ve only ever made foccacia with yeast but this is the only way I will make it going forward. It was crispy and springy on the inside. This dough was so fun to work with. Will see how much further I can decrease the olive oil to get a fairly similar result. I did decrease the olive oil on the surface by half and it was still perfect.
I was wondering if this recipe would work as a high hydration bread baked in a loaf tin? With gratitude from South Africa 🇿🇦
Absolutely, I’ve even shaped the dough into a batard and baked it like an artisan loaf of bread, it turned out great! It’s just a bit wobbly and requires quick, confident movements while shaping
Made your Same day Focaccia bread, great recipe. Everyone love your recipe. Definitely a 10 👍❤️🫓🍞 Thank you
Fantastic! I used this recipe to make my first focaccia. It was fun to make, beautiful to look at, and tasted amazing. We loved it!
I want to make it again, but want to experiment with adding cheddar and Jalapeños. Would I make any adjustments to the recipe? Do I add some of the ingredients during the stretch and folds, and the rest on the top before baking? Do I still put water on top before baking? Thanks for your guidance!
So glad you enjoyed!! So those are questions I’d try to iron out during recipe testing. I don’t honestly know! But probably a combination of all of the above.
I love this recipe!! I have made it so many times and it’s our family’s favorite. I was wanting to make it in a 8 x 8 pan so I could gift them to wishing our church and wondering if I keep the same measurements on everything or would they need to be adjusted. (By the way your recipes are awesome keep it up!!!)😊
For an 8×8 pan, half the recipe! And thank you!!