
Same Day Sourdough Bread (Quick, Easy Recipe)

Sourdough recipes are all about timing. Depending on when you want your loaf ready or what your day looks like, there’s a recipe for every schedule.
Traditional Tartine-style recipes usually take 2-3 days, while others can be done overnight, which works nicely with my 9-to-5 working mom schedule.
But, same-day sourdough bread is also an option! This recipe is perfect when you want fresh bread on the table today.
It takes 12 hours or less depending on when you fed your starter and how warm you can keep your dough. I’ll take you through it.
Why You’ll Love This Same-Day Sourdough Bread Recipe
- It’s fast: Sourdough loaves usually take me 2-3 days from feeding my starter to pulling the bread out of the oven, so to have this all done in one day is pretty convenient.
- Easy to handle: The dough has a total hydration of 66%, making it easy to work with.
- No cold-proof needed: You can skip the overnight proofing and still get great results, which is a huge time-saver.
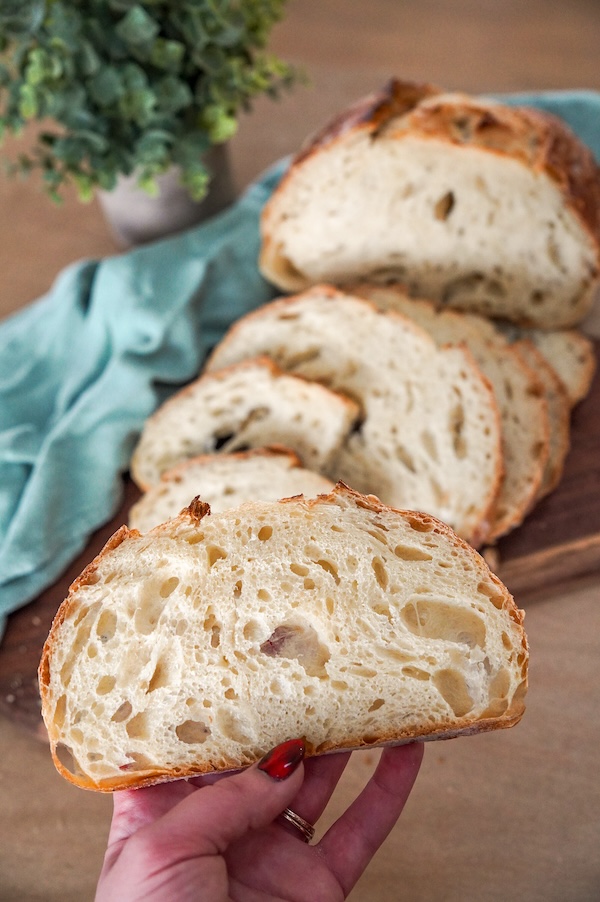
- Delicious and kid-approved: The loaf turned out light and airy with a perfectly crisp crust. My kids love this bread!

Another same-day recipe you’ll love: Same-Day Sourdough Focaccia (Tested by 627 Bakers!)
Same-Day Sourdough Bread Timeline
You have two options for same-day sourdough.
You can either feed your starter the night before to get a head start, or you can feed your starter the morning of.
Timeline Option 1
This is the exact timeline I used for the bread photos in this post:
| 7:30 AM | Feed your starter a 1:1:1 feeding ratio. |
| 1:00 PM | Mix all ingredients together, cover, and let rest in a warm place. |
| 1:30 PM | Stretch & fold |
| 2:00 PM | Stretch & fold |
| 2:30 PM | Stretch & fold |
| 3:00 PM | Stretch & fold |
| 3:00-5:00 PM | Let dough finish bulk fermentation |
| 5:00 PM | Pre-shape dough |
| 5:30 PM | Clasp dough and place in banneton. Let rest in a warm place for the second rise. |
| 6:30 PM | Bake |

Timeline Option 2
If you want your bread fully cooled before dinnertime, this timeline may work a little better for you. Feed your starter before bed so it’s peaked by the morning.
This way, you can mix your dough first thing in the morning without waiting for your starter to be ready. This is the timeline I used for the bread seen in this video.
| 9:00 PM (the night before) | Feed your starter a 1:5:5 feeding ratio. |
| 8:00 AM | Mix all ingredients together, cover, and let rest in a warm place. |
| 8:30 AM | Stretch & fold |
| 9:00 AM | Stretch & fold |
| 9:30 AM | Stretch & fold |
| 10:00 AM | Stretch & fold |
| 10:00-12:00 PM | Let dough finish bulk fermentation |
| 12:00 PM | Pre-shape dough |
| 12:30 PM | Clasp dough and place in banneton. Let rest in a warm place for the second rise. |
| 1:30 PM | Bake |

Ingredients in Same-Day Sourdough Bread
- Unbleached bread flour: I use King Arthur’s unbleached bread flour (12.7% protein). Another good option for this is Sunrise Flour Mills bread flour (affiliate link); it’s a little higher quality and has a better flavor profile, which really shines through in a same-day loaf.
- Active starter: Make sure your sourdough starter is bubbly and ideally tripled in size before you start mixing your dough. It should smell yeasty and maybe even a little sweet – not acidic or like vinegar. (More tips on how to know when your starter is ready to bake with here.)

- Water: I just use tap water (we live in the country and have a well), but those with city water generally prefer spring water for their dough.
- Sea salt: Any kind of salt is fine. Just try to avoid salt with anti-caking ingredients inside.
Step-by-Step Instructions Same-Day Sourdough Bread
Step 1: Feed Your Starter
Feed your starter a 1:1:1 ratio first thing in the morning. If you feed it around 7:30 AM, it should be peaked and ready to mix into your dough within 4-6 hours. Mine was perfectly peaked at 1:00 PM.

Note: if you want to bake your bread a little earlier in the evening, feed your starter a 1:5:5 feeding ratio before bed. That way, you can mix your dough first thing in the morning.
Step 2: Mix the Dough
Start by mixing the sourdough starter and warm water. Then, add your bread flour and salt. Mix well, switching from a utensil to your hands, until all the flour is absorbed.

Cover and place in a warm spot, ideally 78-82°F (25.5-27.7°C).
I’ve been loving the Brod & Taylor proofing box for its accuracy and easy setup. The Cooluli is also great, but it’s not quite as precise and requires a few check-ins to ensure the temperature stays stable.
If you don’t have any special warming devices, put the bowl of dough in your oven with the light on. If your light doesn’t provide much heat, set a cup of boiling water in there.
It should create a toasty environment that keeps your dough warm.
Step 3: Stretch and Folds
Over the next few hours, do a stretch and fold about every 30-45 minutes to help develop the gluten and give the dough its structure and strength.
Start by gently stretching one edge of the dough up until it resists, and fold it over to the center. Turn your bowl 90 degrees and repeat—stretching and folding until all four sides have been folded.
I generally stretch and fold the dough 8-10 times per “round,” or until the dough resists me and doesn’t want to be stretched anymore.

After the 2nd or 3rd round of stretch and folds, you can switch to coil folds if you like. This is a gentler technique where you lift the dough from underneath and allow it to fold over itself.
Step 4: Bulk Fermentation
If you can keep your dough around 78°F (25.5°C), the bulk fermentation should take about 4-5 hours.
If you’re keeping track, remember to start timing bulk fermentation as soon as you mix in the starter—not when you finish your stretch and folds.

Look for the dough to increase in size and become jiggly like jello. We want to see bubbles all over the sides of the bowl. I find the best visual tell is shaking the bowl.
If the dough literally looks like jello when you shake the bowl, it’s ready.

Step 5: Pre-shape the Dough
Lightly spray your counter with a bit of water (I find water works better than flour here to prevent sticking) and dump your dough out onto the surface.

Using your bench scraper, gently pre-shape the dough into a smooth ball by pulling it toward you so you get a bit of tension on top.

Let the dough rest, uncovered, for about 30 minutes. This will give the dough a little time to relax before the final shaping.
Watch me do the pre-shaping here:

Step 6: Final Shape
For the final shaping, I shaped my loaf into a batard using the caddy clasp method.
Simply clasp the sides of the dough together like you’re closing a book. Pinch the center seam together to seal it tightly.

I stitch the dough to increase surface tension. Then, place your dough in an oval banneton to rise for its final proof.

Step 7: Proof
Normally, at this point, you’d pop the dough into the fridge for an overnight cold proof, but since this is a same-day sourdough bread recipe, we’re doing a room-temperature second proof.
In a warm place, let the dough rest and rise in the banneton for 1-2 hours.

To check if it’s ready, do the poke test: gently press your finger into the dough. If it bounces back slowly and leaves a slight indentation, it’s time to bake!


Step 8: Bake – Score – Bake Again
Once your dough is fully proofed, preheat your oven to 450°F with your Dutch oven or bread dome inside to get it nice and hot.
Room-temperature dough is notoriously difficult to score (the blade drags and the loaf is more prone to spreading).
So, I tried something a little different by doing a delayed score, and it turned out great:
- Place the dough in the oven and bake for 7 minutes, covered, at 450°F.

- Take the loaf out, score the top, and put it back in the oven for another 20 minutes, covered.

- Remove the lid and bake for an additional 5-10 minutes, until the exterior is golden brown.

Here’s a video showing the full scoring and baking process in one clip:

Step 9: Let Sit and Enjoy
If you have the time, let the loaf cool for at least an hour, ideally two.
When you take the loaf out of the oven, the interior is still steaming. If you cut too early, that steam escapes, and you may be left with a gummy texture.

Two other recipes you might like to try:
Also, not sure what to do with stale or leftover slices? Try this recipe: Italian-Style Sourdough Breadcrumbs

Same-Day Sourdough Bread Recipe
Equipment
- Oval banneton (5% off with code TSG5) | Size I'm Using: Oval – Spiral MD
- Dutch oven ($15 off with code REBEKAH15)
Ingredients
Make the Starter
- 100 g sourdough starter (active or discard)
- 100 g warm water
- 100 g bread flour (King Arthur, unbleached)
Main Dough
- 290 g warm water
- 250 g active starter
- 500 g bread flour (King Arthur, unbleached)
- 10 g sea salt
Instructions
Feed Your Starter
- First thing in the morning, combine 100 g sourdough starter, 100 g warm water, and 100 g bread flour in a jar. This is called a 1:1:1 feeding ratio. Your starter should be ready (bubbly and hopefully tripled in size) in 4-6 hours.

Mix the Dough
- When your starter has peaked, mix together 290 g warm water** and 250 g active starter. Then, add 500 g bread flour and 10 g sea salt. Stir with a Danish dough whisk or use your hands, squeezing and kneading until everything is well combined. This takes 3–5 minutes. Cover and let it rest for 30 minutes.**If you're in a drier, colder environment and your dough feels stiffer than mine after mixing, increase the water by 25-35g or until the texture matches what you see in my tutorial video.Note: To stay on track with the same-day timeline, we need to keep your dough warm; ideally, around 78°F (25.5°C). I use the Brod & Taylor proofing box, but you can use a warming mat, put the bowl in your oven with the light on, or even put a cup of boiling water in the oven (in a corner) to create a warm, steamy environment.
Stretch and Fold
- After 30 minutes, do your first set of stretch and folds. Grab one side of the dough, stretch it up, and fold it over. Turn the bowl a quarter turn and repeat 8-10 more times, or until the dough resists being stretched.Cover and let the dough rest for 30 minutes. Repeat this 3 more times, resting 30 minutes between each set.
Bulk Fermentation
- After the last stretch and fold, let the dough ferment in a warm place until it looks very bubbly and jiggles like Jello when you shake the bowl. If you can keep the dough around 78°F (25.5°C), this should take 4-5 hours. (The timing begins when you first mix the dough.)


Pre-Shape the Dough
- Lightly mist your counter with water (so the dough doesn’t stick). Gently turn the dough out of the bowl. Using a bench scraper (or your hands), shape it into a round ball and let it rest for 30 minutes.
Final Shaping & Proofing
- Shape the dough into a batard (log shape) using the caddy clasp method. Place it in a banneton (or other proofing basket). Stitch the seams closed to create surface tension. Cover and let it proof in a warm place. This takes about 1-2 hours at 78°F (25.5°C).
- To know when the dough is ready to bake, do the poke test. Gently press a floured finger into the dough about half an inch. If the dough bounces back slowly and leaves a slight indentation, it’s ready!

Bake the Bread
- Preheat your oven to 450°F (230°C). Put a Dutch oven or bread dome inside while it heats up. Place your dough inside, cover it, and bake for 7 minutes. Take it out, score the top, then cover again and bake for 20 more minutes. Remove the lid and bake for another 10 minutes, until golden brown. The internal temperature of your bread should be between 205-210°F (96-99°C).
- Let the bread cool for at least 1 hour before slicing (if you can wait!).

Video

Conclusion
Fresh, homemade sourdough in just one day—simple, satisfying, and perfect for when your cravings can’t wait.
If you try this recipe, let me know how it went in the comments below. I also LOVE when you tag me in your Stories on Instagram. It makes my day!
Happy baking, friends!
Another fun recipe to try: Easy, Soft Sourdough Sandwich Bread Recipe (1 Day)


I don’t have Wheat flour can I use yeast on the start on purpose flour
What?
Can I use a mix of whole wheat and all-purpose flour?
This is my favorite recipe I’ve tried since starting my sourdough journey! No reason to try any other recipe 🙂
I know this is same day, but can I cold proof it and right and cook the next day?
Yes but you might prefer my recipe that is written that way instead! https://thatsourdoughgal.com/the-best-foolproof-white-sourdough-bread-recipe/
Had active starter but wanted bread for supper and this recipe came through! Thank you for making such a simple and straightforward same-day recipe! I’ll definitely make again!
You’re welcome, so glad it was helpful!!
This Same Day recipe fits perfectly with my schedule. I have success with it every time. That builds my confidence! This time I baked it on a stone. It turned out amazing.
Stunning, thanks for sharing!
This was my first successful loaf of sourdough. Enjoyed it toasted this morning with pb & j. Delicious!
Yay so glad to hear that!!
Hi! Thanks so much for sharing 😊 I baked it yesterday for my light meals before Easter and really enjoyed it. I was hoping for an ear, but I’m still super happy with how it turned out. Soft and delicious!
I love that it’s a same day bake. My starter almost tripled in under 3 hours 😮
I’m still new to sourdough and this is probably my 8th try (5th recipe variation). Your method has worked the best for me so far! I’m in Ontario, so I know the environment plays a big role too.
Do you have any tips for getting a more open crumb and a better ear?
Thanks again for sharing! 😊
The bread looks lovely!! For the ear, you’ll want to score sideways instead of straight down. And for a more open crumb, you’ll want to increase the hydration!
as soon as i tipped the bowl out, it was a crazy wet mess, but it wasnt like that during stretch and folds
It sounds like it overproofed quickly toward the end!
Sourdough rookie here…my starter has been refrigerated…should I take the 100 grams out tonight to get to room temp and then feed it in the morning following your steps??
I’d actually take only a little out and give it a feed to perk it back up. Then feed it in the morning following the recipe steps!
One of my best loaves, thank you for the recipe, as well as the temps and timings, they are incredibly helpful! 8.5h from mixing to my mouth 😁
You’re welcome, looks beautiful!!
Hi! LOVE LOVE this recipe! This recipe is finally how I got to understand and see the fermentation signs of sourdough. I appreciate it so much! Thank you. Quick question- can you do any of this with a kitchen aide mixer and a dough hook? I was thinking for that initial mix prior to stretch and folds. (Maybe bc I hate how sticky the dough is 😂)
You have 2 options when it comes to mixing with a stand mixer and I actually created a video about it! I will link it for you here: https://www.instagram.com/p/DRzPtkKgqk3/
How do we track the nutrition info on sourdough.
I just added the nutrition facts for this recipe, sorry it was not there already! If you slice your loaf into 10 slices, each slice is about 225 calories.
If all I had was King Arthur unbleached All Purpose Flour would it totally mess up the recipe? I don’t want to waste the flour. Is there any way to use it and make it work?
It won’t be the same but it can definitely work. Reduce the water in the recipe by about 30g and see how the dough feels and behaves. If you have any vital wheat gluten, add a tablespoon of that!
This came out perfect. So easy to follow with the pictures and videos. Thank you for ALL the time and effort you put into your recipes!
Lovely thanks so much for the kind words and the review!
could I add Everything but the bagel seasoning? If so when and how? Thank you
Yes for sure! I’d laminate the dough at shaping and add it there.
this was my second time ever making sourdough and this recipe was truly amazing! i’m still new to this so I made a few errors in regards to temperature and shaping but overall I think the recipe alone is great!
This is amazing for your second loaf!!
Finally!!! This recipe was easy to follow, the results were amazing. Keeping the dough at 78, so there was a loose time frame to watch for bulk ferment to end finally helped my loaf. Thank you so much for this recipe!
You’re welcome! So glad you enjoyed it!!
Could I use a loaf pan instead of a DO? If so – what size would be best? I have 9×5, 13×4.
Thanks in advance!!!!!
Either size would work! If you use the 9×5, the dough will rise well above the pan (which you might like that tall loaf shape). If you use the larger one, the loaf will be shorter but longer, which you also might prefer. Just preference!
Can I use a 9×5 loaf pan for this?
Yes
I love all your recipes and tips! I have made this in a loaf pan but I am wondering if I can also make this in a dutch oven? If so, are there any alterations I need to make?
The recipe is written for a Dutch oven so I’m a little confused! Let me know if I’m missing anything.