
Is My Sourdough Starter Ready to Bake With? How I Can Tell
If you want to make sourdough bread, the kicker is your starter has to be active and at its peak.
But how exactly can you tell when it’s ready? And is there a way to manipulate the timing of it for easier baking routines?
Get all the answers to the burning question – “is my sourdough starter ready?” – in this post.

Understanding Your Sourdough Starter
To understand when your starter is ready to bake with, you first have to understand what exactly is going on in that jar of flour, water, and bubbles.

A sourdough starter works by giving natural bacteria and yeast a place to grow in a mix of water and flour.
As they feed on the carbs in the mixture, they produce compounds that create the unique flavor and texture of sourdough bread.
Wild yeasts are the primary leavening agent as they create carbon dioxide as a byproduct of their metabolism (my kids think it’s funny when I say the yeast is basically farting).
Watch this in action:
Meanwhile, bacteria play a big role in making the starter acidic and adding unique flavors by producing organic acids and other compounds.
Another article you might like: How I Buy & Store Bulk Flour for Sourdough Baking
Baking With Starter at Peak
It’s important to bake with a peaked starter because once it starts deflating, so do your results.
When a starter collapses, it becomes less nutritious for fermenting microorganisms (“A Review of Sourdough Starters,” 2021). This means it won’t ferment your bread as well as it would if you used it at its peak.
This drawing from Adam Veitch, founding partner of Doughies sourdough microbakery, illustrates the various stages of a sourdough starter:

So, how can you tell if a starter has peaked? Let’s get into it.
Signs Your Sourdough Starter is Ready
There are three main ways to tell your sourdough starter is ready to use:
- Visual cues
- Aroma
- Floats in water (least reliable)
Let’s take a closer look at each one.
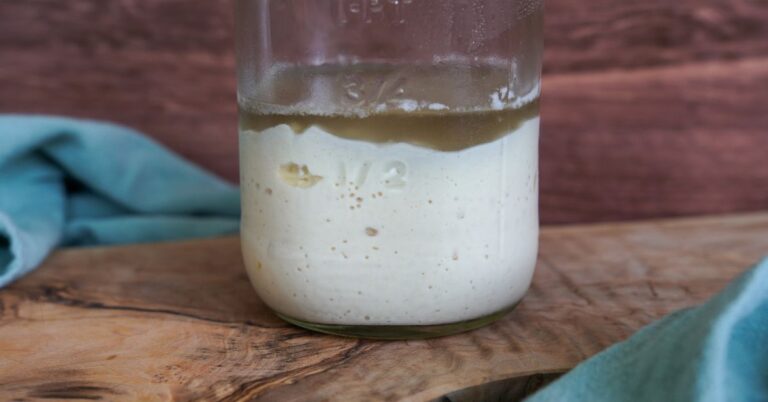
Visual Cues: The Top of the Starter
I personally find visual cues to be the best way to tell if my starter is ready to bake with. Specifically, I look at the top of the starter:
- Domed: not ready yet
- Deflating/drag lines down the side of the jar: a little too late
- Flat (or a little wavy) on top: ready

If the top of your sourdough starter is domed, it’s still rising and needs more time to reach its maximum strength. You can see an example of this in the following video:
If there are drag lines on the sides of the jar and the starter is deflating and falling down, it’s a little too late.
Note: It's still totally fine to bake with a slightly deflated starter. Will it be your best loaf ever? Probably not. Will it be delicious anyway? For sure. There are people who make bread with unfed starter (discard) and still get good bread. Don't take any of this too seriously unless you want to!
If the top of the starter is flat – not domed, and not deflating – it’s at its peak. This is the perfect time to mix your dough.
Visual Cues: Doubles or Triples in Size
Another visual cue is to see if your starter has at least doubled, if not tripled, in size from when you fed it.
I personally find that when my starter is in its best health – as in, I’ve been feeding it daily and haven’t neglected it – it triples in size.


However, the general rule of thumb is you want your starter to at least double in size from when you fed it last.
Visual Cues: Bubbles
The last visual cue is lots of bubbles.

The sides and bottom of your jar should show you tons of little bubbles, indicating that the wild yeast has released lots of carbon dioxide.
Aroma
The smell of your starter can tell you a lot about whether or not it’s ready to bake with – it can also cue you in to potential acidity issues.

When a sourdough starter is past its peak (i.e., not ideal to bake with), it usually smells acidic, like nail polish remover or vinegar. It may cause your eyes to water a little if it’s particularly acidic!
It’s normal for your starter to smell like this when it has deflated and is in need of a feeding. If it smells like this when it has peaked, though, your starter is too acidic, and we need to strengthen the yeast population. Otherwise, you’ll end up with bread issues, including weirdly sticky dough and gummy loaves.
This video explains how to cure an acidic starter if you need it:

When it’s active, ripe, and ready to bake with, it definitely smells yeasty. It has a slightly earthy, possibly even sweet, aroma. The exact way your starter smells will be unique, as every starter is different!
Floats in Water
The last (and least reliable) way to tell if your sourdough starter is ready to bake with is to pour a little in a bowl of water.
If the starter floats, it’s ready to mix into your dough.
Some bakers don’t like this method, because depending on how you handle the starter, you could degas it and get a false reading.
If you knock all the carbon dioxide out, it could sink, leading you to think you can’t bake with it.
That said, I’ve never had a false reading by simply pouring the starter into a bowl of water. Don’t use any utensils to scrape or lift it out of the jar. Just pour and let the weight of the starter fall into the bowl and naturally cut itself off.
How to Manipulate When Your Starter Peaks
You have total control over when your sourdough starter peaks. Understanding how feeding ratios work can help you plan out your bake days a whole lot more easily.
Check out: Sourdough Starter Ratio Calculators
The higher your feeding ratio, the longer it will take to peak.

Experiment with different feeding ratios in your kitchen to get a better guideline for when your starter peaks.
Related: How to Feed Sourdough Starter Without a Scale (So Easy!)
One of my favorite methods is doing a time-lapse video on your phone!
Use Time Lapse to Determine Starter Peak
Your phone likely has a time-lapse setting.


After feeding your starter, set up your phone to record. I prefer doing this overnight to capture your starter growing, peaking, and possibly even falling by morning.
A couple of tips:
- Plug in your phone to avoid battery drain.
- Include a clock in the shot to track timing.
Reviewing a time-lapse shows exactly when your starter peaks and starts deflating. This helps you plan your baking schedule.
For example, if a 1:1:1 ratio peaks in 5 hours but you want to bake in 10, you’ll need to increase the feeding ratio.
Note: you can even go so far as to do a 1:100:100 feeding ratio… I tried it once and the results were actually shocking!
FAQs
How do I know when my sourdough starter is ready?
You’ll know your sourdough starter is ready to bake with when it has at least doubled, if not tripled, in size. It will have bubbles all throughout, and it should smell yeasty, earthy, and maybe even a little sweet. The top of the starter should be mostly flat – not domed (still rising) and not deflating.
How soon after feeding sourdough starter can I use it?
You can use feeding ratios to determine how soon you can use your sourdough starter after feeding. A lower ratio, such as 1:1:1, will cause your starter to peak more quickly (usually between 4-6 hours). A higher ratio, such as 1:5:5 or 1:10:10, will cause your starter to peak more slowly (usually between 10-12 hours).
How do I figure out the feeding ratios thing?
If your recipe needs 150g of starter and you want to use a 1:5:5 ratio, start by dividing 150 by 11 (since 1 + 5 + 5 = 11). That gives you about 14g for each part.
So, you’ll use:
- 14g of starter (1 part)
- 70g of flour (14g x 5)
- 70g of water (14g x 5)
You can use this method for any ratio. For a 1:1:1 ratio, just divide the total starter needed by 3. For a 1:3:3 ratio, divide the total starter needed by 7. Does that make sense?
It’s a good idea to make a little extra since some will stick to the jar, by the way!
Note: you can use my feeding ratio calculator to skip the math!
Can I leave my sourdough starter out overnight after feeding it?
You can absolutely leave your sourdough starter on the counter overnight after feeding it. This is actually my favorite way to feed my starter. I feed it before bed and mix my sourdough bread dough in the morning.
Conclusion
If you want to know when your sourdough starter is ready, get familiar with the visual cues, aroma, and even the float test.
Once you master the ripening of your sourdough starter, you can start experimenting with feeding ratios. That way, you have total control over your baking schedule.
Let me know if you have any questions in the comments below!
Related:


hello!
what temperature do you shoot for after feeding your starter?
Thank you,
🙂
Mary
I don’t really aim for any particular temperature – my home is 75°F so that’s usually what it is! If your home is really cold, you can buy little “sourdough homes” that have heating elements inside to keep it at the ideal temperature.
I am a visual learner, and I LOVE all your videos! New to all this; my house temp (in N.CA) is 68. I have fed a starter that a friend gave me that’s been sitting in the refrig. for weeks. I have just placed it in the oven with the light on, not sure if that alone will get the temp up enough? I do have a bread proof button on my oven as well. Suggestions? My plan is to feed it again tonight, and at 7 am tomorrow morning, as I’m hoping to bake tomorrow??? Thanks for ALL your amazing insight!!
68F should be just fine for a starter! Sure, it prefers closer to 75F-80F, but my home has been 68F for the last few weeks and I’ve had no issues. The oven with the light on – plus maybe a cup of boiling water in the corner if your oven light doesn’t produce much heat – should be good. I don’t recommend the bread proof button because it’s typically made for commercial yeast and sourdough cannot handle that high of temps.
Help my daughters starter has small bubbles, however when making levin it never increases past 1x. Even daily feeds does not increase volume by much
Is it brand new or established?
Hola! I’ve learned so much from you on IG and your blog! Love sourdough mama too! What happens or doesn’t happen if you use starter not at peak (domed)? My starter passed the float test, but in hindsight I think it may have not been at peak. Still learning!
If it hasn’t peaked yet, you’ll end up with a milder, less tangy loaf. It also will have a lower population of active yeast so things may take longer.
Why does my starter always smell like paint. I make bread and it looks good and tastes good, but the starter never smells like sourdough should smell
It’s likely that it’s overly acidic. Unless it’s brand new – how long have you had this starter?
I was hoping to get a recipe for sourdough starter.
I’ve actually never made one from scratch!
Hello, I’ve been following you for a while now and find your tips very helpful! But I’ve run into a problem: my starter is about 9 weeks old. I started with a 1:1:1 ratio and steadily increased the ratio as soon as it peaked after about 8h. I am now at 1:4:4, because before that, it was more than tripling and peaking within 8 hours (room temperature 21.5°C / ~71°F) and I couldn‘t keep up with it. Unfortunately, before that I missed the peak every now and then, but switched to a higher ratio anyway. Now it doesn’t quite double anymore, has fewer bubbles, and is rather sluggish. I thought it would help doing a higher ratio so it dilutes the acidity. Should I just stick with it or jump back to 1:2:2?
The sluggish behavior would not be related to the higher feeding ratio. Are you discarding and feeding it as it’s deflating? The only reason the starter would become weaker is if you are discarding and feeding before it reaches peak (prematurely) or long after it has deflated (too acidic). You can email me also if you want more in-depth help – hello@thatsourdoughgal.com
Would my starter still triple if I’m just feeding it small amounts (total 100g)?
Yes, absolutely! The goal for a healthy, well-maintained starter is for it to triple in size after feeding, and that goal applies whether you are feeding 100g total or 500g. The size increase (doubling or tripling) is determined by your feeding ratio and the health of your starter, not the overall amount you mix up. In fact, when I do time-lapse experiments to test different feeding ratios, I often use a total of only 100g of starter in each jar to see how they rise. If you are using all bread flour, tripling is the ideal sign that your starter is at its peak and ready to bake with. Adding whole wheat flours or rye flours will cause the starter not to rise quite as high, so considering the other cues that it’s ready (like the smell) can be helpful as well!
Ahh thank you- this is helpful!
I meant I only use about 9-10g of starter and do a 1:5:5 ratio!
Hi! I’m confused about maintaining my sourdough starter in the refrigerator. I have taken it out, fed it 1:5:5. It has tripled in size. I use what I need for the recipe, and have planned for leftover. At this point, do I
1.feed the leftover again before putting it in the fridge then
2. Let this leftover rise again before refrigerating
3. When ready to bake in 1-2 wks, bring out, let rise, then feed it to strengthen it. Thank you so much!
At that point, feed the leftover again. I personally like to let it rise for a few hours before sticking in the fridge. When ready to bake in 1-2 weeks, bring it out, let it come to room temperature just to make sure it hit its peak at some point (sometimes you bring it out and it still rises but not always). Then discard, feed, and use it in a recipe! Repeat!