
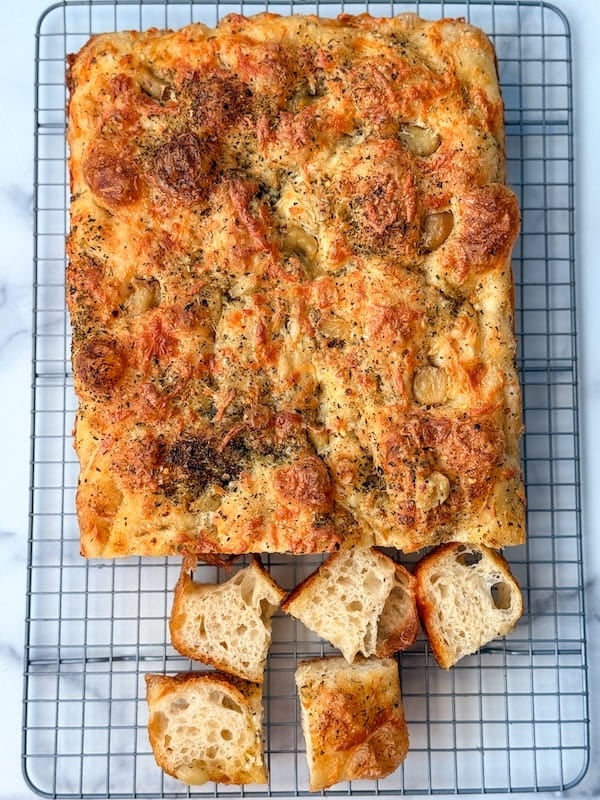
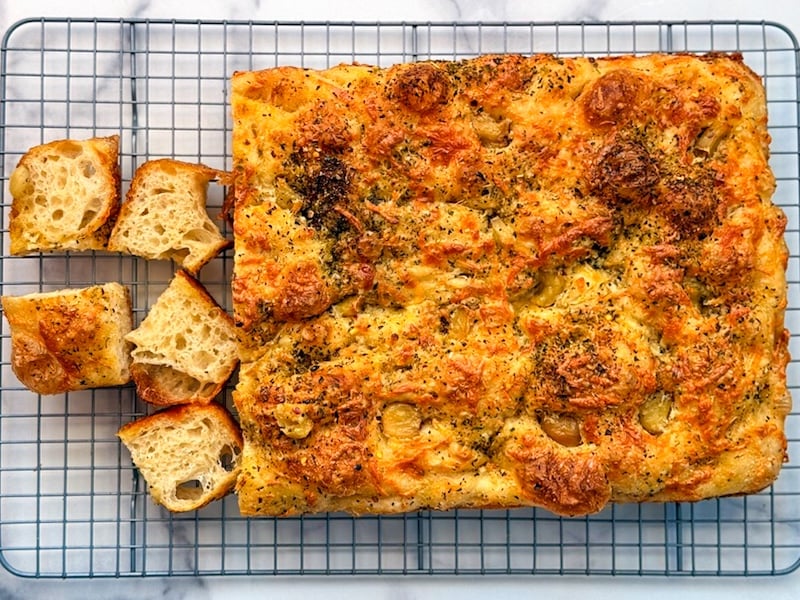
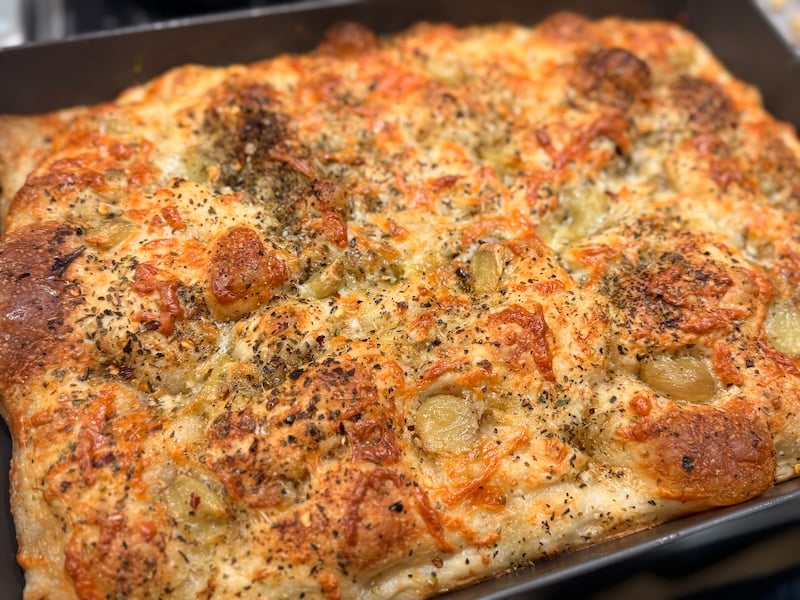
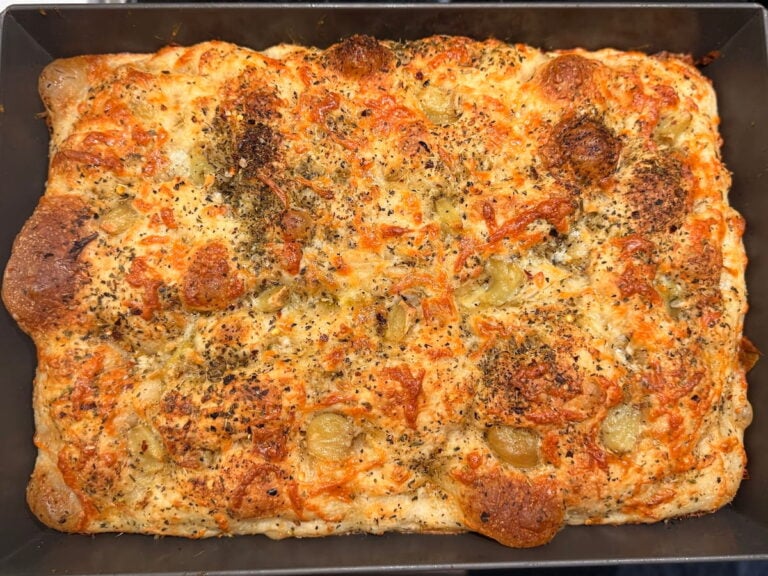
Roasted Garlic and Cheese Sourdough Focaccia (Same-Day Recipe)
I’m a big garlic person, and once I started thinking about loading my same-day sourdough focaccia with roasted garlic and two kinds of melted cheese, I had to make it.
I brought a test batch to one of my husband’s coworkers, and after his first bite, he said, “You oughtta be proud of that one right there.”
That was all I needed — I sent it off to recipe testers shortly after, and nearly 200 of them agreed: this garlic and cheese sourdough focaccia is a keeper.
Disclaimer: Some of the products I recommend in this post are affiliate links. If you choose to purchase after clicking one of my links, I may earn a small commission, which helps fund this website, recipe development, and monthly giveaways. I sincerely appreciate your support.
Why You’ll Love This Roasted Garlic and Cheese Sourdough Focaccia
- Proven dough base: This recipe uses the same base as my same-day sourdough focaccia — one of the most-tested, most-loved recipes on this blog. If you’ve made it before, you already know what you’re in for.
- Same-day bake, start to finish: Feed your starter the night before, mix your dough in the morning, and you have focaccia on the table for dinner. No long overnight waits required — though you absolutely can cold proof it if that works better for your schedule.
“Quick, and can be done easily in 1 day if you are available for stretch and folds/coil folds.” –Recipe tester from Flemington, NJ
- The dough is genuinely fun to work with: 96% of testers had zero issues working with this high-hydration dough, and a lot of them said the coil folds were the highlight of their entire day. Same!!
“Coil folding high hydration dough is a dream!” –Recipe tester from New Jersey
“I LOVE working the dough! I had my hands in it a lot!” –Recipe tester from Texas
“The feel of handling the coil folds. It’s a beautiful dough!” –Recipe tester from Vancouver Island, Canada
- Roasted garlic heaven: Roasting garlic transforms it from sharp and pungent into something sweet, soft, and deeply caramelized. Pressed into the surface of the focaccia before baking, those cloves melt right into the dough and create little pockets of garlic flavor in every bite.
“The roasted garlic took it to another level.” –Recipe tester from Victoria, Australia
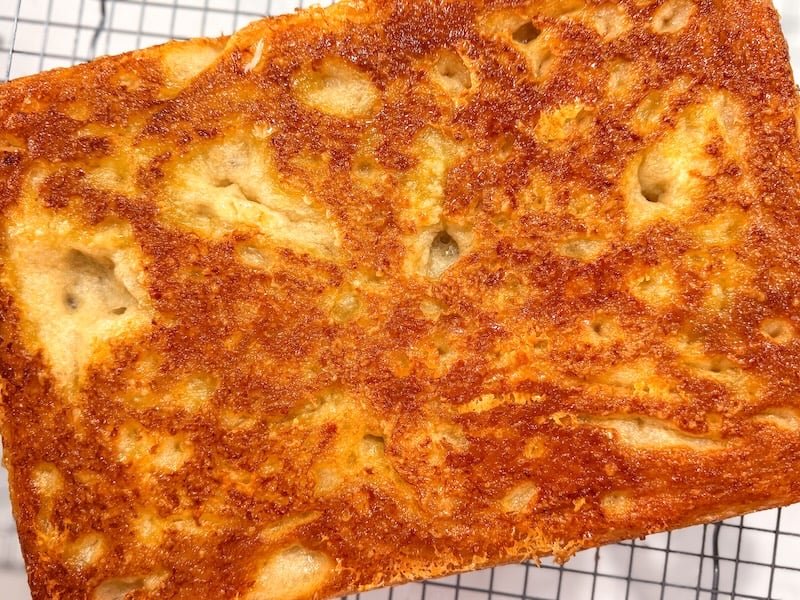
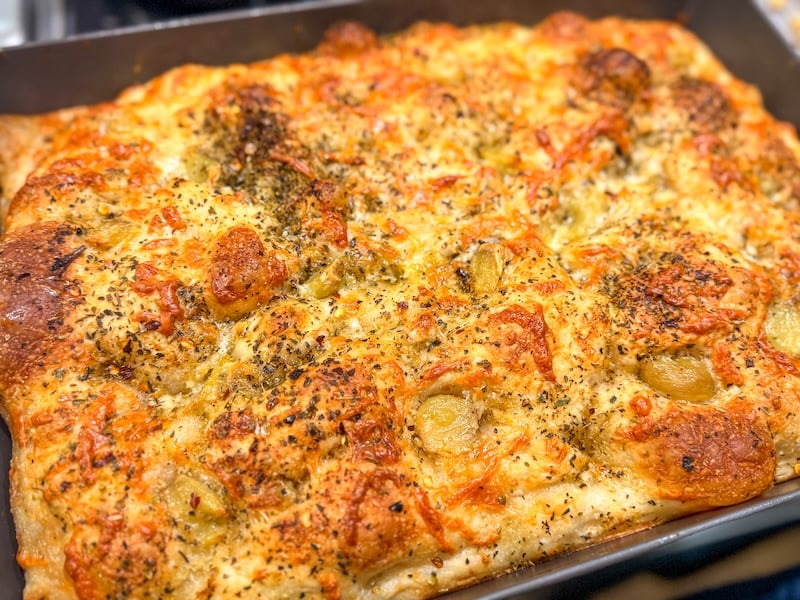
- A crispy parmesan bottom: A light layer of freshly shredded Parmigiano-Reggiano goes into the pan before the dough is added — and it bakes into a golden, almost frico-like layer that is absolutely not an accident.
“Very easy and adaptable recipe. You could add other spices, change up the cheese, add olives, veggies. Sky’s the limit.” –Recipe tester from Dallas, TX
- Totally customizable: Different seasoning blends, different cheeses, more garlic, less garlic — this recipe is flexible, forgiving, and easy to make your own. I’ve made it with Dan-O’s Cheesoning, which was insanely good, and when I used King Arthur Pizza Seasoning, it literally tasted like pizza, even though it had no sauce.
- Tested and approved. 202 home bakers gave this recipe an average rating of 4.81 out of 5, with 93% saying they’d make it again.
“It is the most flavourful focaccia and so versatile. You can do so much with it and it’s super easy to make.” –Recipe tester from Sydney, Australia
The Recipe Testing Journey
I’ll be honest — this one didn’t take long.
My same-day sourdough focaccia is already one of the most tested recipes on this blog, and it’s incredible. My job was to figure out how to pack that dough with the most garlic-forward, cheesy, savory flavor possible.
Roasting the garlic was an immediate yes — it’s sweet, soft, and deeply caramelized.
For cheese, I landed on a two-layer setup: Parmigiano-Reggiano on the bottom of the pan (where it crisps up into something magical) and low-moisture mozzarella on top to melt and bubble.
And for seasoning, I left it open — Dan-O’s Cheesoning, Italian seasoning, King Arthur Pizza Seasoning — whatever you love works here. I tested multiple options and all were equally delicious in their own way.
Once the recipe felt right, I sent it out to testers for a quick round. Not because I thought it needed major work, but because my testers always catch something. And as usual, they did.
Meet the Recipe Testers
This recipe was tested by 202 home bakers. They ranged from beginners to advanced bakers, worked in kitchens from Minnesota to South Africa to Australia, and used everything from USA Pans to cast iron to glass casserole dishes.
The results were consistent: this focaccia delivers.
- Average overall rating: 4.83 out of 5
- Average texture rating: 4.86 out of 5
- Average flavor rating: 4.80 out of 5
- 93% would make this recipe again
- 96% had no issues working with the high-hydration dough
- 100% found the instructions clear or mostly clear
“This recipe is fail-proof. I made so many mistakes and it still turned out great.” –Recipe tester from Georgetown, Texas
“I LOVED the flavor… it was such an amazing mouth experience!” –Recipe tester from Calgary, AB, Canada
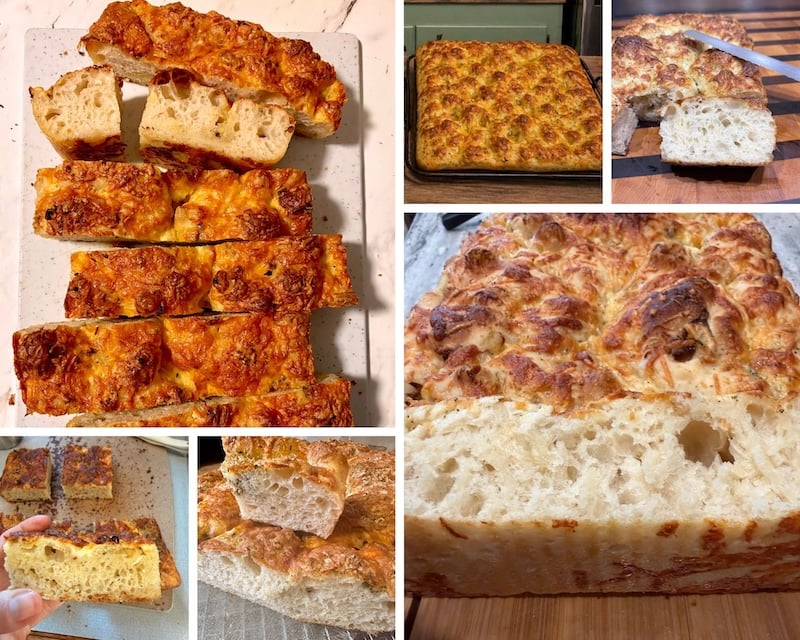
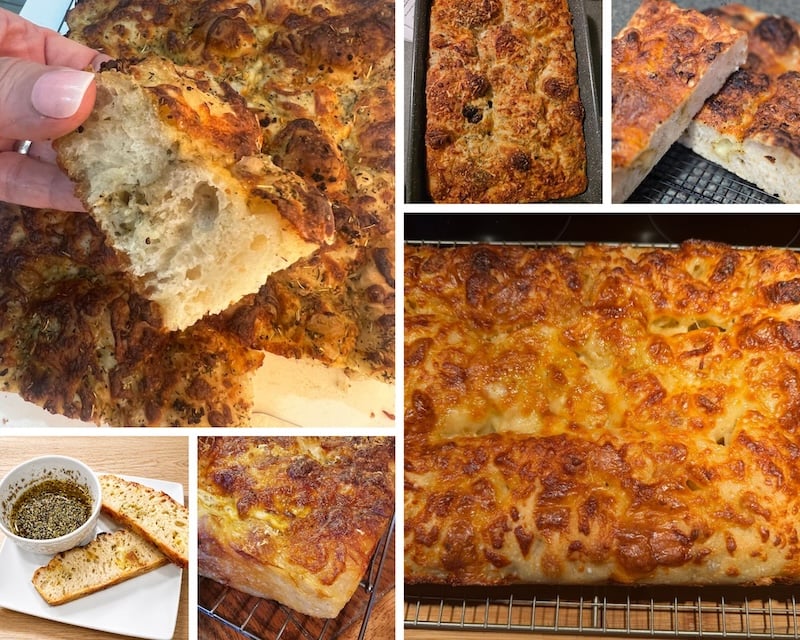
Here’s a compilation of some of the recipe tester photo submissions:


3 Things We Learned from Testing
A few things came out of this testing round that made it into the final recipe:
- Roast the garlic ahead of time: The most common piece of feedback was that the garlic roasting step felt misplaced mid-recipe, especially since it takes about an hour to roast and then needs to cool completely. The fix is simple: roast your garlic the evening before, or first thing while you’re feeding your starter. I’ve moved this step to the beginning of the recipe so you’re not caught waiting when your dough is ready to go.
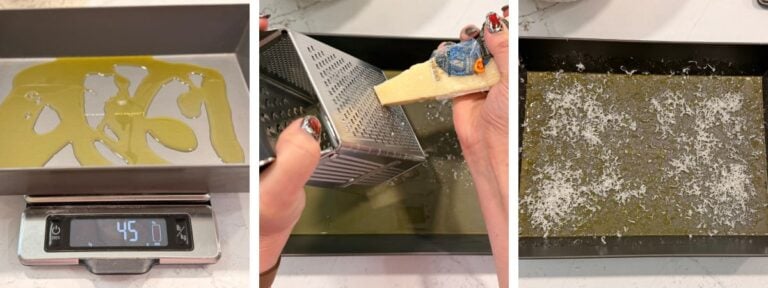
- The oil amount is pan-specific — and that needs to be clearer: Several testers found their focaccia too oily on the bottom, and this almost always came down to using more oil than their pan needed. The 45g of oil in the recipe is for the Lloyd Pans Detroit-Style Pizza Pan. A USA Pan or glass dish needs significantly less. I’ve made the pan-by-pan breakdown part of the actual recipe steps rather than burying it in the notes.
- Garlic distribution is worth thinking about: A handful of testers mentioned that pressing whole garlic cloves in means you sometimes hit a big pocket of garlic in one bite and nothing in the next. I personally LIVE for this, but it’s not for everyone. If you want a more even distribution, smash the roasted cloves and spread them across the dough before pressing them in.
“Absolute perfection! The texture and flavor of this bread are perfect! Don’t forget to put cheese on the bottom of the pan!” –Recipe tester from Wisconsin
Baker’s Timeline
These times are approximate and based on a dough temperature of around 79°F (26°C) during bulk fermentation. If your kitchen runs warmer, things will move faster. If it runs cooler, give it more time.
| Night before | |
| 8 PM | Feed your starter. Roast garlic now if making ahead — it keeps well in the fridge. |
| Next morning | |
| 7–8 AM | Mix the dough. Place in a warm spot (~80°F/27°C). Rest 30–40 minutes. Bulk fermentation has begun. |
| 7:30–9:30 AM | Stretch & fold #1, #2, and #3 — spaced 30–45 minutes apart. Keep your bowl scraper wet. |
| 10 AM–11:30 AM | Coil fold #1, #2, #3, and #4 — spaced 30 minutes apart. Wet hands every time. |
| Early afternoon | |
| ~1:30 PM | Finish bulk fermentation (~6.5 hours total at 79°F/26°C). Dough should be doubled, bubbly, and bouncy. Watch the dough, not the clock. |
| 1:30 PM | Prep pan with oil and parmesan. Transfer dough smooth-side up and stretch to edges. Return to warm spot for final proof. |
| Afternoon | |
| ~3:30 PM | Once dough looks super puffy and ~50% larger (about 2–3 hours after transferring), add oil, seasoning, mozzarella, Parm, and roasted garlic. Dimple deeply. Preheat oven to 500°F (260°C). |
| ~4 PM | Bake. Reduce to 450°F (232°C) immediately. Bake 20–30 minutes, rotating halfway through. |
| ~4:30 PM | Cool 5 minutes in pan, then transfer to a rack. Wait at least 1 hour before slicing. |
Tip: Consider roasting your garlic the night before while you’re feeding your starter. It’s one less thing to think about in the morning. But really, you can do it anytime — it just needs an hour to bake and about an hour to cool.
Equipment You’ll Need
- Scale: Accurate measurements are especially important with a high-hydration dough like this one.
- Danish dough whisk: This makes the initial dough mix fast and easy.
- Large mixing bowl: You need enough room for the dough to bulk ferment and expand. I love my Anchor Hocking glass bowls, but for coil fold-heavy doughs like this one, I am LOVING shallow, wide ceramic dishes. This one from Staub has been my go-to.
- Bowl scraper: This is your best friend for this entire recipe. Keep it wet to avoid sticking.
- Bowl cover: I use the bowl covers from Doe a Deer — excellent quality and they don’t dry out the dough. Get 15% off with code THATSOURDOUGHGAL.
- Proofing mat or box: This dough ferments best around 78–82°F (25.5–27.5°C). A Cozy Bread proofing mat (10% off with code THATSOURDOUGHGAL), Brod & Taylor proofing box, Giyudot budget proofing box, your oven with the light on, or a microwave with a cup of boiling water all work great.
- Baking pan: Your pan choice affects how much oil you’ll use, so it matters. My two favorites are from Lloyd Pans and USA Pan:
- Lloyd Pans 10×14-inch Detroit-Style Pizza Pan: My current favorite for focaccia — it gives an incredibly crisp bottom every time. But a very close runner-up is…
- USA Pan 9×13-inch Baking Pan: The most popular pan among testers — 50% used it, and it consistently delivers great results with less oil. Just make sure to use 10g of oil or butter in the bottom — not the 45g recommended for the Lloyd pan.
- Glass and ceramic work too, but require extra prep and don’t give quite as good a result. See the pan guide in the recipe steps.
- Cooling rack: Essential for keeping the bottom crisp. Once it comes out of the pan, it needs air circulation all around.
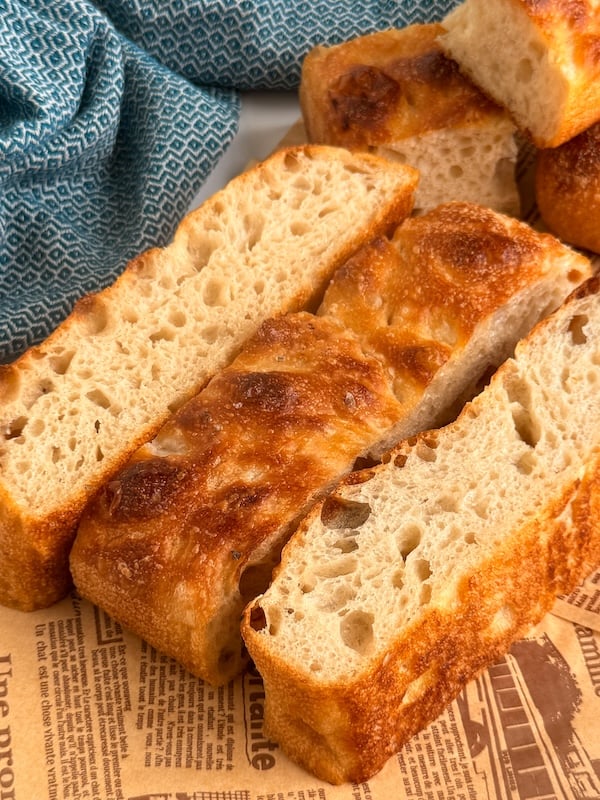
- Bread knife: For clean slices without squishing that beautiful open crumb.
“It’s stupid easy to make, very forgiving, and full of fluffy yumminess!” — Flemington, NJ
Roasted Garlic and Cheese Sourdough Focaccia Ingredients
- Sourdough starter: The first step of this recipe explains how to feed your starter so it’s active and ready to use. Don’t use discard straight from the back of the fridge on this one.
- Water: Room temperature tap water works great. If you’re in a city and notice your starter is sluggish, chlorinated water could be a factor — filtered or spring water is an easy fix.
- Melted butter or olive oil: Either works! Butter adds richness, while olive oil is more traditional. Several testers used avocado oil with great results.
- Sugar: Just a small amount — it helps with browning and adds a faint sweetness.
- Bread flour: A high-protein bread flour gives this focaccia its structure and chew. King Arthur was the most popular choice among testers, with 60% using it. Central Milling’s High Mountain flour is my personal go-to.
- Salt: I use Redmond’s Real Salt (15% off with code TSG15), but any salt will work.
For the toppings:
- Garlic: One large head (60–70g before roasting) or two small heads. After roasting and squeezing out the cloves, you’ll end up with about 35–40g. That said — if you’re a garlic person, add as much as you want. I won’t stop you.
- Olive oil: Used in the pan and drizzled over the surface. I use and love California Olive Ranch. The amount varies by pan — this is important. See Step 8.
- Parmigiano-Reggiano: Freshly shredded is definitely best! A small amount goes on the bottom of the pan, where it crisps into something incredible. The rest goes on top.
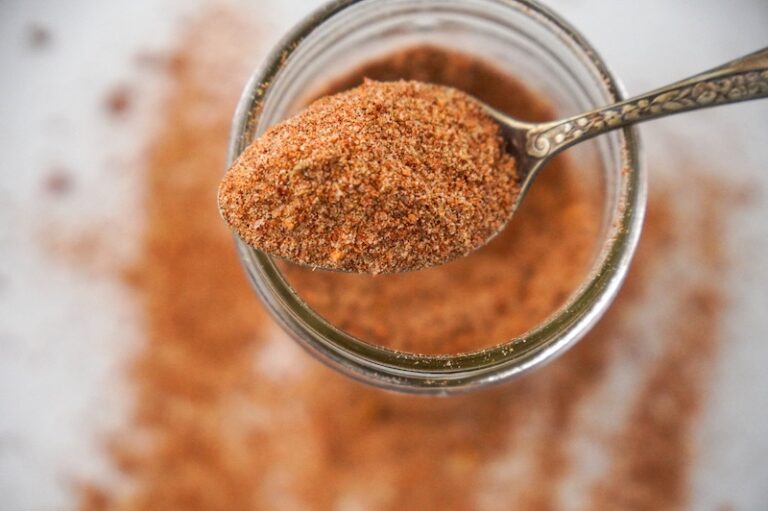
- Seasoning of choice: This is where you can have some fun. Dan-O’s Cheesoning and Italian seasoning were the two most popular choices among testers. King Arthur Pizza Seasoning was a close third. Whatever you use, make sure it has salt — if it doesn’t, add about half a teaspoon separately.
- Low-moisture mozzarella: Freshly shredded is best. Pre-shredded has anti-caking agents that affect how it melts, but if that’s what you have, it’ll be totally fine.
“Oh my gosh, the flavor is amazing!! The cheesy and garlic pockets are in every bite!” –Recipe tester from St. Paul, MN

Ingredient Substitutions
- Bread flour: King Arthur, Central Milling High Mountain, Bob’s Red Mill, Member’s Mark from Sam’s Club, and HEB bread flour were all popular among testers — all worked well. If you’re using a lower-protein flour like Kirkland all-purpose from Costco (11.5% protein), add 15–25g more flour, or add 1 tablespoon of vital wheat gluten to help compensate.
- Butter vs. olive oil in the dough: Either works. Butter adds a slightly richer flavor; olive oil is more traditional. Avocado oil is another great option.
- Garlic: Roasted garlic is strongly recommended — the sweetness and depth it brings are hard to replicate. That said, a few testers used garlic-infused olive oil as a shortcut and loved the result. One tester rehydrated dehydrated garlic with a tiny bit of water and had good success. Think of this recipe as a guide and don’t be afraid to work with what you have and what you like!
- Cheese: The Parmigiano-Reggiano and mozzarella combination is the tested and recommended setup, but this recipe is very customizable. Testers mentioned Romano, Gruyère, and other meltable cheeses as fun swaps or additions. Just stick with a good melting cheese for the top layer.
- Seasoning: This recipe is wide open when it comes to seasoning — use whatever you love. Dan-O’s Cheesoning, Italian seasoning, and King Arthur Pizza Seasoning were the three most popular choices among testers, but any blend you enjoy works here. Just make sure your seasoning contains salt — if it doesn’t, add about half a teaspoon separately.
“Focaccia just got an upgrade; you’ll never go back to plain focaccia again.” –Recipe tester from Star, Idaho
How to Make Roasted Garlic and Cheese Sourdough Focaccia (Step by Step)
Step 1: Roast the garlic (night before, or early in the morning)
Get this step out of the way first — it takes about an hour to roast, plus cooling time, and you do not want to be waiting on it when your dough is ready to go. This was the most consistent piece of feedback from testers, and it’s an easy fix.
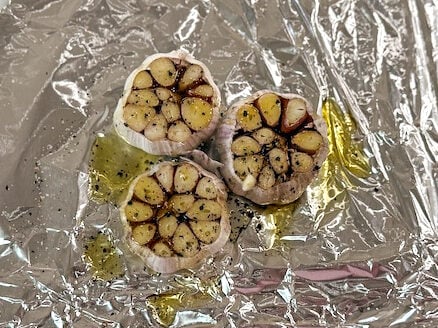
Preheat your oven to 350°F (175°C). Slice off the top of one large head of garlic (or two small heads) to expose the cloves, then place it on a sheet of aluminum foil. Drizzle with 2 teaspoons of olive oil and add a pinch of salt and pepper.
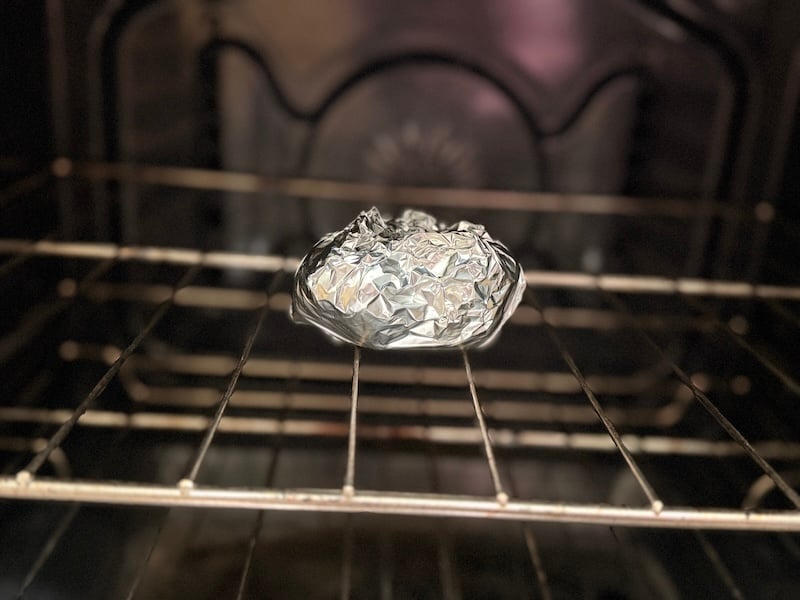
Wrap it up and bake directly on the oven rack for about 1 hour, until the cloves are soft and golden.
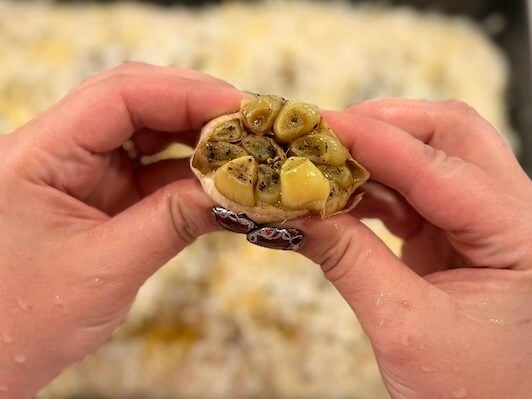
Let it cool fully before unwrapping. Roasted garlic keeps well in the fridge for several days — I usually roast a few heads at once and keep extras on hand.
Step 2: Feed your starter
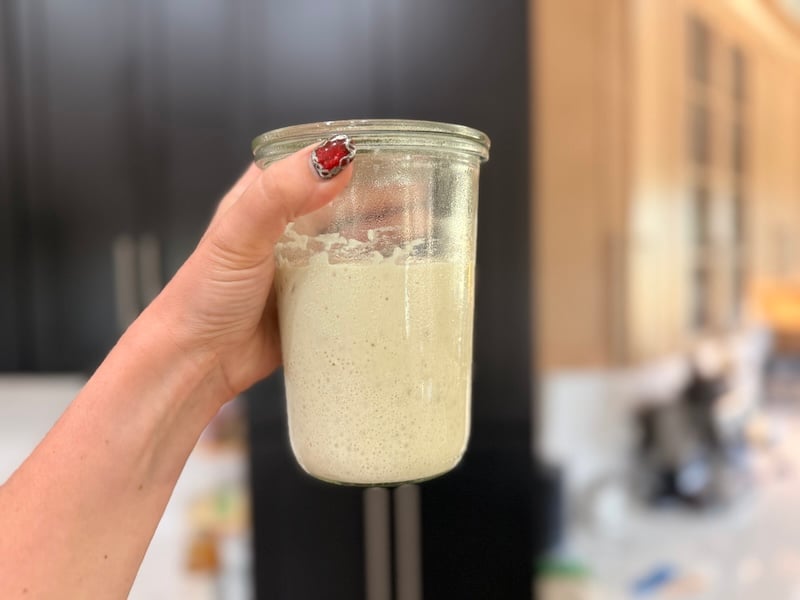
Before bed, mix together 20g sourdough starter, 100g water, and 100g bread flour. Cover loosely and let ferment on the counter overnight (10–12 hours at 68–75°F/20–24°C).
By morning, it should be bubbly, puffed, and active.
If it looks watery, has frothy bubbles on the surface, and smells like vinegar or alcohol, I’d recommend discarding and feeding your starter again before attempting this recipe. A weak, acidic starter is the most common cause of a flat, dense focaccia.
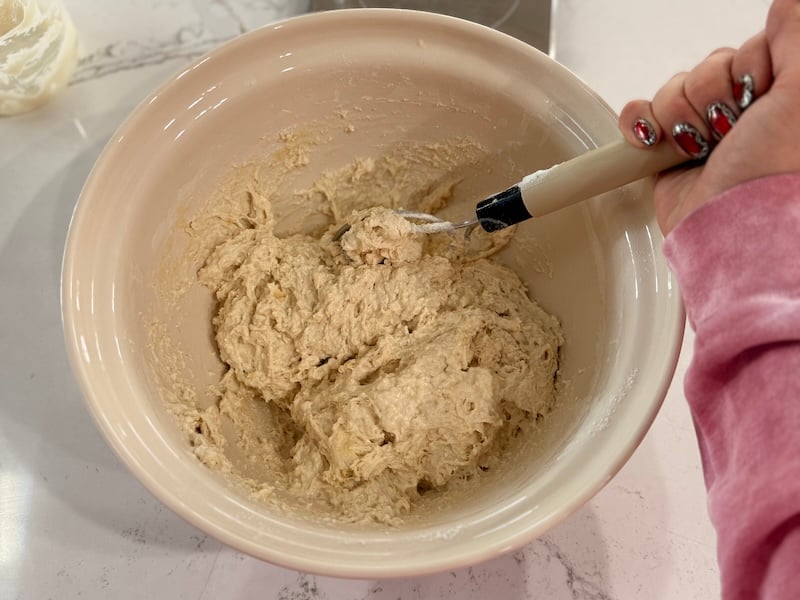
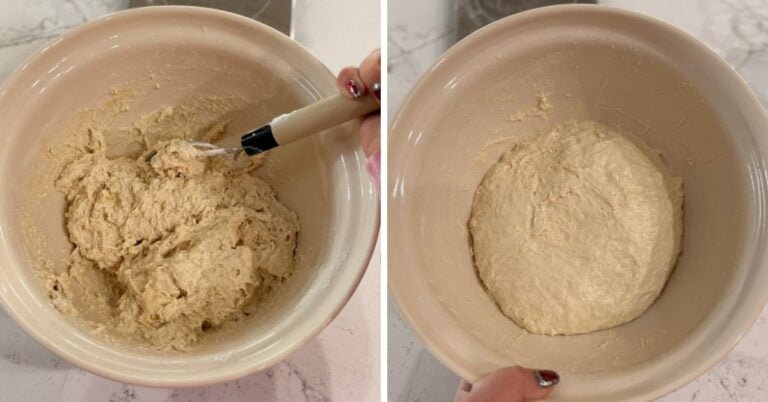
Step 3: Mix the dough
In a large mixing bowl, combine 390g warm water, 200g active starter, 15g melted butter (or olive oil), and 15g sugar. Add 500g bread flour and 10g salt. Mix with a Danish dough whisk or wet bowl scraper until no dry flour remains.
This dough is wet and sticky. That’s completely normal and exactly what you want. Do not add more flour unless the texture looks much looser than mine in the photos.

Cover the bowl and place it in a warm spot — around 80°F (27°C). A proofing box, warming mat, your oven with the light on, or a microwave with a cup of boiling water all work great. Rest for 30–40 minutes.
Bulk fermentation has begun.
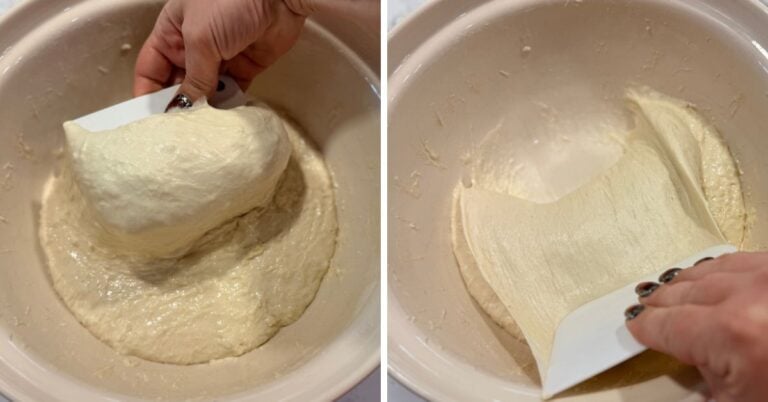
Step 4: Stretch and folds (3 rounds)
Starting 30–40 minutes after mixing, do your first set of stretch and folds.
Using a wet bowl scraper, lift and fold the dough over itself from four points around the bowl, rotating as you go. Cover and rest 30–45 minutes. Repeat for a total of 3 rounds.
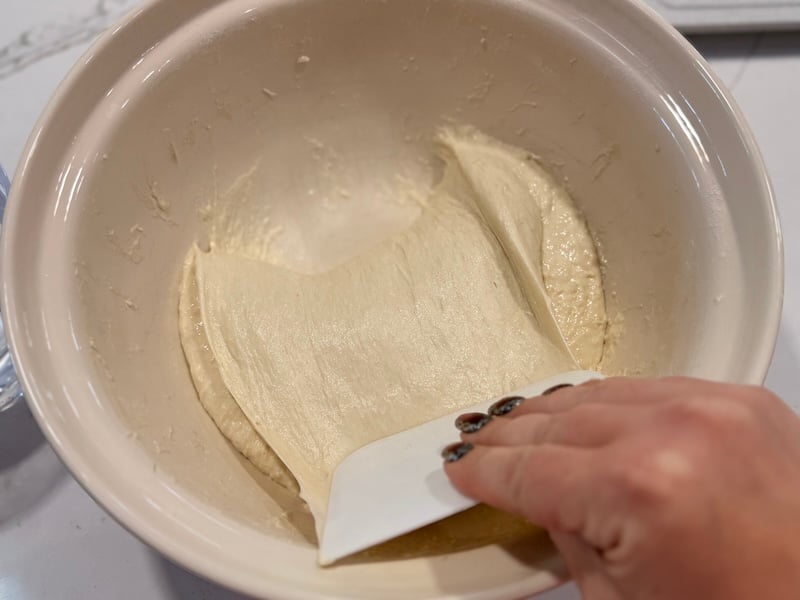
Keep that bowl scraper wet between every single use. Re-wet it before every fold to help prevent sticking.
Note: If you’re super confident with high-hydration doughs, you don’t need to use the bowl scraper — you can simply use wet hands.
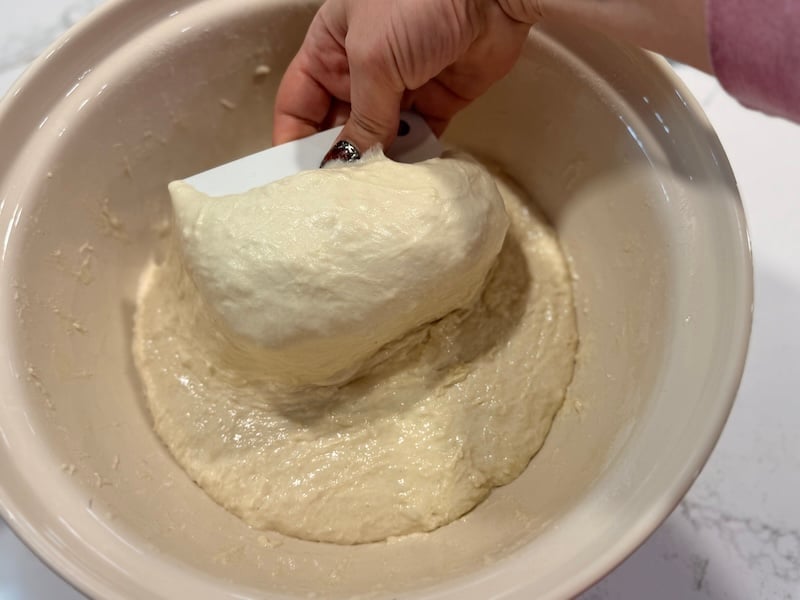
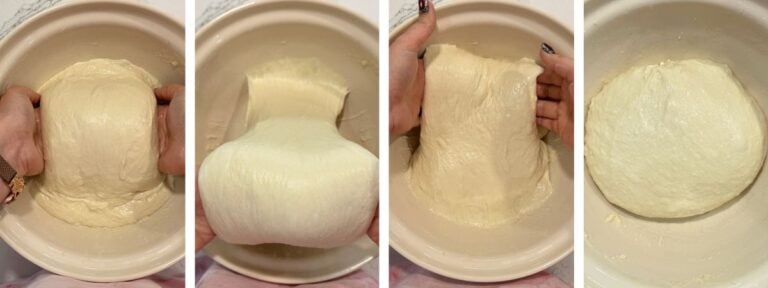
Step 5: Coil folds (4 rounds)
Beginning 30–40 minutes after your last stretch and fold, switch to coil folds.
“Handling this dough was a dream — it was sooo silky soft and therapeutic to work with.” –Recipe tester from Kitchener, Ontario
With very wet hands, slide your hands under the center of the dough, lift it up, and let the ends fold under themselves. Rotate the bowl 90° and repeat. Re-wet your hands between every fold to prevent sticking.
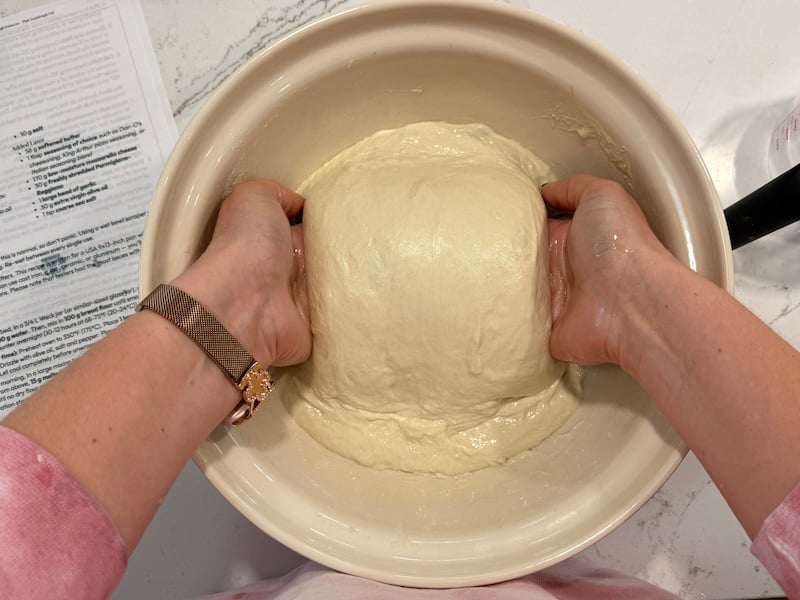
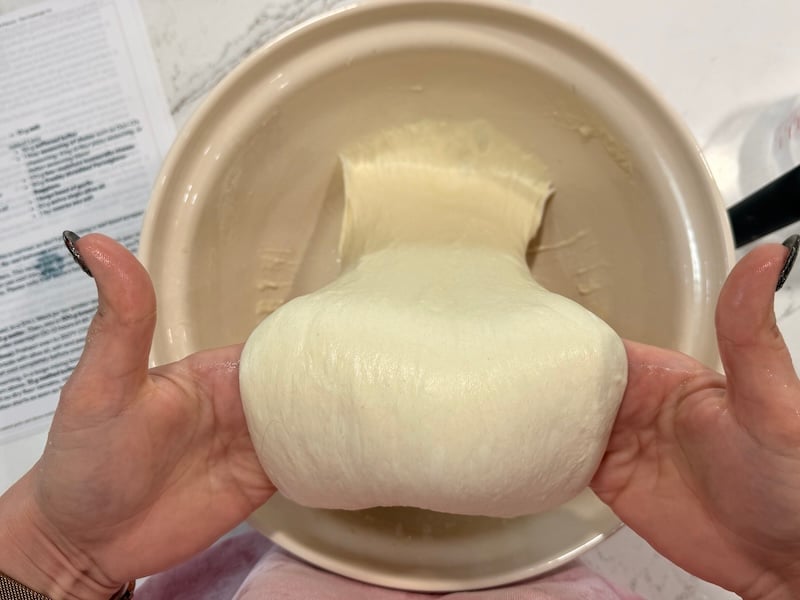
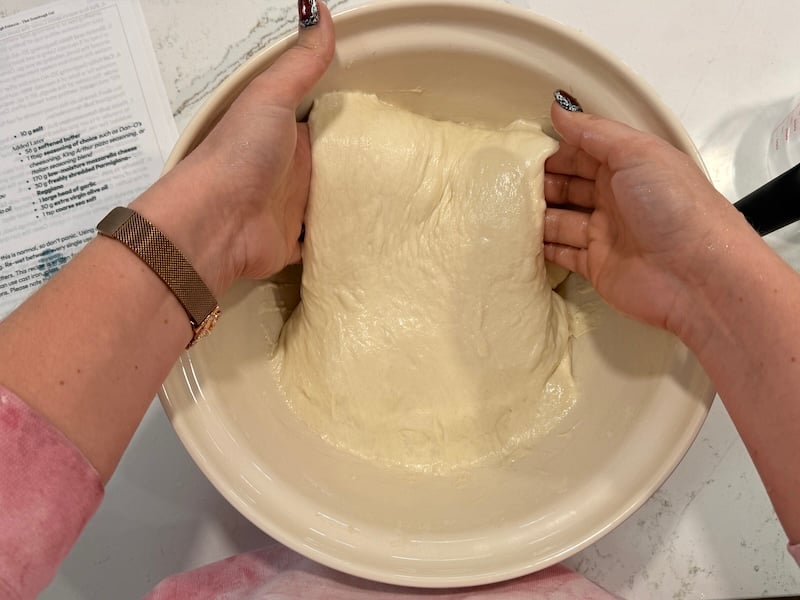

Complete 4 rounds, spaced 30 minutes apart.
This is the step testers kept raving about. If you enjoy the process of making sourdough, you’ll adore these folds!!
“I loved working with the high-hydration dough. The stretch and folds with the rubber scraper were a great idea, the coil folding was smooth!” –Recipe tester from Chippewa Falls, Wisconsin
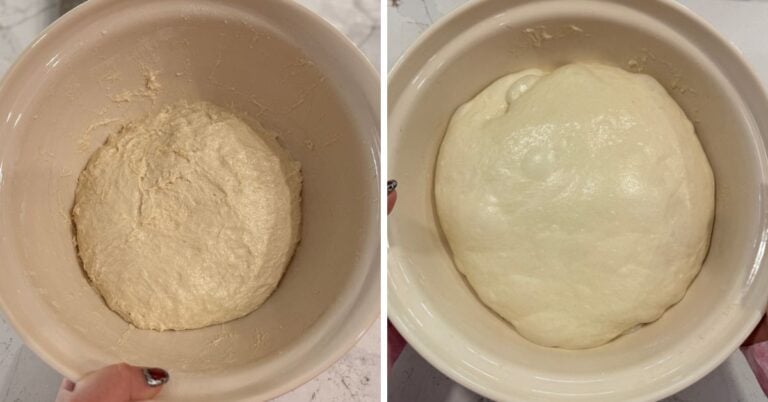
Step 6: Finish bulk fermentation
Your dough is ready for the next step when it:
- has approximately doubled in size
- is covered in bubbles on the surface and sides
- feels bouncy and airy when you tap the surface
- jiggles like jello when you shake the bowl
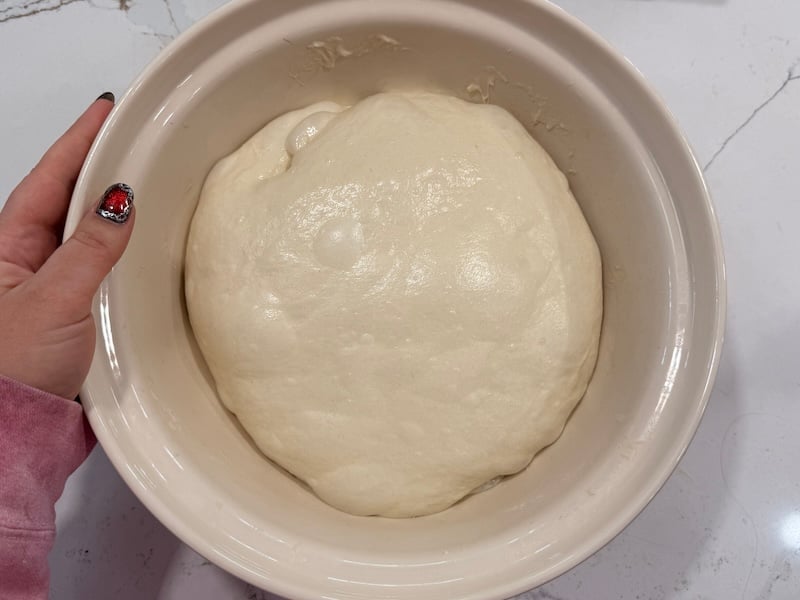
At about 79°F (26°C), this took me about 6.5 hours from the time the dough was mixed. But your timing can vary, so watch the dough, not the clock!
Note: The dough has fermented too long if it starts to feel wet, sticky, and loose — like it has collapsed upon itself. You’ll notice the texture shift from smooth and silky to slack and sticky. If this happens, move to the next step as quickly as possible and shorten the final proof. Don’t toss the dough — always bake it anyway!
Step 7 (optional): Overnight cold proof
If you’d rather bake the focaccia tomorrow, cover the bowl and refrigerate it after bulk fermentation.
The focaccia will develop a more sour, complex flavor and may be easier to digest for some people. When you’re ready, remove the bowl from the fridge and let the dough warm up for 1–2 hours before continuing with Step 8.
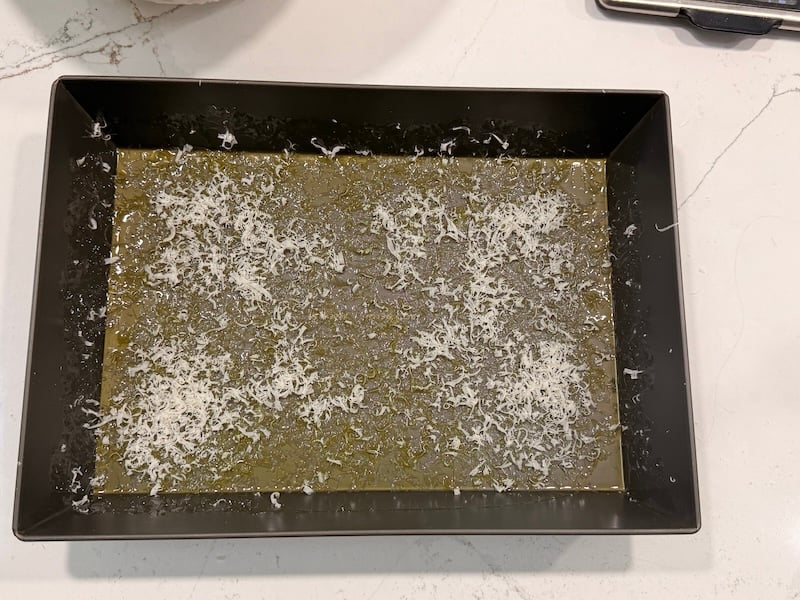
Step 8: Prep your pan
The amount of oil (or butter) you use here depends on your pan.
This is the step where confusion tends to happen, so please read carefully before you pour the oil:
- Lloyd Pans 10×14-inch Detroit-Style Pizza Pan or a 12″ cast iron skillet: Coat the bottom and sides with 45g olive oil (or butter).
- USA Pan 9×13-inch: Coat the bottom and sides with only 10g olive oil (or butter). With this pan, if you add too much, you’ll get a super soggy, oily bottom, which is why we reduce it so much.
- Glass or ceramic: Spray with nonstick oil spray or coat with softened butter, line with parchment paper, then add 20g olive oil (or butter) on top of the parchment.
Once you’ve prepped your pan with oil, add 10g grated Parmigiano-Reggiano on top. It gives your focaccia a crisp, cheesy bottom that is *chef’s kiss.*
Step 9: Transfer dough to pan and final proof
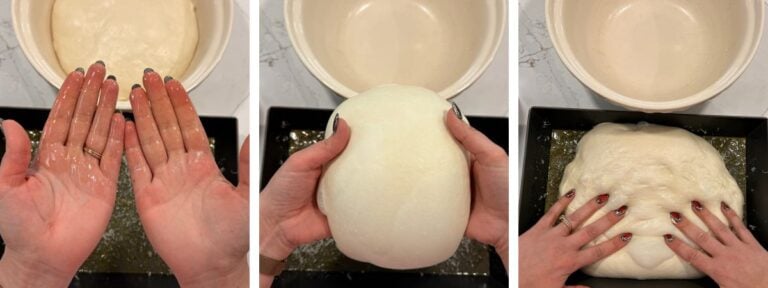
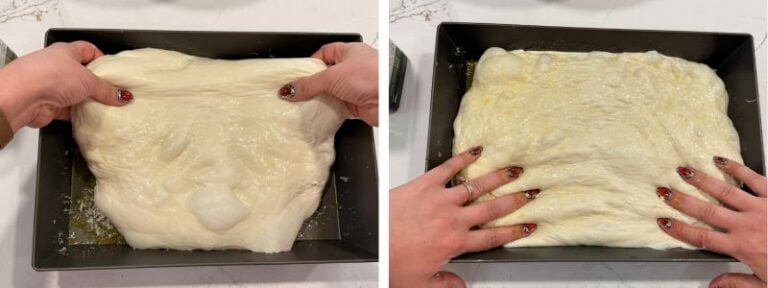
With oiled hands, pick up your dough and place it smooth-side up on top of the cheese in the pan. Don’t dimple yet.
Gently stretch the dough toward the edges of the pan.
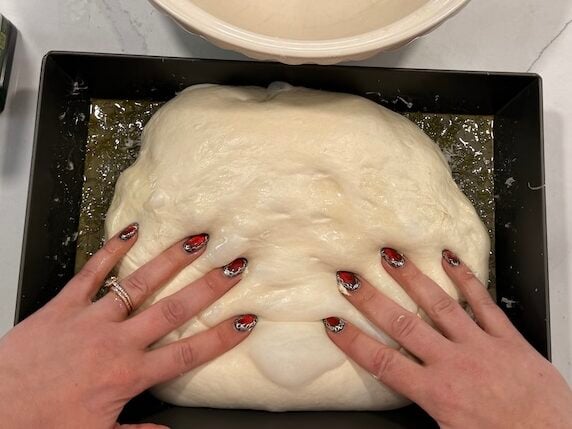
If it springs back, leave it uncovered and let it rest for 10–15 minutes, then gently stretch again. Cover the pan and return it to your warm spot for the final proof.
Step 10: Pre-bake prep
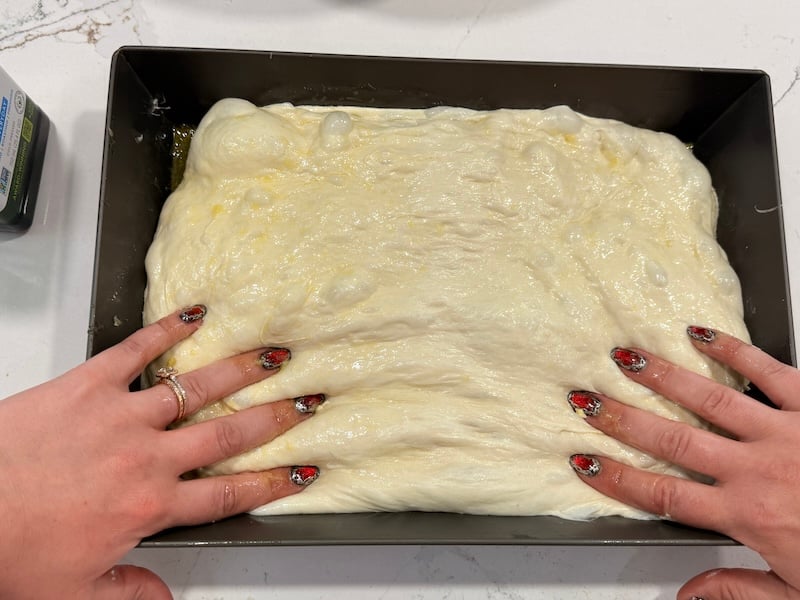
About 2–3 hours after transferring to the pan — or once the dough looks super puffy and roughly 50% larger than when you placed it in the pan — it’s time to top and bake.
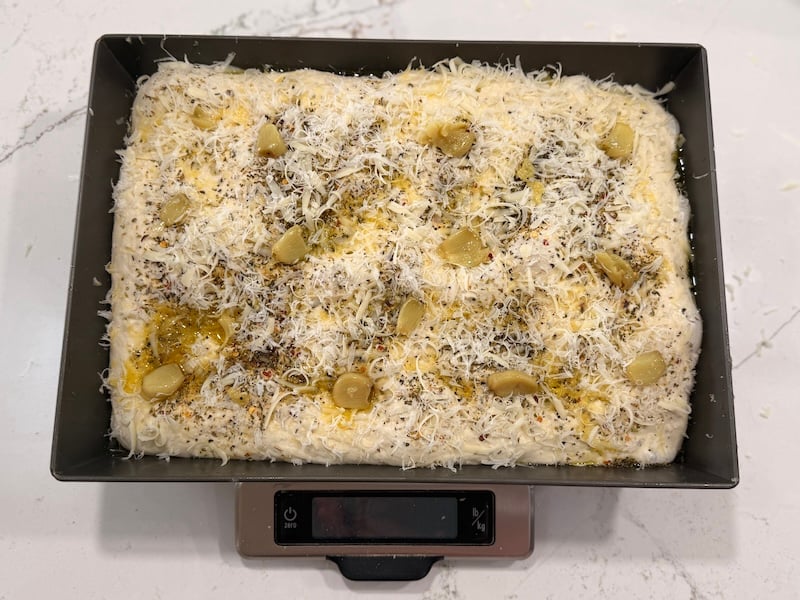
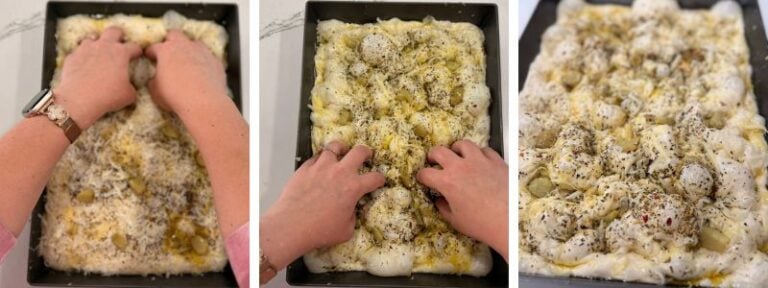
Drizzle 30g olive oil evenly over the surface. Add 1 tablespoon of your seasoning of choice, 170g low-moisture mozzarella, and 30g freshly shredded Parmigiano-Reggiano.
Note: Parmigiano-Reggiano adds saltiness, but it’s not quite enough on its own. If your seasoning of choice doesn’t contain salt, sprinkle about half a teaspoon of salt over the dough to compensate.
Squeeze the roasted garlic cloves out of their skins and distribute them evenly across the surface. If you want garlic in every single bite, consider mashing the garlic cloves into a paste and spreading it across the surface instead.
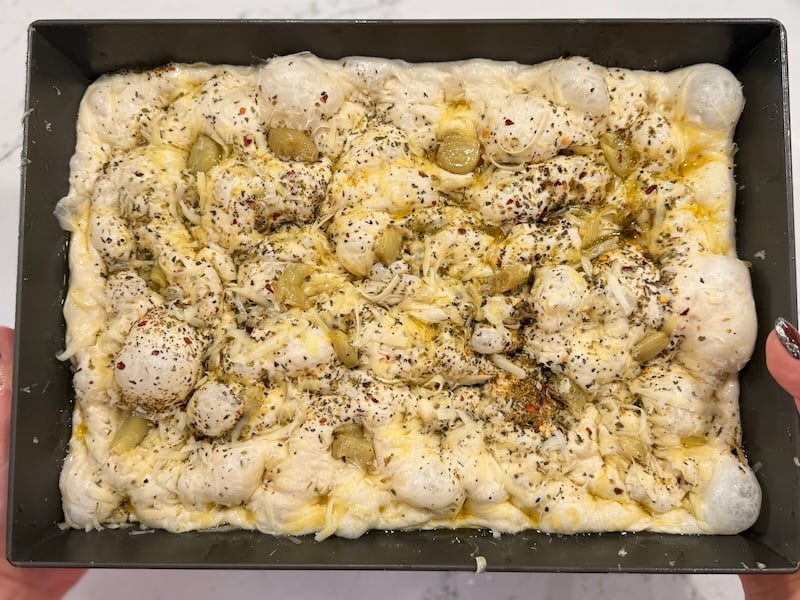
Then dimple the entire surface deeply with your fingers, pressing all the way down to the bottom of the pan.
Move your oven rack to the lower third of the oven and preheat to 500°F (260°C) conventional. If you’re using a glass pan, preheat to 425°F (220°C).
Step 11: Bake
Once the oven is fully preheated, place the focaccia on the lower oven rack and immediately reduce the temperature to 450°F (232°C). If you’re using a glass pan, there’s no need to reduce the temp — just keep the oven at 425°F (220°C) and note that the baking time may be slightly longer.
Bake for 20–30 minutes, rotating the pan halfway through. At the 20-minute mark, start checking for doneness — the top should be a deep golden brown, and the internal temperature should be 205–210°F (96–99°C).
If your focaccia is not up to the target temperature but is starting to get too dark on top, tent with foil for the remainder of the bake.
“The original focaccia recipe has quickly become a household favorite! My husband says it’s the best bread he’s ever had. That said, he thought this version was BETTER!” — Sacramento, California
Step 12: Cool and serve
Let the focaccia cool in the pan for 5 minutes, then transfer it to a cooling rack. This is important — if the focaccia sits in the pan too long after baking, the bottom can become soggy.
Wait at least 1 hour before slicing — I know it’s painful, but the interior needs time to finish setting, and you’ll get much cleaner slices But who am I kidding? Break the rules if you want!
Serve warm or at room temperature, sliced with a bread knife. It pairs beautifully with marinara or vodka sauce for dipping.
“Your home will smell like an Italian bakery after baking this!” –Recipe tester from Columbia, South Carolina
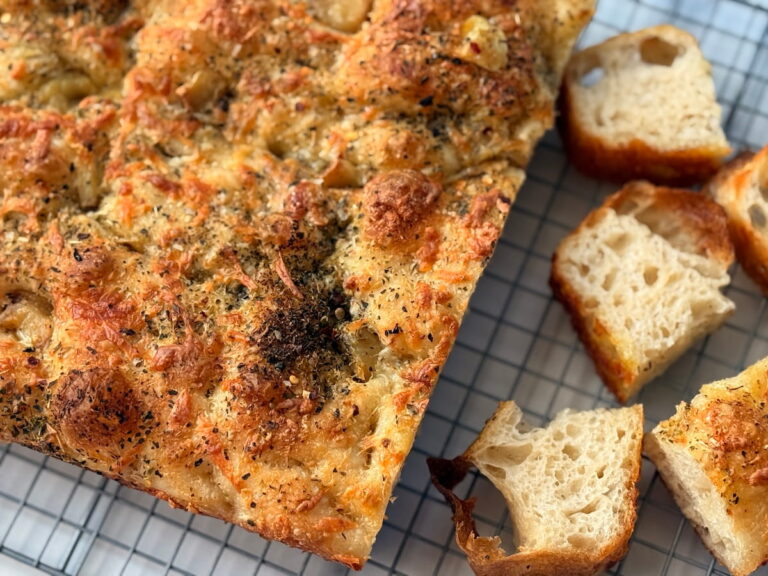
Storage and Reheating
Best on day 1: Focaccia is at its absolute peak the day it’s baked — crispy on the outside and pillowy in the middle. Day 2 is still great, and day 3 is fine.
Room temperature: Store in a bread bag or an airtight container for 2–3 days.
Freezer (recommended for longer storage): Let the focaccia cool completely, then slice and freeze in a sealed bag.
Reheating: Warm slices in a toaster or a 300°F (150°C) oven for 5–7 minutes, until warmed through and crisp again. It comes back beautifully.
Suggested recipe pairing: The Best Dipping Oil for Sourdough Breads
Troubleshooting Tips
FAQs
Yes, you can absolutely make this without a proofing mat or proofing box. Your oven with just the light on, or your microwave with a cup of boiling water inside, both work well. The target is around 80°F (27°C). A cooler environment just means a longer bulk fermentation, so you might not make the same-day timeline — watch the dough, not the clock.
You can use pre-shredded cheese, but freshly shredded is strongly recommended — especially for the Parmigiano-Reggiano on the bottom of the pan. Pre-shredded cheese contains anti-caking agents that can affect how it melts and crisps.
If you’d rather skip roasting a whole head of garlic, a few testers used garlic-infused olive oil and loved the result. One tester rehydrated dried garlic with a small amount of water and had good success. Neither will give you exactly the same sweetness and depth that roasting brings — but they’re solid options if you’re short on time.
The recipe calls for one large head of garlic, which yields about 35–40g after squeezing. But garlic heads vary wildly in size, and this is genuinely a “to taste” situation. One tester used 54g from two small bulbs and said she would happily have used even more. Other testers said the garlic flavor was too strong. You know yourself — if you’re a garlic person, go for it. If not, reduce the amount.
Yes, you can cold proof this dough overnight instead of baking it the same day. After bulk fermentation, cover your bowl and refrigerate the dough overnight. The next day, remove it from the fridge to let it warm up for 1–2 hours before continuing. The flavor will be more complex, and it may be easier to digest for some people.
Yes, the cheese in this recipe is very customizable, but keep the two cheese roles in mind. Romano and Grana Padano can work in place of the Parmigiano-Reggiano, but for the top layer, stick with a good melting cheese like provolone, fontina, or Gruyère in place of the mozzarella.
Absolutely — this focaccia works beautifully as more than just a side. Several testers used it as a base for sandwiches or as a pizza-style bread with toppings. It pairs especially well with marinara or vodka sauce for dipping, and it’s a natural alongside any Italian-style dinner.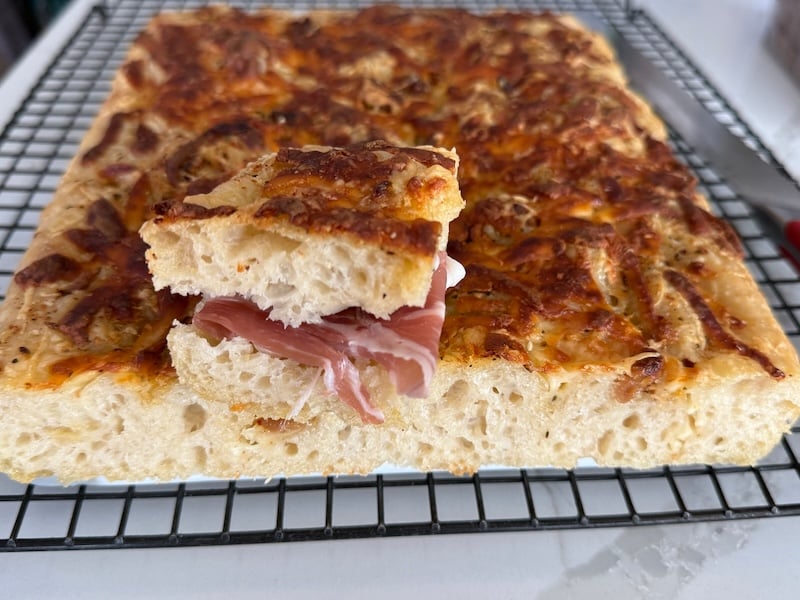
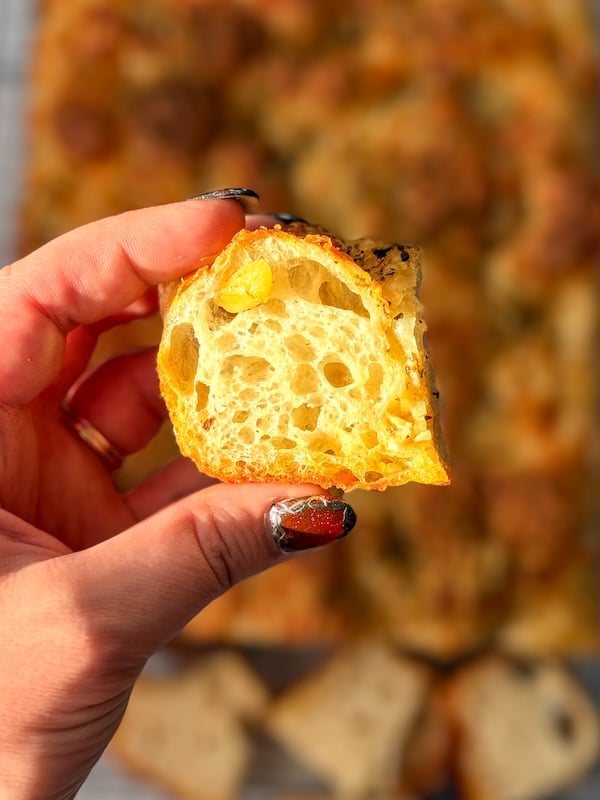
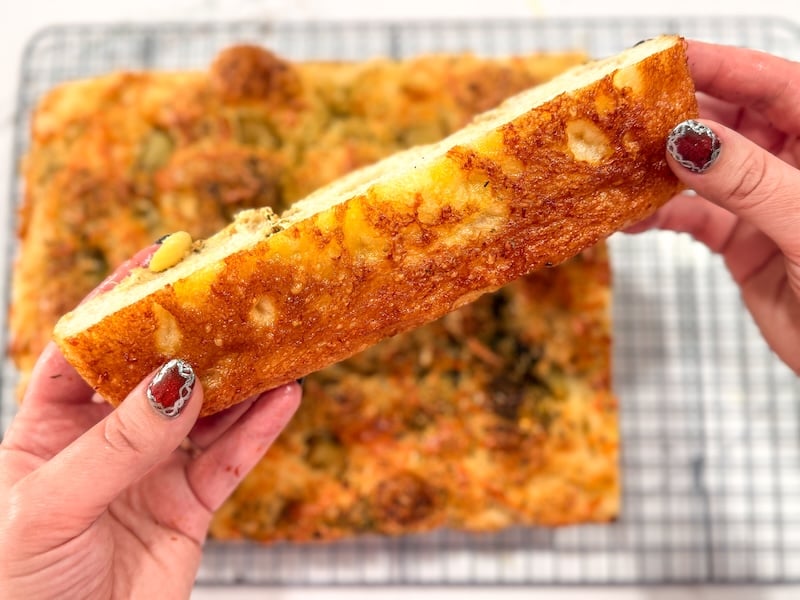
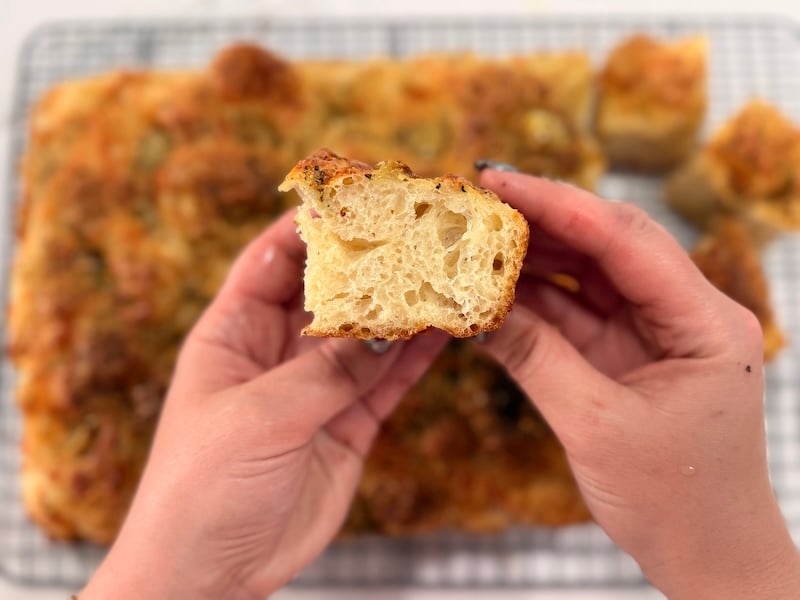
Photo submission from recipe tester
“I love the pillowy texture of the high hydration dough. It was so fluffy! It was like eating a cheesy garlic cloud!” — PA

Roasted Garlic and Cheese Sourdough Focaccia
Equipment
- Warming mat or proofing box or DIY option — see Recipe Notes
- Bowl cover 15% off with code THATSOURDOUGHGAL
- Lloyd Pans 10×14" Detroit-Style Pizza Pan or a 9×13" USA Pan or a 12" cast iron skillet — see Recipe Notes
Ingredients
Feed Your Starter
- 20 g sourdough starter
- 100 g water
- 100 g bread flour
Main Dough
- 390 g warm water
- 200 g active sourdough starter that you made from above
- 15 g melted butter or olive oil, avocado oil
- 15 g sugar
- 500 g bread flour
- 10 g salt
Roasted Garlic
- 1 large head of garlic See Notes for quantity
- 2 tsp olive oil
- pinch of salt and pepper
Prep the Pan
- 45 g olive oil or melted butter; lower to 10g if using USA Pan; lower to 20g for glass or ceramic
- 10 g freshly shredded Parmigiano-Reggiano
Dimple In
- 30 g olive oil or melted butter
- 30 g freshly shredded Parmigiano-Reggiano
- 1 tbsp seasoning of choice such as Dan-O's cheesoning, King Arthur pizza seasoning, or Italian seasoning blend
- 170 g low-moisture mozzarella cheese
Before You Begin

Instructions
- Roast the garlic (at any time): Preheat oven to 350°F (175°C). Slice the top off of 1 large head of garlic to expose the cloves. Set it cut side up on a sheet of aluminum foil. Drizzle with 2 tsp olive oil and a pinch of salt and pepper. Place directly on the oven rack and bake for about 1 hour. Let cool completely before unwrapping the foil. Note: I typically roast a few heads of garlic at once and store the extras in the fridge!

- Feed your starter: This recipe uses 200 g of active sourdough starter. Before bed, in a 3/4 L Weck jar (or similar-sized glass jar), mix together 20 g sourdough starter and 100 g water. Then, mix in 100 g bread flour until smooth. Loosely cover and let ferment on the counter overnight [10–12 hours at 68–75°F (20–24°C)].

- Mix the dough: In the morning, in a large mixing bowl, combine 390 g warm water, 200 g active sourdough starter (you should have 20 g remaining), 15 g melted butter, and 15 g sugar. Add the 500 g bread flour and 10 g salt. Mix until no dry flour remains, using a Danish dough whisk or a wet bowl scraper. (Note: Bulk fermentation starts as soon as the ingredients are mixed.)
- Put in a warm spot: Cover the bowl and place it in a warm spot, ideally around 80°F (27°C). A proofing box or proofing mat works well, but your oven with the light on or your microwave with a cup of boiling water inside will also work. Let the dough rest for 30–40 minutes..
- Stretch and folds (beginning 30–40 minutes after mixing and repeating every 30–45 minutes for a total of 3 rounds): Using a wet bowl scraper, lift and fold the dough over itself from four points around the bowl, rotating as you go. Wetting your bowl scraper after each fold makes this much less messy than using your hands! Cover the bowl and let the dough rest between rounds.
- Coil folds (beginning 30–40 minutes after the last stretch and fold and repeating every 30 minutes for a total of 4 rounds): With wet hands (seriously — dunk them in water), slide your hands under the center of the dough, lift it up, and let the ends fold under themselves. Rotate the bowl 90° and repeat, wetting your hands often. Cover the bowl and let the dough rest between rounds.You don't have to do this many rounds of coil folds, but wet dough benefits greatly from handling throughout bulk fermentation.
- Finish bulk fermentation: Bulk fermentation began when we first mixed our dough — we're ready to transfer it to our pan when it has approximately doubled in size and is covered with bubbles. It'll feel bouncy and airy. For me, bulk fermentation took a total of 6.5 hours at about 79°F (26°C), but timing can vary, so pay more attention to visual cues.
- Optional — overnight cold proof: You can put your dough in the fridge until tomorrow. The focaccia will develop a more sour, complex flavor profile and may be easier to digest for those sensitive to gluten. When you're ready, remove the bowl from the fridge, let the dough warm up slightly for 1–2 hours, then continue with the next step.
- Prepare your baking pan: The amount of oil we add depends on your pan type. If using the Lloyd Pan or a cast iron skillet, coat bottom and sides of pan with 45 g olive oil. If using a USA Pan, use just 10 g olive oil. For glass or ceramic (not recommended), spray with nonstick spray or coat with softened butter, line with parchment, and add 20 g olive oil on top of the parchment.
- Then, add 10 g freshly shredded Parmigiano-Reggiano on top of the oil.
- Transfer dough to pan: With oiled hands, pick up your dough and place it smooth-side up on top of the cheese. Do not dimple yet – that's in the next step!
- Gently stretch the dough to fill the pan. If it springs back, leave it uncovered and let it rest for 10–15 minutes, then gently stretch it again. Cover the pan and return it to your warm spot for the final proof.
- Pre-bake prep and preheat: Approximately 2–3 hours after transferring to the pan, or once the dough looks super puffy and roughly 50% larger, drizzle 30 g olive oil evenly over the surface. Then, top with 1 tbsp seasoning of choice, 170 g low-moisture mozzarella cheese, and 30 g freshly shredded Parmigiano-Reggiano. If your seasoning of choice does not contain salt, I suggest you sprinkle about 1/2 tsp salt over the dough.Squeeze out your roasted garlic cloves and place them evenly across the dough's surface. Dimple the entire surface deeply with your fingers, pressing all the way down to the bottom of the pan. Move your oven rack to the lower third of the oven and preheat to 500°F (260°C) conventional. Note: if using a glass dish, preheat to 425°F (220°C).
- Bake: Once the oven is fully preheated, place the focaccia on the lower oven rack. Immediately reduce the oven temperature to 450°F (232°C). If using glass, skip the temperature reduction and bake at 425°F throughout; the bake time may be slightly longer. Bake for 20–30 minutes, rotating the pan halfway through and keeping an eye on it around the 20-minute mark. Pull it when the top is a deep golden brown and the interior temperature is 205–210°F (96–99°C).

- Cool: Let the focaccia cool in the pan for 5 minutes, then transfer to a cooling rack. Allow to cool for at least 1 hour before slicing — this helps the interior finish setting and gives you cleaner slices.
- Serving and storage: Slice with a bread knife and serve warm or at room temperature. It pairs beautifully with marinara or vodka sauce for dipping. Store leftovers at room temperature in an airtight container for up to 2–3 days, or slice and freeze for up to 3 months. It reheats beautifully.


Notes
Other great options include:
- Ballerina Farm high protein farm flour (14%)
- King Arthur bread flour (12.7%)
- Bob’s Red Mill bread flour (12.5–13.5%)
- Cozy Bread Original Proofing Mat — Use code THATSOURDOUGHGAL for 10% off
- Brod & Taylor Folding Proofer
- Giyudot Folding Bread Proofing Box
- DIY — Your oven with the light on
- DIY — Your microwave with a cup of boiling water inside
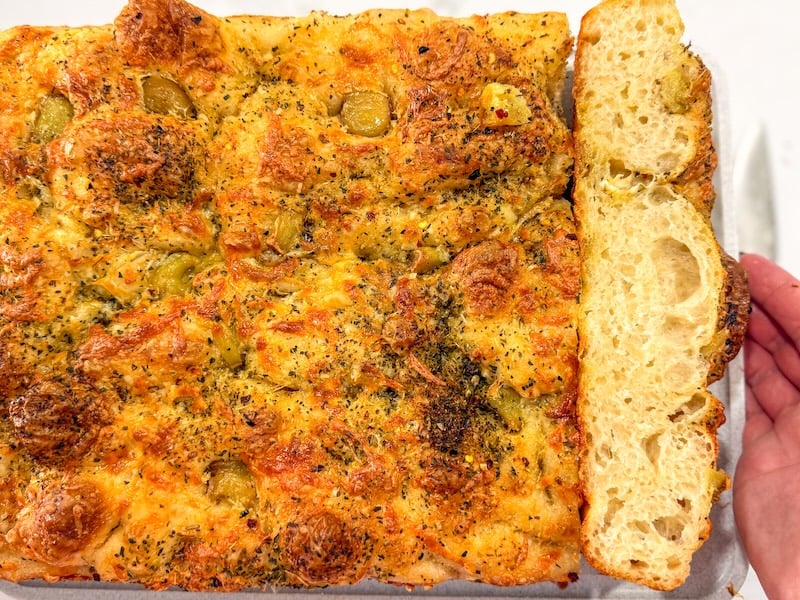
“An incredible focaccia — crispy outside, soft, fluffy, airy crumb, with pockets of roasted garlic and gooey cheese.” –Recipe tester from Innisfail, Alberta, Canada
Conclusion
This same-day sourdough focaccia is basically my dream recipe. The dough is so fun to work with, and the savory flavor combos are right up my alley. I love how versatile it is – you can really play around with the cheeses and seasonings to switch things up.
“An amazing addition to any dinner, the guests will be wowed and may never get to the main course!” –Recipe tester from Connecticut
If you make this one, I want to see it. Drop a photo in the comments below or tag me on Instagram @thatsourdoughgal.
Other focaccia and savory sourdough recipes you might love:


I made this bread and it was amazing!!! I have been requested to make it into a detroit style pizza. Should I pre or par bake the dough and then put the cheeses, sauce and toppings on and then finish the bake. Or should I put the cheeses, sauce and toppings on and then bake it? Thanks!
I actually have a detroit-style pizza recipe! https://thatsourdoughgal.com/detroit-style-sourdough-pizza-recipe/
Why is there so much difference in the amount of starter for the Focaccia vs the Detroit style pizza?
Fermentation timeline! For the overnight recipe, I use less starter so the dough can withstand a longer rise.
If I want to make the dough ahead of time and put it in the fridge the night before and bake it the next day should I pull it out of the fridge for a few hours to let it warm up or just bake it straight from the fridge?
If you feel the dough needs more rise time, let it come to room temperature and continue rising. But if it is fully proofed, there is no need to let it come to room temp.
Hi Rebekah!
I just made this focaccia today and loved it! I had to put it to the fridge last night as it was getting too late, and baked it this morning. The dough is very pleasant to work with. I love doing coil folds.
I couldn’t decide what spices to use so I sprinkled all three that you suggested next to each other in the row 🙈😂. I also didn’t have mozzarella and Parmesano Reggiano, so I used what I had in the fridge, Suluguni (like salted mozzarella) and Gruyère cheeses.
The most important thing for me is the dough, and it turned out great!
Thank you so much for your recipes! I’m your devoted tester 😁👏👏👏🌹🌹🌹
Yay, so glad you enjoyed it!
I made this and the family loved it. My teenage son said it was one of the best things I have made. He loved using it to make a sandwich. I just made a second focaccia and used fresh rosemary as the seasoning. Still too hot to cut, but it looks and smells amazing. I am kind of obsessed with the silky puffiness of the dough.
Love it!!