
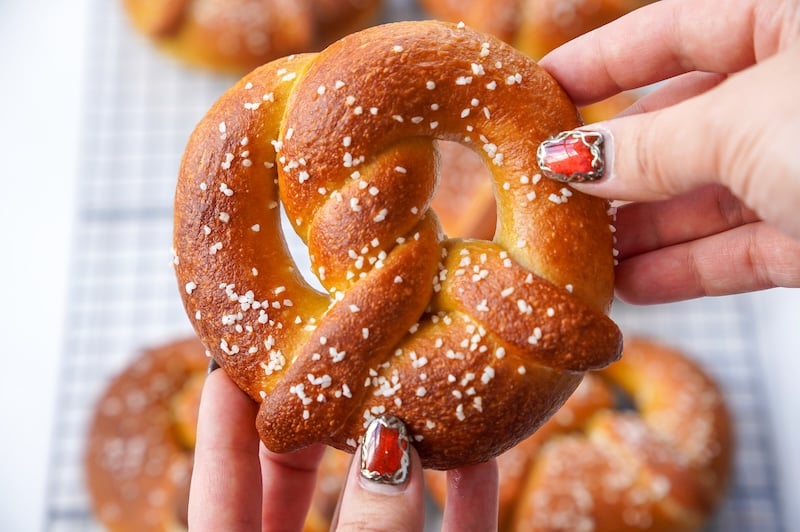
The Best Soft Sourdough Pretzel Recipe (Tested by 595 Bakers)
I have never been more confident about a recipe on my site — these soft sourdough pretzels are insanely good! 595 recipe testers gave these an average rating of 4.72 out of 5, so believe me when I say you will LOVE these pretzels!
“Think of the best soft pretzel you ever had, and multiply that by 100.” –Recipe tester from Cleveland, Ohio
My dad always kept a box of frozen pretzels that we’d occasionally get out and pop in the toaster oven — these remind me of that, but the sourdough flavor is out of this world.
I walk you through every step, and you don’t need lye to get a super dark crust — just the right ratio of baking soda to water when you boil them. Let’s go!
Disclaimer: Some of the products I recommend in this post are affiliate links — if you choose to purchase after clicking one of my links, I may earn a small commission, which helps fund this website, recipe development, and monthly giveaways. I sincerely appreciate your support.
Why You’ll Love These Soft Sourdough Pretzels
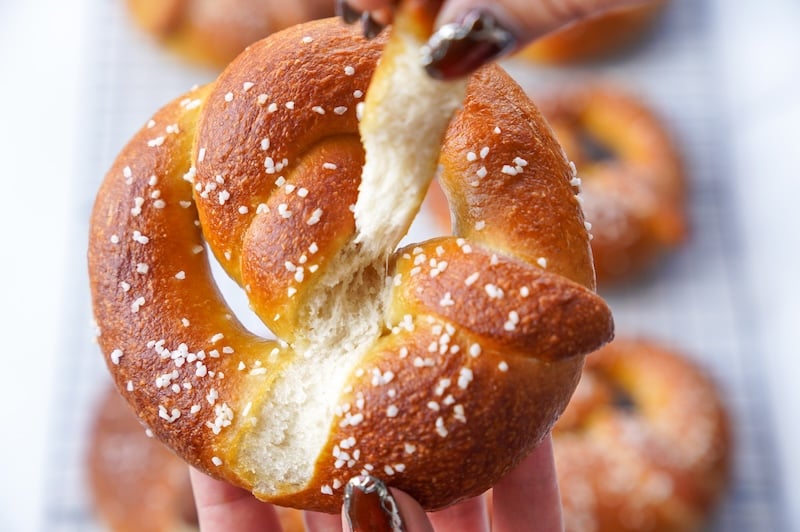
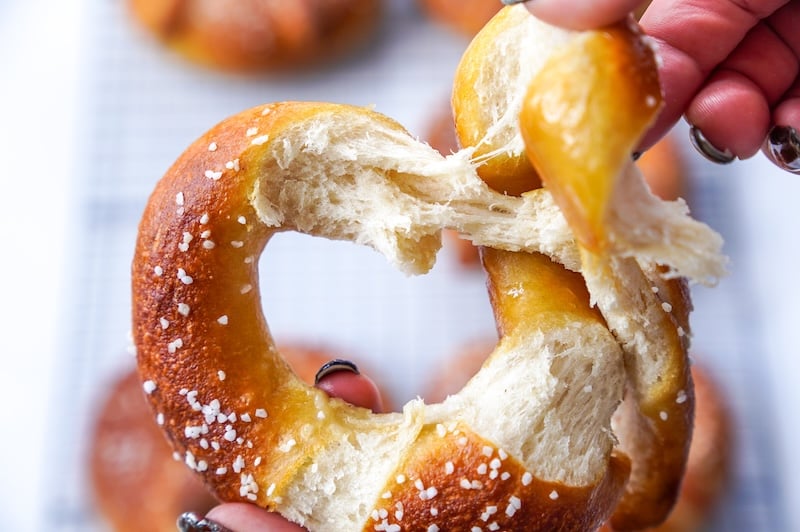
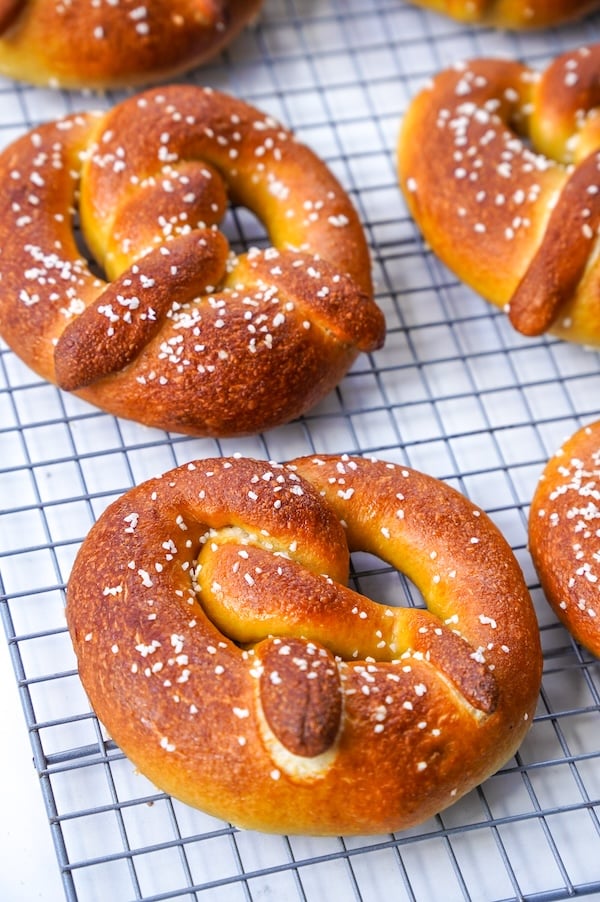
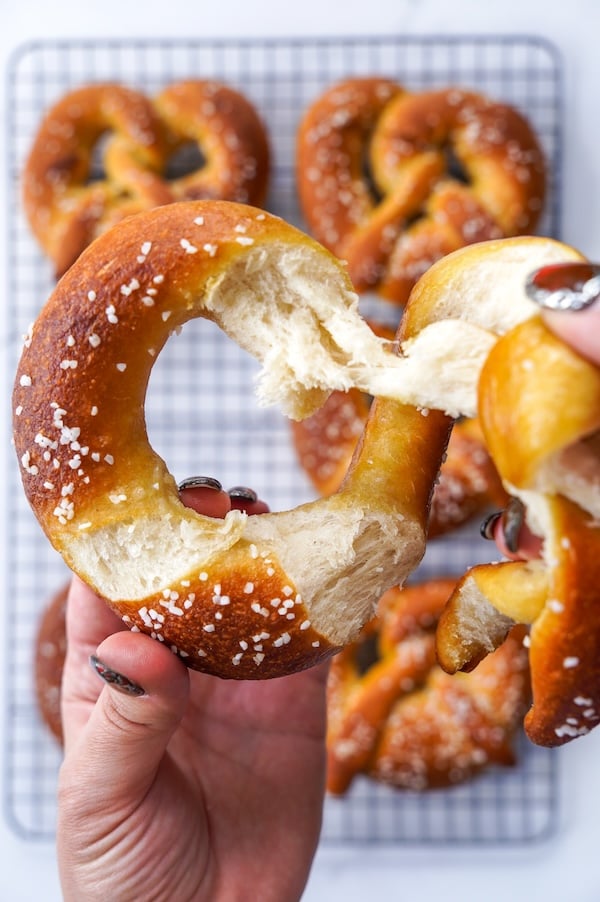
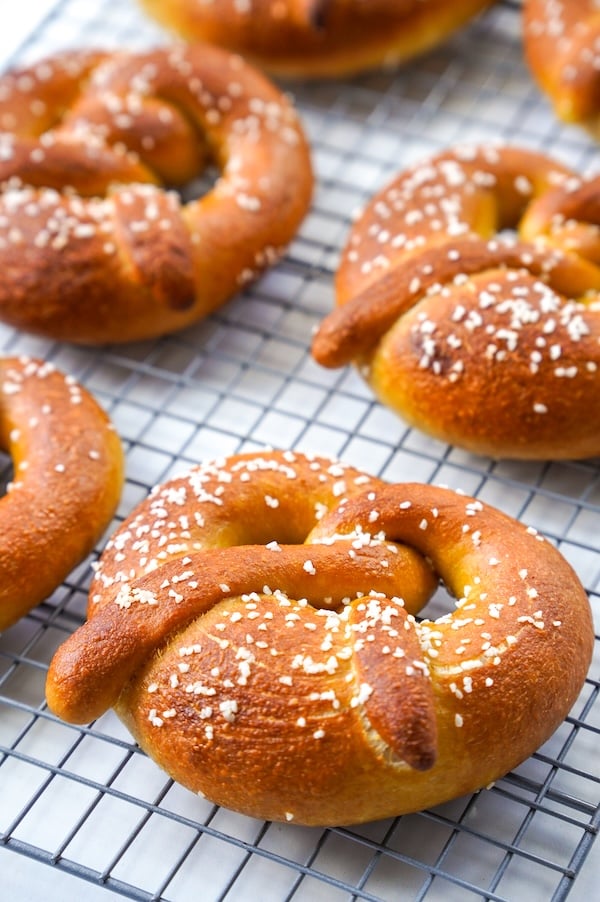
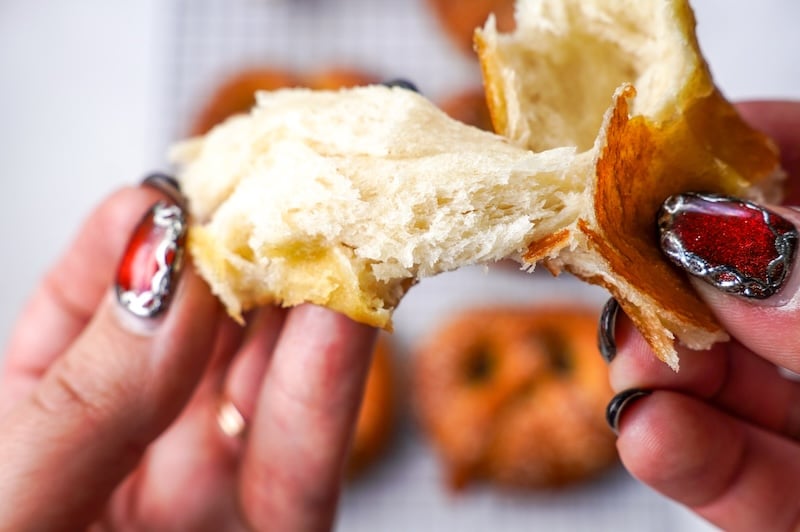
- Soft and squishy inside, dark and crisp outside: That classic contrast — the one you get at a ballpark or from a mall pretzel stand — is exactly what these deliver. No lye required. Just baking soda.
- Overnight, mostly hands-off: Mix the dough before bed, let it bulk ferment while you sleep, and wake up to dough that’s ready to shape. Most of your time is waiting — not working.
- No-lye boiling bath: A baking soda bath gives you that authentic pretzel exterior and deep mahogany color without needing to handle lye. Make sure to measure your water, because the ratio of baking soda to water is critical here!
“Without the fuss of a lye dip, you got the perfect dark mahogany colour.” –Recipe tester from Vancouver, Canada

- The malt powder secret: Non-diastatic malt powder is optional, but 89% of testers who used it said it made a noticeable improvement. It’s the ingredient that keeps these soft for up to 5 days and enhances both flavor and browning.
- Beginner-friendly: Half of the testers rated this as beginner-level difficulty. The dough is firm and smooth — like bagel dough — which actually makes it easier to handle than a sticky, high-hydration bread dough.
“Don’t be scared to make pretzels!” –Recipe tester from Idaho
“Do not be scared of the shaping process because this dough is perfect, easy to handle, and very forgiving.” –Recipe tester from Columbus, Ohio
- Tested by 595 home bakers: An average rating of 4.72 out of 5 with 96% four-and-five-star reviews. I’ll leave it at that!
“Disney has nothing on these pretzels! Super soft on the inside!” –Recipe tester from Glendale, Arizona
The Recipe Testing Journey
I was very fortunate that, for once, the recipe testing journey here was simple and easy. Praise the Lord!
I adapted my winning bagel recipe by adding butter to the dough, changing the boiling process, shaping them like pretzels, and adding pretzel salt on top.
To truly get that pretzel-y flavor, you need quite a bit of baking soda in the boiling water. Make sure to measure the water — testers who didn’t ended up with pretzels that tasted more like bagels (which makes sense!).
I also spent some time fine-tuning the pretzel shaping process. The first one is always a learning curve — by the third or fourth, you’ll have the hang of it.
Meet the Recipe Testers
This recipe was tested by 595 bakers on 5 continents — North America, Europe, Africa, Asia, and Australia/Oceania. I’m blown away that people all over the world volunteer their time and ingredients to help perfect my recipes!
Here’s how they rated it:
- Average rating: 4.72 out of 5
- Would make again: 90.9%
- Would recommend to a friend (5/5): 86%
Here’s a collection of photo submissions from some of the testers:
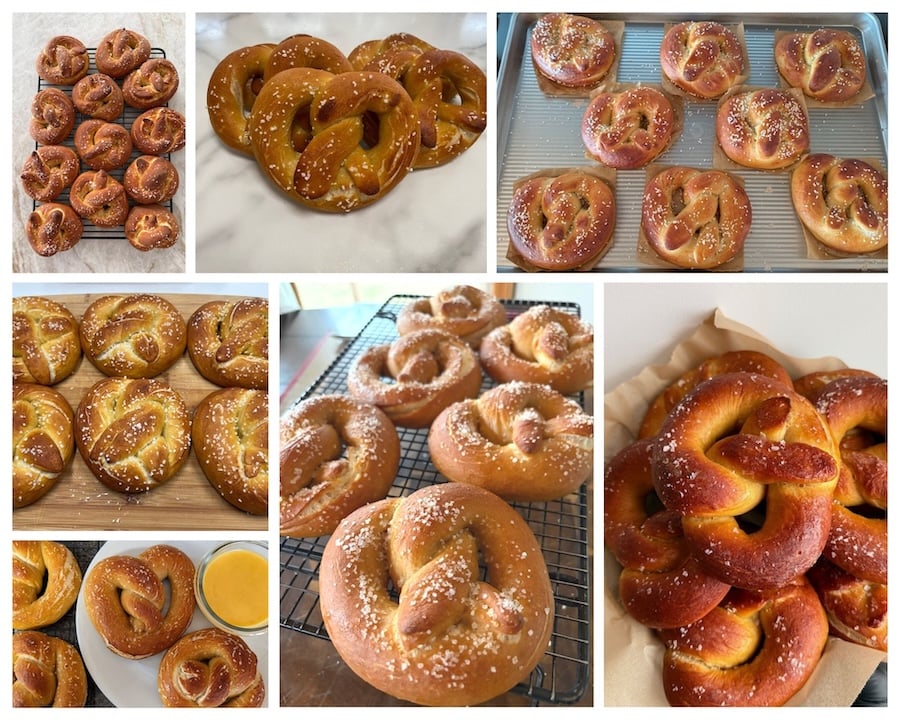
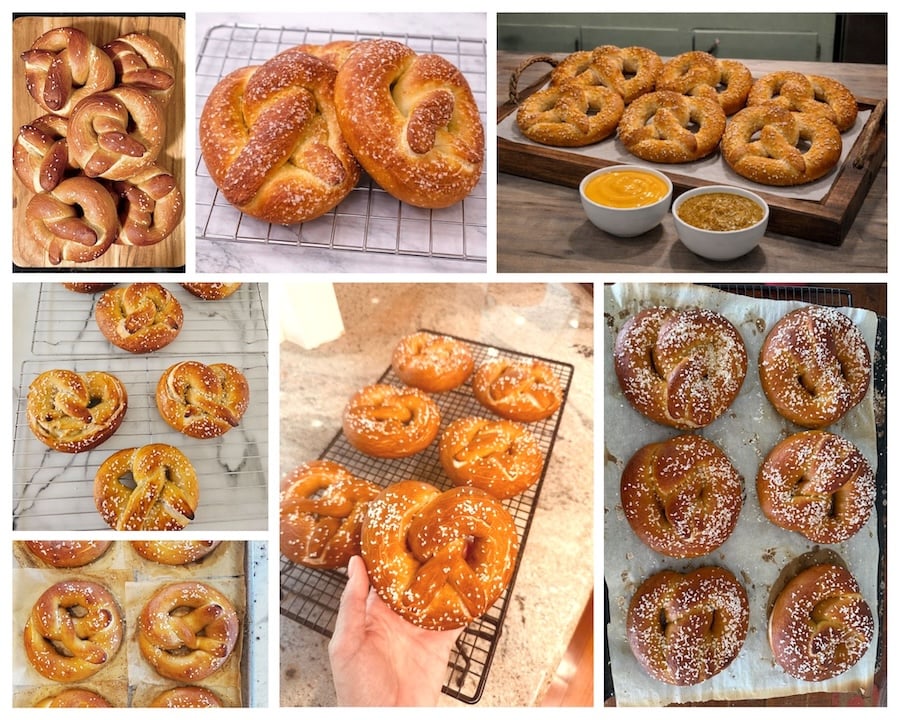
Testers used more than 70 different flours — from King Arthur and Ballerina Farm to locally milled grains in Uganda and Australia. Most mixed by stand mixer (87%) and others by hand (13%). They did cold proofs, skipped cold proofs, added extra water, and made pretzel bites.
Speaking of which, I’ve published a pretzel bite version of this recipe here: Easy, Soft Sourdough Pretzel Bites (No Lye Needed)
One person rolled hers into pretzel buns for sandwiches. Another used everything-but-the-bagel seasoning. Someone in Kitchener, Ontario made mini pretzel loaves.
In other words: this recipe was put through its paces.
“First time making pretzels? No problem… slightly crisp on the outside, soft and fluffy on the inside. This recipe is easy and beginner friendly!” –Recipe tester from Vacaville, California
What 595 Bakers Learned
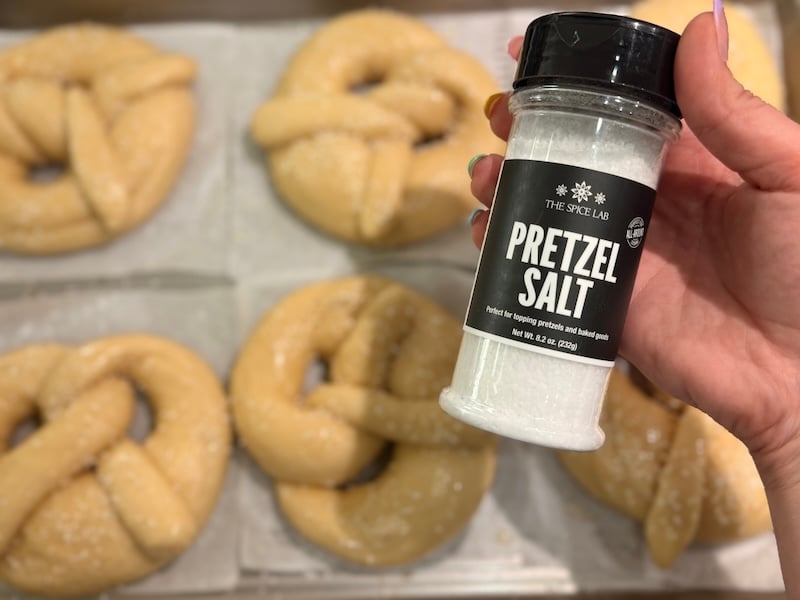
Pretzel Salt and Malt Powder
- Pretzel salt is worth buying. 59% of testers bought pretzel salt, and 93% of them said it was worth the purchase. That said, flaky sea salt works in a pinch — several testers used it and said it was fine.
- Malt powder really does matter — but substitutions work. Of the 595 testers, about a third had the non-diastatic malt powder on hand. Another 21% successfully used toasted diastatic malt powder as a substitute [toasting it at 325°F (160°C) for 5 minutes deactivates the enzymes]. 89% of the testers who used it said it made a real difference.
- Don’t have malt powder? 28% of testers skipped the malt powder entirely and were still happy with their pretzels — they just noted the pretzels didn’t stay soft as long.
The Dough is Supposed to Feel Firm
- The dough may look intimidating — it isn’t. Lots of testers mentioned the dough felt stiffer than they expected — which is exactly right. This dough is meant to be firm, like bagel or pasta dough. Several testers who initially thought something had gone wrong found it “rolled out beautifully” once they trusted the process.
“The dough was a dream to mix and work with.” –Recipe tester from Hinesville, Georgia
- Shaping gets easier as you go. About 19% of testers found shaping “somewhat tricky” — but they also noted getting better with each pretzel.
“Shaping is tricky, but you’ll be better by the 6th one.” –Recipe tester from Chippewa Falls, Wisconsin
- The boiling step is easier than it sounds. This was a common concern going in, and a non-issue coming out. Nearly every tester who mentioned the boil said it went smoothly — just don’t add the baking soda to already-boiling water (we’ll cover this in the instructions).
- You can get creative with the pretzel format and flavor. This dough is versatile — testers made pretzel bites (get that recipe here), pretzel buns, mini loaves, and cinnamon-sugar versions! They dipped them in beer cheese, mustard, jalapeño mustard, and warm cheese sauce.
“These are better than any pretzel you could get at the mall!” –Recipe tester from Huntsville, Alabama
Baker’s Timeline
These times are flexible. The bulk fermentation is forgiving, and the cold proof is optional.
| Day 1, Morning | Feed your starter. Let ferment 10–12 hours at 68–75°F (20–24°C). |
| Day 1, Before Bed | Mix the dough. Bulk ferment overnight, 8–12 hours at 68–75°F (20–24°C). |
| Day 2, Morning | Divide and shape pretzels. Second proof: 3–6 hours at 68–75°F (20–24°C) until ~50% larger. |
| Day 2, Afternoon/Evening | Boil and bake. |
Optional cold proof: After shaping, refrigerate for 12–36 hours before boiling. This deepens the flavor and may make them easier on the gut. Just make sure they’re fully proofed (puffed up) before you boil them.
Note: One tester worked around her schedule beautifully: she fed her starter before bed, mixed the dough first thing in the morning, shaped in the early evening, cold proofed overnight, and baked the next morning. The timeline bends to you — not the other way around.
Equipment You’ll Need
- Kitchen scale: Essential for accurate measurements.
- Stand mixer with the dough hook: Because this dough is stiff, a stand mixer makes the kneading much easier. I highly recommend the Zacme stand mixer — you can read my full review of it here. You can also knead by hand — instructions are in the recipe card — just plan for 10–12 minutes of solid work.
- Large mixing bowl: For bulk fermentation. You can also just use your stand mixer bowl if you prefer. Also, I absolutely love the 10.5″ Doe a Deer bowl covers — code THATSOURDOUGHGAL for 15% off.
- Individual parchment squares: Each shaped pretzel gets its own small square of parchment, which you use to lower it into the boiling water. You can cut them yourself, order some online, or find them at Dollar Tree.
- Half sheet tray: For baking.
- 4-quart saucepan: The baking soda solution needs to be concentrated to give your pretzels that deep color and characteristic flavor. A larger pot dilutes it too much — stick with a 4-quart rather than whatever’s biggest in your cabinet.
- Large slotted spoon: For retrieving pretzels from the boiling water and letting excess drip off before they hit the sheet tray.
Soft Sourdough Pretzel Ingredients
Pretzel Dough
- Sourdough starter: The first step of this recipe explains how to feed your starter so it’s active and ready to use. Don’t use discard straight from the back of the fridge on this one.
- Water: Room temperature tap water works great. If you’re in a city and notice your starter is sluggish, chlorinated water could be a factor — filtered or spring water is an easy fix.
- Sugar: Just a touch — adds a hint of sweetness and helps with browning.
- Unsalted butter: Softened or melted and cooled. This goes into the dough itself, plus a tablespoon gets brushed on after boiling. For the record: buttery dough is the best smell on the planet.
- High-protein bread flour: The higher protein content gives pretzels their signature chew. I tested this recipe with Central Milling High Mountain (13.5% protein) and King Arthur unbleached bread flour (12.7% protein). Both work great. See the Substitutions section if you’re using a lower-protein flour like Kirkland all-purpose.
- Non-diastatic malt powder: Optional, but recommended. This ingredient keeps pretzels (and bagels!) squishy for up to 5 days. See Ingredient Substitutions for info on using diastatic malt powder. You can omit this ingredient, but your pretzels will go stale faster.
Other recipes that use non-diastatic malt powder include my original sourdough bagel recipe and a blueberry bagel variation. - Sea salt: I use Redmond’s Real Salt (15% off with code TSG15), but any salt will work.
Baking Soda Bath
- Baking soda: This is what gives the pretzels their characteristic flavor, color, and chewy exterior. Add it to the water before heating — adding it to already-boiling water causes it to foam up and overflow. (Ask me how I know.)
Topping
- Unsalted butter (melted): Brushed on right after boiling, before baking. It adds flavor and helps the salt adhere.
- Pretzel salt: Optional, but 93% of testers who bought it said it was worth it. The coarser texture holds up better on the pretzel surface than table salt or flaky sea salt.
Ingredient Substitutions
- Bread flour alternatives: If you’re using a lower-protein flour like Kirkland all-purpose (around 11.5% protein), add 1 tablespoon of vital wheat gluten to help it perform more like a bread flour, or reduce the water by about 10–15g. Testers used a wide range of flours — King Arthur (the most popular by far), Kirkland, Bob’s Red Mill, Ballerina Farm, Lehi Mills, and more — with great results across the board.
- Diastatic malt powder: If non-diastatic malt powder is out of stock, you can toast diastatic malt powder at 325°F (160°C) for 5 minutes to deactivate the enzymes before using. Multiple testers did this successfully. Do not skip the toasting step — active diastatic malt powder will speed up your fermentation significantly, which is not what you want for an overnight recipe.
- No malt powder at all: Totally fine — just know your pretzels will go stale a little faster and won’t have the same depth of flavor or browning. 28% of testers skipped it entirely and were happy.
- Salted butter: You can use it — just reduce the salt in the dough by a couple of grams.
- Pretzel salt: Flaky sea salt or coarse sea salt works, but over time, it will dissolve into the surface rather than sitting on top.
How to Make Soft Sourdough Pretzels (Step by Step)
Step 1: Feed Your Starter
In the morning, stir together 10g sourdough starter, 50g water, and 50g bread flour in a medium glass jar. Cover loosely and let ferment for 10–12 hours at 68–75°F (20–24°C).
By evening, it should be bubbly, domed, and about tripled in size.
Step 2: Mix the Dough (Before Bed)
In the bowl of a stand mixer fitted with the dough hook, combine 245g water, 95g active starter you made this morning, 10g sugar, and 25g unsalted butter. Add 510g bread flour, 15g non-diastatic malt powder (if using), and 11g salt.
Mix on low speed until no dry flour remains — about 2 minutes — then increase slightly and knead for 6–8 minutes, until you have a smooth, firm dough. Think bagel dough or Play-Doh: pliable and smooth, not tacky or sticky.
Mixing by hand? Combine all ingredients in a large bowl, then turn out onto a clean, unfloured counter and knead for 10–12 minutes. The firmness of the dough actually makes this easier than a wet, sticky bread dough.
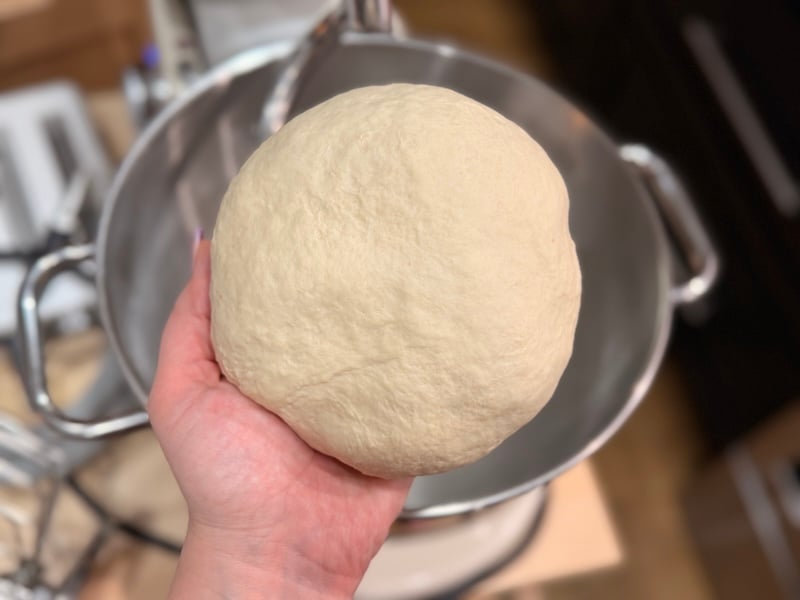
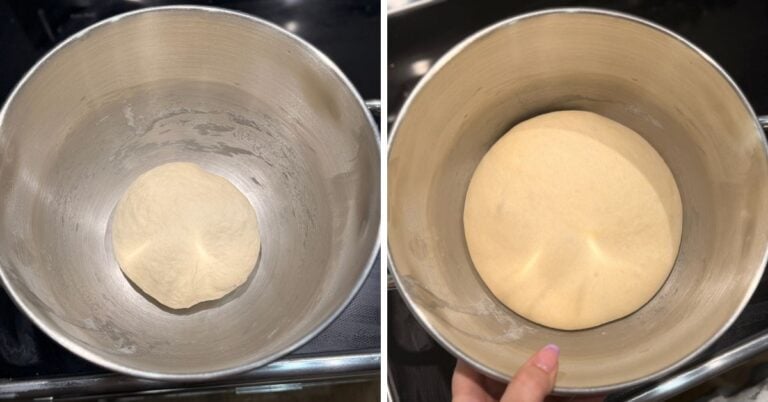
Step 3: Bulk Ferment Overnight
Transfer the dough to a large mixing bowl, cover, and let ferment on the counter overnight — 8–12 hours at 68–75°F (20–24°C). In the morning, the dough should have roughly doubled to tripled in size.

There’s flexibility here. If your kitchen runs warm, it may move faster. Cooler kitchens will take longer.
Survey data from testers showed bulk fermentation times ranging from under 8 hours to over 13 — so trust the visual cues over the clock.
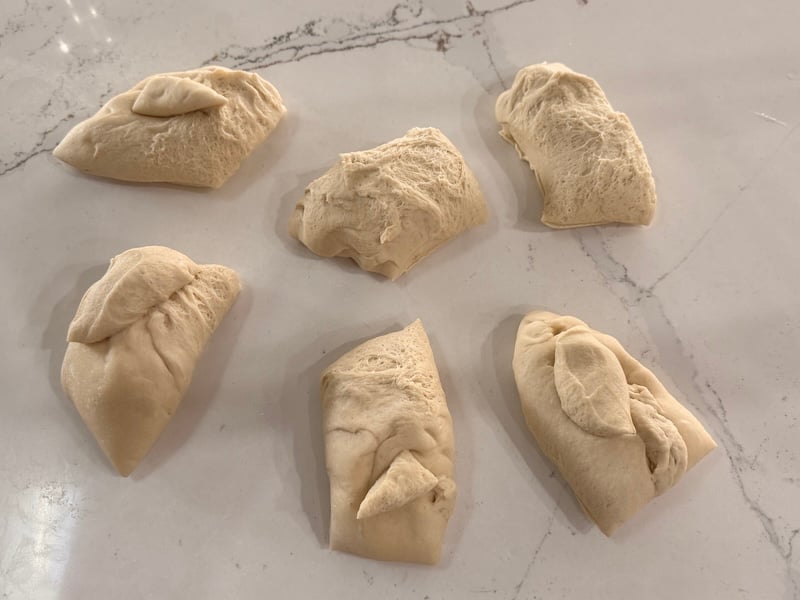
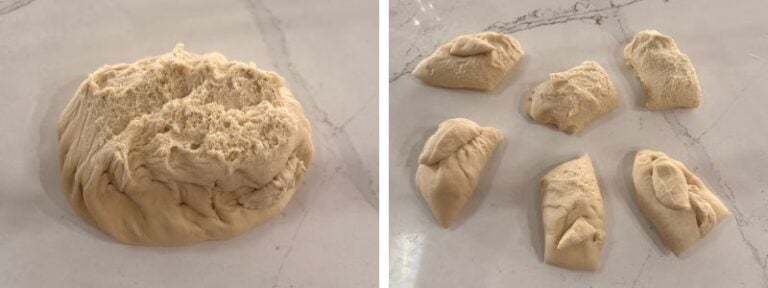
Step 4: Divide and Shape
Turn the dough out onto a clean, unfloured surface and divide into 6 equal pieces (about 150g each).
Note: This recipe yields 6 large soft pretzels, but about 32% of recipe testers felt they were too big. If you prefer a smaller pretzel, divide your dough into 8 pieces at about 100–110g each instead.
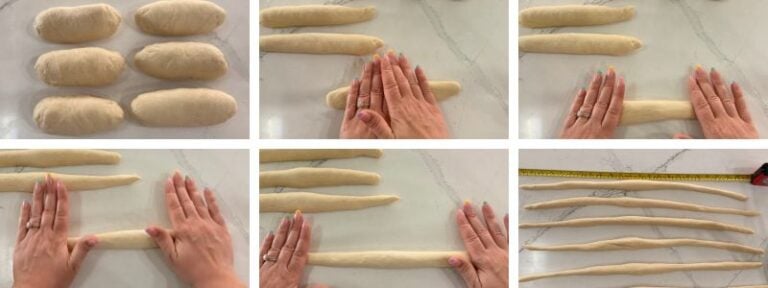
Working one piece at a time, roll each piece into a cylinder about 6 inches long and pinch the seams on each end.
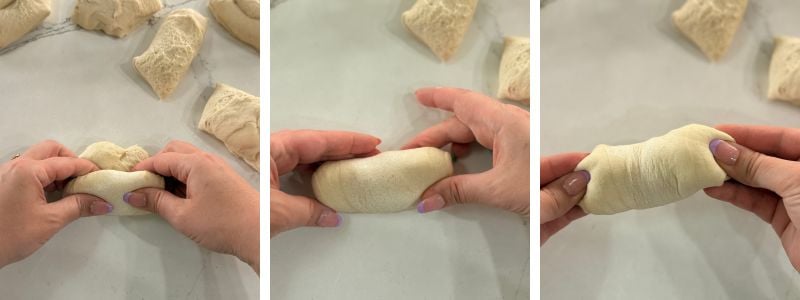
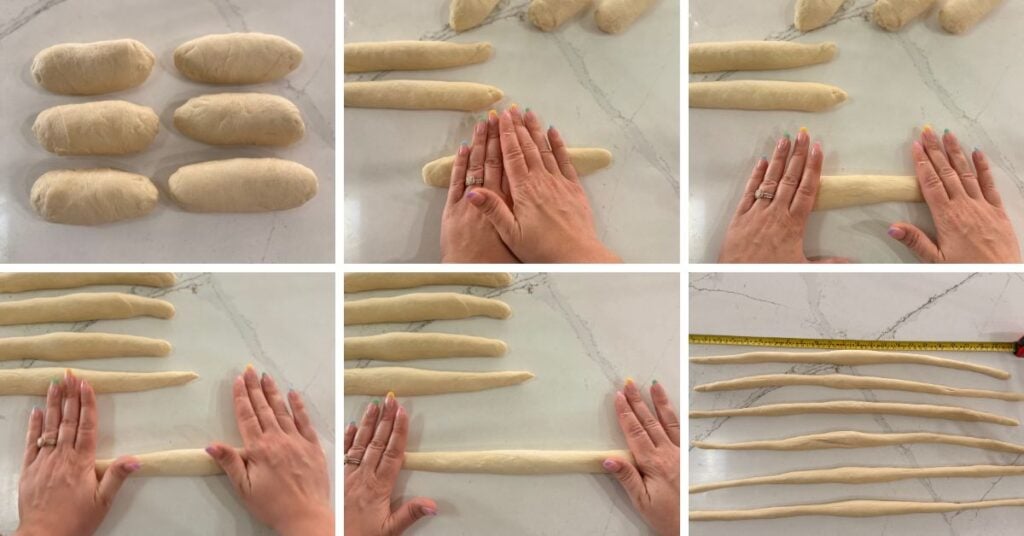
Using your palms, roll each cylinder into a rope — keeping the center slightly thicker than the ends.
Here’s the trick: Because the gluten tightens quickly, roll each rope as far as it’ll go, then set it aside and move to the next one. Rotate through all 6, rolling a little further each time, until all ropes reach about 24 inches long.
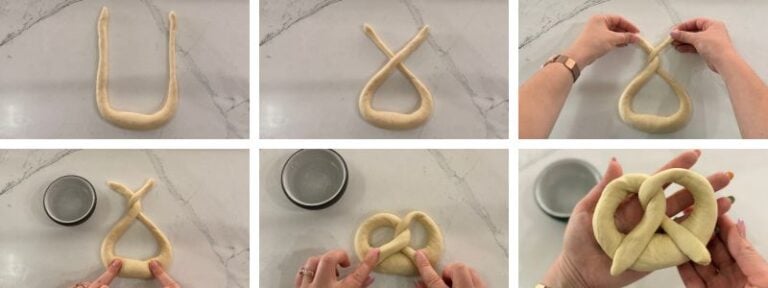
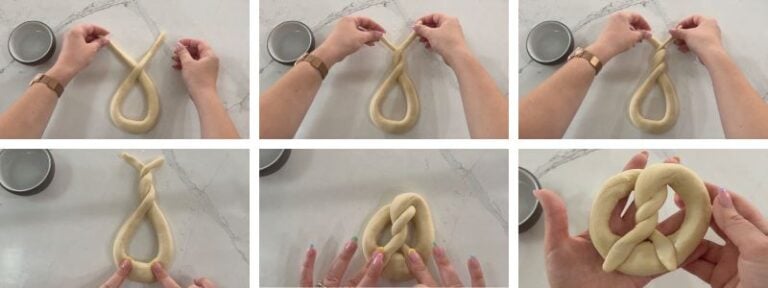
To shape the pretzel: form a U, cross the two ends over each other twice to create a twist, then fold the twisted ends down onto the bottom curve. Add a small drop of water where the dough meets the bottom curve and press firmly to seal.
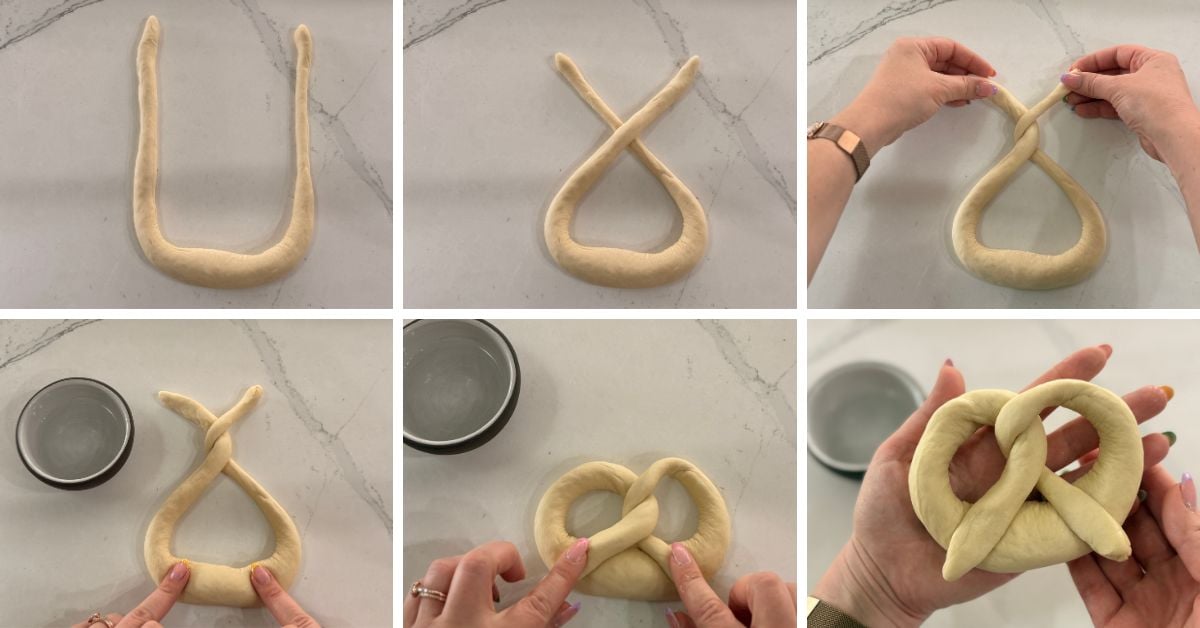
Optional extra twist: Twist the ends an extra time before folding them down for a more traditional pretzel shape.

“The hardest part is rolling out the dough — the rest is easy and SO worth it when you get to eat them!” –Recipe tester from Phoenix, Arizona
Step 5: Second Proof
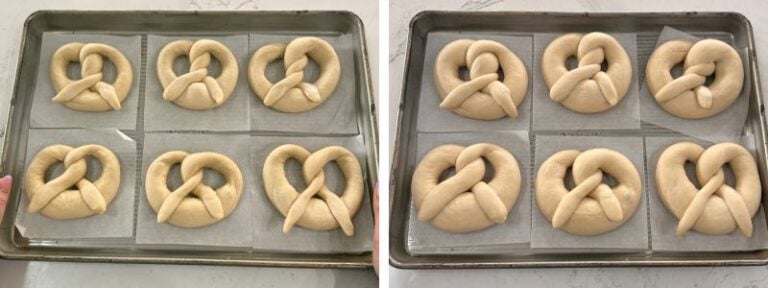
Place each shaped pretzel on its own small square of parchment paper and set on a half sheet tray. Cover loosely and let rise on the counter until the pretzels are about 50% larger and feel puffed up — about 3–6 hours.

Optional cold proof: For a deeper sourdough flavor, improved handling during boiling, and potentially better digestion, refrigerate the shaped pretzels for 12–36 hours. You can do this before or after the second proof — just make sure they’re fully puffed before you boil them.
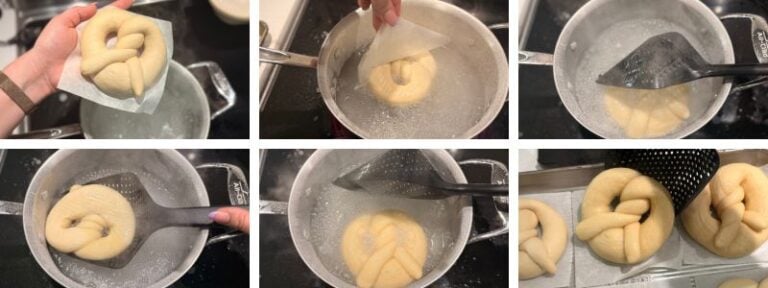
Step 6: Boil
When you’re ready to bake, position one oven rack in the center and one at the very top. Preheat to 450°F (230°C) convection or 475°F (245°C) conventional.
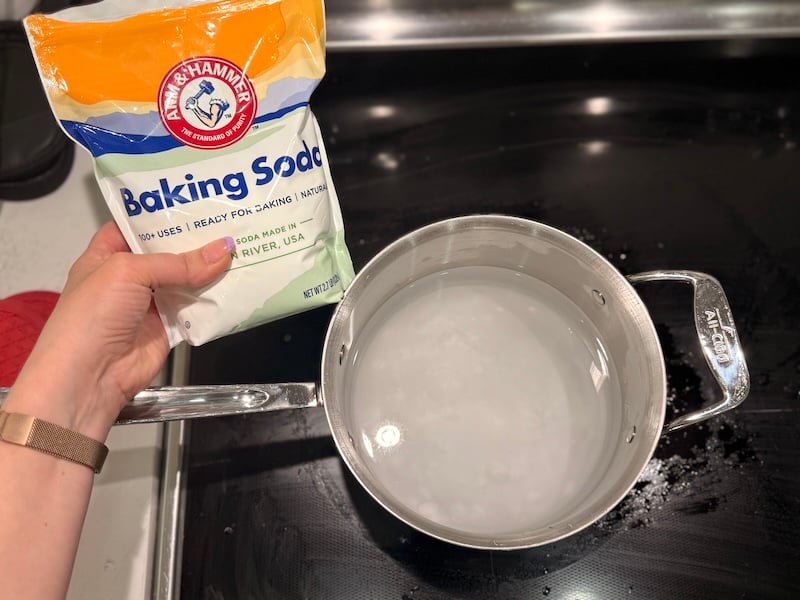
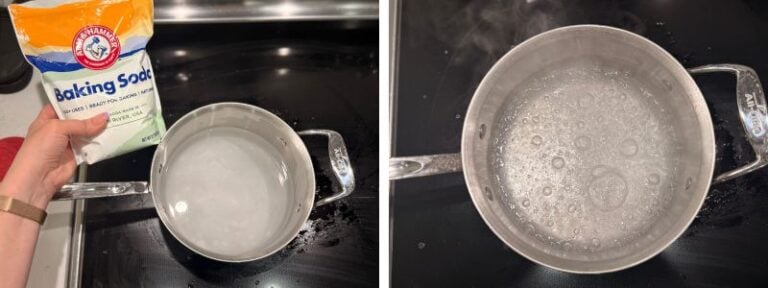
In a 4-quart saucepan, combine 6 cups water and 1/2 cup of baking soda before turning on the heat. (If you add baking soda to already-boiling water, it will foam up and overflow — add it cold.) Bring to a boil over medium-high heat.
Note: The water-to-baking soda ratio is important. Make sure to measure the water!
Working one at a time, lower each pretzel into the baking soda water using the parchment square to help transfer it — peel away the parchment once the pretzel is in the water.

Boil for 30 seconds total, flipping once at 15 seconds. Remove with a slotted spoon and hold over the pot for a few seconds to let the excess water drip off, then place on a parchment-lined sheet tray.
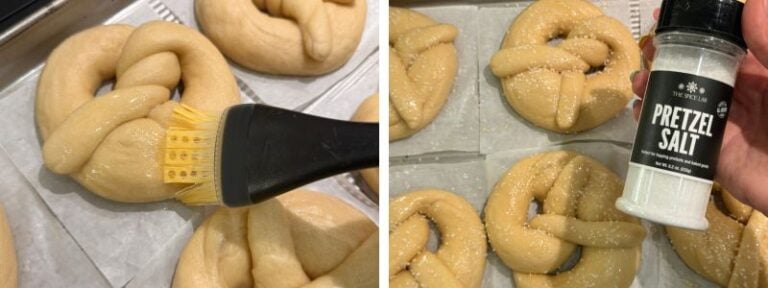
Step 7: Top and Bake
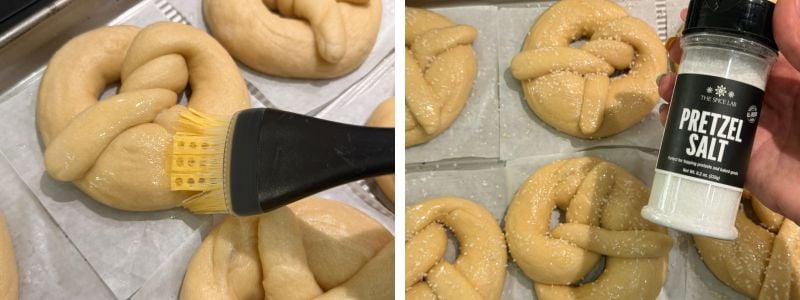
Brush all boiled pretzels with 2 tbsp melted butter, then sprinkle with pretzel salt to taste.
Heads up: pretzel salt starts to dissolve into the dough after a day or two. If you’re not eating these right away, hold off on the salt before baking and add it fresh — just spritz the pretzel with a little water first so it sticks.
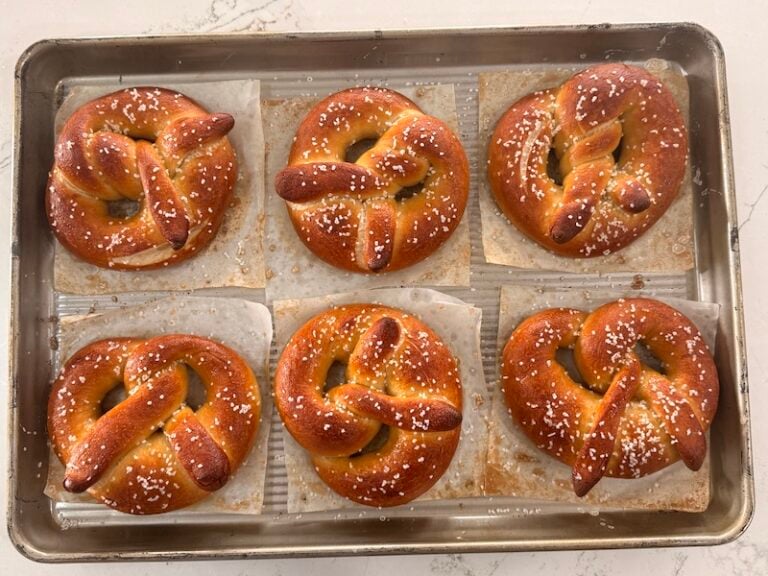
Place the sheet tray on the center rack and bake for 10–13 minutes. Move the pan to the top rack and bake an additional 1–2 minutes, or until the pretzels are a deep mahogany brown. Watch them closely during these final minutes — they can go from perfect to overdone quickly.
Total bake time: 12–15 minutes.
Serve warm, ideally within the first hour of baking.
“Worth every moment of your life to make these pretzels, they are that good!” –Recipe tester from Gilbert, Arizona
Serving Suggestions
I love soft pretzels with Herlocher’s dipping mustard. My husband’s family, from Pennsylvania, introduced me to it, and I’ve been a huge fan ever since.
I asked recipe testers what they dipped their pretzels in, and mustard dominated so heavily it’s almost funny — standard yellow, honey mustard, and stone ground were all popular.
Beer cheese and nacho cheese were the runners-up.
“Make a beer cheese sauce and make them now.” —Recipe tester from New York
Storage & Reheating
- Same day: These are best eaten warm, within the first hour of baking. Truly.
- Room temperature: Store in an airtight container for up to 5 days. The non-diastatic malt powder helps keep them soft throughout — a noticeable difference if you’re planning to make them ahead.
Heads up: pretzel salt starts to dissolve into the dough after a day or two. If you’re not eating these right away, hold off on the salt before baking and add it fresh — spritz the pretzel with a little water so it sticks, then toast for a couple of minutes.
- Freezing: Let cool completely, then wrap individually and freeze for up to 3 months. Reheat in a 350°F (175°C) oven for 5–8 minutes.
Troubleshooting Tips
FAQs
Pretzel salt gradually dissolving after a day or two of room-temperature storage is completely normal. Moisture from the pretzel slowly absorbs the salt crystals over time. It doesn’t affect the flavor, but you do lose that satisfying exterior crunch.
If you plan to store your pretzels for a day or two before eating, skip the pretzel salt before baking and add it fresh when you’re ready to eat. Lightly spritz the pretzel with water so the salt has something to stick to, then toast for a couple of minutes.
If your dough didn’t rise overnight, the most likely culprits are a cool kitchen or a starter that wasn’t fully active. Don’t panic or throw it out — just give it more time.
Several testers found their bulk fermentation took 13–15 hours instead of 8–12, and the pretzels still turned out great. If your kitchen runs cool, move the dough somewhere warmer: a proofing box, an oven with just the light on, or a warm spot on your counter.
Yes — a proofing box works very well for this recipe. Several testers used one and reported beautiful results. At 75–80°F (24–26.5°C), bulk fermentation took about 4 hours, compared to the typical 8–10 hours at room temperature. If you’re short on time or your kitchen runs cool, this is a great option.
Proofing mat and box options:
Cozy Bread Original Proofing Mat — Use code THATSOURDOUGHGAL for 10% off
Brod & Taylor Folding Proofer
Giyudot Folding Bread Proofing Box
DIY — Your oven with the light on
DIY — Your microwave with a cup of boiling water inside
Yes — pretzel bites are a fantastic use for this dough, and several testers made them, either by choice or as a creative solution when rolling long ropes felt tedious. Get the pretzel bite version of this recipe here!
I like to store my pretzels in a bread bag. These cloth bags are my favorite — use code THATSOURDOUGHGAL for 15% off — and these paper ones are another great option. To refresh a day-old pretzel, lightly spritz with water, add pretzel salt, and warm in a 350°F (175°C) oven for about 5 minutes to crisp the exterior again.
For longer storage, freezing is your best bet. Let the pretzels cool completely first, then freeze without the salt. When ready to eat, spritz lightly with water, add fresh salt, and reheat in a 350°F (175°C) oven until warm and crisp.
Yes – many testers preferred making 8 smaller pretzels instead of 6 larger ones, with each weighing about 100–110g.
“These remind me of the soft pretzels back home in Philly that we could get basically anywhere. Definitely a new staple that my whole family loves!” —Recipe tester from Las Vegas, Nevada

Soft Sourdough Pretzels
Equipment
- Stand mixer with the dough hook (or you can knead by hand)
Ingredients
Feed Your Starter
- 10 g sourdough starter healthy; ideally, fed within the last 24 hours
- 50 g water
- 50 g bread flour
Pretzel Dough
- 245 g water
- 95 g active sourdough starter that you made, from above
- 10 g sugar
- 25 g unsalted butter softened or melted and cooled
- 510 g high-protein bread flour see Recipe Notes
- 15 g non-diastatic malt powder optional
- 11 g sea salt
For Boiling
- 6 cups water
- 1/2 cup baking soda
After Boiling, Before Baking
- 2 tbsp unsalted butter melted
- pretzel salt shake on pretzels to taste
Before You Begin

Instructions
- Feed your starter: In the morning, in a medium glass jar, stir together 10 g sourdough starter and 50 g water. Mix in 50 g bread flour until smooth. Loosely cover and let ferment all day, 10–12 hours at 68–75°F (20–24°C).
- Mix the dough (before bed): In the bowl of a stand mixer fitted with the dough hook, combine 245 g water, 95 g active sourdough starter (that you made earlier), 10 g sugar, and 25 g unsalted butter (softened or melted and cooled). Add 510 g high-protein bread flour, 15 g non-diastatic malt powder, and 11 g sea salt. Mix on low speed (usually Speed 1) until no dry flour remains, about 2 minutes. Increase the speed slightly (usually Speed 2) and knead 6–8 minutes, or until smooth. The texture of this dough is just like bagel dough, which is firm and smooth yet pliable — not sticky or tacky.To mix by hand: combine all of the pretzel dough ingredients in a large bowl. Once you have a rough dough ball, turn it out onto a clean, unfloured counter and knead 10–12 minutes, or until smooth.

- Bulk ferment: Transfer dough to a large mixing bowl and cover. Let ferment on the counter overnight, 8–12 hours at 68–75°F (20–24°C). In the morning, the dough should be roughly doubled to tripled in size (there is flexibility here).

- Divide and shape: Turn dough out onto a clean, unfloured surface. Divide into 6 equal pieces, about 150 g each.

- Working one piece at a time, roll each piece into a cylinder about 6 inches long and pinch the seams on each end.
- Using your palms, roll each cylinder into a rope, keeping the center slightly thicker than the ends. The gluten will tighten quickly — roll each rope as far as it'll go, then move to the next one. Rotate through all the pieces, rolling a little further each time, until all ropes reach 24 inches long.
- Shape into a pretzel: form a U shape, cross the two ends over each other twice to create a twist, then fold the twisted ends down onto the bottom curve. Place a small drop of water where the dough meets the bottom curve, then press firmly to seal.
- Optional extra twist: Twist the ends an extra time before folding them down for a more traditional pretzel shape.
- Second proof: Place each shaped pretzel on its own small square of parchment paper. Set on a half sheet tray. Cover loosely and let rise on the counter until the pretzels are about 50% larger and feel puffed up, which takes about 3–6 hours.
- Optional cold proof: For a deeper sourdough flavor, improved handling during boiling, and potentially better digestion, refrigerate the shaped pretzels for 12–36 hours. You can do this before or after the second proof — just make sure the pretzels are fully puffed up before you boil them.
- Preheat and prep the boiling water: When ready to bake, position one oven rack in the center and one at the very top. Preheat oven to 450°F (230°C) convection or 475°F (245°C) conventional. In a 4-quart saucepan, combine 6 cups water and 1/2 cup baking soda before turning on the heat (adding baking soda to already-boiling water will cause it to foam up and overflow). Bring to a boil over medium-high heat.
- Boil the pretzels: Working one at a time, lower each pretzel into the baking soda water using the parchment to help transfer it — peel away the parchment once the pretzel is in the water. Boil 30 seconds total, flipping once at 15 seconds. Remove with a slotted spoon and hold it over the pot for a few seconds to let the excess water drip off before placing on the parchment-lined sheet tray.
- Top the pretzels: Brush all of the boiled pretzels with 2 tbsp unsalted butter (melted). Sprinkle with pretzel salt to taste.
- Bake: Place the sheet tray on the center rack and bake 10–13 minutes. Move the pan to the top rack and bake an additional 1–2 minutes, or until pretzels are a deep mahogany brown — watch closely, as they can burn. Total bake time: 11–15 minutes.
- Serve warm, ideally within the first hour of baking. Pairs well with mustard or a warm cheese dipping sauce.Pretzels are best the day they are baked. Store leftovers in an airtight container at room temperature for up to 5 days. To freeze, cool completely, then wrap individually and freeze for up to 3 months. Reheat in a 350°F (175°C) oven for 5–8 minutes.


Video

Notes
- Bread flour: Bread flour works best for pretzels — its higher protein content gives them a nice chewiness. I’ve tested this recipe with Central Milling High Mountain bread flour (13.5% protein). Another great option is King Arthur unbleached bread flour (12.7% protein). If you use a lower-protein flour, such as Kirkland all-purpose flour from Costco (11.5% protein), add 1 tbsp of vital wheat gluten to help it perform like a higher-protein flour, or decrease the water in the dough by about 10–15 g.
- Non-diastatic malt powder: This is optional but highly recommended — it keeps the pretzels soft for days and enhances flavor and browning. If you only have diastatic malt powder (or non-diastatic is out of stock), toast it at 325°F (160°C) for 5 minutes first to deactivate the enzymes. Those enzymes would speed up the fermentation, which is not ideal for an overnight fermentation recipe.
“The best pretzels you’ll ever have. A perk is that they’re sourdough to help justify eating them all at once.” —Recipe tester from New Jersey
Conclusion
These soft sourdough pretzels totally exceeded my expectations, and I’m so glad recipe testers loved them, too!
“These are dangerously good — soft, chewy, golden perfection with that buttery, slightly crisp bite and make you wonder why you ever settled for mall pretzels.” –Recipe tester from Franklin, Tennessee
If you try this recipe, I’d love to see it — drop a photo in the comments or tag me on Instagram @thatsourdoughgal!
Other staple recipes to try:


Made these this week and they were awesome! Thank you for the recipe. I do have a question though. They cooled for hours before I put them into a tupperware container but when I opened the container the next day they got damp & the exterior kind of wrinkled. There were even a few drops of water in the container. Any thought on how or why that happened?
It was probably the salt. It tends to absorb into the dough a bit and draw out moisture over time. If you don’t plan to eat all of the pretzels same-day, I suggest skipping the pretzel salt on those. Before enjoying them the next day (or whenever) brush with butter or spritz with water, sprinkle your pretzel salt on top, and give them a quick refresh in an air fryer, oven, or toaster oven!