
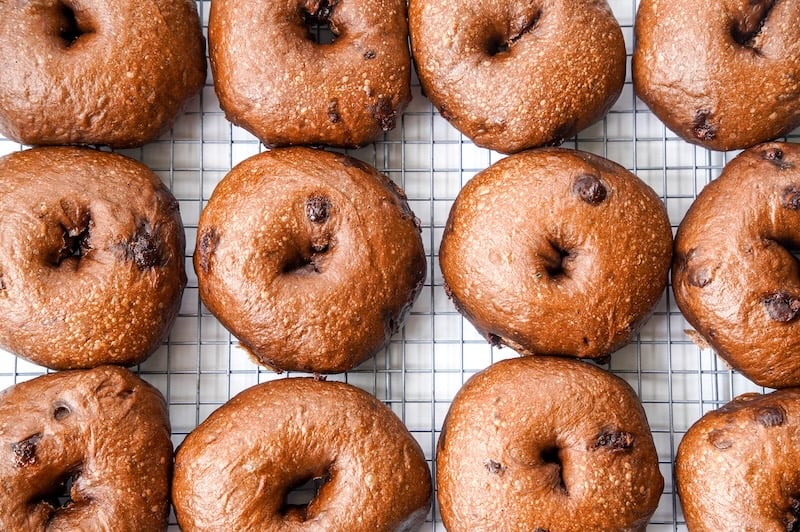
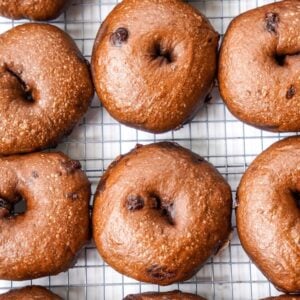
Overnight Double Chocolate Sourdough Bagels
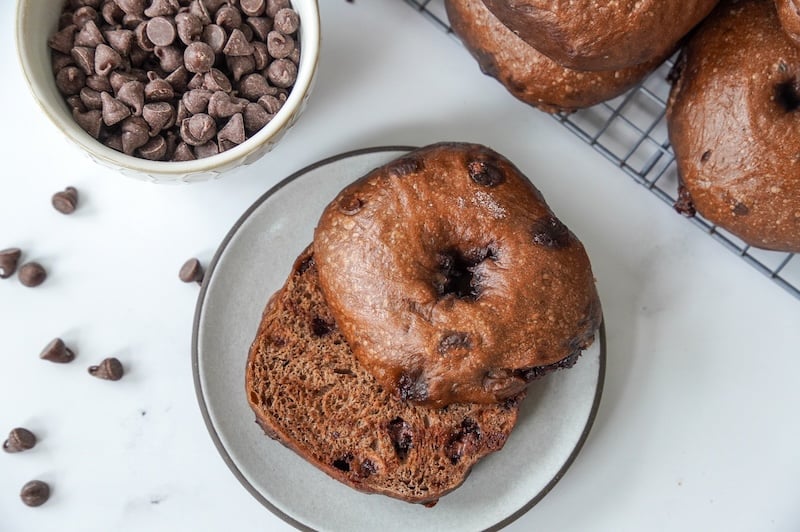
Put chocolate, sourdough, and bagels in the same sentence, and I’M IN. These double chocolate sourdough bagels are insanely good, and a bonus — my kids love them, too!
They’re mixed in the evening, fermented overnight, shaped the next day, and baked into chewy, glossy bagels with a soft chocolate crumb.
After 361 recipe testers gave them an average rating of 4.86 out of 5, I think it’s safe to say — these are the real deal.
“Chewy, chocolatey bagels that are the perfect amount of sweetness.” –Recipe tester from Grand Rapids, MI
Disclaimer: Some of the products I recommend in this post are affiliate links. If you choose to purchase through one of my links, I may earn a small commission, which helps fund this website, recipe development, and monthly giveaways. I sincerely appreciate your support.
Why You’ll Love These Double Chocolate Sourdough Bagels
- Incredible chocolate flavor: Not too sweet and perfectly chocolatey — that was the most common feedback from recipe testers. You’ll notice a subtle sourdough tang underneath the chocolate, but these bagels are not overtly sour.
“These are the perfect sweetness level, very balanced flavor profile.” –Recipe tester from Savannah, GA
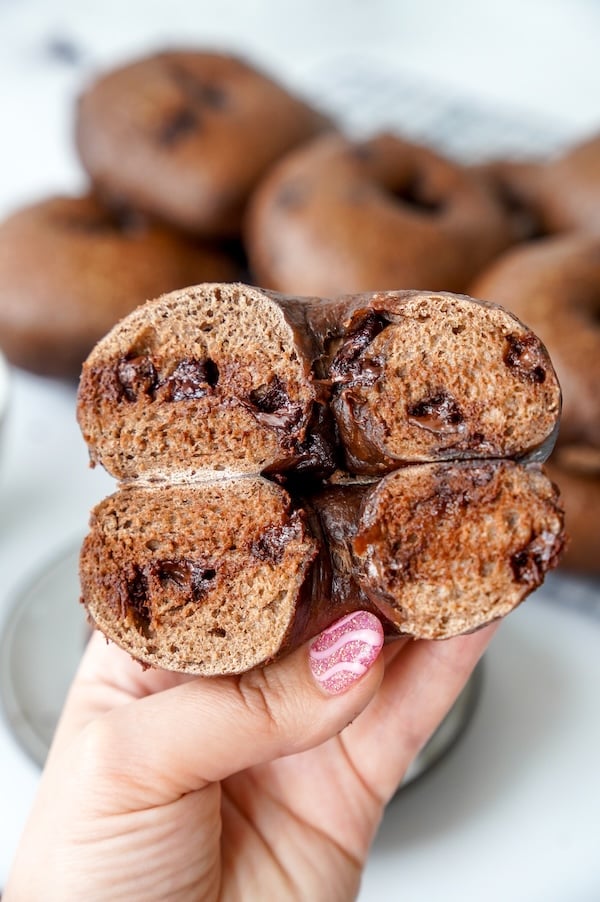
- Dreamy dough: It’s smooth, supple, and easy to work with. Testers described the dough as “Play-Doh,” “a dream,” and “gorgeous,” and honestly, it’s therapeutic to shape! It smells incredible from the moment you add the cocoa all the way through baking.
- Beginner-friendly with simple ingredients: Aside from blooming the cocoa, all the ingredients go in the bowl at once, and there are no stretch-and-folds or coil folds required. The process is easy to follow, even though the finished bagels look seriously impressive.
“The recipe is very easy, very little hands-on time and a real treat. Tastes like something from a commercial bakery but made at home with very little effort.” –Recipe tester from Antrim, NH
- Works with your schedule: The overnight fermentation is mostly hands-off and the shaped bagels can be refrigerated if you need to pause the process. If overnight fermentation isn’t your jam, there’s also a same-day option. Either way, the dough is forgiving — multiple testers said it still worked when life got in the way.
“Don’t be discouraged or intimidated by trying to make these bagels — they are absolutely incredible.” –Recipe tester from the Pacific Northwest
- A kid-friendly crowd-pleaser: Kids loved these bagels — that feedback came up in dozens of recipe tester responses. Testers also shared them with neighbors, coworkers, and friends, and they were universally well-received. Multiple families immediately requested another batch.
“I [made] a second batch the very next day. These are amazing and foolproof! Delicious.” –Recipe tester from Dallas, TX
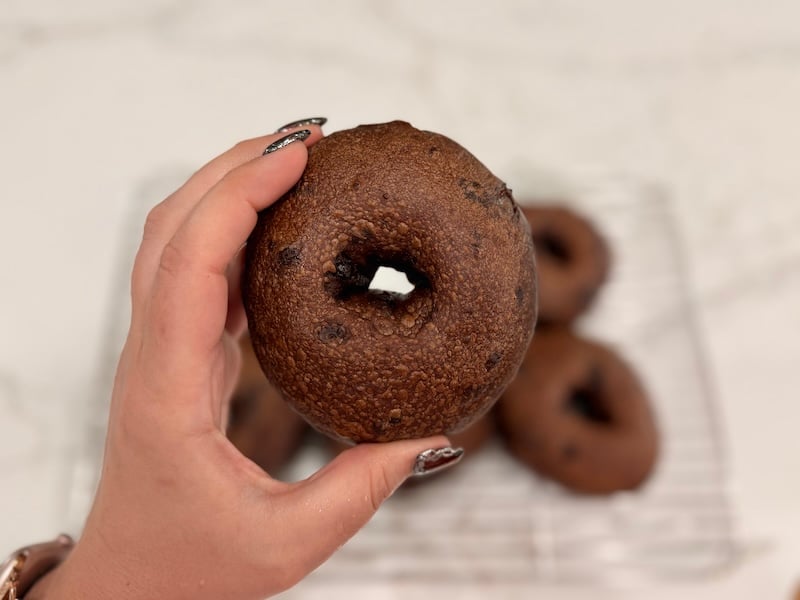
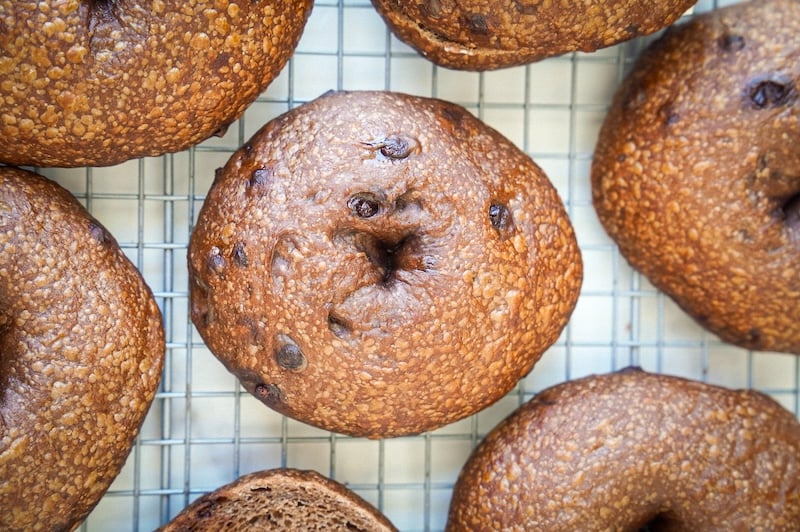
- Perfectly chewy texture: These bagels have that classic bagel chew, a soft interior, and a glossy crust. If you use the non-diastatic malt powder, they stay noticeably softer for multiple days.
- Tested and approved by 361 home bakers. With a 4.86/5 average rating and 96% of testers saying they’d recommend this recipe to a friend, these double chocolate sourdough bagels are a slam dunk!
The Recipe Testing Journey
Getting to the final recipe took three rounds of my own testing before I handed it off to recipe testers. Here’s what I learned.
Test 1: The chocolate levain experiment
My first instinct was to build a chocolate stiff sweet levain — basically, I mixed cocoa powder directly into the starter before adding it to the dough.

The flavor was great, but when I tried again with a regular active starter, I didn’t notice much difference. In my book, simpler is always better.
But by all means, add a little cocoa powder to your starter if you want! All of this is very customizable to your preferences.
Test 2: Not sweet enough
I swapped in regular active starter, reduced the cocoa so it wouldn’t slow fermentation too much, and tested 70g of sugar.
The texture was great. The chocolate flavor was there. But the bagels needed more sweetness to balance the bitterness of the cocoa.
Test 3: The winner
I bumped the brown sugar to 130g, and that was it. The sweetness lifted the chocolate flavor without pushing the bagels into dessert territory.
Meet the Recipe Testers
This recipe was tested by 361 home bakers around the world, including bakers in the United States, Canada, Australia, South Africa, and the UK.
They used different cocoa powders, stand mixers, and timelines.
They topped their bagels with everything from strawberry cream cheese to mocha espresso spread to peanut butter and banana slices.
The final verdict:
- Average rating: 4.86 out of 5
- 99.2% gave the recipe 4 or 5 stars
- 96% said they’d recommend it to a friend
“It is so delicious. One of my favorite sourdough bagels I’ve made so far — and I’ve made a lot!” –Recipe tester from Asheville, NC
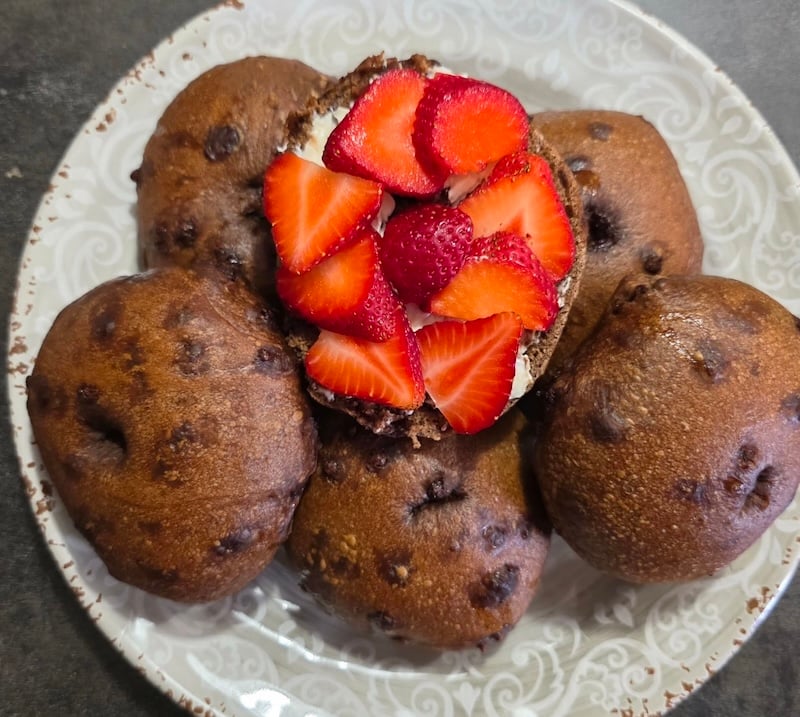
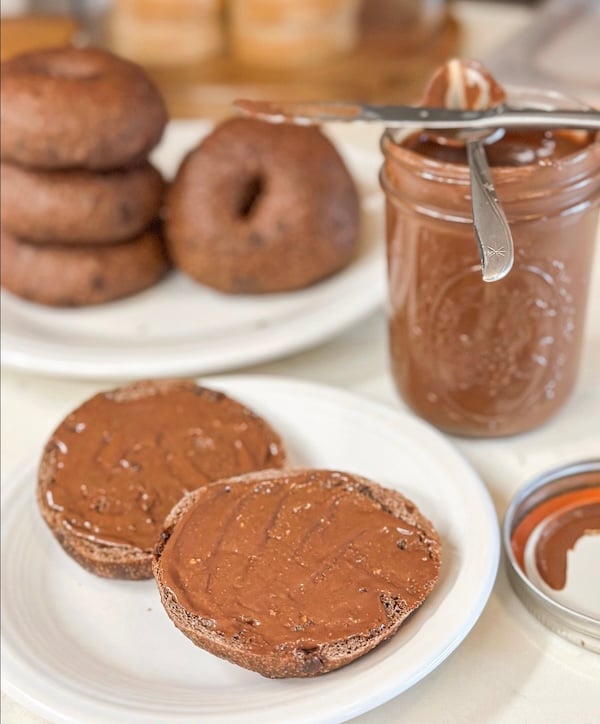
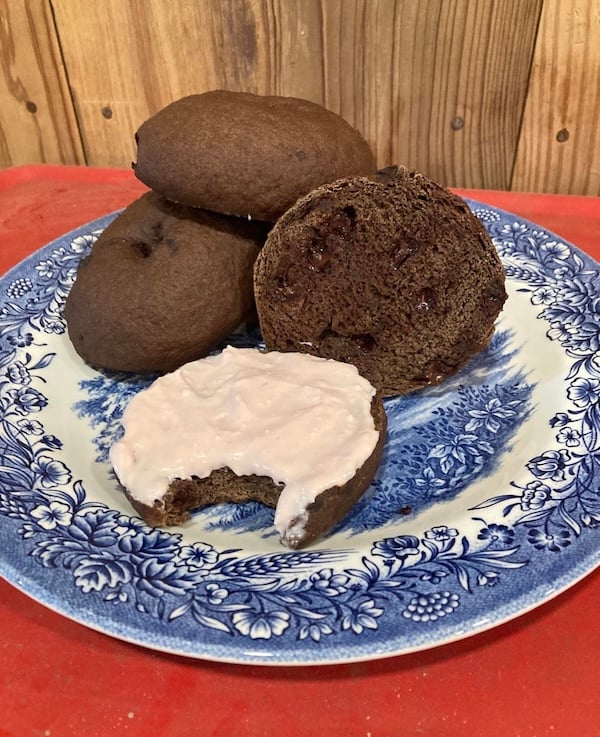
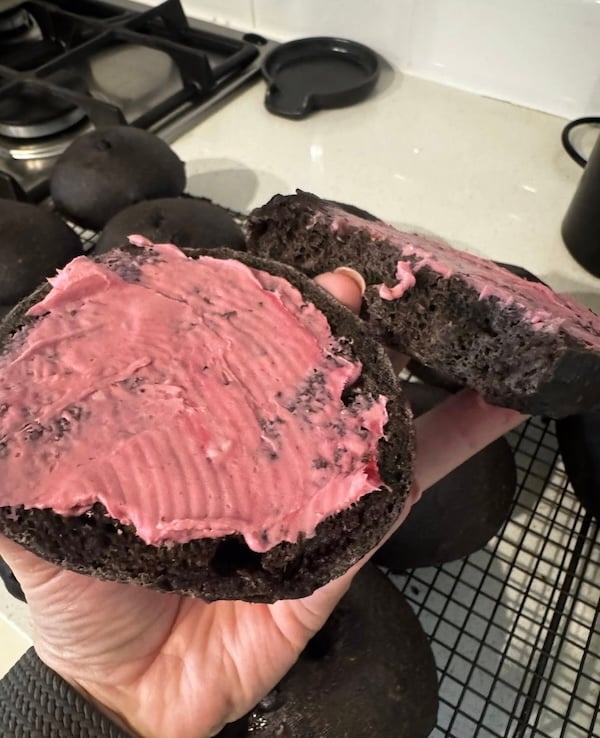
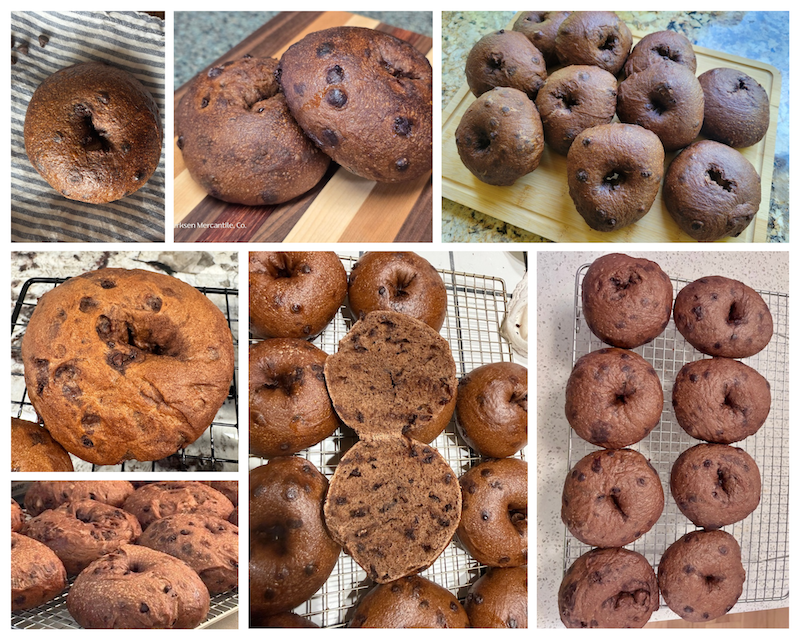
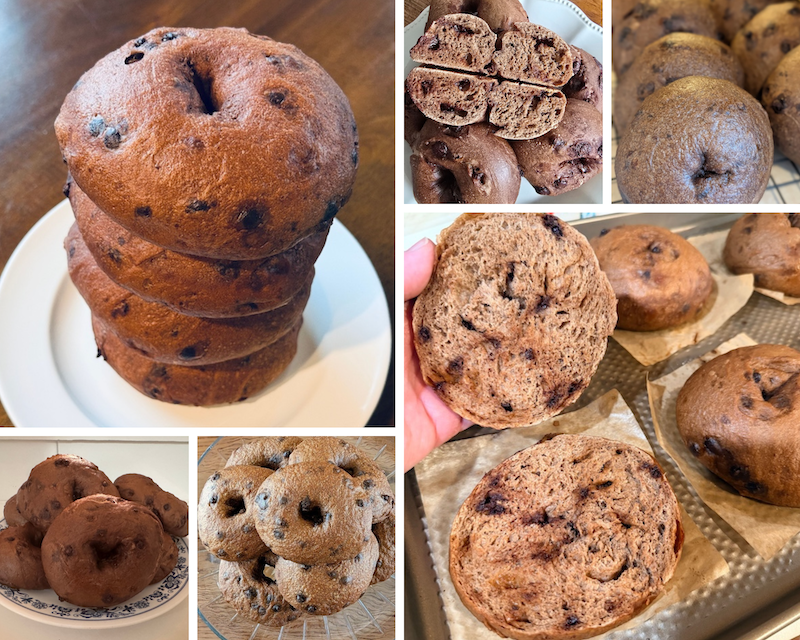
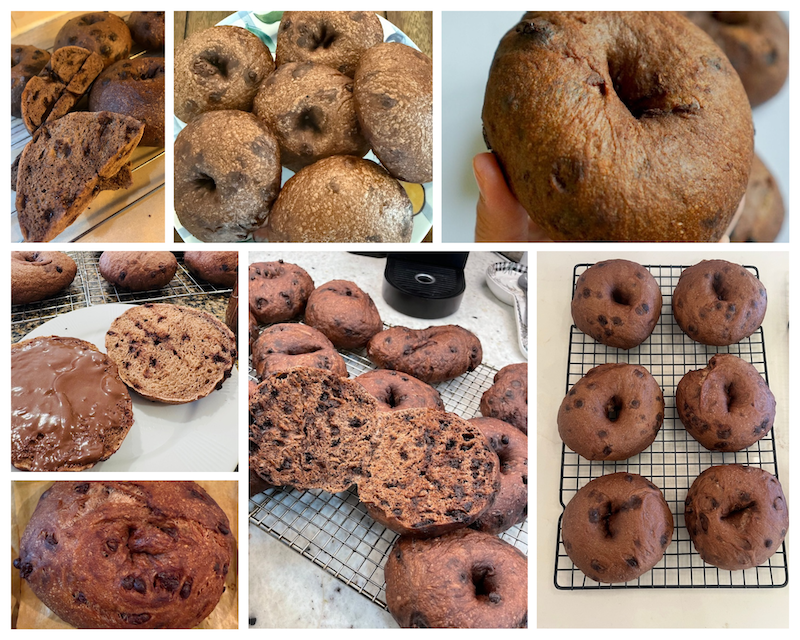
Here’s a look at some of their amazing chocolate bagel photo submissions:
What 361 Bakers Learned
The recipe-testing process always uncovers valuable insights, and this one gave us really helpful notes on cocoa powder, chocolate chips, and fermentation.
Dutch-processed vs natural cocoa powder
Natural cocoa powder is acidic, which can make fermentation timing a little less predictable.
Dutch-processed cocoa has been alkalized, which neutralizes that acidity and gives you a smoother, more consistent ferment — and a deeper, less bitter chocolate flavor.
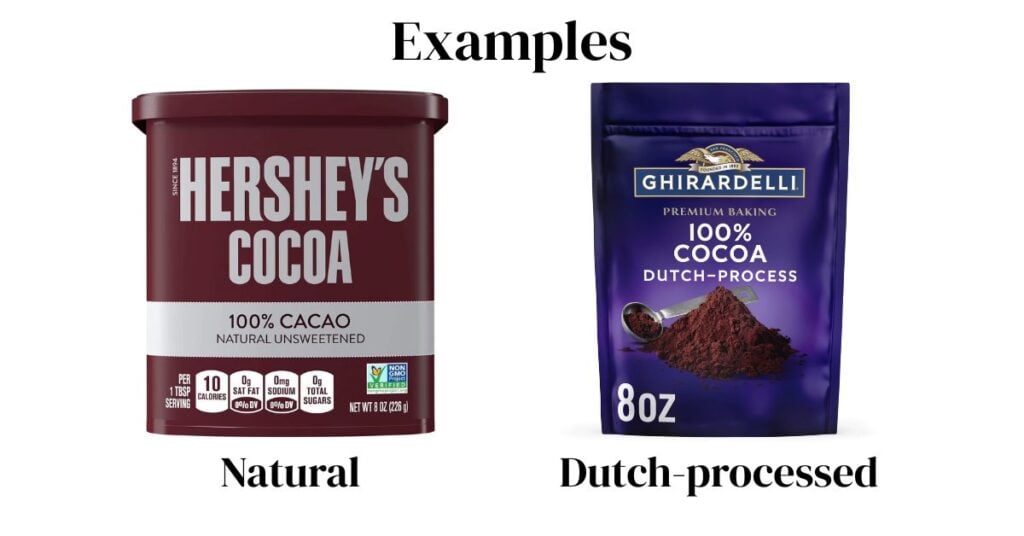
Of the 361 testers, 41% used natural cocoa powder, and most still loved their bagels. But testers using Dutch-processed cocoa were more likely to report “perfect” fermentation results — 74.8% compared with 67.3% for natural cocoa users.
It’s a difference worth noting, even if it doesn’t show up in the overall recipe ratings.
Mini vs regular chocolate chips
Mini chocolate chips distribute more evenly through the dough and tend to make shaping a little smoother — of the 77.5% of testers who used mini chips, almost all reported that shaping went smoothly.
Regular-sized chips work, too — most of my photos in this post were actually made with full-size chips! Shaping is only slightly trickier, and either way, you’ll end up with delicious bagels.
Cocoa slows fermentation
Here’s a heads-up I want you to have before you start: cocoa, even Dutch-processed cocoa, can slow bulk fermentation compared to a plain bagel dough.
Many recipe testers who’ve made bagel dough before were confused and slightly panicky about the longer fermentation. So don’t panic if your dough rises slower than expected. Watch the dough, not the clock.
Bloom the cocoa for better chocolate flavor
I’m KICKING myself for not thinking of this, but the recipe testers came in clutch.
To enhance the chocolate flavor, bloom the cocoa powder in steaming hot water. If you like, add a little espresso powder, too. Let it cool and add it to the dough.
This step is now added to the recipe card, so just follow the water amounts as written. I can definitely taste the difference!
Special shout-out to Yuning Quek from Australia for suggesting it and sharing her awesome results.
Baker’s Timeline
There are two timelines below for this recipe. The overnight version is on the recipe card, and it works great if you like mixing the dough in the evening and letting it ferment while you sleep.
The daytime version flips the schedule so you can monitor fermentation while you’re awake. That’s especially helpful if your home is warm or you want to use a proofing box to speed up fermentation.
“This double chocolate bagel recipe may seem like a lot of work, but it is broken into small chunks of time and the instructions are super clear and easy to follow.” –Recipe tester from St. Paul, MN
Overnight Fermentation (Recipe Card Version)
| Time | Step |
|---|---|
| Morning (Day 1) | Feed your starter |
| Evening (Day 1) | Mix the dough; bulk ferment overnight on the counter; about 10–12 hours at 68–75°F (20–24°C) |
| Morning (Day 2) | Shape bagels; second proof for 5–6 hours at room temp, or 3–4 hours in a proofing box at 80°F (26.5°C) |
| Afternoon/Evening (Day 2) | Boil and bake |
Daytime Fermentation (Flipped Schedule)
| Time | Step |
|---|---|
| Evening (Day 1) | Feed your starter |
| Morning (Day 2) | Mix the dough; bulk ferment on the counter all day (10–12 hours) |
| Evening (Day 2) | Shape, second proof, boil, and bake |
Tip: Because cocoa can slow fermentation, build in extra buffer time if your kitchen is cool, especially below 68°F (20°C). Some testers in cool kitchens reported bulk fermentation taking 13+ hours — that’s normal. See the note below about dough doubling if your dough is moving slowly.
Equipment You’ll Need
- Kitchen scale: Essential for accurate measurements, especially with sourdough baking.
- Stand mixer fitted with a dough hook: This is a stiff dough, like traditional bagel dough or pretzel dough. A stand mixer makes the 7–10 minute mixing process much easier. If you knead by hand, budget 10–15 minutes and be mentally prepared — it’s a workout. Ooni, Bosch, Zacme, and KitchenAid all worked for testers, though a few KitchenAid users with smaller models noted the dough challendged their mixers. If yours struggles, stop and let the dough rest for 10–20 minutes, then resume.
- Half sheet pan or two quarter sheet pans: For proofing and baking the bagels. USA Pan makes my favorite ones.
- Parchment squares: I pick them up at the Dollar Tree, but you can also order them online or cut your own squares. The bagels are dropped into the boiling water still on their squares — the parchment releases on its own. This prevents the bagels from sticking or deflating when you transfer them.
- Large, wide pot: For boiling. A wide pot lets you boil 4 bagels at a time. A smaller pot works fine if that’s what you have — you’ll just boil fewer at a time.
- Slotted spoon or spider scoop: For flipping and removing bagels from the boiling water. I tend to reach for a regular slotted spoon, but a large slotted spoon and spider scoop are also great!
- Bench scraper: Helpful for dividing the dough into even portions. Brod & Taylor’s bench scraper is my favorite!
- Bread knife: A sharp serrated knife makes slicing so much easier once they’re baked and cooled. This one from Mercer is under $20 and is the best bread knife I own.
- Bread bag (optional): Great for storing your finished bagels. Use code THATSOURDOUGHGAL for 15% off my favorite bags from Doe a Deer!
Double Chocolate Sourdough Bagel Ingredients
- Sourdough starter: Step 1 explains how to feed your starter so it’s active and ready to use. This dough needs a strong starter, especially if you’re using natural cocoa. Don’t use discard from the back of your fridge on this one.
- Water: You’ll use steaming hot water to bloom the cocoa powder, then room-temperature water for the dough.
- Brown sugar: The amount is more than you might expect for a bagel, but this is what balances the bitterness of the cocoa and gives these bagels their signature flavor. Don’t reduce it.
- Vanilla extract: Just a touch makes a difference. Vanilla is a natural pairing with chocolate, and it rounds out the overall flavor beautifully. If you aren’t already, you should totally make your own! Vanilla paste works great here, too.
- Bread flour: Higher protein = better chew, and it makes a real difference in bagels. King Arthur bread flour was the most popular choice among testers by a wide margin — 208 out of 361 used it. Central Milling High Mountain earned a perfect 5.0 from the testers who used it, and notably, 38 testers used Costco’s Kirkland all-purpose flour and averaged a 4.92 rating, the highest of any well-represented brand. If you’re using a lower-protein flour like all-purpose, see Ingredient Substitutions for tips.
- Dutch-processed cocoa powder: Dutch-processed cocoa is alkalized, which gives it a smoother, deeper flavor than natural cocoa and — importantly — tends to make fermentation more predictable. But rest assured, many recipe testers used natural cocoa powder and still reported great results.
- Non-diastatic malt powder (optional): This is the secret weapon in my bagel recipes and my soft pretzel recipe. It keeps the bagels soft for days and enhances both browning and flavor. It’s optional, but if you can find it, I really encourage you to use it. See the Ingredient Substitutions section for what to do if you can’t.
- Sea salt: Balances the sweetness and makes everything taste more like itself.
- Mini semi-sweet chocolate chips: These are mixed directly into the dough. Mini chips distribute more evenly and are much easier to work around during shaping. If you use regular-sized chips, expect a bit more chip escape during shaping.
For the boiling water:
- Brown sugar (or honey or molasses): Added to the boiling water to give the bagels their signature glossy, slightly sweet crust with a lovely chew.
Ingredient Substitutions
- Natural cocoa powder: It works, but there are tradeoffs. 41% of testers used natural cocoa and most still got great results — but testers using Dutch-processed cocoa were more likely to report “perfect” fermentation — 74.8% compared to 67.3% for natural cocoa users. Natural cocoa’s higher acidity can make fermentation timing less predictable, which is the most likely culprit there. The flavor may also be slightly more bitter. Dutch-processed is worth seeking out, but if natural cocoa is all you have, you’re in good company.
- Regular-sized chocolate chips: Totally doable. Shaping may be slightly trickier, and a few more chips may escape. Several testers found that rolling the dough into a tight ball and letting it rest for a few minutes before poking the bagel hole helped keep more chips contained.
- Diastatic malt powder: If non-diastatic malt powder is out of stock, you can use diastatic malt powder instead, but toast it at 325°F (160°C) for 5 minutes to deactivate the enzymes before adding it to the dough. Multiple testers did this successfully. Do not skip the toasting step — active diastatic malt powder will speed up your fermentation significantly, which is not what you want for an overnight recipe.
- No malt powder at all: 28.6% of testers skipped it entirely and loved their bagels. You’ll still get a great result — the bagels just may not stay quite as soft over multiple days.
- Lower-protein flour, such as all-purpose: If you’re using all-purpose flour with a lower protein content (around 11.5%), add 1 tablespoon of vital wheat gluten to help it perform more like bread flour. You can also reduce the water in the dough slightly.
- Freshly milled flour: One recipe tester from St. John’s, FL, used freshly milled flour and simply added 10g of extra water for every 120g of flour. She gave the result 5 out of 5 stars. Because freshly milled flour varies so much, use this as a starting point and adjust by feel.
How to Make Double Chocolate Sourdough Bagels (Step-by-Step)
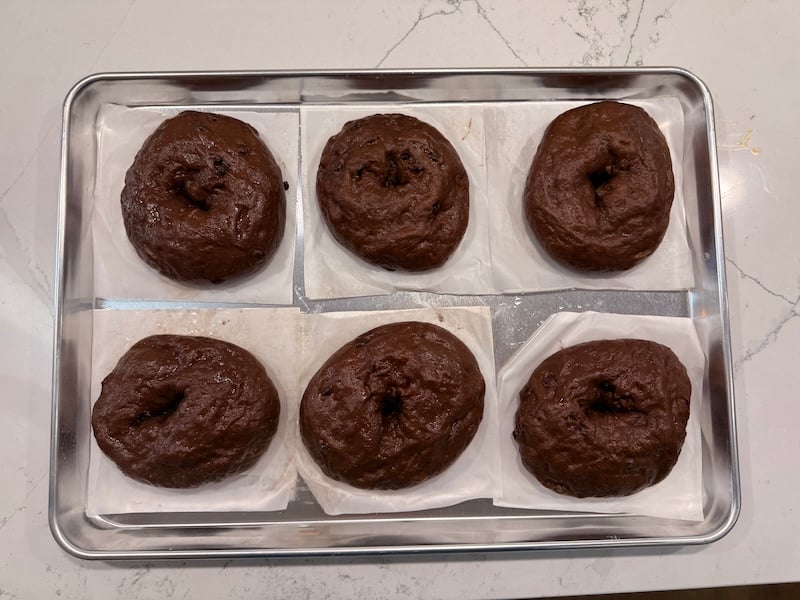
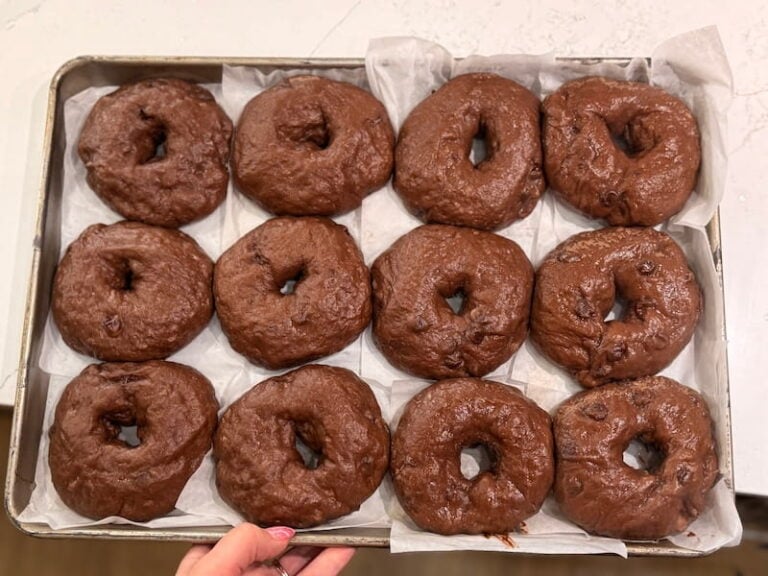
Note: This recipe makes 12 bagels (though you can half it by clicking the 0.5x button on the recipe card). Some of the instructional photos here show a half batch of 6.
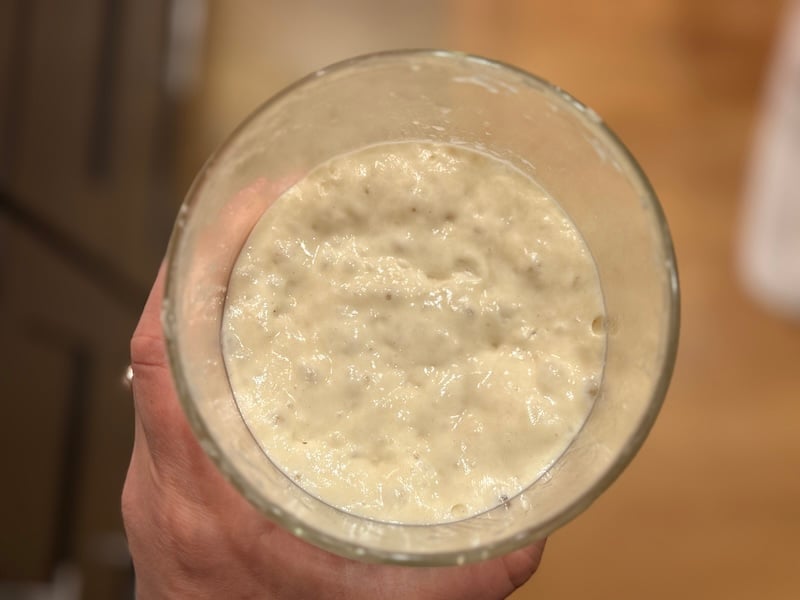
Step 1: Feed Your Starter (Day 1 Morning)
In the morning, stir together 15g sourdough starter, 75g water, and 75g bread flour in a medium glass jar. Cover loosely and let ferment for 10–12 hours at 68–75°F (20–24°C).
By evening, it should be bubbly, domed, and about tripled in size.
Not sure if your starter is at peak and ready to use? Read this detailed guide.
Step 2: Bloom the Cocoa and Espresso (Day 1 Evening)
Before you mix the dough, I highly recommend blooming the cocoa powder and espresso powder, if you’re using it. It’ll really amp up the chocolate flavor!
About 30 minutes before you want to mix your dough in the evening, combine 80g steaming hot water, 28g Dutch-processed cocoa powder, and 1 teaspoon espresso powder, if using, in a small bowl. Whisk until smooth.
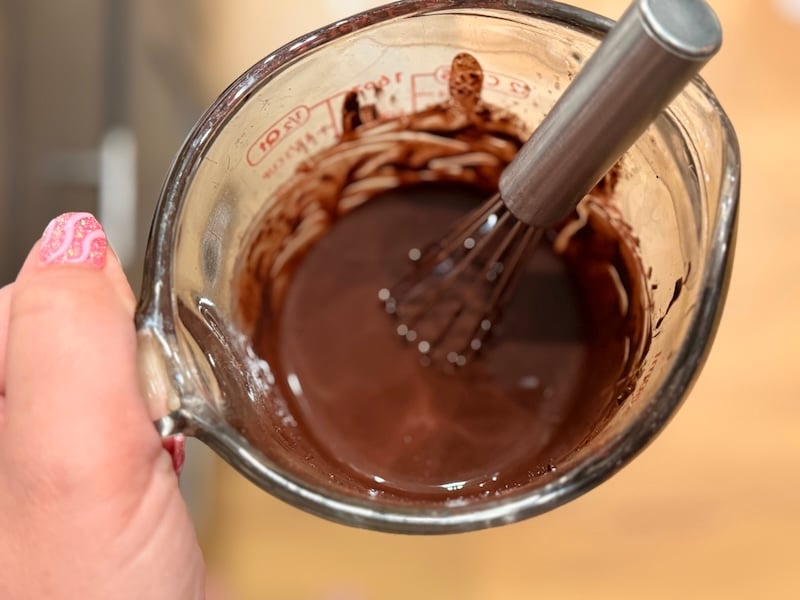
Set aside and let cool to below 90°F (32°C) before adding it to the dough. If it’s still hot, it can kill your sourdough starter.
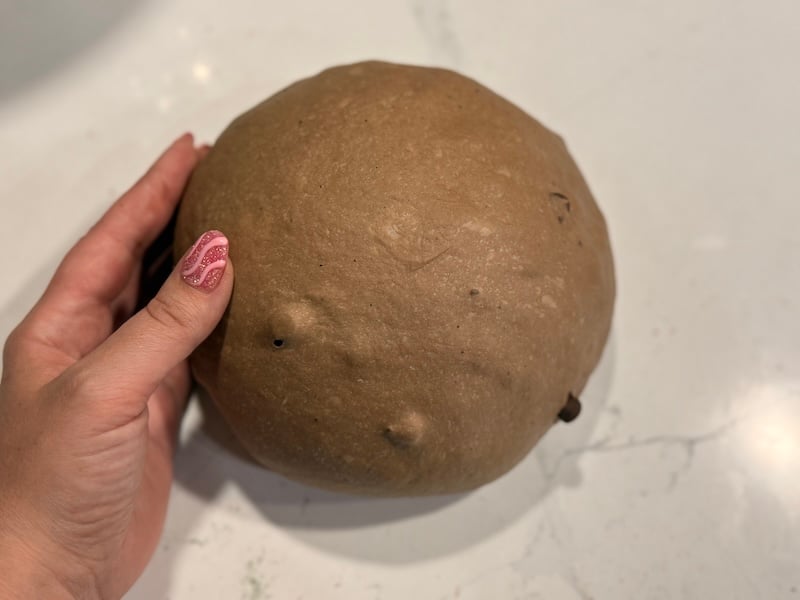
Step 3: Mix the Dough
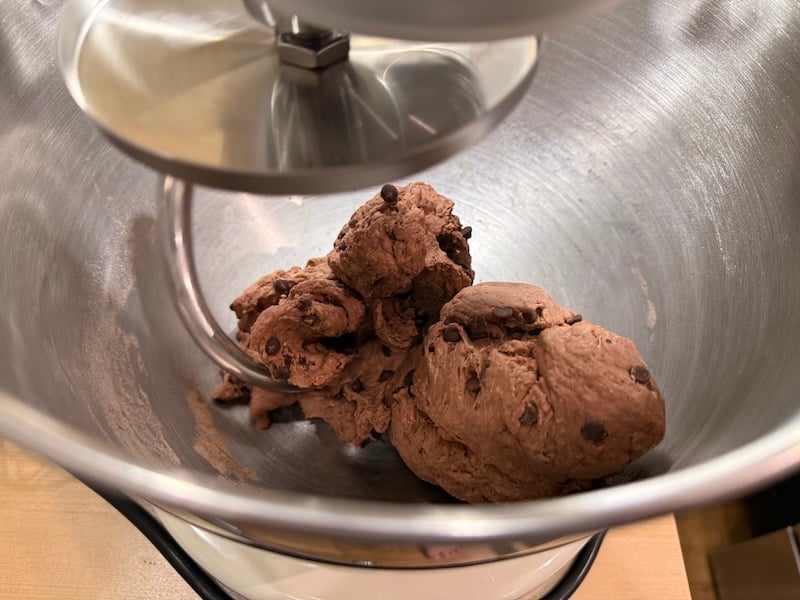
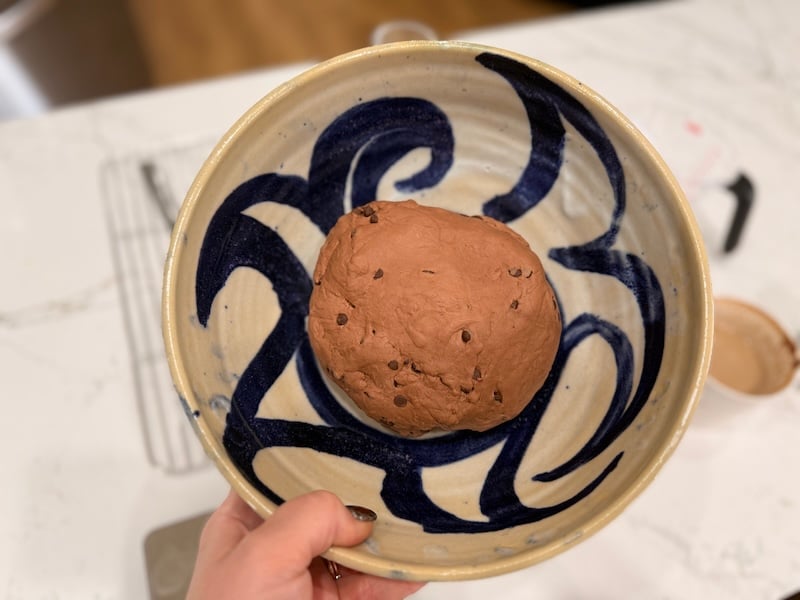
Once the cocoa mixture has cooled, add it to your stand mixer bowl fitted with the dough hook along with 370g water, 150g active starter, 130g brown sugar, 10g vanilla extract, 825g bread flour, 25g non-diastatic malt powder, 16g sea salt, and 200g mini chocolate chips.
Note: If your ingredients feel really warm, hold back the chocolate chips and add them toward the end of mixing. That’ll prevent them from melting in the dough.
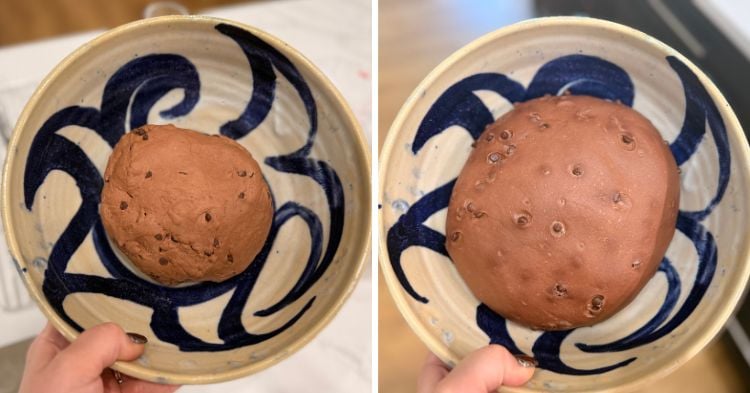
Mix on low speed for 7–10 minutes, until the dough is smooth and has a stiff, Play-Doh-like texture. It should hold its shape when pressed and not stick to your hands.
If your mixer struggles, stop, let the dough rest for 10–20 minutes, then resume. If the dough seems too dry, add 1 tablespoon of water at a time. If it’s sticky, add 1 tablespoon of flour at a time.

Mixing by hand? Combine all ingredients in a large bowl and stir until it comes together. Turn it out onto a clean counter and knead for 10–15 minutes, until smooth and pliable.
Note on chocolate chips: In warmer kitchens above 75°F (24°C), chocolate chips may start to melt during mixing or early bulk fermentation. If your chips do melt, don’t panic: the dough will still shape and bake beautifully. You’ll just have a more uniformly chocolatey crumb rather than distinct chip pockets.
Step 4: Bulk Ferment Overnight
Cover the dough and let it bulk ferment on the counter overnight — about 10–12 hours at 68–75°F (20–24°C). The dough should roughly double in size and feel noticeably puffier than when you started.
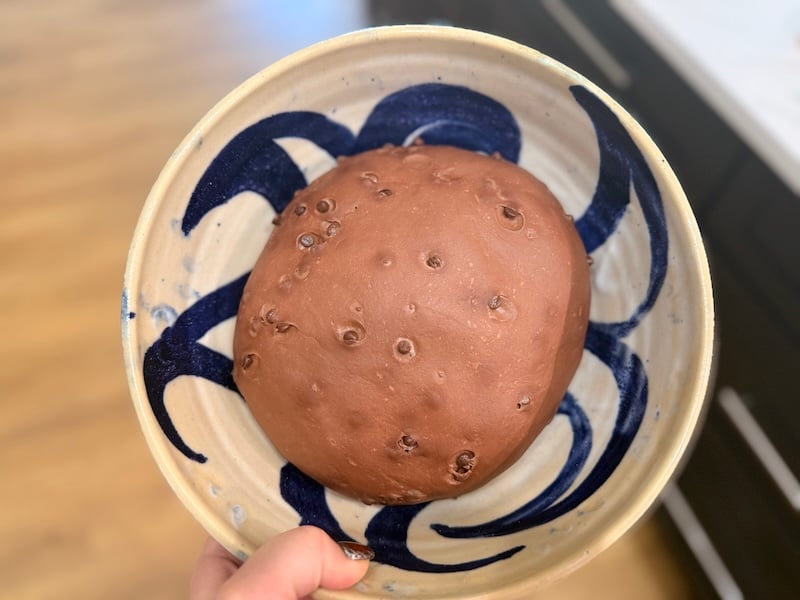
Because cocoa can slow fermentation, this dough will take longer to ferment than a plain bagel dough, especially in a cool kitchen. Some testers reported bulk fermentation taking 13+ hours. That’s OK — watch the dough, not the clock.
A Note About Dough Doubling
A lot of bakers get a bit stuck on the percentage rise or “doubling” language. If the dough has fermented for 12 hours or more, I’d focus less on the exact rise and more on signs of fermentation. Has the dough expanded? Does it feel full of air when you poke it? If you press it gently, does it leave an imprint? That’s really what you’re looking for. Your dough might not double, or it might quadruple — both are fine in my experience.
That said, if it’s truly dragging in a normal-temperature kitchen, your starter may need a few strengthening feeds before your next bake. Also, check your cocoa powder — natural cocoa’s higher acidity can slow fermentation further, so Dutch-processed cocoa might be worth seeking out next time.
Warm kitchens above 75°F (24°C): Skip the overnight fermentation and use the daytime schedule instead. Mix the dough in the morning, monitor bulk fermentation throughout the day, then shape and proof in the afternoon or evening.
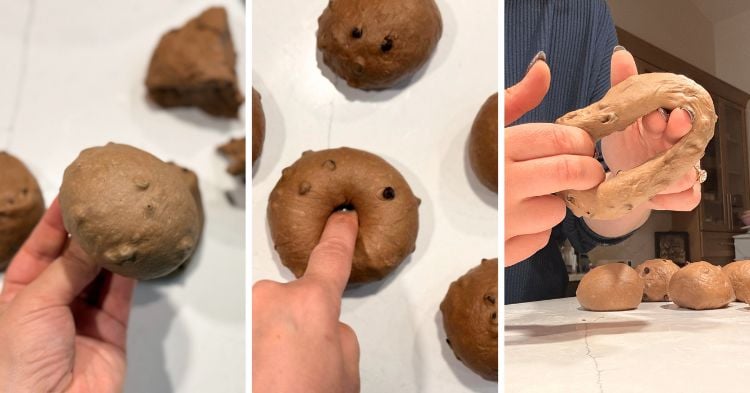
Step 5: Divide and Shape (Day 2 Morning)
Dump the dough out onto a clean counter and give it a quick knead.
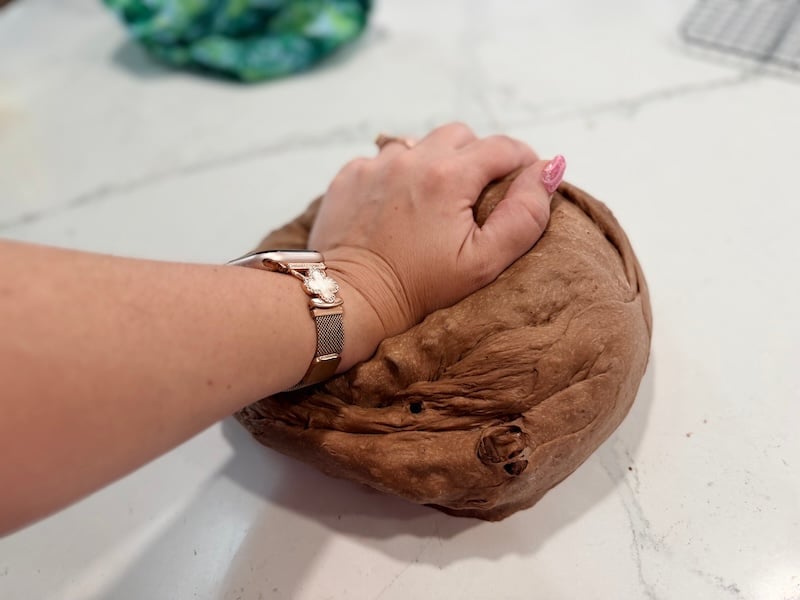
Divide into 12 equal portions, about 150g each. Shape each portion into a smooth, taut ball.
Tip from testers: Roll each dough ball tightly with all the chocolate chips tucked inside, then let the balls rest for a few minutes before poking the holes. This gives the gluten a chance to relax, which makes the next step significantly easier and reduces chip escapes.
Poke a hole through the center of each ball.
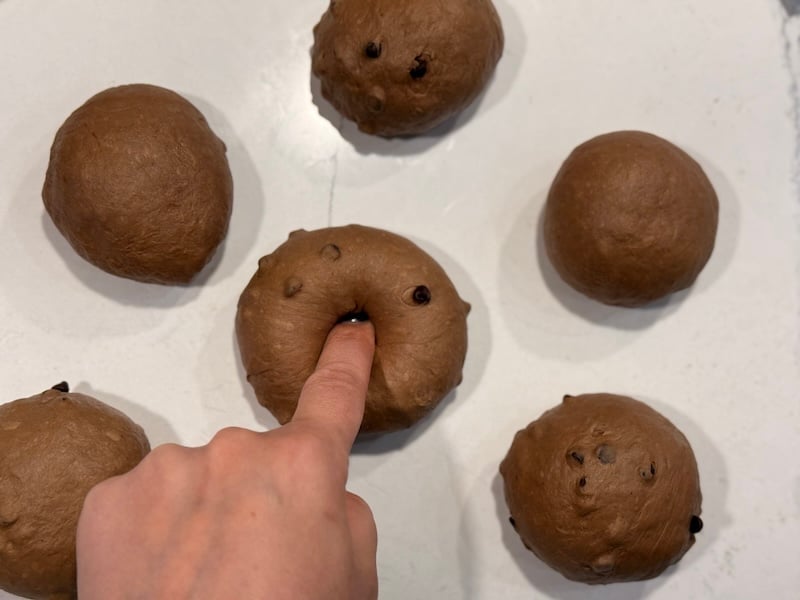
Then, stretch the hole with your fingers to form the bagel shape. Aim for a hole that’s a little larger than you want — it will fill in slightly during proofing, so bigger is better. If any chocolate chips escape, pinch them back in.
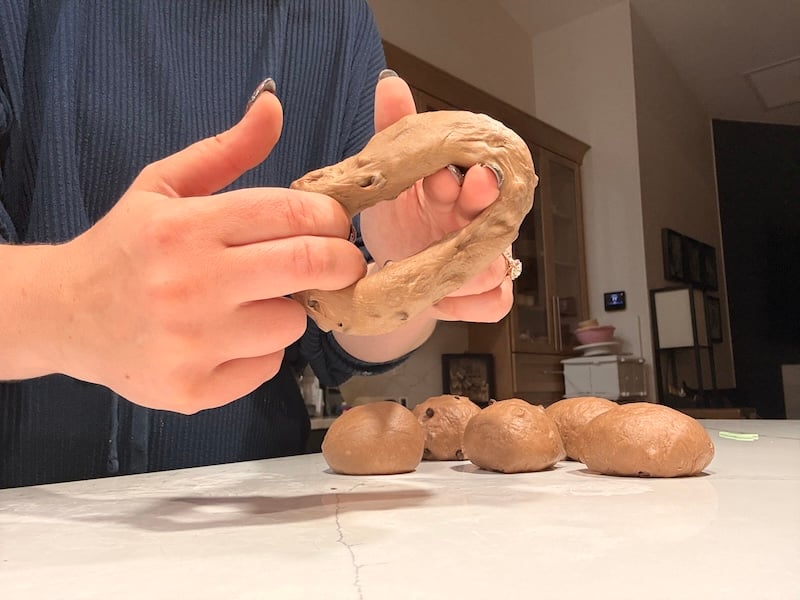
Place each shaped bagel on an individual parchment square.
Optional pause point: You can refrigerate the shaped bagels at this point for a few hours or up to 2–3 days. When ready to continue, remove them from the fridge and proceed with the second proof at room temperature or in a proofing box. The longer they rest in the fridge, the more sour the bagels will taste.
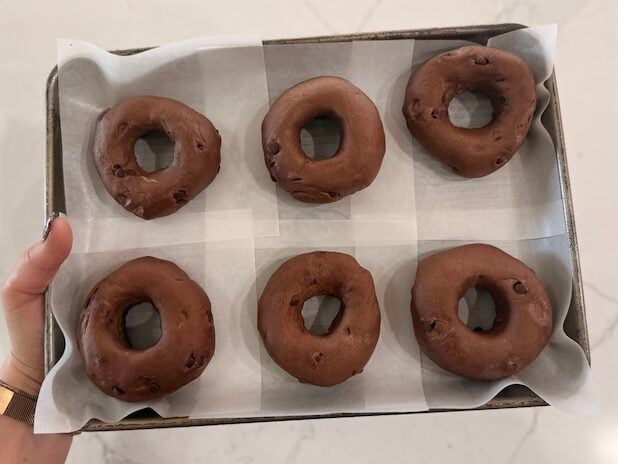
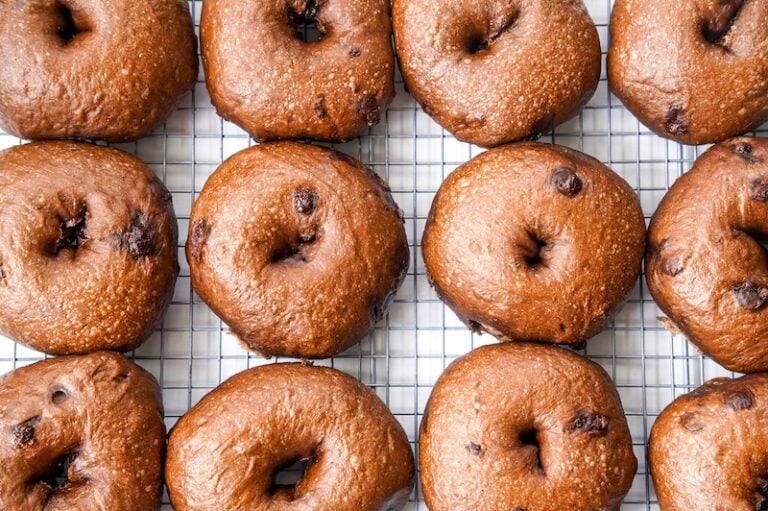
Step 6: Second Proof
Cover the shaped bagels to keep them from drying out. Plastic wrap or a sheet tray cover work well. Let them proof for 5–6 hours at room temperature or 3–4 hours in a proofing box at 80°F (26.5°C).
The majority of testers reported about 6 hours at 71–73°F (21.5–22.5°C).
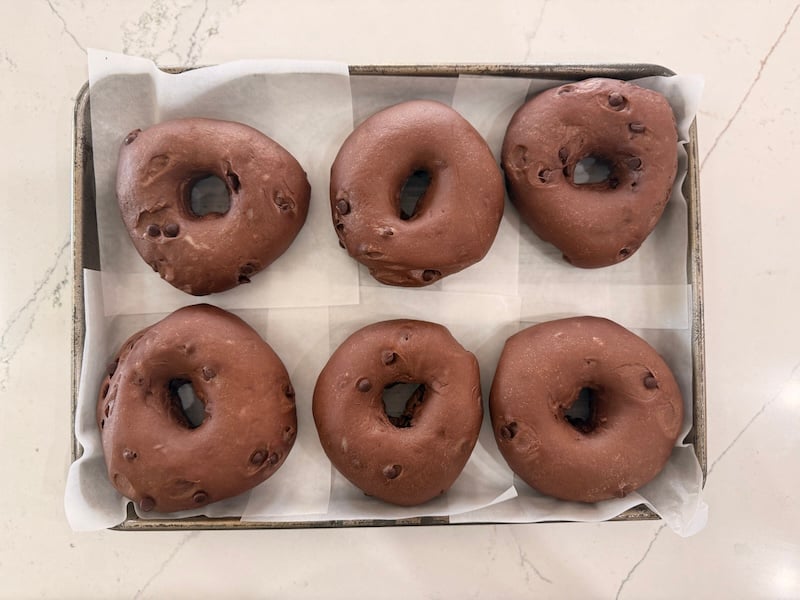
They should puff up noticeably; if you pick one up, it should feel very light and airy in the hand.
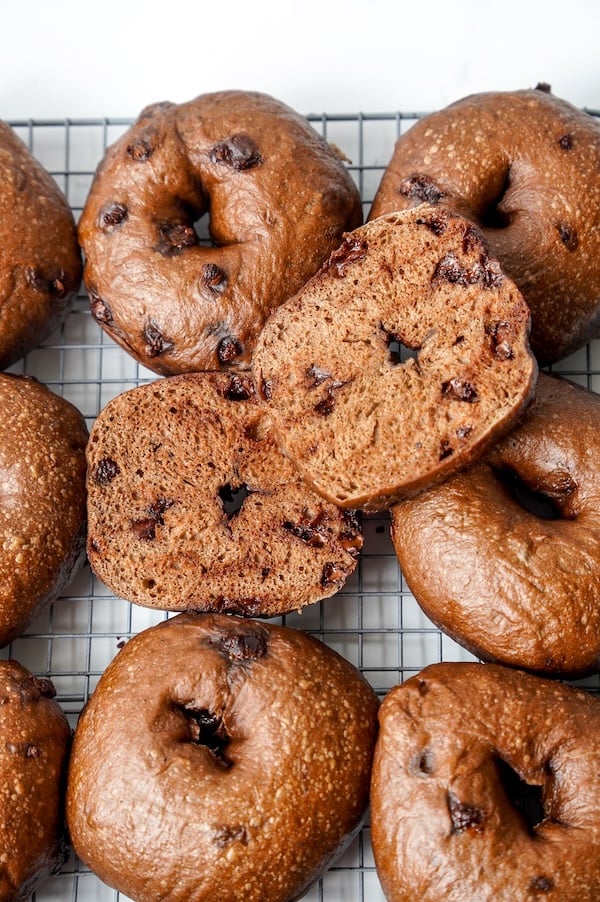
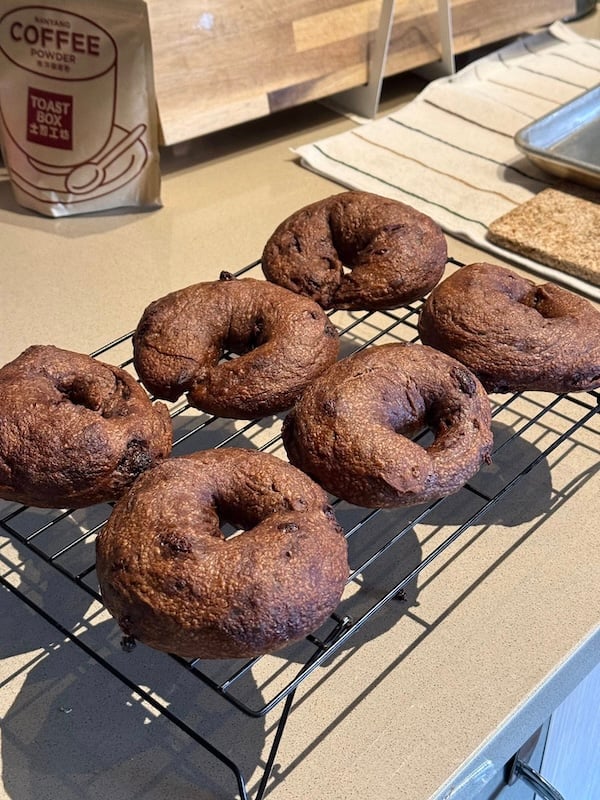
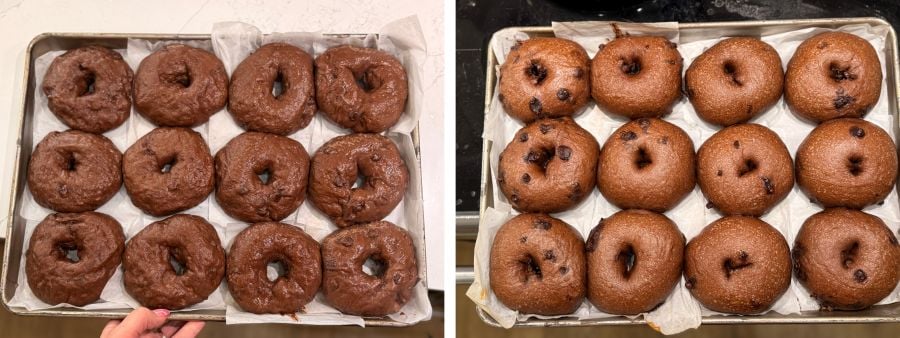
Here’s another photo of a full batch, before and after the second proof:
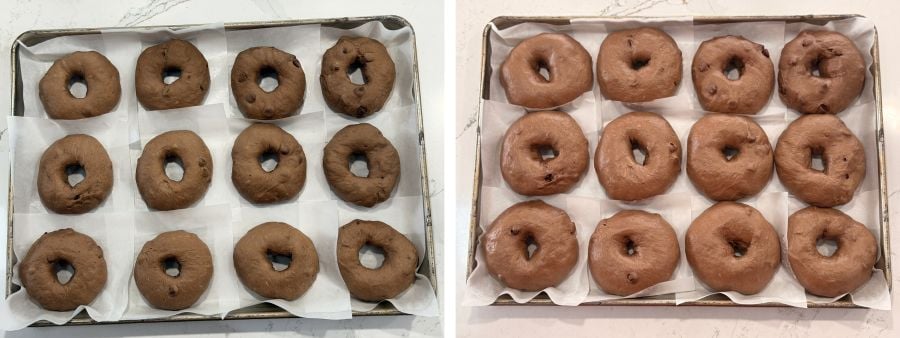
Because this is a stiffer dough, there’s a lot of flexibility here. I’ve let mine proof for over 8 hours in the past, and they still came out beautifully.
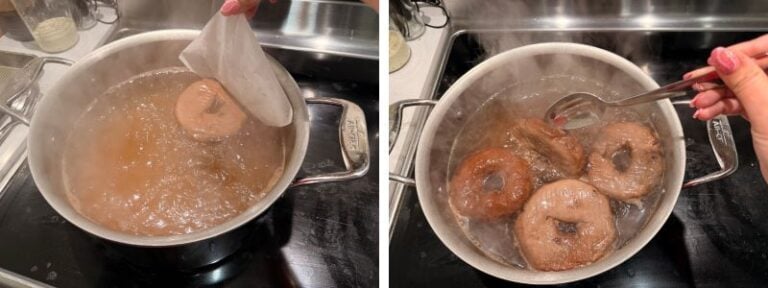
Step 7: Boil
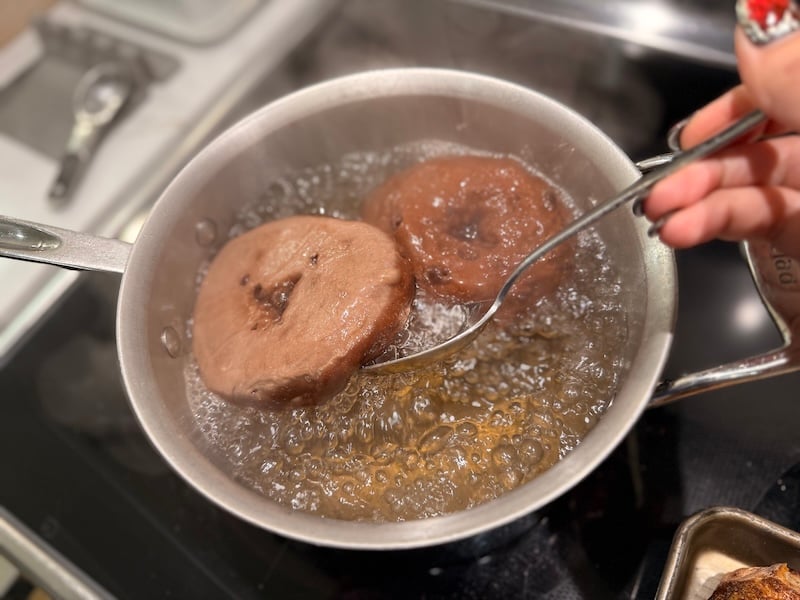
Preheat your oven to 425°F (220°C) convection or 450°F (230°C) conventional. Bring a large pot of water (about 4 quarts) to a rolling boil, then add 2 tablespoons of brown sugar.
Drop bagels into the boiling water still on their parchment squares — the parchment will release on its own within a few seconds. Peel it off and set it aside to reuse. Boil 4 at a time for 20–30 seconds per side, flipping once with a slotted spoon. A smaller pot works fine, too — just boil 2 at a time.
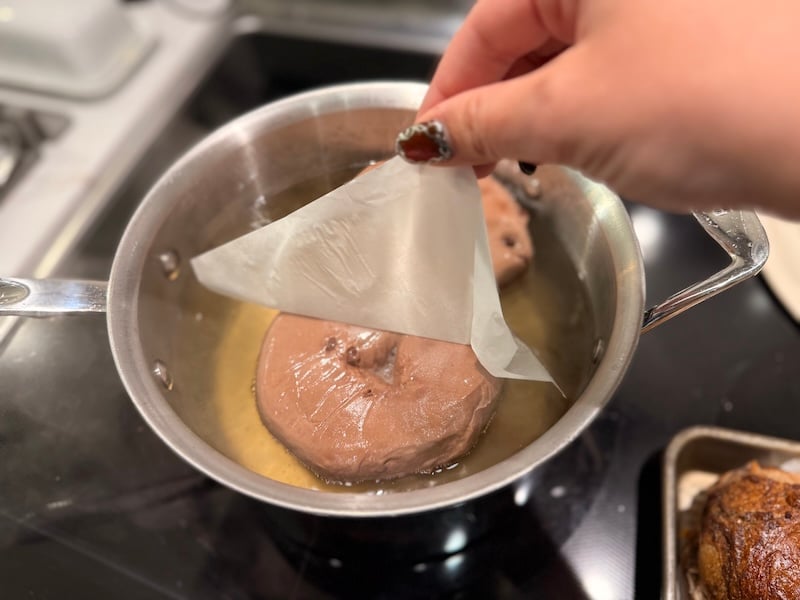
Remove boiled bagels and place them back on your parchment-lined sheet tray. If you’re concerned about sticking, lightly spritz the parchment with cooking oil first.
Step 8: Bake
Bake for 15–20 minutes or until the internal temperature reaches 205°F (96°C) or higher. 17 minutes was the sweet spot for most testers, but start checking at 15 minutes since ovens vary — a small number of testers had burnt bottoms before the timer was up.
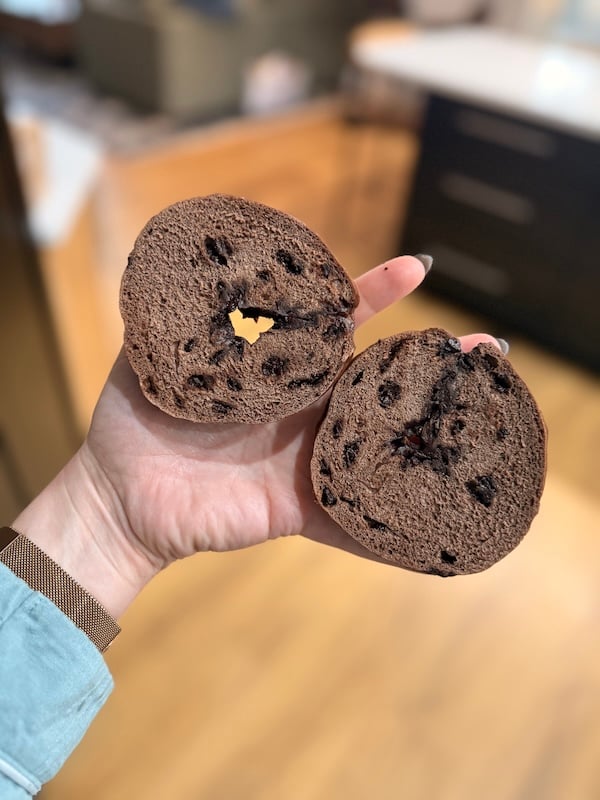
Let them cool on a wire rack for at least 30 minutes before slicing — or 1–2 hours for best results. If you cut into them while they’re still hot, you might get some gummy spots and smeared chocolate chips.
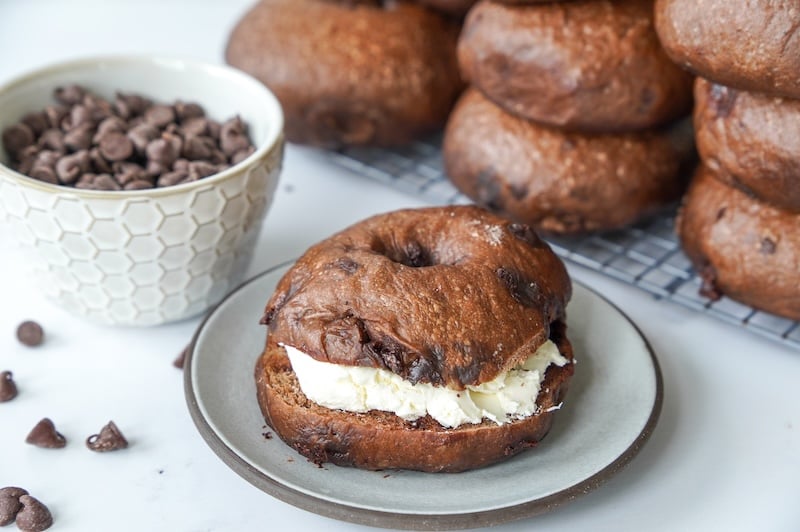
Topping Ideas from Our Testers
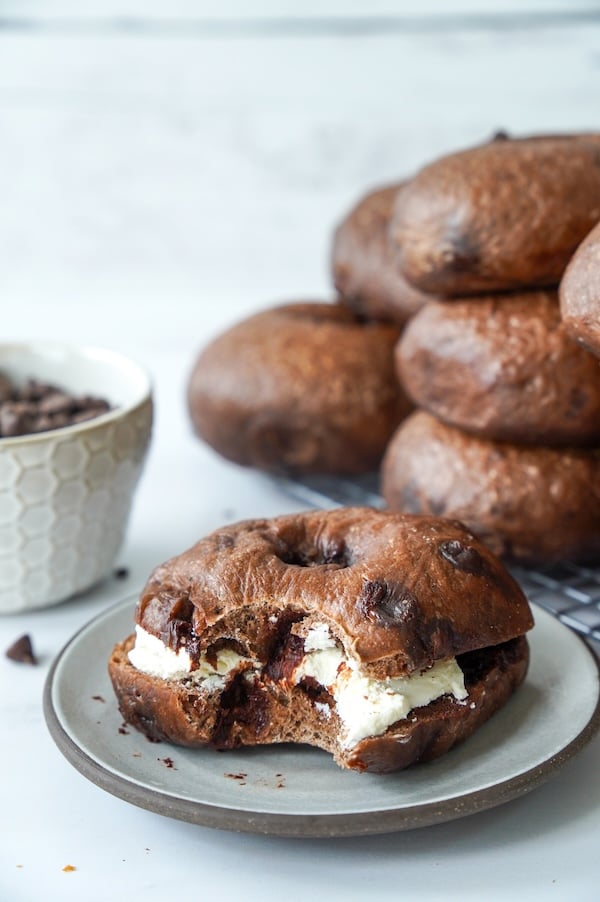
These bagels are delicious plain or with basic cream cheese, but our testers got wildly creative.
Here’s what they tried:
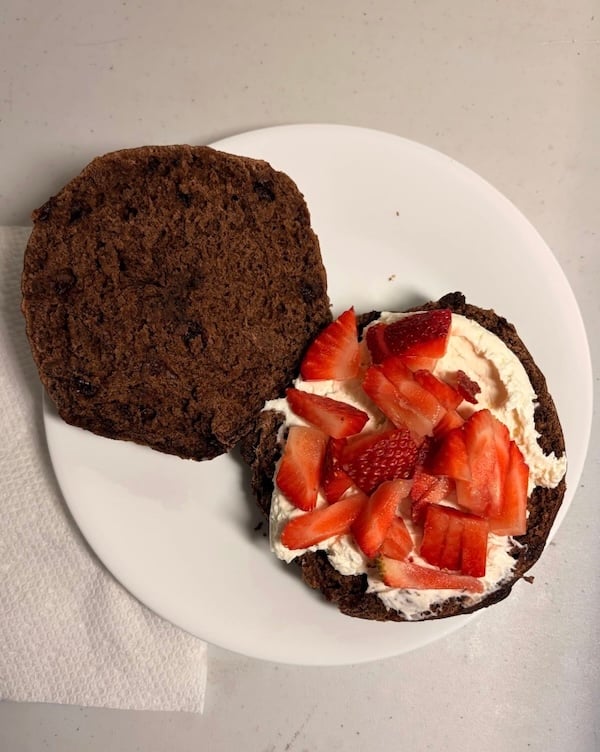
- Strawberry cream cheese: the most popular choice by far
- Mocha espresso cream cheese: one tester whipped together cream cheese, cold brew, instant espresso, cocoa powder, and powdered sugar with a hand mixer — she called it “subtle and not overly sweet”
- Peanut butter and banana slices with a drizzle of Nutella
- Nutella with fresh strawberries
- Cream cheese with strawberry jam
- Ricotta cheese, sliced strawberries, and a drizzle of honey
- Honey walnut cream cheese
- Just butter: simple and completely satisfying
“My daughter called them ‘my breakfast dessert.'” –Recipe tester from Sparks (Reno), NV
How to Store Double Chocolate Sourdough Bagels
- Room temperature: Store in a bread bag (these are my favorite — use code THATSOURDOUGHGAL for 15% off), a glass cake stand, or other airtight container for 2–3 days. If you used the non-diastatic malt powder, they’ll stay noticeably softer for up to 4–5 days.
- Freezer: Slice the cooled bagels in half and freeze in a sealed freezer-safe bag.
- To reheat: Toast directly from frozen — no need to thaw first.
Troubleshooting Tips
“When the taste is just as good if not better than the smell of the dough baking, that’s the best reason for making these delicious bagels.” –Recipe tester from Lawrenceburg, TN
FAQs
Yes, you can use natural cocoa powder instead of Dutch-processed, but there are a few things to know. Natural cocoa is more acidic than Dutch-processed cocoa, which can slow fermentation and result in a slightly sharper, less smooth chocolate flavor. 41% of testers used natural cocoa and most still had great results, but Dutch-processed is strongly recommended for the most consistent fermentation and the best chocolate flavor, but natural cocoa will still work.
I recommend mini chocolate chips, but regular-sized chips work, too. Mini chips are easier to work with during shaping and less likely to melt during mixing or bulk fermentation. If you use regular chips, expect them to poke out a little more when you shape the bagels. I’ve done both, and while I prefer mini chocolate chips, regular-sized chips are fine as long as you’re prepared for a slightly tougher shaping process.
Yes — 28.6% of testers skipped the non-diastatic malt powder and still loved their bagels. Non-diastatic malt powder enhances browning, adds a subtle flavor boost, and — most importantly — helps keep the bagels softer longer.
If you use it, your bagels should stay soft for about 4–5 days instead of 2–3. If you don’t have it, your bagels will still be delicious.
If bulk fermentation is taking significantly longer than 12 hours at a normal room temperature, don’t get too caught up in the exact timing — look for signs of fermentation instead. Has the dough expanded? Does it feel full of air when you poke it? If you press it gently, does it leave an imprint? That’s really what you’re looking for.
Your dough might not double, or it might quadruple — both are fine. That said, if it’s truly dragging in a normal-temperature kitchen, your starter may need a few strengthening feeds before your next bake. Also, check your cocoa powder — natural cocoa’s higher acidity can slow fermentation further, so Dutch-processed cocoa might be worth seeking out next time.
Yes, but it depends on your kitchen temperature and your starter strength. If your kitchen is warm, around 75–80°F(24–26.5°C), bulk fermentation might be done in 7–8 hours, which can make a same-day bake possible.
Keep in mind — the fermentation is slower in this recipe due to the stiff dough and the cocoa powder, so squeezing it all into one day might be a bit tricky, even with a proofing box. Use the daytime schedule in the Baker’s Timeline section.
“A bagel that exudes all that a chocolate lover desires! Worth the effort — you won’t find this flavor in a bagel store.” –Recipe tester from CT
Here’s another sweet bagel recipe you might enjoy: Overnight Cinnamon Raisin Swirl Sourdough Bagels (Advanced Recipe)
Double Chocolate Sourdough Bagels
Equipment
- Stand mixer fitted with the dough hook; you can also knead by hand
- Half sheet pan or two quarter sheet pans
- Slotted spoon
- Bread bag use code THATSOURDOUGHGAL for 15% off
Ingredients
Feed Your Starter
- 15 g sourdough starter
- 75 g water
- 75 g bread flour
Bloom the Cocoa and Espresso
- 80 g steaming hot water
- 28 g Dutch-processed cocoa powder
- 1 tsp espresso powder optional
Main Dough
- 370 g water
- 150 g active starter that you made, from above
- 130 g brown sugar
- 10 g vanilla extract or vanilla paste
- 825 g bread flour 12.7–13.5% protein is ideal, See Notes
- 25 g non-diastatic malt powder optional
- 16 g sea salt
- 200 g mini semi-sweet chocolate chips or regular-sized
For the Boiling Water
- 2 tbsp brown sugar or honey or molasses
Instructions
Day 1: Feed Your Starter & Mix Your Dough
- In the morning, feed your starter using a 1:5:5 ratio: 15 g sourdough starter, 75 g water, and 75 g bread flour. This recipe uses 150 g, so this leaves you with 15 g left to maintain your starter.
- Bloom the cocoa and espresso: About 30 minutes before you want to mix your dough in the evening, whisk together 80 g steaming hot water, 28 g Dutch-processed cocoa powder, and 1 tsp espresso powder (optional) in a small bowl. Once it has cooled to below 90°F (32°C), proceed to the next step.

- To a stand mixer fitted with the dough hook, add all of the cooled cocoa and espresso mixture, 370 g water, 150 g active starter, 130 g brown sugar, 10 g vanilla extract, 825 g bread flour, 25 g non-diastatic malt powder (optional), 16 g sea salt, and 200 g mini semi-sweet chocolate chips.
- Stand mixer method: Mix on low speed for 7–10 minutes, or until the dough is smooth and has a stiff Play-Doh texture. If your mixer struggles, stop and let it rest for 10–20 minutes, then resume mixing.Hand mixing method: Combine all main dough ingredients in a large bowl and stir until it comes together. Turn out onto a clean counter and knead for 10–15 minutes until smooth and pliable. (It's a workout, but totally doable!)
- Hydration adjustment: If your dough seems too dry, add 1 tbsp water at a time. If it's sticky, add 1 tbsp flour at a time.

- Cover the dough and let it bulk ferment on the counter overnight, about 10–12 hours at 68–75°F (20–24°C). It should puff up nicely and roughly double in size.


Day 2: Shape, Boil, & Bake
- The next morning, dump out your dough and give it a quick knead.
- Divide into 12 equal portions, about 150g each. Shape each portion into a smooth, taut ball. Then, poke a hole in the center of each ball and stretch it out using your fingers to form the bagel shape. Make the hole slightly larger than desired — it will fill in a bit during proofing. If any chocolate chips escape, just pinch them back in. Place on individual parchment squares.
- Optional pause point: You can refrigerate the shaped bagels here for a few hours up to 2–3 days. When ready to continue, remove from fridge and proceed with the second proof at room temperature or in a proofing box until puffy.
- Cover the bagels (so they don't dry out) and let them proof for 5–6 hours at room temperature, or use a proofing box at 80°F (26°C) to speed things up. They should puff up and feel very airy when gently touched. If you pick one up, it should feel very light in the hand.

- Preheat your oven to 425°F (220°C) convection, or 450°F (230°C) conventional. Bring a large pot of water (about 4 quarts) to a boil, then add 2 tbsp brown sugar.
- Drop bagels into the boiling water still on their parchment squares — the parchment will release on its own, so just peel it off and set it aside to reuse. Boil 4 at a time for 20–30 seconds per side, flipping with a slotted spoon. (A smaller pot works fine, too — just boil 2 at a time.)
- Remove boiled bagels and place them back on your parchment-lined sheet tray. Optional: lightly spritz the parchment with cooking oil if concerned about sticking — I've never needed to, but some bakers prefer this.
- Bake for 15–20 minutes until the internal temperature reaches 205°F (96°C) or higher.
- Let cool on a wire rack for at least 30 minutes before enjoying (or 1–2 hours for best results).


Video

Notes
- Warm homes (above 75°F/24°C): If your kitchen is warmer than 75°F (24°C), skip the overnight fermentation and flip the timeline instead. Mix your dough in the morning, monitor the bulk fermentation throughout the day (watching for it to double), then shape and proof in the afternoon/evening. This prevents overproofing.
- Bread flour: Bread flour works best for bagels — its higher protein content gives them a nice chewiness. I’ve tested this recipe with King Arthur unbleached bread flour (12.7% protein) and Central Milling High Mountain bread flour (13.5% protein). If you use a lower-protein flour, such as Kirkland all-purpose flour from Costco (11.5% protein), add 1 tbsp of vital wheat gluten to help it perform like a higher-protein flour, or decrease the water in the dough slightly.
- Non-diastatic malt powder: This is optional but highly recommended — it keeps bagels soft for days and enhances flavor and browning. If you only have diastatic malt powder (or non-diastatic is out of stock, which is the case at the time of this writing), toast it at 325°F (160°C) for 5 minutes first to deactivate the enzymes. Those enzymes would speed up the fermentation, which is not ideal for an overnight fermentation recipe.
- Flexible timeline/long-ferment option: You can refrigerate shaped bagels for a few hours up to 2–3 days, then complete the second proof before boiling and baking.
Conclusion
If you’re a chocolate fan, you’ve gotta try these bagels!! Not only do they taste AMAZING, but your entire house will smell like Willy Wonka’s Chocolate Factory.
And don’t take it from me — here are a few more reviews from recipe testers:
“This is the best bagel I’ve ever made — and I am not even a chocolate lover.” –Recipe tester from Pittsburgh, PA
“It is like the marriage between a brownie and a bagel.” –Recipe tester from San Juan, Puerto Rico
“Warning!!! These are too good. They are the definition of death by chocolate.” –Recipe tester from Myrtle Creek, OR
If you try these, I’d love to see them! Leave a comment below, share a photo, or tag me on Instagram @thatsourdoughgal. Especially if you try one of those wild cream cheese variations — I want to hear about it!
Other sourdough bagel recipes you might love:


I’ve made your chocolate bagels several times. I can’t seem to get the timing right. After 6.5 hours of bulk fermentation in a 73 kitchen my dough was puffy and had risen. But it also had webbing. I divided it and shaped it. My question is now what. Do I cold proof and bake the next day or do I leave it on the counter for a second rise the 5/6 hours?
Leave on the counter for a second rise! You can cold proof it at this point if you want, but you still need to complete that second rise at some point.