
Overnight Cinnamon Raisin Swirl Sourdough Bagels (Advanced Recipe)
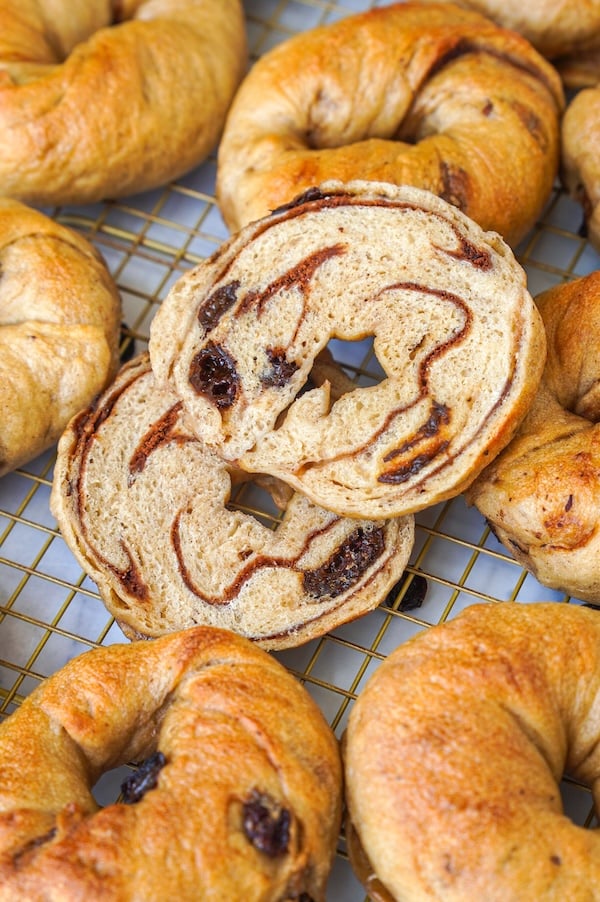
My husband’s favorite bagel flavor growing up was cinnamon raisin, so when he requested cinnamon raisin sourdough bagels, I was ready for the challenge! And boy, was this one a challenge.
The two key ingredients are a little sneaky: cinnamon naturally slows fermentation, and raisins can cause moisture issues. But after a lot of testing, we nailed it!
“Move over Thomas, Rebekah’s in town!” –Recipe tester from Egg Harbor Township, New Jersey
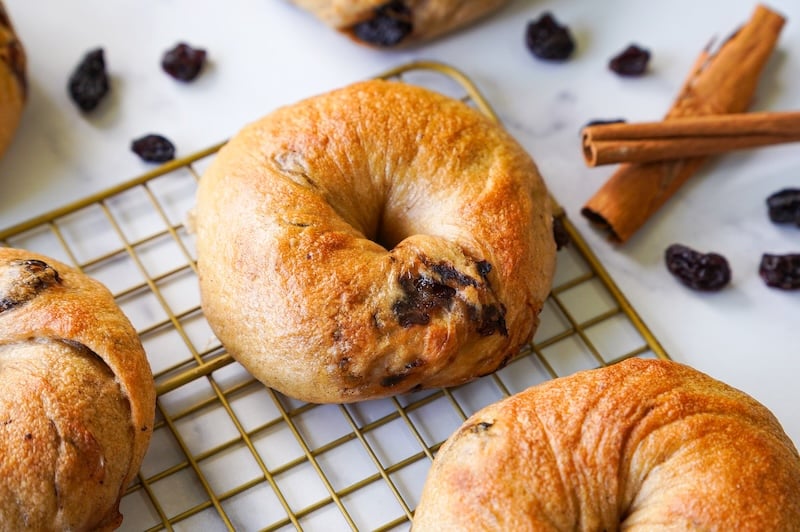
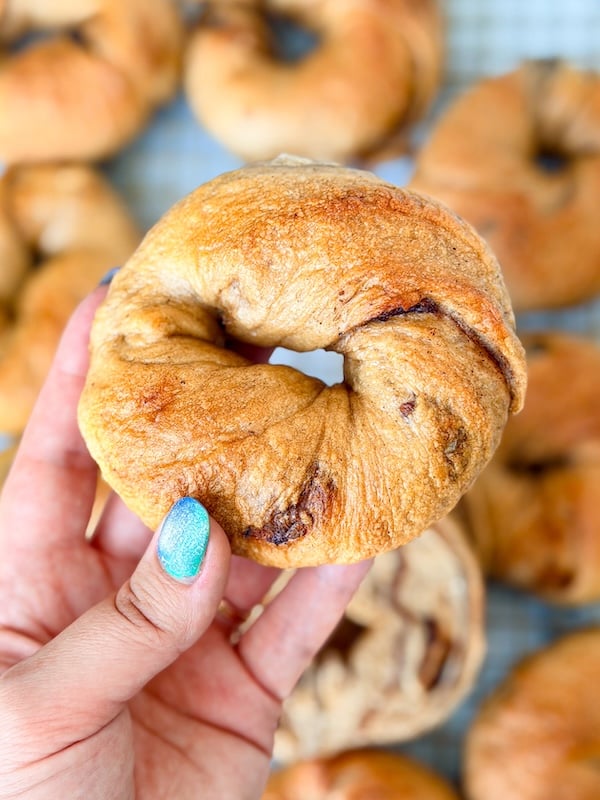
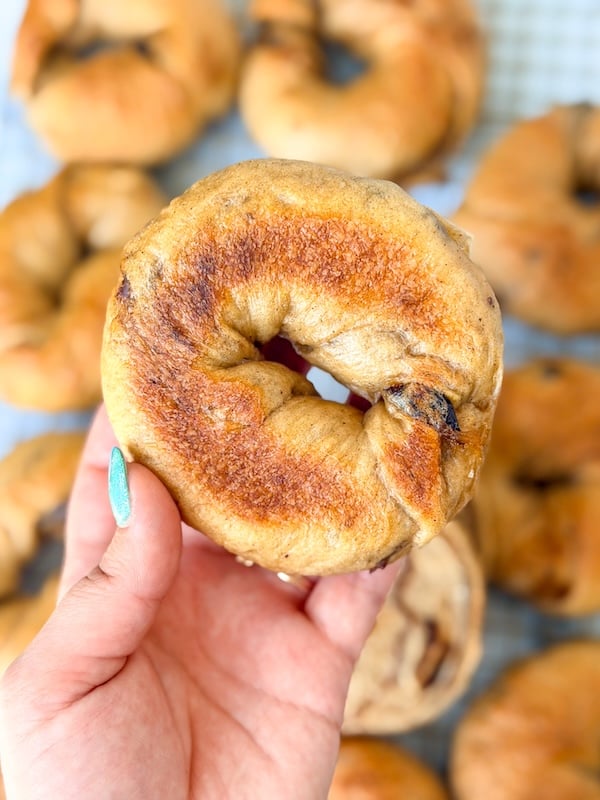
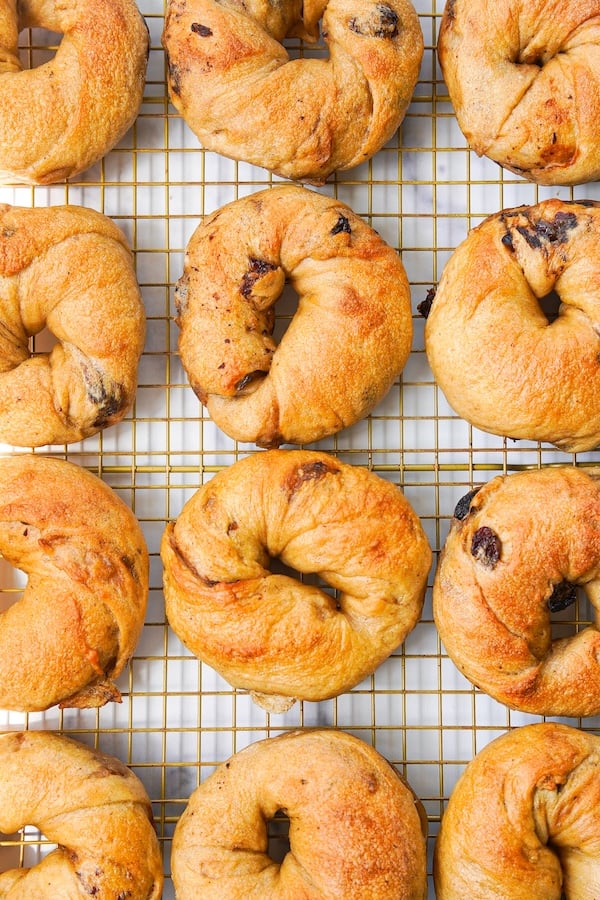
These cinnamon raisin bagels are packed with plump, vanilla-soaked raisins and a warm cinnamon swirl that brings all the flavors together beautifully.
Recipe difficulty: This recipe is a more advanced bake due to the shaping process. Many beginners nailed it on their first try, so don’t let the “advanced” label scare you off. If you’ve never made bagels before, I’d suggest starting with my plain bagel recipe, which is truly beginner-friendly!
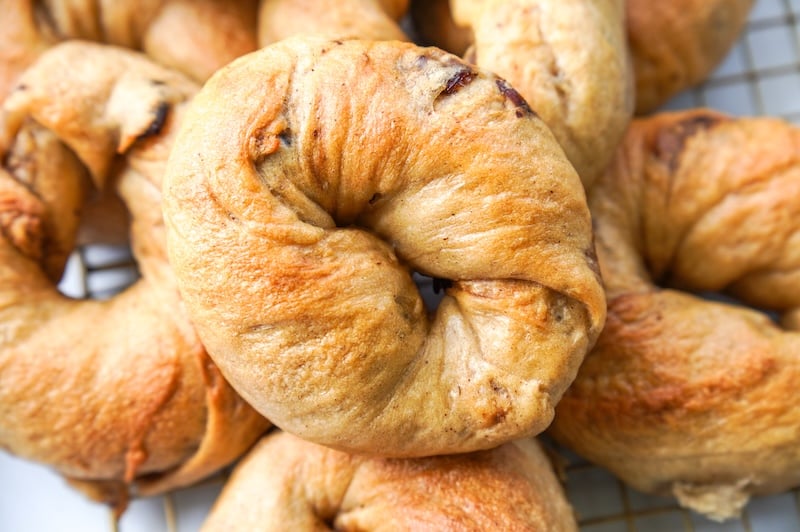
“To quote Steve Harvey, ‘If it were easy, it wouldn’t be worth it.’ These are not easy, but they are definitely worth it!” –Recipe tester from Prescott Valley, Arizona
Disclaimer: Some of the products I recommend in this post are affiliate links. If you choose to purchase through one of my links, I may earn a small commission, which helps fund this website, recipe development, and monthly giveaways. I sincerely appreciate your support.
“This cinnamon raisin sourdough bagel recipe is very doable with all of the great step-by-step instructions and photos, including a detailed shaping video. And it will be the BEST bagel you will have ever eaten!!” –Recipe tester from St. Paul, Minnesota
Why You’ll Love These Cinnamon Raisin Sourdough Bagels
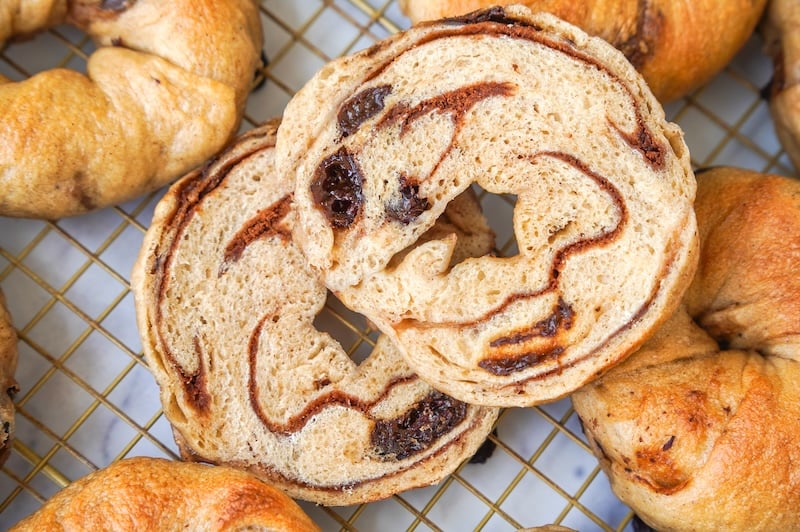
- That cinnamon sugar swirl: Instead of mixing cinnamon into the dough — which interferes with fermentation — we roll it in, like a cinnamon roll. The result is pockets of warm, sweet cinnamon woven through every bite. It’s the thing that makes these completely different from every other cinnamon raisin bagel you’ve ever had.
“The cinnamon sugar swirl in every bite was my favourite part.” –Recipe tester from the United Kingdom
“If you think you don’t like cinnamon raisin bagels, you haven’t tried this one! Cinnamon roll meets bagel!” –Recipe tester from Oregon
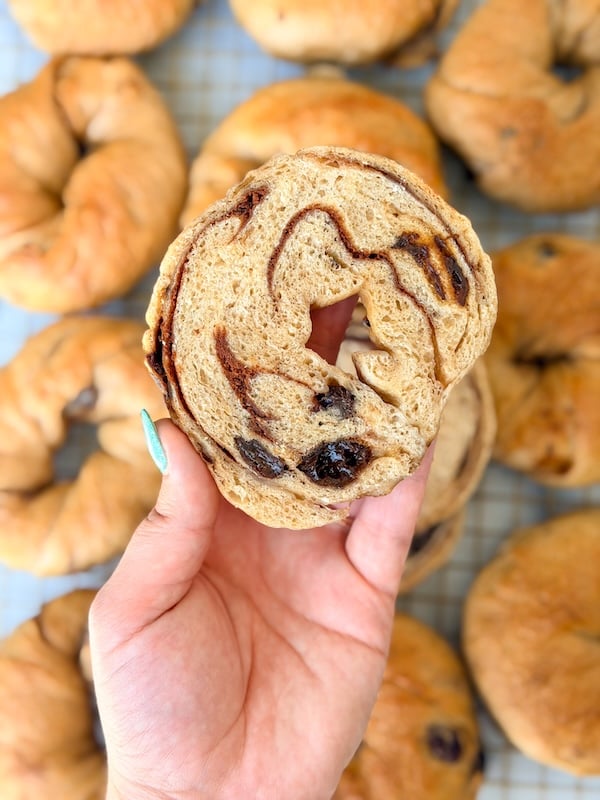
- Recipe tested by 226 home bakers: This recipe earned an average rating of 4.48 out of 5, with 93% giving it 4 or 5 stars. The lower scores? Almost entirely from testers who found the shaping challenging — and nearly every one of them still said the bagels tasted incredible. Come in knowing the shaping takes practice, and you’re going to love these.
- Vanilla-soaked raisins: A short soak in water and vanilla before mixing plumps the raisins and infuses them with a subtle warmth that plays beautifully with the sourdough tang. It’s a small step that makes a noticeable difference in every bite.
“The perfect combination of cinnamon sugar and vanilla.” –Recipe tester from Coeur d’Alene, Idaho
- A true bagel texture: Chewy on the outside. Soft on the inside. 93% of recipe testers described the texture as perfectly chewy, and multiple testers compared them to New York–style bagels.
“I live in the NY/NJ area so you can throw a stone and hit 5 really good bagel places, but these had a better flavor than most of them.” –Recipe tester from New Jersey
- Overnight, mostly hands-off timeline: Feed your starter in the morning. Mix the dough before bed. Wake up to a beautiful, fermented dough ready to shape. This recipe only needs you at a few key moments.
- Stays soft for up to 5 days: Non-diastatic malt powder is the secret ingredient that keeps these bagels soft and chewy long after baking. Totally optional, but highly recommended if you want bagels that are just as good on day 4 as they were on day 1.
- Freezer-friendly: Slice the baked bagles before freezing and place parchment between the halves so they’re ready to go straight into the toaster. You can also freeze the bagels after boiling but before baking — just bake from frozen and add a few extra minutes to the bake time.
“These will be the most beautiful, whimsical and cottage core cinnamon bagels you will ever make. It’s gorgeous inside and out AND tastes delicious — a definite showstopper!” –Recipe tester from Kitchener, Ontario
The Recipe Testing Journey
I already have a wonderful sourdough bagel recipe on this site, so I knew the basic framework going in. The puzzle was getting the add-ins right.
Testing Cinnamon Chips
My first test used chai-soaked raisins and Hershey’s cinnamon baking chips.
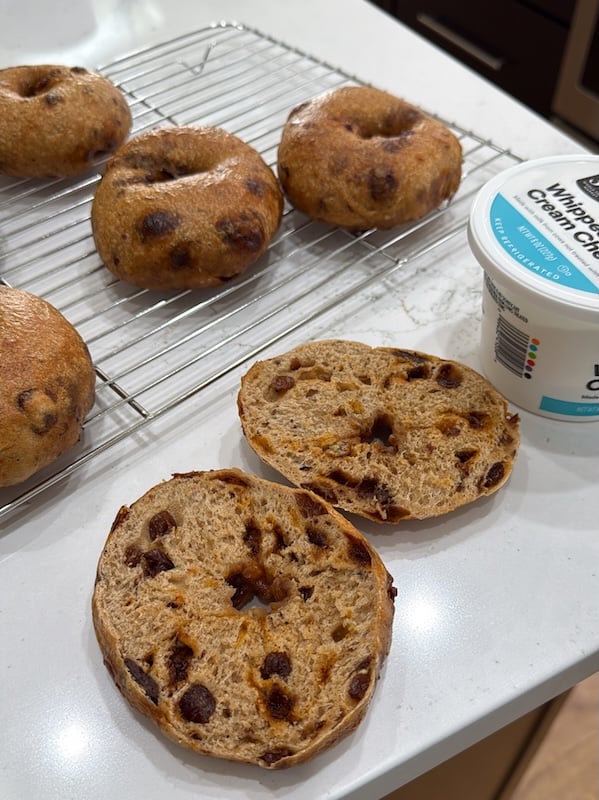
The result was honestly amazing, but the cinnamon chips had an artificial flavor that felt off to me. I polled my Instagram followers, and the vast majority did not want cinnamon chips in the recipe.
So I went back to the drawing board. I do plan to publish the cinnamon chips version since it’s much more beginner-friendly. Stay tuned!
Testing More Ground Cinnamon
In my next test, I switched to dry raisins added straight to the dough, bumping up the hydration to account for the moisture they’d absorb overnight — roughly 30% of their weight, which turned out to be too much.
Instead of cinnamon chips, I leaned into more ground cinnamon in the dough itself.
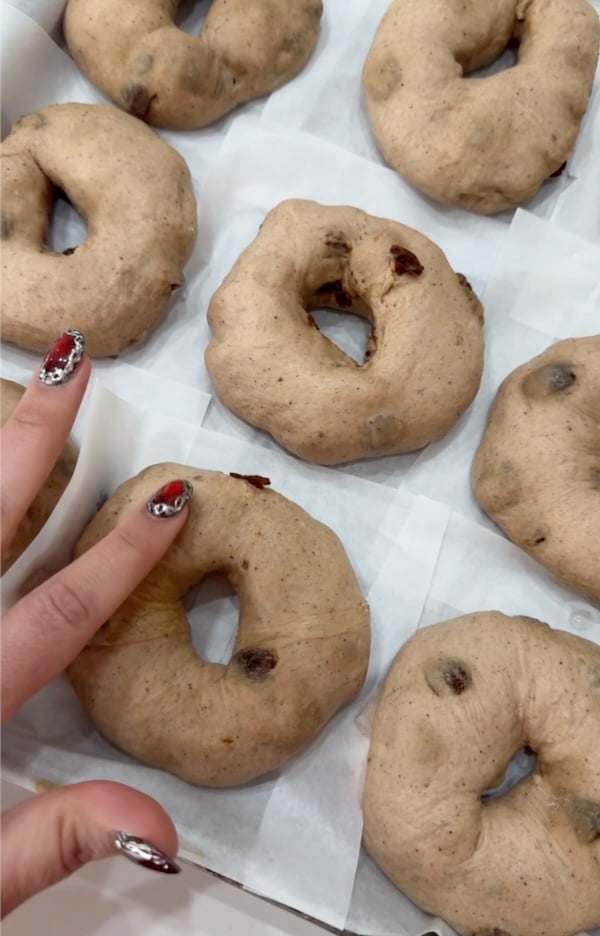
Total fail!
The amount of ground cinnamon you need in the dough for the flavor to truly pop is enough to interfere with fermentation. Cinnamon has antimicrobial properties, and too much of it can slow fermentation enough to prevent a proper rise.
I needed a way to add tons of cinnamon flavor without adding it directly to the dough — what a dilemma!
Testing Frozen Cinnamon Bits
Several bakers suggested making a cinnamon paste with butter, brown sugar, cinnamon, and flour, then freezing it on a sheet tray.
During shaping, I planned to chop up the frozen cinnamon sheet and add the bits to each bagel.
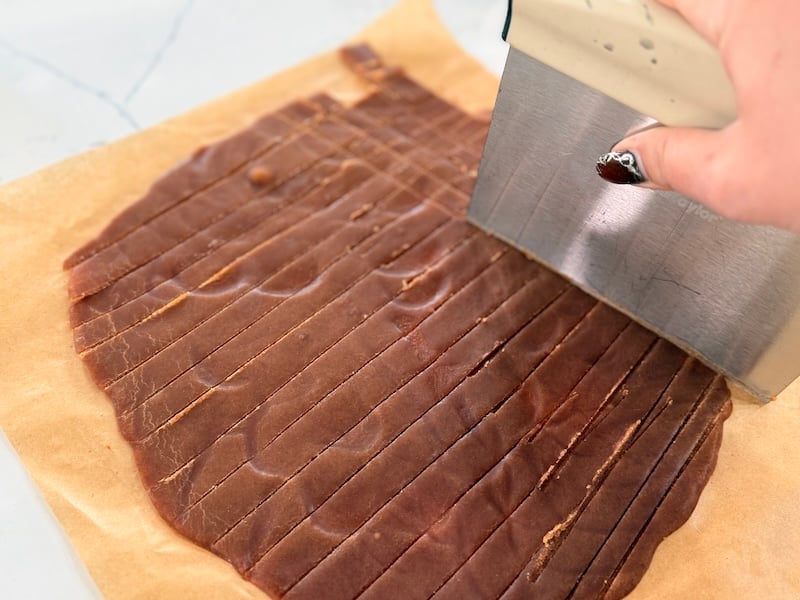
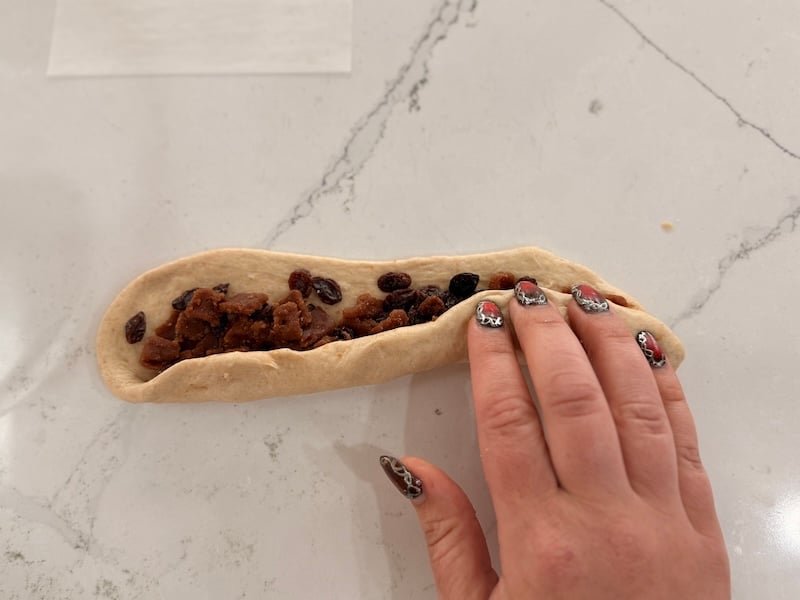
The problem? The frozen cinnamon bits started melting after about 5 minutes, leading to a sticky cinnamon MESS. I actually liked the shaping technique, but not the frozen cinnamon bits.
The resulting bagel was getting closer, but the cinnamon mixture was too gooey for a bagel, and the raisins really needed to be a part of the dough.
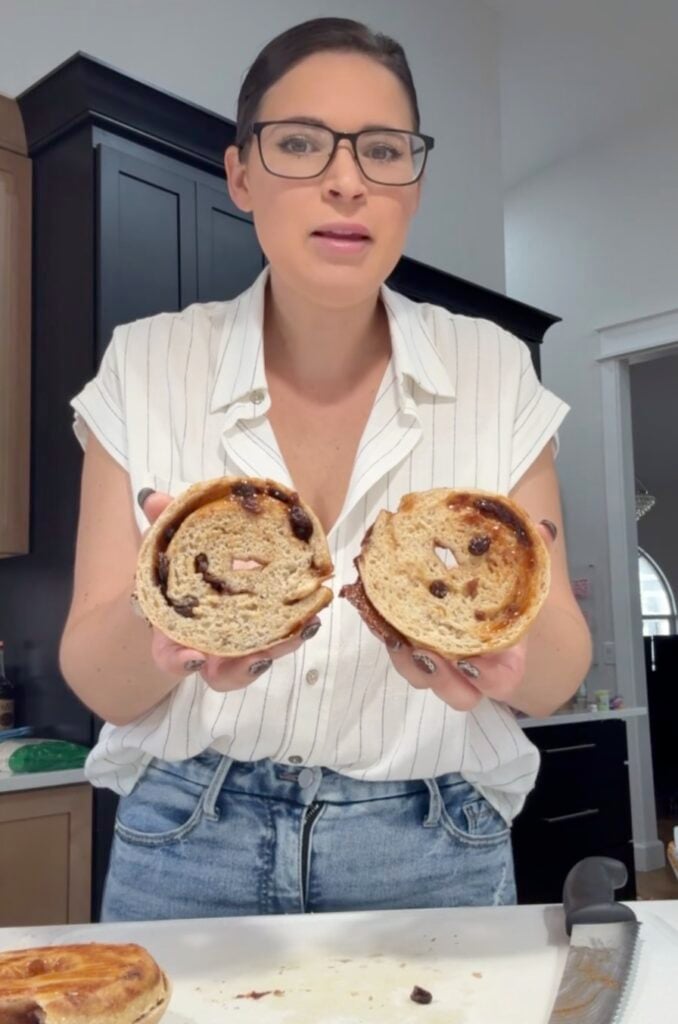
Testing Cinnamon Sugar
For my final test, I mixed cinnamon, sugar, and flour in a small bowl. During shaping, I spooned the mixture over each flattened piece of dough, then rolled and twisted it so the interior would be marbled with cinnamon.
The shaping took longer, and I worried beginners would struggle with the extra steps, but the result was well worth it.
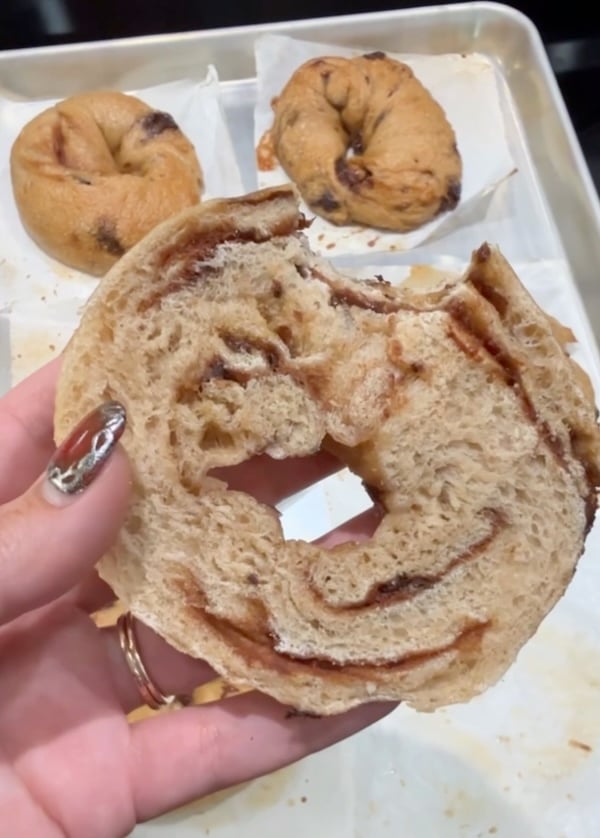
I knew I wouldn’t be making cinnamon raisin bagels any other way going forward, so I sent the recipe to testers and braced myself for the feedback.
Meet the Recipe Testers
This recipe was tested by 226 home bakers from 206 unique locations — we’re talking the US, Canada, Australia, the UK, Ireland, Germany, Uganda, Qatar, and beyond. They did not hold back.
Testers used:
- Bread flour from King Arthur, Central Milling, Costco/Kirkland, Sam’s Club, Bob’s Red Mill, and other brands
- The overnight timeline and the daytime (flipped) timeline
- Stand mixers, hand kneading, and a mix of both
- Non-diastatic malt powder, diastatic malt toasted in the oven, and no malt powder at all
- Proofing boxes, warm ovens, and cool counters
The final result? An average rating of 4.48 out of 5, with 93% of testers giving it 4 or 5 stars.
The one area testers had the most thoughts on? Shaping. About 74% of testers said they had at least a little trouble with it — and that’s exactly why the shaping section below is more detailed than anything I’ve written before.
Shout out to Delorse for her honesty 😂:
“Be prepared to maybe cuss a little during the shaping process 😂😂😂” –Recipe tester from Missouri
The good news: even testers who struggled made incredible bagels, and nearly all of them were raving about the flavor in the same breath.
“The shaping may seem daunting at first but put your earbuds in and listen to music to bake by on Spotify and go for it… you won’t be disappointed.” –Recipe tester from Connecticut
“Quite literally the best homemade bagels I have ever had! (A very critical Jersey Girl!)” –Recipe tester from Myrtle Beach, South Carolina
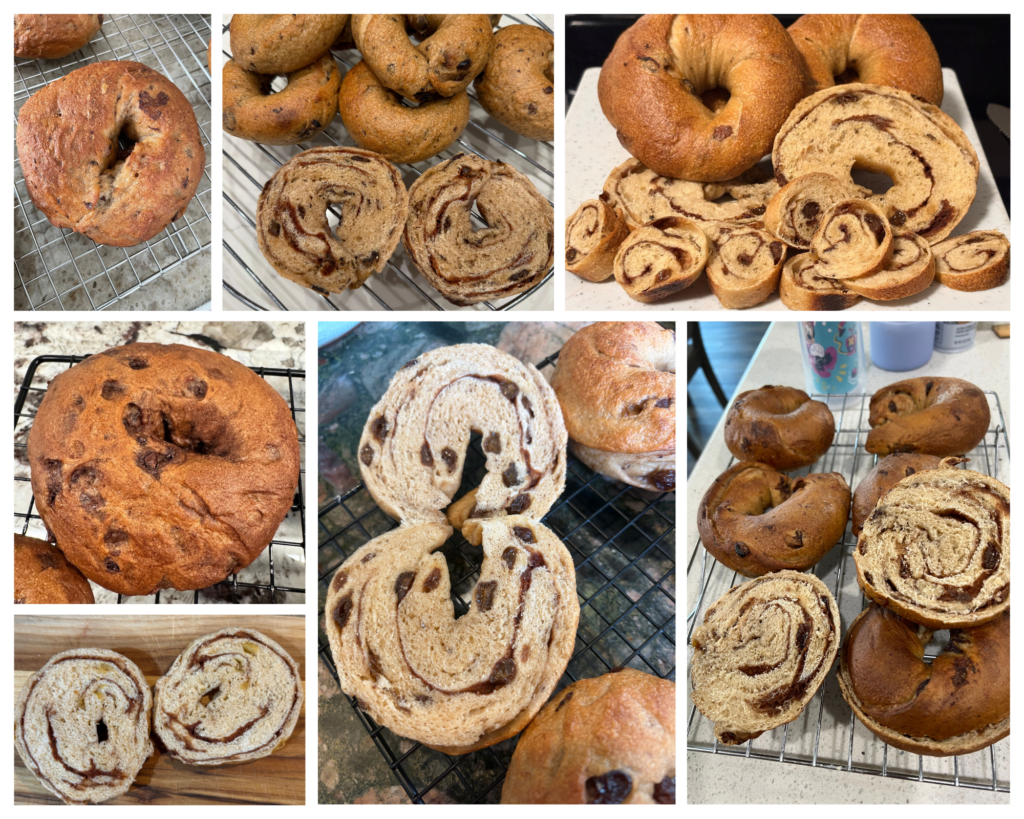
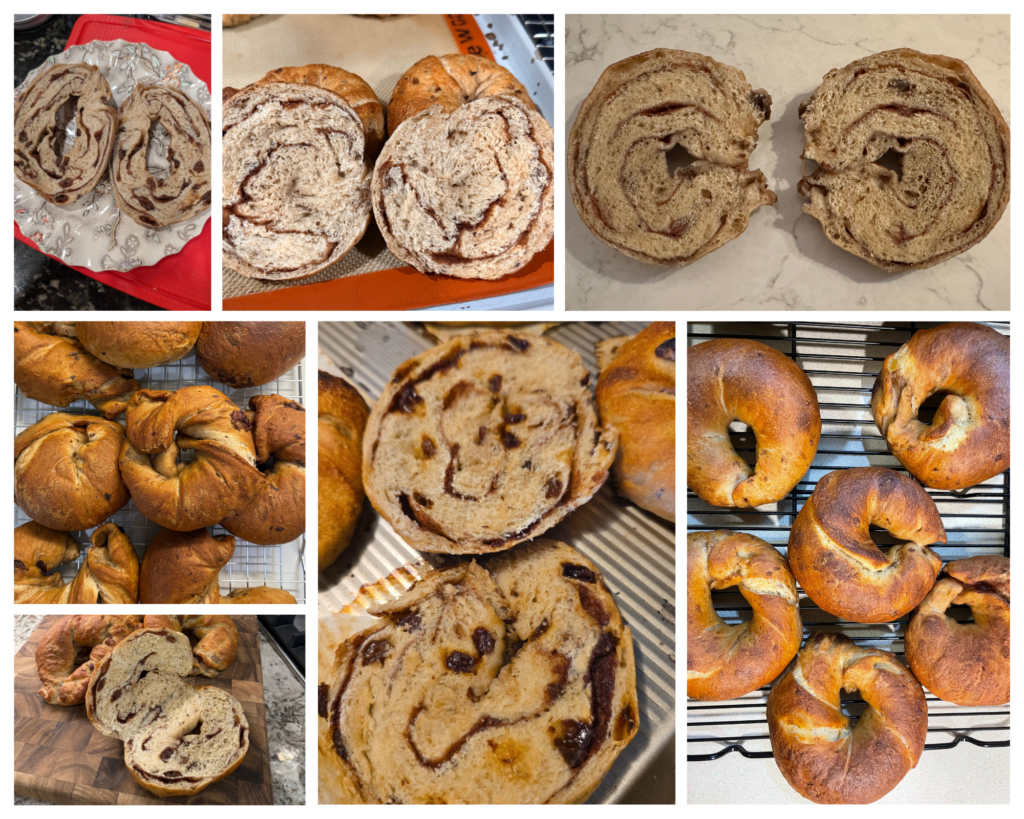
Baker’s Timeline
This recipe runs on an overnight timeline, which fits really well into a busy schedule:
Overnight Fermentation | |
| Morning, Day 1 | Feed your starter |
| Evening, Day 1 | Mix your bagel dough; bulk ferment overnight |
| Morning, Day 2 | Shape the bagels; second proof |
| Afternoon/Evening, Day 2 | Boil and bake |
Note for warm kitchens above 75°F (24°C): Use the flipped timeline instead. Mix your dough in the morning, monitor bulk fermentation throughout the day, then shape and proof in the afternoon or evening. This helps prevent overproofing in a warm kitchen.
Daytime Fermentation (Flipped Timeline) | |
| Night before | Feed your starter |
| Morning | Mix your bagel dough; bulk ferment all day |
| Evening | Shape the bagels; second proof |
| Night | Boil and bake, OR refrigerate shaped bagels and boil/bake the following day |
Equipment You’ll Need
- Kitchen scale: A scale gives you consistent results, especially when dividing the dough and portioning the cinnamon sugar filling for each bagel.
- Stand mixer with dough hook: Bagel dough is stiff — stiffer than most bread doughs — and kneading it by hand is a workout. A stand mixer makes this much easier, but don’t worry, you can absolutely knead it by hand if needed!
- Half sheet tray + parchment squares: The bagels proof on individual parchment squares and slide directly into the boiling water — parchment and all. Dollar Tree carries inexspensive parchment squares that work great for this.
- Half sheet tray cover: This keeps the shaped bagels from drying out during the second proof and is a great alternative to plastic wrap for the second proof.
- Large pot for boiling: Use a pot wide enough to boil 3–4 bagels at once comfortably.
- Slotted spoon or spider scoop: Used for flipping and removing bagels from the boiling water. I tend to reach for a regular slotted spoon, but a large slotted spoon or spider scoop works well too!
Ingredients for Cinnamon Raisin Sourdough Bagels
- Sourdough starter: You’re doing a 1:5:5 feeding ratio here — just enough to build a healthy, active starter for the dough. If your starter is already active and bubbly from a recent feeding, you can skip the feeding step. Don’t use discard straight from the fridge for this one.
- Water: Room-temperature tap water works fine. If you have heavily chlorinated city water, spring water is worth using.
- Sugar: Adds just a touch of sweetness and helps with browning during baking.
- Vanilla extract or paste: This is a meaningful amount of vanilla — it actually comes through in the finished bagel. Vanilla paste gives you a stronger flavor and those pretty little specks; extract works great, too.
- Bread flour: Bread flour’s higher protein content is what gives bagels their characteristic chew. I tested with Central Milling High Mountain, which is my favorite. Most recipe testers used King Arthur unbleached bread flour.
- Non-diastatic malt powder (optional): This is the secret weapon in my bagel and soft pretzel recipe. It keeps the bagels soft for days and enhances both browning and flavor. It’s optional, but if you can find it, I really encourage you to use it. See the Ingredient Substitutions section for what to do if you can’t.
- Ground cinnamon: Use ground cinnamon from the spice aisle.
- Salt: I use Redmond’s Real Salt (15% off with code TSG15), but any salt will work.
- Raisins: Regular raisins work great here. Golden raisins are a popular swap — several testers used them and loved the result, though they can have a slightly green tint after baking. Whatever variety you use, don’t skip the soak — it’s what gives the raisins that plump texture and vanilla-infused flavor that make these bagels stand out.
“I love rehydrating the raisins in vanilla. It gave them an AMAZING flavor. I don’t usually love raisins, but this made them taste way better. I’ll do this going forward for all of my recipes that call for raisins.” –Recipe tester from Iowa
- Brown sugar: This goes into the boiling water to add a subtle depth of flavor to the crust and help with browning. Molasses or honey works as a substitute.
- Baking soda: This is added to the boiling water to help with browning. Some testers preferred the bagels without baking soda, so you can omit it — just note that your bagels won’t brown as deeply on top.
Ingredient Substitutions
- Bread flour: Bread flour is strongly recommended for bagels — the higher protein content gives you that signature chew. If you use a lower-protein all-purpose flour such as Kirkland’s AP flour from Costco, add 1 tablespoon of vital wheat gluten or reduce the water slightly.
- Non-diastatic malt powder: If non-diastatic malt powder is not available, you can use diastatic malt powder instead, but toast it at 325°F (160°C) for 5 minutes to deactivate the enzymes before adding it to the dough. Multiple testers did this successfully. Do not skip the toasting step — active diastatic malt powder can speed up your fermentation significantly, which is not what you want for an overnight recipe.
- Vanilla extract vs. paste: Either is great. Paste has a slightly stronger vanilla flavor and adds pretty vanilla specks throughout the bagels.
- Raisins: Dried cranberries or dried blueberries can be used as a 1:1 swap by weight. A few testers omitted the raisins entirely and increased the water by about 25g to compensate.
- Brown sugar in the boiling water: Use molasses or honey if you don’t have brown sugar on hand.
How to Make Cinnamon Raisin Sourdough Bagels (Step-by-Step)
This section is more detailed than the recipe card. If you want all the tips and extra photos, you’re in the right place.
Step 1: Feed Your Starter
In the morning, stir together 15g sourdough starter, 75g water, and 75g bread flour (or all-purpose flour) in a medium glass jar. Cover loosely and let ferment for 10–12 hours at 68–75°F (20–24°C).
By evening, it should be bubbly, domed, and about tripled in size.
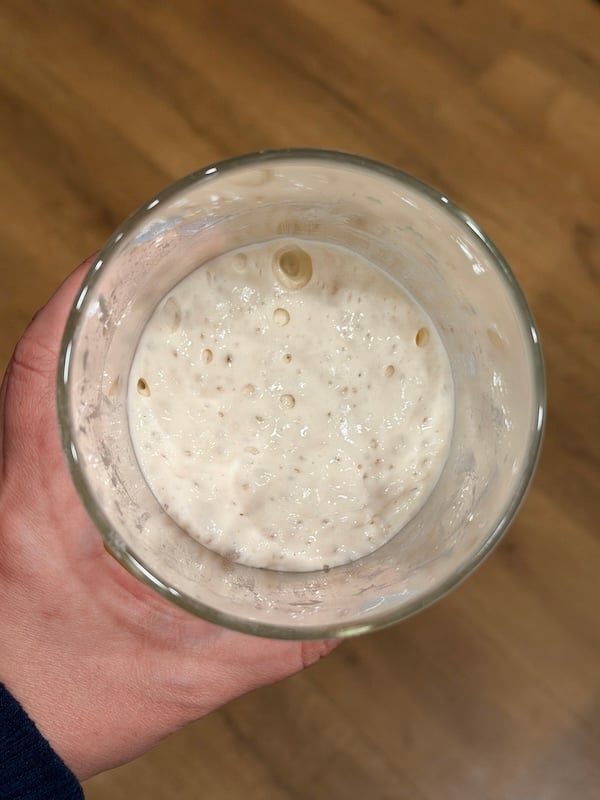
Note: If your starter is already active from a recent feeding, you can skip this step and use 150g of your starter directly.
Step 2: Soak the Raisins
To hydrate the raisins and help prevent wet spots around them later, about 15 minutes before you’re ready to mix the dough, combine 140g raisins, 15g vanilla extract, and 20g water in a small dish.
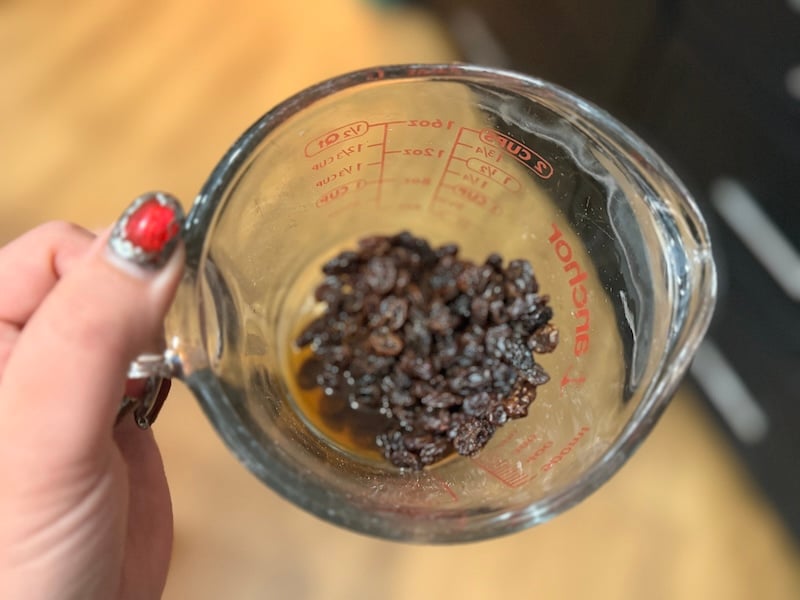
This gives them that slightly sweet vanilla flavor that makes these bagels stand out.
Don’t soak much longer than 15 minutes. One tester left hers overnight and found the raisins fell apart completely.
Step 3: Mix the Dough
In a stand mixer fitted with the dough hook, combine:
- 410g water
- 150g active sourdough starter
- 30g sugar
- 825g bread flour
- 26g non-diastatic malt powder (optional)
- 16g salt
- 1/2 tsp ground cinnamon
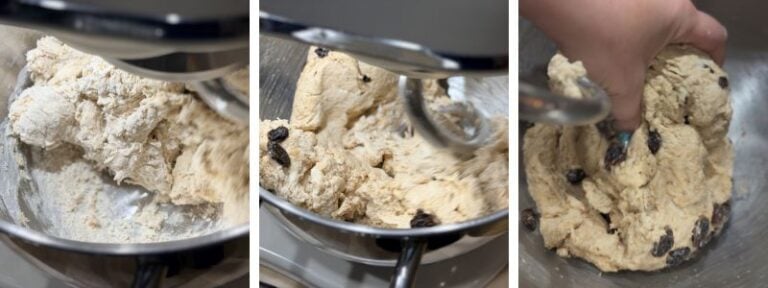
Mix on low speed (speed 1) for about 1 minute, just until the dough starts coming together. Then add the soaked raisins — including the soaking liquid — and continue mixing for another 1–2 minutes, just until the raisins are evenly distributed. Stop before the dough hook has a chance to shred them.
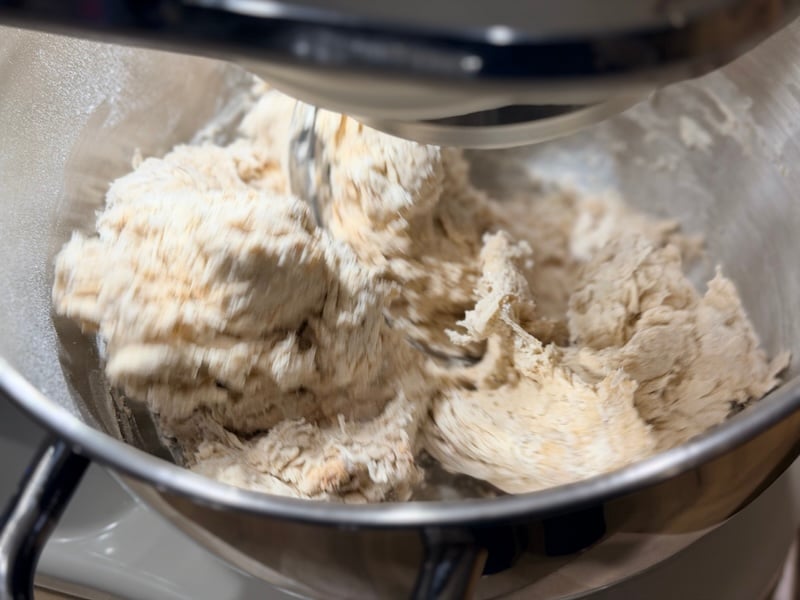
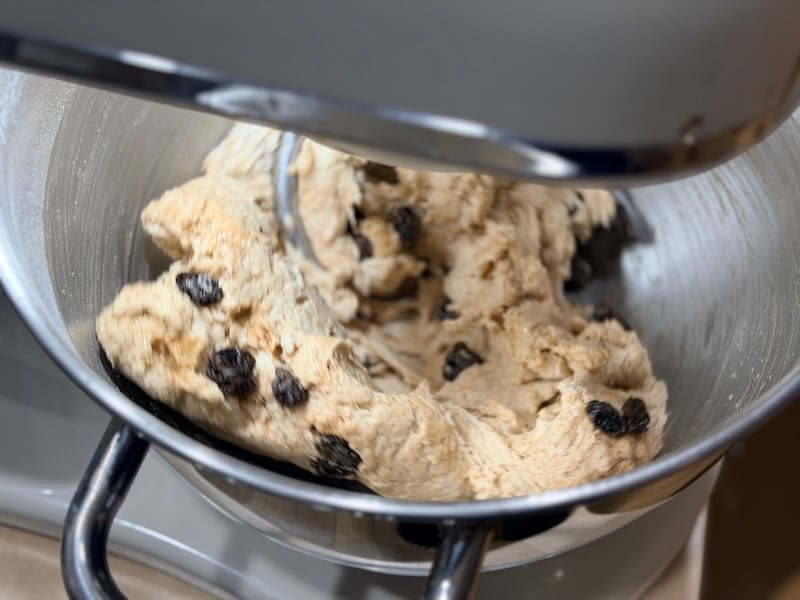
Dough consistency check: The dough should be firm yet slightly tacky, but not sticky. Think Play-Doh. If it clings to the bowl walls, it’s too wet — add flour in 1 tablespoon increments. If it won’t come together because it’s too dry, add water in 1 tablespoon increments.
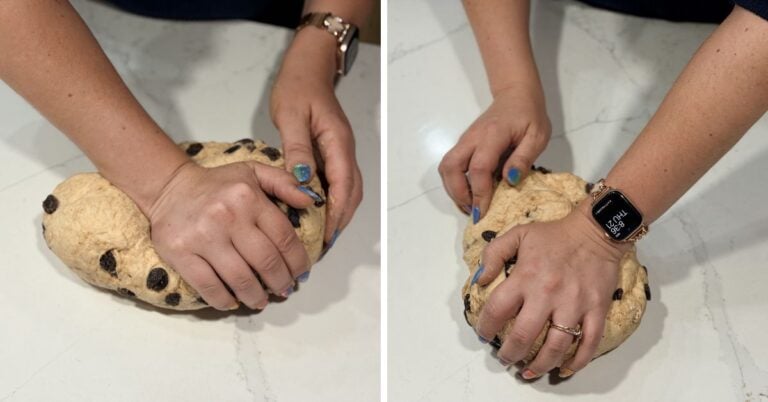
Turn the dough onto your counter and knead by hand for 3–4 minutes, until the dough feels smooth. Place in a bowl, cover, and rest for 30 minutes.
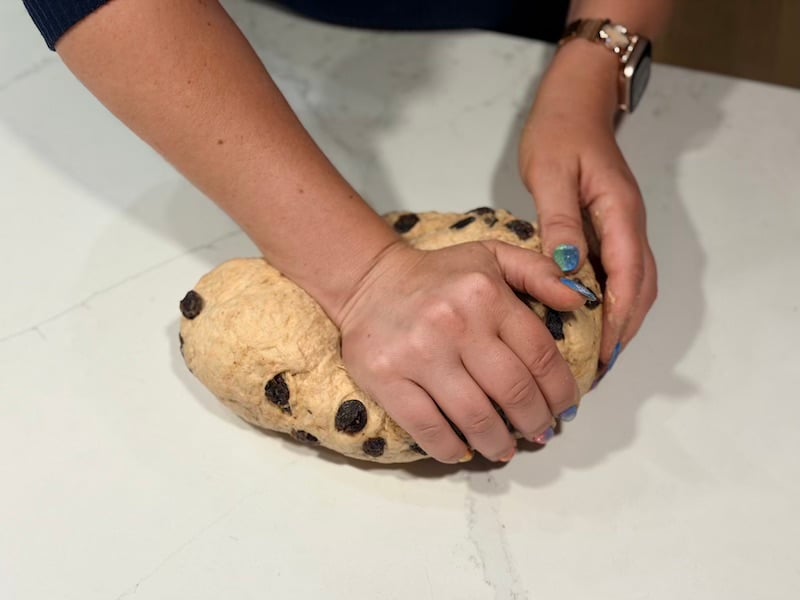
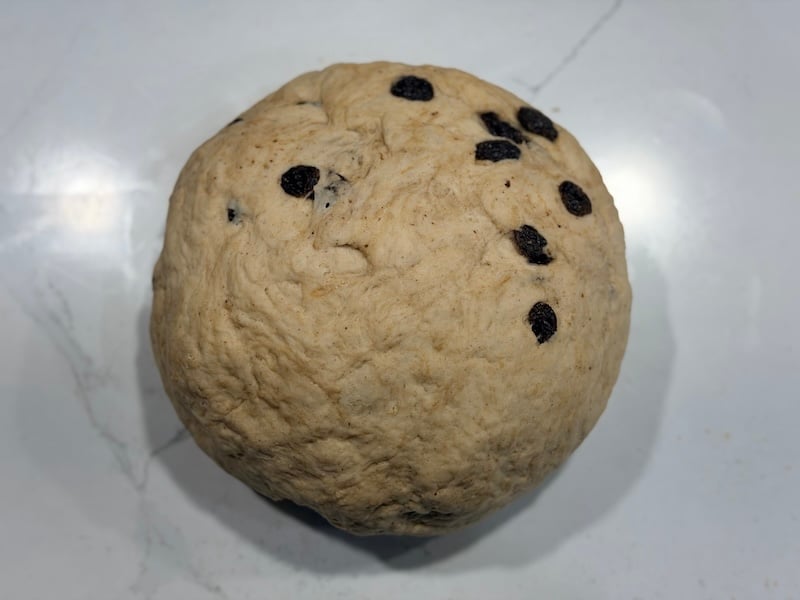
Optional: After the 30-minute rest, knead the dough again for 2–3 minutes. This develops the gluten a bit more, strengthening the dough — and the stronger it is, the more stable the rise.
If you’re mixing solely by hand, plan on about 10 minutes of kneading total. The dough is stiff, so it’s a workout — rest it for 5–10 minutes if it resists (or your arms need a break), then continue.
About 8% of testers kneaded by hand, and every single one rated the recipe 4 or 5 stars.
Step 4: Bulk Fermentation
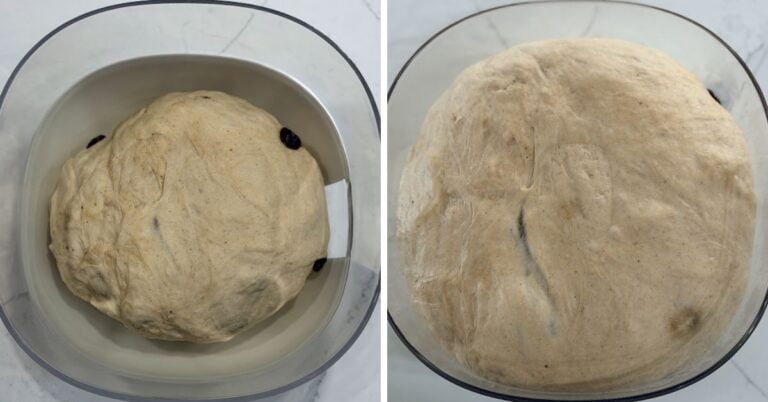
Cover and let the dough bulk ferment on the counter overnight for 8–12 hours at 68–75°F (20–24°C). The dough should roughly double in size.
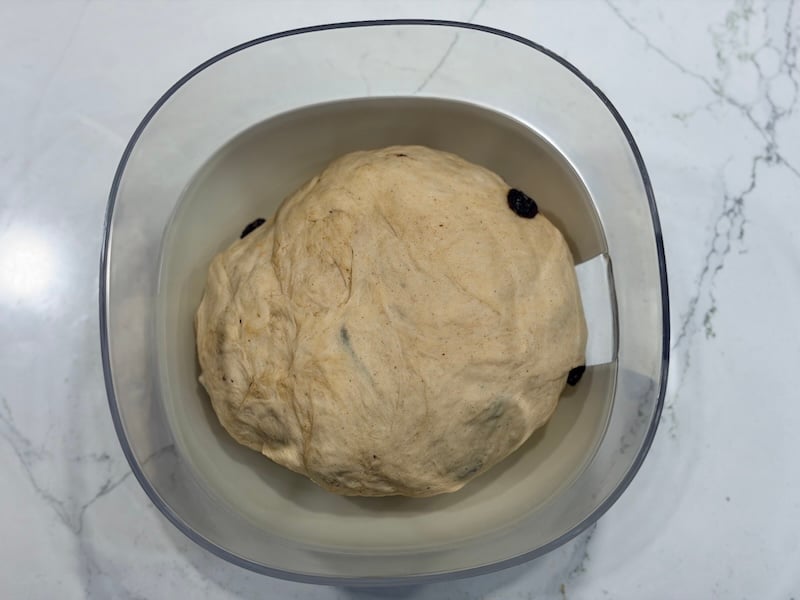
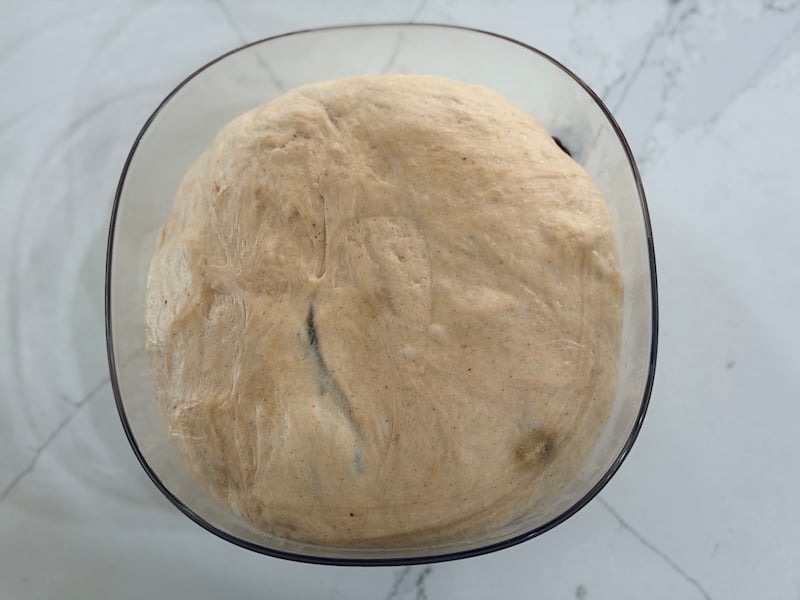
How to know it’s done: In the morning, the dough should have clearly risen (around doubled in size) and look puffy. If you punch down the dough, it should leave a deep imprint.
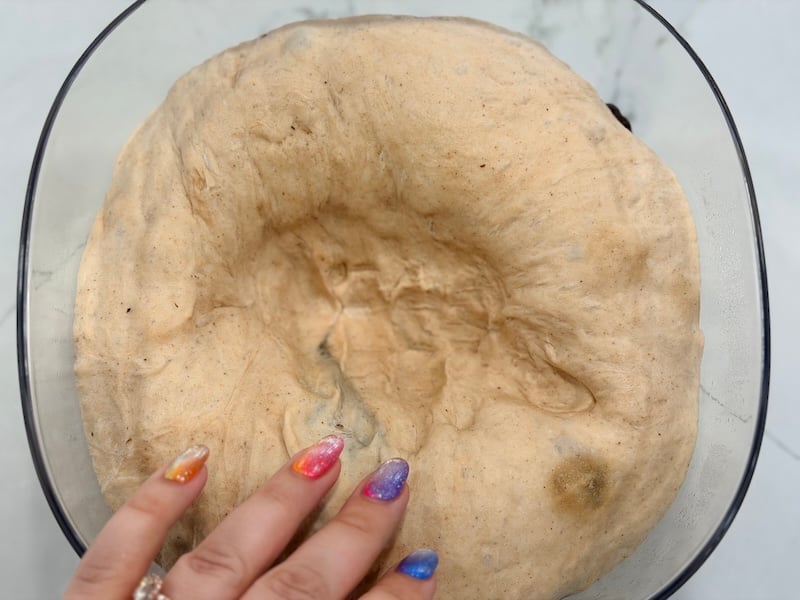
Timing guide by kitchen temperature:
- Under 68°F (under 20°C): 12–14+ hours
- 68–73°F (20–23°C): 10–12 hours, sometimes closer to 13
- 74–76°F (23.5–24.5°C): 8–10 hours
- 77–80°F (25–26.5°C): 7 hours or less — use the flipped timeline so you can keep an eye on it
A Note About Dough Doubling
A lot of bakers get a bit stuck on the percentage rise or “doubling” language. If the dough has fermented for 12 hours or more, I’d focus less on the exact rise and more on signs of fermentation. Has the dough expanded? Does it feel full of air when you poke it? If you punch it down, does it leave an imprint? That’s really what you’re looking for. Your dough might not double, or it might rise much more than expected — both are fine in my experience.
That said, if it’s truly dragging in a normal-temperature kitchen, your starter may need a few strengthening feeds before your next bake.
Step 5: Make the Cinnamon Sugar Mixture
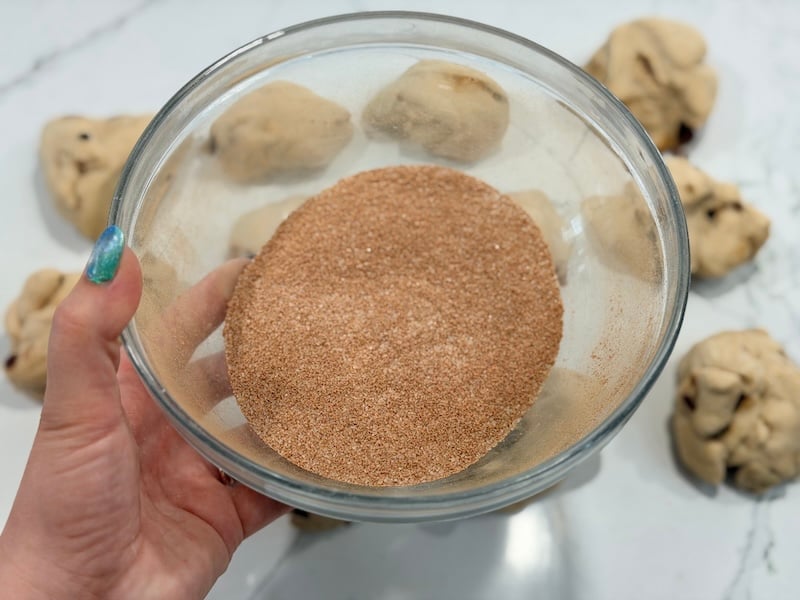
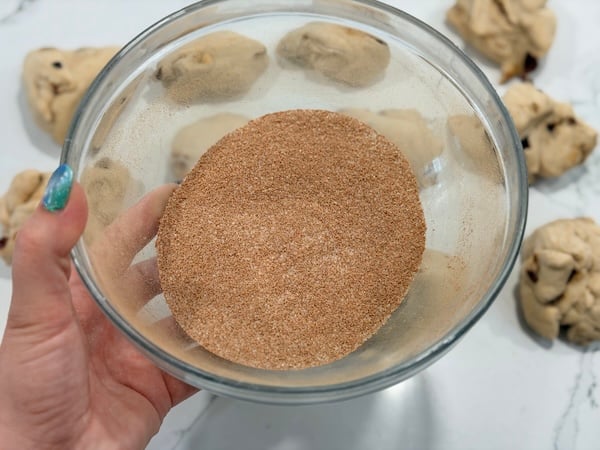
The next morning, mix together 90g sugar, 15g bread flour, and 15g cinnamon in a small dish. The flour helps stabilize the mixture and keeps it from melting and leaking out during the second proof.
Step 6: Divide and Shape the Bagels
This is the step everyone talks about, and I want to be real with you: it takes time and practice.
Most testers spent 25–60 minutes shaping a full batch of 12. By bagel 6 or 7, nearly every tester said they’d figured it out. Your first batch is your practice batch — and imperfect-looking bagels taste just as incredible as pretty ones.
Here’s a shaping video from start to finish — then I’ll break down each step with photos below.

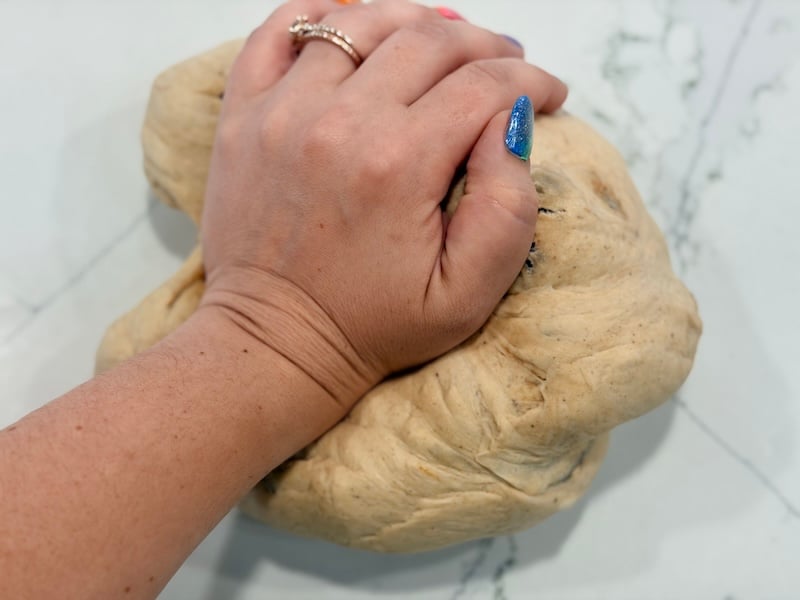
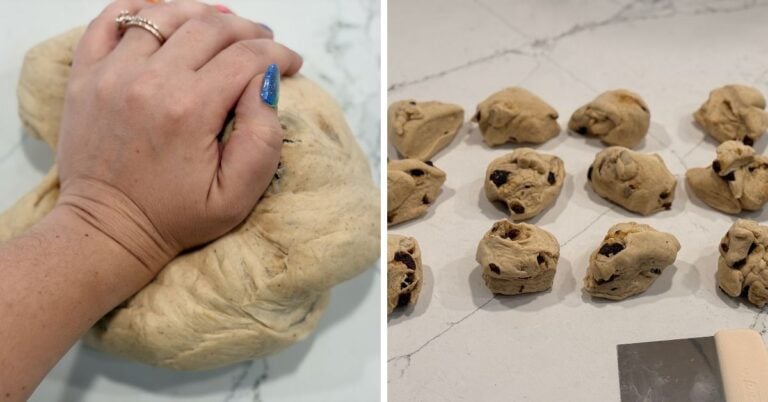
Divide the dough: Punch down the dough, give it a quick knead, and divide it into 12 equal pieces, about 135g each.
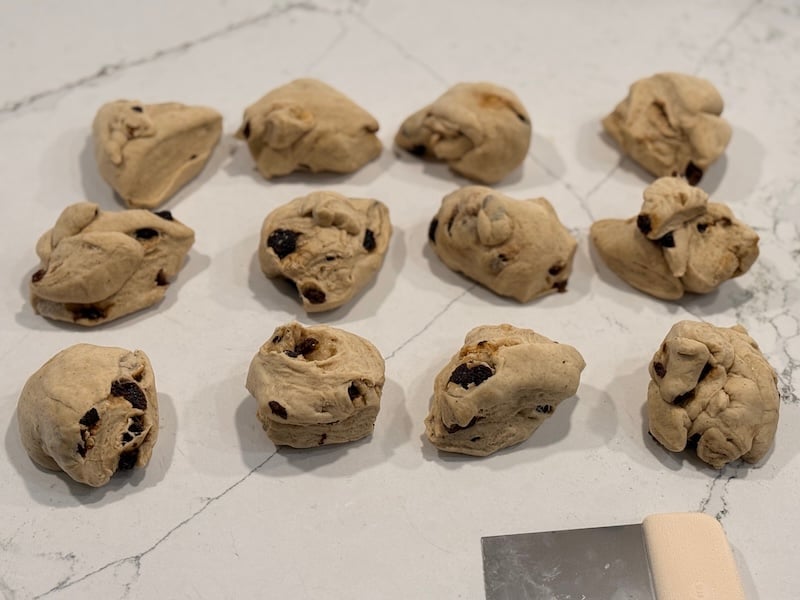
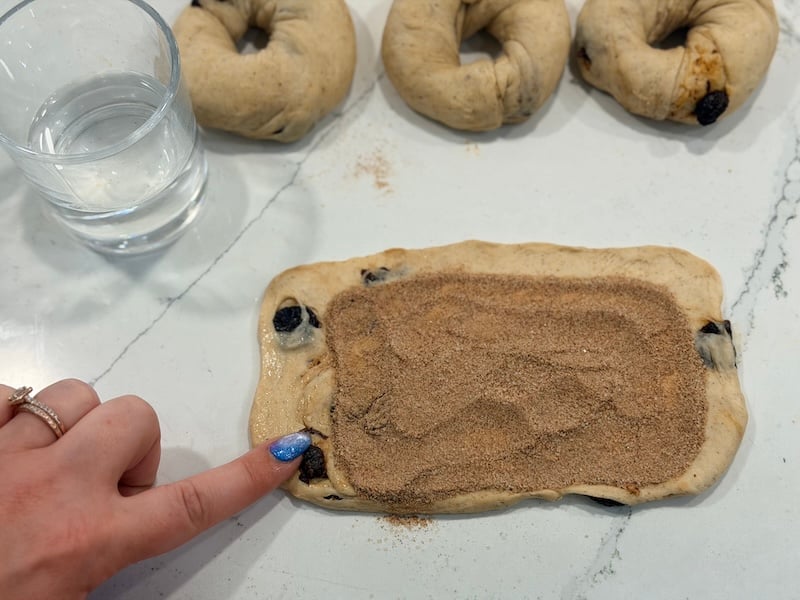
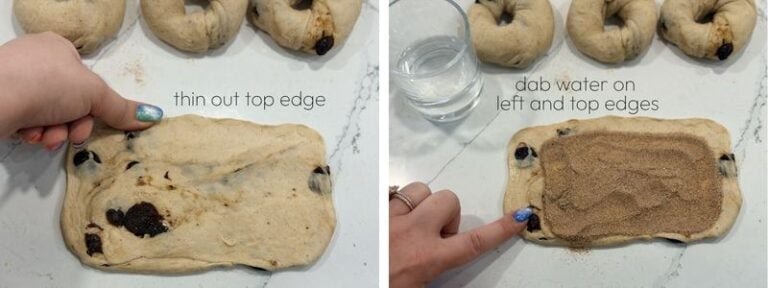
Flatten and fill: Working one piece at a time (keep the rest covered so they don’t dry out), use a rolling pin to flatten a dough ball into a rectangle — about 8 inches long by 4 inches wide. Thin the top edge with your thumb. Sprinkle 10g (a scant tablespoon) of the cinnamon sugar mixture over the rectangle, leaving a 1-inch gap on the left side and a smaller gap along the top edge and right side.
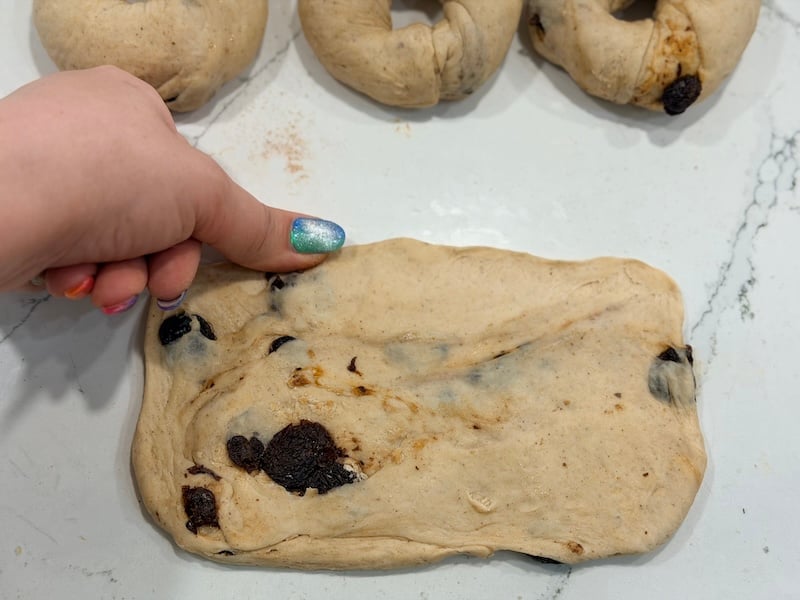
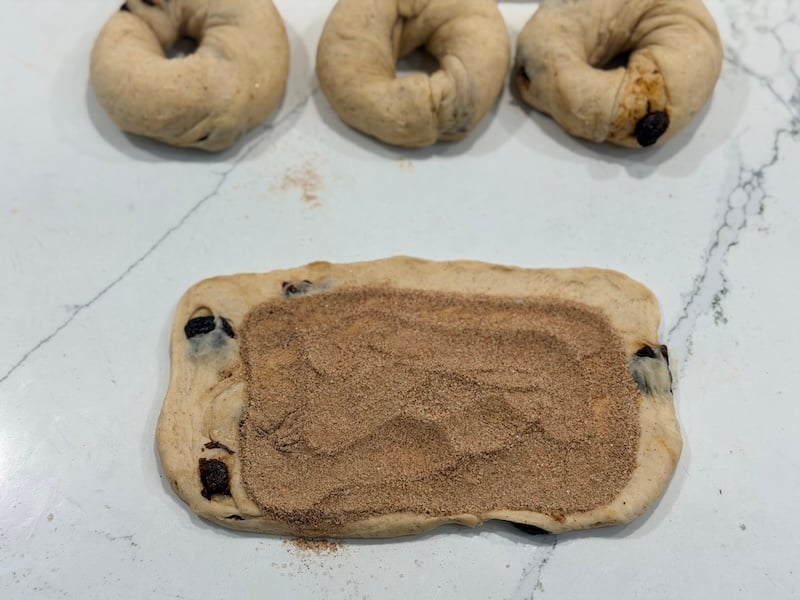
Quick tip: To quickly measure 10g of cinnamon sugar, set your bowl directly on the scale and zero it out. Use a spoon to scoop the mixture out until the display reads −10g — that’s the amount you need!
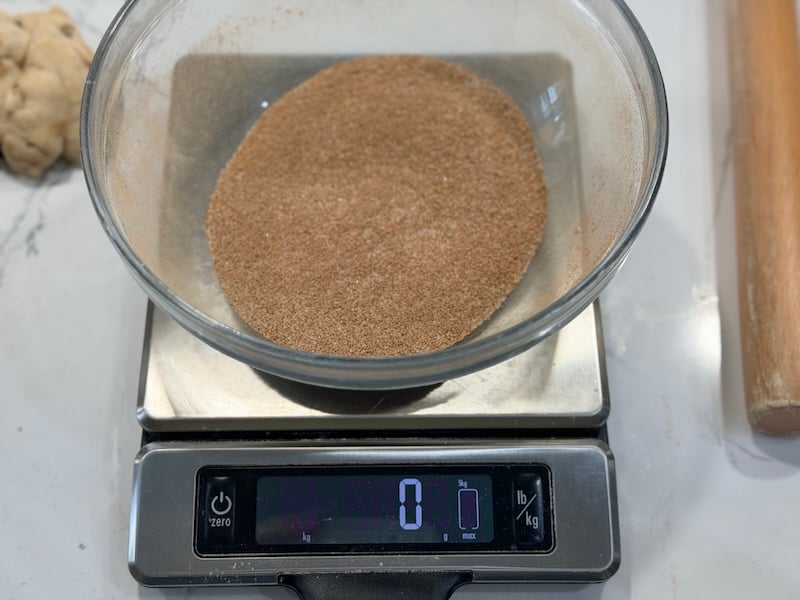
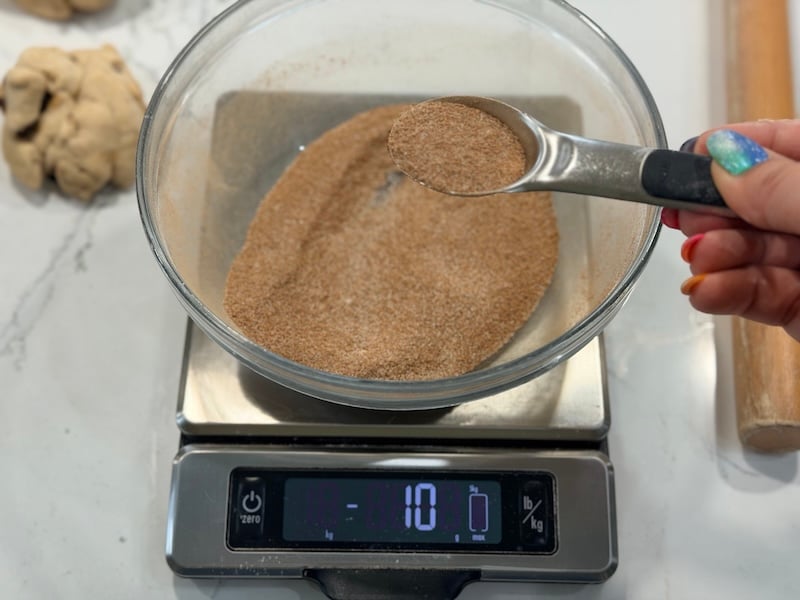
Wet your finger and dab along the left side and top edge to help the dough adhere to itself.
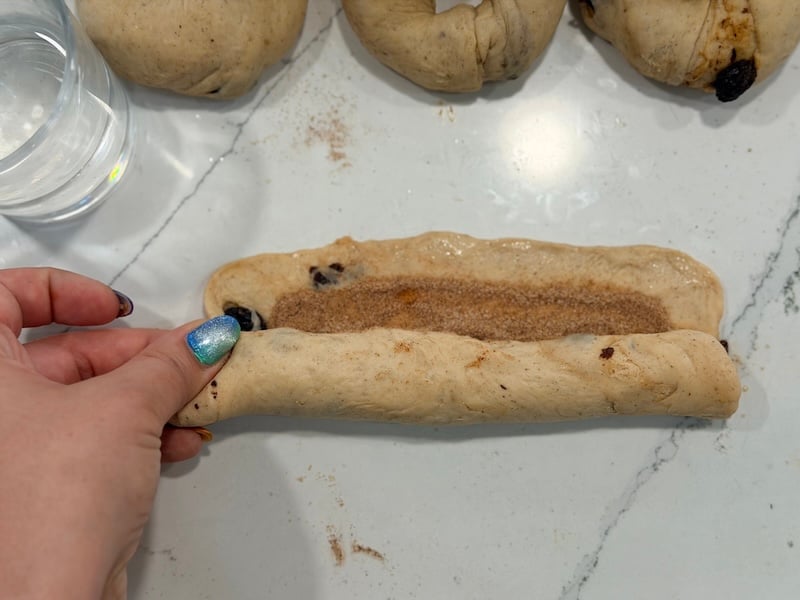
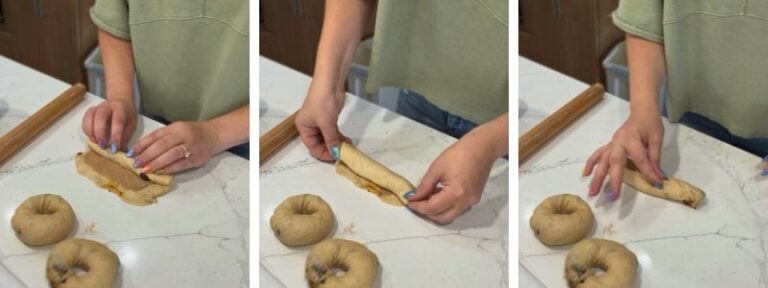
Roll: Starting from the edge nearest you, roll the rectangle up tightly, tucking in and pinching the side seams closed as you go. Pinch the seam along the log closed. You should end up with a log.
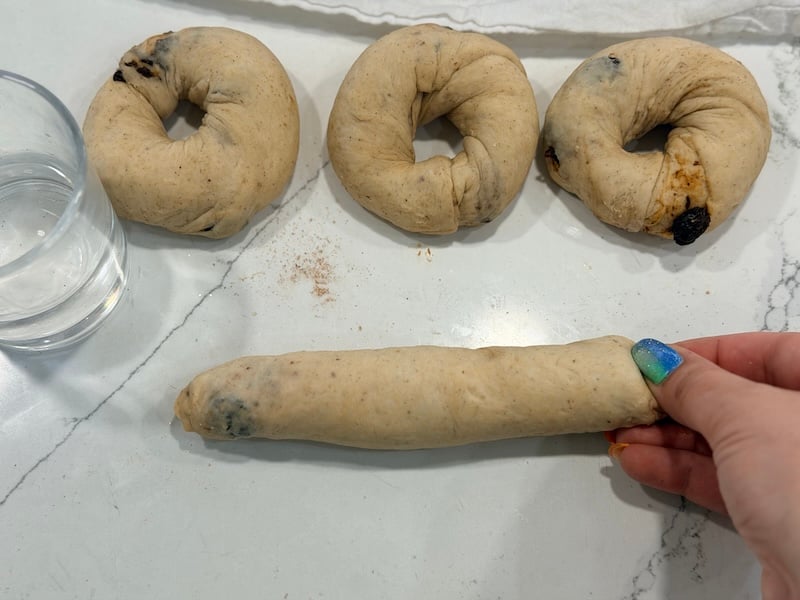
If your log is too short to wrap around into a bagel shape, gently squeeze and work it between both hands, moving from the center outward, until it reaches the length you need.
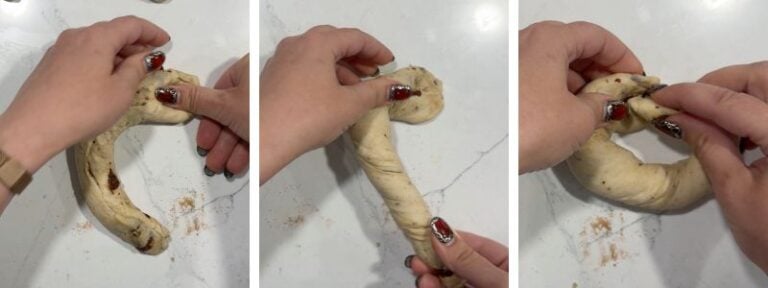
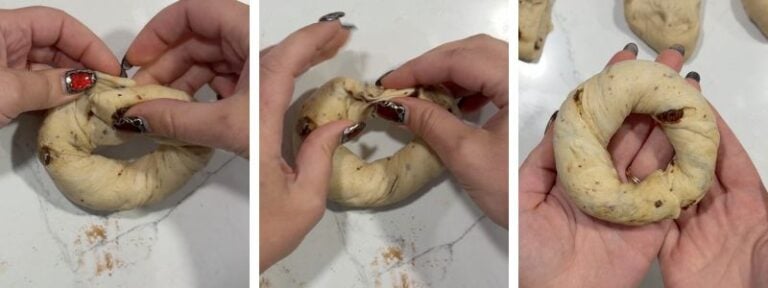
Twist: Using your thumb, press the left side of the log flat to widen it. With your right had, twist the log a couple of times and bring the right side around to rest on top of the flattened end.
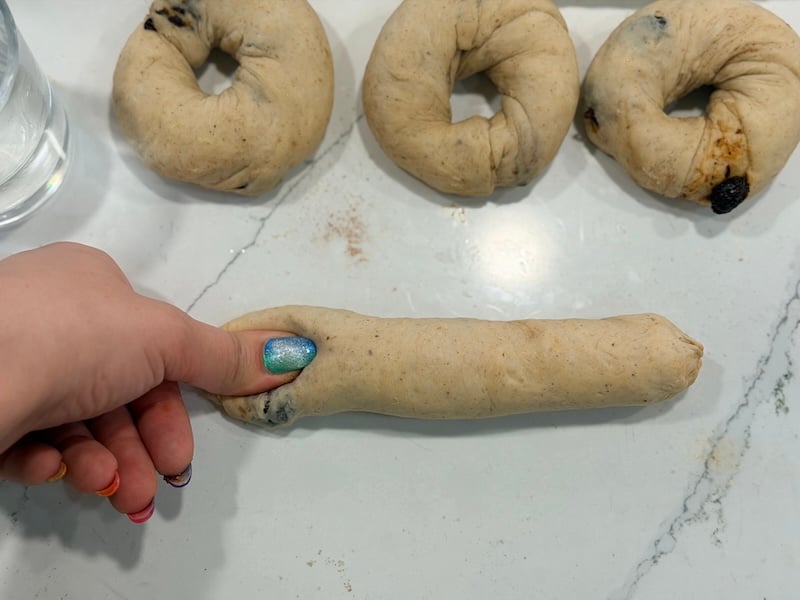
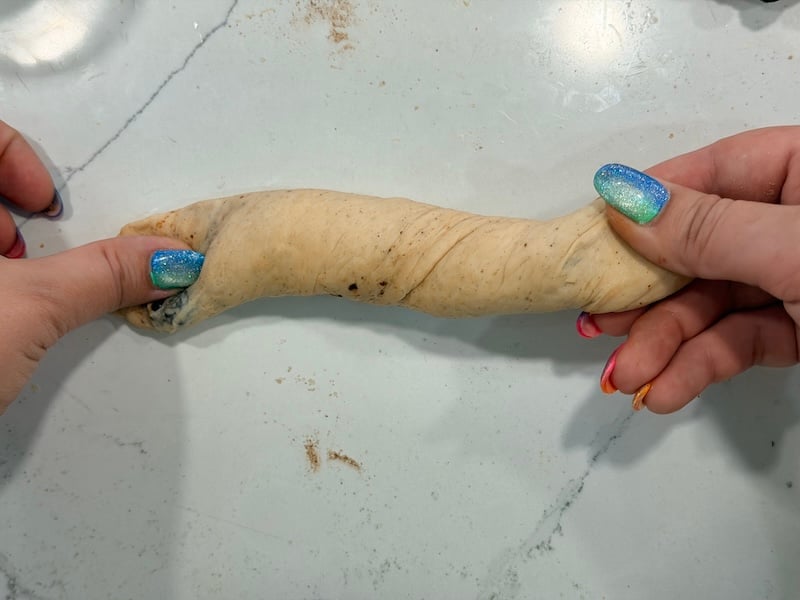
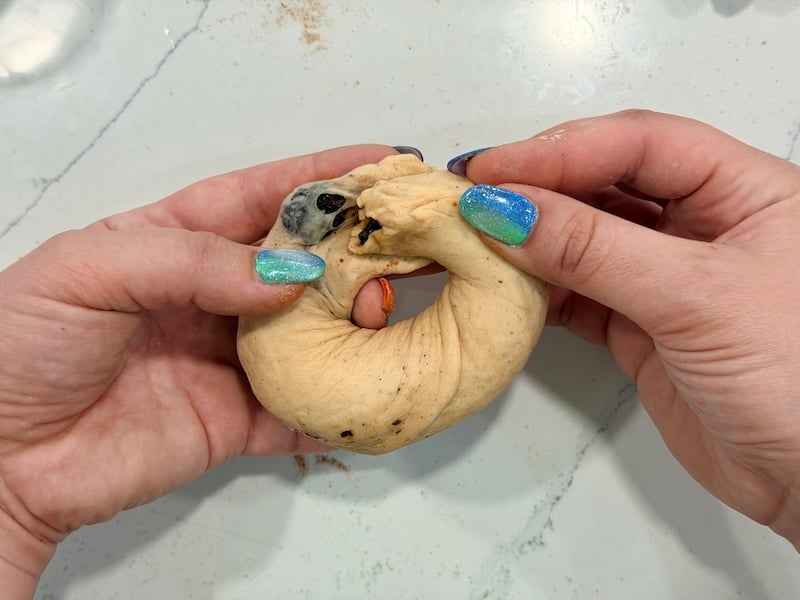
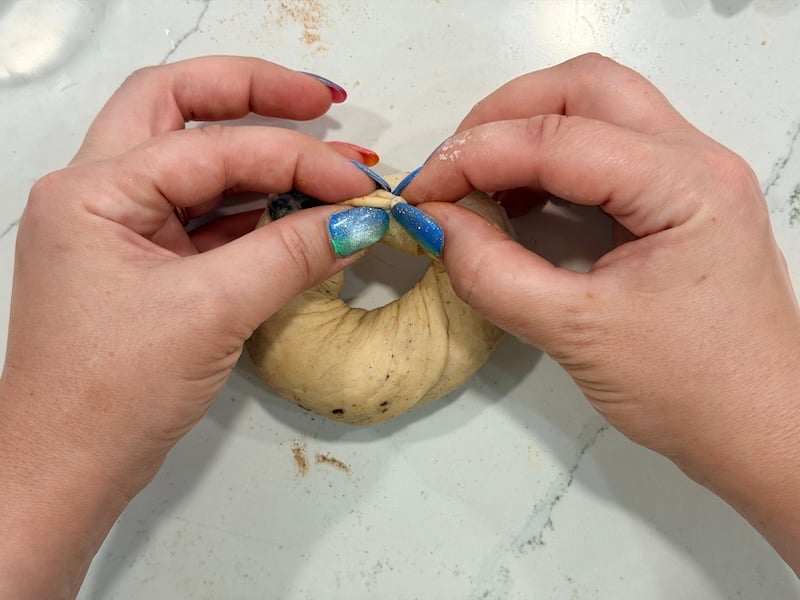
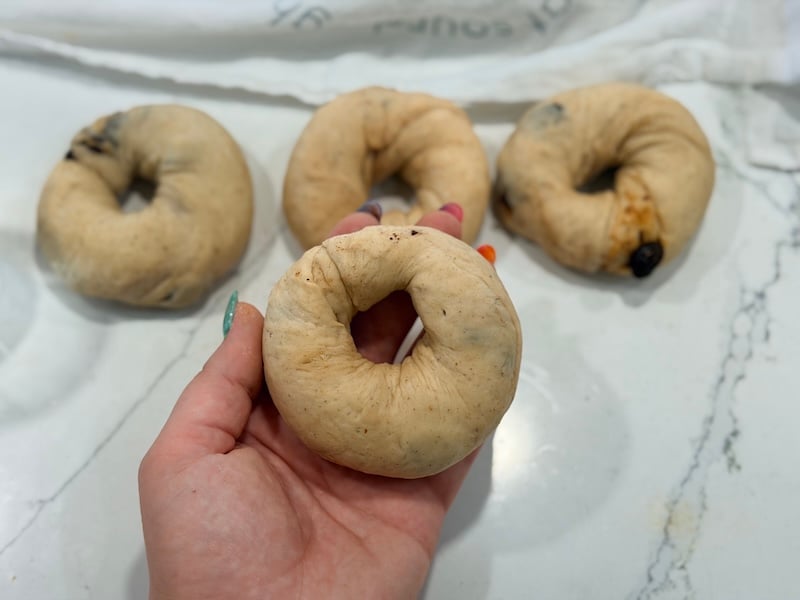
Wrap and seal: Wrap the flat dough end around the twisted end and pinch firmly to seal. If raisins are in the joint, move them aside — raisins at the connection point are the number one reason bagels pop open during boiling.
Tips from testers that actually help:
- Cold dough seals more cleanly: Chill the shaped logs in the fridge for 10–15 minutes before forming the circle if your dough feels warm or sticky.
- If the dough keeps springing back and resisting the rolling, cover it and let it rest for 5–10 minutes, then try again.
Place each shaped bagel on its own parchment square on your sheet tray.
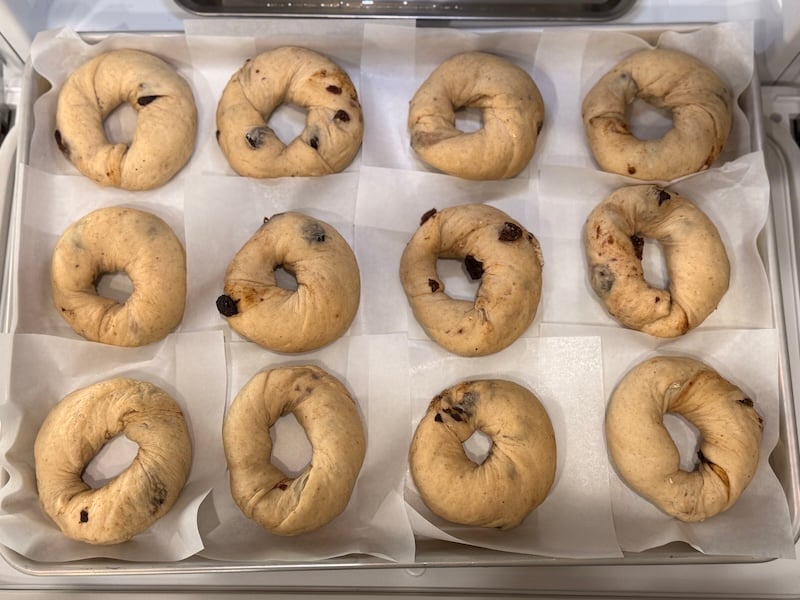
Optional cold proof: Refrigerate shaped bagels for 8–36 hours for a tangier flavor and potentially easier digestion. When ready, bring them back out and finish the second proof before boiling. I don’t personally do this step, but if you need a pause or are sensitive to gluten, you might enjoy it.
Note: several recipe testers used this recipe’s swirl method and applied it to my pumpkin bagel recipe—it’s an extra step, of course, but it adds a really fun element if you want to try it!
Step 7: Second Proof
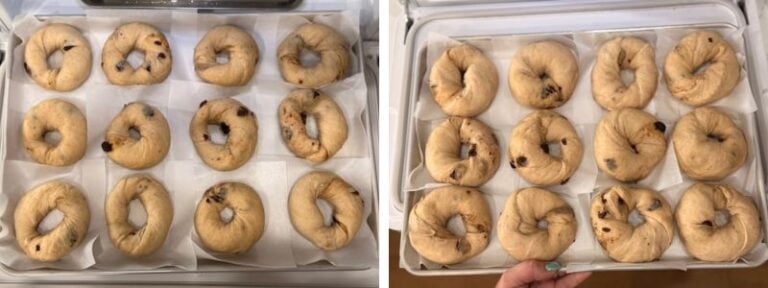
Cover the sheet tray with plastic wrap or a tray cover and let the bagels rise on the counter for 6–8 hours at 68–75°F (20–24°C), until they’re visibly puffed and about 50% larger than when you first set them out. Heads up: this takes a little longer than my plain bagel recipe — cinnamon slows fermentation, so don’t panic if the bagels need extra time to puff up.
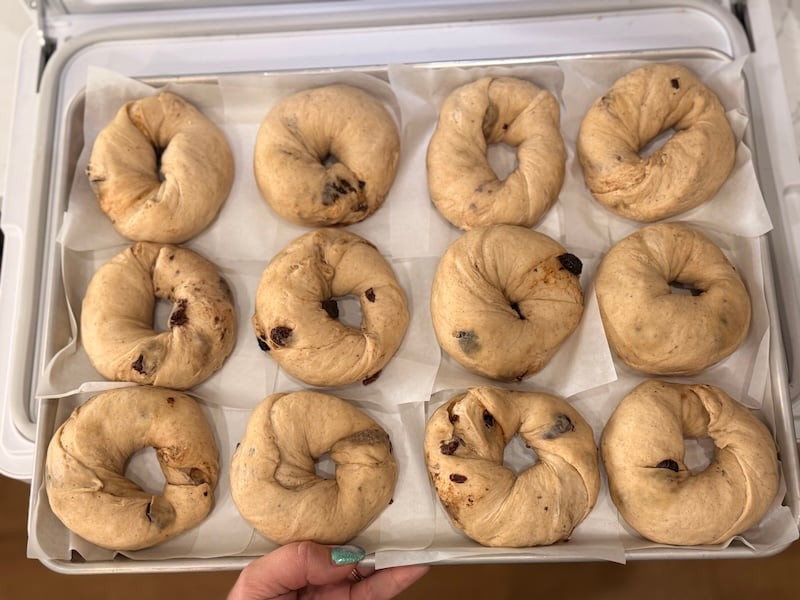
About 25% of testers found the second proof harder to read than bulk fermentation. The clearest cue is simple: the bagels should look noticeably puffed. They’ll also feel noticeably lighter in your hand when you pick one up. A helpful trick — take a photo right after shaping so you have a reference point as they rise.
To speed things up, you can put your shaped bagels into a proofing box or warm spot. Mine took about 5 hours at 80°F (26.5°C).
Step 8: Boil the Bagels
Preheat your oven to 450°F (230°C) conventional, or 425°F (220°C) convection. Bring a large pot of water to a boil. Add 2 tablespoons of brown sugar and 1 tablespoon of baking soda to the boiling water.
Secure any opening seams before boiling: If any bagels have spread open into a crescent shape during proofing, thread a toothpick through the seam to hold it together. Remove the toothpick after boiling.
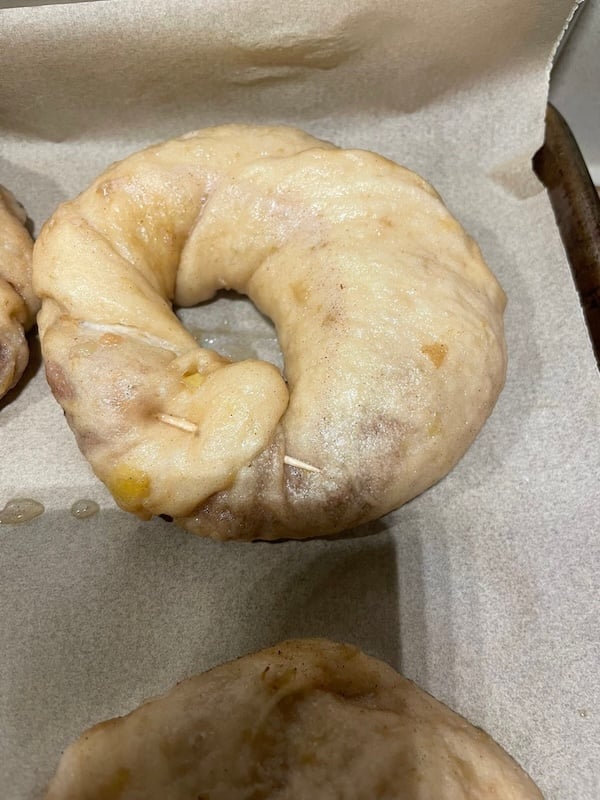
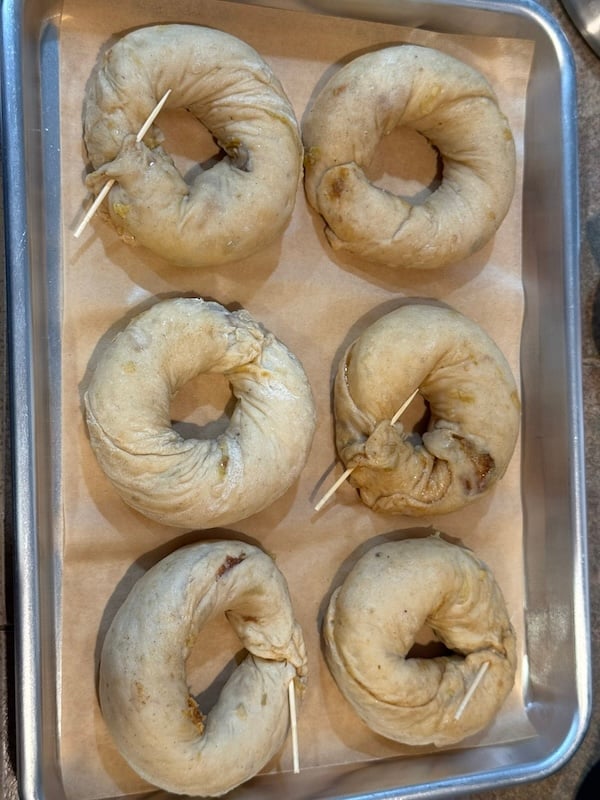
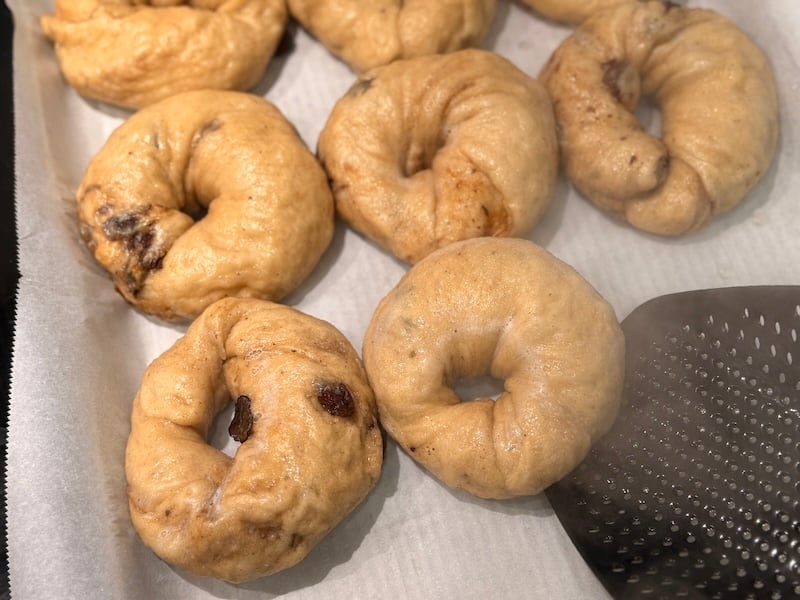
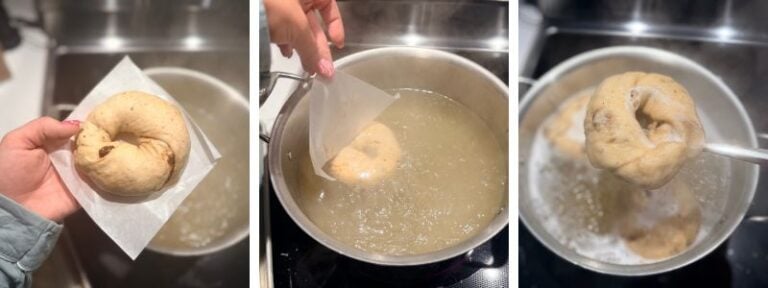
Working in batches of 3–4, slide each bagel into the water on its parchment square. The parchment will peel off in the water. Boil 30 seconds per side, then transfer back to the sheet tray with a slotted spoon.
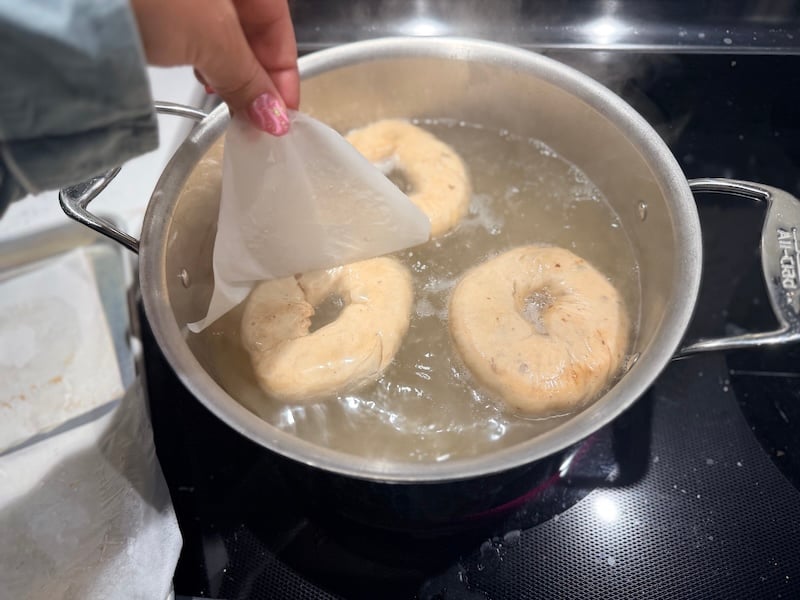
Note: When the bagels go in, the boiling water will slow to a simmer. That’s normal. Start your 30-second timer right away — you don’t need to wait for a rolling boil to return.
Swap your parchment now. After boiling, throw away the used parchment squares and line your sheet tray with fresh parchment or a Silpat before baking. Any sugar that leached onto the old parchment will burn in the oven.
Step 9: Bake
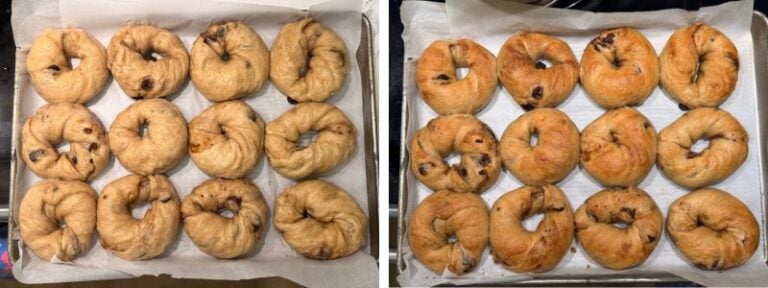
Bake at 450°F (230°C) conventional or 425°F (220°C) convection for 10–18 minutes, or until the tops are golden brown and the internal temperature reaches 205–210°F (96–99°C).
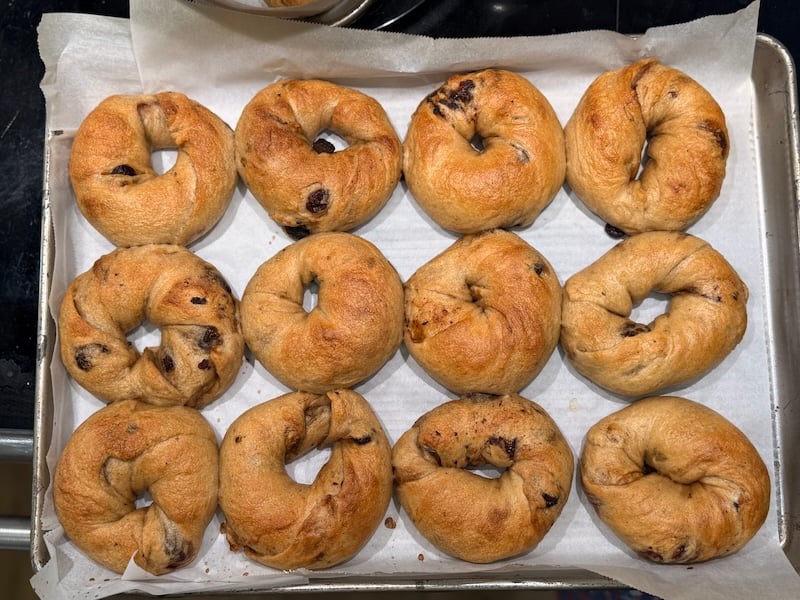
Bake times varied quite a bit across testers — anywhere from 10–20+ minutes depending on the oven. Use internal temperature as your guide rather than the clock.
Watch the bottoms. The cinnamon sugar makes them prone to over-browning on the bottom. If your oven runs hot, slide an empty sheet pan onto the rack below.
Topping Ideas from Our Testers
These bagels are flavorful enough to eat plain, but if you want to take them up a notch, here’s what 226 testers discovered:
- Plain cream cheese: The most popular choice by far, and for good reason. One tester noted that sweetened cream cheese can compete with the bagel’s flavor, while plain cream cheese lets the cinnamon swirl shine. If you want to dress it up, stir in a pinch of cinnamon — my fav!
- Flavored cream cheeses: Honey pecan, brown sugar cinnamon, blueberry, and strawberry all got rave reviews. Several testers made their own at home.
- Butter: A close second to cream cheese, and some testers actually preferred it. One tester said butter “added richness all around,” while cream cheese softened the cinnamon flavor. Cinnamon honey butter — the same recipe from the gingerbread sourdough post) — was a particularly popular variation.
- Peanut butter: At least two testers mentioned this — and honestly, it makes sense with the vanilla-soaked raisins.
How to Store Cinnamon Raisin Sourdough Bagels
Room temperature: Store in a bread bag, glass cake stand, or other airtight container for 2–3 days. If you used non-diastatic malt powder, they’ll stay noticeably softer for up to 4–5 days.
- I love these bread bags from Doe a Deer — use code THATSOURDOUGHGAL for 15% off.
- These paper bread bags from Sis & Co Collective are also great for storing on your counter or gifting.
Freezing options:
- After boiling, before baking: Let the boiled bagels cool, freeze them on a parchment-lined sheet pan until solid, then transfer to a freezer-safe bag. When you’re ready, bake straight from frozen at 425°F (220°C), adding a few extra minutes to the bake time. A couple of recipe testers tried this and reported great results!
- After baking: Let the bagels cool completely, slice in half, and freeze with a piece of parchment between each half in a sealed freezer-safe bag. You could also flash freeze them on a sheet tray if you don’t want to use the parchment squares.
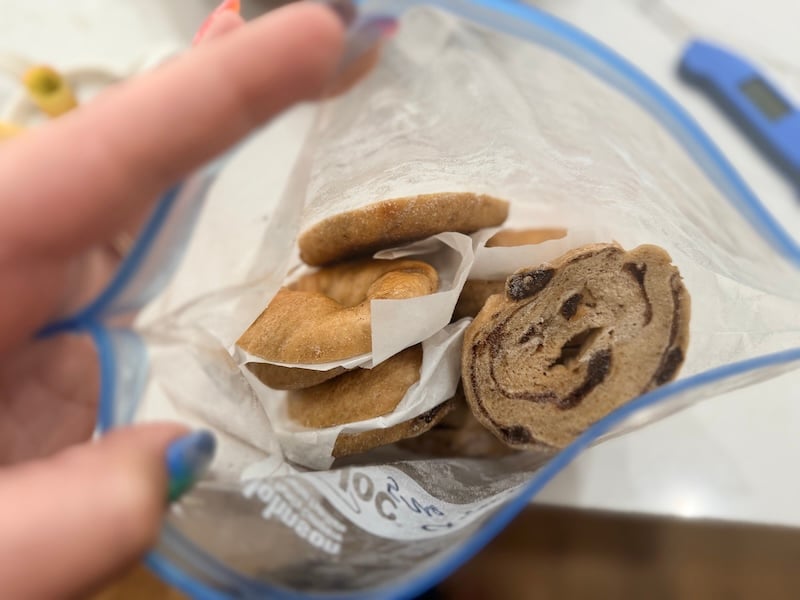
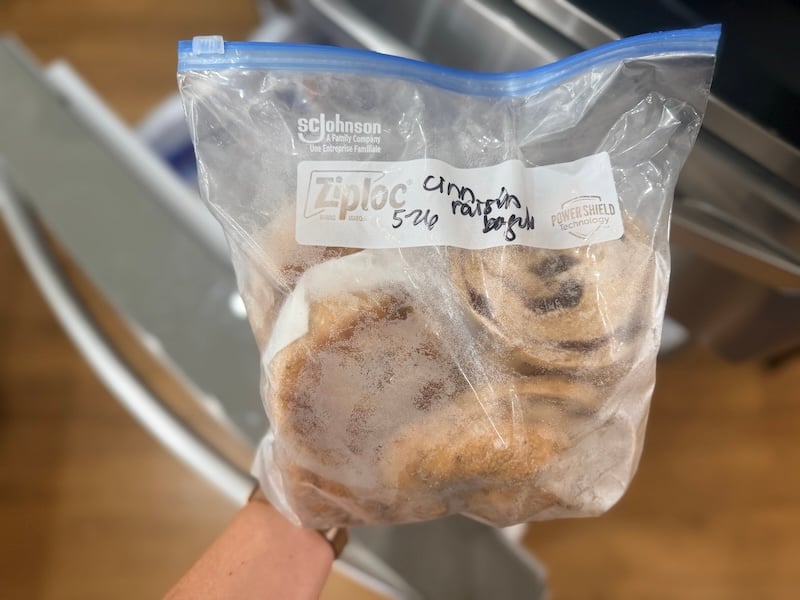
To reheat: Toast directly from frozen — no need to thaw first!
Troubleshooting Tips
FAQs
Yes, you can absolutely make these cinnamon raisin sourdough bagels without a stand mixer. About 8% of testers kneaded completely by hand, and every single one rated the recipe 4 or 5 stars. The dough is intentionally stiff — similar to pretzel or pasta dough — so it takes some elbow grease, but it’s very doable. Knead until the dough forms a smooth, cohesive ball (about 8–10 minutes by hand). If it fights you, cover it and let it rest for 5–10 minutes, then continue. The resting time gives the gluten a chance to relax.
Yes, you can skip the raisins or swap in another dried fruit. If you omit the raisins entirely, increase the water in the dough to compensate for the lost moisture from the soak — one tester who skipped them added the vanilla directly to the dough and increased the water by about 25g to compensate, with great results. For substitutions, testers had success with dried cranberries and dried blueberries used as direct 1:1 swaps by weight. Just soak them in place of the raisins as directed and proceed as written.
The type of cinnamon you use is entirely up to you. Saigon cinnamon, also called Vietnamese cinnamon, has a bold, sweet, spicy flavor and will give these bagels the strongest cinnamon punch. Ceylon cinnamon is milder and more delicate. Most grocery-store cinnamon in the U.S. is Cassia cinnamon, which is generally considered lower quality and is less expensive.
I’ve tested all three, and while all of them are delicious, I tend to prefer the spiciness of Saigon cinnamon in this recipe.
No, you don’t have to use non-diastatic malt powder — it’s optional. Sixty-two testers omitted it entirely, and the vast majority of those bagels still baked up beautifully, with 60 of those testers rating the recipe 4 or 5 stars. That said, the malt powder contributes to browning and a classic bagel flavor, so it does add something if you have it.
If you only have diastatic malt powder on hand, toast it first to deactivate the enzymes. Spread it on a sheet pan and bake at 325°F (160°C) for 5 minutes, then let it cool and use it the same way.
Yes, you can use barley malt syrup instead of baking soda and brown sugar, and several testers preferred it. Baking soda is included in this recipe primarily for browning, but a few testers noticed a slight aftertaste.
Testers who used barley malt syrup — about 2 tablespoons per pot of water — reported beautiful golden-brown color, a slightly sweeter and more flavorful exterior, and no aftertaste. Molasses is another good option that works similarly.
Bulk fermentation is done when your dough has visibly increased in volume. You’re looking for roughly doubled in size, but it doesn’t have to be exact. In the morning, when you punch the dough down, it should feel airy and leave a deep imprint.
For most testers at 70–73°F (21–23°C), this took 8–12 hours overnight. In cooler kitchens, it can take 13+ hours.
A warmer kitchen — around 77–80°F (25–26.5°C) can cut that time significantly, sometimes down to 6–7 hours, which isn’t ideal for an overnight timeline. If your kitchen is warm, used the flipped timeline and mix your dough in the morning, so you can keep a closer eye on it.
The second proof is done when your shaped bagels look noticeably puffier than when you first set them out — about 50% larger. They’ll also feel very light in your hand if you pick one up.
About 25% of testers said the second proof was harder to read than the bulk fermentation, so you’re not alone if it feels less obvious.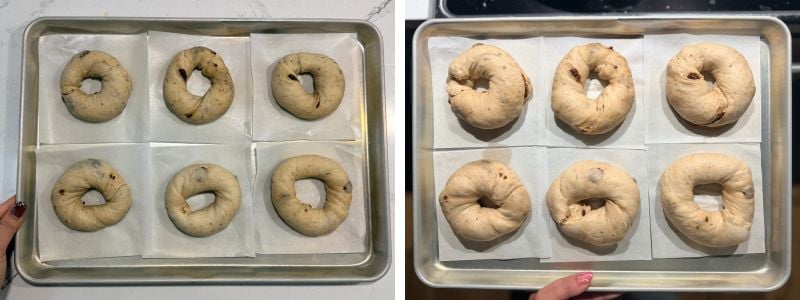
You can absolutely refrigerate the bagels and boil them straight from the fridge — cold bagels tend to hold their shape better through the boil, which is especially helpful if you’ve had trouble with seams reopening. That said, I now recommend refrigerating right after shaping rather than waiting until after the second proof. Bagels that are fully proofed before they hit the fridge can deflate as they chill, so shaping and then refrigerating gives you a more reliable result. Just know that the longer they sit, the more moisture you may see from the raisins or cinnamon sugar filling.
Yes, you can freeze these cinnamon raisin sourdough bagels, and there are a couple of ways to do it.
Freezing after boiling: A few recipe testers froze the bagels after boiling but before baking. Let the boiled bagels cool, then freeze on a parchment-lined sheet pan until solid and transfer to a freezer bag. When you’re ready, bake from frozen at 425°F (220°C), adding a few extra minutes to the bake time.
Freezing after baking: You can also freeze fully baked bagels — let them cool completely, slice in half, put parchment between each half, and freeze in a sealed freezer-safe bag. To reheat, toast directly from frozen.
Yes, you can absolutely make a half batch of these cinnamon raisin sourdough bagels, and several testers specifically recommended it for a first attempt. A half batch makes 6 bagels, which is much more manageable given the shaping time involved.
All ingredient amounts scale down proportionally, and the bulk fermentation and the second proof timing stay the same.
The cinnamon swirl shaping method is what creates the signature swirl pattern inside the bagel, so skipping it means you won’t get that same effect.
That said, the shaping was the most challenging part of this recipe for many testers, and a simpler version using cinnamon chips mixed directly into the dough is on the horizon. For now, if you’re up for the challenge, the swirl is worth it. And it gets faster with practice — many testers said by bagel 6 or 7, they had the technique down.
“If a bagel and cinnamon roll had a baby, it would be this sweet bagel.” –Recipe tester from California

Overnight Cinnamon Raisin Swirl Sourdough Bagels
Equipment
- Stand mixer with dough hook
- Half sheet pan or two quarter sheet trays
- Half sheet pan cover A fantastic alternative to plastic wrap!
- Parchment squares Dollar Tree has really cheap ones, too!
- Large pot for boiling
- Bread bag use code THATSOURDOUGHGAL for 15% off
Ingredients
Feed Your Starter
- 15 g sourdough starter
- 75 g water
- 75 g bread flour or all-purpose flour
Raisin Soak
- 140 g raisins
- 15 g vanilla extract
- 20 g water
Main Dough
- 410 g water
- 150 g active sourdough starter that you made, from above
- 30 g sugar
- 825 g bread flour
- 26 g non-diastatic malt powder make sure it's NON-diastatic (optional; see Notes)
- 16 g sea salt
- 1/2 tsp ground cinnamon
- soaked raisins do not strain
Cinnamon Sugar Mixture
- 90 g sugar
- 15 g bread flour
- 15 g cinnamon
For the Boiling Water
- 2 tbsp brown sugar or molasses or honey
- 1 tbsp baking soda
Before You Begin

Instructions
Day 1: Morning
- Feed your starter: In the morning, in a medium glass jar, stir together 15 g sourdough starter and 75 g water. Mix in 75 g bread flour until smooth. Loosely cover and let ferment all day, 10–12 hours at 68–75°F (20–24°C). If your starter is already active and bubbly, you can skip this step.
Day 1: Evening
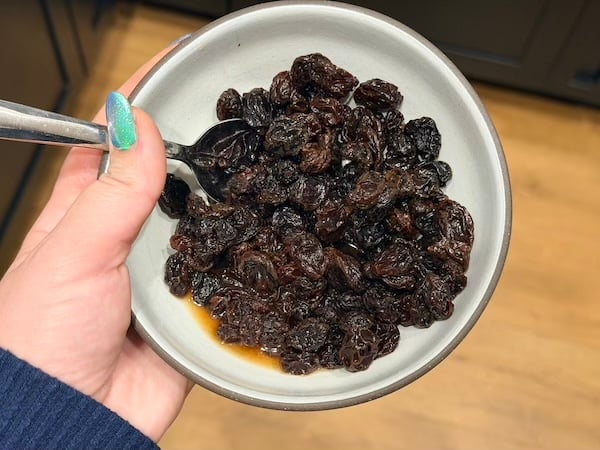
- Soak your raisins: To hydrate the raisins and help prevent wet spots around them later, 15 minutes before you’re ready to mix the dough, combine 140 g raisins, 15 g vanilla extract, and 20 g water in a small dish.

- Mix the dough: In a stand mixer fitted with the dough hook, combine 410 g water, 150 g active sourdough starter, 30 g sugar, 825 g bread flour, 26 g non-diastatic malt powder, 16 g sea salt, and 1/2 tsp ground cinnamon. Knead on low speed (speed 1) for about 1 minute, or until the dough just starts to come together. Then, add in the soaked raisins (including the soaking liquid). Continue mixing for about 1–2 minutes more, just until the raisins are evenly distributed. Stop before the dough hook has a chance to shred them.

- The dough should be stiff but pliable and slightly tacky – think Play-Doh. If your dough is sticky, add flour in 1 tbsp increments. If it is so stiff that it's not pliable, add water in 1 tbsp increments.
- Dump the dough on your counter and finish kneading by hand for 3–4 minutes, or until the dough feels smooth. Put the dough in a medium-sized bowl and cover for 30 minutes.

- Optional: After the 30-minute rest, knead the dough again for 2–3 minutes.
- Bulk ferment: Cover and let bulk ferment on the counter overnight for 8–12 hours at 68–75°F (20–24°C), or 12–14+ hours if your kitchen is cooler). The dough should about double in size.
Day 2: Morning
- Make the cinnamon sugar mixture: The next morning, combine 90 g sugar, 15 g bread flour, and 15 g cinnamon in a small dish.
- Divide: Punch down the dough, give it a quick knead, and divide it into 12 equal pieces (about 135g each).
- Flatten and fill: Starting with your first dough ball, use a rolling pin to roll it into a small rectangle, about 8 inches long by 4 inches wide. Thin the top edge with your thumb. Sprinkle 10g of the cinnamon sugar mixture (a scant tablespoon) over the rectangle, leaving a 1" gap on the left side and a smaller gap along the top edge and along the right side. Wet your finger and dab along the left side and top edge (to help the dough adhere to itself).
- Roll: Roll up your rectangle, pinching the side seams closed as you roll. Pinch the seam along the log closed.
- Twist: Using your thumb, press the left side of the log down to flatten and widen it. Twist the dough log (like a pretzel twist) and bring the right side around to rest on top of your flattened dough end.
- Wrap and seal: Wrap that flattened dough around the end of the twisted log and pinch the dough around it to seal. Repeat this shaping process with the remaining pieces.
- Second proof: Cover the sheet tray with plastic wrap or a sheet tray cover and let rise on the counter for 6–8 hours at 68–75°F (20–24°C) until visibly puffed and about 50% increased in size. This takes a little longer than my plain bagel recipe, as a heads up. A warm spot or proofing box will speed this up if desired.
- Optional cold proof: Refrigerate shaped bagels for 8–36 hours for tangier flavor/easier digestion. When ready, bring them back out and finish the second proof before boiling.
Day 2: When Ready to Bake (Afternoon/Evening)
- Boil: Preheat the oven to 450°F (230°C) conventional or 425°F (220°C) convection and bring a large pot of water to a boil. Add 2 tbsp brown sugar and 1 tbsp baking soda to the boiling water.
- If any of the bagels have opened up during the second proof (as in, they look like a crescent roll), stitch them back together with a toothpick. The toothpick can be removed after boiling.
- Working in batches of 3 or 4, slide bagels (on parchment squares) into the water. Important: If your bagels sink, they're not ready. Put back on sheet tray and continue proofing.Slide each bagel into the water using its parchment square — the parchment will peel off in the water. To prevent burnt bottoms, throw away the used parchment squares and line your sheet tray with a fresh sheet of parchment or Silpat. Boil 30 seconds per side, then transfer back to the sheet tray with a slotted spoon.Note: When you drop the bagels in, the water will adjust from a rolling boil to a simmer. This is normal. You do not need to wait for the water to return to a rolling boil to start the 30-second-per-side timer.
- Bake: Bake the bagels for 10–18 minutes, or until the tops are golden brown and the interior temperature reaches 205–210°F (96–99°C). Transfer bagels to a wire rack and let cool for at least 1 hour before slicing.
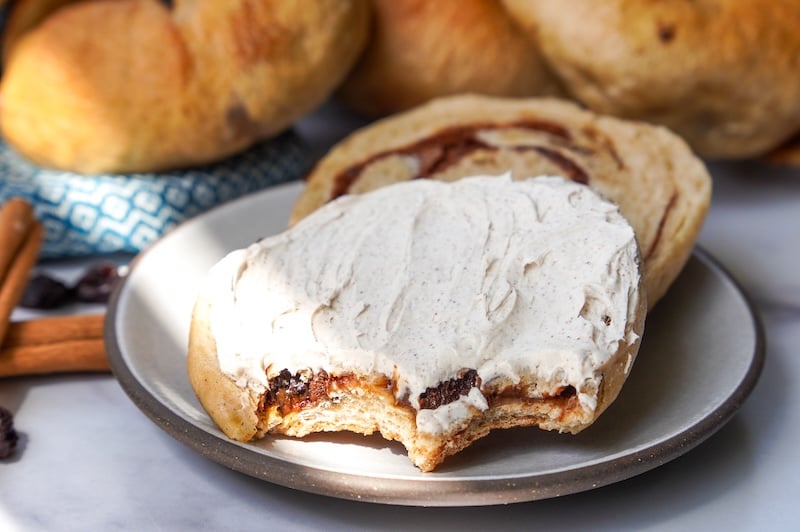
- Serving: These are best served warm, sliced and toasted with a generous schmear of whipped cream cheese. A pinch of cinnamon stirred into your cream cheese takes it over the top and echoes the swirl inside.
- Storage: Store in a bread bag on the counter for 2–3 days, or up to 5 days if you used non-diastatic malt powder. To freeze, slice them in half, place parchment between the halves, and freeze in a zip-top bag for up to 3 months. Toast directly from frozen — no need to thaw.
Video
Notes
- Use diastatic malt powder instead: Toast at 325°F (160°C) for 5 minutes to deactivate the enzymes, then sift after cooling to remove any lumps. Once toasted, use it just like non-diastatic.
- Use diastatic malt powder, untoasted: Mix your dough in the morning instead of overnight so you can monitor fermentation – the active enzymes will speed it up.
- Omit it entirely: Your bagels will just stale a bit faster.
“It takes some extra time and steps, but is SOOOOOO worth it when you discover that chewy, cinnamony goodness!” –Recipe tester from Kampala, Uganda
Conclusion
Cinnamon raisin sourdough bagels are definitely better homemade — this is one of those recipes you’ll never find in a supermarket.
Yes, the shaping takes practice. Yes, your first batch will probably have a few horseshoes. But once you taste one, you’ll be glad you did it!!
“Worth it. Don’t let the shaping scare you — just make sure you ROLL it and tuck the sugar mix IN.” –Recipe tester from Cheshire, Massachusetts
“Don’t be intimidated — it’s easier than you think! Reference back to the pictures for the shaping and really make sure you seal each bagel!” –Recipe tester from Ohio
If you make these, I want to see them — horseshoes and all. Drop a comment below or tag me on Instagram @thatsourdoughgal!
Other recipes I think you’d like:


Hi!
Can I use cranberry instead of raisins ( no cinnamon)?
Yes
“ True beauty comes from within”. I definitely need more shaping practice. However, these taste divine!
Amazing, they look great!!
Just made these and baked this morning. Delicious! Husband and teenage boy approved. I followed the recipe exactly. The only challenging part is the shaping. It took me about an hour to shape the 12 bagels. I did use the toothpick trick on some of them. I think they are beautiful!
Just baked these this morning. Husband and teenage boy approved! They are delicious. I followed the recipe exactly. The only challenging part was the shaping. It took me a full hour to shape 12 bagels. But, they are beautiful!
Looks amazing!! Great job!!
I’ve made 3 loaves and an attempt of pretzels… this is my 1st successful bake!! I’m in love with this recipe and has boosted my confidence in baking! I may pull back on cinnamon, bc I think my scale wasn’t catching the weight for the filling, still delicious! Perfection!
So glad to hear it!!
First time making these, and they came out so good! A little crunch on the outside, soft on the inside and the cinnamon swirl is perfect! They are a bit labor intensive but well worth it. Thank you, Rebekah!
Yay!! So glad they came out good!
I was intimidated to try this based on the “advanced” classification, but after watching a few videos about the process I decided to give it a try. I’m so glad I did! The shaping was definitely the hardest part – it took me about 40 minutes, but the end result was so worth it! Love this recipe, will for sure make it again.
So glad you dove into it, they look gorgeous!!
Just finished making your cinnamon raisin bagels. Excellent flavor. Every one of them ended up looking like a croissant. That wasn’t a problem though, since I’m making bagel chips. I’ll pass along a pic when I’m finished . Great ending for all the work you put into the recipe
YAY! I am so glad you enjoyed this recipe. I can’t wait to see the final photos!
Hi! Could I do the second proof on the counter and then put them in the fridge until I’m ready to bake?
Yes!
Holy Cow! These are the best cinnamon raisin bagels I’ve ever tasted. The shaping did take me awhile, but it was so so worth it. Will be making again! Thank you for this recipe.
These look amazing! So glad you enjoyed them!
These are the best bagels!!! They’re time consuming at first, but after you make them regularly, you realize how simple it is!! I definitely find it easiest to boil directly from the fridge with a toothpick in them! I have a sourdough microbakery and I have a customer who orders these from me pretty much weekly!!! He says they’re the best bagels he’s ever had, and I agree. Thank you, Rebekah!
Ahh gorgeous!! So glad you enjoy the recipe!!
Love it!
I don’t know why it took me a while to make it.
Guess what?? Delicious!!
Definitely I’ll make it again. Family loved them. I was able to get 16 bagels (100gr each).
I only had 225gr of bread flour, and the rest of it with Organic all purpose flour. Came out perfect!
YAY! these look incredible, so glad everyone is loving these!
This was the first bagels I ever made, of course I started with the hardest. They were so wonderful. Now I am bagel obsessed. Today I am making the starter to make blueberry bagels tomorrow. Thank you for sharing your recipe.
YAY! I am so glad you gave these a try and they turned out great for you!