
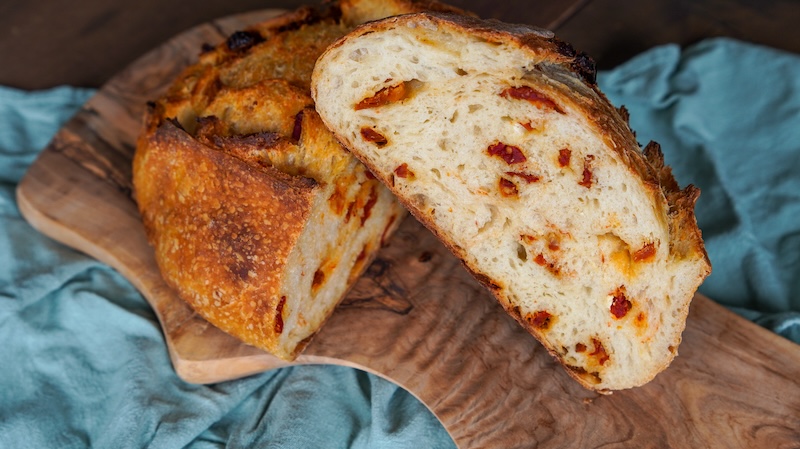
Sun-Dried Tomato and Goat Cheese Sourdough Bread Recipe
Sweet sun-dried tomatoes and tangy, creamy goat cheese combine to make a unique, incredible loaf of sourdough bread. This is my favorite sandwich bread, and it also makes a killer base for avocado toast.

Sun-dried tomato and goat cheese: it’s my favorite flavor combination of all time. Put it in a salad, on toast, or better yet, in the actual bread, and I’m in heaven.

Why You’ll Love Sun-Dried Tomato and Goat Cheese Sourdough Bread
- No-Prep Inclusions: just toss the sun-dried tomato and goat cheese into the dough – no cooking or blending required.
- Complimentary Flavors: the sweetness of the sun-dried tomatoes and the tanginess of the goat cheese pair so well together as it is, but add it to the sour, complex flavor profile of sourdough? Forget about it.
- Elevates Any Sandwich: these flavors make the perfect base for an incredible sandwich. It’s my all-time favorite sandwich bread!

Related: Olive Parmesan Artisan Sourdough Bread Recipe
Sourdough Bread Timeline
Here’s a sample timeline to help you plan out your bake.
| Day 1 | |
| 9 pm | Feed your starter (1:5:5 ratio is best for overnight but experiment with your starter in your environment to nail it down) |
| Day 2 | |
| 8 am | Mix your dough (this starts the bulk fermentation) |
| 8:30 am | Stretch and fold #1 |
| 9 am | Add sun-dried tomato and goat cheese to the bowl; stretch and fold #2 |
| 9:30 am | Stretch and fold #3 |
| 10 am | Stretch and fold #4 |
| 12-3 pm | Let the dough finish bulk fermentation (pointers in the recipe card) |
| 3 pm | Pre-shape dough |
| 3:30 pm | Final shape, put in banneton, stitch, and refrigerate overnight |
| Day 3 | |
| 7 am | Preheat Dutch oven to 450°F (230°C) |
| 8 am | Score and bake the dough |
| 11 am | Let the bread cool; now, enjoy the bread! |

Ingredients in Sun-Dried Tomato and Goat Cheese Sourdough
The beauty of this sourdough recipe is you’re simply adding inclusions to a regular, white sourdough bread base.
If you already have a plain sourdough bread recipe that works for you, make that same recipe but add the inclusions during your stretch and folds.
- Flour: I primarily use unbleached bread flour with a touch of whole wheat flour to keep the starter happy.
- Sourdough starter: use an active, bubbly starter to leaven the bread. Make sure your starter has peaked (isn’t domed, is flat, and hasn’t started severely deflating).
- Warm water: I use water straight from my tap but if you have city water, you may want to use purified water.
- Salt: don’t forget the salt or your bread will get wonky!
- Sun-dried tomatoes: sun-dried tomatoes in oil permeate the dough and create the most amazing sweet and tangy flavor!
Related: Sun-dried Tomatoes In Sourdough: Dry vs Oil-Packed

- Goat cheese: the creamy texture paired with the tangy flavor of goat cheese is the perfect pairing in this inclusion combo. Herbed goat cheese is even better!
How to Make Sun-Dried Tomato and Goat Cheese Sourdough Bread
This inclusion combo is a simple addition to my foolproof white sourdough bread recipe. Once you have the base recipe down, you can add any inclusions you want!
The process starts with feeding your starter and waiting for it to peak.
Step 1: Feed Your Starter.
Feed your sourdough starter with warm water and flour. When it’s active and bubbly, has at least doubled in size, and is fully peaked (not domed, and not deflating), move on to the next step.
Step 2: Mix Your Dough.
Mix the flour, water, starter, and salt together in a bowl. I like using a dough whisk to do the heavy lifting, and I switch to my hands at the very end to ensure everything is fully incorporated.
A bowl scraper also ensures all the bits on the sides are mixed into the dough. The bulk fermentation has now begun!
Step 3: Perform Stretch and Folds + Add the Inclusions.
I like doing four total sets of stretch and folds, spaced 30 minutes apart. During the second set, add your drained sun-dried tomatoes and goat cheese.

Note: Drain the oil out of the sun-dried tomato jar. Save the oil to make a fabulous dipping oil for your bread later on! You can also chop the sun-dried tomatoes if you like, but that’s optional.
To do a set of stretch and folds: grab the edge of your dough, pull up as far as you can without ripping the dough, and lay the stretched dough on top of the rest of the dough ball. Rotate the bowl a quarter of a turn and repeat the process. Do this over and over again until the dough is super resistant to being stretched. You’re developing that gluten, which will make a delicious loaf!

When you do add the sun-dried tomatoes and goat cheese, there’s really nothing special or tricky about it.
Just dump the ingredients on top and go about your stretch and folds. It’ll be a little messy, and that’s fine. As you continue the stretch and folds, it’ll all come together.
If you’re curious about how I landed on oil-packed sun-dried tomatoes, check out my full experiment here: Sun-dried Tomatoes In Sourdough: Dry vs Oil-Packed
Step 4: Finish the Bulk Fermentation.
Bulk fermentation is done when the dough is visibly larger (the exact percentage rise is not as important as the other visual signs), with bubbles all around the sides and underneath the surface.
The dough should jiggle like jelly when you shake the bowl and feel light, airy, and puffy to the touch.
It should be domed on the edges where the dough meets the bowl.
Don’t worry about exact timing; trust these visual and tactile cues to guide you. Warmer dough ferments faster, colder dough takes longer, but slightly overproofed dough often makes better bread than underproofed. Don’t be afraid to push the limits.
For this recipe, my bulk fermentation took 8 hours at a 70°F (21°C) average temperature. Another test at 75°F (24°C) took just under 6 hours.
Step 5: Pre-Shape and Final Shape.
When that dough is fully fermented, puffy, and cloud-like, it’s time to pre-shape!
I wouldn’t skip the pre-shape as it really helps achieve a nice oven spring, but it’s optional.
- Sprinkle some water on your surface. Put your dough ball on top.
- Using a candy cane motion, roll the dough repeatedly until the surface is taught and you have a nice, round-shaped ball.
- Let it rest for about 20-30 minutes, uncovered.


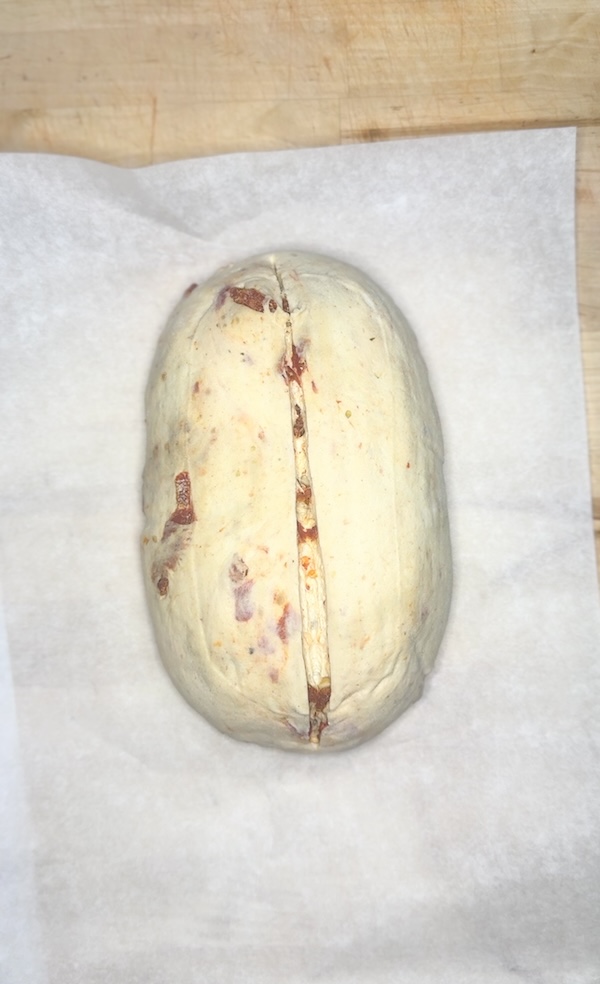
For the final shape, you can do the same exact process again, and then put it in a floured banneton. However, I’ve really been enjoying the caddy clasp method.
It’s kind of hard to explain in words, but you basically clasp the sides together and pinch the top closed. You can do what’s called a double clasp by rotating the dough and clasping a second time. It’s super fast!
Watch a double clasp in action here:
After you put your shaped loaf in the banneton, wait a few minutes and stitch it up.


To stitch a loaf of sourdough in your banneton, pull dough from the outer edge into the middle, which creates tension on what will eventually be the top of your dough.
Step 6: Cold Proof.
Once your shaped dough ball is in the floured banneton, cover it and put it in the fridge. I like an overnight cold proof, but you can leave this in the fridge for up to 4 days.
The longer you go, the more sour the flavor will be. Long ferments are also potentially easier on the gut when you eat the bread.
I recently made a video about that if you’re interested in learning more:

Related: Sourdough Bread Flavor: Why Does It Taste Sour?
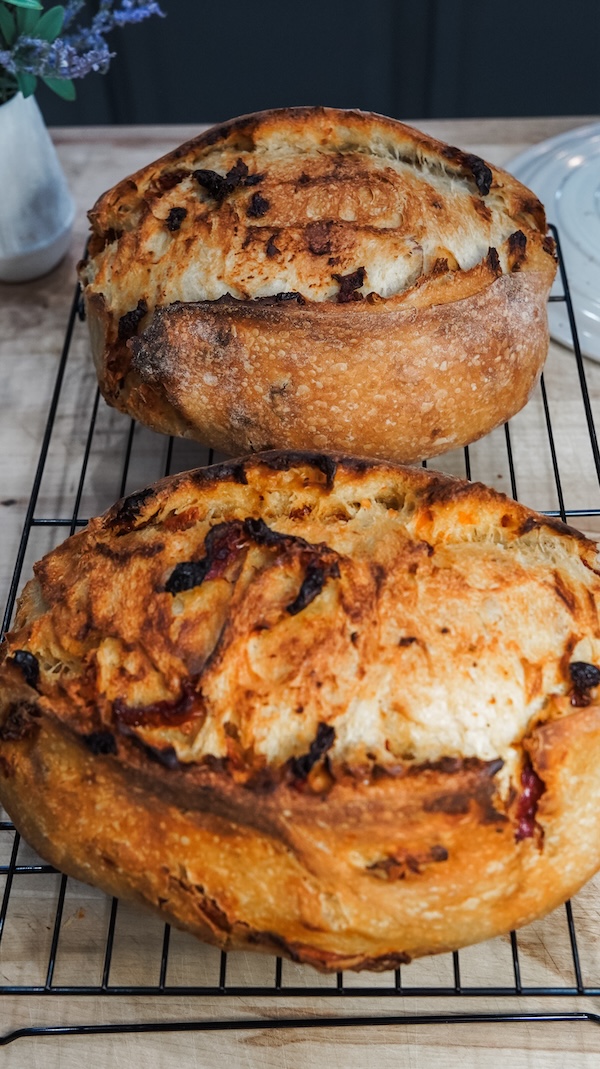
Step 7: Score and Bake!
Preheat your oven to 450°F (230°C) with a Dutch oven inside.
When your oven is fully preheated, take out the cold loaf and flip it out of the banneton onto parchment paper.

Score the top of the dough and put the loaf in the hot Dutch oven.
Bake for 30 minutes.

Take off the lid, lower the oven temperature to 425°F/215°C, and bake for an additional 20 minutes, or until the top is as golden brown as you prefer.

Enjoy!!
Substitutions
- Sun-dried tomatoes: instead of sun-dried tomatoes in oil, you can use dried sun-dried tomatoes. I’ve tried both and immensely prefer the intense flavor of the tomatoes in oil, but the dried version still works.

- Flour: you can use all-purpose flour instead of bread flour, and it’ll still work. You can also remove the whole wheat flour – I just do that to make the starter extra happy (it’s my little sprinkle of love in the recipe!).
- Goat cheese: you can use any kind of cheese in this recipe. I’ve had people ask me if it’s food-safe to use goat cheese since it’s fermenting in the bread for many hours, and my honest answer? I don’t know, but I suspect it’s a non-issue because the pH of the starter should preserve the cheese. If you’re concerned, use a hard cheese instead! Parmesan or Asiago would be incredible here.
How to Store Leftovers
If you have any leftovers, I envy you.
But seriously, individual slices freeze very well, and it’s my preferred storage method if you won’t eat it before it molds.
If you’ll eat it within a few days, I like storing it in a glass cake stand on the counter.
Related: How Long Does Sourdough Bread Last? + Storing Tips
Frequently Asked Questions
Is the goat cheese safe to use in this sourdough recipe?
I don’t honestly know if it’s “safe” to add goat cheese during the bulk fermentation, since it takes more than two hours. However, I assume it’s safe because the pH of the starter should preserve the cheese (think: Amish starters that use milk instead of water).
If you’re concerned about food safety, you can add the goat cheese during the pre-shaping. You could also swap out the goat cheese for a hard cheese, which is safe to keep at room temperature for longer than two hours.
Do I have to use a Dutch oven?
You don’t have to use a Dutch oven – check out the open baking method. I’ve never mastered it so I don’t have a personal resource on it, but a quick Google search will get you there!

Sun-Dried Tomato and Goat Cheese Sourdough Bread Recipe
Equipment
- Oval banneton (5% off with code TSG5) | Size I'm Using: Oval – Spiral MD
- Oval Dutch oven ($15 off with code REBEKAH15)
Ingredients
Sourdough Starter
- 15 g sourdough starter (active or discard)
- 75 g water
- 75 g bread flour (unbleached, King Arthur)
Main Dough
- 485 g bread flour (unbleached, King Arthur)
- 15 g whole wheat flour (optional; substitute for more bread flour if desired)
- 120 g active sourdough starter (from above)
- 330 g warm water
- 10 g salt
Inclusions
- 8.5 oz sun-dried tomatoes in oil (drained and chopped)
- 2 oz goat cheese
Instructions
Feed Your Starter
- The night before making your dough, feed your starter a 1:5:5 feeding ratio by mixing 15 g sourdough starter, 75 g water, and 75 g bread flour. This gives you 45 extra grams, so you don’t have to scrape the jar clean (use the leftovers to maintain your starter). At this ratio, your starter should peak in 10-12 hours.
- Starting in the morning instead? Use a 1:1:1 ratio for a faster peak (4-6 hours). Combine 50 g starter, 50 g water, and 50 g bread flour.
Make the Dough
- In the morning, when your starter has peaked (see Recipe Notes for help), mix 485 g bread flour, 15 g whole wheat flour, 120 g active sourdough starter, 330 g warm water, and 10 g salt. Mix until the ingredients are fully combined and the dough is shaggy. Cover the bowl with plastic wrap, a shower cap, or a cloth, and let it rest for 30 minutes. (This is the beginning of the bulk fermentation.)
Stretch and Folds
- Stretch & Fold 1: Do the first set of stretch and folds. Cover and let rest 30 minutes.
- Stretch & Fold 2: Incorporate the 8.5 oz sun-dried tomatoes in oil (drained and chopped) and 2 oz goat cheese during the second set of stretch and folds. Add a quarter of the inclusions at a time, layering them evenly as you perform each fold to ensure even distribution. Cover and let rest 30 minutes.

- Stretch & Fold 3: Perform the third set of stretch and folds. Cover and let rest 30 minutes.
- Stretch & Fold 4: Perform the last set of stretch and folds. Cover and let rest 30 minutes.If the dough feels particularly weak, you may add a fifth set after waiting another 30 minutes. Once you've completed all rounds of stretch and folds, cover the dough and let it rest until bulk fermentation is complete.
Bulk Fermentation
- Bulk fermentation is done when the dough is visibly larger (the exact percentage rise is not as important as the other visual signs), with bubbles all around the sides and underneath the surface. The dough should jiggle like jelly when you shake the bowl and feel light, airy, and puffy to the touch. It should be domed on the edges where the dough meets the bowl.Don’t worry about exact timing; trust these visual and tactile cues to guide you. Warmer dough ferments faster, colder dough takes longer, but slightly overproofed dough often makes better bread than underproofed. Don't be afraid to push the limits.For this recipe, my bulk fermentation took 8 hours at a 70°F (21°C) average temperature. Another test at 75°F (24°C) took just under 6 hours.
Shape the Dough
- Pre-shape the dough. Mist your work surface with water (or lightly flour it if you prefer). Gently turn the dough out of the bowl. Using a push and pull motion, shape the dough ball into a round shape. We want the surface to be taut. Let rest, uncovered, for about 20 minutes, or just until the dough relaxes a bit.

- Final shaping. Flip the dough and use the caddy clasp final shaping technique to fold it into a boule or batard. See the Notes section for video tutorials.


Cold Retard
- Cover banneton and refrigerate overnight. Ideal cold retard: 12-36 hours. Do not exceed 96 hours.
Score and Bake
- Preheat oven to 450°F (230°C) with Dutch oven inside. Transfer dough to parchment paper or a silicone bread sling, score, and place in Dutch oven.
- Bake with lid on for 30 minutes. Remove lid, lower temperature to 425°F/215°C, and bake for 15-20 minutes, or until golden brown and the internal temperature reaches 205-210°F (96-99°C).

- Cool on a wire rack for at least 2 hours before slicing.

Notes
Related Recipes:


How much water do I pour in? I don’t see it in the ingredients list.
OMG! What an oversight on my part. It’s 330g of water.
it says 2 loaves, i don’t see where it references “2 loaves” or separating.
I fixed that error on the recipe card. I typically always bake two loaves at a time but made sure to publish this recipe as just one since I may be in the minority there. Thanks for pointing that out for me!
Hello, goat cheese is my favorite! Is it safe to leave out on counter during bulk fermentation?
I don’t know! I’ve never had any issues with it but I am also not a food safety expert. My personal assumption is recipes that include milk also ferment on the counter for many hours and that has been a standard practice for as long as time. So I haven’t worried about it. The bread is also baked at a super high temperature. But it’s a personal choice if you don’t feel it’s safe.
When I buy my sun dried tomatoes in the jar of oil I also buy a couple of bags of dried tomatoes. Then I save the oil and refill the jar with the bagged tomatoes and keep for next time. Saves a couple of bucks.
So smart!!
Carol Hope that’s brilliant!
Thanks so much for the recipe. I tried it today and it is the most beautiful loaf I have made to date. Followed your wonderful recipe and instructions. Awesome!
That makes me so happy to hear!!
Can you use the two pan method with this recipe?
Yes
This one is a gift for my son. It smells delicious and baked up so nice.
Beautiful!!
I love the flavors , I can taste the goat cheese and the tomatoes , perfect combo. Next one, I will add some herbs… almost like the Italian cheese . My crumb was not that open, but it is user error, still trying to figure when to end the final; proof. Now for a sandwich I prefer not the open crumb,
Looks beautiful Great job!!
I want to make this and then make it as a focaccia!!!
The tomato basil will make a fantastic focaccia, too!
Thank you for your amazing recipes!
Great idea, let us know how it turns out!
I like the way you think. I may have to try your foccacia idea later on, as well. Should be outstanding flavor for both breads. 🤩
I want to make 4 small loaves of this recipe to give to some friends. At what point in the process do I split the dough up?
During pre-shaping!
I’m not sure you have it listed somewhere on your website but I made this twice and each time I used a loaf tin. First time I used another loaf tin as a cover, second time I used a water pan for steam and no lid . I’m finding that shape of loaf and temps matter because mine are slightly over browned. After doing some research online I learned you need to cook loaf tins at lower temps. They still came out delicious. But just wanted to mention that.
Thanks for sharing!!
I wish there was a way to straight print the pdf file or just download the pdf file without going through another program. Currently I just copy and past into a .pdf file on my computer.
What do you mean?
I’m excited to try this recipe and love all the tips from the bakers in the comments. I’m not a fan of goat cheese. What other cheese options would be a good compliment to the sun dried tomatoes?
Feta cheese would be awesome!
Rebekah, I made this bread a few months ago and really loved it (gifted two loaves for Christmas). I wanted to make two loaves again this weekend but didn’t want to run to the grocery just for goat cheese. Since I had feta, I used that instead, and it’s absolutely awesome!
Love it!! Looks awesome!
This turned out to be my best inclusion loaf so far and I can’t wait to make it again! I didn’t think anything could beat the garlic, parm, and rosemary inclusions, but this one surprised and delighted me! Thanks 🙂
Stunning loaf!! So glad you enjoyed it!