
The Ultimate Sourdough Proofing Box Guide: Reviews, Tips, and DIY Options
If you’ve been making sourdough for any length of time, you already know how much temperature matters. A dough that took 8 hours last Tuesday might take 12 hours this Tuesday — and the only thing that changed was the weather.
For years, my solution was a cup of boiling water in the corner of my oven. It worked, mostly. But every hour or so, I’d have to refresh the water to keep the temperature up, and honestly? I was ready for an upgrade.
Eventually, I invested in my first proofing box — the Brod & Taylor Folding Proofer — and it changed the way I bake. Since then, brands have sent me all kinds of proofing tools to test, and I’m ready to share my honest thoughts!
This post is the resource I wish I’d had before I bought anything. I get asked about proofing gadgets constantly, so I wanted to put everything in one place — DIY options, full product reviews, a comparison table, and honest opinions on what’s actually worth your money.
Disclaimer: Some of the products I recommend in this post are affiliate links. If you choose to purchase through one of my links, I may earn a small commission, which helps fund this website, recipe development, and monthly giveaways. I sincerely appreciate your support. Products sent to me for testing include Brod & Taylor’s Proofer Pro and Sourdough Home, Cozy Bread’s products, Giyudot’s proofing box, the Sourhouse Goldie, and D’Baker Aid.
Why Proofing Temperature Matters for Sourdough
Sourdough is all about temperature. Even a few degrees can translate into hours of difference in fermentation time, which honestly surprised me when I first started.
Who knew your whole baking schedule would change from summer to winter?! But it’s true.
Warmer temperatures speed up fermentation, while cooler temperatures slow it down. So the next question is — what’s the point of aiming for a warmer temperature anyway?
Four Benefits of Warm Sourdough Fermentation
In my view, there are four main benefits of trying to keep your dough warm during fermentation:
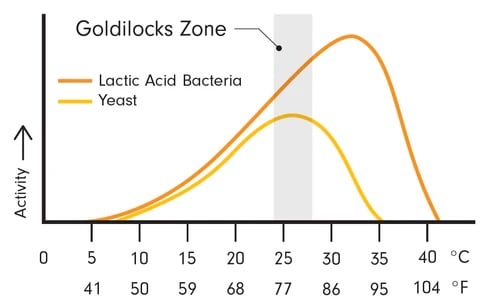
- Optimal temperatures for yeast: Wild yeast thrives and multiplies most rapidly in the upper 70s to lower 80s °F. That’s not to say it can’t survive at higher or lower temperatures, because it absolutely can. But if you want to find that sweet spot where the yeast is happy and the lactic acid bacteria aren’t overpowering it, 75–82°F (24–28°C) is a reliable range to aim for.
I find this chart from Sourhouse to be incredibly helpful for visualizing the ideal fermentation temperature:
- Faster fermentation: There’s nothing inherently wrong with a slow fermentation — it comes with its own benefits — but if you want to stick to a quicker timeline, warm dough will get you there. For scheduling reasons, being able to manipulate the timing can be quite handy.
Benefits of a cooler fermentation: A cooler fermentation (65–72°F / 18–22°C) is ideal for an overnight timeline – mix before bed, rise overnight, shape in the morning. It also develops more sour, tangy flavors and may be easier to digest for some people who have gluten sensitivities. The biggest perk? More grace. Because fermentation moves slowly, you have a much wider shaping window – 12, 13, or even 14 hours, and you can still catch your dough at its sweet spot. Proof warm, and 45 extra minutes could tip you into overproofed territory.
- Predictability: Using a proofing tool to keep your dough at a consistent temperature gives you a much more reliable timeline. If it took 5 hours at 78°F last time, it’ll probably take about 5 hours at 78°F next time.
- Milder sourdough flavor: Time equals flavor, and when it comes to sourdough, that flavor is typically tangy and sour. If you speed up fermentation, your final result will be milder.
With all of those benefits in mind, the next question is: how do you actually keep your dough warm?
And while there are lots of DIY solutions — I’ll share them all — there are also contraptions you can buy — namely, proofing boxes.
Do You Actually Need a Proofing Box?
Do you need a proofing box? Absolutely not. But is it a nice-to-have item for regular sourdough bakers? You bet.
Five Benefits of a Proofing Box for Sourdough
Here are five reasons you might want to invest in a proofing box:
- Consistent temperature: Maintains a stable environment regardless of your kitchen temperature, so your dough rises at a predictable pace
- More reliable than DIY: Far more consistent than an oven with the light on or a sunny spot in your kitchen
- Fermentation on your schedule: Control how fast or slow things move so the dough fits your day, not the other way around
- Fewer over- or underproofing disasters: Predictable conditions mean fewer surprises
- Fewer seasonal adjustments: Your timeline stays much more consistent, whether it’s January or July
Now, I do want to pause for a second on the seasonal changes bit, because I think this is a big one.
Most of us get into a rhythm, especially when making the same recipe over and over again. It’s almost like cruise control. Then the season changes, and suddenly your dough is overproofed when it used to be just right.
By using a proofing box and setting the temperature, you can take a lot of the seasonal guesswork out of your timeline.
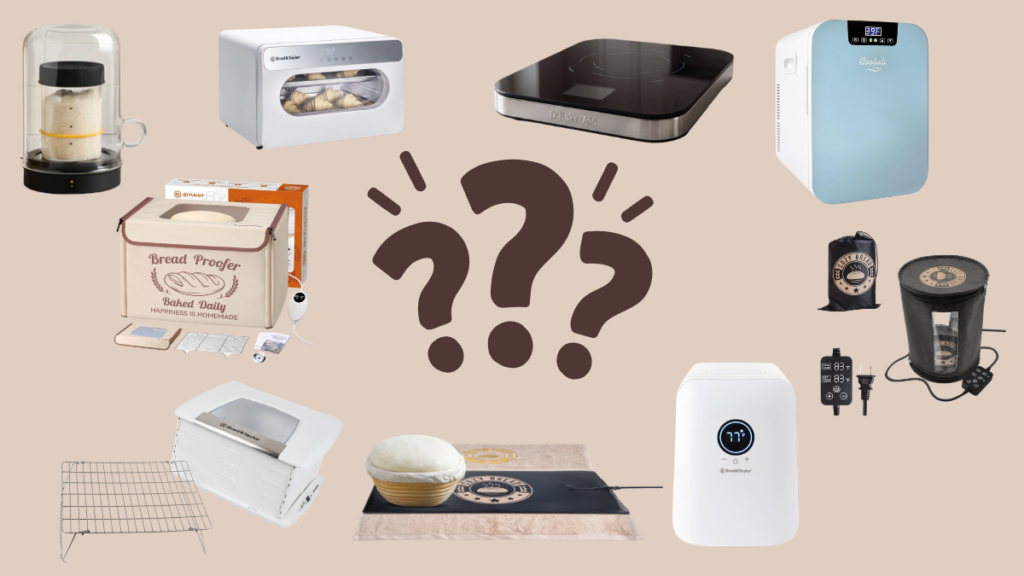
My Favorite Proofing Products
If you just want my quick recommendations, here’s the short list:
- My personal favorite: Brod & Taylor Proofer Pro ($999)
- It warms AND cools, and has plenty of room inside for multiple bakes. But it’s very expensive and requires a good bit of dedicated counter space. It’s definitely not for everyone — best for someone like me, honestly, or a very serious hobby baker.
- Best overall: Brod & Taylor Folding Proofer ($269)
- The best fit for most home bakers. It’s incredibly precise and folds down for easy storage. If you’re a “I want the best of the best” type of person, this is the one you want.
- Best budget: Giyudot Proofing Box ($69.95)
- A reliable budget option for those not interested in splurging on the Brod & Taylor version. It’s precise and folds up for easy storage, but you might not like how it looks, and the outer fabric makes it difficult to clean thoroughly.
- Best low-fuss option: Cozy Bread Original Proofing Mat ($44.95)
- Much more budget-friendly than a box, and you can use my code THATSOURDOUGHGAL for 10% off. It’s the quickest, most convenient option, but less reliable than a proofing box. You need to set the temp 10°F higher than your target, and it tends to heat the dough unevenly.
- Best for starter: Brod & Taylor Sourdough Home ($149)
- FABULOUS contraption. Warms and cools for easy starter management.
Scroll down for detailed reviews on each and a full comparison table.
Sourdough Proofing Options: What Are Your Choices?
Whether you want to spend $0 or $1,000, there’s a proofing option for you.
DIY Sourdough Proofing Options
Before I ever bought a proofing box, I used my oven or microwave with a cup of hot water in the corner. There are plenty of budget-friendly or completely free ways to create a warmer proofing environment.
Get tons of ideas here: Budget Sourdough: 20+ Tool Swaps for Amazing Bread
In any DIY setup, you can check the temperature of your dough and make adjustments to your environment as needed. The Thermapen One is my favorite thermometer (read my detailed review here), but it’s pricey — a good budget alternative is this one from Atogou.
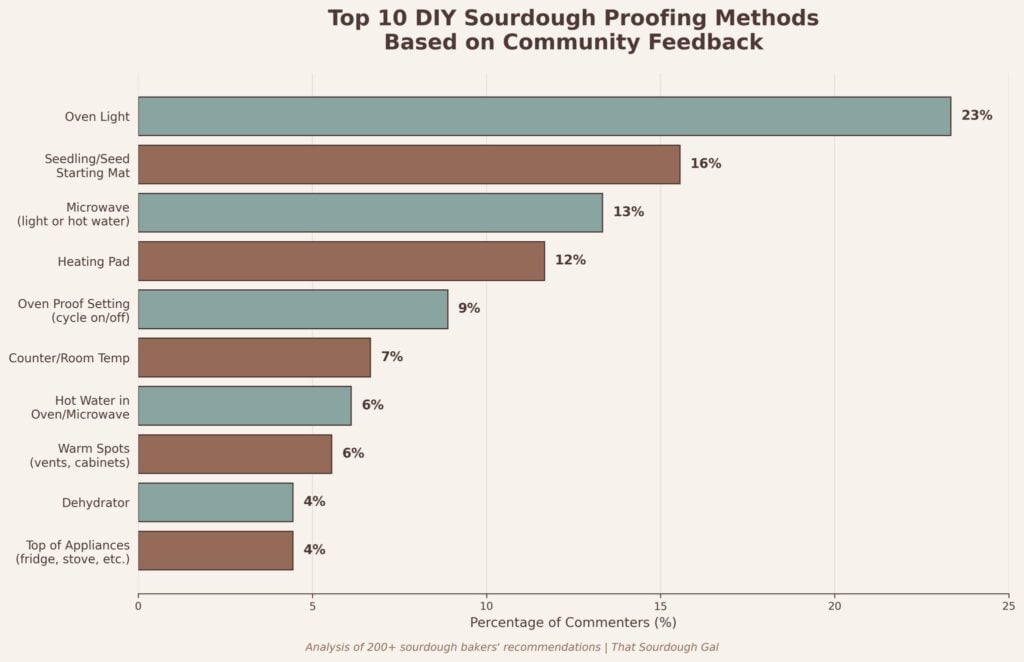
I asked my Facebook community what DIY proofing solutions they use — here’s a quick chart showing them in order of popularity:
Let’s look at some of these in a little more detail:
- Oven or microwave setup: Both can create a warm, enclosed space. Some ovens are naturally warmer, some need the light on, and some need added heat, like a cup of hot water in the corner. It helps to check the temperature inside the space (this inexpensive countertop thermometer is what I use) to figure out what works best in your kitchen.
- Towel insulation: A simple towel around your bowl could do the trick if you need just a bit of protection from the chill of cold counters.
- Repurposed heating mats: Heating mats don’t have to be sourdough-specific. If you already have one (like a seedling mat), it can work here, too. Some people even mentioned using electric blankets or microwaveable rice warmers.
- Warm spots around the house: Naturally warmer areas — like near a fireplace, in a laundry room, in the garage, on top of an appliance, or inside a cabinet — can work.
- DIY “box”: A lot of people create their own version of a proofing box using things like coolers, tote bins, cardboard boxes, or insulated shopping bags. You can use anything that will trap heat and create a more enclosed, stable environment, with or without a DIY heat source.
- Appliances: Some ovens, microwaves, and air fryers have proof settings, but many run warmer than we need for sourdough. We’re talking hot enough to favor lactic acid bacteria over yeast — which weakens dough structure — or even kill the microbes in your starter entirely. But if your appliance can be set to something like 80°F (26.5°C), you’re good to go!

At the end of the day, anything that helps control your dough’s temperature during bulk fermentation can work. But some methods will give you more consistency, better temperature control, and less guesswork than others.
Here’s a quick rundown of ideas:

Proofing Mats
Proofing mats sit under your bowl or container, gently warming the dough from below. They’re more affordable and easier to store than a full proofing box, but there’s a trade-off.
Because they only heat from the bottom, the temperature across your dough can be uneven. If you’re not doing stretch and folds or coil folds throughout bulk fermentation to help even out the dough temperature, the bottom can ferment faster than the top.
Best for: Bakers who want an affordable, easy-to-store option and don’t mind the occasional check-in during fermentation.
Cozy Bread Original Proofing Mat
I like how simple the Cozy Bread Original Proofing Mat ($44.95) is — take it out, set your bowl on top, done. You might want to set a towel underneath it so your countertop doesn’t absorb so much of the heat.
They also sell an insulation box that pairs with the mat to create a more contained proofing setup. I tested it with a bowl of dough on the bottom and a sheet pan of bagels on top, and the results were uneven.
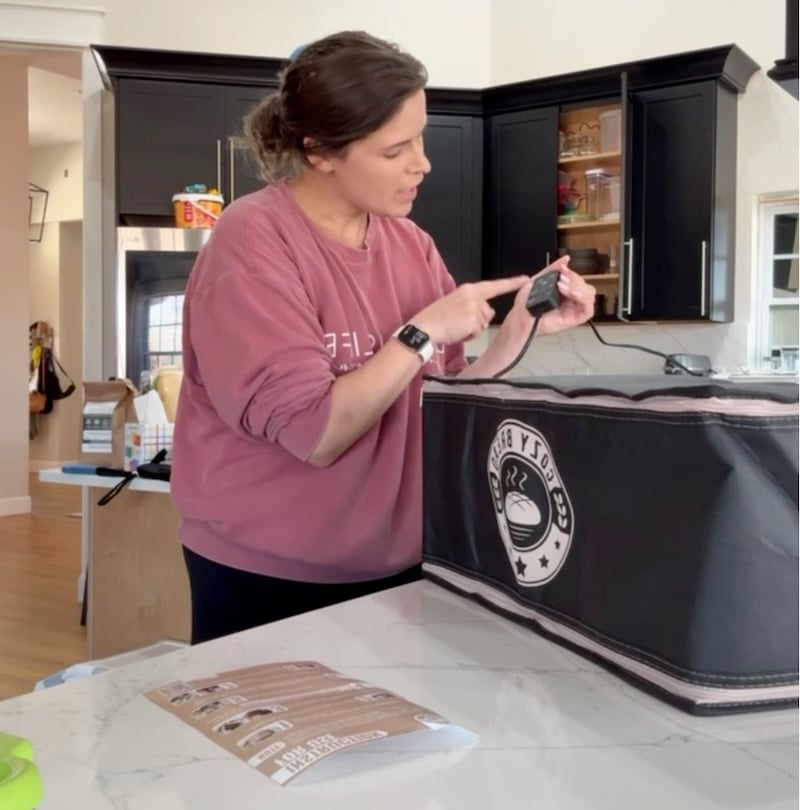
The bowl of dough was nearly overproofed while the bagels had barely moved. The mat heats from the bottom, so the further you get from the heat source, the less consistent the temperature becomes. For that reason, I’d skip the box add-on and just use the mat on its own.
Specs Overview:
- Temperature range: 70–120°F (21–49°C)
- Dimensions: 10″ W x 20.75″ D
- Weight: 0.75 lbs
Best for:
- Bakers who want a simple setup, not a bulky appliance on their counter
- Bakers on a budget
- If you only need to warm one bowl or starter at a time
What I like:
- Takes up almost no space — rolls up for easy storage in a drawer or cabinet
- Super easy, quick setup — plug it in and go
What to know before buying:
- It warms from the bottom, so heat isn’t as evenly distributed
- Can create a hot spot where the bowl touches the mat
- You may need to set the temperature higher than your target — usually about 10°F higher
Bottom line: This is a solid step up from DIY. You get more consistency without committing to a more expensive setup. But it’s nowhere near as reliable or sophisticated as a full proofing box.
Proofing Boxes — Full Reviews
If you want consistency, a proofing box is the easiest way to get it.
There are a few different types out there — some fold up and store away, some stay on your counter, and some are compact models made just for starter.
Brod & Taylor Folding Proofer Review
The Brod & Taylor Folding Proofer ($269 with the accessory shelf) is the one I recommend to most bakers. You get consistent temperature and plenty of space. When you’re done, it folds down so it’s not taking over your kitchen.

You can set the exact temperature you want for your proofing environment, and it will stay there the whole time.
I usually give timing guidance in my recipes, and lately I’ve even started giving exact temperatures for proofing boxes — like in my Sourdough Gingerbread Artisan Loaf Recipe. So instead of adjusting the timeline for your kitchen, you can follow the timing much more closely.

Specs Overview:
Best for:
- Anyone struggling with inconsistent fermentation timing
- Bakers who want temperature control without a permanent appliance on the counter
What I love:
- Holds a steady temperature — no guessing
- Big enough for multiple loaves
- Folds flat and stores easily
- Can fit two quarter sheet trays if you get the optional stacking tray
- No need to cover your bowl because the water tray provides enough humidity
- Can also be used for yogurt, sous vide, tempering chocolate, and more
What to know before buying:
- It heats, but doesn’t cool, so it won’t help you slow down bulk fermentation for overnight proofs
- It’s on the pricey side, but it’s definitely best-in-class
Bottom line: If you want one tool that makes sourdough more consistent without overcomplicating things, this is it.
Giyudot Folding Proofing Box Review
The proofing box from Giyudot ($69.95) is a great budget option. It actually surprised me because I didn’t expect a low-cost Amazon product to perform so well.
It does the same general job as the Brod & Taylor, just with fewer refinements.

Specs Overview:
- Temperature Range: 50–113°F (10–45°C)
- Material: 5-layer polyester fabric
- Dimensions: 12″ x 12″ x 12″ (16″ option also available)
Best for:
- Anyone not sure how often they’ll use a proofing box
- Bakers who want to try a proofing box without spending a lot
What I like:
- More even heat than a mat
- Budget-friendly way to try a proofing box
What to know before buying:
- Build quality feels more basic
- You have to unzip the sides to lift the top, which can get tedious
- The outside is fabric and can’t go in the washing machine
- You may not like the overall look
Bottom line: It gets the job done and is a solid budget-friendly proofing box.
Brod & Taylor Proofer Pro Review
Brod & Taylor just sent me their new Proofer Pro ($999), and ohhhhhh my.
I absolutely love it. (How could I NOT?)
It warms and cools, so you have full control over your proofing environment, and it’s definitely top-of-the-line — we’re talking WiFi and Bluetooth connectivity and all that fancy stuff.
This is not for your typical home baker making a loaf or two of sourdough bread on the weekends. It’s also not really for microbakers, since it’s not large enough for high-volume production.
It’s honestly more for people like me — food bloggers who benefit from a stable environment with enough room for multiple bakes at once. More serious home bakers would also love this, but you need the counter space for it. It doesn’t fold down; it’s a true appliance.
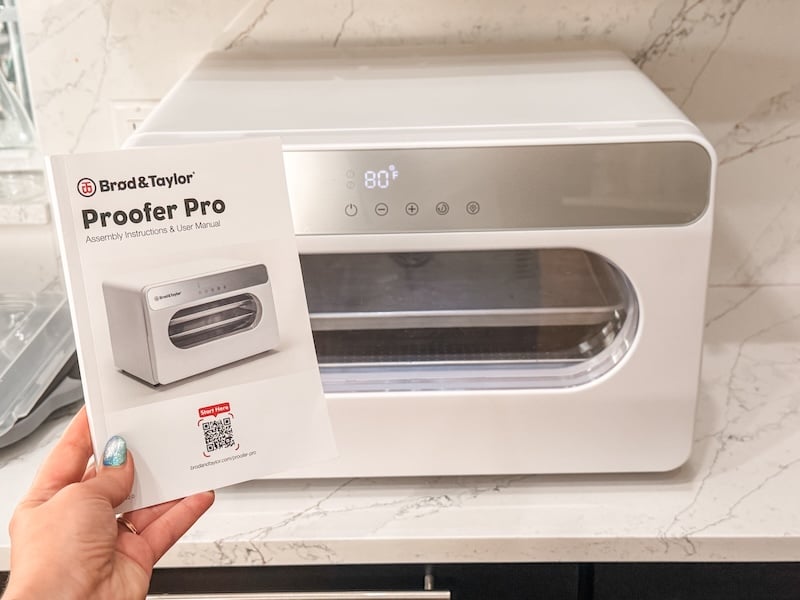
Specs Overview:
- Temperature range: 70–195°F / 21–90°C
- Material: Stainless steel
- Dimensions: 22″ W x 22″ D x 14.625″ H
- Weight (without trays): 31 lbs
Best for:
- Bakers who bake often and want consistent results every time
What I love:
- Very precise temperature control
- Cooling feature is very useful for overnight bulks — it can slow down fermentation, not just speed it up
- Takes all the guesswork out
What to know before buying:
- It doesn’t fold — this lives on your counter
- It’s very expensive
- More than a casual baker needs
Bottom line: If sourdough is a regular thing for you and you’re tired of adjusting everything around your kitchen temperature, this makes it easy.
Other Proofing Products I’ve Tested
Cooluli
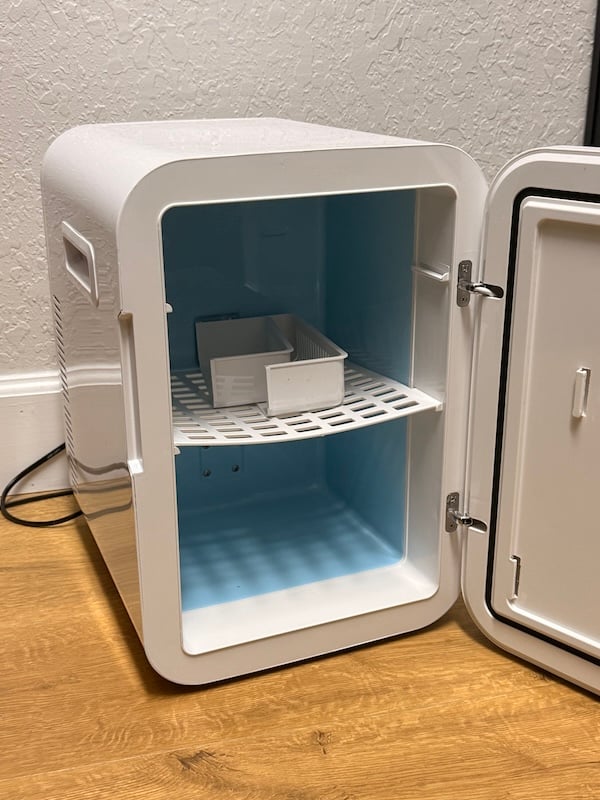
So, the Cooluli 20L Mini Fridge ($149.99) is a neat contraption that warms and cools, much like the Proofer Pro. However, it isn’t really comparable — the warming function isn’t reliable, and the size is a major limitation.
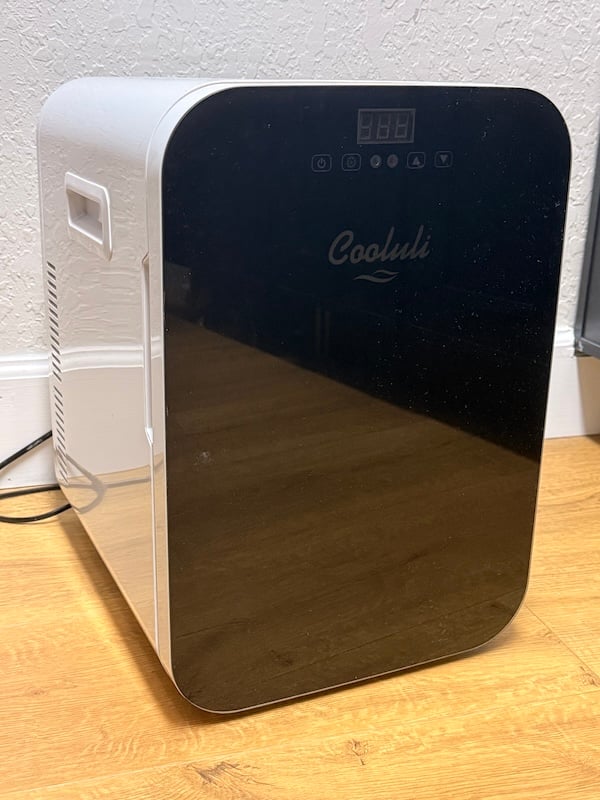
Where it really shines, at least in my opinion, is for gentle cooling. You can set the temperature to something like 65°F (18°C) and enjoy a long, cool overnight fermentation. It’s awesome for summertime if you like that overnight timeline, but your kitchen runs too warm.
Note: Since I don’t really use this for sourdough anymore, we tried using it as a mini fridge in our bedroom and found that it can’t handle true fridge temperatures. The fan in the back was covered in a thick layer of ice.
It’s only wide enough to fit a 2-quart bowl (large enough for one loaf), though you can stack another bowl on top.
What it’s best for:
- Gentle cooling and slowing down fermentation
What to know:
- Limited space — only wide enough to fit a 2-quart bowl
- The warming function is not reliable — often off by multiple degrees
Bottom line: Helpful for those who want to gently cool their dough or starter for longer fermentation timelines, but not something I’d rely on as your main proofing setup.
D’BakerAid suredough complete kit
D’BakerAid recently sent me a SureDough™ Complete Kit ($299.95), and I was eager to give it a go.
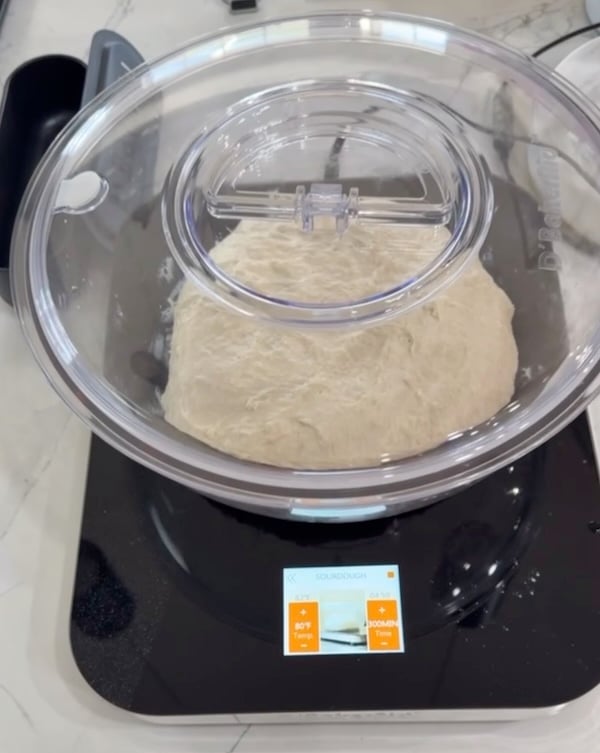
Sadly, this is not a product I’d recommend. While it does keep my dough at a warm, steady temperature, I have a few issues with it:
- The bowls are made from Tritan, a BPA- and BPS-free copolyester plastic — not glass or stainless steel. Tritan is a higher-end food-contact plastic, but this may still be a dealbreaker for bakers who avoid warming food in plastic.
- The built-in scale drifted so much that I ditched it and went back to my OXO scale. It might be okay for larger quantities like 500g of flour, but I wouldn’t trust it for precise measurements like 10g of salt.
- The manual is really bad. Some instructions were written in incomplete sentences, and one section says to grab the 2.5L bowl when neither of the bowls are labeled that way — they only have cup and ounce measurements.
- It’s very expensive for what it is.
- I’m skeptical of the brand itself. I stumbled across one of their ads on Instagram, and the caption said, “Tired of sourdough that never rises?” but the video showed a baker making focaccia with commercial yeast. That made me feel like this is another brand trying to capitalize on the popularity of sourdough without actually understanding it.
Starter-Specific Warmers
Finally, there are smaller warmers made specifically for your sourdough starter.
Now, you can just put your starter in a proofing box, but if you want something more compact that can stay on your counter, one of these tools may be worth a look.
Getting your starter to peak right when you’re ready to bake can take some planning. You can adjust that with feeding ratios (higher ratio = longer to peak) and temperature (the warmer it is, the quicker it will peak).
A starter-specific warmer allows you to control the temperature, but not all are created equal. Some warm and cool, while others only warm.
Brod & Taylor Sourdough Home
The Brod & Taylor Sourdough Home ($149) is my favorite starter warmer. It gives you full control, so you can warm or cool your starter to an exact temperature and keep it there.

Why I like it:
- Warms and cools to the exact temperature you set
- Great for timing your starter to peak when you need it
- Small enough to live on your counter
What to know:
- You can’t see inside without opening it
- It’s definitely pricey
Sourhouse Goldie
The Sourhouse Goldie ($149.95) is beautiful on your counter and is easy to use, but it comes with some major cons that leave me unable to fully recommend it.
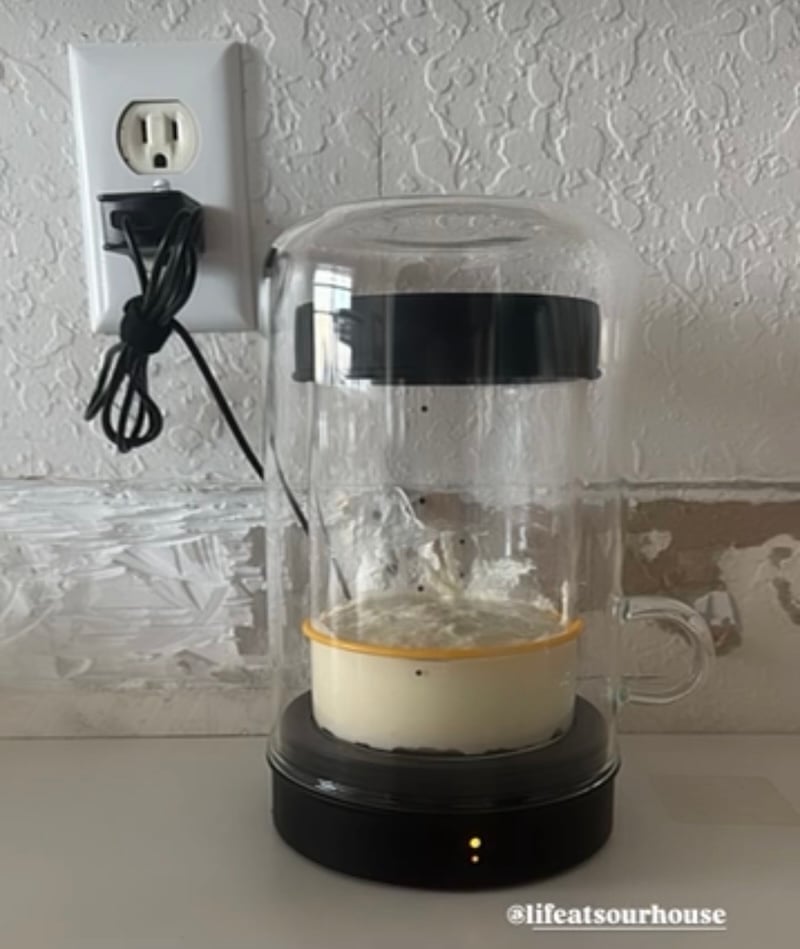
If you’re going to spend this kind of money, the Brod & Taylor Sourdough Home is the obvious choice here.
Why I like it:
- Looks pretty on the counter
- Keeps your starter in a solid fermentation range
What to know:
- You can’t set an exact temperature — it stays around 75–82ºF (24–28ºC)
- The cooling puck is a separate piece that needs to be frozen before using, and the setup feels kind of bizarre to me
- The topper is glass, so it could break if it falls or topples over
Cozy Bread Starter Jar Warmer
The Starter Jar Warmer from Cozy Bread ($34.95) works, but I’ll be honest — it’s not my favorite. For those on a really tight budget, it has its place.
But the zipper setup is quite tedious, and it has the same con as the warming mat — it warms from the bottom, so the starter may heat unevenly even though it’s insulated.
What I like:
- Rolls up easily and stores in a drawstring bag
- Clear panels let you see your starter without opening it
What to know:
- The zipper setup is very clunky
- Not as convenient as other options, so I don’t typically reach for it
Honorable Mentions From Other Bakers
While I’ve tried a lot of proofing gadgets, I definitely haven’t tried them all. Here are a few products followers and friends have shared with me, along with their thoughts.
- InnovifyHub Extra Large Folding Dough Proofing Box ($69.98): Described as the largest proofing box available on Amazon, it can fit two bowls plus two covered half sheet pans simultaneously — or get creative and stack bowls on a cooling rack for even more capacity. One follower did note that hers stopped working after a few months, but reported that the company honored their one-year warranty quickly and had a replacement shipped the same day. “It’s been a game changer!” –Eileen H.
- Dollar General Food Warming Mat ($25-30): A budget-friendly find from one of my close friends — she picked hers up at Dollar General for $25 with a coupon. The lowest temperature setting is 95°F (30°C), which is too hot for sourdough, but she found that placing a folded dish towel under the bowl kept things right in the sweet spot at 79–81°F (26–27°C). It rolls up for easy storage and doubles for other uses in the kitchen. “I wish it wasn’t as hot… but I love the convenience of it rolling up for storage, and it’s multipurpose.” –Stephanie T.
- Nordic Canyon Proofing Box ($74.99): A budget-friendly alternative to higher-end proofing boxes. One of my friends picked this up when she wasn’t ready to invest in a Brod & Taylor, and she was immediately impressed — her dough was more bubbly and active than she’d ever seen. “I’ve literally never had dough proof like that… if I would’ve known a proofer bag would do this I would’ve bought it day one!” –Becca L.
Proofing Products Comparison Chart
| Product | Price | Type | Warms | Cools | Best For | My Rating |
| Cozy Bread Original Proofing Mat | $44.95 | Warming mat | Warms | Dough + Starter | 3.5/5 |
| Brod & Taylor Folding Proofer | $249.00-$269.00 | Folding proofing box | Warms | Dough + Starter | 5/5 |
| Giyudot Proofing Box | $69.95 | Folding proofing box | Warms | Dough + Starter | 4/5 |
| Brod & Taylor Proofer Pro | $999.00 | Countertop appliance | Warms + Cools | Dough + Starter | 6/5 |
| Cooluli Mini Fridge | $149.99 | Mini fridge | Warms + Cools | Dough + Starter | 2.75/5 |
| D’Baker Aid SureDough™ Complete Kit | $299.95 | Proofing kit | Warms | Dough | 2/5 |
| Brod & Taylor Sourdough Home | $149.00 | Starter temp controller | Warms + Cools | Starter | 5/5 |
| Sourhouse Goldie | $149.95 | Starter temp controller | Warms + (Kind of) Cools | Starter | 3/5 |
| Cozy Bread Starter Jar Warmer | $34.95 | Starter warmer | Warms | Starter | 3/5 |
Frequently Asked Questions
I asked my Instagram and Facebook communities what questions they had about this topic — here, I’m answering all of them! I’ve organized them by section since there were so many.
Temperature & Timing
The ideal proofing temperature for sourdough is 75–82°F (24–28°C). This is the sweet spot where wild yeast thrives and multiplies most rapidly, without lactic acid bacteria overpowering it. Most literature — and the Sourhouse Goldilocks Zone chart — points to this range as optimal.
Dough temperature is the more reliable of the two. Your ingredients — water, flour, starter — may all be at different temperatures when you mix them, so your dough could easily be warmer or cooler than your room at the start of bulk fermentation.
Since it’s the dough temperature that directly drives how quickly fermentation moves, that’s the number that matters most. That said, if your dough has been sitting on the counter for a few hours, it’ll likely have equalized to roughly room temperature — so at that point, either reading can be helpful.
Taking your dough’s temperature during bulk fermentation isn’t required, but it can be helpful to get a general sense of how long things will take. A 70°F (21°C) dough is going to need significantly more time than 80°F (26.5°C) dough, so knowing your dough temperature early in bulk fermentation can help you plan your day.
As for timing, you can check the dough as often as you like. The initial temperature might be higher if you use warm water, for example. But it may decline if you’re fermenting on the counter and your kitchen is cool. If you’re checking around stretch and folds, just be consistent — checking before or after is less important than tracking it the same way each time.
Fermentation time can vary even when the temperature is the same because temperature is just one of many variables at play. Starter activity is a big one — the specific strains of yeast and bacteria in your starter are unique to you, and how well you maintain it directly impacts its activity level.
Flour type matters, too — more nutrient-dense flours (like whole wheat or rye) tend to speed fermentation up compared to white flours. Hydration, salt levels, and even the temperature of your water at mixing can all play a role as well. Temperature is the easiest variable to control, which is why it gets so much attention — but it’s never the whole picture.
If you’re talking about killing your starter, according to The Sourdough School, yeast begins to die off around 130°F (55°C), with complete yeast death occurring at 140°F (60°C) — so you’d have to get quite hot to do permanent damage during fermentation. That said, yeast activity slows dramatically above roughly 95°F (35°C), giving lactic acid bacteria the upper hand — which leads to a soupy, over-acidified dough that loses its structure.
Proofing at a lower temperature is not bad at all — in fact, a cooler fermentation range of 65–72°F (18–22°C) comes with its own advantages. It develops more complex, tangy flavors, may be easier to digest for some people who have gluten sensitivities, and gives you a much wider “grace period” for judging the end of bulk fermentation. The trade-off is time — fermentation moves slowly, so you need to plan accordingly.
Bulk Fermentation
Knowing when bulk fermentation is complete is the million-dollar question — and the honest answer is that it depends on the recipe. An all-white-flour dough can get super bubbly and jiggly by the end of fermentation, while a dough with more whole grains needs to be shaped before it reaches that point, or it’ll likely overproof. This is why I provide specific visual cues in all of my recipes.
That said, the universal thing to look for across any dough is inflation. You want the dough to be puffy and full of air — but not so much that it starts to collapse. A gentle poke can also give you clues: press a floured finger gently into the dough. If it doesn’t spring back at all, it’s gone too far. If it springs back immediately, it needs more time. Ultimately, this is a skill that develops with practice.
Failing — and learning from it — is genuinely one of the most useful things you can do as a sourdough baker.
If you’re using a proofing box and keep accidentally overproofing your dough, shorten bulk fermentation next time. The beauty of a proofing box is that you can create a consistent environment and really dial in your timing. Keep making the same recipe until you nail it!
A 70°F (21°C) kitchen is actually a solid temperature for an overnight bulk fermentation. At that temperature, fermentation usually moves slowly enough that you have a generous window — many doughs may take 10–12 hours or more, though it truly depends on the recipe. Mix your dough before bed, and check it in the morning. If it’s overproofed by the time you wake up, reduce the amount of starter in your dough next time.
First of all, God bless. But in all seriousness, if your home is that warm, sourdough gets tricky fast because that heat can favor lactic acid bacteria over yeast , which can leave you with soupy, weakened dough.
Two tips that might help:
1. Reduce your starter significantly. Less starter means slower fermentation, which buys you more time and control. For example, if a typical recipe calls for 500g bread flour, 100g starter, 350g water, and 10g salt, try adjusting to 540g bread flour, 20g starter, 390g water, and 10g salt. The dough size and hydration stay the same — you’re just dramatically dialing back the starter.
2. Use your fridge strategically. Pop your dough in the fridge periodically throughout bulk fermentation to bring the temperature down, then move it back to the counter. Repeating this throughout the process can help keep things at a more manageable middle ground between your fridge and your kitchen.
Proofing Equipment
You absolutely do not need a proofing box — plenty of great sourdough is made without one. DIY options like an oven with the light on, a microwave with a cup of hot water, or a warm spot in your home can all work well. A proofing box becomes worthwhile when you want more consistency, less guesswork, and the ability to bake on your schedule more consistently throughout the year.
Warming mats are a solid step up from DIY options. The main limitation is that they heat from the bottom only, which can create uneven temperatures throughout your dough — the bottom may ferment faster than the top. If you’re doing regular stretch and folds or coil folds during bulk fermentation, this is less of an issue.
Yes, you can control the temperature on a proofing mat, but it’s less precise than a proofing box. I’ve found I have to set my Cozy Bread mat about 10°F higher than my target dough temperature.
The shape of your proofing vessel does not significantly affect how the dough rises. The one thing to watch out for is proportion — if your bowl is much larger than your dough, it becomes harder to gauge how much the dough has actually risen. A vessel that’s closer in size to your dough gives you a much clearer visual read on fermentation progress.
When using the Brod & Taylor Folding Proofer, you don’t need to cover your bowl if you add water to the tray that comes with it. The tray provides enough humidity to prevent the dough from drying out. For other proofing boxes, it’s still a good idea to cover your bowl as you normally would.
Yes. I use the water tray when proofing uncovered dough in the Brod & Taylor. It provides enough ambient humidity inside the box to keep the dough surface from drying out.
Yes — a few options warm and cool. The Brod & Taylor Proofer Pro is the most advanced option, with precise temperature control in both directions. The Cooluli mini fridge also warms and cools, though its warming function is less reliable — it’s best used for gentle cooling. The Brod & Taylor Sourdough Home heats and cools as well, but it’s designed and sized specifically for your starter.
Flavor & Digestion
If your goal is a milder loaf a warmer, faster fermentation, ideally 80–85°F (26.5–29.5°C) produces less sour-tasting bread. Because time equals flavor in sourdough, speeding up fermentation means less time for those tangy, sour notes to develop.
A cooler, slower fermentation is not necessarily healthier, but it may be easier to digest for some people who have gluten sensitivities — not Celiac disease. The extended fermentation gives the natural fermentation process more time to break down some of the harder-to-digest components in the dough.
Conclusion
If your sourdough feels inconsistent, temperature is very likely part of the equation. The other major consideration would be how active your starter is, but that’s a topic for another post.
The good news is you don’t have to spend a dime to get started. An oven with a cup of hot water, a warm spot in your house, a towel around your bowl — these DIY options work, especially when you’re just getting started.
But if you’re baking regularly, a proofing box is one of those purchases you’ll wonder how you ever lived without.
If you enjoyed this article, you might also enjoy my in-depth banneton guide. It’s part education and part product suggestions and reviews, just like this one. Happy baking!!


Thank you for this great article! I have the Sourhouse Doughbed and it’s fine but not always consistent. I would have enjoyed your opinion on it within this article. I’ve been looking forward to this article and am considering purchasing the B&T proofing box for more control. I appreciate your well researched great information and advice. Your content, videos and recipes are fantastic! You are greatly appreciated in this community!
Thanks so much Tanya, so glad this was helpful!
I have two large storage boxes I bought at Sam’s Club that have a seedling heat mat in the bottom with a cooling rack set on top. I then plug the heating mat into a thermostat controller. This allows me to set my temperature. I stick the thermometer to the inside of the bin, put my dough or loaves on the cooling rack, pop on the lid, and voila! A temperature controlled proofing box. You can add a jar full of hot water for humidity if you need it but here in San Antonio I don’t find that necessary.
Love it!
I keep thinking about getting a proofing box, but I have been doing the same thing for my sourdough bread for 15 years or so. Using the oven light to allow the dough to rise works the same way every time. The temperature is 110°. In two to three hours, I am ready to shape the loaves. Then another hour or so, and I am ready to bake. My loaves are always just right.
Hey, if it ain’t broke, don’t fix it!
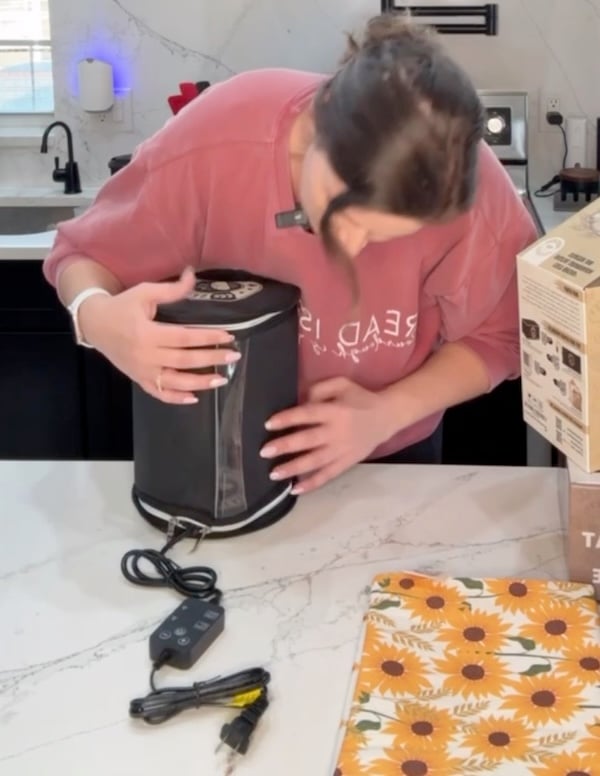
I built this proofer box. It has a wire rack to hold the seed stater mat off the bottom, then a wire rack to keep the dough container out of direct contact with the heat mats. Then a second heat mat( chicken water watmer) i use to heat the box a little quicker at the start. Then a full removable lid or an end pull out door for smaller container loading. It holds 5 5×9 bread pans or 4 of the larger bulka battard bannetons. It takes a bit more space but can blend with furniture.