
Sourdough Bierocks (Runzas) Recipe – Meal Prep & Freezer-Friendly
Sourdough bierocks, runzas, or — as my in-laws call them — patrol sandwiches (I’ll explain in a bit) are an incredible all-in-one meal you can prep and freeze for later.
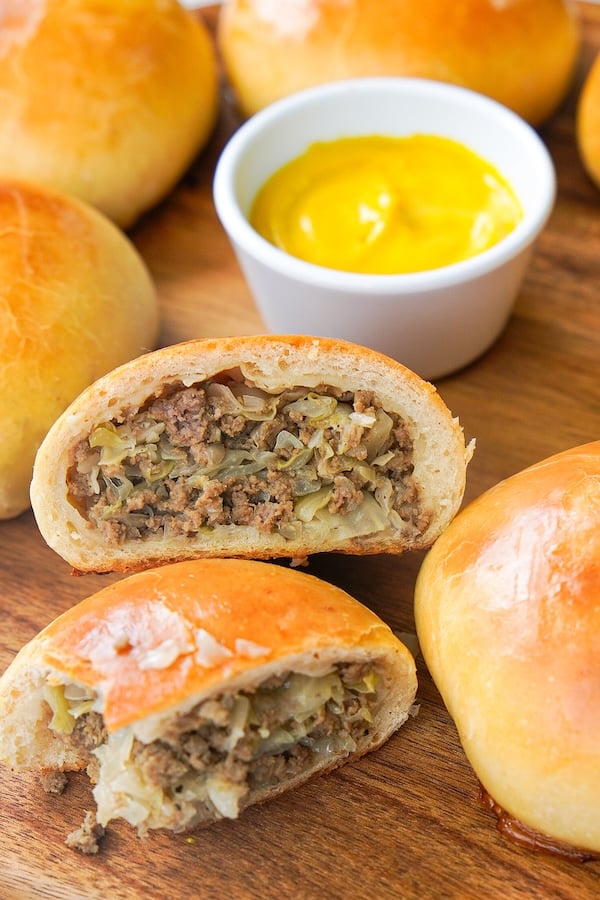
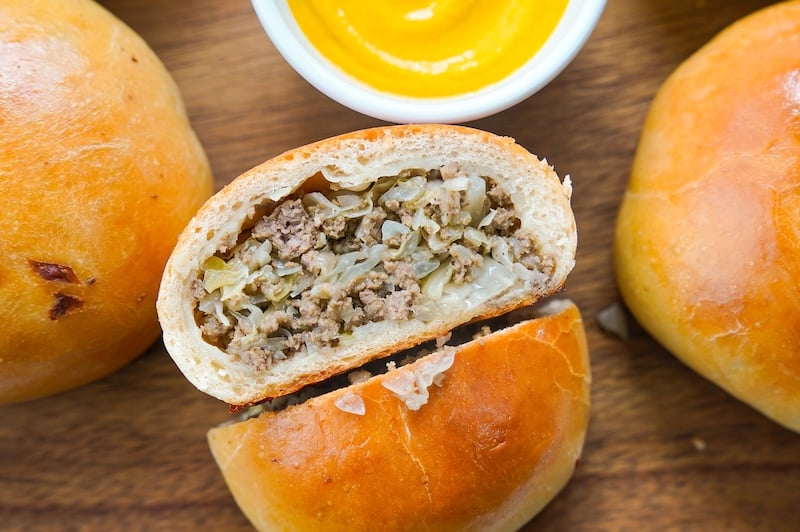
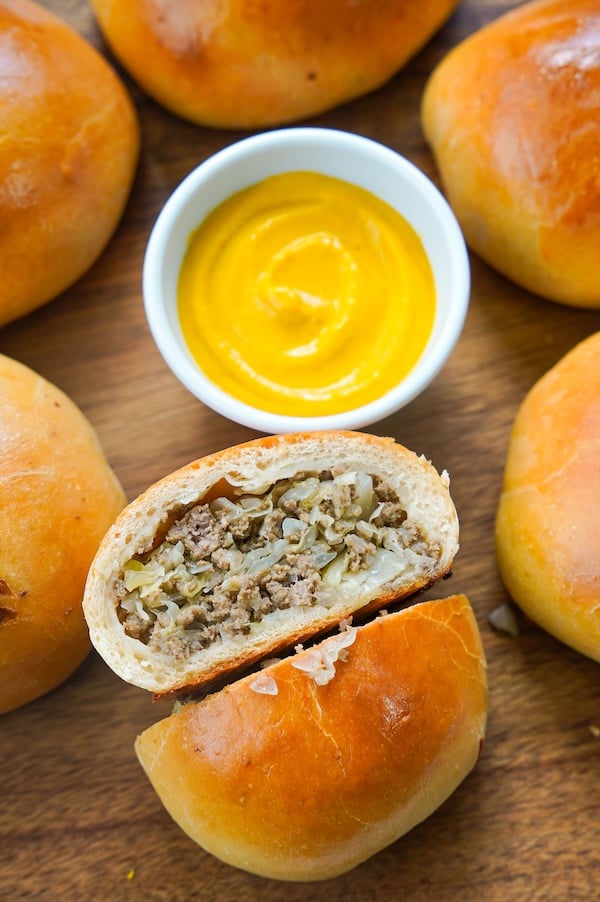
This slightly sweetened dough is stuffed with a cooked beef-and-cabbage mixture, but you can get creative with the filling. Recipe testers experimented with mushrooms instead of beef, some added cheese, and cabbage-averse bakers swapped in potato or broccoli slaw for a fun twist.
The recipe is quite simple, and it’s such a fun base to riff on — stay tuned, because I can’t wait to share different filling variations using this lovely dough!
Before we get into the recipe, I want to share this tester quote, because it touched me so deeply:
“Thank you for such a wonderful recipe. My dad was stationed in Germany when he was in the Army and this recipe reminded me of the stories of the food and experiences he would tell when I was growing up. I lost my dad 5 years ago. Thank you for the memories.” —Recipe tester from Columbus, Ohio
Disclosure: Some of the products I recommend in this post are affiliate links — if you choose to purchase after clicking, I may earn a small commission, which helps fund this website, recipe development, and monthly giveaways. I sincerely appreciate your support.
Quick History of Bierocks
For those unfamiliar, bierocks — also called runzas or krautburgers — are tied to Volga German food traditions. Immigrants brought them to the American Great Plains in the late 1800s, which is why they’re still a well-loved staple in Kansas and Nebraska.
Bierocks are often compared to Russian pirozhki (not to be confused with Polish pierogi, which are unleavened dumplings). Like bierocks, pirozhki are stuffed buns, though they can be baked or fried depending on the tradition and recipe.
One common theory is that the word bierock comes from the Russian word pirog, a baked pie with a sweet or savory filling, though the exact etymology is a bit hard to pin down. But sadly, I couldn’t find bierock or runza in the Oxford English Dictionary, so I couldn’t dig any deeper there.
My husband grew up eating these — his family got the recipe from a Russian friend. But in their house, they called them “patrol sandwiches” because my mother-in-law made them in bulk, froze them, and sent them with my father-in-law during his patrols with the Pennsylvania Game Commission. The name stuck!
“I will affectionately call these Patrol Sandwiches, in honor of your in-laws. I love this story, and the name, and it will forever be that in my house, in honor of you.” —Recipe tester from Farmington Hills, Michigan
I’ve been wanting to develop a sourdough version for a long time, and with the help of 232 recipe testers, we finally did it!
Why You’ll Love This Recipe
- Recipe tested by real home bakers: 232 home bakers tested this recipe, giving it an average rating of 4.67 out of 5 — before I made improvements based on their feedback! This recipe is a keeper.
“The flavor and texture were amazing. My picky daughter who doesn’t like pork or cabbage said these were the best sourdough recipe I’ve made to date.” —Recipe tester from Georgetown, Texas
- A flexible timeline: I’ve made this dough before bed or first thing in the morning, and both timelines work beautifully. You can prep the filling ahead of time, too.
- A whole meal in one roll: The slightly sweet dough wrapped around a savory beef-and-cabbage filling means you’ve got dinner in one fell swoop.
“It’s a meal that can be frozen and enjoyed!!” —Recipe tester from Alpharetta, Georgia
- The dough is an absolute dream: Recipe testers consistently commented on how easy this dough is; no stretch and folds, no coil folds — just mix, rise, shape, and bake.
“It was so easy and gave fantastic results. I love making stuffed rolls, but have never tried them with sourdough; huge difference from yeast rolls.” —Recipe tester from Star, Idaho
- Endlessly riffable: The beef and cabbage is just the jumping-off point, and testers came up with a wishlist a mile long. A pizza-stuffed version (pepperoni, sausage, the works) was far and away the most-requested, followed by ham and cheese and a breakfast filling with egg, sausage, and cheese. From there, it spirals: cheeseburger, taco, Philly cheesesteak, BBQ pulled pork, Reuben, Buffalo chicken, Thanksgiving leftovers, and even sweet versions like apple pie filling with a glaze. Don’t be afraid to get creative!!
“Such a versatile dough. The options are endless for ingredients!” –Recipe tester from Camden, Arkansas
- Built for your freezer: These freeze beautifully and reheat in minutes, which makes them perfect for batch cooking, busy weeks, camping, hunting season, or stocking lunches ahead.
“I absolutely love recipes like this that I can fill my freezer with.” –Recipe tester from Northern Nevada
- That sweet-and-savory contrast: The lightly sweetened dough against the rich, savory filling is the thing people kept coming back to. It’s just. So. GOOD.
The Recipe Testing Process
Years ago — I’m talking 2018–2019 — I made a yeasted version of bierocks that we loved, and as these thing go, we kind of forgot about them. But once sourdough took over my kitchen (and my brain), I knew a sourdough version had to happen.
Two things stood between me and a recipe I was happy with:
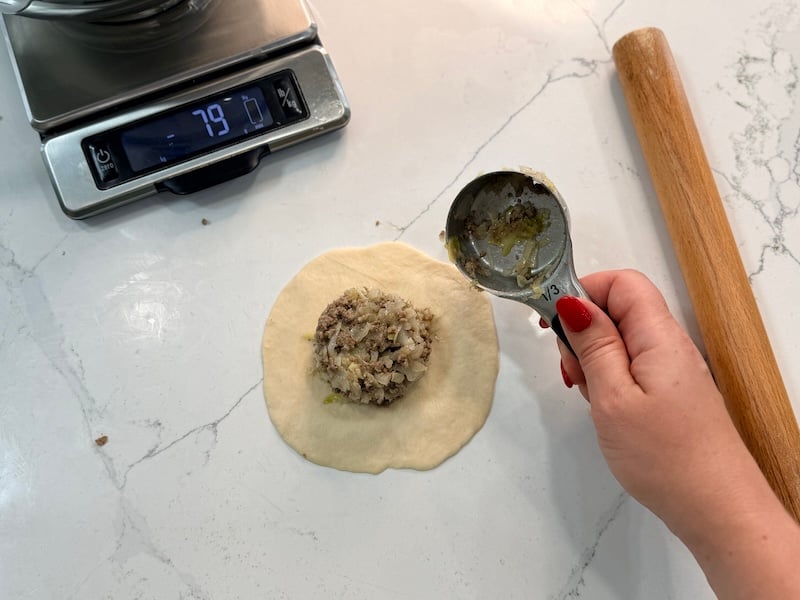
- Getting the filling-to-dough ratio right: My very first attempt was almost all dough with a sad little pocket of filling in the middle — not what anyone signs up for with a bierock. Dialing in the right amount of dough and filling per roll took a bit of tweaking, but 70g dough portions with a heaping 1/3 cup of filling (about 75–80g) is the sweet spot I landed on.
- Cracking the second proof: The second proof was a real puzzle. Because these are stuffed with a cooked meat filling, I wanted to keep the second proof capped at 2 hours for food safety. That meant I had to figure out how to get a soft, well-proofed result inside a shorter window.
By the time the recipe went out to testers, both pieces were locked in, and the feedback backed it up: the filling amount and the 2-hour second proof landed right where I’d hoped.
“I wasn’t super confident about the 2nd proof, but it turned out amazing.” —Recipe tester from Middle TN
Meet the Recipe Testers
Bakers from all over the world tested this recipe, including home bakers across the U.S. — from Louisiana, Texas, and the Carolinas to Idaho, Montana, the Pacific Northwest, and the U.S. Virgin Islands — plus testers in Canada, the UK, Australia, Iran, and Qatar.
I’m absolutely stoked that this recipe was so well-received. Not only is it a fun change from your typical loaf of bread or focaccia recipe, but it’s practical!
“My spouse said it was the best thing I’ve ever made.” —Recipe tester from New Jersey
“I loved learning the process and stepping out of my comfort zone. This recipe gives me so many ideas of how I can change things up to suit my family. Thank you, Rebekah!” —Recipe tester from Chicago, Illinois
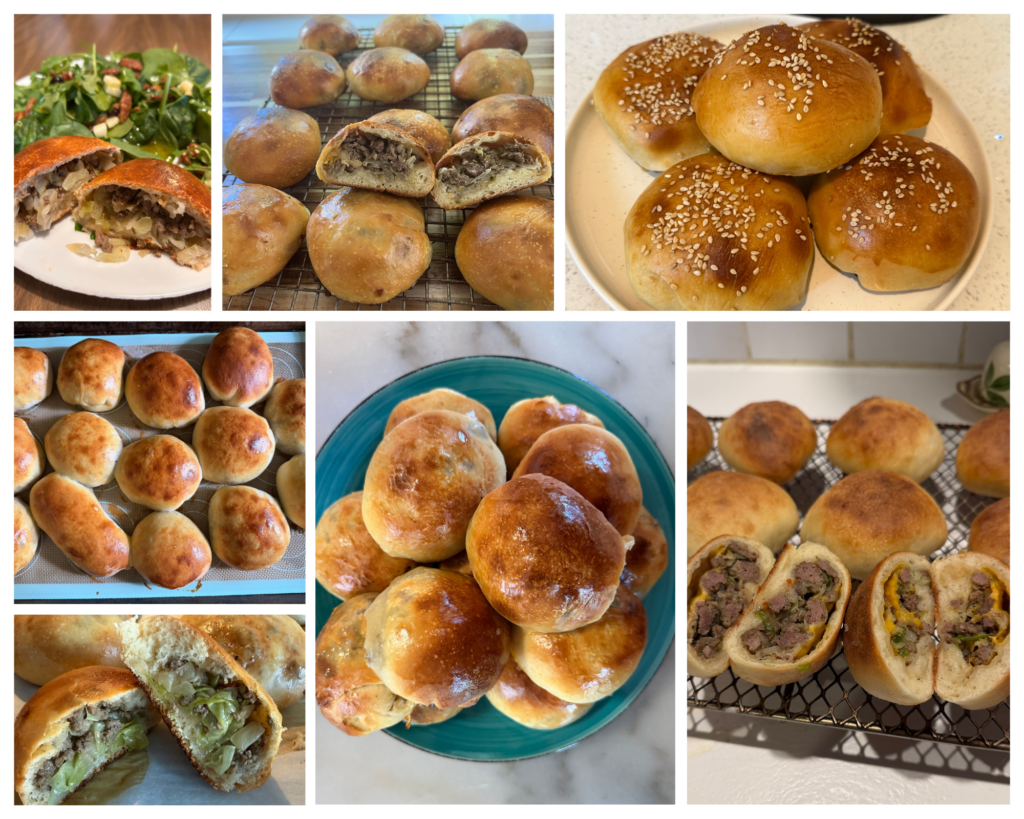
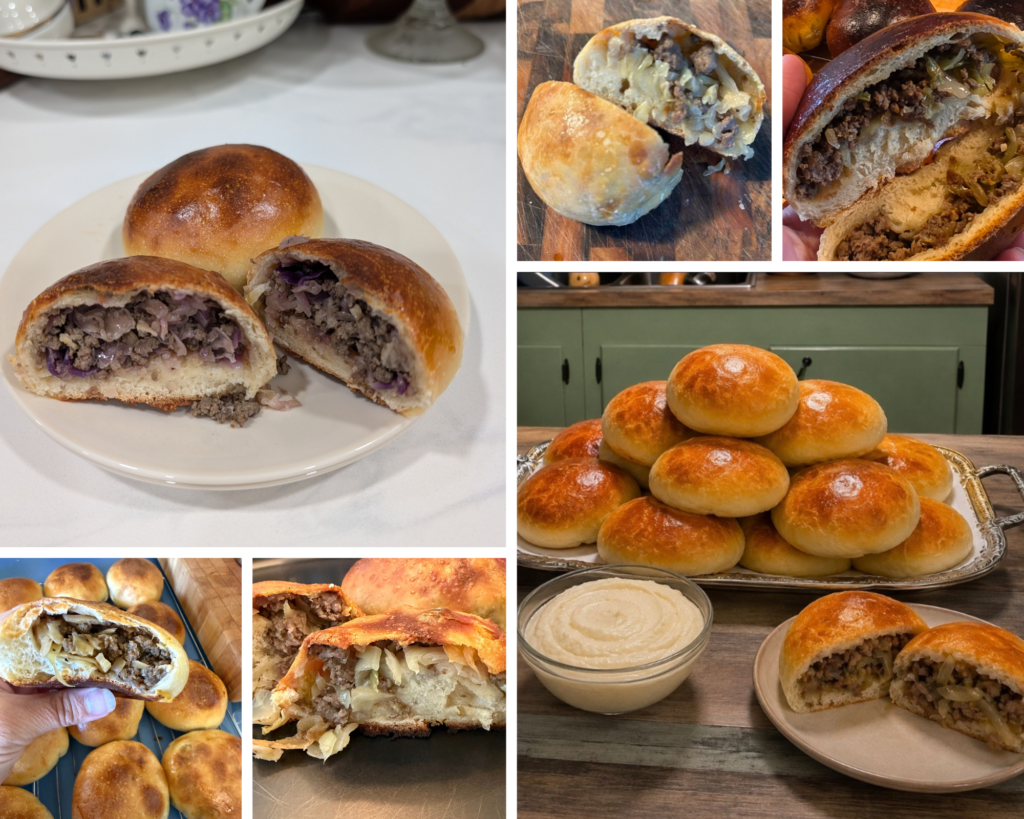
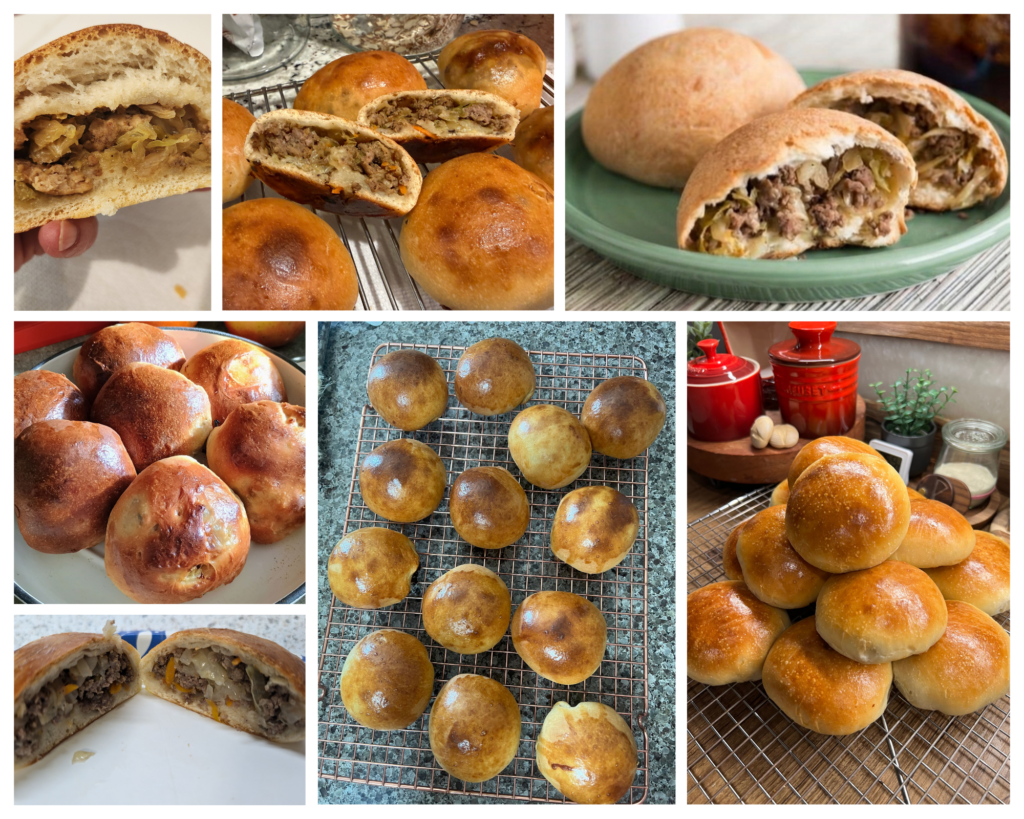
Here are a few beautiful tester photo submissions:
12 Lessons Recipe Testers Taught Me
The recipe is better in so many ways thanks to feedback from recipe testers.
Here are 12 key improvements we made to my original draft (these are the details that make all the difference):
- Poke the rolls before baking: A few testers ended up with a big hollow air pocket where the dough separated from the filling. The fix is simple: After the second proof, poke a small hole in the top or side of each roll with a toothpick before baking to give the steam somewhere to go.
- Lower the oven temperature: This was the loudest piece of feedback. A large number of testers found the stated temperature, originally 400°F / 205°C, too aggressive and pulled their bierocks earlier than written or dropped the temp partway through. I ended up reducing the temperature in the recipe to 375°F / 190°C to help avoid overbrowning or even burning. Much better.
- Tent with foil if they’re browning too fast: Along the same lines, plenty of testers loosely tented the tops with foil for the last few minutes and reported it kept the color in check without affecting the bake.
- Weigh your filling: The 1/3 cup filling measurement worked for most, but a decent number of testers ended up with leftover filling or ran short. How much you pack into that cup varies widely, so I’ve added a weight measurement, 75–80g, to address that.
- Add milk or cream to the egg wash: Lots of testers thinned the egg wash with a splash of milk or heavy cream and got a more even, better-looking crust. I tried it and loved the result!
- Blot the grease: Testers who patted the cooked beef-and-cabbage mixture with paper towels before filling reported less leaking during the bake.
- You can add cheese to keep the filling together: Traditionally, the filling is loose, and when you bite or cut in, it tumbles out a bit. Some testers didn’t love the mess and found that stirring shredded Swiss — or even a little cream cheese — into the cooled filling helped it hold together for tidier eating. Not traditional, but a fun riff.
- Bring everything to room temperature before filling: I learned this firsthand during testing, and several testers confirmed it: cold filling leaves a dense, gummy line inside the roll. Make sure your filling is room temperature, not fridge-cold, before filling the rolls. If you prepped the filling ahead of time, give it a quick burst in the microwave before filling.
- We changed the yield to 12 instead of 14: A good number of testers made 12 larger rolls and preferred it, both for a slightly heftier dough-to-filling ratio and for spacing the rolls evenly on the sheet tray. I concur.
- Consider bagged slaw: Several testers skipped shredding a whole head of cabbage and used a bag of coleslaw mix instead, with great results and a lot less prep. I personally found using the shredding attachment on my food processor made quick work of the job!
- Lin’s horseradish dip stole the show. Recipe tester Lin Landrum shared her horseradish dip with the testing group, and it was a runaway hit. I included the full recipe in the serving section below, but trust me — if you love a creamy, tangy dip with a little kick, you’ll want to make it!
“I also made the horseradish dip to go along with them. Man, oh, man! It elevated all of the flavors!” —Recipe tester from Vincennes, Indiana
- Shaping takes a little practice. The most common stumbling block was ending up with a thin top and a thick wad of dough on the bottom. Adjusting the shaping method solves it, and I refined the shaping method after testing so the instructions are even clearer.
“I was very intimidated with the shaping as I have bad arthritis and considered a newbie — I’ve done sourdough less than a year. It was soooo very easy! The dough was a dream to work with!” –Recipe tester from Pontotoc, Mississippi
Baker’s Timeline
This is the same-day timeline (with the optional cold proof noted at the end). Times are flexible and depend on your kitchen temperature.
Same-Day Timeline | |
| Night before | Feed your starter |
| 8 AM | Mix dough; bulk ferment until doubled, about 7–8 hours at 80°F (26.5°C) |
| Around 2:30–3:30 PM | Make filling; let cool to room temp |
| Around 3–4 PM | Divide, shape, and fill. Cover and proof up to 2 hours at 80–85°F (26.5–30°C). |
| Around 5–6 PM | Bake |
And if you prefer to let your dough rise overnight, here’s a flipped timeline:
Overnight Fermentation Timeline | |
| Morning | Feed your starter |
| Before bed | Mix dough; bulk ferment until doubled |
| Morning | Make filling; let cool to room temp. Then, divide, shape, and fill. Cover and refrigerate. |
| 2 Hours Before Baking | Bring out bierocks and proof up to 2 hours at 80–85°F (26.5–30°C). |
| 2 Hours Later | Bake |
Optional cold proof: After the bulk rise in either timeline (and before shaping), you can refrigerate the dough 12–36 hours for a more sour flavor and potentially easier digestion. It does not need to come back to room temperature before shaping and filling.
Equipment You’ll Need
- Kitchen scale: A scale gives you consistent results, especially when dividing the dough and weighing the filling.
- Stand mixer with dough hook: A stand mixer makes kneading this dough a breeze, but you can absolutely knead it by hand if needed.
- Bench scraper: Makes dividing the dough clean and easy. It’s also helpful for tidying up your work surface as you shape.
- Large skillet or pot: For browning the beef and cooking down the cabbage filling. I like using my 5.5-quart Le Creuset pot, but any large skillet or pot is fine – a 12″ cast-iron skillet would also be great.
- Half sheet tray + sheet pan lid: The bierocks proof and bake on the sheet tray. Several testers noted their dough stuck to plastic wrap during the second proof — a sheet tray cover solves this entirely and is a worthwhile investment!
- Parchment paper or a silicone baking mat: Lines the sheet tray so the bierocks don’t stick during baking. Either works great here.
- Pastry brush: For applying the egg wash evenly before baking — this is what gives the bierocks that beautiful, glossy golden brown finish.
- Cooling rack: Let the bierocks cool on a wire rack after baking so air can circulate underneath and the bottoms don’t get soggy.
Ingredients for Sourdough Bierocks
For the dough:
- Active sourdough starter: I include instructions for feeding your starter before you begin. But, if you already have active starter ready, you can use that and skip the feeding step!
- Whole milk: Adds richness and softness to the dough. A couple of testers used 2% milk with good results.
- Sugar: Lightly sweetens the dough — that gentle sweetness against the savory filling is part of this recipe’s magic!
- Unsalted butter: Softened, helps create a tender crumb.
- Egg: For structure and richness.
- All-purpose flour: Save a little money by using all-purpose flour for this one. We don’t need the extra structure bread flour provides — a soft dough is ideal for this recipe.
- Salt: I use Redmond’s Real Salt (15% off with code TSG15), but any salt will work.
For the filling:
- Olive oil: For browning the beef.
- Ground beef: 80/20 gives the best flavor. Drain excess fat after browning so the rolls don’t leak a ton of extra grease.
- Onion: Diced, cooked down with the beef.
- Garlic (optional): ‘Cause who doesn’t love garlic?! If you don’t, you can omit it.
- Umami seasoning (optional but highly recommended): Rounds out and deepens the filling flavor. You can substitute mushroom powder, fish sauce, or soy sauce for a similar savory boost.
- Unsalted butter: Helps the cabbage soften and adds delicious, buttery flavor.
- Shredded cabbage: The base for the classic filling. Shred it on the finer side — a couple of testers found large pieces made the rolls harder to seal.
- Worcestershire sauce: Adds so much depth and amps up the umami.
- Salt and black pepper: I always add this to taste, but I did measure it last time and found that 1 1/2 teaspoons salt and 1/2 teaspoon pepper were perfect.
“What I loved most about this recipe was how something so simple could taste so rich and comforting. The beef and cabbage blended beautifully, and that tiny splash of Worcestershire added a depth that made the filling feel so complete.” —Recipe tester from Ontario, Canada
For the egg wash:
- Egg plus a little whole milk or heavy cream: For a golden, glossy top.
Ingredient Substitutions
All of these substitutions came from testers who tried them and reported great results:
- The flour: All-purpose is the default and what I’d reach for first. Bread flour works too, but the dough comes out a bit stiffer and tends to shrink back more when you roll it — roll the edges thin so they hold their shape better. One tester swapped in about 20% freshly milled flour with good results. No one has tested a gluten-free version yet, so I can’t speak to that.
- The milk: Whole milk gives the richest dough, but 2% worked well for the testers who used it. Dairy-free bakers had success with oat milk and lactose-free milk, and one used fat-free milk in a pinch. One tester even forgot to buy milk and used water — not ideal, but it still came together.
- The ground beef: 80/20 brings the best flavor, but leaner blends (85/15, 93/7, 96/4) worked — just expect a little less richness. They also leak less grease during baking, which some testers actually preferred. Testers also successfully used ground turkey, chicken, pork, elk, venison, and breakfast sausage. One tester boosted ground turkey with a little beef bouillon to add a beefier flavor — smart move. Dairy-free and meat-free bakers used Impossible Meat with great results.
- The cabbage: A bag of coleslaw mix is a fantastic shortcut — several testers skipped shredding a whole head and loved the result. Broccoli slaw works too, and red cabbage is fine (the color may bleed slightly). Not a cabbage household? Consider swapping in shredded potato instead — just give it a little extra cook time on the stove to make sure it’s fully cooked through before filling. A few testers also stretched the filling by adding shredded carrot, and one used a cabbage and kale mix with good results.
- The sugar in the dough: Honey worked nicely for one tester. And if the lightly sweet dough reads as too sweet against your savory filling, you can scale the sugar back — one tester halved it and was happy.
- The butter: Salted butter is fine if that’s what you keep on hand. Just dial back the added salt to taste so the dough and filling don’t end up oversalted.
- The umami seasoning and Worcestershire: Testers subbed in fish sauce, soy sauce, coconut aminos, a dash of Accent, mushroom powder, or steak sauce in place of the umami seasoning and/or Worcestershire. If you leave them out entirely, the filling won’t have the same depth of flavor.
- The egg wash: A straight egg wash can sometimes lead to uneven, splotchy browning — testers found that adding a small splash of whole milk or heavy cream helped a lot. And I agree! If you’re working around an egg allergy, skip the wash and brush with butter or milk instead. Note: the egg in the dough itself is structural — an egg-free dough is untested, so I can’t promise how it’d behave.
- Cheese: Plenty of testers stirred cheese into the cooled filling and loved it. Shredded sharp cheddar, true to the runza tradition, and Swiss were the favorites. Beyond flavor, cheese does double duty: it helps bind the loose filling so it holds together when you bite in, for a less messy roll.
“I live in Nebraska and we have Runzas often and these in my opinion are much better than the restaurant.” —Recipe tester from Ogallala, Nebraska
- Creative filling additions: Testers got adventurous with mix-ins, and several reported great results. A tablespoon of tomato paste added depth and richness. A splash of apple cider vinegar brightened the filling. Diced bell pepper, mushrooms, spinach, and even a splash of Claussen pickle juice all made appearances. If you’re adding extra vegetables, just make sure to cook them down well so they don’t release too much excess moisture inside the roll.
What to Serve with Sourdough Bierocks
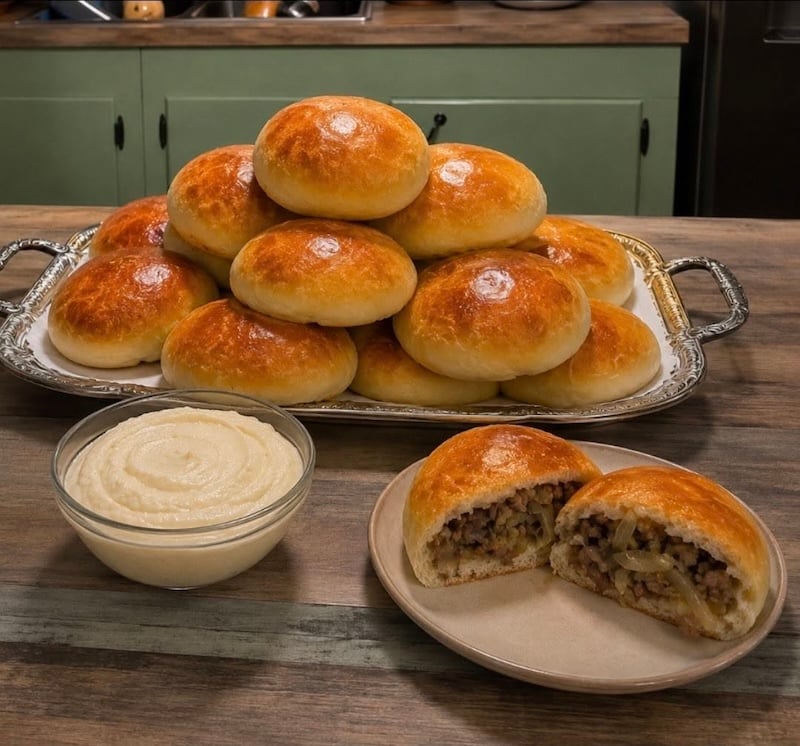
A good dipping sauce takes sourdough bierocks to another level.
During recipe testing, Lin Landrum’s horseradish dip became the runaway favorite — multiple testers called it a must-make alongside this recipe. Here it is:
Lin’s Horseradish Dip
- 1/2 cup sour cream
- 1/4 cup mayo
- 2–3 tablespoons prepared horseradish (drained)
- 1 teaspoon apple cider vinegar
- 1 teaspoon Worcestershire sauce
- 1/4 teaspoon kosher salt (more to taste)
- 1/4 teaspoon freshly cracked black pepper
- Pinch of sugar, to cut the sharpness of the horseradish
Mix everything together and chill for about an hour before serving.
Beyond Lin’s dip, here’s what testers reached for:
- Mustard: the most classic pairing, and for good reason.
- Honey mustard: a slightly sweeter option that’s especially popular with kids.
- Thousand Island: a few testers loved the creamy, tangy contrast.
- Marinara: one tester’s kids dipped theirs in marinara and loved it.
- Caesar dressing: one tester said it might sound weird, but it tastes amazing.
- Honey-Dijon Greek yogurt dip: one tester whipped this up on the fly and raved about it. Equal parts Dijon and honey, thinned with Greek yogurt to your desired consistency.
How to Store and Reheat Sourdough Bierocks
Fridge: Store cooled bierocks in an airtight container for up to 4 days.
Freezer: These freeze wonderfully for up to 6 months. Wrap each roll individually in plastic wrap and tuck them into a freezer-safe zip-top bag.
To reheat: Pull one out and let it thaw overnight in the fridge or on the counter for up to 2 hours. Warm in the microwave in 30-second intervals until heated through. A toaster oven or air fryer also works well.
“They taste wonderful! We travel in our Motor Home often and [it] will be wonderful to have them frozen, pulling them out on the road to heat up.” —Recipe tester from Western Washington
Troubleshooting Tips
FAQs
This question came up during recipe testing. Lin Landrum, a community member with a background in microbiology and food science and over 35 years of baking experience, offered helpful context: food safety is based on both time and temperature, not temperature alone, and a short room-temperature proof is standard practice across countless filled dough products — pepperoni rolls, kolaches, stuffed breads, and pizza have all been made this way for generations. The cooked-and-cooled filling, short proofing window, and the immediate bake after proofing all work in the recipe’s favor. As always, evaluate your own comfort level and make the choice that’s right for you.
108 testers did the optional cold proof, and the feedback was overwhelmingly positive — many said it made the dough significantly easier to work with. The cold dough firms up and rolls out more cleanly than room-temperature dough, and it doesn’t stick to the counter as much. The tradeoff is that testers generally didn’t notice a strong flavor difference from the extended fermentation, so if you’re doing it purely for flavor, the difference may be subtle.
Yes — sourdough bierocks freeze beautifully. Wrap each cooled roll individually in plastic wrap, pop them in a freezer zip-top bag, and freeze for up to 6 months. To reheat, thaw overnight in the refrigerator or on the counter for up to two hours, then warm in the microwave in 30-second intervals until heated through. Several testers specifically called out the freezer-friendliness as one of their favorite things about the recipe.
The most popular dipping sauce among testers was a horseradish sauce — multiple people called it a must. Mustard (classic), honey mustard, and Thousand Island also came up frequently. One tester made a honey-Dijon-Greek yogurt dip that got rave reviews.
“The dough is AMAZING. I love it! The end result was a fluffy bun. It reminded me so much of Asian buns at traditional bakeries!” —Recipe tester from Melbourne, Australia

Sourdough Bierocks (Runzas)
Equipment
- Stand mixer with dough hook
- Large skillet
- Parchment paper or Silpat
- Half sheet tray or two quarter sheet trays
- Half sheet tray cover A fantastic alternative to plastic wrap!
Ingredients
Feed Your Starter
- 14 g sourdough starter
- 70 g water
- 70 g bread flour
Main Dough
- 185 g whole milk
- 50 g sugar
- 150 g active sourdough starter that you made, from above
- 28 g unsalted butter (softened)
- 1 egg
- 425 g all-purpose flour
- 10 g salt
Filling
- 2 tsp olive oil
- 1 lb 80/20 ground beef
- 1 white onion (diced)
- 4 cloves garlic (minced) optional
- 1 tsp umami seasoning optional
- 40 g unsalted butter
- 450 g shredded cabbage approx. 5 cups
- 2 tsp Worcestershire sauce or soy sauce or fish sauce
- 1 1/4 tsp salt or to taste
- 1/2 tsp black pepper or to taste
Egg Wash
- 1 egg
- 1 tsp whole milk or heavy cream
Before You Begin

Instructions
- Feed your starter: The night before, combine 14 g sourdough starter and 70 g water. Then, add 70 g bread flour and stir until smooth. Cover loosely to ferment overnight (10-12 hours). If you already have 150 g active starter ready to go, you can skip this step.
- Mix the dough: In the morning, in a large mixing bowl (or a stand mixer), mix together 185 g whole milk, 50 g sugar, 150 g active sourdough starter, 28 g unsalted butter (softened), 1 egg, 425 g all-purpose flour, and 10 g salt. Knead until a soft, smooth dough forms, which takes about 10-15 minutes by hand or 7-12 minutes in a stand mixer on a low speed (typically Speed 1 or 2). Your finished dough should be tacky but not stick to your hand or your surface.
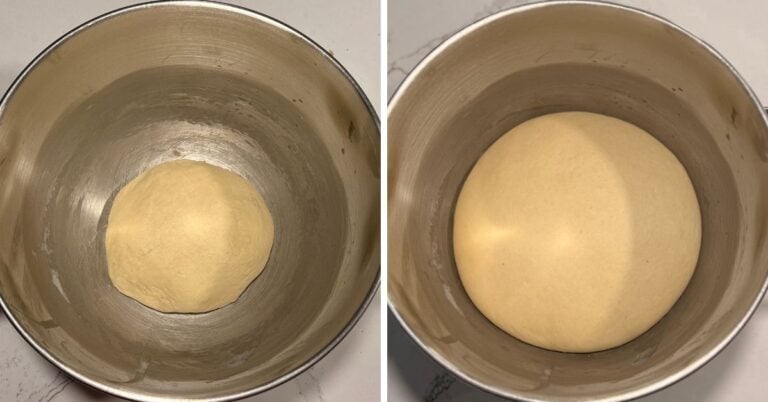
- Bulk fermentation: Place dough ball in a greased bowl, turning to coat the dough. Cover and let rise until doubled in size. For a guideline, this takes about 7-8 hours at 80°F (26.5°C) or 10-12 hours at 73°F (23°C).

- Optional cold proof: For deeper sourdough flavor and a longer, slower fermentation, refrigerate the risen dough for 12–36 hours. It does not need to return to room temperature before shaping.
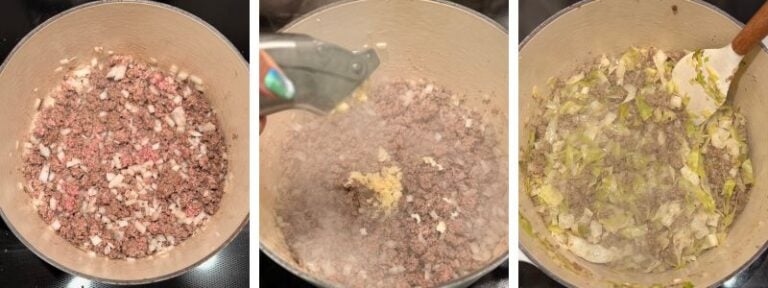
- Prepare the filling: While the dough is rising, make the filling. Heat 2 tsp olive oil in a large skillet. Brown 1 lb 80/20 ground beef with 1 white onion (diced) over medium heat until mostly cooked, about 5-7 minutes. Drain excess fat if needed. Add 4 cloves garlic (minced) and 1 tsp umami seasoning. Cook 1 minute more, or until fragrant. Add 40 g unsalted butter, 450 g shredded cabbage, and 2 tsp Worcestershire sauce. Cook about 10 minutes more, or until cabbage is tender. Season with 1 1/4 tsp salt and 1/2 tsp black pepper (or to taste); remove from the heat to cool.

- Depending on your timing, you can refrigerate the filling until your dough is ready. Just make sure to bring it to room temperature before using — cold filling may cause a dense, gummy line in the interior.
- Shape the dough: Line a half sheet tray with parchment paper or a Silpat. Turn the dough out onto your work surface, and give it a quick knead. Divide into 12 pieces, about 70g each. For the following steps, you shouldn't need bench flour, but if your dough is really sticky, do a light dusting to help.
- Form each piece into a ball by pinching the bottom seam closed, then rolling it against the counter under your palm until smooth. Consider covering the dough balls as you work so they don't dry out.
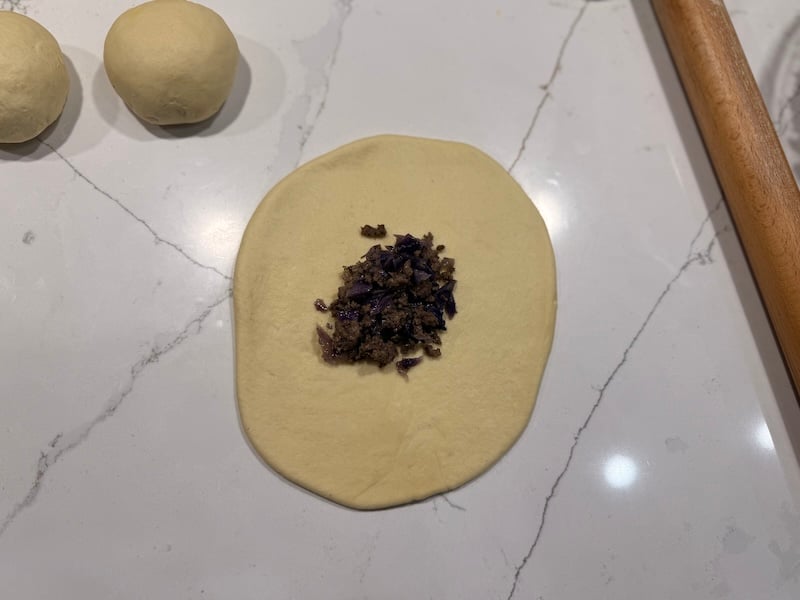
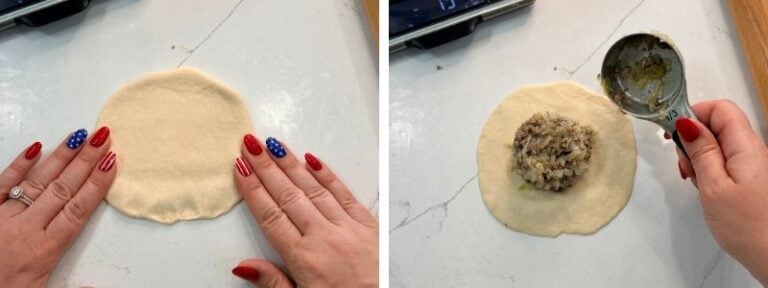
- Working one dough ball at a time, flatten it into a 5" circle. Press down the outer edge so it's a little thinner than the center. Spoon 1/3 cup (75-80g) of the filling into the center.
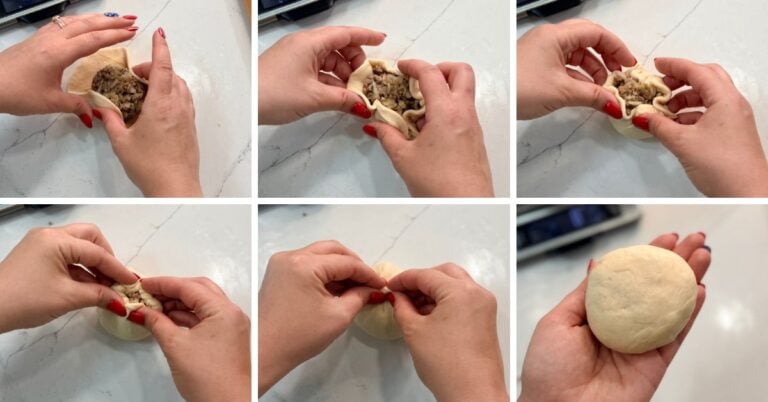
- Gather the edges of the dough up and around the filling, pinching them together at the top to seal. Place seam-side down on your prepared pan. Repeat with the remaining dough and filling.
- Second proof: Cover and let rise in a warm spot for up to 2 hours (no longer for food safety reasons), ideally at 80-85°F (26.5-30°C). You may not notice much visual change, but this proofing time helps create much softer rolls.
- Preheat oven and make egg wash: Toward the end of the second rise, preheat your oven to 375°F (190°C). In a small bowl, whisk together 1 egg with 1 tsp whole milk or heavy cream.
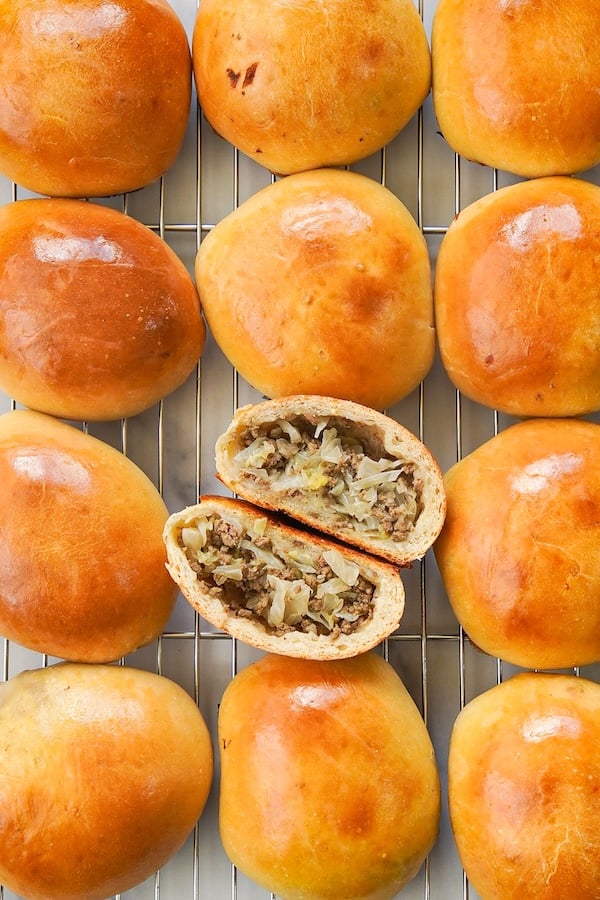
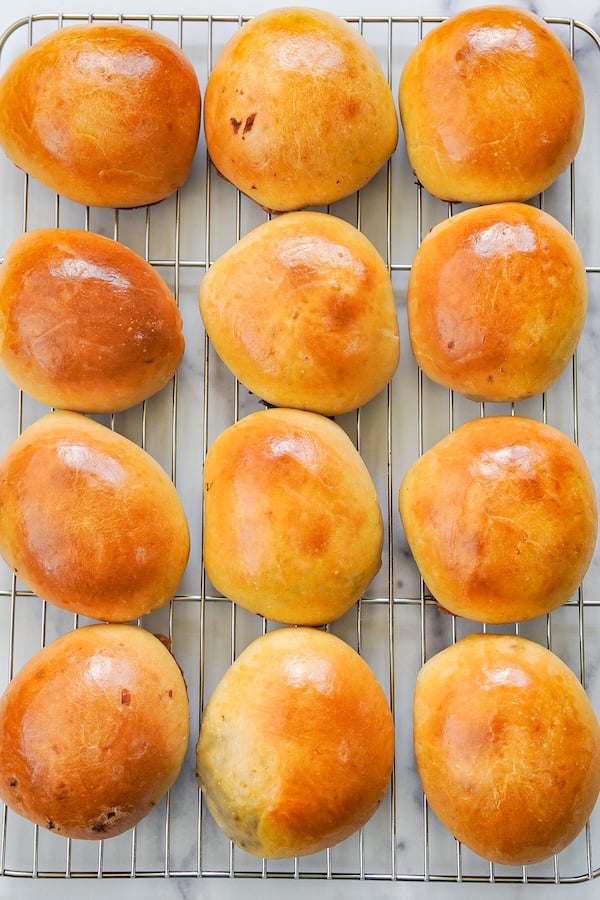
- Brush the bierocks with the egg wash. Consider poking the tops with a toothpick to prevent large air pockets in the rolls. Bake for 30-40 minutes, rotating the pan halfway through. They're done when the tops are golden brown. Let cool on a wire rack.
- Store in the fridge for up to 5 days or the freezer for up to 6 months.


Notes
Conclusion
I’m so stinkin’ proud of how these sourdough bierocks turned out, especially when my husband said it reminded him of his childhood. Recipe testers felt the nostalgia, too:
“If you knew and loved these growing up, you will be transported by the first taste. And if you’ve never had them, get ready to fall in love!” —Recipe tester from Texas
“It’s an old-fashioned German recipe that my great great grandmother made, so it was wonderful to make these.” —Recipe tester from Upstate South Carolina
“Brought back memories from my Bolga German ancestry.” —Recipe tester from Paden, Oklahoma
It’s a beautiful dough, a forgiving process, and a freezer-friendly finished result that tastes absolutely incredible. Even my kids devour these!
Whether you stick with the classic beef-and-cabbage filling or go rogue with pizza, cheeseburger, or breakfast fillings, I hope this recipe becomes something you make on repeat.
And if you do, I want to see it — tag me on Instagram @thatsourdoughgal so I can cheer you on.
Other all-in-one sourdough meal ideas:


I made these and they are AMAZING! I can’t wait to make them again with my childhood Spanish meat filling and a few sweet ones with my Puerto Rican roots of the classic Coquito and guava/cheese filling. Love being a recipe tester for @thatsourdoughGal.
Thank you so much for sharing!!
Grab and go!
Next time, I’m definitely making them into breakfast sandwiches… sausage, egg & cheese?
Yes, PLEASE!!!
As a basic cabbage and beef stuffed roll my husband and I enjoyed them. I only made a half batch and wish I had made the whole batch and frozen the rest.
The tips on closing them was helpful. We will try Italian and Philly Cheese Steak options in the future. The possibilities are endless.
Love all of those filling ideas! So glad you enjoyed them.
These sound so yummy & fun! If I want to reheat (after thawing) in the oven instead of in the microwave (tends to make baked goods loose their crispiness) how would you suggest doing that?
I’d do 350F for 5-10 minutes! Just keep an eye on them!
I didn’t have the time to make this recipe when it was still in the testing phase, but I’m glad I was able to make it now! The recipe is super easy to follow and make! My shaping needed some practice, as I had never made filled buns before, but I got better over the first dozen.
Here are a few thoughts/experiences/small changes I noted during the process:
-For the dough, I added all ingredients to my mixer except the egg and butter. I mixed for a few minutes on low before adding the egg and butter, to give it a little more time to hydrate all the gluten before adding these two other ingredients. I find my dough reaches windowpane much more quickly when I hold back the oil/fat-containing ingredients.
-For the filling, the flavor profile was still a little bland for me, so I also added paprika and some ground ginger powder during the cooking process, as well as additional salt and pepper until it tasted right to me 🙂
-I kept the dough in the fridge overnight, but it was too firm and not easily workable straight out of the fridge (even though the instructions suggested this was possible in step #4). I did have to let it warm up 20-30 mins at room temp before it was pliable and elastic enough to shape into a disc and add the filling.
Overall, I’m very happy with this recipe! I will definitely make again and definitely experiment with other filling variations!
In the process of making, so fingers crossed. I noticed that your overnight fermentation timeline (below the recipe) doesn’t appear to match the recipe itself. The timeline looks as though it would have you form the bierocks into buns before putting them in the fridge overnight. Or am I missing something? Thx!!!
I can’t find the mismatch in instructions you’re referring to – but you could really do it either way. You can just stick the dough in the fridge and resume later, or you can go ahead and fill the bierocks and put the stuffed rolls in the fridge to resume later on.
Are we able to print this recipe? I don’t see a print option and the ads make it nearly impossible to make it due to them (the ads) getting in the way and slowing down the scroll. Super frustrating!
Yes just click the Print button
Another terrific recipe! Clear cut instructions, great tips along the way, and they turned out great! My family loved them. I struggled with getting the bottoms to close so most of my buns leaked but I think that’s a me problem lol. Thank you!
Made these tonight for dinner OMG so good and so easy! I can’t wait to experiment with the filling these are going to be a staple in my freezer.
So glad you enjoyed!!
I’m going to try it with homemade saurkraut
Oh yum! Let me know how they turn out!
I’m delighted with how these turned out! Thanks for all the effort you put in to make sure your recipes are just right.
Wow they look perfect!! And absolutely, that is what I’m here for!!
Thanks so much for this recipe, it’s delicious. Can’t wait to try it with other fillings.
Great recipe! I added celery seed and paprika to the filling and those were a great addition. I’ve made these 4 times now (was a recipe tester) and they are always a success! I also throw in whatever vegetables in the fridge that need to be used up (red bell peppers, green bell peppers, garlic scapes, etc). I love these so much!
So glad to hear that, thank you for sharing!!
My starter (from scratch) is finally active so decided to make these for the first time. My goodness! They are divine! And now, at 2:36am, I’m trying to step away from the still cooling buns so the rest of the family can have them for breakfast😁
Looks amazing!!!
I grew up eating and making Runzas. I love the crispier result with this dough vs traditional way we make it. I made bigger ones so there was more filling to dough. Family approved!
So glad to hear that!