
Sourdough Hoagie Rolls (Same-Day and Overnight Options)
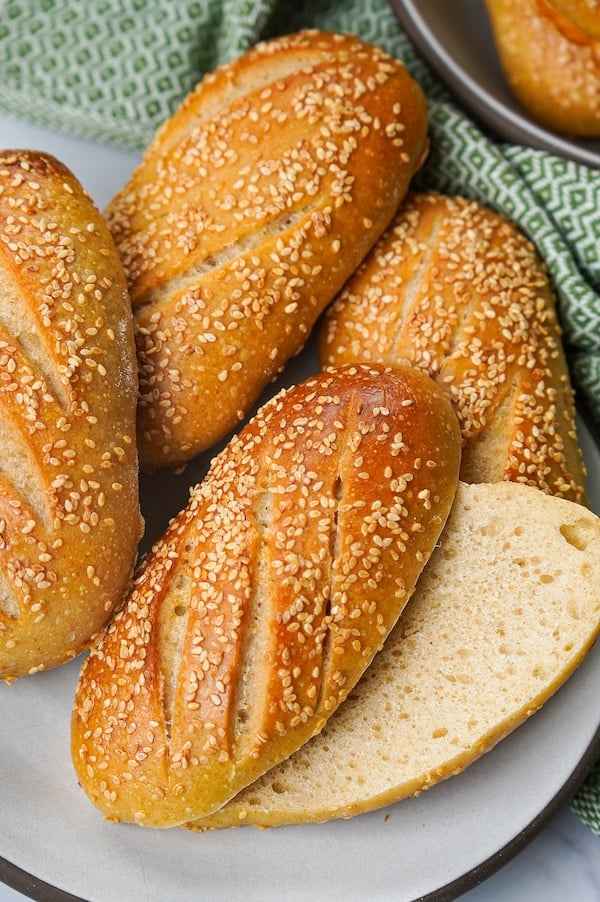
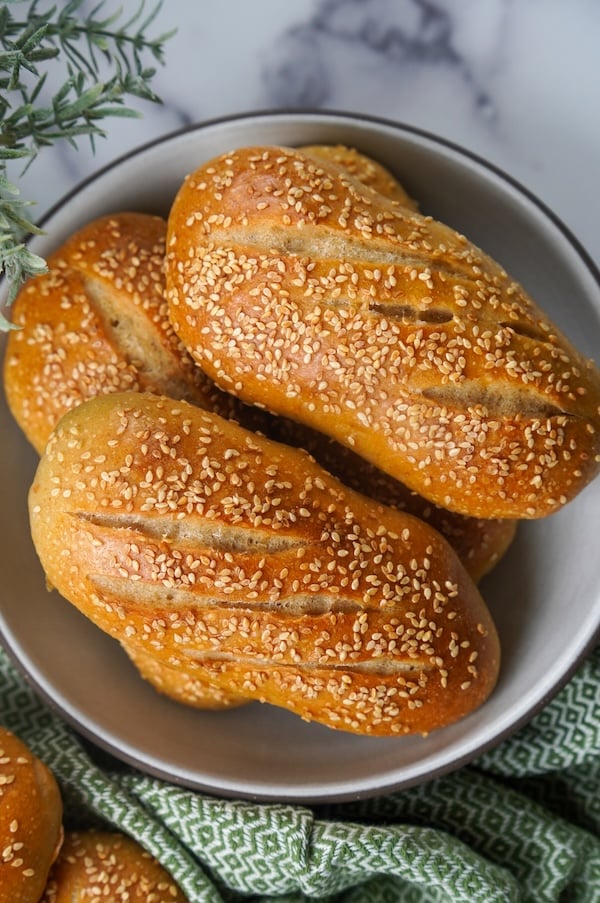
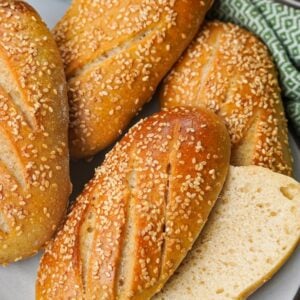
These sourdough hoagie rolls can hold up to meat juices (hello, Italian beef) and oil and vinegar (grinder sandwich, anyone?) without falling apart, but they’re still soft and squishy inside. It’s like a baguette and a hot dog bun had a baby.
“These hold up perfectly for sandwiches. They’re not too soft and not too hard. They will take the weight of any filling as well as dipping.” —Recipe tester from Phoenix, AZ
Before publishing this recipe, over 250 testers baked it in their own kitchens, on their own equipment, on three different timelines, and told me exactly what worked and what didn’t. Their feedback is woven through this entire post.
So, prepare your Italian beef, your Philly cheesesteaks, your meatball marinara, and let’s make some sourdough hoagie rolls!
“Make them! You won’t regret it. They taste delicious and are easy to make.” —Recipe tester from Farmington Hills, MI
P.S. Do NOT skip the serving suggestions section — there are so many amazing sandwich ideas from recipe testers!
Disclosure: Some of the links to products I recommend in this post are affiliate links — if you choose to purchase after clicking, I may earn a small commission, which helps fund this website, recipe development, and monthly giveaways. I sincerely appreciate your support.
Why You’ll Love These Sourdough Hoagie Rolls
- Soft on the inside, sturdy on the outside: This was the single most repeated theme in tester feedback. Meatball subs, French dips, au jus, sauce-heavy everything — the rolls held. And the interior is still soft and squishy.
“Soft, fluffy, but very sturdy hoagie rolls that can stand up to even the sloppiest of sloppy joes.” —Recipe tester from Star, ID
- Mostly hands-off dough: There are no stretch and folds or coil folds. You mix, let it ferment, shape, and bake. Testers brought this up constantly as one of their favorite things about the recipe.
“The rolls taste delicious! I like that it’s very hands off before shaping and I could leave the house and do other activities and not have to worry about doing stretch and folds and babysitting the dough!” —Recipe tester from Delaware
- Three timelines, and none of them is the “wrong” one: Testers split almost evenly across the three schedules — 36% chose same-day, 34% chose the 2-day cold proof, and 30% went overnight. All three landed within 0.07 stars of each other in average rating, which tells me you really can pick whichever one fits your schedule.
“Easy!! Try it. I like overnight proofing. Makes timing more flexible!!” —Recipe tester from Florida
- A low-hydration dough that’s a pleasure to handle: No need to panic about sticky or unruly dough. This one is very user-friendly.
“I hand mixed mine, and the dough came together beautifully with some slap and folds. It was very springy and easy to work with.” —Recipe tester from Leesburg, GA
- Just a hint of whole wheat: 75g of whole wheat flour adds a nutty depth that testers picked up on and liked, without pushing these into “wheat bread” territory.
“Delicious, deli style bread with a hint of wheat.” —Recipe tester from Lawrenceburg, TN
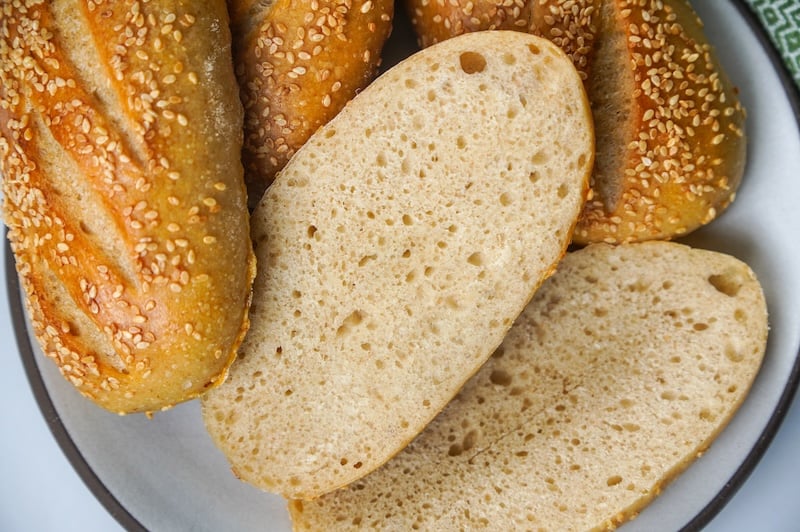
- No more $10 subs: Eight rolls made with simple pantry ingredients. You just can’t beat it.
“They are the best and you don’t have to pay $8–$10 for a sub at the local shop.” —Recipe tester from Iowa
- Tested by hundreds of home bakers: 253 home bakers tested these rolls across 9 countries and gave them an average rating of 4.49 out of 5, with 94.1% rating them 4 or 5 stars and 85% saying they’d make them again. And this is before I made improvements based on their feedback.
My Recipe Testing Journey
My first hoagie roll recipe test was awful. My notes: “TERRIBLE. Rolls were pale on the exterior; flavor was super off. Sour with an underdone taste to them.”
Clearly, I had a lot of work to do. But I also realized I wasn’t entirely clear on what a hoagie roll is. What was I actually trying to achieve? Something like a hot dog bun? A baguette? A Jimmy John’s roll? It all felt a bit murky.
So, I asked you for help. Over 100 Instagram followers weighed in, and the consensus was:
A hoagie roll is bigger than a hot dog bun, with a crisper, sturdier crust and a denser, chewier crumb that holds up to heavy, saucy fillings without going soggy.
Many also mentioned sesame seeds, cornmeal, and a distinctive scoring pattern.
With a clear goal in mind, recipe testing got much easier. By test 4, I was closing in on a winning recipe. Simpler, it turned out, was better.
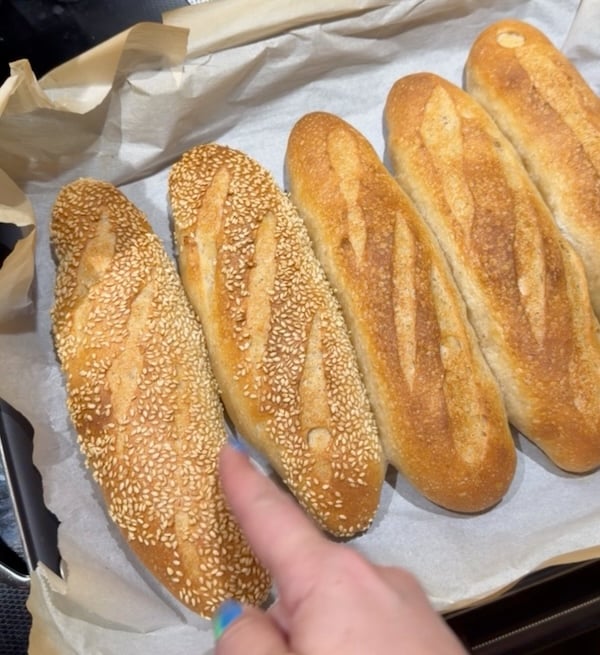
I eliminated the egg, tangzhong, and milk and landed on a simple, low-hydration dough with a touch of honey and olive oil and a smidge of whole wheat flour.
The flavor was incredible, and the interior texture was perfect — soft and squishy but sturdy enough to hold up to juicy fillings. I still had a snag with thick, overdone bottoms, but a couple more bakes got the recipe ready for testers.
What Recipe Testers Taught Me
The test bakers found things I never would have caught on my own.
- Shaping was the sticking point, and I knew it going in.
I flagged the shaping step in the tester version and asked for feedback, and boy did I get it. Seventy-three testers mentioned shaping. Of the 253 testers, 199 followed my written method and 54 tried something else — most often a traditional baguette shaping method or a video shared in the tester group.
- Fermentation ran faster than my timeline said it would.
Among testers at 77–80°F (25–26.5°C), the most common bulk fermentation time was 5.5–6.5 hours, not the 7–8 hours it took me. Overall, 26.9% of testers ended up with overproofed rolls. This is the fix I’m most glad they caught.
- Most testers didn’t use the equipment I recommended, and it didn’t matter.
Only 30% used a cooking steel, and 8% used a Dutch oven. The other 62% used sheet pans, pizza stones, baguette pans, or silicone molds and reported great results. That reshaped the whole equipment section.
- Flour absorption varies more than I expected.
Forty-five testers added flour to get the dough to match my photos, so I’ve added guidance for adjusting based on flour absorption.
Meet the Recipe Testers
These sourdough hoagie rolls were tested by 253 home bakers, and I owe every single one of them a sandwich.
The testers were from the United States, Canada, Australia, the United Kingdom, Greece, the Czech Republic, South Africa, Iran, and Trinidad & Tobago, plus the U.S. Virgin Islands. They gave the recipe an average rating of 4.49 out of 5 stars. Their feedback helped me make a ton of improvements.
King Arthur was the runaway favorite for flour, mentioned by 116 testers. Kirkland AP from Costco, Bob’s Red Mill, and Central Milling also showed up frequently, and about a dozen testers used freshly milled flour successfully.
“Firm top, squishy center, shaping takes practice, result is worth it.” —Recipe tester from Orange County, CA
“Beautiful dough to work with, easy to shape, bake and delicious.” —Recipe tester from Innisfail, Alberta, Canada
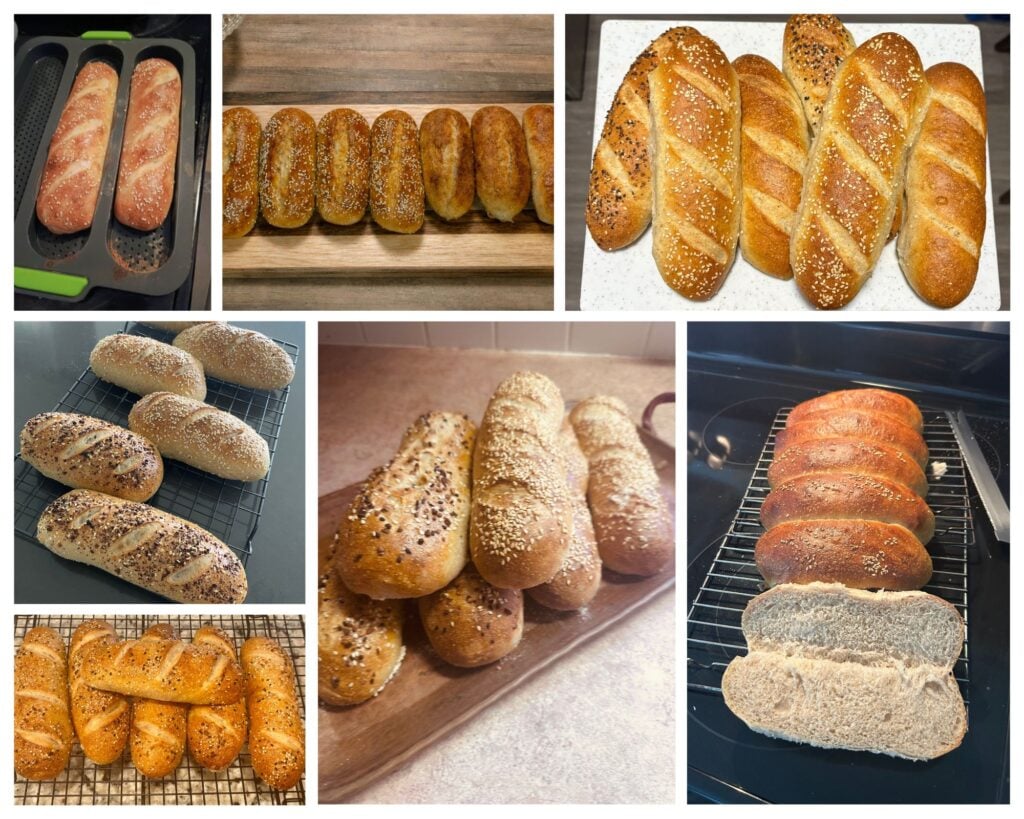
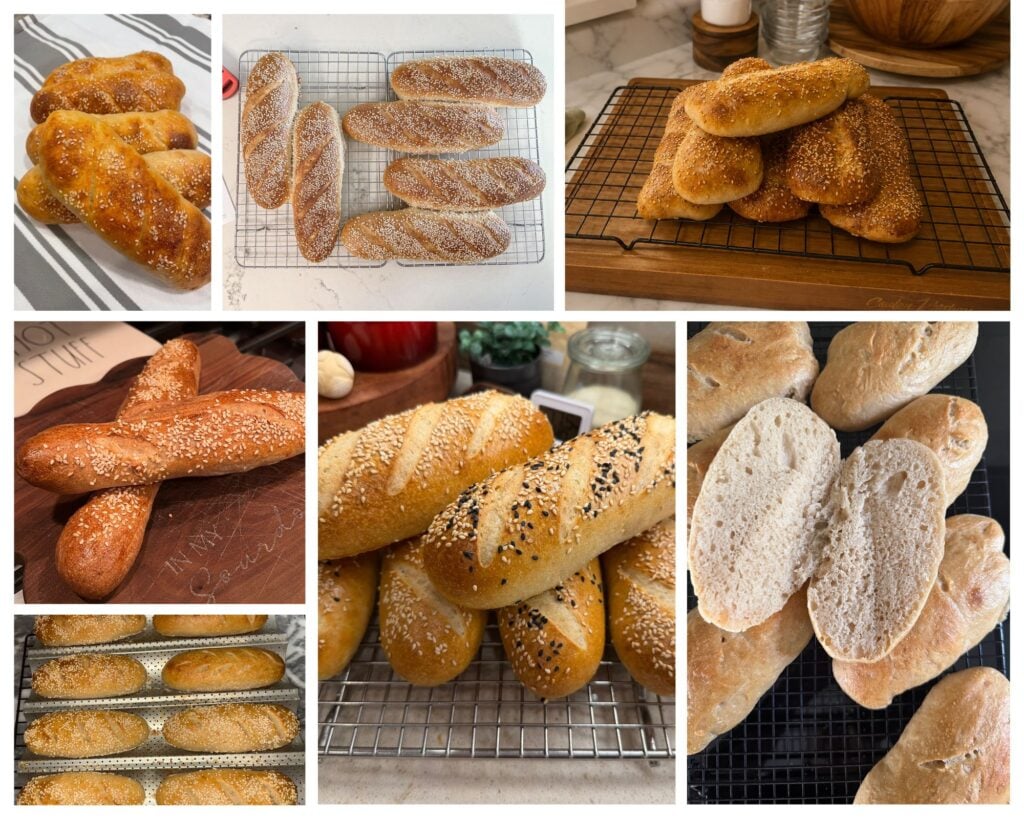
Here’s a look at some of their photo submissions:
Baker’s Timeline
I’ve included three schedules to fit most bakers’ needs. Choose based on:
- When you need your hoagie rolls
- The temperature of your environment during bulk fermentation
All three produced great results — so pick the one that fits your week, not the one you think is “best.” These are sample schedules; fermentation-dependent times will vary.
For a same-day bake, start early and keep your dough warm:
| Same-Day Timeline (Must Keep Dough Warm) | |
|---|---|
| Time | Step |
| Before bed (8–9 PM) | Feed your starter |
| 7 AM | Mix the dough (fermentation begins) |
| 1:30 PM | Shape |
| 3:45 PM | Preheat oven |
| 4:30 PM | Egg wash, seed, score, and bake |
| 5:30 PM | Enjoy! |
For an overnight bulk fermentation, follow this timeline:
| Overnight Fermentation Timeline | |
|---|---|
| Time | Step |
| DAY 1: 9 AM | Feed your starter |
| DAY 1: 9 PM | Mix the dough (fermentation begins); keep dough in a cool spot |
| DAY 2: 7 AM | Shape; put dough in warm spot (~80°F/26.5°C) |
| DAY 2: 9:45 AM | Preheat oven |
| DAY 2: 10:30 AM | Egg wash, seed, score, and bake |
| DAY 2: 11:30 AM | Enjoy! |
For a 2-day schedule and a potentially more sour flavor, you can refrigerate the dough before or after shaping. This timeline refrigerates it before shaping:
| 2-Day Timeline | |
|---|---|
| Time | Step |
| Before bed (8–9 PM) | Feed your starter |
| DAY 1: 9 AM | Mix the dough (fermentation begins) |
| DAY 1: 4 PM | Put dough in fridge (cold proof) |
| DAY 2: 9 AM | Shape |
| DAY 2: 11:45 AM | Preheat oven |
| DAY 2: 12:30 PM | Egg wash, seed, score, and bake |
| DAY 2: 1:30 PM | Enjoy! |
No matter which timeline you choose, watch the dough rather than the clock — fermentation speed depends heavily on temperature.
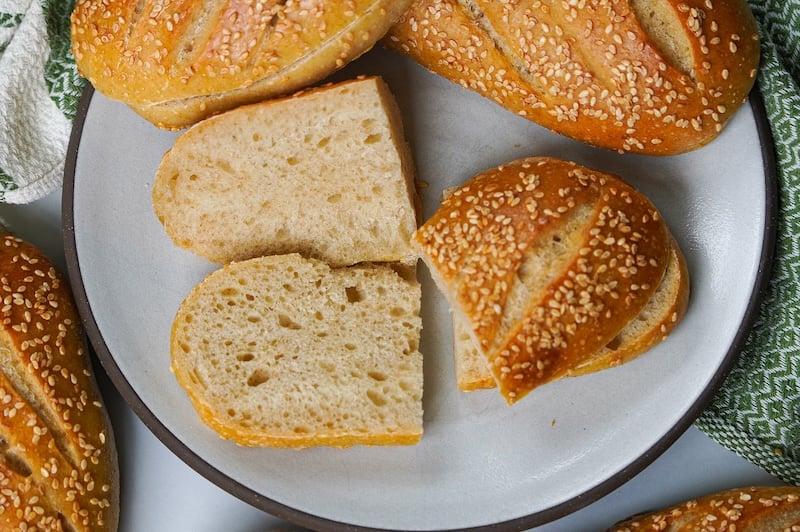
Ingredients for Sourdough Hoagie Rolls
- Sourdough starter: Healthy and ideally fed within the last 24 hours. If you already have 150g of active starter, you can skip the feeding step.
- Water: I use room-temperature well water. If your tap water is chlorinated, use bottled spring water.
- Honey: Adds a subtle sweetness and helps the crust brown.
- Extra virgin olive oil: A touch of oil helps keep the interior soft.
- Bread flour: The backbone of the dough. The higher protein gives you the structure and chew that let these rolls stand up to juicy, saucy fillings without falling apart.
- Whole wheat flour: Just a smidge, but it adds a subtle depth of flavor and a little heartiness without weighing the rolls down.
“The touch of wheat added a really nice flavor!” —Recipe tester from Cincinnati, OH
- Sea salt: I use Redmond Real Salt (15% off with code TSG15), but any salt works.
- Cornmeal (optional): For dusting the pan to prevent sticking and adding that classic hoagie-roll touch to the bottom.
- Egg: Beat with a splash of water for a glossy, golden finish and to help the sesame seeds stick.
- Sesame seeds (optional): For topping.
Ingredient Substitutions
With 253 testers came 253 pantries, so I got to watch a lot of swaps play out in real kitchens.
- Sugar or agave: Totally fine. 20% of testers replaced honey with sugar with good results. A few used agave without issue.
- Avocado or other neutral oils: 84 testers successfully used avocado oil instead of olive oil. If you’re sensitive to the flavor of olive oil, it’s a good swap. Grapeseed oil, peanut oil, and blends also worked.
- All-purpose flour: Testers got good results using AP flour, though a few needed extra flour to compensate for the lower protein. I still recommend bread flour for the chew and structure that help these rolls hold up to saucy fillings.
- Fresh-milled flour: About a dozen testers used it successfully, though you may need to adjust the flour or water based on absorption. One tester who mills her own noted she uses 15% less flour.
- Bread flour for whole wheat: Several testers replaced it with bread flour and got good results, though most needed extra flour because the dough was stickier without the whole wheat.
- Spelt, semolina, or rye: A few testers replaced the whole wheat with spelt, semolina, or rye with good results.
- Poppy seeds: One tester with a sesame allergy used poppy seeds successfully.
- Everything bagel seasoning: This was a popular tester swap for sesame seeds, but one noted that the garlic can burn.
- Other toppings: Italian seasoning, shredded cheese, and a garlic-herb-Parmesan topping brushed on with butter before baking.
- Semolina for cornmeal: Semolina works for dusting the pan.
Equipment You’ll Need
You don’t need anything fancy for these hoagie rolls, but a few tools make the process a lot smoother.
Open Baking Setup
These are open-baked, which means the rolls go into the oven uncovered with a separate source of steam.
That’s a change from a lot of my other recipes, and it lets you bake all 8 rolls at once instead of in batches. Testers proved that almost anything works:
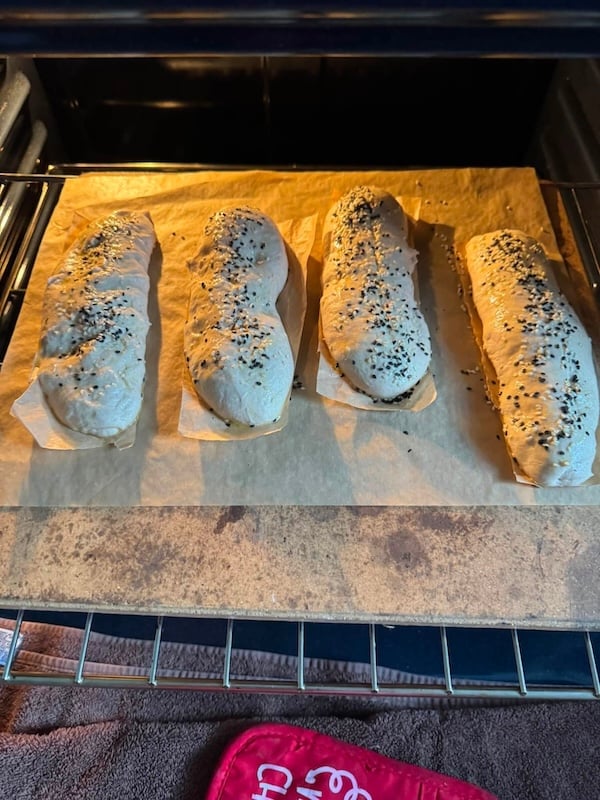
- Cooking steel (my recommendation): Set your sheet tray of rolls directly on the preheated steel. The stored heat gives you consistent bottom browning and a crisp crust. Use code SDGAL10 for 10% off the one I use.
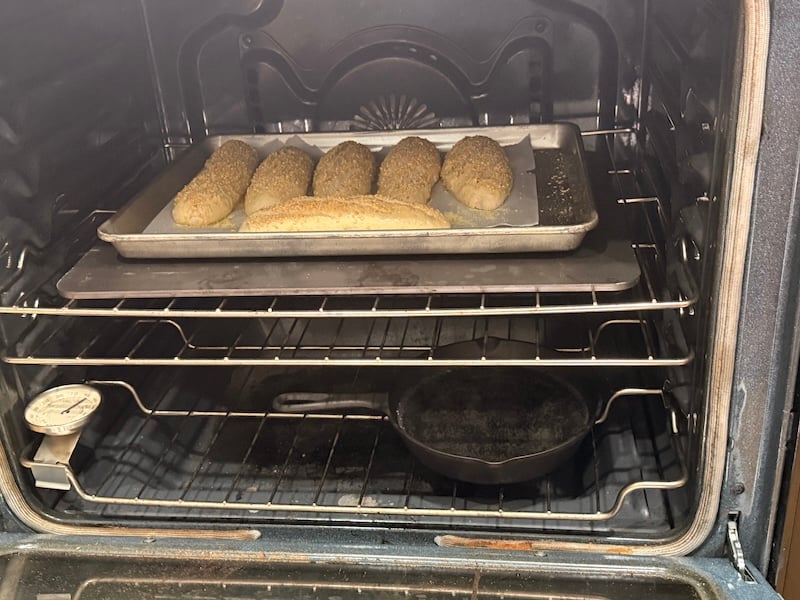
- Half sheet pan: No steel, stone, or preheating needed — just set your parchment-lined sheet pan on the oven rack with a steam pan below. This was the most common tester setup and still produced great oven spring.
- Preheated pan underneath: For a similar effect without buying a steel, preheat a second sheet pan (many testers inverted it) and set your pan of rolls on top.
- Pizza or baking stone: Preheat it like you would a steel and set your parchment-lined sheet pan on top.
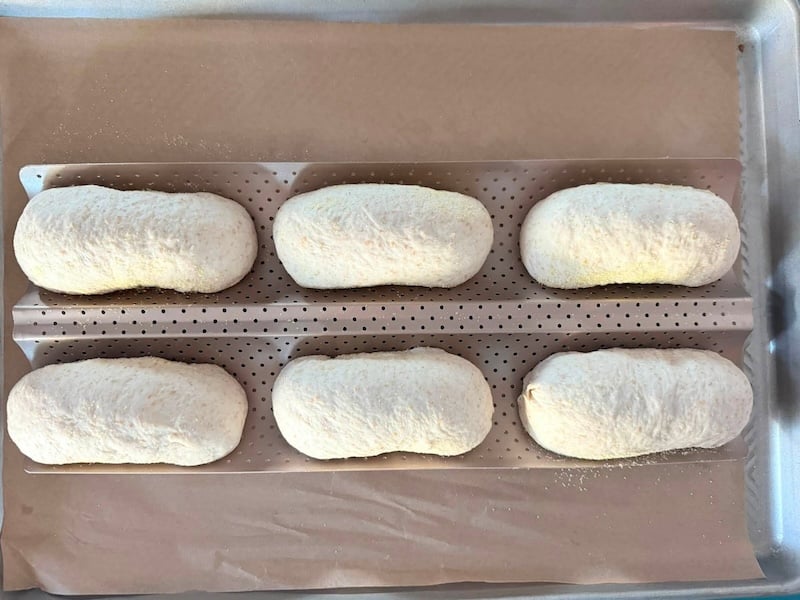
- A baguette or French bread pan: The channels help the rolls rise up instead of spreading. Leave plenty of room between them — several testers had rolls touch during the second proof and bake with squared-off ends. If the baguette pan sits on another sheet pan, consider removing the lower pan when you remove the steam so the bottoms brown properly.
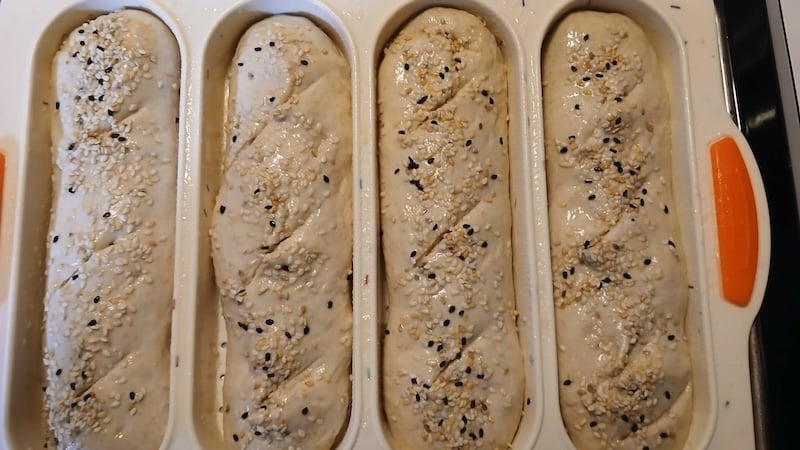
- Silicone sub or hoagie molds: Like a baguette pan, they cradle the rolls and keep them from spreading. One tester said the molds rescued rolls that were flattening on the counter.
Steam Options
Steam in the first part of the bake is what gives you oven spring and that glossy, crisp crust. Here’s what testers used, from most to least common:
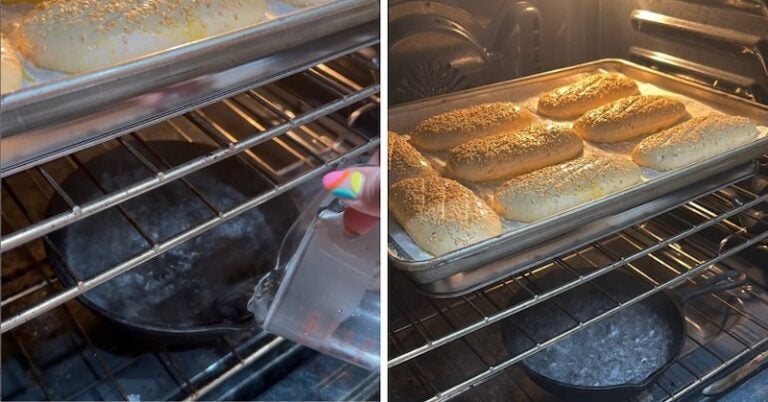
- A cast iron pan of hot water on the lowest rack: Preheat the empty pan along with the oven, then pour in hot water right as the rolls go in. Steam rises immediately, so close the door fast.
- Ice cubes: Either tossed into the preheated cast iron pan for an extra burst alongside the hot water, or used on their own in a pan below. I tested this myself, and it worked great, but I got some messages with concerns about potentially cracking the cast iron, so proceed with caution.
- An inverted pan over the rolls. Cover the rolls with a second sheet pan, roasting pan, or large cake pan for the first 15 minutes to trap their moisture, then remove it for the rest of the bake.
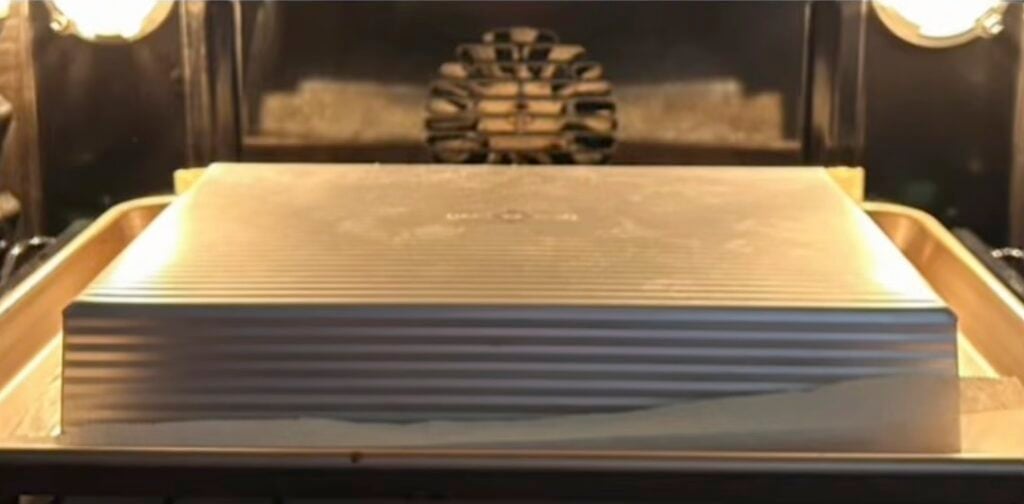
“I used 1/2 sheet, sprayed dough with water for steam and used my USA cake pan as a dome for the 1st 15 min. Then open baked for another 7 min. Worked out perfectly!” —Recipe tester from Vacaville, CA
- A quick spritz of water. A few testers misted the rolls or the oven walls right before closing the door.
Whichever you choose, remove the steam source (or the inverted pan) after about 15 minutes so the crust can dry out and brown for the last 5–10 minutes.
A note if you have a gas oven: Because gas ovens vent continuously, steam pans may be less effective. The inverted-pan method is probably your best bet.
Other Tools I Used
- Scale: Essential for accurate measurements!
- Stand mixer with the dough hook (or your hands): Either works great — use what you’ve got.
- Large mixing bowl: Leave your dough in the stand mixer bowl or transfer it to another one for bulk fermentation.
- Bench scraper: Perfect for dividing the dough and shaping.
- Half sheet tray: For proofing and baking the rolls.
- Parchment paper: Keeps the rolls from sticking and makes for easy cleanup.
- Bread lame or sharp knife: For scoring the rolls before baking.
- Thermometer: For checking doneness.
- Cooling rack: For cooling the baked rolls.
- Bread knife: For clean slices when it’s time to build your sandwich.
How to Make Sourdough Hoagie Rolls (Step by Step)
This is the detailed version with all the tips. If you want a streamlined copy for printing, the recipe card is at the end of the post.
Step 1: Feed your starter (the night before)
Combine 14g sourdough starter, 70g water, and 70g bread flour and stir until smooth. Cover loosely and let it ferment overnight, about 10–12 hours.
If you already have 150g of active, bubbly starter, skip this step and jump right into mixing the dough.
Step 2: Mix the dough
In a large mixing bowl or the bowl of your stand mixer, combine 275g water, 150g active sourdough starter, 18g honey, 30g extra virgin olive oil, 425g bread flour, 75g whole wheat flour, and 12g sea salt.
Knead until a soft, smooth dough forms — about 10–15 minutes by hand or 7–12 minutes in a stand mixer on low speed (typically Speed 1 or 2).
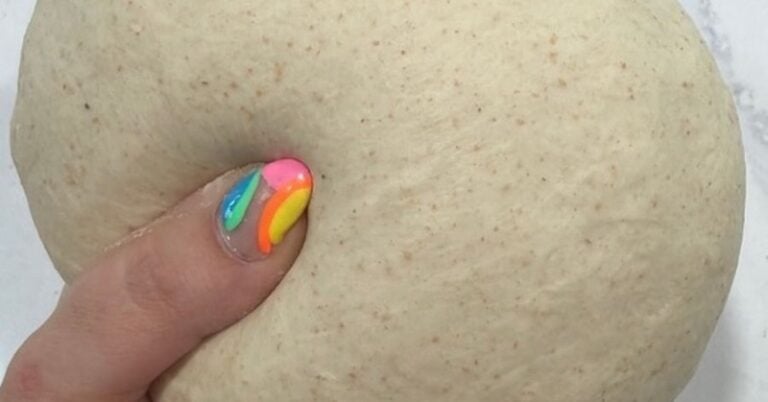
Your finished dough should be tacky but not stick to your hands or work surface. This is the single most important checkpoint in the recipe, and it’s where testers who struggled later usually went wrong.
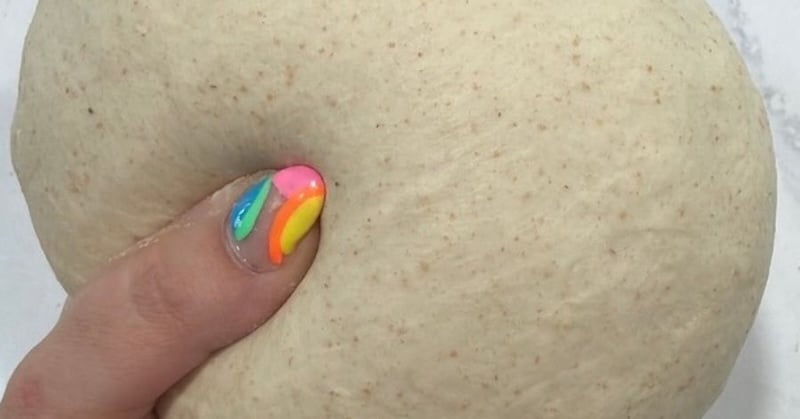
Tip from testing: Some testers found their dough stickier than expected, and a few needed longer mixing times than the recipe’s range. Flour absorbs water differently depending on brand, grind, and humidity. If your dough is still slack and sticky after mixing, add flour one tablespoon at a time until it firms up. If your mixer spins the dough around the hook without kneading it, stop, let it rest 10 minutes, and resume, or finish it by hand.
Step 3: Bulk fermentation
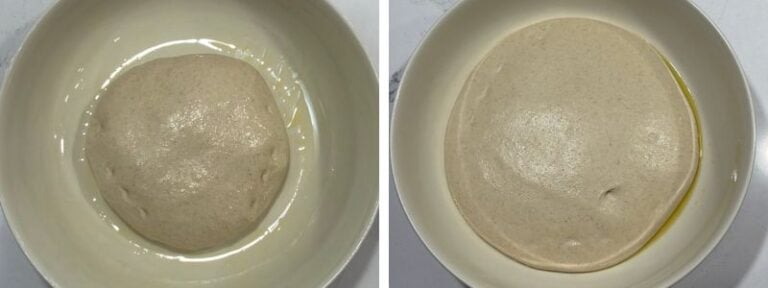
Place the dough ball in a greased bowl (I use a little olive oil), turning to coat. Cover and let it rise until doubled in size. (No stretch and folds or coil folds needed.)
This takes about 6–7 hours at 77–80°F (25–26.5°C) or 8–10 hours at 71–73°F (21.5–22.5°C). These are guidelines, not rules — your fermentation temperature and starter health drive everything here.
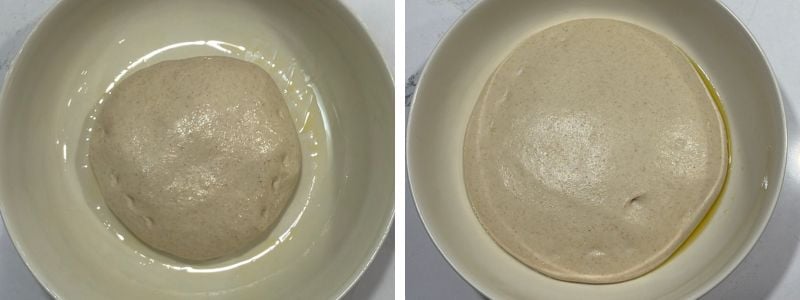
Bulk fermentation is where the most testers got tripped up, so it’s worth explaining why.
This is a stiff, low-hydration dough, and it does not behave like the artisan bread dough you’re probably used to. If you’re waiting for the cues you’d look for in a high-hydration boule — a bubbly surface, a wobbly jiggle when you shake the bowl, webbing when you pull at the edge — you will be waiting a very long time, and you’ll end up in overproofed territory.
Here’s what to look for:
- The dough should roughly double in size. I don’t mark the container — I just look for the dough ball to be about twice as big.
- The surface will stay fairly smooth and taut. Unlike a wetter dough, don’t expect lots of bubbles on top.
- It should stay domed. The dough will puff up and out rather than slump or spread flat across the bottom of the bowl.
- It will feel aerated when you press it — light and pillowy rather than dense and heavy.
Watch the dough, not the clock. In a warm kitchen, start checking around the 5-hour mark. If the dough has gone from tacky and smooth to deflated and sticky, it’s overproofed.
Step 4 (optional): Overnight cold proof
Pop the risen dough in the fridge overnight to pause the process and develop a more complex, slightly sour flavor. Any time the following day, move on to the divide-and-shape step.
If you find cold dough harder to shape, let it come up to room temperature first.
Step 5: Divide and shape
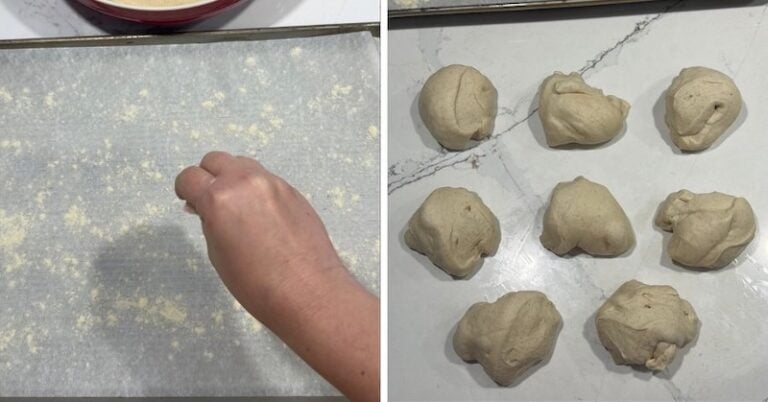
Line a half sheet tray with parchment paper and dust generously with cornmeal or semolina.
Turn the dough out onto a clean surface and divide into 8 equal pieces, about 120–125g each. If your dough is sticking, lightly dust your surface with flour — I’d just use all-purpose flour for this.
Note: For 6 larger rolls, divide the dough into 160–165g pieces and shape them about 8 inches long.
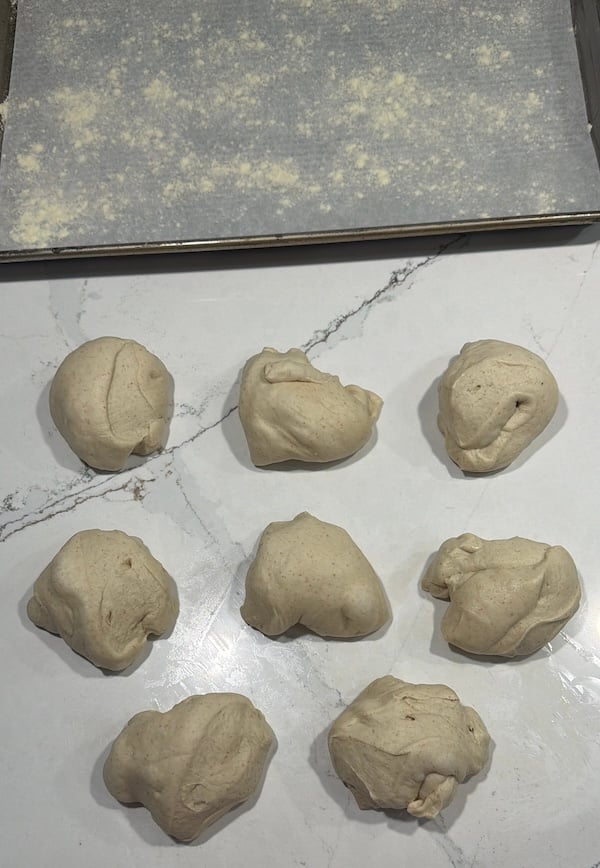
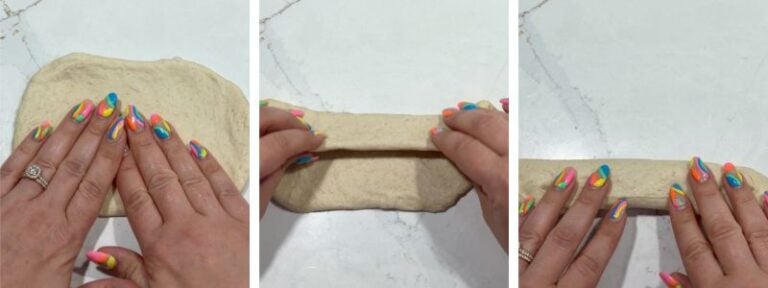
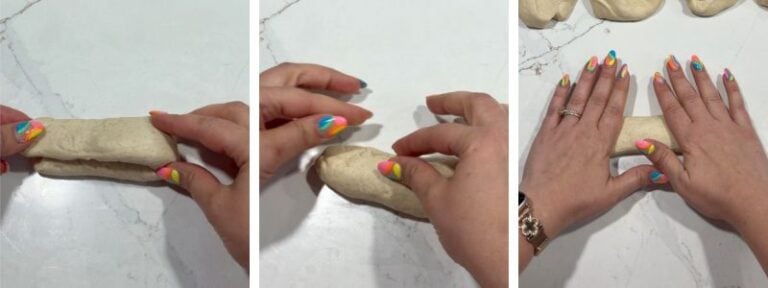
Working one piece at a time, pat the dough into a rough rectangle, about 8 inches wide and 4.5 inches tall. It doesn’t need to be exact. Starting at the top edge, fold the top third of the dough down toward you and press gently to seal. Fold it down once more over the remaining third and press to seal, forming a long, narrow strip.
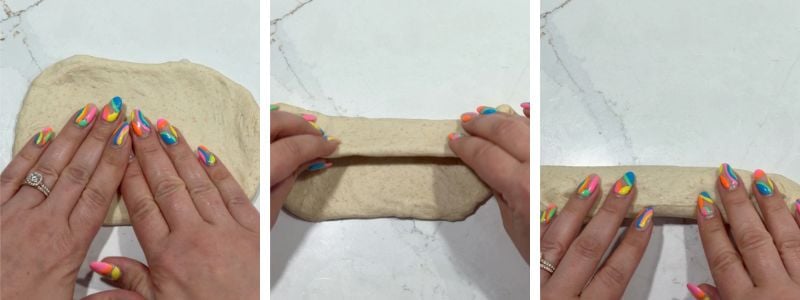
Fold the strip in half, bringing the right end over to meet the left, and pinch the seams closed. Use the palms of your hands to press and roll the log into a 6-inch hoagie roll.
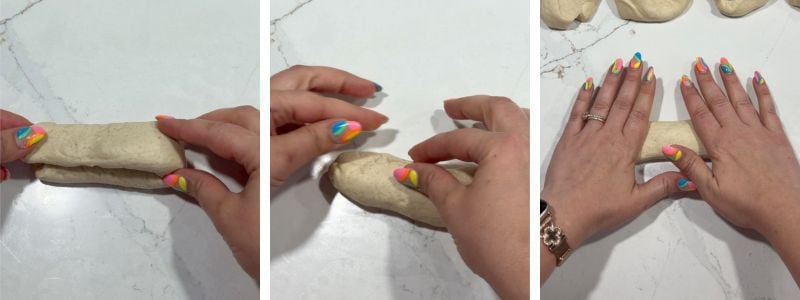
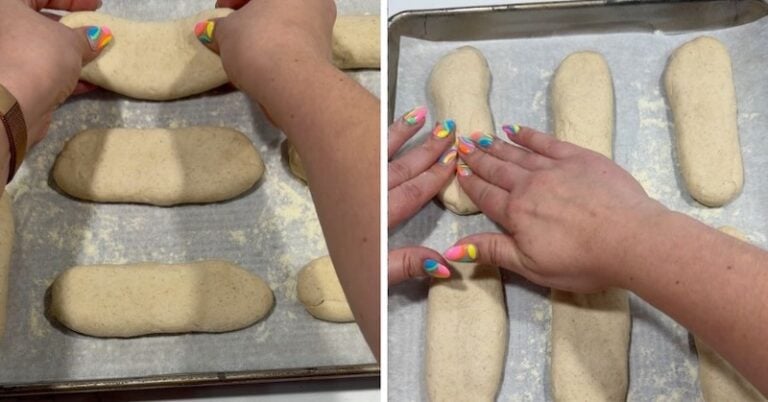
Place seam-side down on the prepared sheet tray. Gently press the rolls so they widen out a bit.
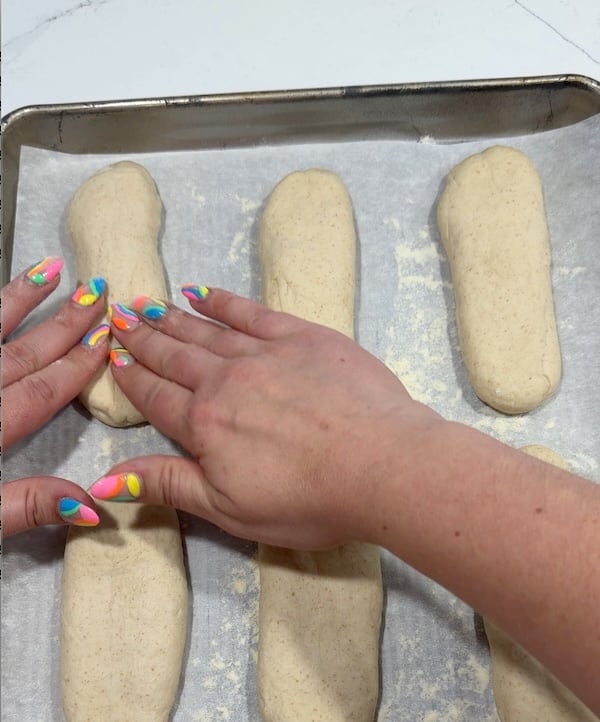
Leave plenty of space between the rolls — if they touch during the second proof, the ends can square off.
Step 6: Second proof
Cover with oiled plastic wrap, a sheet tray cover, or an inverted container — anything that won’t stick to the dough.
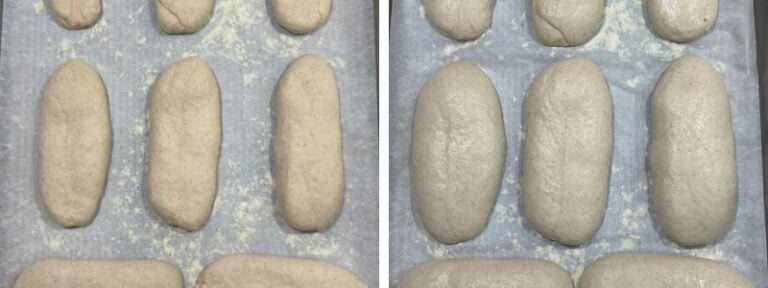
Let the rolls rise until puffed up and the dough springs back very slowly when poked with a floured finger. This takes about 3 hours at 77–80°F (25–26.5°C). If you’re shaping cold dough straight from the fridge on the 2-day timeline, expect closer to 3½–4 hours.
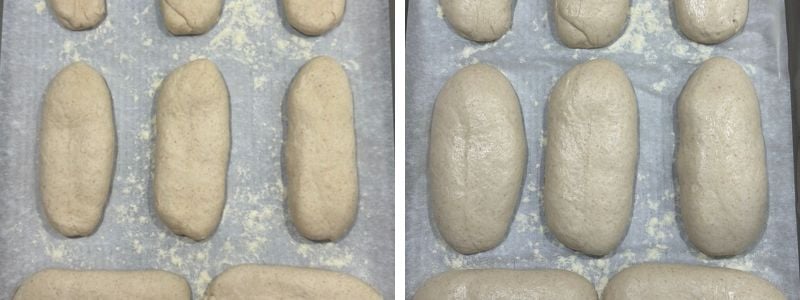
Step 7: Preheat
About 45 minutes before baking, preheat your oven to 450°F (230°C) conventional or 425°F (220°C) convection with your cooking steel, stone, or empty sheet pan inside. Place a small cast iron pan (or similar vessel) on the lowest rack to use for steam.
Give the oven an extra 10–15 minutes after it beeps so the baking surface is fully heated. Testers who rushed this step were the ones most likely to report pale bottoms.
Step 8: Egg wash, seed, and score
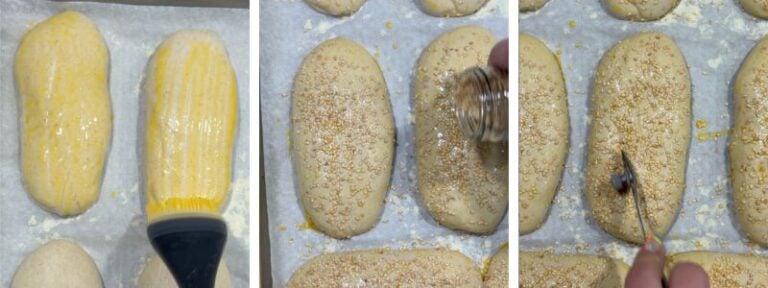
When you’re ready to bake, beat 1 egg with a splash of water and brush each roll with the egg wash. Optionally, sprinkle sesame seeds another topping over the entire surface.
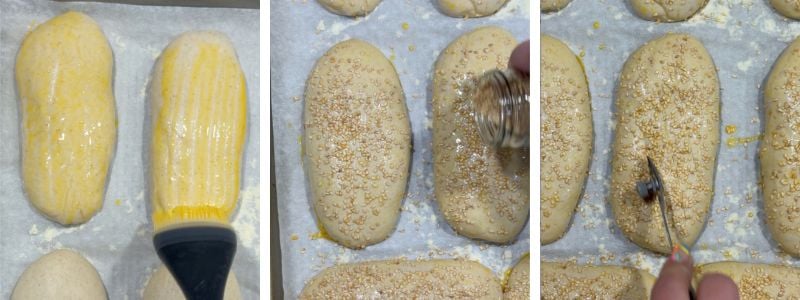
Score each roll with 3 diagonal slashes using a bread lame or sharp knife.
Tips from testing: The egg-washed surface can be slippery, so score confidently with a very sharp blade and go deeper than you think you need to. If the blade drags, chill the rolls for 10–15 minutes before scoring to firm the surface.
Step 9: Bake
Place the sheet tray of rolls directly on your preheated steel, stone, or sheet pan.
Pour about 1 cup of hot water into the cast iron pan on the lowest rack — steam will rise immediately, so close the oven quickly.
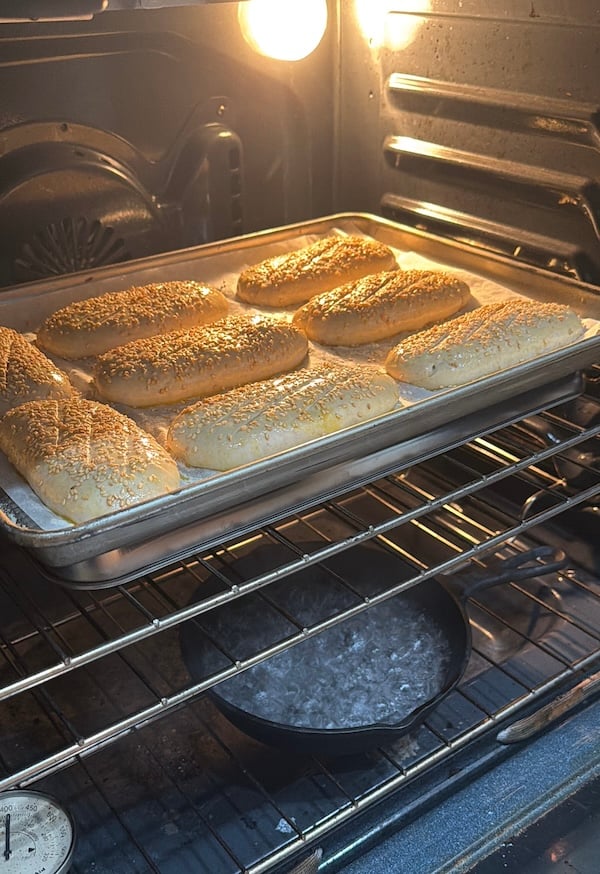
Bake 15 minutes, then remove the steam source and bake an additional 5–10 minutes.
If you’re using the inverted-pan method instead of a steam pan, remove the top pan at the same 15-minute mark.
Rolls are done when they’re deep golden brown and the internal temperature reaches 200–210°F (93–99°C).
Tip from testing: If the bottoms brown too quickly, especially in a thin baguette pan, place a second sheet pan on the rack below or move the rolls up a rack. Pulling them closer to 200ºF instead of 210ºF can help, too.
Step 10: Cool
Let the rolls cool on a wire rack for at least 30 minutes before slicing so the crumb can set.
Serving Suggestions — Tons of Sandwich Ideas!
Recipe testers submitted photos of so many amazing-looking sandwiches. I created these rolls with Italian beef in mind, but they inspired me to try some new meals!
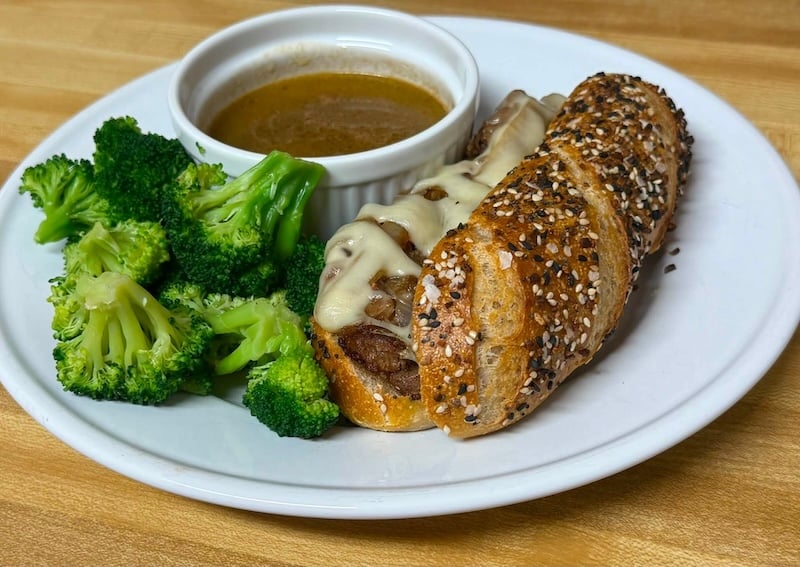
- The hot, saucy, roll-destroying classics. This is what the recipe was built for. Philly cheesesteaks were far and away the most popular use, followed by meatball subs. Testers also made Italian beef, French dips with au jus, chicken parm, eggplant parm, sausage and peppers, BBQ pulled pork, BBQ chicken, Mississippi pot roast, and chopped cheese sandwiches.
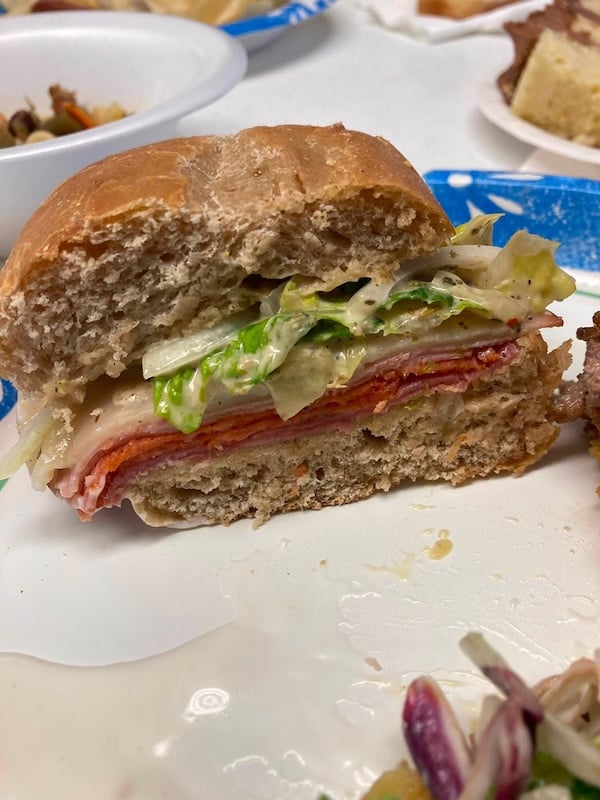
- The classic cold sub. Italian hoagies and grinders came up constantly, along with chopped Italian subs, deli cold cuts, turkey and Swiss, ham and cheese, tuna salad, chicken salad, clubs, and veggie subs with hummus or grilled vegetables. Several testers specifically mentioned that the roll soaked up oil and vinegar without going soggy, which is the whole ballgame for an Italian sub.
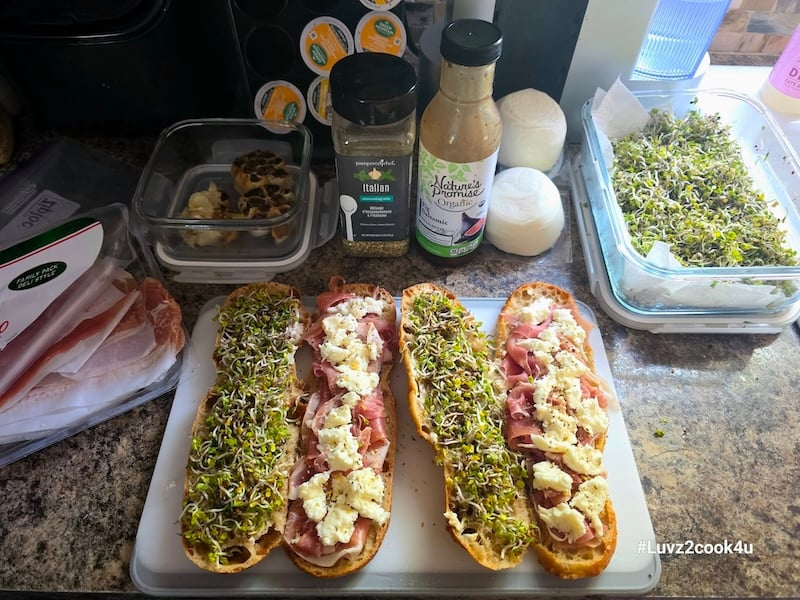
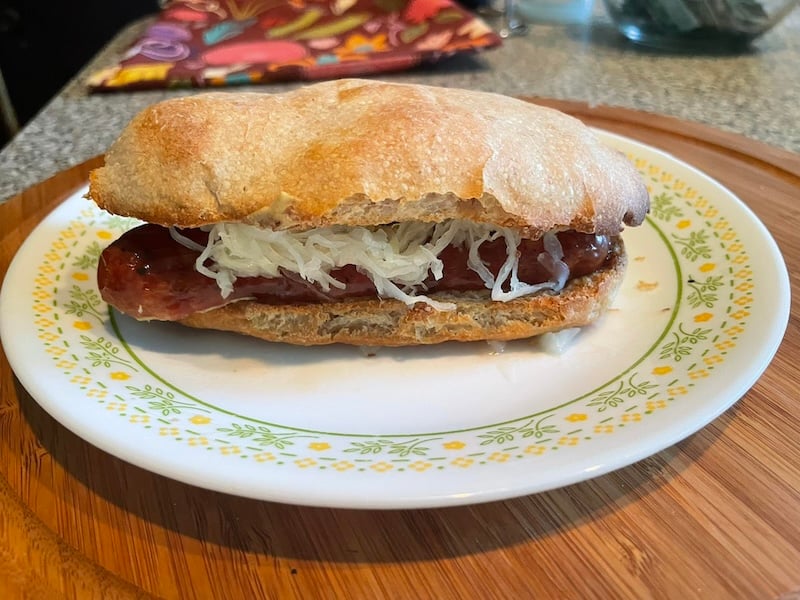
- Anything in a casing. Bratwurst, Italian sausage, Polish sausage with sauerkraut, cheddar brats, bacon-wrapped hot links, and quarter-pound hot dogs.
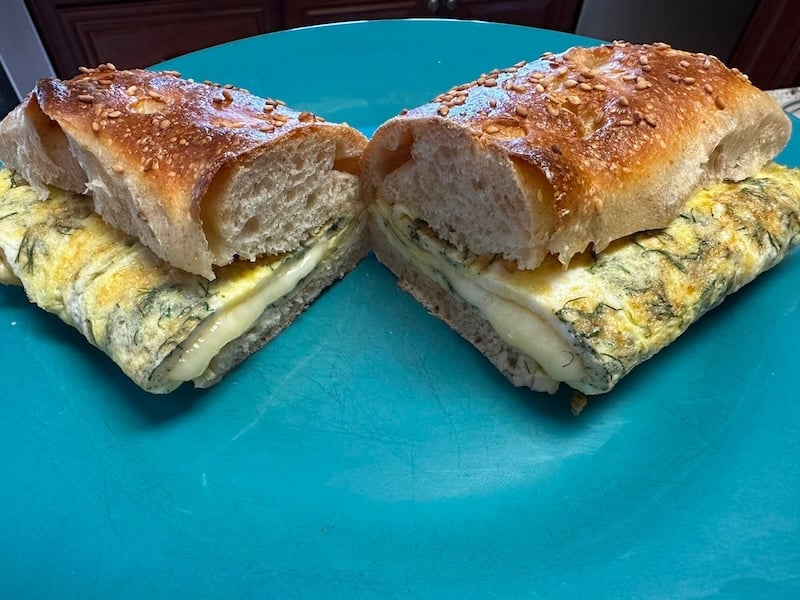
- Breakfast, which I did not see coming. Egg sandwiches, bacon-egg-and-cheese, a New Jersey breakfast sandwich with Taylor ham, and omelet sandwiches. One tester pressed hers in a pan with butter for a crunchy crust.
- Seafood. Shrimp po’boys, prawn rolls, imitation crab rolls, and one tester who’s planning a lobster roll.
Now, for some really inventive ideas — the responses that made me put down my coffee:
- Pizza hoagies: Recipe tester Jodi H. hollowed out the rolls, filled them with mozzarella and a beef-and-pizza-sauce mixture, topped them with more cheese, and baked them for 15 minutes. She even turned the hollowed-out bread into croutons.
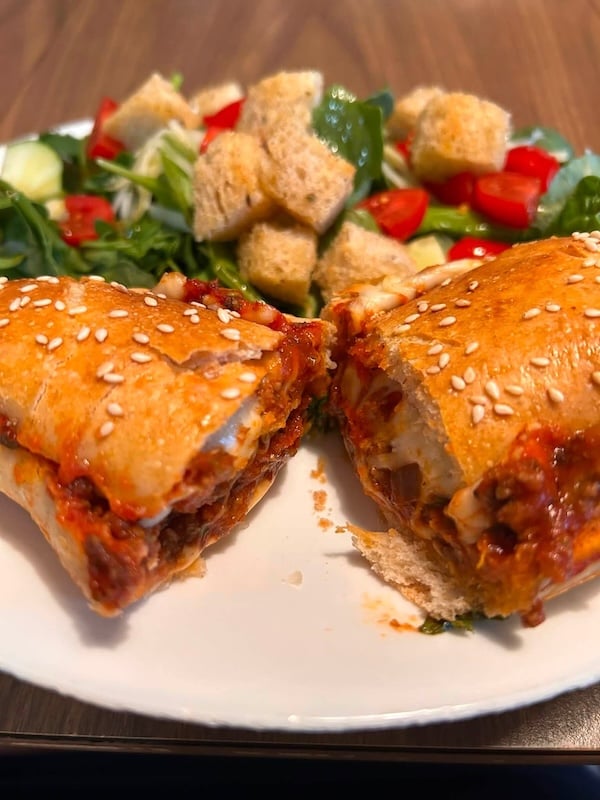
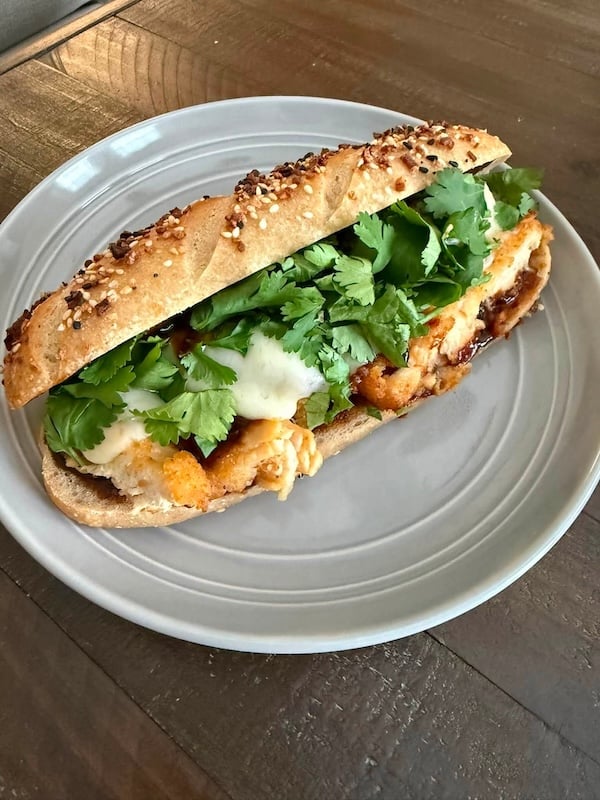
- Banh mi pork rolls
- Cubanos
- Mexican tortas
- Picadillo with cheddar and Monterey Jack
- Vegetarian Philly cheesesteaks made with Impossible burger
- Sausage with eggplant and broccoli rabe
- Chicken fajita veggie hoagies
- Garlic bread, French bread pizza, and crostini cut lengthwise
- For dipping, sopping, or serving alongside: Beef stew broth, garlic butter mussels, and lasagna.
“We made beef stew for dinner and used them to sop up the broth — perfect.” —Recipe tester from Central Florida
And plenty of testers didn’t bother with a sandwich at all — they ate the rolls with butter and honey, butter and Vegemite, sliced into medallions, or plain straight off the cooling rack.
“My teens just grab them unsliced and eat them.” —Recipe tester from Orange County, CA
Storing and Reheating
- At room temperature: Store cooled rolls in a bread bag or airtight container for 2–3 days.
- Refresh a day-old roll: Warm at 300°F (150°C) for about 5 minutes to restore the crisp crust, or microwave in 10-second increments until soft.
- Freeze for longer storage: Let the rolls cool completely, then freeze whole or pre-sliced in a freezer-safe bag for up to 3 months.
- Reheat from frozen: Warm at 300°F (150°C) for about 10 minutes, or until heated through.
Troubleshooting Tips
FAQs
No. You can replace the whole wheat flour with additional bread flour. You may need a little less water — or just add a bit more flour if the dough is too sticky.
Absolutely. If you already have a baguette pan or something similar, use it!
No. Only 30% of my testers used one. Others used Dutch ovens, plain sheet pans, pizza stones, baguette pans, or silicone molds with great results. Whatever you bake on, add steam with a cast iron pan of hot water on the lowest rack, or invert a second pan over the rolls for the first 15 minutes.
No. Sesame seeds are optional. Testers also used poppy seeds, everything bagel seasoning, and Italian seasoning; just note that the garlic in everything bagel seasoning can burn.
They’re best for messy, saucy sandwiches like Philly cheesesteaks, meatball subs, Italian beef, French dips, and deli subs, but testers used them for everything from breakfast sandwiches to pulled pork and tuna melts.
Let them cool for at least 30 minutes before slicing so the crumb can finish setting. Cutting too early can leave the interior gummy.
A similar recipe to try: The Best Sourdough Ciabatta Rolls (Tested by 340 Bakers)
Sourdough Hoagie Rolls
Equipment
- Stand mixer with the dough hook (or you can knead by hand)
- 14" x 20" cooking steel Use code SDGAL10 for 10% off; you could also use a pizza stone or a second sheet pan
Ingredients
Feed Your Starter
- 14 g sourdough starter healthy; ideally, fed in the last 24 hours
- 70 g water
- 70 g bread flour
Main Dough
- 275 g water
- 150 g active sourdough starter from above
- 18 g honey or sugar
- 30 g extra virgin olive oil or avocado oil
- 425 g bread flour
- 75 g whole wheat flour
- 12 g sea salt
For Finishing
- cornmeal or semolina optional; for dusting the pan
- 1 egg beaten with a splash of water
- sesame seeds optional; for topping
Before You Begin

Instructions
- Feed your starter: The night before, combine 14 g sourdough starter, 70 g water, and 70 g bread flour and stir until smooth. Cover loosely to ferment overnight (10–12 hours). If you already have 150 g active sourdough starter ready to go, you can skip this step.
- Mix the dough: In the morning, in a large mixing bowl (or a stand mixer), mix together 275 g water, 150 g active sourdough starter, 18 g honey or sugar, 30 g extra virgin olive oil or avocado oil, 425 g bread flour, 75 g whole wheat flour, and 12 g sea salt. Knead until a soft, smooth dough forms, which takes about 10–15 minutes by hand or 7–12 minutes in a stand mixer on a low speed (typically Speed 1 or 2). Your finished dough should be tacky but not stick to your hand or work surface.

- Bulk fermentation: Place the dough in a greased bowl, turning to coat the dough. Cover and let rise until doubled in size. For a guideline, this takes about 6–7 hours at 77–80°F (25–26.5°C) or 8–10 hours at 71–73°F (21.5–22.5°C). This is a stiff dough, so don't wait for the bubbly, jiggly cues you'd look for in an artisan bread dough — watch for volume instead.

- Optional — overnight cold proof: Pop the risen dough in the fridge overnight to pause the process. Any time the following day, move on to dividing and shaping. If you find cold dough harder to shape, you can let the dough come up to room temperature before proceeding.
- Divide and shape: Line a half sheet tray with parchment paper and dust generously with cornmeal or semolina. Turn dough out onto a clean surface and divide into 8 equal pieces, about 120–125 g each.
- Working one piece at a time, pat the dough into a rough rectangle, about 8 inches wide and 4.5 inches tall. Starting at the top edge, fold the top third of the dough down toward you and press gently to seal. Fold it down once more over the remaining third and press to seal, forming a long, narrow strip.
- Fold the strip in half, bringing the right end over to meet the left, and pinch the seams closed. Use the palms of your hands to press and roll the log into a 6-inch hoagie roll. Place seam-side down on the prepared sheet tray. Repeat with remaining rolls.
- Leave space between the rolls so they don't touch as they proof. Gently press each roll to widen it slightly.
- Second proof: Cover with oiled plastic wrap, a sheet tray cover, or an inverted container — anything that won’t stick to the dough. Let the rolls rise until puffed and the dough springs back very slowly when poked — about 3 hours at 77–80°F (25–26.5°C). Watch the dough rather than the clock.
- Preheat: About 45 minutes before baking, preheat oven to 450°F (230°C) conventional or 425°F (220°C) convection with your cooking steel, stone, or an empty sheet pan inside. Place a small cast iron pan on the lowest rack to use for steam. Give the oven an extra 10–15 minutes after it beeps so everything inside is fully heated.
- Egg wash, seed, and score: Beat 1 egg with a splash of water and brush each roll with the egg wash. Optionally, sprinkle sesame seeds or another topping over the entire surface. Score each roll with 3 diagonal slashes using a bread lame or sharp knife, going deeper than you think you need to.
- Bake: Place the sheet tray of rolls directly on your preheated steel, stone, or sheet pan. Pour about 1 cup of hot water into the cast iron pan — steam will rise immediately, so close the oven quickly. Bake 15 minutes, then remove the steam source and bake an additional 5–10 minutes. If you’re using the inverted-pan method instead of a steam pan, remove the top pan at the same 15-minute mark. Rolls are done when they're deep golden brown and the internal temperature reaches 200–210°F (93–99°C).
- Cool: Let rolls cool on a wire rack for at least 30 minutes before slicing.
Notes
“This looks intimidating, but it’s actually an easy recipe that yields satisfying results.” —Recipe tester from Grand Rapids, MI
Conclusion
I set out to make a roll that could survive an Italian beef sandwich, and after many failed bakes, 100 Instagram opinions, and 253 bakers testing the recipe, we finally achieved that goal.
If you make these, I’d love to see what kind of sandwich you build with them. Drop a photo in the comments or tag me on Instagram @thatsourdoughgal.
Other sourdough recipes you might like:



This recipe was so fun to make! I loved the hint of wheat. What a delightful excuse for a beautiful sandwich!
Gorgeous!!
Have been waiting for this post. I don’t have any whole wheat. 🙁 Can I use all bread flour? What would be the proportions?
Yes, that is covered in the substitutions and FAQ sections!
Mine were a little on the small side @122 grams each. I think I’ll try making 6 rolls instead of 8 next time. My inaugural same day bake also came out a little too flat – probably from flattening them soo much. I also had to go in and give them another score. I will try the cold proofing next time too. That could have contributed to my dough being really loose. It’s a warm day in So. Cal today. Cant wait for them to cool down to give them a taste test . 🤞
Instructions were good, shaping went fine, a few wonky ones but overall good. They burned a bit on the bottom which doesn’t usually happen anymore.
Love the sesame seeds. They don’t look as big as i expected. Maybe because I refrigerated them before shaping and maybe didn’t let them rise as much? Tips appreciated.
Ahh, sorry about the burning. They look beautiful – they kind of look like they were maybe shaped a little more stout. They don’t look under or overproofed to me!
I did not have wheat flour, and they’re a little flatter than I would like. I was afraid of over proofing, and may have baked too early.Also, my shaping could use a bit of work! But, first tries are for working out the kinks. I’ll definitely try again!
I can’t wait to try this one!!!
They are so good!
Maybe could have raised a bit more before baking them. But very good! I buttered top after they came out of the oven so stayed soft. Husband liked them and said we could make steak sandwiches 😀 I had and breakfast sandwich! Picture
Yummy
Looks amazing! Thanks for sharing!
I tried those but the crust didn’t get crispy. And they didn’t color much.
That sounds like an underbaking issue – bake until the outside reaches the desired color. If it never does, no matter how long you bake them, that’s indicative of underproofing.
I did bake them till the internal temperature was whatt it should be 209 fermenting or so. Didn’t won’t to over bake them. Will try proofing more next time. Sandwich was really good soft. Not really a sigh of underproofed like heavy of gummy.
Is it possible to make only half the recipe?
Yes, just click the 0.5x button on the recipe card!
Love these!!! So yummy 😋
Yay! So glad you’re loving these!
Finally, I got a win after two failed ciabatta attempts! These are absolutely delicious! My husband wanted Italian Herb and Cheese so I dumped some herbs, garlic powder and shredded cheddar in the initial mix, then when I took the steam out of the oven I brushed them with butter and topped with more cheese. They are so soft and pillowy inside! You did it again Rebekah!
Love this! Glad they turned out great for you!