
The Best Sourdough Ciabatta Rolls (Tested by 340 Bakers)

I’m still shocked at how easy this sourdough ciabatta recipe is. And the fact that they look this good?! I sincerely feel like I’ve hit the lottery on this one.
What I love about ciabatta, besides how stinkin’ easy it is to make, is how versatile and practical it is.
Slather with butter and enjoy as-is, or slice in half to make some incredible sandwiches. My personal favorites are classic lunch meat and cheese with all the fixin’s, chicken salad, and a breakfast sandwich with Gouda, bacon, and egg (Starbucks-style).
Per usual, this recipe went through extensive testing, with feedback from 340 recipe testers woven throughout this post to help you get the best results.
“Take the leap. The higher hydration is so fun and Rebekah makes learning the technique virtually impossible to fail!” —Recipe tester from Knoxville, Tennessee

Disclosure: Some of the links to products I recommend in this post are affiliate links — if you choose to purchase through one of my links, I may earn a small commission, which helps fund this website, recipe development, and monthly giveaways. I sincerely appreciate your support.
Why You’ll Love These Sourdough Ciabatta Rolls
- Easier than any artisan loaf because there’s almost no shaping: I cannot stress enough how much simpler this is compared to making artisan sourdough bread. The “shaping” is just a matter of dumping out your dough and cutting it into 8 pieces. When I asked testers what they loved most, more of them said some version of “how easy it is” than anything else. It came up more often than the flavor, the crumb, and the texture combined.
“This is easier than bagels!” —Recipe tester from Vincennes, Indiana
“It is simple, not a lot of steps.” —Recipe tester from Vail, Arizona
- Faster than you’d expect: After ease, the thing testers brought up most was how quickly these come together. Bulk fermentation runs fast in this high-hydration dough — most testers were done in 4–5.5 hours.
“It’s fairly easy and quicker than I’d expected.” —Recipe tester from Richmond, Virginia
- Flexible timeline options: You can skip the overnight cold proof for same-day sourdough ciabatta (super convenient), or add that fridge rest and bake them anytime the next day.
“I could cold proof overnight and didn’t have to angst about getting it done in one day.” —Recipe tester from Annapolis, Maryland
- Complex sourdough flavor: The overnight cold proof adds depth of flavor that testers (and I!) noticed.
“Great flavor with the overnight proof!” —Recipe tester from Riverview, Florida
- That open, airy crumb: This is what ciabatta is all about!! And this recipe delivers.

“Nice crusty exterior with a soft, moist and holey interior.” —Recipe tester from Oil City, Pennsylvania
- Built for sandwiches: When I asked testers how they’d serve these, the answers came flooding in — breakfast sandwiches were the runaway favorite, followed by chicken salad, deli-style subs, burgers, BLTs, tuna salad, paninis, and plenty of “just butter.”
“Best vessel for a sturdy sandwich yet soft and delicious!” —Recipe tester from Finlayson, Minnesota
- A great intro to high-hydration dough: Several testers told me this bake finally made wet dough click for them. The stickiness can be intimidating, but this recipe is very beginner-friendly.
“Making this recipe will help you understand high-hydration dough, and your results will be delicious bread — a win-win!” —Recipe tester from Summerfield, North Carolina
- Refined with the help of 340 home bakers: I sent this recipe to hundreds of testers across six continents and improved it based on their feedback. I thought the original recipe was a winner, but BOY am I so proud of the refined version! I’m so grateful for the testers.
“I’ve made other ciabatta recipes that were just ok. This is an awesome recipe. You nailed it.” —Recipe tester from McHenry, Illinois
Here’s a compilation of photos from testers:

The Recipe Testing Journey
By the grace of God, my first draft for sourdough ciabatta turned out beautifully. I worried it was just a fluke because I’m never that lucky — flashback to the 15 tests required for tomato basil bread.
So, I tested it one more time just to be sure — and they were just as gorgeous as the first round.
I sent it off to testers, and their feedback helped me improve the recipe even further.
4 Recipe Improvements Based on Tester Feedback
1. I lengthened the bake time and added a touch of honey.
Pale ciabatta rolls were one of the biggest issues testers reported: 44.3% of testers got bottoms with no browning at all.
Here’s a compilation of some of those pale bakes:

Pale bottoms showed up at roughly the same rate in electric and gas ovens, with and without fans, with cast iron steam, and with metal-pan steam. It wasn’t the bakers’ fault — it was the recipe.
“I pulled my rolls at 208°F and they barely looked cooked. Both the top and the bottom were extremely pale. I think the steam needs to be pulled ⅓–½ of the way through baking.” —Recipe tester from Poquoson, Virginia
That tester was right. The bake time is now much longer, and we lower the oven temperature after the steam comes out. I also added a tiny bit of honey to the dough to help with even browning.
2. I now tell you when to pull the steam source — and how much water to use.
My original recipe draft didn’t say when to remove the steam source, and testers noticed. Several left it in for the entire bake, which likely contributed to the widespread pale-bottom problem.
Several more asked how much water to actually pour in, and one just guessed at a cup. Both are now spelled out: 1 cup of water, with the steam source removed after 10 minutes.
3. I clarify how much bench flour you need for stress-free shaping.
Testers advised me to make it crystal clear that this dough needs a serious amount of flour on the bench, on the dough, and on their hands.
“I would (maybe in bold) emphasize to add a lot of flour during shaping.” —Recipe tester from Poulsbo, Washington
Without enough bench flour, the dough is impossibly sticky, leading to stretched-out dough, misshapen rolls, and a stressful experience:

Message received! It’s now called out in the ingredient list, in the shaping step, and in troubleshooting.
4. I made the overnight cold proof the default, and I now shape the dough cold.
The version testers baked was written as a same-day recipe — the cold proof was optional.
But when I compared the two groups afterward, the bakers who cold-proofed reported pale bottoms less often — and their crumb was just as open.
Then I tested it both ways myself and found even more reasons to encourage it:
- Cold dough is much easier to shape. This is the big one.
- The flavor improvement was a huge bonus.
- It’s great for scheduling, since you can bake the rolls at basically any time the following day.
Shaping was the hardest part of this recipe for people, partly because of the lack of bench flour, but those who worked with cold dough said it was much easier.
“I think cold ferment made the shaping process easy to transfer to the tray.” —Recipe tester from Laramie, Wyoming
One tester cold-proofed her dough but let it warm up for 45 minutes before shaping — and still found it sticky and hard to transfer. Cold dough it is!
Baker’s Timeline
If you want to mix the dough in the morning and serve ciabatta with dinner, choose the same-day timeline. But the two-day option, which includes an overnight cold proof, has major benefits, like easier handling during shaping and more complex flavor.
Times are flexible and depend on your kitchen temperature.
| Same-Day Timeline | |
|---|---|
| Stage | Step |
| Before bed (8–9 PM) | Feed your starter |
| 10 AM | Mix the water, starter, and flour |
| 10:45 AM | Mix in the salt |
| 11:15–12:45 PM | 2–3 rounds of coil folds, 30 minutes apart |
| Around 2:30 PM | Turn out and divide into 8 rolls |
| Around 2:30–4:30 PM | Second proof |
| 5 PM | Bake |
| 6 PM | Enjoy |
| 2-Day Timeline (Recommended) | |
|---|---|
| Stage | Step |
| Before bed (8–9 PM) | Feed your starter |
| 10 AM | Mix the water, starter, and flour |
| 10:45 AM | Mix in the salt |
| 11:15–12:45 PM | 2–3 rounds of coil folds, 30 minutes apart |
| Around 2:30 PM | Put dough in the fridge until tomorrow |
| Any time the following day | Turn out, divide into 8 rolls, and begin the second proof |
| About 2.5–3 hours later | Bake |
| 30 minutes after baking | Enjoy |

Equipment You’ll Need
- Kitchen scale: Essential for accurate measurements!
- Large mixing bowl: For mixing, though you could just mix in a 9×13 baking dish – see the next bullet point.
- 9×13-inch glass baking dish: If you bulk ferment in a 9×13-inch dish, the dough is already roughly the size and shape you need when you turn it out. So there’s very little stretching and patting to do before you cut. You can mix the dough in it from the start or transfer the dough over at any point during bulk fermentation.
- 10×14-inch baking dish cover: I love these covers from Doe a Deer — they fit a 9×13-inch baking dish perfectly. They’re great quality and don’t dry out the dough. Get 15% off with code THATSOURDOUGHGAL.
- Danish dough whisk: Makes the initial mix so much easier with a wet dough like this.
- Bench scraper: To turn the dough out and divide it into 8.
- Bowl scraper: For cleaning the sides of the bowl between folds and getting the dough out cleanly.
- Parchment paper: For lining the sheet pan.
- Half sheet pan: All 8 rolls bake on one. A few testers found theirs a little tight and had rolls grow together during the second proof — you can split the rolls between two pans.
- Half sheet pan cover: Keeps your shaped ciabatta rolls from drying out during the second proof. Recipe testers who used plastic wrap reported disaster — it often stuck to the tops of the rolls, causing them to tear when removed. A DIY option is to invert a second half sheet pan and place it on top; you can secure it there with clips!
- Small cast iron skillet: For steam. 61% of testers used cast iron; another 29.6% used a metal baking or roasting pan, and both worked well.
Note: Don’t use glass for your steam pan. Several testers reached for a glass baking dish, and pouring boiling water into glass in a piping hot oven risks shattering it. Use cast iron or any metal pan you don’t mind discoloring.
- Instant-read thermometer: To confirm the rolls reach 205–210°F (96–99°C) internally. It’s OK if they reach temp before they’re the perfect golden brown — we’re looking for both cues before pulling them.
- Bread knife: For slicing your ciabatta rolls in half. The budget-friendly one linked here is exceptionally sharp!
- Cooling rack: For the 20–30 minute rest before slicing.

Ingredients for Sourdough Ciabatta Rolls
- Sourdough starter: Healthy and ideally fed within the last 24 hours. If you already have 120g of active starter ready to go, you can skip the feeding step.
- Water: I use room-temperature well water. If your tap water is heavily chlorinated, use bottled spring water.
- Honey (optional, but recommended): Adds a touch of sweetness and helps with browning.
- Bread flour: I use Central Milling High Mountain Bread Flour at 13.5% protein. King Arthur bread flour was by far the most popular choice among testers — 133 of them used it, and it worked well.
- Sea salt: Added after the initial rest. I use Redmond’s Real Salt (15% off with code TSG15).
- Bench flour (up to 30g): All-purpose or bread flour for shaping. The most common note across the entire test was that bakers wished they’d used more flour during shaping. You can always brush the excess off.
“The recipe may feel challenging due to the stickiness of the dough, but trust the process — it’s worth it.” —Recipe tester from Palm Coast, Florida
Ingredient Substitutions & Additions
- All-purpose flour: Plenty of testers used it, and Kirkland all-purpose flour from Costco was popular. Most who did either added a little extra flour or held back some water, since AP flour generally absorbs less. One tester using Kirkland Organic AP flour added 25g of extra flour and was happy with the result.
- Freshly milled flour: A handful of testers successfully swapped in 20–25% freshly milled hard white or hard red wheat. Fresh-milled flour typically absorbs more water, so you may need to add a little more.
- Sugar: Can be substituted for the recommended honey.
- Diastatic malt powder: Tester Jean S. suggested adding 1 tsp to the dough, noting that it helps with fermentation, oven spring, and browning. Check your flour’s ingredient list first. If it already contains malted barley flour or added enzyme, you likely don’t need diastatic malt powder. I have not personally tested it in this recipe.

How to Make Sourdough Ciabatta Rolls (Step-by-Step)
Step 1: Feed your starter (the night before)
In the evening, in a medium glass jar, stir together 12g sourdough starter and 60g water. Mix in 60g bread flour until smooth. Loosely cover and let it ferment overnight, 10–12 hours at 68–75°F (20–24°C).

This recipe uses 120g, so you’ll have 12g left over to maintain your starter.
Step 2: Mix the dough
You can mix the dough in a large mixing bowl or in a 9×13-inch baking dish.
Using the baking dish puts the dough in roughly the right shape from the start — so when you turn it out, you don’t have to finagle a round blob of dough into a rectangle.
But you could also mix the dough in a large mixing bowl, then transfer it to the 9×13-inch dish at any point during bulk fermentation.
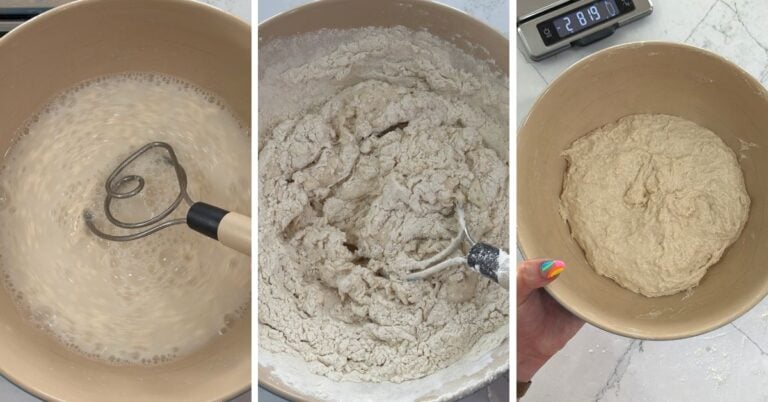
Either way, sometime in the morning, combine 390g water, 10g honey, and 120g active sourdough starter. Add 500g bread flour and mix with a Danish dough whisk or a wet bowl scraper until no dry flour remains. I like to switch to my hands at the end to really get in there, but you don’t have to.

Bulk fermentation starts right now. Cover and rest for 45 minutes.
Step 3: Add the salt
Sprinkle 10g sea salt over the dough. Work it in by pinching the dough, then switch to slap and folds or a scooping motion called the Rubaud technique until fully combined.

Cover and rest 30 minutes.
Step 4: Coil folds (2–3 rounds, 30 minutes apart)
Wet your hands. Seriously — dunk them in a bowl of water or wet them under your faucet. It’ll prevent excessive sticking.
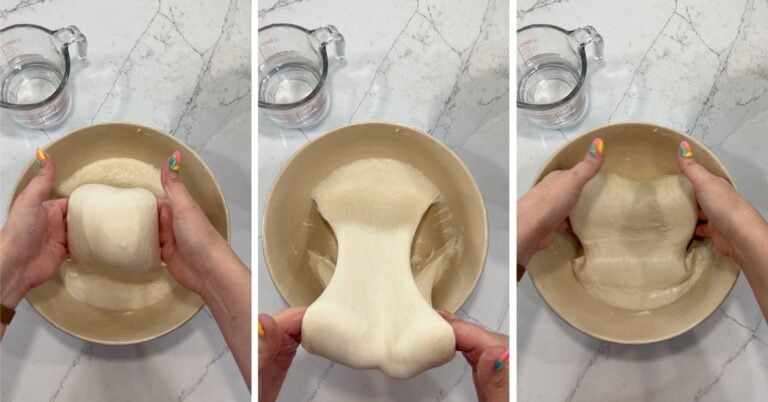
Slide your wet hands under the center of the dough. Lift straight up and let the dough hang — it will stretch under its own weight, and the ends should release from the bowl. Lower it back down, letting those ends fold underneath as it settles.
The photo below shows you what a single coil fold looks like:

Rotate the bowl 90° and repeat, re-wetting your hands as often as you need to. Cover between rounds.
You’ll feel the dough strengthen, and it’s the best part of this whole recipe. Testers mentioned it constantly.

When to stop doing coil folds: Check the dough 30 minutes after a set. If it’s puddled back out and held zero shape, do another set. If it’s roughly holding shape, you’re done.
Step 5: Finish bulk fermentation
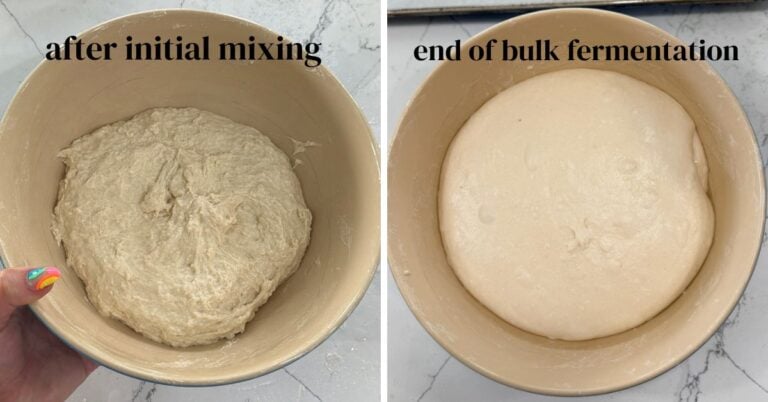
Look for the dough to roughly double in volume, spread out to the corners of the dish, and be covered in bubbles. It should also be very jiggly — give the dish a shake and look for a loose wobble, almost like Jell-O.
Below are two photos showing the dough at the beginning and end of bulk fermentation — one in my Staub mixing bowl and another in a 9×13-inch baking dish. Use these as a reference when looking at your own dough.


For me, bulk fermentation took 4.5 hours at about 75°F (24°C). Timing varies with your kitchen, so trust the visual cues over the clock.
A note on reading this dough: Nearly 40% of testers said they were at least somewhat unsure when bulk fermentation was done, and it was one of the most common questions in the survey. High hydration dough looks different from a stiff dough at the same stage — it’s slacker and more jiggly by nature, so “loose” doesn’t automatically mean “overproofed.” Look for that volume increase and a super bubbly surface.
Step 6: Overnight cold proof
Once bulk fermentation is complete, cover the dough and put it in the fridge overnight.
Baking the same day instead? Skip to the next step. Everything is identical, except your dough will be at room temperature, so it’ll be stickier to work with — be generous with the bench flour — and it’ll move faster through the second proof.
Step 7: Turn out the cold dough and divide into 8 pieces
Line a half sheet pan with parchment paper.
Take the dough straight out of the fridge. Don’t let it come to room temperature first — the cold is what makes shaping a lot easier.
Flour the top of the dough while it’s still in the baking dish, and flour your work surface well. I use about a quarter cup of all-purpose flour for this, so seriously — be generous!
Gently turn the dough out onto the counter, flouring all the sticky bits as you go. If the rough side is facing up, flour everything well and flip it — you want the smoothest, prettiest side up since that will become the tops of the rolls.
“During shaping, move confidently. The less you touch/disrupt the dough, the better.” —Recipe tester from Central Massachusetts
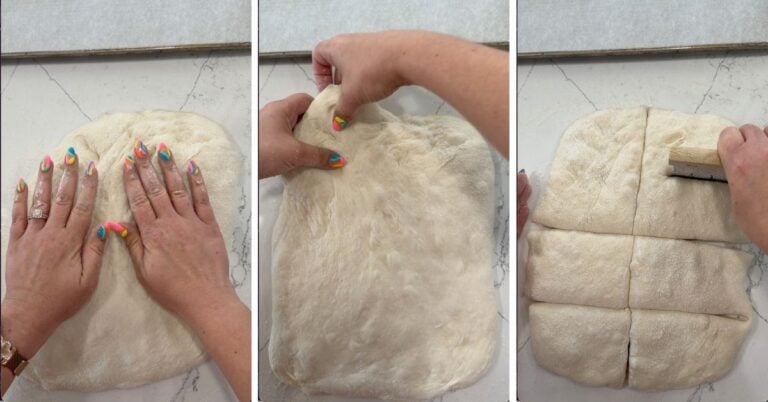
Gently pat the dough into an even rectangle, roughly 9×12 inches. Flour anything that sticks to you or the counter.
Use your bench scraper to cut straight down into 8 rolls, then transfer them to your prepared sheet pan.

A tip from testing: you can absolutely tidy them up. Several testers used the bench scraper to nudge each roll into a more uniform shape after cutting. Ciabatta is meant to look rustic, but there’s no rule against helping it along.
Leave as much space as you can between rolls.
Step 8: Second proof
Cover the tray and place it somewhere warm until the rolls look noticeably puffier.

Coming out of the fridge, plan on the second proof being about 2.5–3 hours. If you skipped the cold proof, expect closer to 2 hours.
Two more things testers taught me here:
- Cover it loosely, and watch what you cover it with. More than one tester had their cover stick to the tops of the rolls and tear them. A sheet pan cover or an inverted second sheet pan works better than plastic laid directly on top.
- If the rise isn’t there yet, give it more time. Sometimes, the dough has a mind of its own. If you’ve waited the suggested 2–3 hours and your rolls still don’t look puffed up, give them more time.
Step 9: Prepare and preheat the oven
Toward the end of the second proof, set one oven rack in the middle and another on the bottom. Place a small cast iron skillet on the bottom rack.
We’ll use that skillet for steam. If you don’t have one, any metal baking dish or pan will work! Just don’t use glass.
Preheat oven to 475°F (250°C) conventional.
Step 10: Bake
Set your sheet pan on the middle rack.
Pour 1 cup of steaming hot water into the cast iron skillet. Be careful — the steam rises fast.


Close the oven as quickly as you can and bake for 10 minutes.
Remove the steam source, reduce the oven to 425°F (220°C) conventional, and bake for 25–30 minutes more, or until the tops are golden brown and the internal temperature reads 205–210°F (96–99°C).


If your rolls reach the ideal temperature but are still pale, that’s OK! Keep baking until they’re golden brown. We’re looking for both cues: golden brown tops and an internal temperature of 205–210°F (96–99°C).
Don’t skip removing the steam source. Leaving it in for the whole bake is one of the surest ways to end up with pale, soft-crusted rolls. Several testers did exactly that because the original recipe didn’t say when to remove it — entirely my fault, but now it’s fixed.
Step 11: Cool
Let the rolls cool on the sheet pan for 5 minutes, then move them to a wire cooling rack. Give them at least 20–30 minutes before slicing, since the interior is still setting.

Storing and Reheating
Room temperature: Store in an airtight container or bread bag for up to 4 days.
Freezing: Place the cooled rolls in a zip-top bag and freeze for up to 3 months. To help prevent freezer burn, you can also wrap the rolls individually in plastic wrap before placing them in the bag.
Reheating: Microwave in 10-second intervals until warmed through. You can also reheat them in a 325°F (165°C) oven for a few minutes — just until they’re freshened up. If they’re rock hard or stale, spritz them with water before reheating.
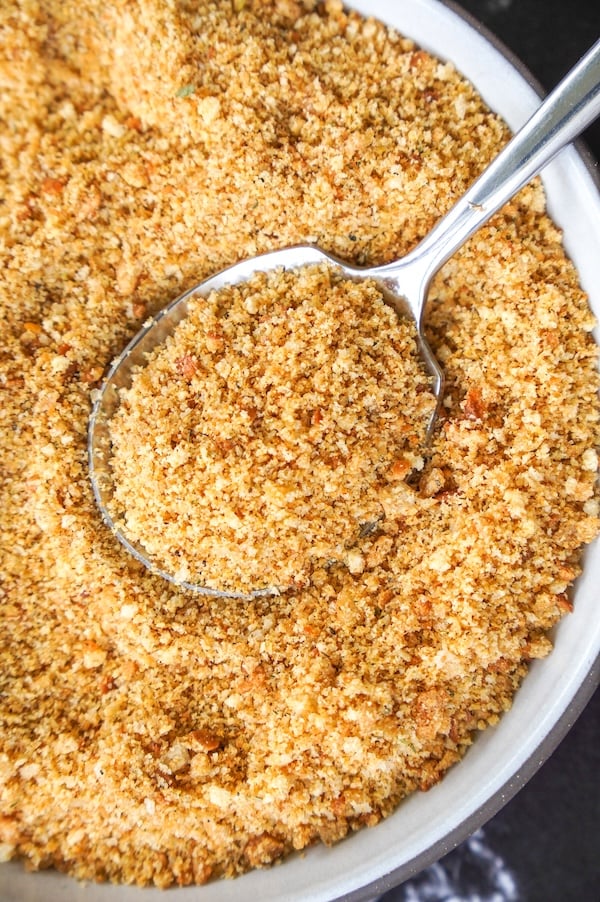
Repurposing stale ciabatta rolls: If your ciabatta rolls become rock hard over time and you don’t want to refresh them, turn them into breadcrumbs! I did this recently, and they were absolutely delicious.
Serving Suggestions from Recipe Testers
I asked the recipe testers how they’d serve these, and the answers were so fun to read. Here are their suggestions, in order of popularity, with the number of testers who mentioned each one in parentheses:
- Breakfast sandwiches (70) — the most popular suggestion, including bacon, egg, cheese, sausage, and the works.
- Chicken salad (42) — one of my favs, too!
- Just butter (41) — warm, split, buttered. Plenty of testers didn’t want anything else on them.
- Italian-style sandwiches (38) — including caprese, prosciutto, and salami.
- BLTs (25)
- Burgers (24) — used as hamburger buns, sometimes cut into smaller squares to size them right.
- Tuna salad (24)
- Turkey sandwiches (23)
- Deli subs and hoagies (22)
- Ham sandwiches (18)
- Pizza (14) — split in half and topped as mini pizzas.
- Avocado toast (13)
- Garlic bread (12)
- Egg salad (12)
- Paninis and pressed sandwiches (11) — one tester said they were perfect in her panini press.
- French dip (8)
- Meatball subs (7)
- Pulled pork (5)
- Bruschetta (4)
- Alongside soup or chili (4)
Here’s a look at a few of the testers’ sandwich photo submissions:

How’s that for some inspiration?!
“Never buy ciabatta rolls at Costco again!” —Recipe tester from Sacramento, California
Troubleshooting Tips
FAQs
No, you don’t have to do the overnight cold proof. There’s a same-day timeline in this post that produces excellent rolls.
No, cut the dough straight from the fridge without letting it warm up. This way, the dough is firmer, holds its shape, and is far less sticky. One tester who cold-proofed but let her dough warm for 45 minutes before shaping found it sticky and difficult to transfer.
Yes, and a number of testers did so successfully. Because AP flour absorbs less water than bread flour, either reduce the water by 10–15g or add roughly 25g of extra flour. You’ll get a slightly less chewy result, but a very good roll nonetheless.
Use a small cast iron skillet or any metal baking or roasting pan. Sixty-one percent of testers used cast iron, and about 30% used a metal pan — both worked well. Don’t use glass — pouring hot water into glass in a super hot oven risks shattering it.
Yes, you can add 1 tsp of diastatic malt powder to this recipe if you’d like. Recipe tester Jean S. swears by it, noting that it helps with fermentation, oven spring, and browning. Check your flour’s ingredient list first. If it already contains malted barley flour or added enzyme, you likely don’t need diastatic malt powder. I have not personally tested it in this recipe.
“I love the transformation from beginning to end… Shaggy to silky to pillowy to delicious!” —Recipe tester from Vincennes, Indiana

Sourdough Ciabatta Rolls
Equipment
- Bowl cover Use code THATSOURDOUGHGAL for 15% off
Ingredients
Feed Your Starter
- 12 g sourdough starter
- 60 g water
- 60 g bread flour
Main Dough
- 390 g water* may need to be adjusted; see Notes
- 10 g honey optional, but recommended; or sugar
- 120 g active sourdough starter prepared above
- 500 g bread flour
- 10 g sea salt
Misc.
- 30 g bench flour for shaping; all-purpose or bread flour
- 1 cup steaming hot water for steam
Before You Begin

Instructions
- Feed your starter: In the evening, in a medium glass jar, stir together 12 g sourdough starter and 60 g water. Mix in 60 g bread flour until smooth. Loosely cover and let it ferment overnight, 10–12 hours at 68–75°F (20–24°C). This recipe uses 120 g, so you'll have 12 g left to maintain your starter.
- Mix the dough: In the morning, in a large mixing bowl, combine 390 g water*, 10 g honey, and 120 g active sourdough starter. Add 500 g bread flour and mix until no dry flour remains, using a Danish dough whisk or a wet bowl scraper. Bulk fermentation starts as soon as the ingredients are mixed. Cover the bowl and let the dough rest for 45 minutes.

- Add the salt: Sprinkle 10 g sea salt over the dough. Incorporate by pinching it into the dough, then switching to slap and folds or a scooping motion until fully combined. Cover the bowl and let the dough rest for 30 minutes.
- Coil folds (2–3 rounds, 30 minutes apart): With wet hands (seriously — dunk them in water), slide your hands under the center of the dough, lift it up, and let the ends fold under themselves. Rotate the bowl 90° and repeat, wetting your hands often. Cover between rounds.
- Finish bulk fermentation: Bulk fermentation began when you first mixed the dough. Look for the dough to roughly double in volume and be covered in bubbles. It should also wobble like Jell-O. For me, bulk fermentation took a total of 4.5 hours at about 75°F (24°C), but timing can vary, so trust the visual cues over the clock.
- Overnight cold proof: After bulk fermentation is complete, put your dough in the fridge overnight. If you're baking the same day, skip this step and continue to Step 7.
- Turn out the dough: Line a half sheet pan with parchment paper. If you cold-proofed the dough, take it straight from the fridge without letting it warm up. Generously flour the top of the dough and your work surface. I typically have about 30 g bench flour on hand. Gently turn the dough out onto the counter, flouring all the sticky bits as you go. If the rough side of the dough is facing up, use your bench scraper to flip it — the smoothest side should be facing up.
- Divide the dough: Gently stretch and pat the dough into a rectangle, roughly 9×12 inches. If any spots stick to you or the counter, flour them! Use your bench scraper to divide the dough into 8 pieces, then place them on your prepared sheet pan.
- Second proof: Cover the sheet pan and place in a warm spot for about 2.5–3 hours, or until the rolls look noticeably puffier. If you skipped the cold proof, expect closer to 2 hours.

- Prepare and preheat the oven: Toward the end of the second proof, set one oven rack in the middle and another on the bottom. Place a small cast iron skillet on the bottom rack to use for steam. Preheat your oven to 475°F (250°C) conventional.
- Bake: Pour 1 cup steaming hot water into the cast iron skillet (be careful — steam will immediately rise), set your sheet pan on the middle rack, and bake for 10 minutes. Remove the steam source, reduce the oven temperature to 425°F (220°C), and bake for 25–30 minutes more, or until the tops are golden brown and the internal temperature reaches 205–210°F (96–99°C). Watch them closely at the end to ensure they don't burn!
- Cool: Let the rolls cool on the sheet pan for 5 minutes, then transfer them to a wire rack. Allow them to cool for at least 20–30 minutes before slicing — the interior is still setting as they cool.
- Serve and store: Serve warm or at room temperature. They're ideal sliced in half for sandwiches or toasted with butter. Store leftover rolls in an airtight container or bread bag at room temperature for up to 4 days. To freeze, place the rolls in a zip-top bag and freeze for up to 3 months.

Notes
“These ciabatta rolls are so good you will want to plan on keeping them on rotation!” —Recipe tester from Las Vegas, Nevada
Conclusion
I still can’t quite believe how easy these are for how good they look.

If the sticky dough intimidates you, I get it. But nearly all of the recipe testers said the same thing: flour the bench generously and handle the dough with confidence. Ciabatta is supposed to look a little rustic and uneven, which is part of the charm. So don’t stress it.
And if you’re one of the 340 bakers who tested these and told me what wasn’t working: thank you. This recipe is better because of you, and I hope you can taste the difference.
“They’re easy to make with impressive, bakery-style results!” —Recipe tester from Crosby, Texas
If you make these, I’d love to see them. Drop a comment below or tag me on Instagram @thatsourdoughgal.
Similar sourdough recipes to try:

I give you 5 stars even if I haven’t tried the recipe yet, because I just KNOW it’s perfect. But I would like to know, if I want to make larger breads instead of rolls, do I have to change the temperature or the baking time? Thank you!
When I make size adjustments like that, I keep the oven temp and times the same but just monitor toward the end of baking. If you make larger breads, assume they’ll take longer to bake. So just check the internal temperature at the end to make sure they’ve cooked through. If not, and they’re getting too dark on top, just tent with foil!
They came out perfect! Actually I needed less time in my Rofco b40 oven, so I burned the first 2 😅 But they were still delicious. The next I left for 10 minutes with steam and then turned off the oven. I just love them! Thank you again!!
Hello Rebekah. I absolutely love all your recipes that I have made! I have recommended you to many of my friends who are starting their sd journey.
I am curious, with this recipe, do you have to wait to add the salt? Why couldn’t you add the salt in with the initial mixing?
Thanks for all your hard work!
You don’t have to wait if you don’t want to! Delaying the salt speeds up fermentation slightly, but what I really love is that it forces us to work the dough a bit more than we would otherwise. That really helps with gluten development and gives us a better crumb on the final rolls.
I’m very keen to make this recipe, however I have a convention oven, what temperature should I bake the ciabatta?
Drop the listed oven temperatures by 25°F and make sure to have plenty of water for the steam – the reason I don’t list convection as an option is that it’s not ideal for open baking (the fan tends to dry things out).