Sourdough Ciabatta Rolls
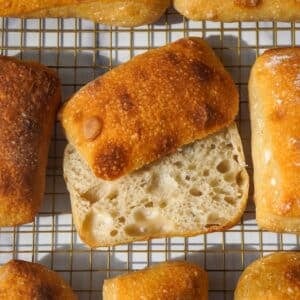
INGREDIENTS
Feed Your Starter
- 12 g sourdough starter
- 60 g water
- 60 g bread flour
Main Dough
- 390 g water* may need to be adjusted; see Notes
- 10 g honey optional, but recommended; or sugar
- 120 g active sourdough starter prepared above
- 500 g bread flour
- 10 g sea salt
Misc.
- 30 g bench flour for shaping; all-purpose or bread flour
- 1 cup steaming hot water for steam
Before You Begin

You can bulk ferment this dough in a large bowl or a 9×13-inch baking dish. The dish gives you a head start on shape, since the dough is already roughly rectangular when you turn it out – but either works.Note: This recipe was developed and is written in metric (grams). Volume measurements (cups & spoons) are automatically converted and untested — use at your own risk. For best results, use a kitchen scale.
Equipment
- Bowl cover Use code THATSOURDOUGHGAL for 15% off
Instructions
- Feed your starter: In the evening, in a medium glass jar, stir together 12 g sourdough starter and 60 g water. Mix in 60 g bread flour until smooth. Loosely cover and let it ferment overnight, 10–12 hours at 68–75°F (20–24°C). This recipe uses 120 g, so you'll have 12 g left to maintain your starter.
- Mix the dough: In the morning, in a large mixing bowl, combine 390 g water*, 10 g honey, and 120 g active sourdough starter. Add 500 g bread flour and mix until no dry flour remains, using a Danish dough whisk or a wet bowl scraper. Bulk fermentation starts as soon as the ingredients are mixed. Cover the bowl and let the dough rest for 45 minutes.
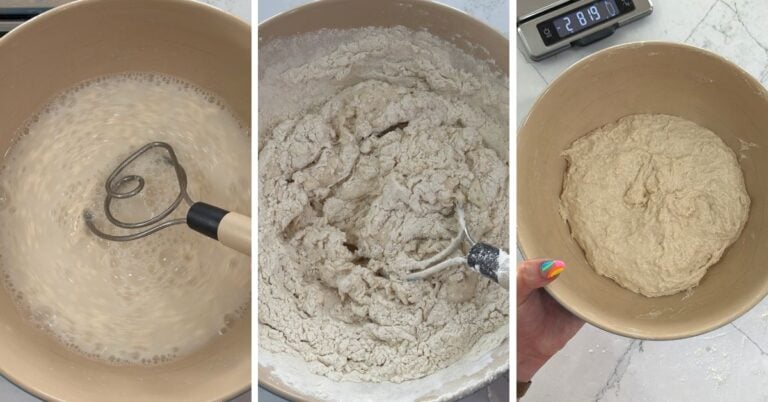
- Add the salt: Sprinkle 10 g sea salt over the dough. Incorporate by pinching it into the dough, then switching to slap and folds or a scooping motion until fully combined. Cover the bowl and let the dough rest for 30 minutes.
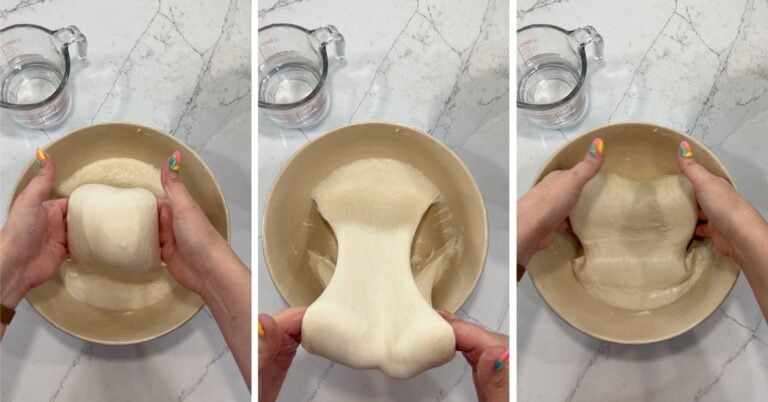
- Coil folds (2–3 rounds, 30 minutes apart): With wet hands (seriously — dunk them in water), slide your hands under the center of the dough, lift it up, and let the ends fold under themselves. Rotate the bowl 90° and repeat, wetting your hands often. Cover between rounds.
- Finish bulk fermentation: Bulk fermentation began when you first mixed the dough. Look for the dough to roughly double in volume and be covered in bubbles. It should also wobble like Jell-O. For me, bulk fermentation took a total of 4.5 hours at about 75°F (24°C), but timing can vary, so trust the visual cues over the clock.
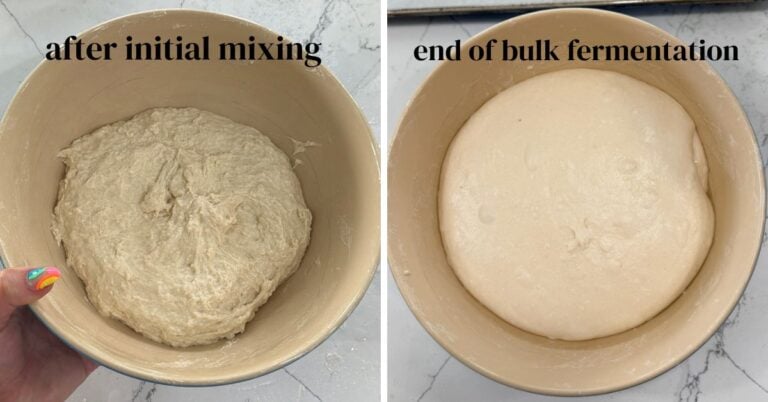
- Overnight cold proof: After bulk fermentation is complete, put your dough in the fridge overnight. If you're baking the same day, skip this step and continue to Step 7.
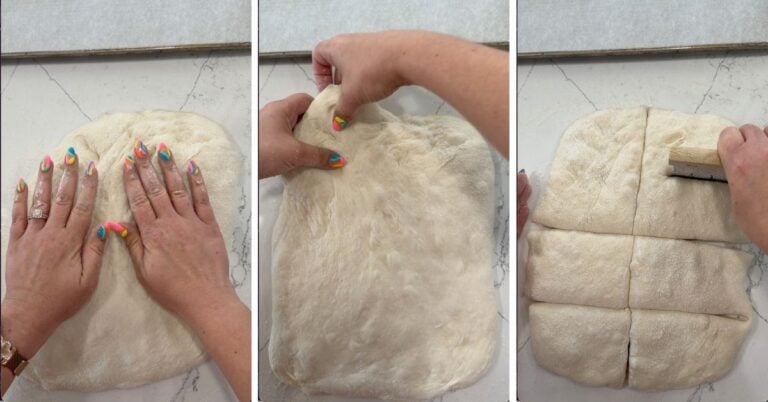
- Turn out the dough: Line a half sheet pan with parchment paper. If you cold-proofed the dough, take it straight from the fridge without letting it warm up. Generously flour the top of the dough and your work surface. I typically have about 30 g bench flour on hand. Gently turn the dough out onto the counter, flouring all the sticky bits as you go. If the rough side of the dough is facing up, use your bench scraper to flip it — the smoothest side should be facing up.
- Divide the dough: Gently stretch and pat the dough into a rectangle, roughly 9×12 inches. If any spots stick to you or the counter, flour them! Use your bench scraper to divide the dough into 8 pieces, then place them on your prepared sheet pan.
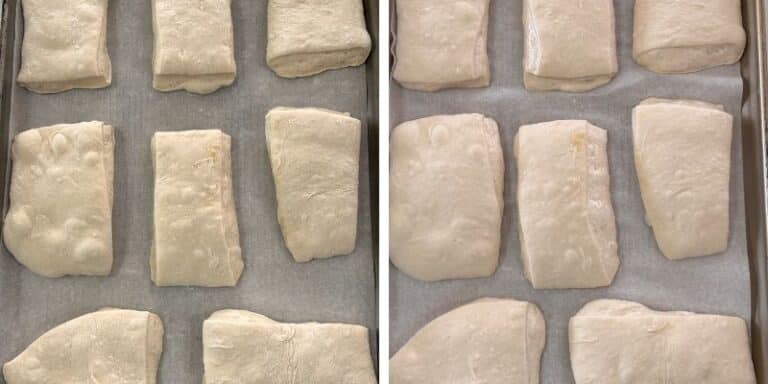
- Second proof: Cover the sheet pan and place in a warm spot for about 2.5–3 hours, or until the rolls look noticeably puffier. If you skipped the cold proof, expect closer to 2 hours.
- Prepare and preheat the oven: Toward the end of the second proof, set one oven rack in the middle and another on the bottom. Place a small cast iron skillet on the bottom rack to use for steam. Preheat your oven to 475°F (250°C) conventional.
- Bake: Pour 1 cup steaming hot water into the cast iron skillet (be careful — steam will immediately rise), set your sheet pan on the middle rack, and bake for 10 minutes. Remove the steam source, reduce the oven temperature to 425°F (220°C), and bake for 25–30 minutes more, or until the tops are golden brown and the internal temperature reaches 205–210°F (96–99°C). Watch them closely at the end to ensure they don't burn!
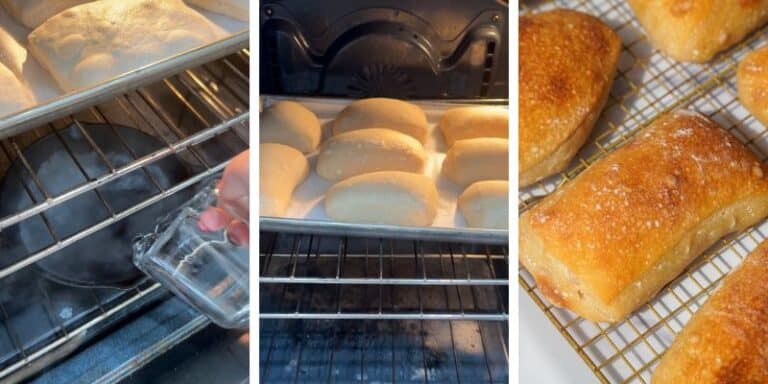
- Cool: Let the rolls cool on the sheet pan for 5 minutes, then transfer them to a wire rack. Allow them to cool for at least 20–30 minutes before slicing — the interior is still setting as they cool.
- Serve and store: Serve warm or at room temperature. They're ideal sliced in half for sandwiches or toasted with butter. Store leftover rolls in an airtight container or bread bag at room temperature for up to 4 days. To freeze, place the rolls in a zip-top bag and freeze for up to 3 months.
Notes
Dialing in your ideal hydration: Different flours absorb different amounts of water. For this recipe, I used Central Milling High Mountain Bread Flour (13.5% protein). If your bread flour has a lower protein content, you may need to reduce the water by 10–15g. Alternatively, you could add a tablespoon or so of additional flour. Use my photos and video tutorial and compare your dough's texture and consistency to mine. Adjust as needed!
Nutrition Facts
Sourdough Ciabatta Rolls
Serving Size
1 ciabatta roll
Amount per Serving
Calories
258
% Daily Value*
Fat
1
g
2
%
Saturated Fat
0.2
g
1
%
Polyunsaturated Fat
1
g
Monounsaturated Fat
0.1
g
Sodium
486
mg
21
%
Potassium
72
mg
2
%
Carbohydrates
52
g
17
%
Fiber
2
g
8
%
Sugar
0.2
g
0
%
Protein
9
g
18
%
Vitamin A
1
IU
0
%
Calcium
11
mg
1
%
Iron
1
mg
6
%
* Percent Daily Values are based on a 2000 calorie diet.
