Overnight Soft Sourdough Pretzel Buns

These soft sourdough pretzel buns are everything I love about a soft pretzel — that deep mahogany crust, classic pretzel-y flavor, and pretzel salt — in a soft, squishy bun.
The trick to the ultra-soft interior is a tangzhong — a cooked milk-and-flour mixture (it’s easy, I promise). Let me teach you how to make these!
Disclosure: Some of the links to products I recommend in this post are affiliate links — if you choose to purchase after clicking, I may earn a small commission, which helps fund this website, recipe development, and monthly giveaways. I sincerely appreciate your support.
Why You’ll Love These Sourdough Pretzel Buns

- Soft and squishy, but not too chewy: Thanks to the tangzhong, these buns are soft enough to bite through easily even when they’re loaded with fillings.
- All the pretzel flavor with no lye required: A concentrated baking soda bath gives you that deep mahogany crust and the pretzel taste we all know and love.
- Truly hands-off dough: Once it’s mixed, you’re done — no stretch and folds, no timers, nothing to keep in the back of your mind. Just cover it and go about your day (my favorite part!).
- Freezer-friendly: I sliced and froze mine, and they defrosted perfectly. More on that in the storage section.
How I Developed This Sourdough Pretzel Buns Recipe
I usually put my recipes through extensive testing with outside bakers before publishing — but I didn’t do that here, and there’s a good reason.
This recipe is a mashup of two recipes that have already been thoroughly tested: my hot dog bun dough (the tangzhong-based one Sam at Healing Slice and I perfected over six rounds) and my soft sourdough pretzel process (tested by 595 bakers).
My new baking assistant, Amanda, helped me develop this adaptation.
You might be thinking: Why not just shape the regular pretzel dough into buns and call it a day?
Well, we tried that, thinking that’d be the obvious winner. But after making hamburgers with them, the buns were too chewy for an enjoyable eating experience. We wanted the soft and squishy texture you expect from store-bought buns, and the chewy pretzel dough was not it.
So we swapped in a much softer dough but kept the soft pretzel process, and voilà! Super soft, squishy buns that still have the pretzel flavor and look.
Amanda helped draft the recipe, and then I baked it myself. Both of our bakes came out looking eerily alike — seriously, I had trouble discerning which photos were hers and which were mine!


Our nearly identical bakes gave me confidence that this recipe is forgiving and easy to nail. That’s the kind of recipe I love to share.
Baker’s Timeline
Here’s a suggested timeline to help you plan. The fermentation windows are flexible.
| When | What to do |
|---|---|
| Day 1, Morning | Mix the sweet levain. Ferment 8–12 hours at 70–75°F (21–24°C) until it peaks. |
| Day 1, Evening | Make the tangzhong and cool it below 100°F (38°C). Mix the dough. Bulk ferment overnight, 8–12 hours at 70–75°F (21–24°C), until doubled or tripled. |
| Day 2, Morning | Shape into 8 buns on parchment squares. Second proof for 2–5 hours at 70–75°F (21–24°C) until about 50% larger and puffy. |
| Day 2, Afternoon | Boil, top, and bake. Cool at least 30 minutes before digging in. |
Optional cold proof: After shaping, refrigerate the buns for 12–36 hours for a deeper sourdough flavor. You can do this before or after the second proof — just make sure they’re fully puffed before you boil them.
Equipment You’ll Need
- Kitchen scale — for accurate measurements
- Stand mixer with dough hook (or knead the dough by hand)
- Large mixing bowl (or just use your stand mixer bowl) — for bulk fermentation
- Individual parchment squares — one per bun, for lowering each bun into the boiling water

- Half sheet tray — for baking
- Pastry brush — for brushing on the butter
- Thermometer — for checking the tangzhong temperature and bun doneness
- 4-quart saucepan — for the baking soda bath
- A sheet tray cover, oiled plastic wrap, or an inverted sheet tray — to cover the buns during the second proof
- Large slotted spoon — for flipping and removing the buns during the boil
Ingredients for Soft Sourdough Pretzel Buns
- Sourdough starter: The first step explains how to make the sweet levain so it’s active and ready. Don’t use discard straight from the back of the fridge here — we need the rising power of a healthy starter to make that levain.
- Honey or sugar: Adds a touch of sweetness to the levain and dough, and helps the crust brown.
- Tangzhong (cooked flour and milk): The secret to squishy buns. Cooking flour with milk gelatinizes the starches so the dough can hold more moisture — that’s what makes these so soft, airy, and slower to stale. Do not skip it.
Read more: Tangzhong: The 3-Minute Secret to Softer Sourdough
- Milk: Enriches the dough for a tender, soft crumb and is also used in the tangzhong. Whole milk is ideal, but 2% or skim will work.
- All-purpose flour: Keeps the crumb soft and tender rather than chewy. (Bread or all-purpose flour both work in the levain.)
- Avocado oil or melted unsalted butter: The fat that adds richness and keeps the crumb soft and pillowy.
- Sea salt: I use Redmond Real Salt (15% off with code TSG15), but any salt works.
- Baking soda: The pretzel magic. A concentrated baking soda bath gives the buns their deep color, classic pretzel flavor, and characteristic exterior — no lye required.
- Water (for boiling): For the baking soda bath. Measure it, because the water-to-baking-soda ratio is what delivers that pretzel color and flavor.
- Unsalted butter (for brushing): Brushed on after boiling for flavor, a soft crust, and to help the pretzel salt stick.
- Pretzel salt: The classic finishing touch. Its coarse texture holds up on the surface better than fine or flaky salt.

Ingredient Substitutions
- Dairy-free option: Brush the buns with olive oil or vegan butter instead of regular butter, and use water or non-dairy milk in place of the milk in the tangzhong and dough.
- Pretzel salt: If you don’t have it, coarse or flaky salt can stand in — just know it dissolves into the crust faster than true pretzel salt. (See the note in the instructions about salting closer to serving.)
Storing and Reheating
- Room temperature: Store leftover buns in an airtight container or zip-top bag. They stay fresh for 3–4 days.
- Freezing: Slice the salted buns before freezing. They defrost perfectly.
A note on the pretzel salt: After a day or two, the pretzel salt starts to dissolve into the surface and leaves a slightly wavy, not-so-pretty texture. Still delish — just not ideal! So if you’re storing them at room temperature for more than a day (and not freezing them), I’d leave the salt off from the start; unsalted buns store better.
- Reheating: When you’re ready to serve, spritz with a little water (or brush with melted butter), sprinkle on the pretzel salt, and gently warm the buns in a 325°F (165°C) oven or toaster oven — just until the salt adheres and they’re freshened up.

Troubleshooting Tips

FAQs
Absolutely. You’ll just need to make a few adjustments to the dough. Swap in 130 g of active starter in place of all of the sweet levain; then adjust the main dough to keep everything in balance:
• Drop the flour to 495 g
• Drop the milk to 60 g
• Increase the honey to 70 g
Everything else stays the same. Just be aware that your buns may taste a touch tangier without the sweet levain.
Yes! The tangzhong is what makes these buns soft and squishy instead of chewy. It’s the whole reason this dough works as a bun rather than a chewy pretzel. Don’t skip it.
They’re perfect anywhere you’d normally use a hamburger bun — think burgers, pulled pork, ham and cheese, or any pile of fillings. The soft, tender crumb makes them easy to bite through, which is exactly why I developed them from a bun dough rather than my chewier pretzel dough.
Yes. Brush the buns with olive oil or vegan butter instead of regular butter, and use water or non-dairy milk in place of the milk in the tangzhong and dough.
No, it’s optional. A 12–36 hour cold proof in the fridge deepens the sourdough flavor and may be easier on digestion, but the buns are great without it. If you do cold proof, make sure the buns are fully puffed up before boiling.

Overnight Soft Sourdough Pretzel Buns
Equipment
- Stand mixer with dough hook
- Large mixing bowl or use your stand mixer bowl
- Half sheet pan cover or oiled plastic wrap or an inverted sheet tray
Ingredients
For the Sweet Levain
- 20 g sourdough starter
- 20 g honey or sugar
- 50 g bread flour or all-purpose flour
- 40 g water
For the Tangzhong
- 60 g all-purpose flour
- 280 g milk
For the Main Dough
- All of the sweet levain from above
- 75 g milk
- 50 g honey or sugar
- 75 g avocado oil or melted unsalted butter
- 500 g all-purpose flour
- 10 g salt
- all of the tangzhong
For Boiling
- 1420 g water
- 110 g baking soda
For Brushing
- 2 tbsp unsalted butter melted
- pretzel salt to taste
Instructions
Morning of Day 1: Prepare Sweet Levain
- Combine 20 g sourdough starter, 20 g honey, 50 g bread flour, and 40 g water in a jar. Let ferment 8–12 hours at 70–75°F (21–24°C) until it peaks.
Evening of Day 1: Make Tangzhong & Dough
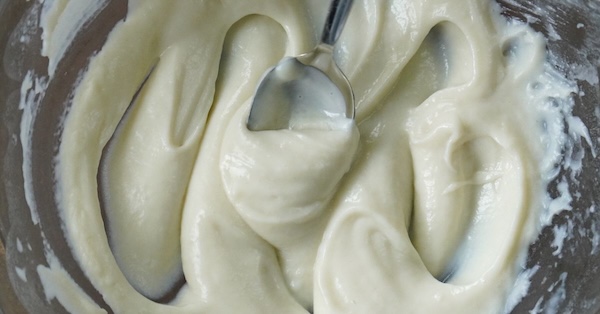
- Make the tangzhong: Mix 60 g all-purpose flour and 280 g milk in a microwave-safe bowl. Microwave in 30-second intervals, stirring between each, until it thickens and reaches 150°F (65°C). For me, it usually takes 3–5 rounds to finish. Cool to below 100°F (38°C) before adding it to the dough.

- Mix dough: Combine All of the sweet levain, 75 g milk, 50 g honey, 75 g avocado oil, 500 g all-purpose flour, 10 g salt, and all of the tangzhong. Mix 7–12 minutes in a stand mixer on low speed (or knead by hand).Optional but helpful: After a 20–30 minute rest, mix again for 5–10 minutes.
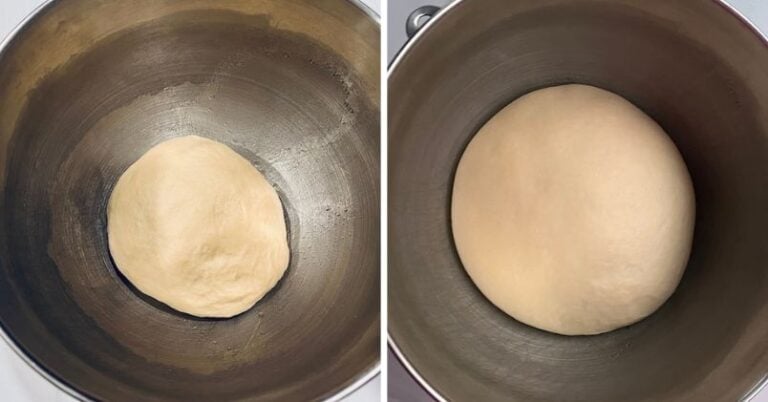
- Overnight fermentation: Place in a lightly greased bowl, cover, and let rise 8–12 hours at 70–75°F (21–24°C) until doubled or tripled in size.

Morning of Day 2: Shape & Bake
- Shape buns: Turn out the dough and use a bench scraper to divide it into 8 equal pieces (about 145–150 g each; you can weigh your dough and divide by 8 to get an exact amount). Roll each piece of dough into a ball, flatten slightly with the palm of your hand, and place on individual parchment squares. Photo note: I forgot to cut my parchment squares and did so after the second proof (which is fine!).

- Second proof: Cover with a sheet tray cover, oiled plastic wrap, or an inverted sheet tray. Let rise on the counter until the buns are about 50% larger and feel puffed up, about 2–5 hours at 70–75°F (21–24°C).
- Optional cold proof: For a deeper sourdough flavor and to potentially make the buns easier to digest for some people, refrigerate the shaped buns for 12–36 hours. You can do this before or after the second proof — just make sure the buns are fully puffed up before you boil them.
- Preheat and prep the boiling water: When the buns are nearly done proofing, preheat the oven to 375°F (190°C) conventional. In a 4-quart saucepan, combine 1420 g water and 110 g baking soda before turning on the heat (adding baking soda to already-boiling water will cause it to foam up and overflow). Bring to a boil over medium-high heat.
- Boil the buns: Working one at a time, lower each bun into the baking soda water using the parchment to help transfer it — peel away the parchment once the bun is in the water. Boil 30 seconds total, flipping once at 15 seconds. Remove with a slotted spoon and hold it over the pot for a few seconds to let the excess water drip off before placing on the parchment-lined sheet tray.
- Top the buns: Brush the boiled pretzel buns with 2 tbsp unsalted butter (melted). Score a cross on each bun. Finally, sprinkle with pretzel salt* to taste.*Making these ahead? Pretzel salt dissolves into the surface after a day or two, so if you're storing them at room temperature for more than a day (and not freezing), bake the buns without it. Before serving, spritz with water or brush with melted butter, add the salt, and warm at 325°F (165°C) until the salt adheres and the buns are heated through.
- Bake: Bake for about 20 minutes on the middle rack until deep golden brown and the internal temperature reaches 200–210°F (93–99°C). Transfer to a cooling rack and let cool for at least 30 minutes. Enjoy!


Notes

Conclusion
These soft, squishy, mahogany-crusted pretzel buns are easy to make and sturdy enough to hold whatever you want to pile inside them. Major bonus: they freeze so beautifully!
If you make these, I’d love to see them! Leave a comment below and tag me on Instagram @thatsourdoughgal so I can cheer you on. Happy baking!
Other fun recipes to try:




Thank you for this! A little while ago we were out somewhere and were served German style sausage on a pretzel bun (hot dog role style). My husband loved these buns and I was looking for a recipe for them. Do you think these hamburger style pretzel buns would be sturdy enough for like a Bratwurst sausage or some other type?
These are pretty soft and squishy – I think they would work, but they won’t hold up to lots of juices like a hoagie roll would.
How would this do shaping it to a sandwich loaf instead of buns?
I haven’t personally tried it but I think it would be a great texture!
Overall good recipe. Not sure why mine were almost dissolving when I did the baking soda boil.
I baked these rolls today. I made one batch with regular starter and one batch with the sweet starter. I did have to add about one to one and a half tablespoons to the dough while I was mixing it, it was a little bit dry for me. Both versions are delicious! I did think that the one with the sweet starter was a bit softer, and I felt the dough with the sweet starter was just a little bit stickier when I was forming the roles. This is definitely a keeper. I will definitely be making this again! Thanks for the recipe.
do you habe glutten free
I do not, I’m sorry!
So soft and squishy! I think your husband was right about this being your best. Thanks.
Ah yay! This makes me so happy to hear!
These came out great on my first try. I did cold proof them after shaping them and letting them puff up. I was worried that they would develop a sour tang after a 12 hour cold proof and I was surprised they didn’t. I love the flexibility with the proofing in case I need to hit pause. Which is a win-win for me! I will save this recipe for when I want hamburger buns. Hats off to you Rebecca and your new assistant!
Ah they look incredible! Enjoy!
Looked and tasted great! Also get that nostalgic aroma you would smell at the mall as a kid. 5 stars!!
I made these to have our burgers on for the holiday weekend. My dad loved the pretzel bits wait till he has his burger on these lol
Once again a perfect recipe!!
Thanks for sharing!! Gorgeous!
Although I haven’t tried these yet, the clear and concise instructions you provide are amazing and simple to follow. Thank you for that! We are heading camping today and will be eating them tonight!
Just out of the oven. Replaced milk with whey and milk powder because I have too much whey and I needed to use it up. And same with the beetroot powder too.
First time making these but it’s very similar to the wonderbread and burger bun recipe but with boiling added in. Made those successfully and this one too! Thank you so much!
WOW! These look incredible! Enjoy!
This might be my new favorite recipe of yours! I actually made these by mistake when I was planning to make your pretzel bites for my son’s birthday party. I clicked the wrong recipe in my party prep haste and discovered my happy mistake when I went to shape in the morning. Luckily we were serving pulled pork so I continued on with the rolls. When I opened the oven door and saw the perfectly browned beautiful buns, all my anger at myself for the wrong recipe quickly disappeared. These were gone so fast and absolutely everyone raved about them! I don’t think I’ll ever be able to eat store bought buns again. These will always be on hand in my freezer from now on. Thank you for yet another recipe I know I can trust!
So glad to hear that!!! Happy accident, haha! Thanks for sharing.