
Easy, Soft Sourdough Pretzel Bites (No Lye Needed)

When you want homemade pretzels but have zero interest in putting in much effort, make these soft sourdough pretzel bites.
Pretzel bites are way faster and easier to shape than twisted pretzels, and their bite-sized nature is perfect for parties (lookin’ at you, sports fans).
Because these are built on my soft sourdough pretzel recipe — the one that 595 recipe testers rated 4.72 out of 5 — you already know the dough is a winner.
“Think of the best soft pretzel you ever had, and multiply that by 100.” —Recipe tester from Cleveland, OH, who tested the original soft pretzel recipe this variation is based on
Disclosure: Some of the products I recommend in this post are affiliate links — if you choose to purchase after clicking, I may earn a small commission, which helps fund this website, recipe development, and monthly giveaways. I sincerely appreciate your support.
Why You’ll Love These Sourdough Pretzel Bites
- Way easier than twisted pretzels: No long ropes, no twisting, no sealing. To shape, you roll a short cylinder, cut it into bite-sized pieces, and you’re done. Super low-stress and, more importantly, fast.
- Squishy inside, dark and crisp outside (with no lye needed): That ballpark-pretzel contrast, but with a concentrated baking soda bath (no lye). Make sure to measure the water because the ratio of baking soda to water is what makes them taste like pretzels instead of bagels.
- Perfect party snack: I’m assuming you’re “the sourdough friend” since you’re here — and this bite-sized (and EASY) sourdough recipe is MADE for parties. Great for game day, holidays, birthday parties, or an after-school snack.
- Overnight and mostly hands-off: Mix the dough before bed, let it bulk ferment while you sleep, then cut it into bites in the morning. Most of your time here is waiting, not working.
- The malt powder secret: Non-diastatic malt powder is optional, but it helps keep these soft for up to 5 days, deepens the flavor, and boosts that gorgeous browning.
- Built on a tested recipe: These pretzel bites use the exact same dough as my soft sourdough pretzels, which 595 home bakers tested for me — that recipe earned an average rating of 4.72 out of 5. You can trust this recipe!
- Freezer-friendly: Make a big batch, freeze what you don’t eat, and reheat straight from the freezer for a quick snack later.
“These are better than any pretzel you could get at the mall!” —Recipe tester from Huntsville, AL, who tested the original soft pretzel recipe this variation is based on
The Recipe Testing Process
These pretzel bites didn’t need their own months-long testing saga (praise the Lord) because the hard part was already done.
These bites use the exact same dough as my soft sourdough pretzels, which 595 home bakers around the world put to the test.
The dough, the baking soda bath, the timing, the malt powder — all of it has already been tester-approved. The main thing that changes here is the shaping: instead of rolling and twisting, you cut.
So this post gives a bite-sized variation its own home, with the shaping spelled out step by step.
Meet the Recipe Testers
Since these bites use the same dough as my soft sourdough pretzels, they’re backed by the 595 home bakers who tested that recipe across 5 continents — North America, Europe, Africa, Asia, and Australia/Oceania.
Here’s how those bakers rated the original soft pretzel recipe:
- Average rating: 4.72 out of 5
- Would make again: 90.9%
- Would recommend to a friend (5 out of 5): 86%
They used more than 70 different flours, mixed the dough with a stand mixer or by hand, and either cold proofed it or skipped the cold proof — and, yes, plenty of them shaped their dough into bites and buns instead of classic twists. This dough has already been tested every which way, including as pretzel bites.
“First time making pretzels? No problem… slightly crisp on the outside, soft and fluffy on the inside. This recipe is easy and beginner friendly!” —Recipe tester from Vacaville, CA, who tested the original soft pretzel recipe this variation is based on
Baker’s Timeline
These times are flexible. The bulk fermentation is forgiving, and the cold proof is optional.
| When | What |
|---|---|
| Day 1, Morning | Feed your starter. Let it ferment for 10–12 hours at 68–75°F (20–24°C). |
| Day 1, Before Bed | Mix the dough. Let it bulk ferment overnight, 8–12 hours at 68–75°F (20–24°C). |
| Day 2, Morning | Divide, roll, and cut the dough into bites. Proof for 3–6 hours at 68–75°F (20–24°C) until they’re about 50% larger and feel puffed up. |
| Day 2, Afternoon or Evening | Boil and bake. |
Optional cold proof: After shaping, refrigerate the bites for 12–36 hours before boiling. You can do this before or after the second proof. This deepens the flavor and may make them easier on the gut. Just make sure they’re fully proofed (puffed up) before you boil them.

Equipment You’ll Need
- Kitchen scale: Essential for accurate measurements!
- Stand mixer with the dough hook: Because this dough is stiff, a stand mixer makes kneading much easier. I love the Zacme stand mixer (read my full review). You can also knead by hand — instructions are in the recipe card — but plan for 10–12 minutes of solid work.
- Bench scraper or sharp knife: For cutting the dough cylinders into bites.
- Large mixing bowl: For bulk fermentation. Your stand mixer bowl works, too. I’m also a fan of the 10.5″ Doe a Deer bowl covers — use code THATSOURDOUGHGAL for 15% off.
- Half sheet tray lined with parchment paper: For proofing and baking. You don’t need individual parchment squares here — since the bites are small, you’ll lower them into the boiling water with a slotted spoon instead.
- Half sheet tray lid: This is totally optional, but I love these sheet tray lids. They eliminate the need for plastic wrap and don’t touch the top of the dough during proofing.
- 4-quart saucepan: You want a pot that’s tall and narrow rather than wide, so the baking soda bath is deep enough to submerge the bites. In a larger pot, you may need more water — and proportionally more baking soda — to keep the bath concentrated enough for that signature deep color and flavor. A 4-quart saucepan hits the sweet spot, so reach for it instead of the biggest pot in your cabinet.
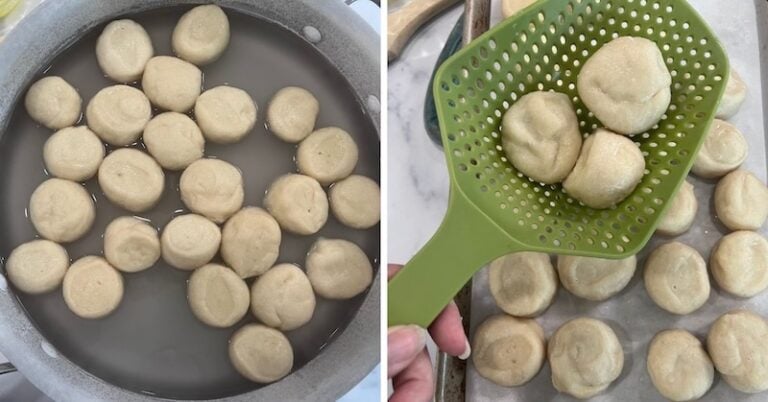
- Large slotted spoon: For lowering the bites into and removing them from the boiling water, allowing excess water to drip off before they go back on the sheet tray.
- Pastry brush: For brushing the boiled bites with melted butter before baking.
Ingredients for Soft Sourdough Pretzel Bites
- Sourdough starter: The first step explains how to feed your starter so it’s active and ready. Don’t use discard straight from the back of the fridge here — we need the rising power of a healthy starter.
- Water: Room temperature tap water works great. If you’re in a city and notice your starter is sluggish, chlorinated water could be the culprit — filtered water or spring water is an easy fix.
- Sugar: Just a touch — adds a hint of sweetness and helps with browning.
- Unsalted butter: Softened or melted and cooled. This goes into the dough itself, plus more gets brushed on after boiling, before baking. Buttery dough is the best smell on the planet, for the record.
- High-protein bread flour: The higher protein content gives these their signature chew. I tested the dough with Central Milling High Mountain (13.5% protein) and King Arthur Unbleached Bread Flour (12.7% protein). Both work great. See Substitutions if you’re using a lower-protein flour.
- Non-diastatic malt powder: Optional, but recommended. It helps keep these squishy for up to 5 days and boosts flavor and browning. See Ingredient Substitutions for using diastatic malt powder instead.
- Sea salt: I use Redmond Real Salt (15% off with code TSG15), but any salt works.
- Baking soda: This is what gives the bites their characteristic flavor, color, and chewy exterior. Add the baking soda to the water before heating — adding it to already-boiling water causes it to foam up and overflow. (Ask me how I know.)
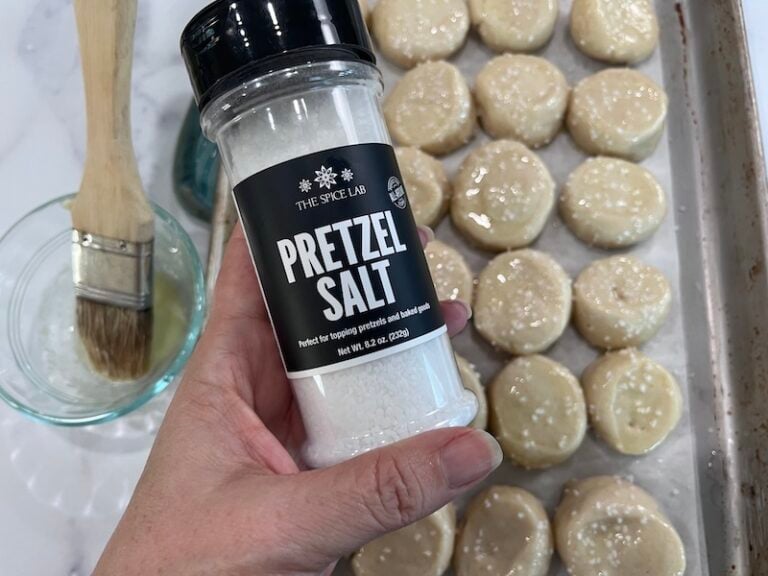
- Pretzel salt: Optional, but the coarser texture holds up on the surface better than table salt or flaky sea salt, especially if the bites will sit for more than a day.
Ingredient Substitutions
- Bread flour alternatives: If you’re using a lower-protein flour like Kirkland all-purpose (around 11.5% protein), add 1 tablespoon (about 8–10g) vital wheat gluten to help it perform more like bread flour, or reduce the water by about 10–15g. Testers used a huge range of flours — King Arthur (the most popular by far), Kirkland all-purpose, Bob’s Red Mill, Ballerina Farm, Lehi Mills, and more — with great results across the board.
- Diastatic malt powder: If you only have diastatic malt powder, toast it at 325°F (160°C) for 5 minutes to deactivate the enzymes before using. Multiple testers did this successfully in the original soft pretzel recipe and my bagel recipe. If you don’t toast it, the fermentation will simply go faster, which isn’t ideal for an overnight fermentation. In that case, flip the timeline so the dough ferments during the day and you can keep an eye on it.
- No malt powder at all: Totally fine — just know that your bites will go stale a little faster and won’t have quite the same depth of flavor or browning. 28% of testers skipped it entirely and were happy.
- Salted butter: You can use it — just reduce the salt in the dough by 2–3 grams.
- Pretzel salt: Flaky sea salt or coarse sea salt works in a pinch, but over time it’ll dissolve into the surface instead of sitting on top like true pretzel salt.
Serving Suggestions
Bites basically demand a dipping sauce, and this is where they shine.
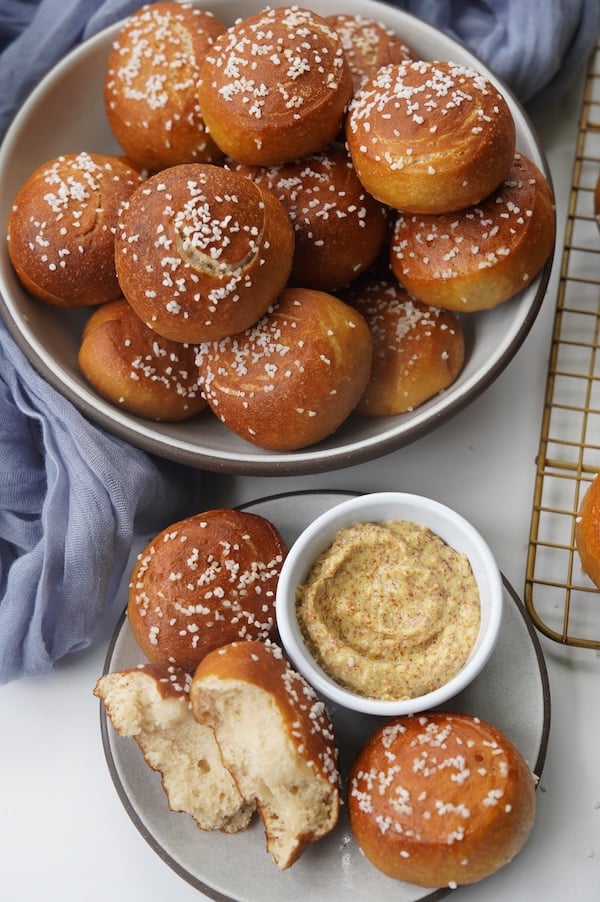
I love soft pretzels with Herlocher’s dipping mustard — my husband’s family is from Pennsylvania and introduced me to it, and I’ve been a huge fan ever since.
When I asked pretzel testers what they dipped theirs in, mustard dominated so heavily that it was almost funny — standard yellow, honey mustard, and stone-ground mustard were all popular. Beer cheese and nacho cheese were the runners-up.
“Make a beer cheese sauce and make them now.” —Recipe tester from New York who tested the original soft pretzel recipe this variation is based on
A cinnamon-sugar version is a fun sweet spin, too — brush the baked bites with butter and toss them in cinnamon sugar instead of pretzel salt.
Storing and Reheating
- Same day: These are best eaten warm, within the first hour of baking. Truly.
- Room temperature: Store in an airtight container for up to 5 days. The non-diastatic malt powder helps keep them soft longer — a noticeable difference if you’re making them ahead.
- Heads up on the salt: Pretzel salt starts to dissolve into the dough after a day or two. If these are for later, hold off on salting before baking; add it fresh when you reheat them. Spritz the bites with a little water or brush with butter so the salt sticks, then toast for a couple of minutes.
- Freezing: Let the bites cool completely, then freeze in a zip-top bag for up to 3 months.
- Reheat from frozen in a 350°F (175°C) oven for 5–8 minutes.
Troubleshooting Tips
FAQs
Yes — sourdough pretzel bites use the exact same dough as my soft sourdough pretzels. The main difference is the shaping: instead of rolling and twisting each pretzel, you roll short cylinders and cut them into pieces.
No, you don’t need malt powder to make sourdough pretzel bites — 28% of testers skipped it and were happy. That said, non-diastatic malt powder helps keep them soft for up to 5 days and improves flavor and browning, so it’s recommended if you can get your hands on it.
Cut sourdough pretzel bites by dividing the dough into 6 cylinders, about 150g each, then cutting each cylinder into 4 pieces, for 24 bites total. Keeping the pieces even helps them proof and bake at the same rate.
Yes, you can make sourdough pretzel bites ahead of time. Cold proof the shaped bites in the fridge for 12–36 hours before boiling for deeper flavor, either before or after the second proof — just make sure they’re fully puffed up before boiling. Freeze the baked bites for up to 3 months and reheat in a 350°F (175°C) oven for 5–8 minutes.
Sourdough pretzel bites are delicious when dipped in mustard (yellow, honey mustard, or stone-ground), beer cheese, nacho cheese, or a warm cheese sauce. For a sweet version, brush the baked bites with butter and toss in cinnamon sugar.

Soft Sourdough Pretzel Bites
Equipment
- Stand mixer with the dough hook (or you can knead by hand)
Ingredients
Feed Your Starter
- 10 g sourdough starter healthy; ideally, fed within the last 24 hours
- 50 g water
- 50 g bread flour
Pretzel Dough
- 245 g water
- 95 g active sourdough starter that you made, from above
- 10 g sugar
- 25 g unsalted butter — softened or melted and cooled
- 510 g high-protein bread flour see Recipe Notes
- 15 g non-diastatic malt powder optional
- 11 g sea salt
For Boiling
- 1420 g water
- 110 g baking soda
After Boiling, Before Baking
- 4 tbsp unsalted butter melted
- 1 tbsp pretzel salt optional
Before You Begin

Instructions
- Feed your starter: In the morning, in a medium glass jar, stir together 10 g sourdough starter and 50 g water. Mix in 50 g bread flour until smooth. Loosely cover and let it ferment all day, 10–12 hours at 68–75°F (20–24°C).
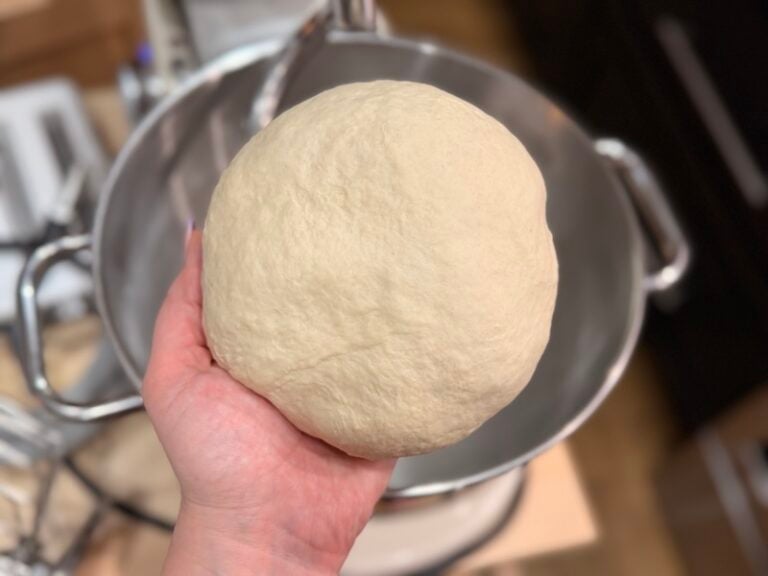
- Mix the dough (before bed): In the bowl of a stand mixer fitted with the dough hook, combine 245 g water, 95 g active sourdough starter (that you made earlier), 10 g sugar, and 25 g unsalted butter (softened or melted and cooled). Add 510 g high-protein bread flour, 15 g non-diastatic malt powder, and 11 g sea salt. Mix on low speed (usually Speed 1) until no dry flour remains, about 2 minutes. Increase the speed slightly (usually Speed 2) and knead for 6–8 minutes, or until smooth. The texture of this dough is just like bagel dough, which is firm and smooth yet pliable — not sticky or tacky.To mix by hand, combine all of the pretzel dough ingredients in a large bowl. Once you have a rough dough ball, turn it out onto a clean, unfloured counter and knead for 10–12 minutes, or until smooth.

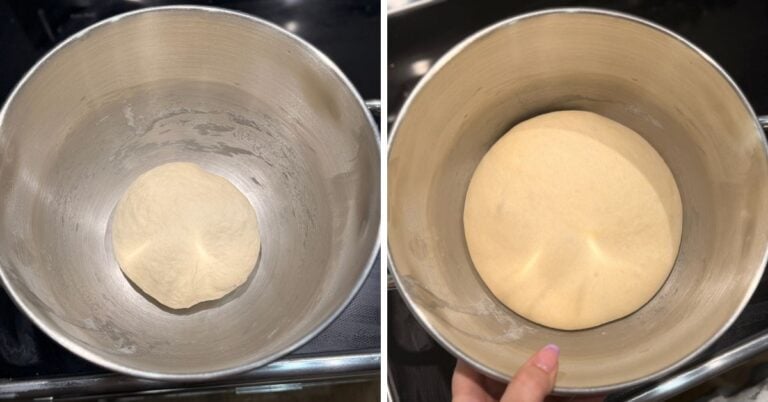
- Bulk ferment: Transfer the dough to a large mixing bowl and cover. Let it ferment on the counter overnight, 8–12 hours at 68–75°F (20–24°C). In the morning, the dough should be roughly doubled to tripled in size (there is flexibility here).

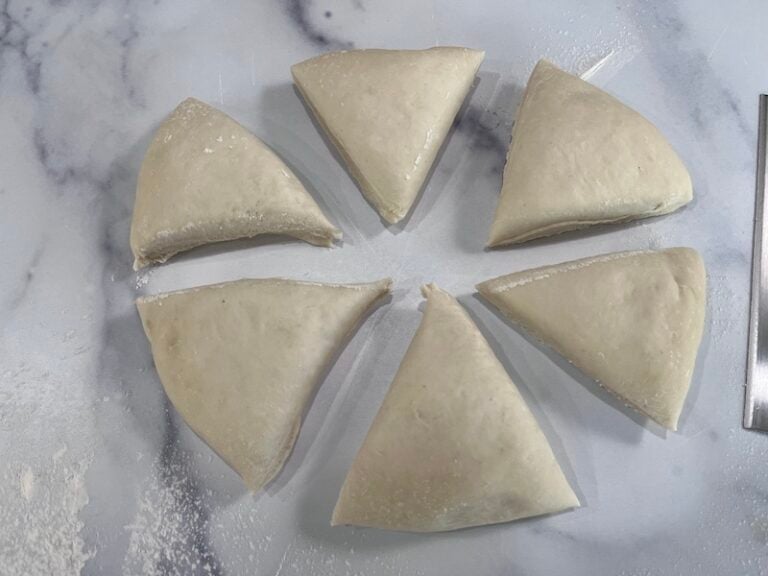
- Divide and shape: Turn dough out onto a clean, unfloured surface. Divide into 6 equal pieces, about 150 g each.
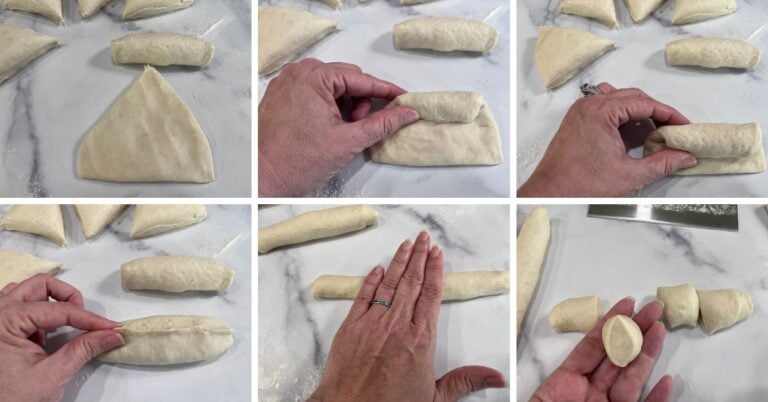
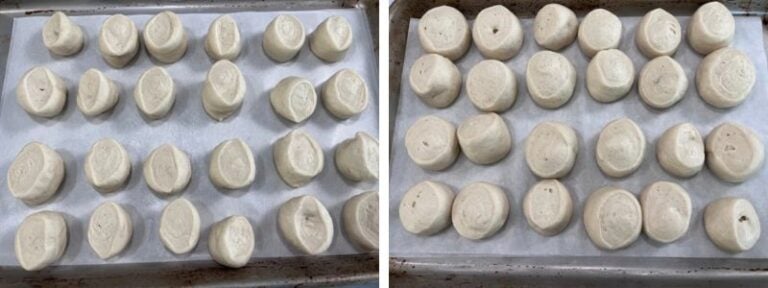
- Working one piece at a time, roll each piece into a cylinder about 6 inches (15 cm) long and pinch the seams closed on each end. Cut each cylinder into 4 equal pieces. Flatten each piece slightly and place cut-side up on the parchment-lined sheet tray. Repeat with remaining pieces.
- Second proof: Cover loosely and let rise on the counter until the bites are about 50% larger and feel puffed up, about 3–6 hours.

- Optional cold proof: For a deeper sourdough flavor and potentially better digestion, refrigerate the shaped bites for 12–36 hours. You can do this before or after the second proof — just make sure the bites are fully puffed up before you boil them.
- Preheat and prep the boiling water: When ready to bake, position one oven rack in the center and one at the very top. Preheat oven to 450°F (230°C) convection or 475°F (245°C) conventional. In a 4-quart saucepan, combine 1420 g water (1420 g) and 110 g baking soda (110 g) before turning on the heat (adding baking soda to already-boiling water will cause it to foam up and overflow). Bring to a boil over medium-high heat.
- Boil the pretzel bites: Working in small batches, lower the bites into the baking soda water using a slotted spoon. Boil 30 seconds total, flipping once at 15 seconds. Remove with a slotted spoon and hold over the pot for a few seconds to let excess water drip off before returning to the parchment-lined sheet tray.
- Top the pretzel bites: Brush all of the boiled bites with 4 tbsp unsalted butter (melted). Sprinkle with 1 tbsp pretzel salt over the tops.
- Bake: Place the sheet tray on the center rack and bake 10 minutes. Move the pan to the top rack and bake an additional 2–3 minutes, until the bites are a deep mahogany brown — watch closely, as they can burn quickly. Total bake time: 12–13 minutes.

- Serve warm, ideally within the first hour of baking. Pairs well with mustard or a warm cheese dipping sauce.Pretzel bites are best the day they are baked. Store leftovers in an airtight container at room temperature for up to 5 days. To freeze, cool completely and freeze in a zip-top bag for up to 3 months. Reheat from frozen in a 350°F (175°C) oven for 5–8 minutes.

Notes
- Bread flour: Bread flour works best for pretzel dough — its higher protein content gives them a nice chewiness. I’ve tested this recipe with Central Milling High Mountain bread flour (13.5% protein). Another great option is King Arthur unbleached bread flour (12.7% protein). If you use a lower-protein flour, such as Kirkland all-purpose flour from Costco (11.5% protein), add 1 tbsp of vital wheat gluten to help it perform like a higher-protein flour, or decrease the water in the dough by about 10–15 g.
- Non-diastatic malt powder: Optional but highly recommended — it keeps the pretzel bites soft for days and enhances flavor and browning. If you only have diastatic malt powder (or non-diastatic is out of stock), toast it at 325°F (160°C) for 5 minutes first to deactivate the enzymes. Those enzymes would speed up the fermentation, which is not ideal for an overnight fermentation recipe.
- If making these ahead, wait to add the pretzel salt until reheating. Pretzel salt starts to dissolve into the dough after a day or two.
Conclusion
If you loved my soft sourdough pretzels but weren’t sure about the twisting, these bites are your easy in. Same dough, same deep flavor, none of the shaping stress — just roll, cut, boil, and bake.
If you make them, I’d love to see them — drop a photo in the comments or tag me on Instagram @thatsourdoughgal!
Other staple recipes to try:

So easy and absolutely perfect!! If you love soft pretzels 🥨 then you’ll love this recipe. Rebekah comes up with the best recipes and easy to follow along instructions that actually give 10/10 results. Get the pretzel it’s worth it and measure the water & baking soda—it’s essential for that “pretzel” flavor!
Thank you so much Tamara!! Those look so good!
Can you make the dough in a bread maker?
Thanks
Yeah I’m sure you can!
Soooo good! I made a double batch for twisted pretzels and pretzel bites!
Gorgeous!!
I love the ease of not having to make pretzel shapes. Next time I will probably make the smaller, more “bite size”. This is a great recipe to start with – the dough is easy to work with and the recipe is clear and the results are amazing!!
Thank you so much for taking the time to share!
Next time I would make them a bit smaller. That said, they were yummy!
Also, I believe mine were paler because I left out the malt powder.
These are amazing! I may even switch pretzel rod obsession to pretzel bite obsession!
This recipe is really good and easy to make. I really appreciate your instructions are spot on (as always)!
The only minor change I made is to make them more bite sized, I cut the rolls into 6 pieces rather than 4 in the recipe.
As with many of your recipes, this one is a keeper!
Love it thanks for sharing!!
I love this recipe. Instead of rolling 6 cylinders, I calculated the weight of 24 bites and cut and shaped each bite. Saved me a step and some time.
Perfect! Glad they turned out great for you!
These are fantastic! Perfectly brown, soft and salty! So much faster then twisting!
These look gorgeous! Thanks for sharing!
Love this recipe and truly enjoyed making them. My husband sailed they were perfect, after he scraped off some of the salt off the top because I may have been a bit heavy handed on the shake.
My only issue has been the storage. I put them in an airtight container after letting them cool down for several hours. Today (the next day) the salt has started to dissolve into the bites (even though I got the exact salt seen in the recipe picture. Also, they already seem stale-ish. What could have helped?
Thanks for all you do 😊
Hey! Yes, that is explained in the post and at the end of the recipe card in the Notes area, but I totally understand that not everyone reads it!
Heads up on the salt: Pretzel salt starts to dissolve into the dough after a day or two. If these are for later, hold off on salting before baking; add it fresh when you reheat them. Spritz the bites with a little water or brush with butter so the salt sticks, then toast for a couple of minutes.
Super easy to make!! They are absolutely delicious. I follow you and use so many of your recipes. Thank you for everything you do to make them easy to follow and delicious!!
Yay thanks Tammy!!