
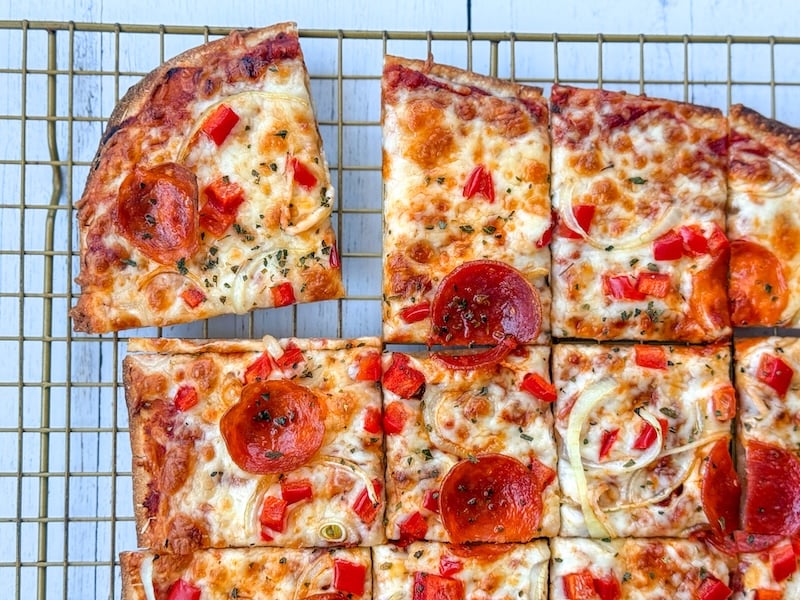
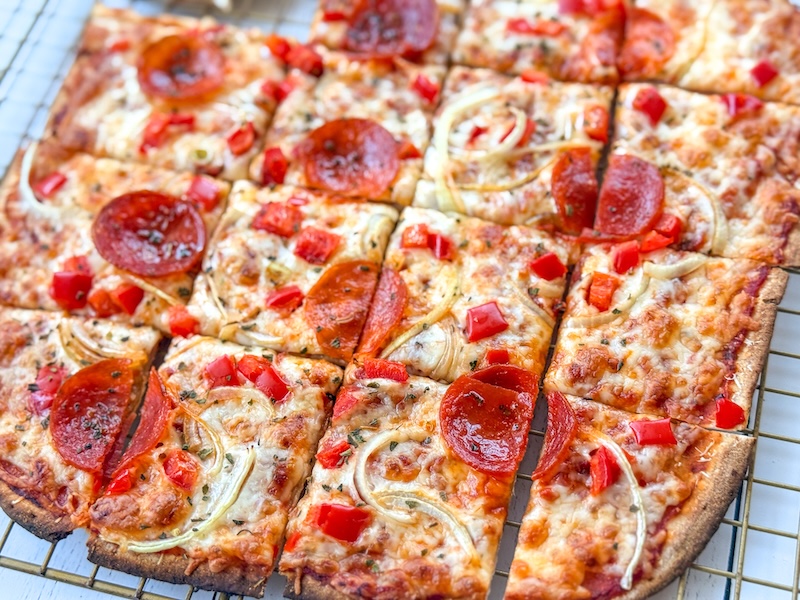
Thin-Crust Sourdough Pizza Recipe (3 Timeline Options)
If we’re ordering pizza, I’m getting thin crust. It’s always been my favorite style, especially growing up in the Midwest with Monical’s pizza – NOTHING beats Monical’s.
A sourdough version would be my dream, but there aren’t that many fully fermented thin-crust sourdough pizza recipes online. In fact, I couldn’t find any.
Most recipes don’t ferment the pizza dough at all, and others pour plain sourdough discard into a piping-hot cast-iron skillet (that’s the crust). Which is fine, but it just wasn’t the true thin-crust pizza I’m after.
I’m SO happy to share that after a ridiculously long time of recipe testing and tweaking, we’ve got a winner!!
“It really is a hands off recipe. Mix and let it do its thing and then plop in the fridge overnight and bake the next day. This recipe is a keeper!” –Recipe tester from Lansing, Michigan
Once again, a massive thank you to nearly 400 sourdough bakers who tested my recipe and gave me feedback. Their discoveries are all over this post – let’s get into it!
“This is now my pizza crust recipe for life.” –Recipe tester from Downingtown, Pennsylvania
Disclaimer: Some of the products I recommend in this post are affiliate links – if you choose to purchase after clicking one of my links, I may earn a small commission, which helps fund this website, recipe development, and monthly giveaways. I sincerely appreciate your support.
Why We Love This Thin-Crust Sourdough Pizza Recipe
- Three flexible timeline options: Same-day, daytime fermentation (my favorite!), or overnight – pick what works for your schedule.
- Super forgiving dough: The fermentation timing is super flexible, and if life gets in the way, this dough can handle several days in the fridge. This isn’t a sourdough recipe you have to execute perfectly to get a fantastic result.
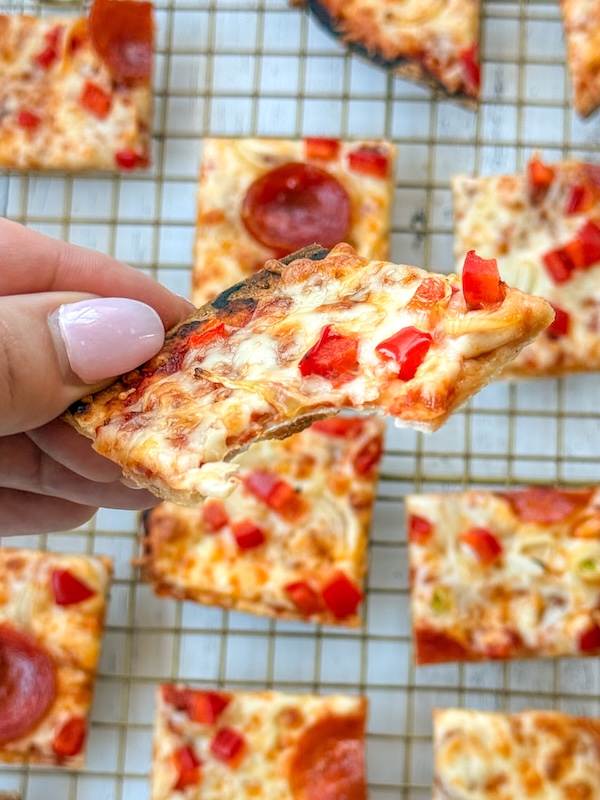
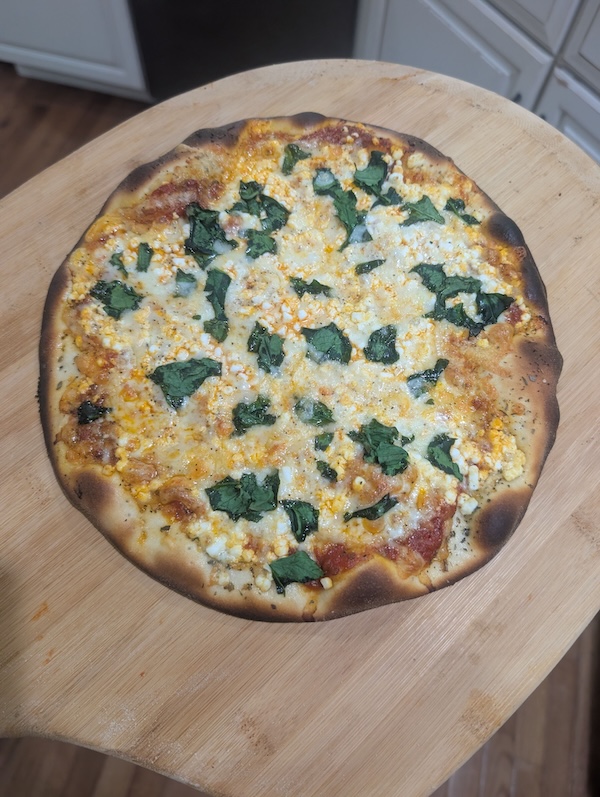
- Cracker-thin and crispy: Over 80% of testers got ‘good’ to ‘perfect’ crispy results. The equipment and method you use impact the crispiness of the final crust, and all of those tips are included in this post!
“This pizza was like the kind you get at a high end tavern downtown or a pub. Super thin and crispy!! Absolute perfection and as always the instructions are so thorough.” –Recipe tester from San Antonio, Texas
“My husband who is a pizza connoisseur, absolutely LOVED this crust!!!!” –Recipe tester from Hayden, Idaho
- Not overly sour: Multiple testers said it “didn’t taste sour at all” – perfect for picky eaters and kids.
- Easy to work with: The most common feedback was that this dough “rolled out like a dream.”
“The recipe is easy to follow, uses ingredients you already probably have in the pantry and comes out delicious. You can add any toppings of your choice without compromising flavour and crispiness. Well done on another great recipe!” –Recipe tester from Cape Town, South Africa
- Makes 3 twelve-inch pizzas: Great for families or meal prep (and you can freeze extras!).
Easy to follow instructions, great outcome, love that it makes 3 pizzas. Omg, you have to make this recipe, it’s so good!” –Recipe tester from Copiague, NY
- Works with all kinds of equipment: Pizza stone, baking steel (my preference), sheet pans, even grills – testers had success with all of them.
- Recipe tested by real sourdough bakers: Nearly 400 home bakers across 6 continents tested this recipe. They used different temps, different flours, different equipment. Result? A 4.58/5 star rating with over 90% four and five-star reviews.
“Best thin crust pizza ever and easy to boot. Can’t beat that. I truly loved this recipe. Thanks for all your hard work.” –Recipe tester from Forsyth, GA
The Recipe Testing Journey
I won’t lie — this recipe took some work to nail down. I tested dozens of versions over several months, messing with hydration, fermentation times, and baking methods.
The biggest challenge? Getting that perfect cracker-thin texture with no gummy center.
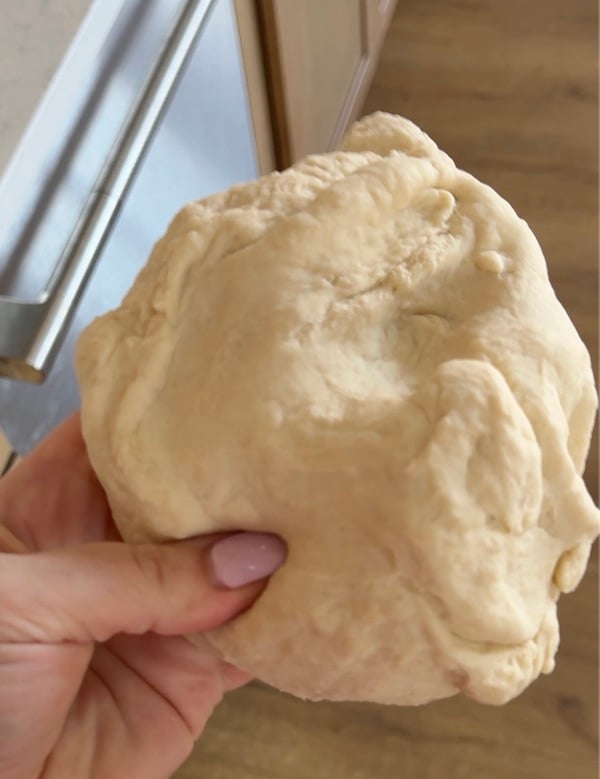
What finally worked was creating a stiff dough (like bagel dough) that could handle a long, cold rest in the fridge after rolling. This dries the crust’s exterior — and that’s the key to achieving a super crispy crust.
“When I met my now husband, he was a thin and crispy pizza guy and I was a fat and fluffy pizza gal. We have been eating classic crust since (in between). I am now a convert! He says this is the best homemade pizza crust he’s ever eaten.” –Recipe tester from Gold Coast, Australia
I also found that this dough is WAY more forgiving than bread dough when it comes to timing. Because it’s stiff, there’s a huge window where it works great — anywhere from 4 to 15+ hours depending on your kitchen temp!
Once I had a recipe I felt good about, I sent it to the recipe testers. Their feedback helped me tweak the final version. They also found some things I never would’ve thought to test myself.
Meet the Recipe Testers
This recipe was tested by nearly 400 home bakers from around the world — and the results? A 4.58 out of 5-star rating! (Yes, I’m happy dancing.)
From Florida (that’s where I live!) all the way to Australia, South Africa, Canada, England, and even Kuwait, bakers from all over the world gave this recipe rave reviews.
“My kids said it was the best pizza I have ever made!” –Recipe tester from Sweet, ID
They tested in cold kitchens and hot kitchens. Some had pizza stones, others used sheet pans. Some mixed by hand, others used a stand mixer. They tried 00 flour, bread flour, and all-purpose flour – it all worked! I have tons of tips on all of this throughout the recipe.
The main takeaway? This recipe gives you crispy, thin-crust pizza with sourdough flavor that’s not too sour.
Multiple testers said this is now their go-to pizza recipe, with one husband saying it’s “the best homemade pizza crust he’s ever eaten.” If hubby is on board, we know it’s a winner!!

What Recipe Testers Discovered
The testers found some cool things while testing this pizza:
Semolina instead of cornmeal: Nearly every tester who used semolina flour instead of cornmeal said it “worked perfectly” — less gritty, better flavor, same anti-stick properties. This feedback was so consistent that I now recommend semolina first (with cornmeal as backup). I also prefer it!
Hand-stretching the dough: Several testers hand-stretched the dough instead of using a rolling pin and achieved better results — a thinner, crispier crust with no gummy interior. Plus, you can make traditional raised pizza edges if you want (nice if you have kids who only eat the crust!). I personally found it takes about twice as long as a rolling pin, so I rarely opt for it – but it’s a fun option to try!
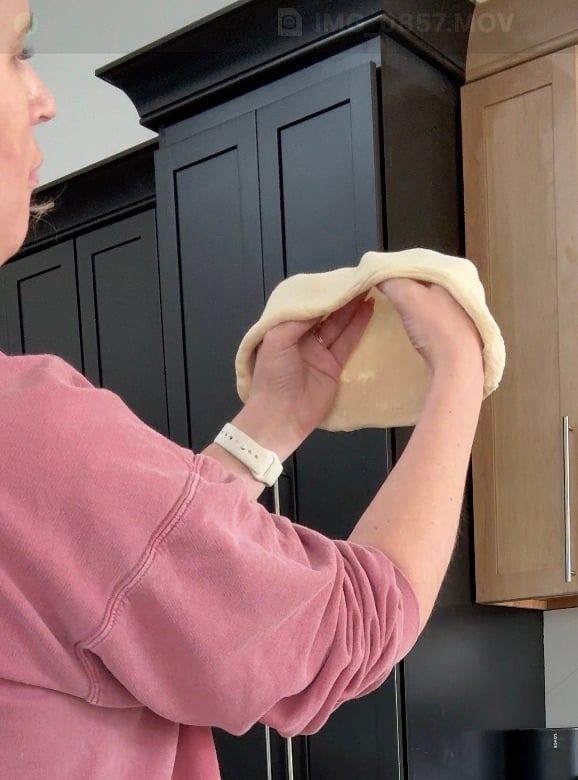
“I much preferred this method and technique for forming the dough crust. This one turned out much better than the rolled out dough and had an even thinner and crisper crust base. No gummy line at all!” –Brittany, Recipe tester
Grilled pizza: Multiple families tried grilling their pizzas and said it was even better than oven-baked. The high heat and char from the grill added great flavor, and one tester said they’re switching to this method permanently.
SUPER forgiving recipe: One tester’s dough sat in the fridge for 4 days (Thursday to Sunday) and still made “delicious” pizza. (To be fair, I don’t recommend more than one day, but still!) This recipe is seriously resilient.
Try out the “flip” technique: Several bakers found that flipping the crust after par-baking and putting toppings on the already-cooked side stops soggy centers completely. Just another little hack worth trying.
3 Flexible Timeline Options: Same-Day, Daytime & Overnight
One of the best things about this recipe is how adaptable it is. I tested multiple timelines, and honestly, all of them turned out great.
Because this dough is stiff, there’s way more wiggle room than you’d get with an artisan bread dough. Depending on temperature, you can ferment anywhere from 4 to 15+ hours – overnight or all day while you’re at work – without much risk of overproofing.
My Favorite Timeline: Daytime Fermentation
This timeline is my favorite – it produces the best-tasting pizza with killer flavor. Plus, the timing works great if you work 9-5 — mix the dough before you leave for work and roll it when you get home.
And if you’re too tired to roll it when you get home, just pop the dough in the fridge and roll it later. I wasn’t kidding when I said this recipe is super flexible!
| Day 1 Evening | Feed your starter |
| Day 2 Morning | Mix dough, shape into balls, let bulk ferment on the counter |
| Day 2 Evening | Roll dough into pizza crusts and refrigerate |
| Day 3 Evening | Make your pizza |
The cold rest in the fridge after rolling is key — it dries out the outside of the crust, which gives you that crispy, crackly texture.
“My husband really liked it! He even ate the crust and he never does that!” –Brenda M., Recipe tester
Overnight Fermentation Timeline
If an overnight rise works better for you, flip the timing:
| Day 1 Morning | Feed your starter |
| Day 1 Evening | Mix dough, shape into balls, let bulk ferment on the counter |
| Day 2 Morning | Roll dough into pizza crusts and refrigerate |
| Day 2 Evening | Make your pizza |
Same-Day Timeline
Last-minute pizza craving? You can do same-day pizzas! The crust just won’t be quite as flavorful since you’re skipping the cold ferment.
| Day 1 Evening | Feed your starter |
| Day 2 Morning | Mix dough, shape into balls, let bulk ferment on the counter |
| Day 2 Evening | Roll dough into pizza crusts and bake right away |
If you’re doing same-day, keep your dough somewhere warm (75-85°F/24-29.5°C) to speed things up. One Las Vegas tester used a warming mat and only needed 4 hours of bulk fermentation!
Recipe tester variations:
- Extended fridge time (2-4 days) after rolling
- Put dough balls in the fridge instead of rolling them out, then roll right before baking — this makes a slightly thicker crust with more chew
- Cold-proofing rolled crusts for 48+ hours for extra flavor
At the end of the day, it’s pizza — no matter how you time it, it’s gonna be delicious.

Thin-Crust Sourdough Pizza Ingredients
For the starter (1:5:5 ratio):
- Water: regular room-temp tap water. If you have city water, the chlorine can be an issue, so consider buying spring water if you notice it’s messing with your starter.
- Active sourdough starter: ideally, your starter was fed within the last 24 hours, so it’s healthy and not overly acidic. It can be at its peak or recently deflated. I just don’t recommend using discard from the back of the fridge – if that’s the case, give it a feeding or two to perk it up before starting this recipe.
- Bread flour: I feed my starter with bread flour, but use whatever you typically do.
Note: In my recipes, I include the “feeding your starter” step. If you’ve already fed your starter and it’s active, you can skip this. Also, this feeding ratio is just a timing suggestion. If you need your starter to peak faster, adjust the ratio (like 25g starter + 25g flour + 25g water) for a quicker rise.
For the pizza dough:
- Water: room-temperature tap water works great. Again, if you have city water, you might consider buying spring water.
- Active starter: this is the starter you fed (from above). It should be at its peak, super bubbly, and ideally tripled in size. Refer to this blog post if you need help telling when your starter is at peak!
- Olive oil: 14g goes in the dough, plus you’ll need extra for coating the dough balls. Regular olive oil is perfect.
- Sugar: adds a touch of sweetness and helps with browning on the crust.
- Salt: I use Redmond’s Real Salt (15% off with code TSG15), but any salt without anti-caking agents works fine.
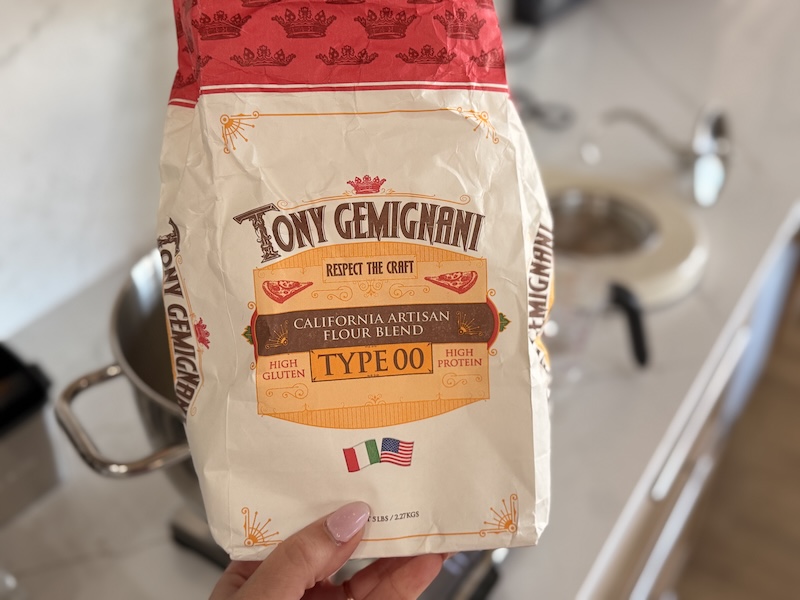
- 00 pizza flour (recommended): This is what I used for most of my testing, and it’s my top choice. The best 00 flour I tried is Tony Gemignani “California Artisan” Type 00 Pizza Flour. King Arthur 00 flour also works great and is way easier to find at most stores, but see the Substitutions section for flour options and tips.
For dusting:
- Semolina flour or cornmeal: You’ll use this for rolling out your crusts and preventing sticking. After extensive tester feedback, semolina is now my top recommendation — it’s less gritty than cornmeal, tastes better, and works just as well (if not better!) for preventing sticking. But cornmeal absolutely works if that’s what you have.
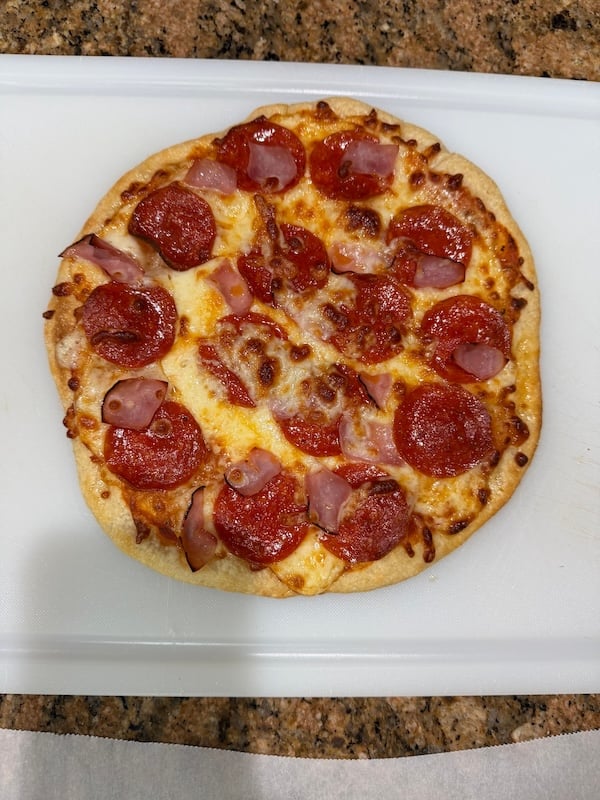
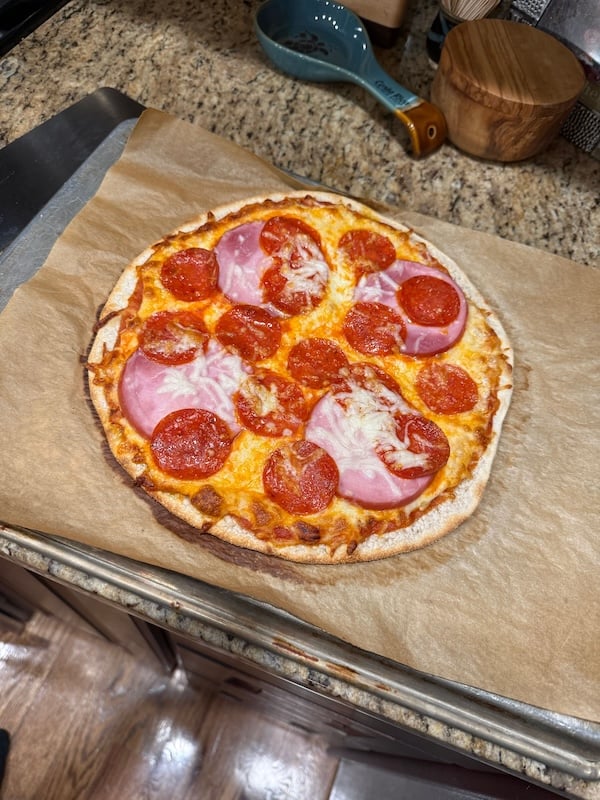
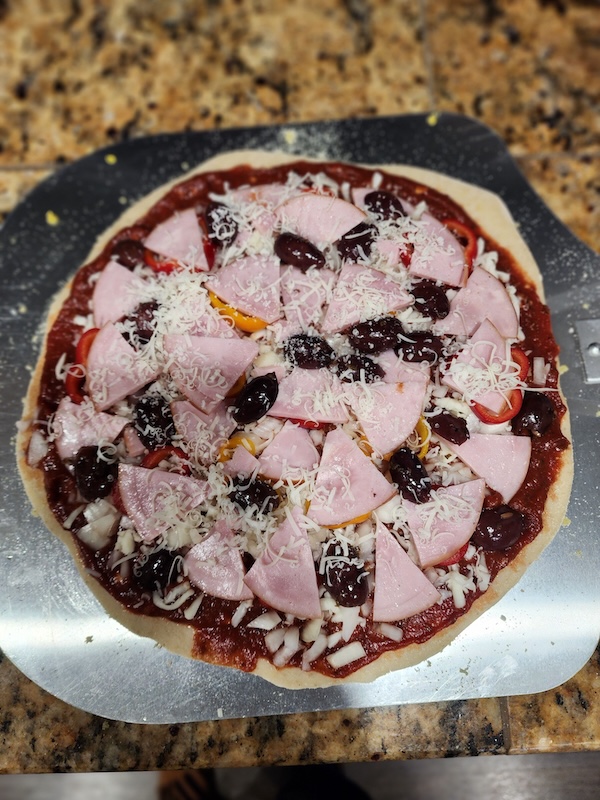
For topping (per 12″ pizza):
- Pizza sauce: I highly recommend my 2-Minute Pizza Sauce — multiple testers raved about it and said they’ll never buy jarred sauce again! Using a thick, concentrated sauce like this one is preferred.
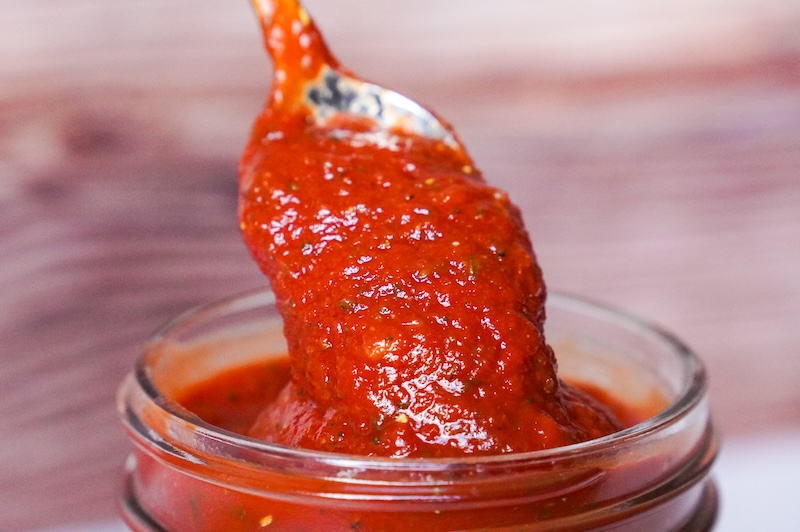
One Chicago pizza expert tester shared this tip: “Use a thick sauce like the one provided. If you go to a traditional/thin sauce, you’re most likely going to get a soggy crust.”
- Parmesan cheese: just a light sprinkle for a salty, umami flavor.
- Shredded mozzarella: Freshly shredded is best! Also, let it come to room temp – one tester used frozen shredded cheese and said it ruined her pizzas.
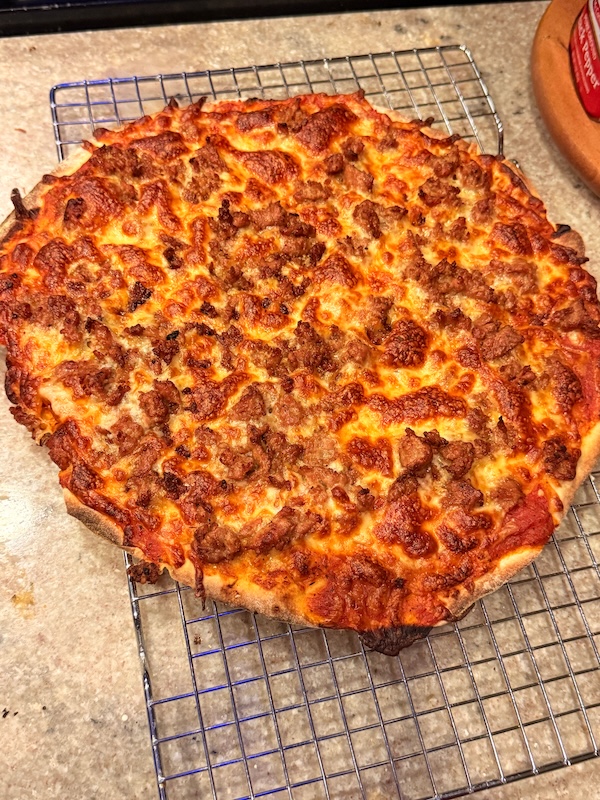
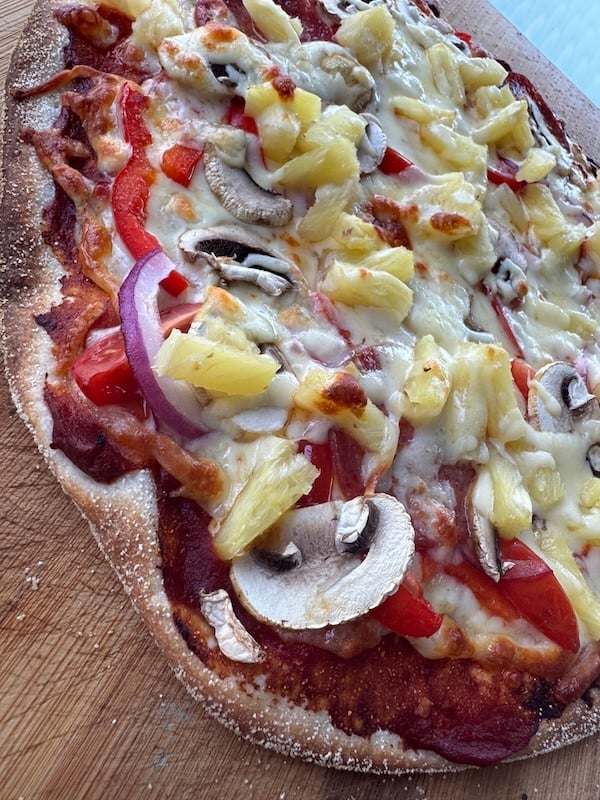
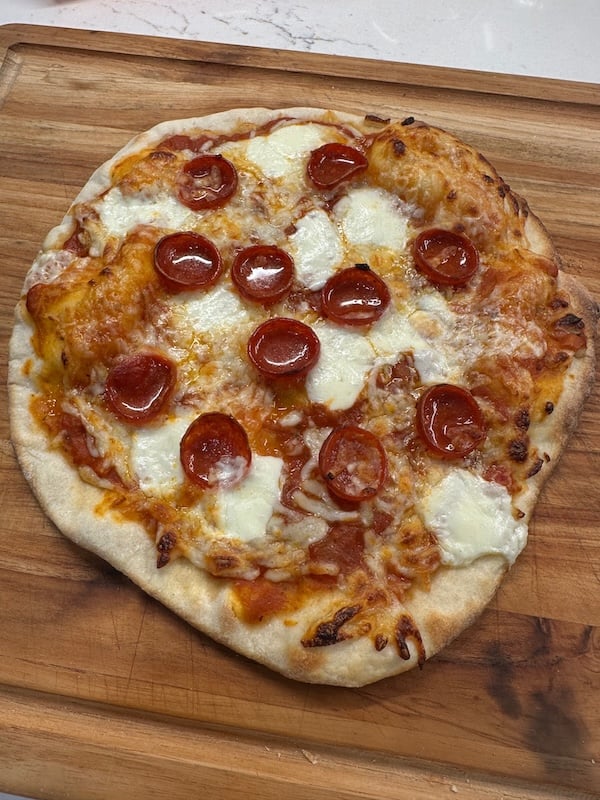
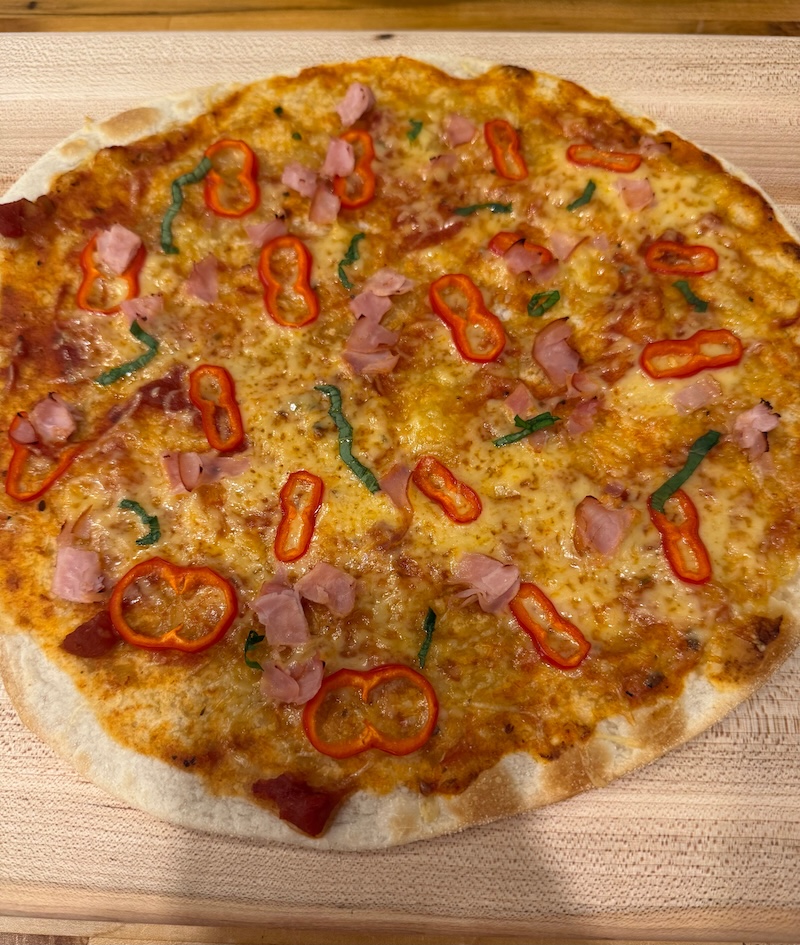
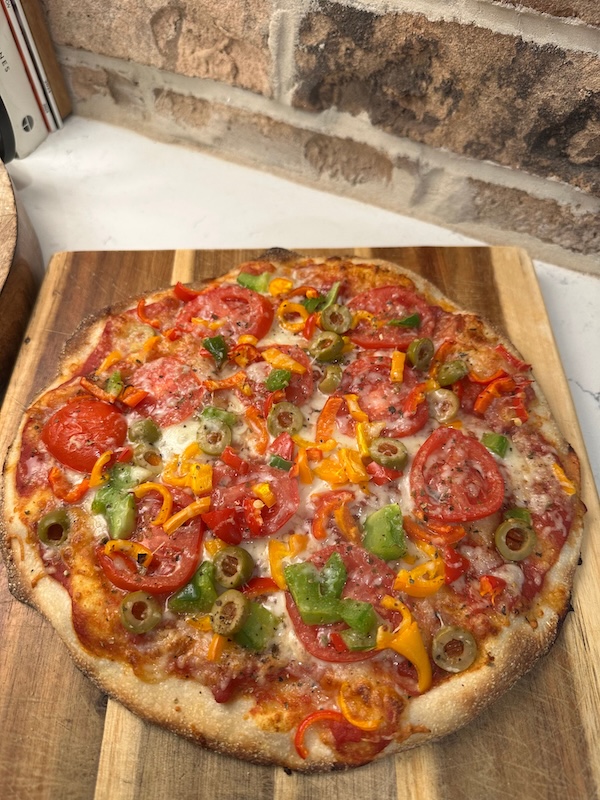
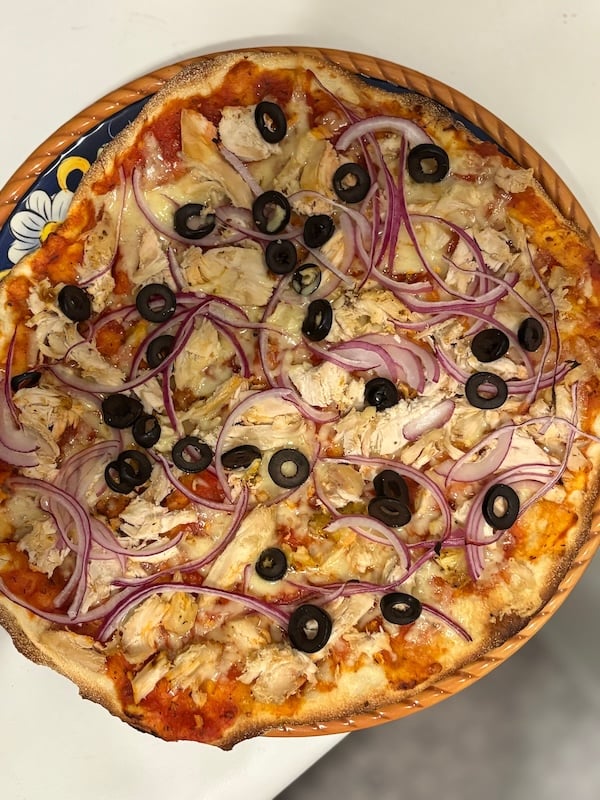
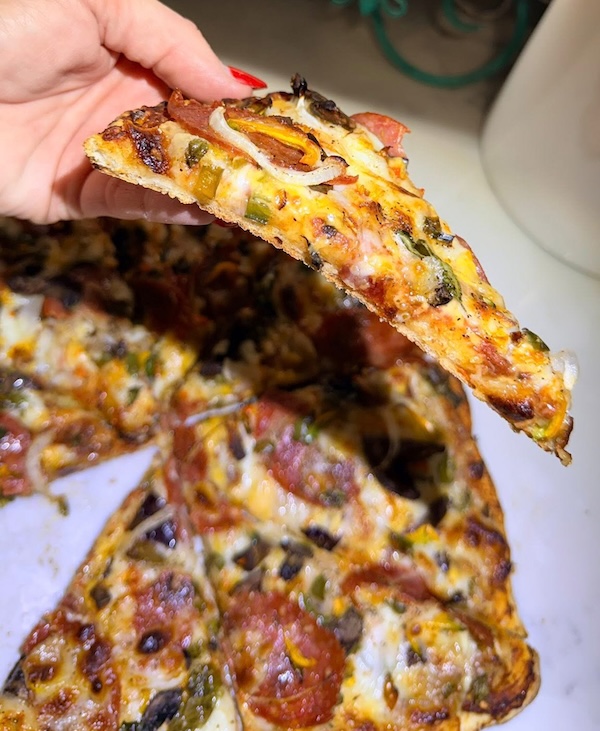
- Your favorite toppings: Pepperoni, sausage, bell peppers, mushrooms, olives, whatever you love! Just remember to bring everything to room temperature before topping your pizza (more on why this matters in the Tips section).
Ingredient Substitutions
- All-purpose flour: Many testers used all-purpose flour exactly as written with great success — no adjustments needed! Kirkland/Costco AP flour was super popular among testers. Other successful international brands: Gideon Milling AP (South Africa), Arva Mills AP (Canada).
- Bread flour: This wasn’t my favorite flour to use, and it also got mixed results from testers. If you’re using bread flour, reduce the flour amount by 20g to start, since bread flour absorbs more water than 00 flour. A few testers noted the dough was slightly drier and stiffer with bread flour, but it still worked and made great pizza.
- Freshly-milled flour: I don‘t personally have a grain mill (yet), but one tester tried out all freshly-milled flour and said it was a total success.
“This recipe was 100% perfect made with fresh milled flour. I wouldn’t have to change anything at all.” –Recipe tester from Good Hope, Georgia
- Cornmeal: For rolling out the crusts and preventing sticking during transferring, semolina flour was the winner — tons of testers said it “worked perfectly,” less gritty than cornmeal, better flavor. Regular flour for dusting works too.
- Flavored olive oil: Flavored olive oils like garlic or Tuscan herb work great too and add extra flavor. One tester used truffle oil (fancy!). Just note that sometimes, garlic-infused oil can interfere with fermentation.
Related: Does Garlic Kill Sourdough? Testing Fresh, Roasted & Powder
5 Tips for Making the Best Thin-Crust Sourdough Pizza
Temp matters a lot for timing. Most successful testers had kitchens around 72°F (22°C) with bulk fermentation taking 8-10 hours.
- Want it faster? Use a warming mat (get 10% off with code THATSOURDOUGHGAL), oven with light on, proofing box, or put your dough somewhere sunny. One tester with a warming mat only needed 4 hours!
- Want it slower? Let it sit on a cool counter.
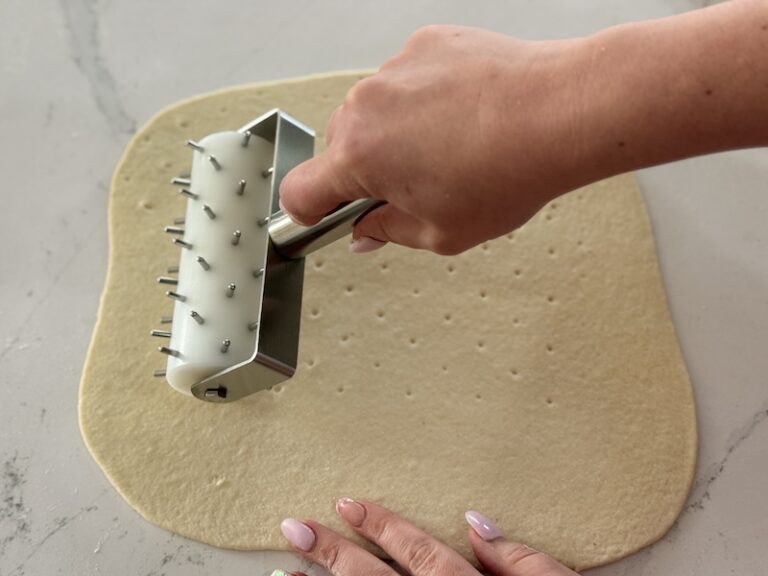
Dock really well. Multiple testers (and I) agree that you need to poke holes all over with a fork before par-baking, or it’ll puff up like pita. Use a fork or pizza docker and poke the WHOLE thing. This happened to several testers (and me) when we didn’t dock well enough.
Room temp toppings. Cold toppings = gummy centers. Pull your sauce, cheese, and toppings out of the fridge while your oven preheats! One tester specifically said frozen cheese ruined her pizzas.
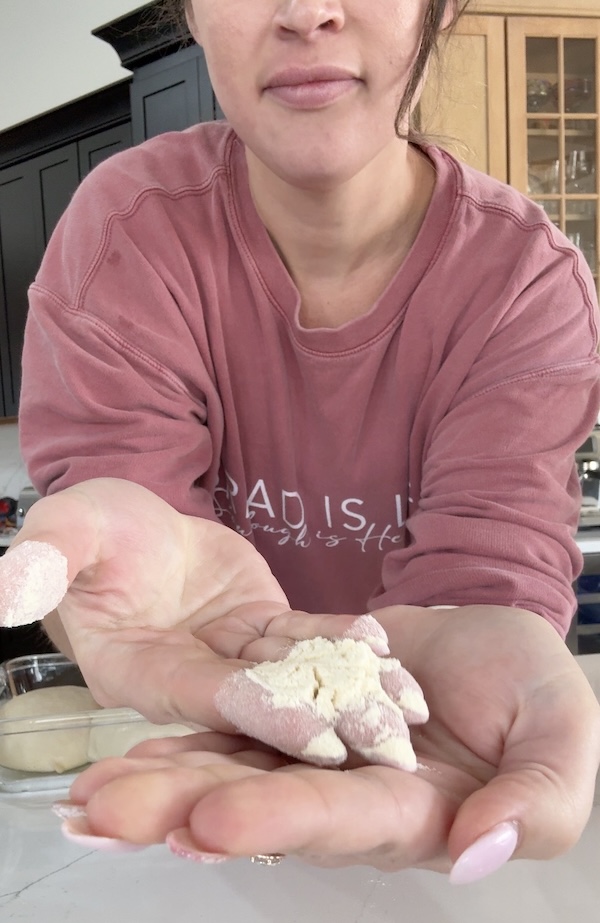
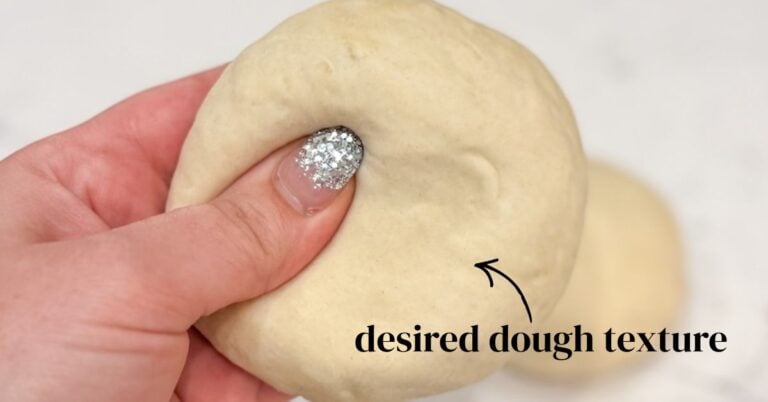
The dough should be stiff. Lots of testers thought the dough looked too dry at first, but then said it “rolled out beautifully.” Trust the process — this dough is supposed to be stiff, like bagel or pasta dough. Don’t add more water unless it’s really not coming together.
Don’t pile on too many toppings. If you love loaded pizzas (that’s me!), just add a minute or two to the bake time. You may sacrifice a little crispiness in the center of the pizza, but sometimes the trade-off is worth it.
Common Sourdough Pizza Problems (And How to Fix Them)
Gummy line in the center: This usually means your toppings were too cold, the par-baking could be a little longer, or there are too many toppings.
What worked:
- Use a pizza stone/steel (makes a big difference!)
- Get ALL your ingredients to room temp first
- Par-bake a little longer
- Try the “flip method” where you flip the crust after par-bake and put toppings on the cooked side
- Don’t overload with toppings
Not crispy enough: Make sure your stone/steel is fully preheated — wait 40+ minutes or use an infrared thermometer to confirm your vessel is as close to 500°F (260°C) as possible. Mine usually tops out around 490°F (255°C).
A few other things to consider:
- Par-bake an extra minute.
- Roll your crusts thinner
- Try hand-stretching instead of rolling (some testers said this was crispier)
Too crispy/hard: Cut down the “curing” time in the fridge. Cover the dough lightly in the fridge so it doesn’t dry out as much. Roll a little thicker. Or bake less.
Puffed up like pita bread: You didn’t dock enough. Poke holes all over the crust with a fork or docker before par-baking! This was super common.
Dough sticking to peel: Use lots of semolina (or cornmeal). Shake the peel a bunch while you’re working to make sure nothing’s stuck.
Crust shrinking when you roll: Let it rest for 10-15 minutes and try again. Or just hand-stretch instead — some testers found that easier.
Equipment Variations & Adjustments
No Pizza Stone/Steel?
Upside-down sheet pan: Preheat an upside-down sheet pan at 500°F (260°C). Par-bake 4 minutes, add toppings, bake 7 minutes. One tester said: “The crust wasn’t as crisp as with my pizza stone, but it still had a nice texture with a slight chew.”
Regular pizza pans: These work, but you’ll need longer baking times and maybe lower temp (450°F/230°C). Still tasty, just not quite as crispy.
Grilling Your Pizza
Multiple testers grilled their pizzas and LOVED it!
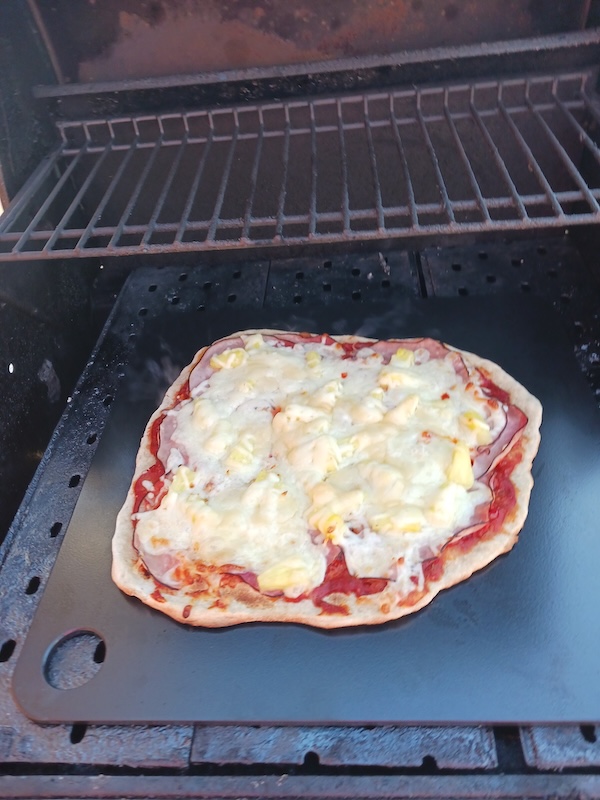
How: Grill one side on high for 2-3 minutes. Bring it inside and add toppings to the grilled side. Put it back on the grill on low/medium for 15 minutes, rotating it around.
One tester said they’re only doing it this way from now on because it was even better than the oven.
Pizza Oven (Ooni, etc.)
Testers with pizza ovens loved this recipe.
Changes: Bake at whatever temp your oven wants (usually 700°F+/370°C+). Par-bake is under 2 minutes. Final bake is way shorter — watch it closely!
How to Freeze Sourdough Pizza Dough & Par-Baked Crusts
There are three main ways to freeze this thin-crust pizza recipe. (Testers tried them all.)
Option 1: Freeze dough balls – After bulk fermentation, put the dough balls in a freezer container. Freeze up to 3 months. Thaw in the fridge overnight, roll out, and proceed.
Option 2: Freeze par-baked crusts – Par-bake like normal, let the crusts fully cool, wrap them up, and freeze flat. Bake from frozen, adding 2-3 minutes to the bake time. Great for quick weeknight pizzas!
Option 3: Freeze rolled crusts (pre-bake) – Roll them out, stack with parchment between, wrap up and freeze. Thaw before par-baking.
Creative Pizza Topping Ideas from Recipe Testers
I am so amazed at how creative all of the recipe testers were!
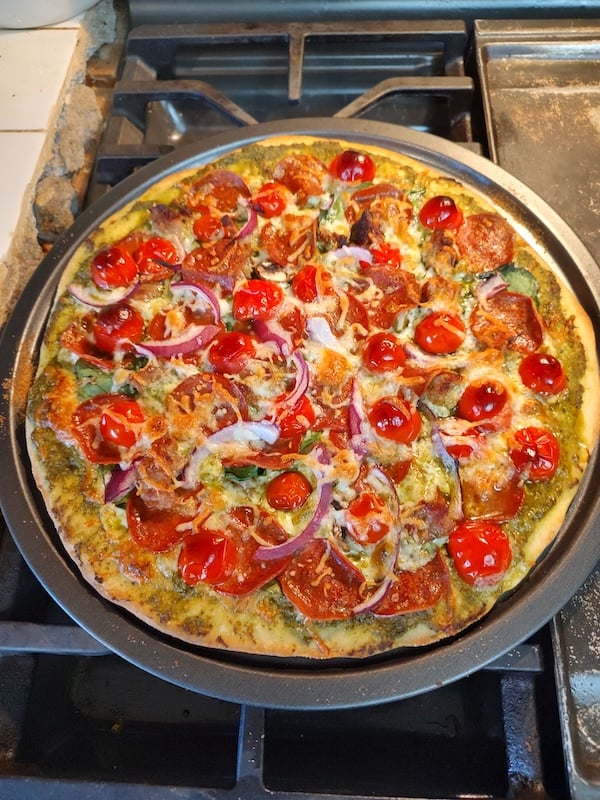
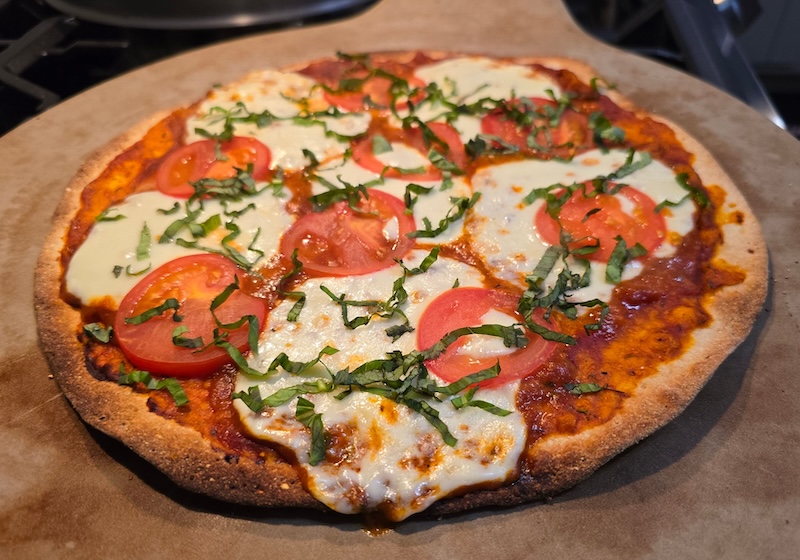
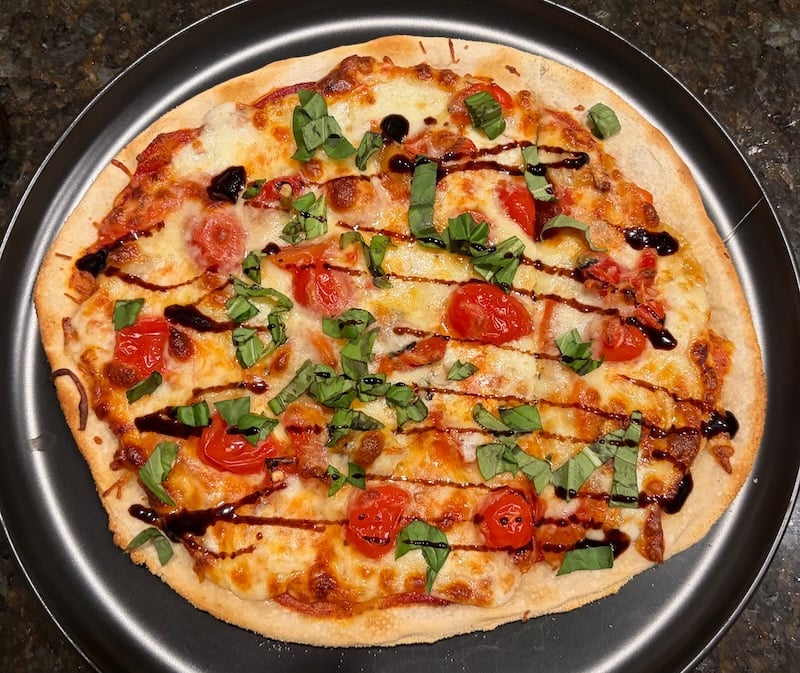
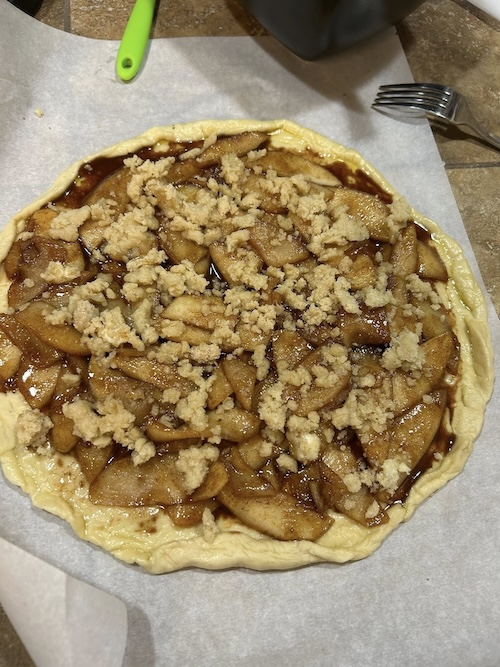
We saw every style of pizza imaginable: traditional pepperoni, BBQ chicken (super popular!), margherita, fig and prosciutto with arugula, dessert pizzas (yes, really!), chicken alfredo, patty melt pizza, and even calzones.
Testers also got creative with dough add-ins, like adding Italian seasoning to the dough or sprinkling it on top before baking.
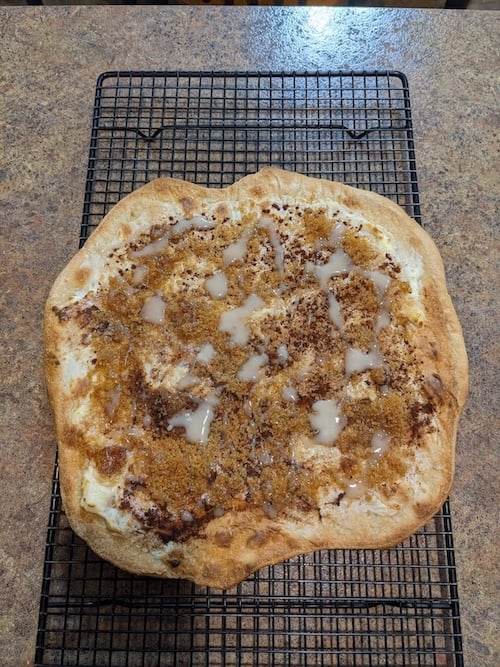
Also, post-bake, some testers added toppings like a hot honey drizzle, balsamic glaze, fresh basil, or flaky sea salt.
FAQs
Yes! Use the same-day timeline and keep your dough somewhere warm (75-85°F/24-29.5°C) to speed it up.
Yep! One tester made calzones and said, “I cooked them on a baking steel at 500 degrees for about 10 minutes. I did do an egg wash on them. They were fantastic!”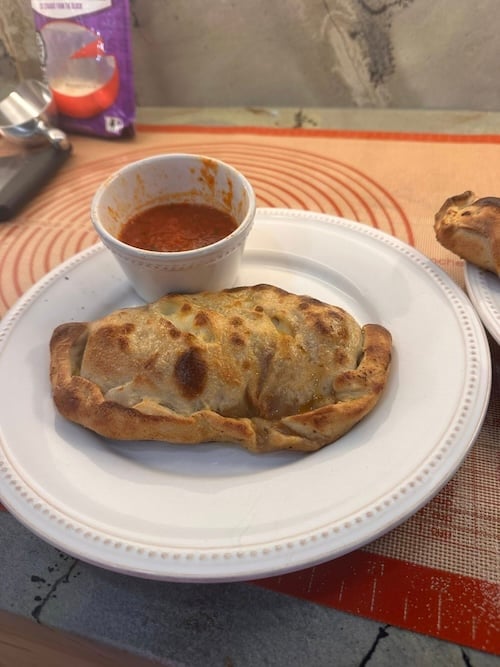
For the crispiest crust, yes — the cold dries out the outside (this process is called “curing”). But you can roll and bake same-day if you need to. Just a bit chewier and a little less flavor.
Yep! You can roll them right before par-baking. This gives you a slightly thicker crust with more chew.
I recommend 1 day for the best texture and flavor, but some testers kept rolled crusts in there for 2-4 days. One tester’s dough was in there for 4 days and still made great pizza! If you’re going longer than a day, I’d cover the pan so the crusts don’t dry out too much.
Cornmeal or regular flour works, too.
Usually cold toppings, not enough par-baking, or too much stuff on top. Get everything to room temp and par-bake a little longer if you’re having this issue. Also, make sure your steel/stone is fully pre-heated – and heats back up fully between pizzas.
Yes! Lots of testers said hand-stretching was even better — thinner crust, no gummy line. Just takes a little practice. For me, it took about twice as long as using a rolling pin, so I don’t typically do it. But many recipe testers raved about it.
OK, this question is so specific, but it actually came up in the recipe testing process. One tester said: “My 7-year-old generally only will eat Dominos, so this was amazing that he loved it so much! We made it a family pizza night and let everyone pick their toppings. This is definitely going into our regular rotation.” So it’s definitely possible!

Thin-Crust Sourdough Pizza
Equipment
- Stand mixer optional – hand mixing instructions also included
- Rectangular dish or container for proofing
- Baking steel or pizza stone; an inverted sheet tray can work but is not the best
- Pizza dough docker or a fork
- Pizza Peel or other flat tool you can use to transfer pizza
- Rocking pizza cutter or pizza wheel
Ingredients
Feed Your Starter
- 7 g active sourdough starter healthy; ideally fed within the last 24 hours
- 35 g water
- 35 g bread flour
Pizza Dough
- 190 g water
- 70 g active starter that you made, from above
- 14 g olive oil plus extra, for coating the dough balls
- 11 g sugar
- 396 g 00 pizza flour can sub for other flour but see Notes
- 9 g salt
- Semolina as needed, to prevent sticking; can sub cornmeal
Toppings
- 360 g pizza sauce
- 30 g parmesan cheese
- 12 oz shredded mozzarella
- Other toppings, like pepperoni, sausage, bell pepper, mushroom, olives, pepperoncini, etc.
Before You Begin

Instructions
- Feed your starter: Before bed, mix 35 g water, 7 g active sourdough starter, and 35 g bread flour (a 1:5:5 feeding ratio). Cover loosely and let sit at room temperature overnight.
- Mix your dough: In the morning, combine 190 g water, 70 g active starter, 14 g olive oil, 11 g sugar, 396 g 00 pizza flour, and 9 g salt in your stand mixer fitted with the dough hook. Mix on a low speed (Speed 1-2 for most mixers) for 5-7 minutes until you have a stiff, smooth dough similar to bagel dough (or Play-Doh). If your mixer struggles, stop and let it rest for 10-20 minutes, then resume mixing.Mixing by hand? Combine all ingredients with a Danish dough whisk, then knead by hand until it forms a stiff, shaggy mass. Cover and rest 30 minutes, then knead 2-3 more minutes.

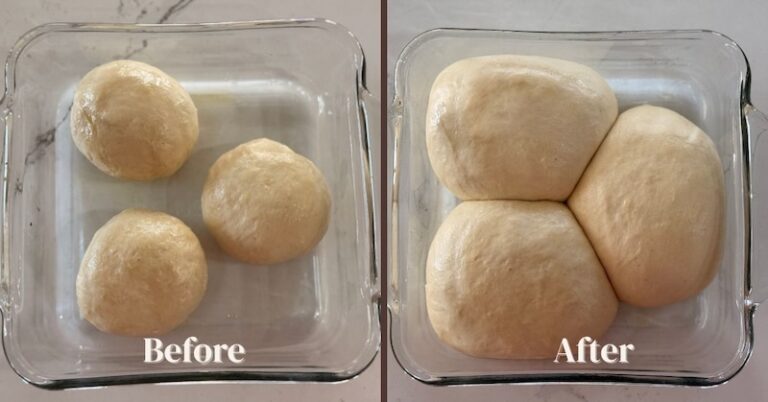
- Shape into balls: Divide dough into three equal pieces (about 230g each). Shape into taut balls and place in a rectangular baking dish. Coat with olive oil and cover the baking dish with a lid, bowl cover, or plastic wrap.
- Bulk fermentation: Let ferment at room temperature for about 10 hours (~72°F/22°C) until the dough balls have visibly puffed up and show bubbles under the surface. They should feel slightly aerated when pressed. Don't stress about perfection here – this is way more forgiving than bread dough!
- Note: You can roll out the crusts now (as written), or you can transfer the dough to the fridge and roll the crusts right before baking.
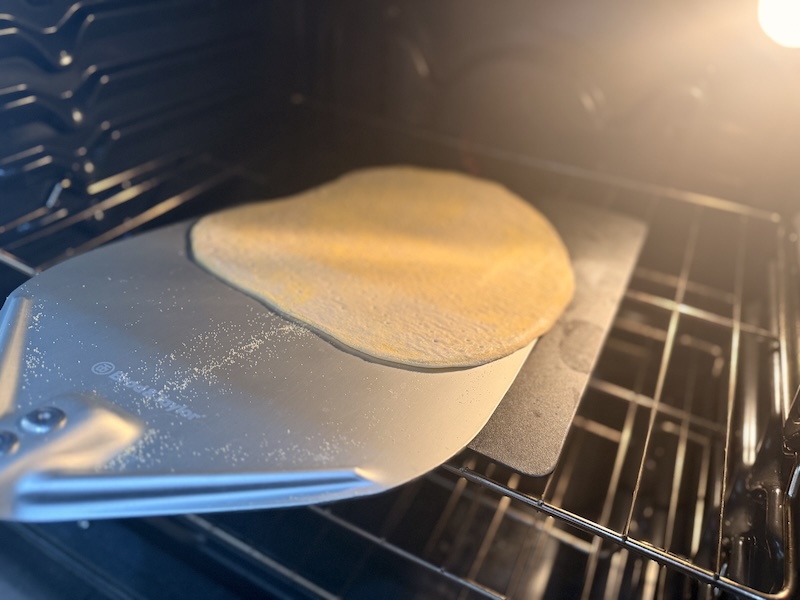
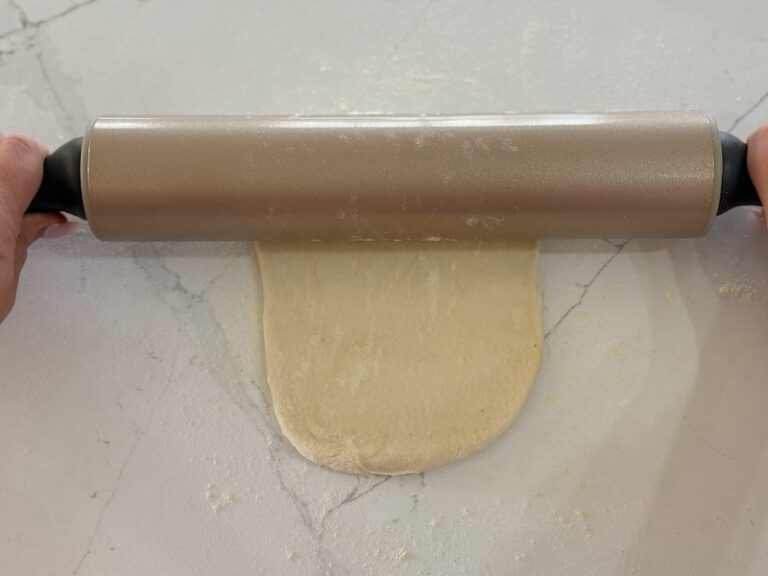
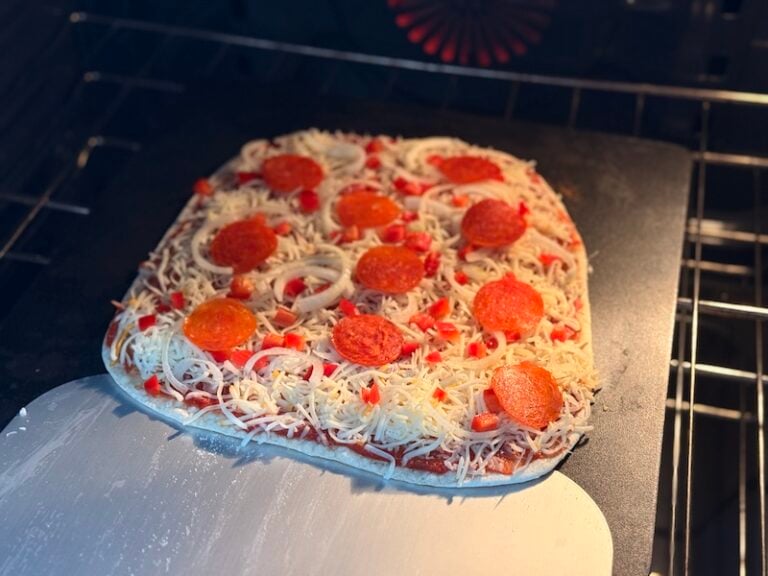
- Roll out the crusts: Dust your work surface with Semolina (or cornmeal). Place one dough ball on top, sprinkle with more semolina, and roll into a thin 12" circle. Make sure both sides are dusted to prevent sticking. Note: you can also hand-stretch the dough if you prefer. See Recipe Notes.

- Dock the crust: dock the entire surface well with a pizza docker or fork.
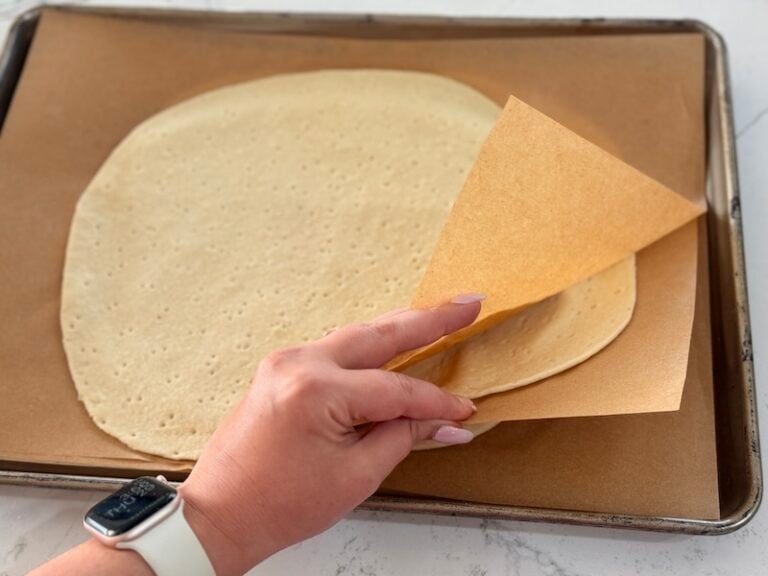
- Place on a parchment-lined baking sheet, sprinkling more semolina (or cornmeal) to prevent sticky areas, if needed. Repeat with the second and third dough balls, stacking them with parchment in between.
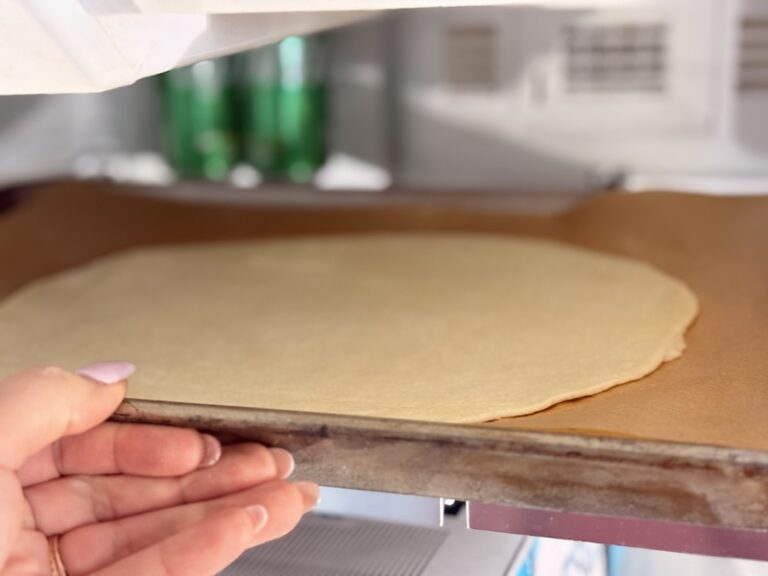
- Refrigerate: Transfer the stacked crusts to the fridge, uncovered, and let rest until the following evening. This dries out the exterior, resulting in a much crispier crust. If you can, rotate them on occasion so the other crusts have a chance to dry out.
- Bake (the next evening): Place a pizza stone or baking steel on the middle rack and preheat your oven to 500°F (260°C) convection for at least 40 minutes (or until the stone reaches close to 500°F/260°C, if using an infrared thermometer). Bring your pizza crusts (+ sauce, cheese, and toppings) out of the fridge so they warm up slightly. Cold ingredients can lead to a gummy interior.
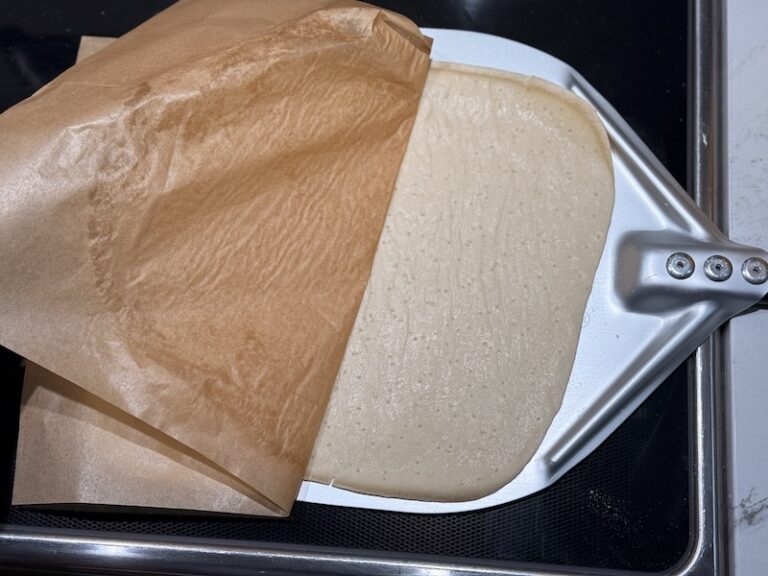
- Sprinkle semolina (or cornmeal) on a pizza peel. Flip one crust onto the peel and peel off the parchment. Shake the peel gently to ensure nothing is sticking.
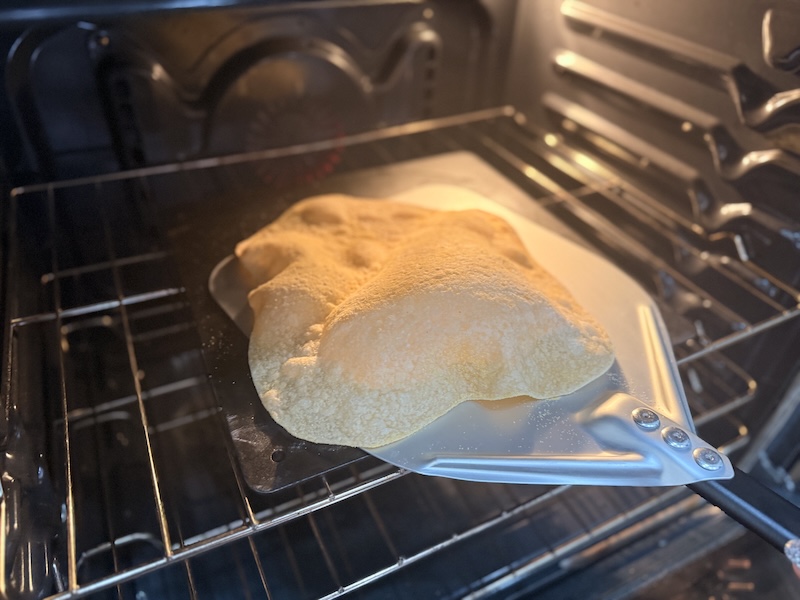
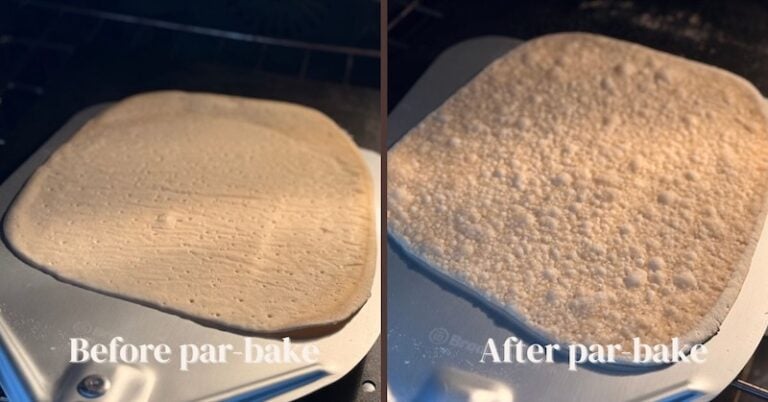
- Slide onto the hot stone and par-bake for 2-3 minutes, or until bubbles start forming across the surface and the underside has brown spots.
- Remove from the oven. Add your sauce, parmesan cheese, mozzarella cheese, and other desired toppings. Note: some recipe testers liked brushing olive oil on the par-baked crust prior to adding the sauce and toppings.
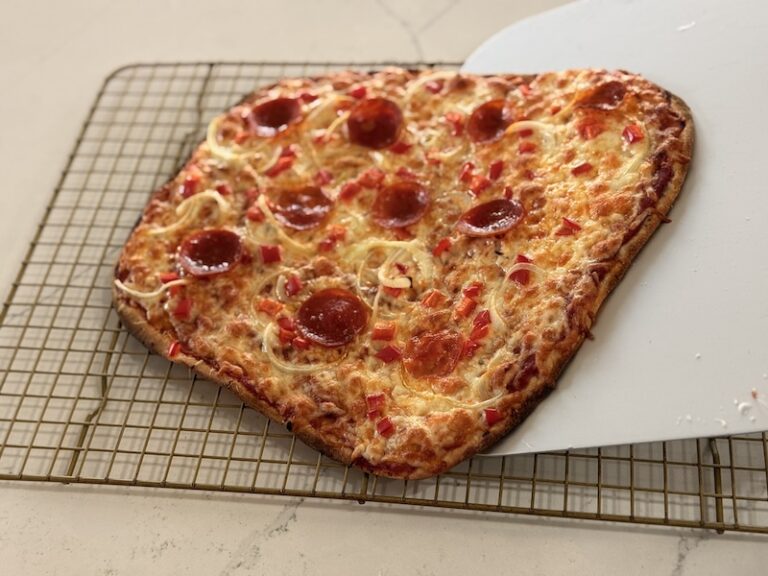
- Return to the oven and bake 5-8 minutes more, or until the cheese is golden brown and bubbly. Transfer to a cooling rack and let rest 5 minutes before slicing.
- Repeat: Let the pizza stone/steel heat back up for about 10 minutes between each pizza. Tip: turn off your oven and re-preheat to 500°F (260°C) to kick it back into gear. Repeat the baking process for the other two pizzas. Enjoy!
Video

Notes
“Closest to Neapolitan pizza I have ever made at home. Amazing!” –Recipe tester from Surfside Beach, SC
Conclusion
I hope you love this thin-crust sourdough pizza as much as the hundreds of recipe testers and I did!
My favorite thing about this recipe is how FORGIVING it is. Beginner or pro, cold kitchen or hot, fancy pizza oven or beat-up sheet pan — this recipe works.
Don’t forget to check out my 2-Minute Pizza Sauce — lots of testers said it was a game-changer!
If you make this, I’d love to see your pizzas. Drop them in the comments or tag me on Instagram @thatsourdoughgal.
Other recipes you might like:
- Detroit-Style Sourdough Pizza
- Easy Pizza Sauce Recipe
- Sourdough Bierocks (Runzas) Recipe – Meal Prep & Freezer-Friendly
- Overnight Sourdough Hot Dog Buns (Super Soft & Easy)
Happy pizza making!


Delicious!
Yum!!
Rebekah, thank you for perfecting this recipe and sharing it. I told my husband that this is going to be the summer of sourdough pizza because the crust is simply that good. He mentioned we could even make some dessert pizzas and my imagination went wild. Your pizza sauce recipe is also the perfect addition to this tasty thin crust. Thank you a thousand times.
So glad you and your husband are loving the pizza crust! Endless options for sure!
Hi,
Is this recipe easy to double? I want to make it for tomorrow and we might need more than 3 pizzas. Or is there a way to make 2 bigger pizzas?
Yes, super easy to double the recipe! There’s an option on the recipe card to double the recipe automatically!
Would this recipe be ok for a pizza oven?
Yes! Here were the changes that recipe testers made when using a pizza oven: Bake at whatever temp your oven wants (usually 700°F+/370°C+). Par-bake is under 2 minutes. Final bake is way shorter — watch it closely!
Absolutely amazing! We love to order from a local pizzeria but my husband said we’re only having this pizza from now on! I’ve tried other sourdough pizza crust recipes but this one was by far the best! I made pepperoni, chicken pesto, Greek, and a raspberry s’more dessert pizza!
They all look so yummy! So glad you all are enjoying the recipe!
I tried this pizza and it was very easy to make. Everybody loved the sauce. My problem is when the pizza gets cold, the crust gets hard. How do I prevent my crust/ dough from getting hard/tough when it gets to room temperature?
I don’t actually know of a solution to that one!
Could I top and then freeze before par baking? Also any tips on making it more round?
So far the process is very simple and I’m excited for the final product. I just stuck the dough balls in the fridge until tomorrow. I read the blog post and unless I missed it I’m not sure if when I pull them out, do I need to let them come to room temp or just roll out straight from the fridge? Thanks!
Either one! I’d probably just roll out straight from the fridge but you could let it warm up first if you wanted.
This was delicious!! I baked 2 pizzas and want to freeze the third. Should I par bake it first?
That is up to you! There are several options – all are outlined in the section titled “How to Freeze Sourdough Pizza Dough & Par-Baked Crusts”
Made this last night and my family said it’s the best pizza I’ve ever made! It was eaten so fast I didn’t get a picture. What I learned is the longer you can warm the oven and pizza stone the better! We only have 1 stone so I made them 1 at a time and the third one was the best!
That’s awesome feedback, thanks Jenni!!
This recipe is a solid winner. Each time I make it I double it and freeze the balls I won’t use directly after shaping. The night before I go to bake I allow to defrost in the fridge, and the day of I allow to proof at room temperature from the morning until it is time to roll out before dinner. It has quickly become an easy family favorite.
Great idea!! So glad you are enjoying the recipe!
I bought my husband a pizza oven for Christmas. I have been struggling and trying every recipe I could find they all seemed so hard to get stretched out. This was the first recipe that not only tasted amazing but was frustration free for me when it came to shaping the dough! Amazing!!!! THANK YOU!!!
Yay!!
HOLY MOLY this is the best crust I have ever had! Sooooooo thin and crispy. I am a That-Sourdough-Gal-Thin-Pizza-Crust person for LIFE!!!!!!!!! 🍕
Yay, so glad you enjoyed it so much!!
Tried your pizza dough receipe tonight and it was yummy! Definitely the thinner you can roll it the better. Not too bad for a first try. We also made a calzone and par baked it to freeze for another meal.
Looks awesome!! Is that Hawaiian pizza I see there? Yum!
Delicious! My entire family loved it. I think we only had 2-3 slices leftover from my family of 5! My dough balls sat in the fridge for 2 days before rolling out and baking and they turned out amazing. I used all purpose flour because that’s what I had, and it was so good that I’m not sure I feel the need to buy pizza flour for next time. Thank you!
Thanks so much for sharing, I’m so glad y’all enjoyed!!