
Wildly Soft Sourdough Cinnamon Rolls (No Tang)
The best sourdough cinnamon rolls need to check a LOT of boxes for me: super soft, not too sweet, bake-ready for breakfast, cinnamon-forward in flavor, freezer-friendly, and no sourdough tang. Bonus if they’re easy to make.
I was worried my goals were too lofty at the outset, but my friends… we totally did it. Almost 400 sourdough bakers tested this recipe for me, and here’s some of their feedback:
“I haven’t had a cinnamon roll in almost 10 years because they have never been my thing but this recipe has switched me completely. Now I may eat all of them” –Recipe tester from Las Vegas, Nevada
“Best cinnamon rolls I’ve ever made.” –Recipe tester from Bedford, Texas
“My husband HATES sourdough but I got him to try these rolls and he loved them. He couldn’t taste the sourdough. I sent them to my taste testers for recipes I come up with and they said it was the best cinnamon rolls they have ever eaten. They even commented on how perfect the cinnamon flavor was.” –Recipe tester from Loganville, Georgia

I’ll just leave it at that for now… let’s get into what makes these fluffy sourdough cinnamon rolls so special!
Disclaimer: Some of the products I recommend in this post are affiliate links – if you choose to purchase after clicking one of my links, I may earn a small commission, which helps fund this website, recipe development, and monthly giveaways. I sincerely appreciate your support.
Why You’ll Love These Soft Sourdough Cinnamon Rolls
- Recipe tested by real bakers like you: This recipe earned a 4.81/5.0 average rating from 387 home bakers, with an incredible 97.9% giving it 4+ stars. From beginners to experienced bakers, testers consistently praised its clear instructions and foolproof results.
“Pillowy soft, cinnamon forward, mouthwatering. Family loves these! They don’t last long in this household.” –Recipe tester from Mission Viejo, CA
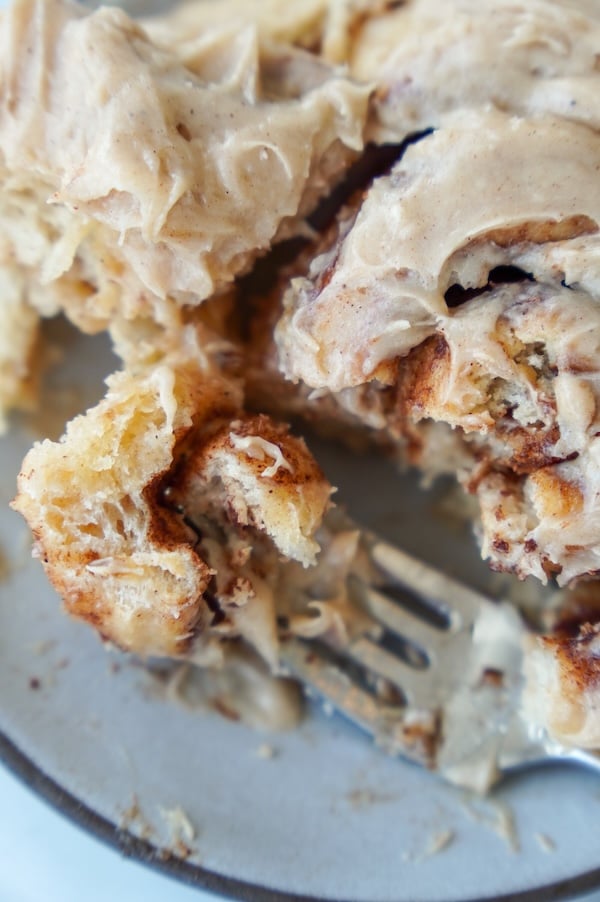
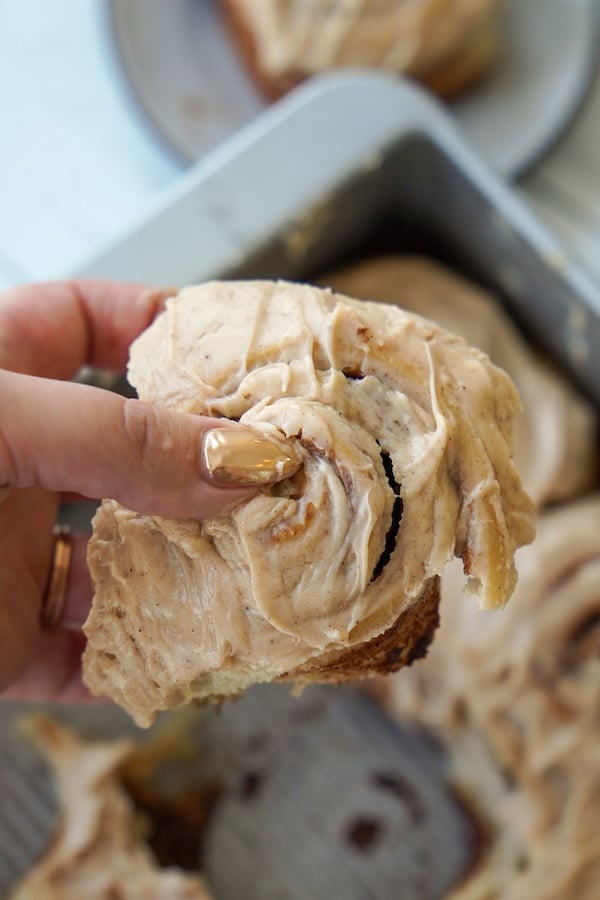
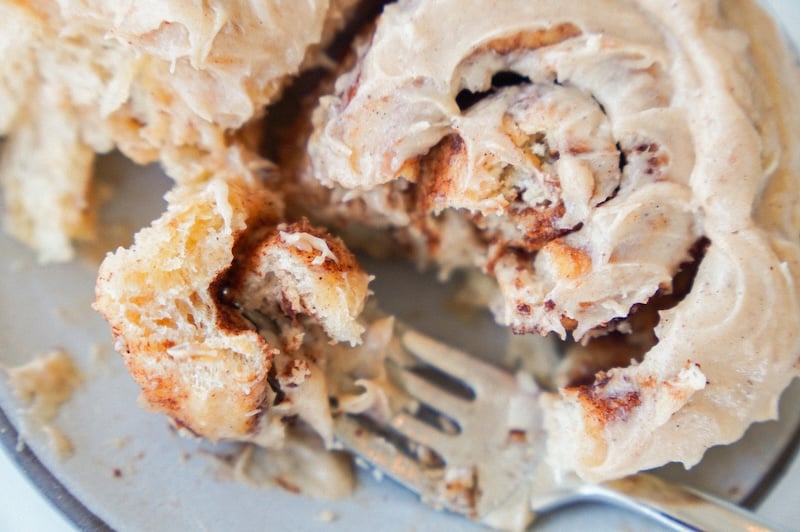
- Soft & gooey: These rolls are everything a cinnamon roll should be—pillowy soft, gooey in the center and on the bottom, and melt-in-your-mouth delicious.

- Cinnamon-forward flavor: The dough, filling, and icing have cinnamon in them, so the flavor isn’t just hiding in the filling. Nearly 90% of testers (87.5%) said the cinnamon flavor was spot-on.
“This is first cinnamon roll recipe I have made that included cinnamon in dough. That was a great idea because I love the cinnamon flavor!” –Recipe tester from Columbia City, IN
- Not too sweet, not too plain: I adjusted the sugar so the rolls are perfectly balanced—sweet, but not sickly sweet. An incredible 95.3% found the sweetness perfectly balanced.
- Breakfast-ready: The overnight second rise does all the work while you sleep, so you can have warm, gooey cinnamon rolls on the table in time for breakfast.
- Freezer-friendly: I tested freezing these cinnamon rolls two ways – before the second rise and fully baked. My results and instructions are included later in the post, but good news: you can prep these ahead of time, so you always have a showstopper breakfast at the ready. Gotta love a make-ahead option!
- Stays soft for days: Thanks to the tangzhong in the dough, these rolls don’t dry out in 24 hours like most homemade rolls. You’ll still have soft rolls on days 2 and 3 (if they last that long).

“Yes! Softest cinnamon roll recipe I have tried and I have tried alot!” –Recipe tester from Houston, TX
- Two icing options: I love a classic, spreadable cream cheese frosting, but many bakers told me they don’t like cream cheese or they can’t use it due to cottage food laws – I got you! I included a maple pecan glaze option that’s to die for. Pick your poison!
- Better than Cinnabon: Don’t take my word for it… several recipe testers told me this beats Cinnabon any day.
“These cinnamon rolls are absolutely delicious. I moved away from a big city 8 years ago and thus no Cinnabon in a mall nearby, but THIS recipe surpasses that flavor and texture. It could put them out of business!!!” –Recipe tester from Lawrenceburg, TN
“The flavor is amazing and the texture of the rolls is perfect! They remind me of the Cinnabons, only better. You nailed it!” –Recipe tester from Summerville, SC

Baker’s Timeline
“I was super impressed with the timelines actually. Having made cinnamon rolls for years, this dough was so much easier to make, handle. Less time. Less worry.” –Recipe tester from Arkansas
| DAY 1 | |
| 5-8 PM (or dinnertime) | Make the stiff sweet starter (earlier is better! I’d rather you use slightly past peak starter than one that’s not ready yet) |
| DAY 2 | |
| 8 AM | Cook the tangzhong |
| 9 AM | Mix the dough |
| 9:30 AM – 1:30 PM | First rise in a warm place |
| 1:30 PM | Move the bowl to the fridge |
| 9 PM (or before bed) | Make the filling, roll and shape the dough, and let it sit out overnight in a cool place |
| DAY 3 | |
| 7 AM | Bake the rolls & make the icing |
| 8:30 AM | Ice and Enjoy |
“YES! The perfect Christmas morning breakfast and the timeline is ideal for that!” –Recipe tester from Portland, Oregon
Recipe Testing Journey
I knew I wanted to use my Wonder Bread copycat recipe as the base for these cinnamon rolls – that dough is smooth, soft, and gives such a fluffy result. Exactly what I want in cinnamon rolls!
But I did need to make a few adjustments. Namely, adding an egg, swapping some of the water for milk, and adding vanilla and cinnamon to the dough.
Note: Cinnamon slows down fermentation, so many recipe developers keep it out of any sourdough goodies during bulk fermentation. However, I wanted that flavor throughout the entire roll, and I also needed a little help slowing fermentation for the long, overnight second rise. It works perfectly here!
Test 1
In my first trial, the cinnamon rolls came out incredible! I was pleasantly surprised that I wouldn’t need any significant improvements to nail this recipe.


Just a few tweaks to make them perfect:
- Less sugar in the dough and icing (it was a bit too sweet)
- A little more cinnamon in the dough (just 1/2 tsp more)
- More filling
- A little less starter to slow down fermentation (I’d rather wake up to slightly underproofed rolls that need more time than overproofed rolls that cannot be saved)
Test 2
I made those adjustments for round two, and the rolls turned out almost perfect!!

I loved the reduced sugar in the dough and icing. Less starter helped the rolls ferment on the perfect timeline for breakfast-ready cinnamon rolls.
What I didn’t love was the extra filling – I think I found the upper limit! It added almost too much cinnamon flavor as you ate your way to the center of the cinnamon rolls.
So, I kept what worked from rounds 1 and 2, and sent the perfected recipe to the recipe testers group.
Recipe Tester Feedback
I cannot even tell you how thrilled I was as the survey responses started coming in.
They were overwhelmingly positive, with reviews like “my husband and I feel 100% these are the best cinnamon rolls we’ve ever eaten” and:
“We have tried so many sourdough cinnamon rolls. I eventually started using the dough from one recipe and icing from another because nothing ever worked together. Your recipe will now be the one and only recipe I’ll need. So THANK YOU!”
And the PHOTOS – wow, y’all really take beautiful food pictures!


On top of the really kind feedback, there were a lot of fantastic ideas and tips to level up this recipe even more. If every round of recipe testing could go like this one, I would be one happy gal!
In case you are curious, here is some of the constructive criticism sent in, which I’ve woven into the final recipe you see on this page:
- KitchenAid mixing tip: Add butter one pat at a time
- Filling spreading technique: If your filling is hard to spread, try warming it slightly
- Sticky dough during rolling: Add more flour to your work surface and use a bench scraper to help release stuck dough
- Holding your starter at peak: Your stiff starter can be refrigerated at peak and used within the next few days
- Storage guidance: If you make the cream cheese icing, the finished rolls technically need refrigeration
- Cutting sweetness in icing: A pinch of salt in the icing helps balance the sweetness
The recipe you see here incorporates all of this feedback (and a lot more) to give you the best possible chance of success.
“My husband LOVES cinnamon rolls and these were exactly as described, ‘WILDLY SOFT’!!! I’m making another stiff sweet starter now so we can have more!!” –Recipe tester from Spring, TX

Recipe Testing Stats: Icing, Cinnamon, Filling, & Sweetness
Cinnamon rolls can be very divisive – how much icing is too much? Do you even like icing? And if so, are you a cream cheese person or not? And that’s just the icing!
I know every recipe can’t please everyone. However, if I can provide you with a great base that you can adjust to fit your preferences, that would be amazing!
So, here are some stats from all 300+ recipe testers on the cinnamon roll components:

- Overall Sweetness: This was the biggest win—an incredible 95.6% found the sweetness perfectly balanced, with only 2.3% saying it was too sweet and 2.1% wanting more sweetness.

- Cinnamon Flavor: Nearly 90% of testers (87.8%) said the cinnamon level was spot-on. Only 3.1% found it too cinnamon-y, while 9.1% wanted a bit more—easily adjustable if you’re a cinnamon superfan!

- Icing Amount: This is where opinions split the most. About 59% loved the icing amount as written, while 37% would reduce it—28% by about 25% and 9% would cut it in half. Only 3.5% wanted even more icing.

- Filling Amount: About two-thirds (65%) found the filling perfect, while 31% wanted a little more, and 3% wanted significantly more filling. Based on this feedback, I decided to bump up the filling slightly—not as much as my Round 2 testing (which was definitely too much!), but somewhere in that sweet spot between the original amount and the over-the-top version.
The takeaway? The base recipe hits the mark for most people, but I’ve included plenty of customization notes so you can adjust the icing and filling amounts to match your family’s preferences.
Whether you’re team “more icing” or team “less is more,” this recipe has you covered!
“They were the best cinnamon rolls I’ve ever had. I never made any from scratch before but will again and soon! Perfect balance of sweetness, and I loved all the cinnamon!” –Recipe tester from Charlotte, NC

How to Make Soft Sourdough Cinnamon Rolls (Step-By-Step Instructions)
Below, I’m walking you through every single step of making these sourdough cinnamon rolls with extra photos, tips, and all the little details that make the difference between good and great rolls.
If you’re new to sourdough cinnamon rolls (or just want to nail them perfectly), follow this detailed guide instead of jumping straight to the recipe card. Trust me—the extra guidance is worth it, especially for your first batch!
Step 1: Make the Stiff Sweet Starter
In the early evening (5-8pm), combine in a jar:
- 25 g active sourdough starter
- 25 g sugar
- 50 g warm water [around 80°F (26°C)]
- 100 g bread flour
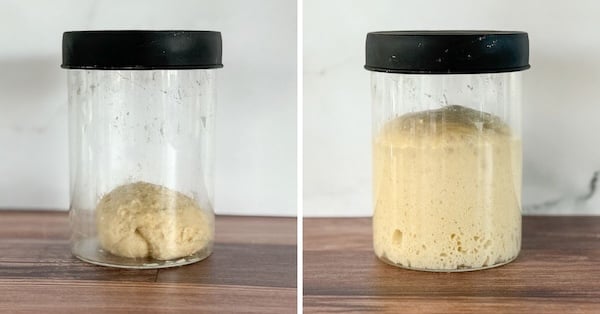
When it starts to come together, take it out of the jar and use your hands to knead it into a stiff ball. It should feel like Play-Doh.

Put it back in the jar, cover loosely, and leave it in a warm spot overnight. Also, set out 84 g of butter so it’s softened by morning for the main dough.
You’ll know your starter is ready when it has tripled in size, has bubbles all over, and smells sweet and yeasty.


This will take 10–16 hours, depending on the temperature of your kitchen and the strength of your starter.
If it’s not quite there by morning, give it a few more hours. It’s better to use it a little past peak than too soon.
Timing flexibility tip: Once your stiff sweet starter reaches its peak (tripled in size), you don’t have to use it immediately. You can refrigerate it for 2 days (I’ve gone up to 4) and use it straight from the fridge when you’re ready to make your dough—no need to bring it back to room temperature first. If life gets in the way, don’t let that stiff sweet starter deflate! Put it on “hold”!
Step 2: Cook the Tangzhong
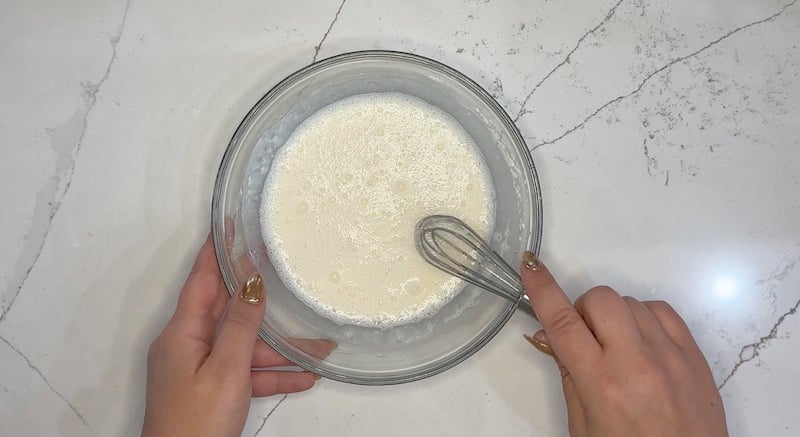
The next morning, in a microwave-safe bowl, whisk together 35 g bread flour and 175 g whole milk until smooth.
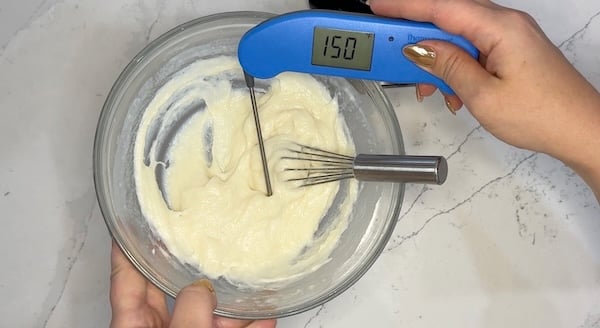
Note: You can make tangzhong in the microwave or on the stovetop. I think the microwave is faster and easier, so I’ve provided detailed instructions below. For the stovetop, just whisk constantly over medium heat until the mixture hits 150°F (65°C). Do NOT walk away or it’ll likely overcook!
Microwave in 30-second bursts, whisking between each round, until the mixture thickens into a pudding-like paste that hits 150°F (65°C).


This usually takes 3–5 rounds, but go by texture and temperature.

The tangzhong needs to cool completely, or to below 80°F (26°C), before you use it.
If it’s too hot, it can kill the yeast in your starter or even scramble the egg in your dough. Ask me how I know this 😅

I recommend putting your tangzhong in the fridge for about 20 minutes. It’ll cool down while you measure out your other dough ingredients.
Check out my full Tangzhong post for all the geeky details on why it’s so amazing.
Step 3: Mix the Dough
In the bowl of a stand mixer fitted with a dough hook attachment, add:
- All of your stiff sweet starter – make sure it’s peaked before starting!
- All of the tangzhong – cooled below 80°F (26°C)
- 80 g whole milk, cold from the fridge
- 100 g cool water (around 60-70°F / 15-21°C)
- 1 egg, cold from the fridge (about 50g)
- 5 g vanilla extract (1 tsp)
- 25 g sugar
- 515 g bread flour
- 3 g cinnamon (1 tsp)
- 12 g salt
Note: If you’re mixing by hand, use warm ingredients instead of cold ones. Stand mixers naturally warm the dough through friction, so cold ingredients work fine. But when mixing by hand, you don’t get that warming effect, which can slow down your rise times and make your dough appear stiffer than it really is—which might trick you into thinking you messed up or need to add more liquid (when you don’t!). For hand mixing: warm your milk to about 80°F (26°C), use room temperature eggs, and stick with warm water.
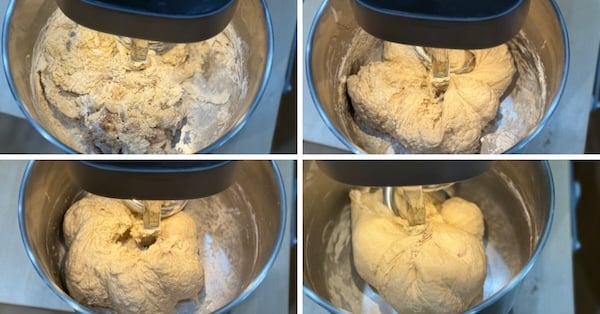
Mix on low speed for 2–3 minutes until all the ingredients are incorporated and you have a very shaggy dough.
Then, turn the mixer up to medium-low and mix for 7–15 minutes until the dough is smooth and elastic (some mixers are faster than others, so focus on visual cues). You’ll actually be able to see the transformation happening – the dough surface will go from looking bumpy and shaggy to completely smooth and almost silky.
That visual change is your cue that the dough is ready for the butter, like so:

A windowpane is excellent, but don’t stress about achieving it. We just want the dough to develop some structure before adding our butter, since butter inhibits gluten development.
Note: a windowpane means you can stretch your dough thin enough to see light shine through, and your dough doesn’t tear. It’s a sign of great dough strength.
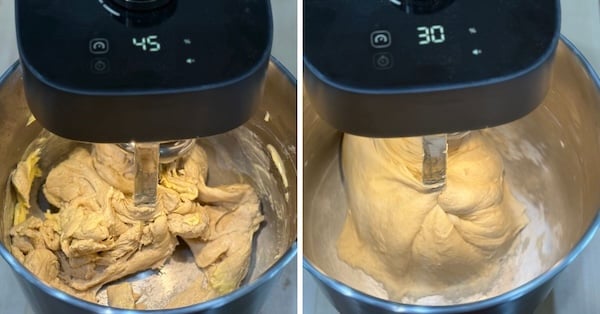
Drop the speed to low and add your softened butter (84 g, or 6 tbsp) one pat at a time, letting it mix in well before adding the next bit. Some mixers are better at this step than others – don’t be afraid to coax things along with a spatula or speed adjustments.

Once the butter is fully incorporated, keep mixing for another 2 minutes until you see a super smooth, soft dough.
If mixing by hand: In a glass mixing bowl, combine all of your main dough ingredients, except for the butter. Knead the dough, switching to slap and folds for faster incorporation if desired. Cover and let rest for 30 minutes.
Spread all of your softened butter on top of the dough. Pinch and squeeze the butter into the dough (think of lobster hands!) until it’s mostly incorporated. Switch to slap and folds on your counter until the dough smooths out. This process takes 4-5 minutes. Cover and let rest for 30 minutes.
Finally, strengthen the dough for 2-3 minutes via stretch and folds, kneading, or slap and folds. Cover and resume with the rest of the recipe as written!
Step 4: First Rise
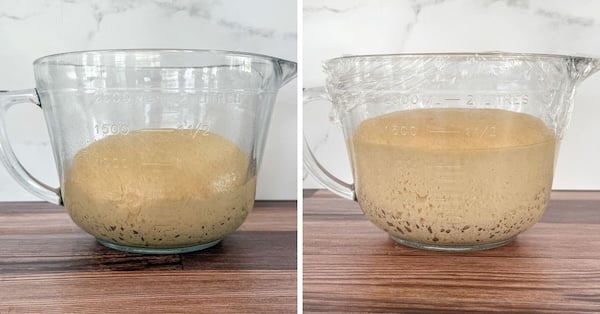
Transfer the dough into a lightly oiled mixing bowl, cover, and let it rest in a warm spot (75–85°F / 24–29°C).
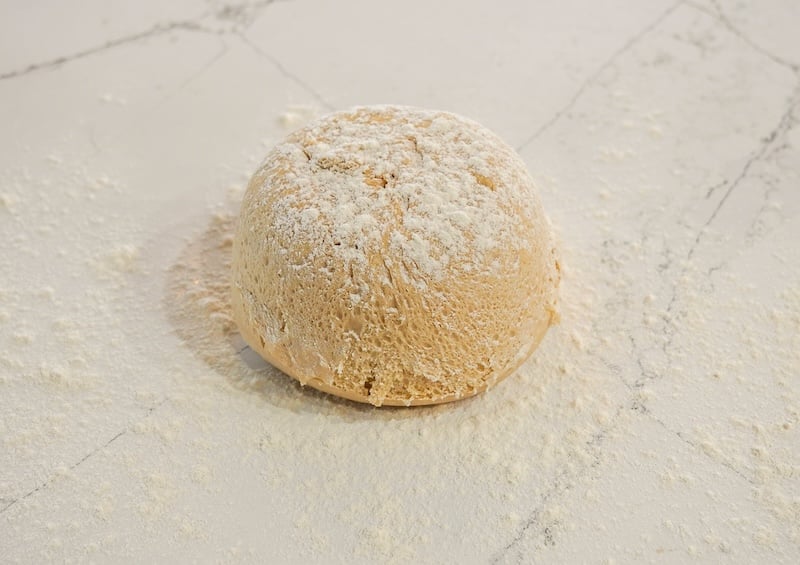
You’re aiming for about a 30% increase in size, not a full double. Watch for small bubbles around the edges and a puffier surface.
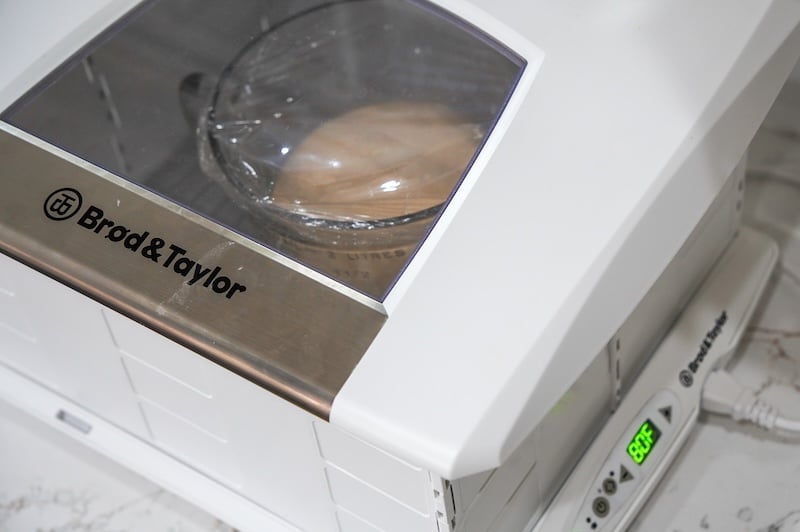
This usually takes 3–6 hours, depending on the strength of your starter and your kitchen temperature. In my 80°F(26°C) Brod & Taylor proofing box, this takes 4 hours.
Once you see those signs of fermentation, move the bowl to the fridge until evening and set out 10 tbsp of butter so it’s ready to use in your filling later.

Step 5: Make the Filling
Before bed, pull your chilled dough out of the fridge. In a medium bowl, whisk together 142 g softened butter, 175 g brown sugar, and 16 g cinnamon until it forms a spreadable paste.
If your butter isn’t completely softened (or you’re using a cheaper butter), you may find a hand mixer easier to use.
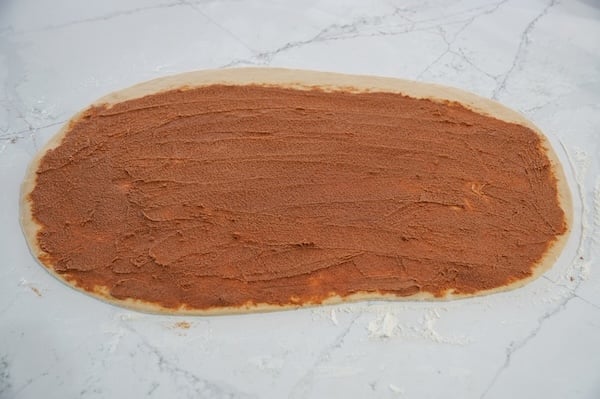
If you find the mixture isn’t very easy to spread, warm it in the microwave for 5-10 seconds and try again. It should spread on easily, like so:

Step 6: Roll and Shape the Dough
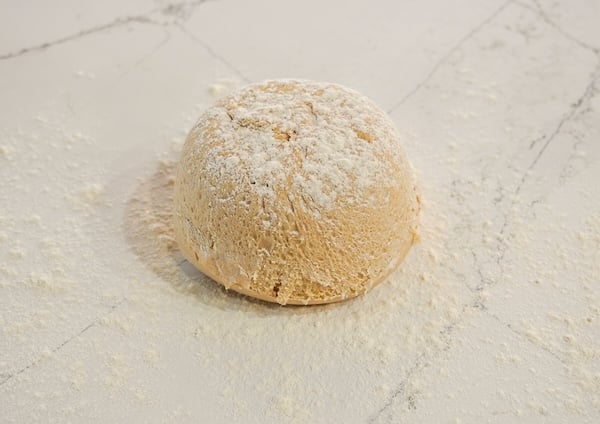
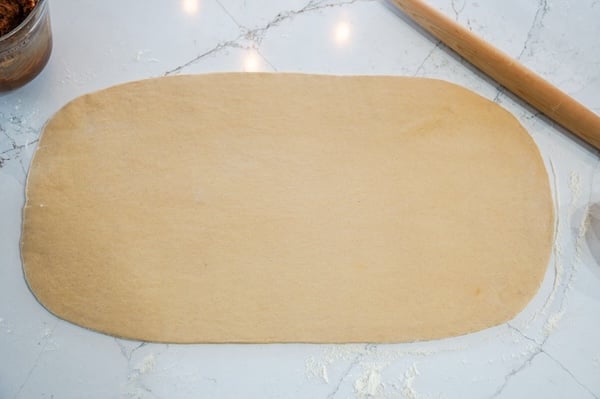
Generously flour your counter and turn out the chilled dough. Also, flour the top of the dough and your rolling pin.
Roll into a rectangle that’s about ¼” thick. Aim for the width of the rectangle to be between 18-24″.
As you roll, lift the sheet occasionally with a bench scraper to make sure it isn’t sticking, sprinkling more flour underneath if needed.
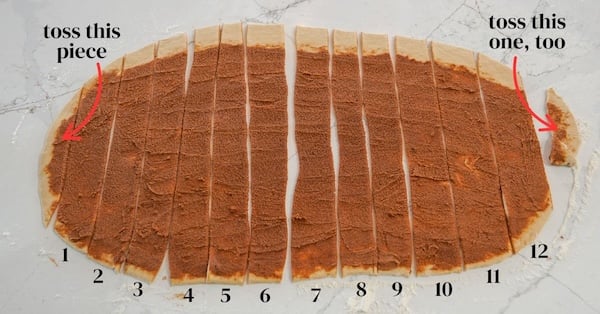
Note: You don’t need to panic about precise measurements here. The main thing is getting your dough width somewhere between 18-24″ so when you cut it, you’ll end up with 12 strips that are roughly 1.5-2″ wide each. Honestly, my best-looking cinnamon rolls came from ditching the ruler entirely. Some of the recipe testers got tripped up trying to measure everything exactly and ended up with uneven rolls anyway, so the following, revised process should remedy that!

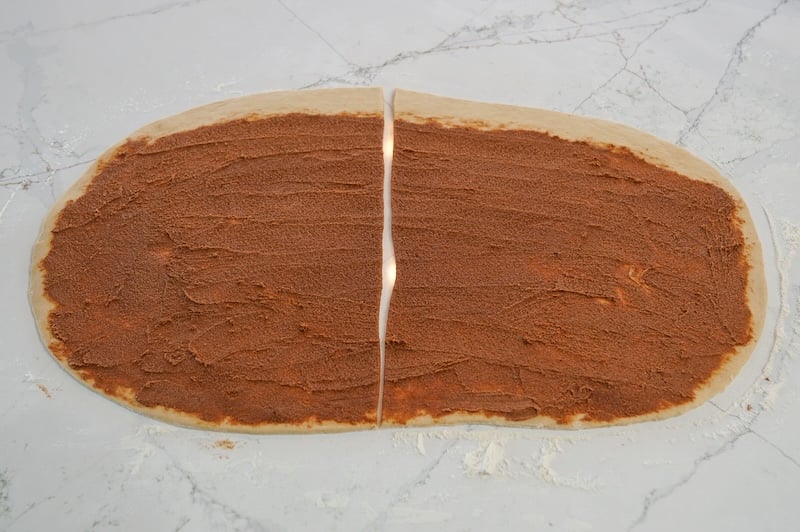
Spread the filling evenly over the dough, going all the way to the bottom edge (this becomes the center of the rolls) and sides, but leave a 1-inch gap along the top edge.

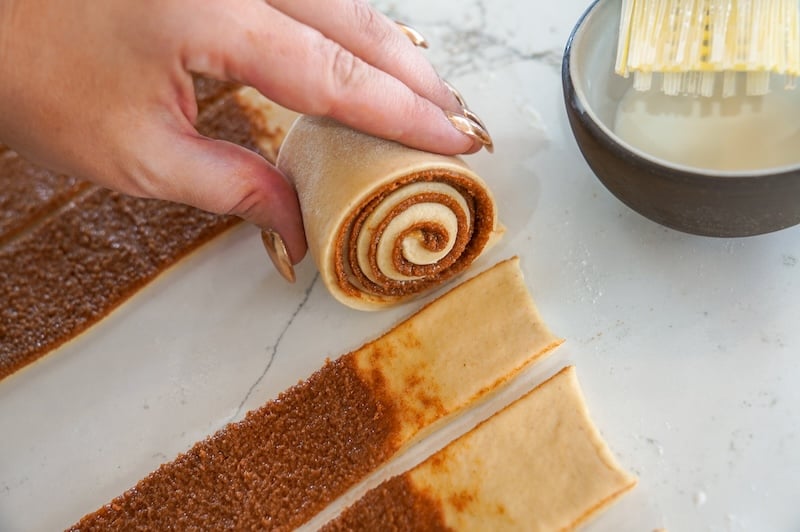
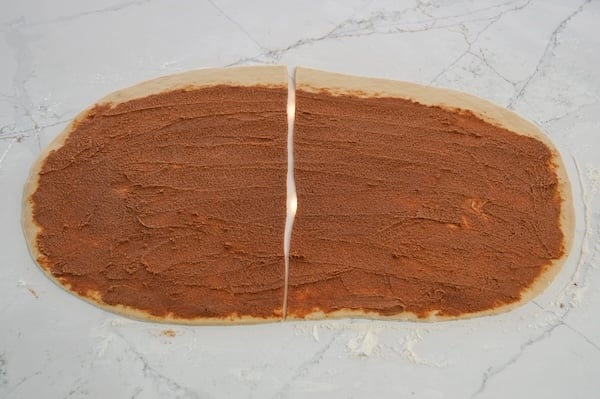
Use a pizza cutter or pastry wheel to cut the sheet in half.
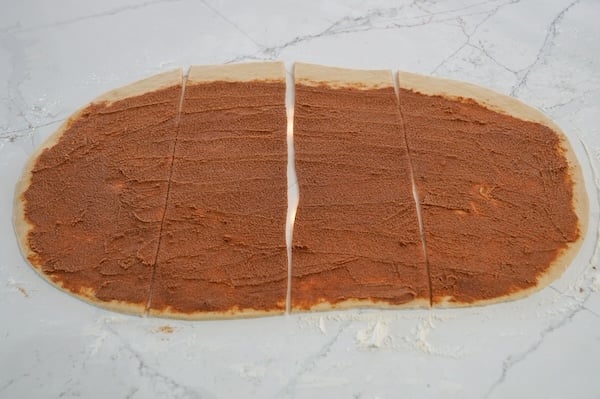
Then, cut each half in half again (to make four sheets).

Now, each quarter can be cut into three equal strips.
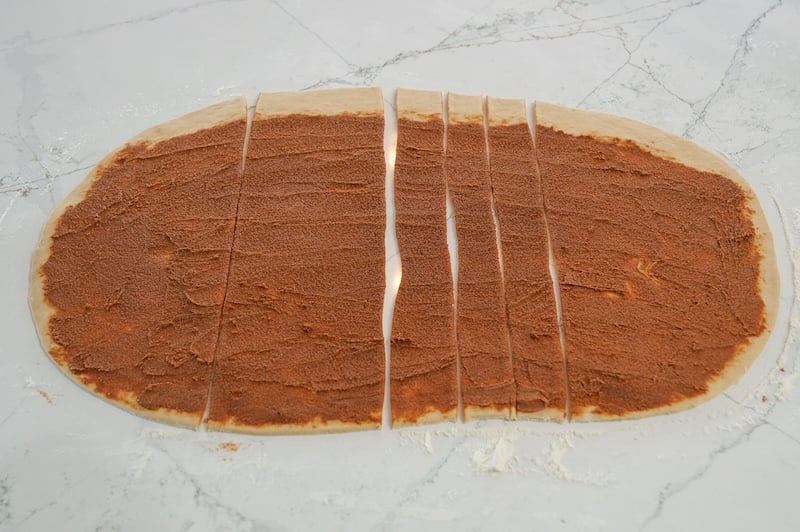
This will make a total of 12 cinnamon rolls that are ideally 1.5-2″ wide. Cut a little off each side to keep the strips tidy.

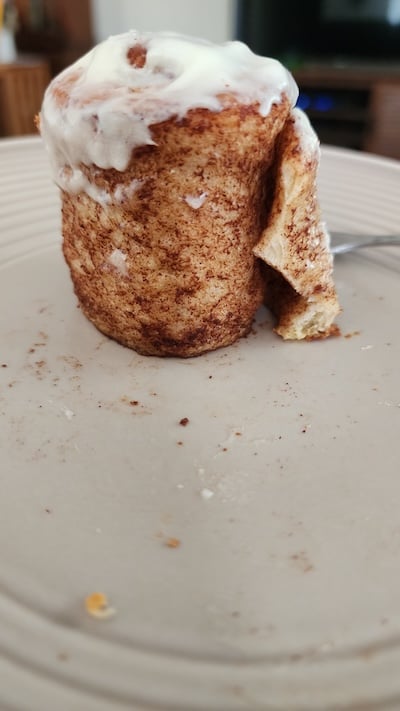
Tip: The wider your cinnamon roll strip is, the taller it will be in the pan. If it’s too tall, it can look awkward and start to tip over a little bit. To get those beautiful, wide cinnamon rolls that fill the pan nicely, try to stick to strips that are 1.5-2″ wide.
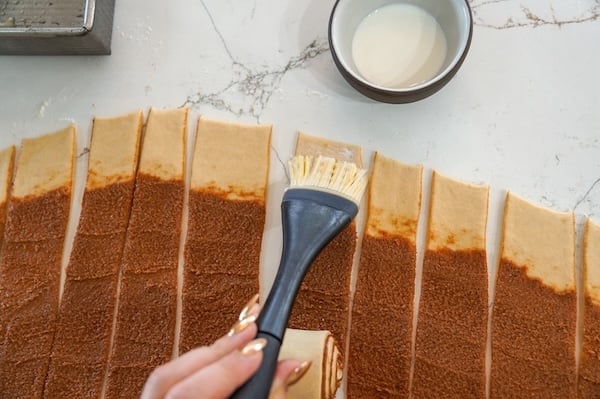
Roll up your strips, brushing a little milk or cream along the top edge to help the dough seal to itself.

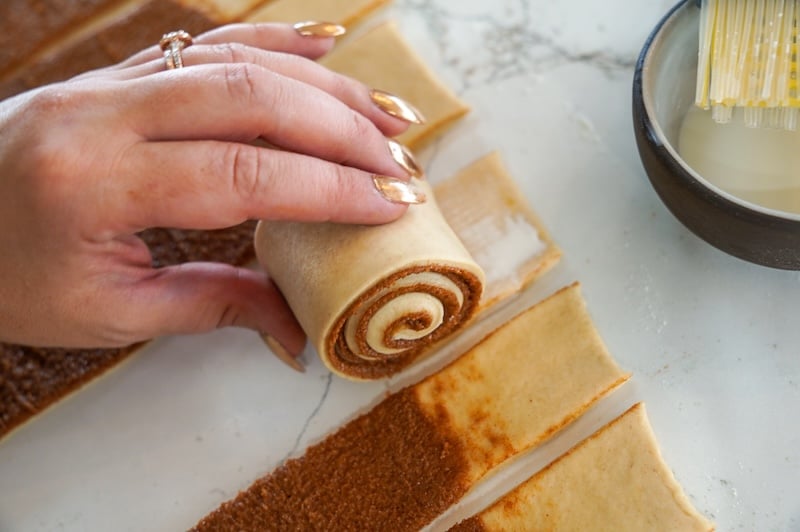
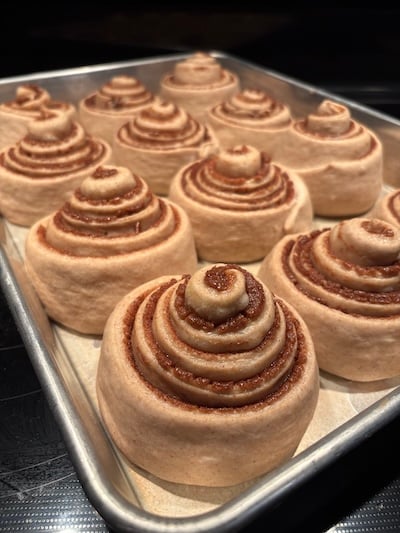
This process is SO FUN. Simply mesmerizing!

Note: If you’re not a fan of this rolling method for whatever reason, you can shape these the more traditional way. Roll the entire dough sheet into one log. Then, using a bench scraper (or dental floss), cut your 12 cinnamon rolls from that log.
Place your cinnamon rolls in a greased baking pan. I usually use avocado oil spray or the remnants of butter on a used butter wrapper.
As for pan size, 9″x13″ works just fine, but I find this USA Pan that’s 10″x16″ works the best. To clarify, the exterior measurement is 10″ x 16″ – internally, it’s 13.75″ x 10″.
Here’s a 9″x13″ pan:

And here is that 10″x16″ pan:

Don’t forget to set out 6 oz of cream cheese and 28 g of butter so they’ll be soft by morning and ready to make the icing.
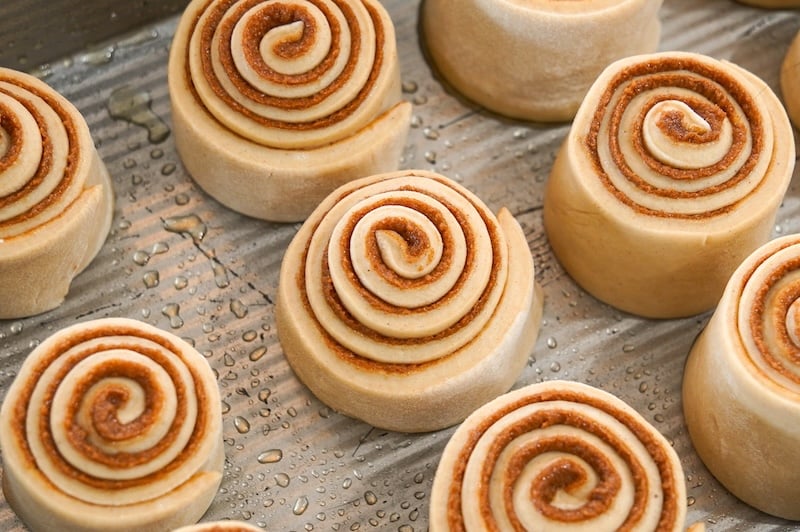
Step 7: Overnight Proof
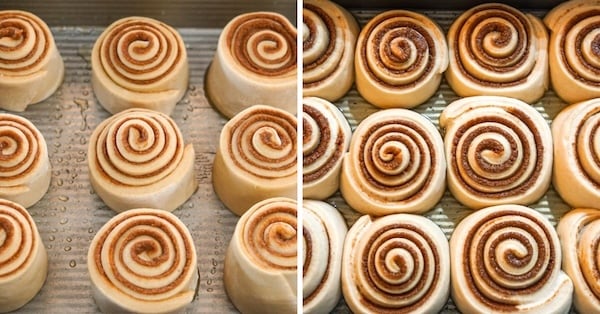
Cover the pan with plastic wrap and let the rolls rise on the counter overnight.
This should take about 10 hours at room temp (70–74°F / 21–23°C).
By morning, the rolls should look noticeably puffier, fill most of the pan, and be touching each other.

Under/overproofing: If your home is on the cool side and the rolls don’t look fully puffed up, put the pan in a warmer spot and let them continue rising. If they look overproofed (are overcrowding each other or are starting to collapse), bake them as fast as possible. For next time: keep them in a cooler spot overnight, or switch things up and do the second rise during the day when you can keep an eye on them.
Step 8: Bake
Preheat the oven to 350°F (175°C) conventional.
Pour 85 g (3 oz) of half & half evenly over the shaped rolls.
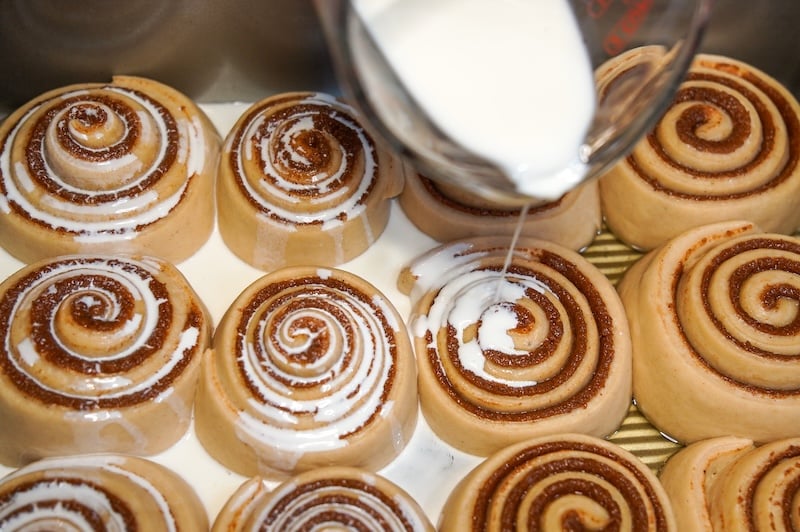
This soaks into the dough and makes the bottoms wonderfully gooey (almost caramel-like!). If you prefer a drier, less sticky-bottomed roll, you can skip this step.
Bake for 30–35 minutes, until golden brown and the centers register around 195°F (90°C).
Step 9: Choose the Icing or Glaze
I have two topping options: your classic cream cheese icing or a maple pecan glaze.
Many bakers dislike cream cheese, and many of you bake for your community, which prevents you from using it due to cottage food laws. In that case, try out the maple pecan glaze! This recipe was sent to me by follower Shelley Biemans. I modified it ever so slightly, but she gets all the credit here.
Both are ridiculously delicious.
To Make the Cream Cheese Icing
For the cream cheese icing, whisk together 28 g softened unsalted butter, 170 g softened cream cheese, 1 tsp vanilla, and 1 tsp cinnamon (optional) until smooth. (Use a hand mixer if a regular whisk isn’t getting the job done for you.)
Add 250 g powdered sugar and a pinch of salt. Continue whisking until the icing is smooth and creamy. It should be spreadable, but still flows when you spoon it on.
To Make the Maple Pecan Glaze
Tip: I don’t advise preparing the glaze ahead of time. Make the glaze when the cinnamon rolls come out of the oven, so you pour it on hot. It does not reheat well.

In a medium saucepan over medium heat, dry roast 100 g chopped pecans for 3-4 minutes, or until fragrant. Remove and set aside. (If you don’t like the pecan part of this, just leave them out entirely!)
In the now-empty saucepan, still on medium heat, add 28 g butter. Brown the butter for 2-4 minutes, or until deep golden brown and very fragrant (will smell nutty). Don’t look away or that dang butter will burn!
Take off the heat and stir in 20 g maple syrup, 100 g powdered sugar, and 5 g vanilla extract.
When the cinnamon rolls are out of the oven and have cooled for about 10 minutes, brush most of the glaze on the warm cinnamon rolls. Add the roasted pecans back to the saucepan, tossing them in the remaining glaze. Sprinkle these candied pecans over the cinnamon rolls.
Top with flaky sea salt. And do not look at the scale for the next week or so.
Step 10: Ice and Enjoy
When the cinnamon rolls come out of the oven, let them cool in the pan for about 10 minutes before icing (or glazing) and serving.
Enjoy!!
How To Store Sourdough Cinnamon Rolls
Cream cheese icing technically should be refrigerated, which gives you two main storage options:
- Option 1: Store separately (recommended) Keep the cinnamon rolls covered at room temperature for up to 3 days—thanks to the tangzhong, they’ll stay soft. Store extra icing in the fridge and add it when serving. This keeps the rolls from staling (which the fridge causes) while keeping the icing food-safe.
- Option 2: Store together in the fridge Cover your iced cinnamon rolls tightly and refrigerate for up to 5 days. The rolls will firm up a bit in the cold, so warm them gently before serving to bring back that fresh-baked softness.
My honest take: Growing up, my mom always kept leftover cinnamon rolls on the counter despite the cream cheese icing, and that’s honestly still my habit. If my kitchen isn’t super warm and we plan to eat them within a day or two, I cover the pan tightly with foil and keep them on the counter. That’s not the official food safety recommendation, but I thought I’d mention it.
If you’ve made the maple pecan glaze, your glazed cinnamon rolls can be stored on the counter, covered with foil, for up to 3 days. You can also store it in the fridge, but that’ll accelerate staling.
Reheating tip: Whether stored at room temp or in the fridge, a quick 10-15 second microwave zap or few minutes in a warm oven brings back that soft texture we want!
Freezing Sourdough Cinnamon Rolls
For longer storage, you can freeze these cinnamon rolls.
It was important to me to include freezer instructions – who doesn’t want incredible homemade sourdough cinnamon rolls in their freezer for when the occasion calls for it?! Instant crowd pleaser.
Option 1: Freeze after baking (easiest for foolproof thawing) Wrap the completely cooled pan with plastic wrap twice, then cover with foil. These will keep well for up to 2-3 months in the freezer. When you’re ready to serve, thaw in the fridge overnight and warm in the oven (covered with foil) at 350°F (175°C) for 15-20 minutes. You can freeze them iced or un-iced—whatever works for you.
Option 2: Freeze unbaked dough (more risky but feels more fresh) After you roll and cut your cinnamon rolls, instead of letting them rise overnight, pop the whole tightly covered pan straight into the freezer. Make the icing and put it in a freezer zip-top baggie.
When you want fresh cinnamon rolls, set the frozen pan (and the bag of icing) on the counter in the early evening. They’ll thaw and finish rising overnight, and should be bake-ready by mid-morning. If they’re not fully puffed when you wake up, just give them a little extra time.
And for the icing, just cut a corner off and pipe it right from the bag like a pastry bag. So easy!

My honest results: I tested the second method after 3 days in the freezer, and they turned out absolutely incredible—you would NEVER know they were previously frozen. I’m still testing how long the yeast stays viable (will update this as I learn more). But honestly? I’d prefer freezing them fully baked. No stress, no worry!
Ingredient Substitutions
Over 150 testers made successful ingredient substitutions. Here’s a look at what worked:
- Whole milk (in tangzhong): Any milk works perfectly! Multiple testers used 2% milk, almond milk, cashew milk, soy milk, and even a mixture of heavy cream and skim milk with excellent results. One Canadian baker specifically mentioned preferring soy milk over regular milk for the improved flavor profile.
- Whole milk (in main dough): 2% milk was the most popular successful substitution with multiple testers confirming “it worked perfectly.” Raw milk and lactose-free options also worked.
- Half & half (to pour on the rolls before baking): Heavy cream mixed with water to make half-and-half works beautifully – as one tester noted: “I don’t think I would be able to tell a difference. People could use all whipping cream or all milk, and I’m sure it would be fine, too.”
- Sugar (in stiff starter): Honey works great as a substitute – no other adjustments needed.
- Filling enhancements: Cinnamon bits from King Arthur Flour sprinkled over the regular cinnamon mixture add extra flavor and texture. One tester really loved that addition!
- Bread flour: While not extensively tested in this survey, one tester successfully used freshly milled flour with all milk instead of water in the main recipe.
“This cinnamon roll is absolutely delicious! My hubby took a few to work this morning and the guys said these were to die for and some of the words that were used were decadent, pillowy, so soft and asked if I could make more! I’ve also made some in the past with candied bacon! Trying that with this recipe next time! Scribbled bacon in the dough at shaping and some on top before baking.” –Recipe tester from Mesa, AZ
FAQs
Yes, you can use a regular active starter instead of a stiff sweet starter — you’ll just need to make a few adjustments to keep the dough balanced. If using a regular starter, use 175g of active starter (fed equal parts flour and water) in place of the stiff sweet starter, then adjust the main dough as follows:
Bread flour: 515g → 540g
Cool water: 100g → 75g
Add 25g sugar to the main dough
These adjustments account for the difference in flour, water, and sugar that the stiff sweet starter would have contributed. Keep in mind that skipping the sweet levain means your rolls may have a slightly more sour flavor, since the sugar in the stiff sweet starter helps buffer tanginess. If you’re not sensitive to sourdough tang, you likely won’t notice a big difference!
Yes, you can make these sourdough cinnamon rolls by hand! It takes more effort, but it’s very doable — one commenter even made a triple batch by hand. See the hand-mixing instructions in the step-by-step section for more tips.
Yes! Double or triple all components, including the stiff sweet starter and tangzhong. There’s also a built-in multiplier on the recipe card to make scaling easier.
Shorten the second rise – or do the second rise in a cooler place. Keep a closer eye on them and bake sooner than you normally would. Since the second rise happens while you sleep, you might consider refrigerating the rolls until the morning so you can bring them out and finish the second rise while you’re awake and can monitor their progress.
Just move them somewhere warmer and give them more time. There’s wiggle room in the proofing window — don’t rush to the oven if they don’t look ready.
Yes. The longer they sit in the fridge, the more pronounced the sour flavor will be — but they can theoretically hold for several days if needed.

Soft Sourdough Cinnamon Rolls
Equipment
- 3/4 L Weck jar (for your starter)
- Tovolo spatula (to feed your starter)
- Stand mixer (with dough hook)
- Pizza Cutter (or pastry wheel)
- 16" x 10" baking pan (interior dimensions: 13.75" x 10") | (9" x 13" also works)
Ingredients
Stiff Sweet Starter
- 25 g sourdough starter (ideally, fed within the last day – needs to be healthy!)
- 25 g sugar (or honey)
- 50 g warm water
- 100 g bread flour
Tangzhong
- 35 g bread flour
- 175 g whole milk
Main Dough
- All of the stiff sweet starter
- All of the tangzhong
- 80 g whole milk
- 100 g cool water
- 1 egg
- 5 g vanilla extract
- 25 g sugar
- 515 g bread flour
- 3 g cinnamon (optional)
- 12 g sea salt
- 84 g unsalted butter, softened
- 85 g half & half (for pouring over the rolls)
Filling
- 142 g unsalted butter, softened
- 175 g brown sugar
- 16 g cinnamon
Cream Cheese Icing (Option 1)
- 28 g unsalted butter, softened
- 170 g cream cheese, softened
- 250 g powdered sugar
- 1 tsp vanilla extract
- 1 tsp cinnamon (optional)
- Pinch of salt
Maple Pecan Glaze (Option 2)
- 100 g chopped pecans (optional)
- 28 g butter
- 20 g maple syrup
- 100 g powdered sugar
- 5 g vanilla extract
- Flaky sea salt (for finishing)
Before You Begin

Instructions
- Before you begin: This is a 3-day process, so plan accordingly (See Notes)! Also, this recipe has two topping options: a classic cream cheese icing or a maple pecan glaze. Choose one (not both!).
Make the Stiff Sweet Starter
- In the early evening (5-8pm), mix 25 g sourdough starter, 25 g sugar, 50 g warm water, and 100 g bread flour until it forms a ball. Knead outside of the jar to fully incorporate the ingredients. Cover loosely and let ferment in a warm place until morning. See Notes for timing and tips.

- Set out your butter for the main dough so it's softened by morning.
- Note: You can make the tangzhong (see next step) right now and refrigerate it overnight, if preferred.
Make the Tangzhong
- In the morning, mix 35 g bread flour and 175 g whole milk in a microwave-safe bowl. Microwave in 30-second intervals, stirring between each, until thickened and reaches 150°F (65°C). For me, it usually takes 3-5 rounds to finish.

- Let rest on the counter (or in the fridge) until the mixture has cooled down to below 80°F (26°C). If it's too hot, it can kill your starter or scramble the egg in the dough.
Make the Dough
- In stand mixer bowl fitted with a dough hook, combine All of the stiff sweet starter, All of the tangzhong, 100 g cool water, 80 g whole milk, 1 egg, 5 g vanilla extract, 25 g sugar, 515 g bread flour, 3 g cinnamon, and 12 g sea salt. Mix on low 2-3 minutes until incorporated, then medium-low 7-15 minutes until smooth.Note: Lower wattage stand mixers (250-325W) may need 15-20 minute rest breaks if they get hot. They may also take double or even triple the time estimates referenced here. You can finish with hand kneading if your machine isn't getting the job done. Higher wattage mixers (500-650W) typically don't need pauses and should get the job done in the times referenced here.
- Reduce to low speed and add 84 g unsalted butter, softened, one pat at a time, waiting for incorporation between additions. Mix 2 minutes more until very smooth.
First Rise
- Transfer your soft, smooth dough to a lightly oiled bowl, cover, and let rise in a warm place (75-85°F/24-29°C) until risen by about 30% and small bubbles appear around the sides of the bowl (3-6 hours).
- Place the bowl of dough in the fridge until bedtime. Also, set out your stick of butter so it's ready to make your filling later!
Shape the Rolls
- Right before bed, pull your chilled dough out of the fridge. In a medium-sized bowl, whisk together your filling: 142 g unsalted butter, softened, 175 g brown sugar, and 16 g cinnamon.
- Generously flour your work surface and dump out the dough. Flour the top of your dough.

- Roll into a rectangle that’s about ¼” thick. Aim for the width of the rectangle to be between 18-24″. While you roll, lift the sheet of dough regularly to prevent sticking; push additional flour underneath with a bench scraper as needed.

- Spread filling on dough with a spatula, leaving a 1-inch gap at top.
- Use a pizza cutter or pastry wheel to cut the sheet in half.
- Then, cut each half in half again (to make four sheets).
- Now, each sheet can be cut into three equal strips.
- This will make a total of 12 cinnamon rolls that are ideally 1.5-2″ wide. Cut a little off each side to keep the strips tidy.
- Roll up your strips, brushing a little milk or cream along the top edge to help the dough seal to itself.

Second Rise
- Place your cinnamon rolls in a greased baking pan, cover with plastic wrap, and let proof on the counter overnight. This worked great for me doing about 10 hours at 70-74°F (21-23°C). And honestly, I could have gone a little longer – there's wiggle room in the proofing time with these!
- Try not to go above 77°F (25°C), or the butter may melt out of the rolls, puddling in the bottom of the pan. You also risk slight overproofing.
- If making the cream cheese icing, set out your cream cheese and butter so they're softened by the morning.
Bake
- In the morning, preheat your oven to 350°F (175°C). Pour 85 g half & half over the cinnamon rolls and bake for 30-35 minutes, or until the internal temperature is around 195°F (90°C). Toward the end of baking, if rolls are getting too dark, tent with foil.

Icing or Glaze
- While the rolls are baking, make your icing or glaze – there are two options to choose from! The first is a classic cream cheese icing, and the second is a maple pecan glaze.
- Icing (Option 1): Whisk together 28 g unsalted butter, softened, 170 g cream cheese, softened, 1 tsp vanilla extract, and 1 tsp cinnamon. Then, add 250 g powdered sugar and a Pinch of salt. Note: 59% of recipe testers loved the icing amount as written, while 37% would reduce it—28% by a quarter and 9% would cut it in half. Adjust accordingly.
- Glaze (Option 2): In a medium saucepan over medium heat, dry roast 100 g chopped pecans for 3-4 minutes, or until fragrant. Remove and set aside. In the now-empty saucepan, add 28 g butter. Brown the butter for 2-4 minutes, or until deep golden brown and very fragrant (will smell nutty). Take off heat and stir in 20 g maple syrup, 100 g powdered sugar, and 5 g vanilla extract. Brush most of the glaze on the warm cinnamon rolls. Add the roasted pecans back to the pan, tossing them in the remaining glaze. Sprinkle candied pecans over cinnamon rolls. Top with Flaky sea salt.
- When the cinnamon rolls are finished, let cool for about 10 minutes before adding your icing or glaze. Enjoy!
Storage
- Store un-iced rolls covered at room temperature for up to 3 days (store cream cheese icing separately in fridge), or refrigerate iced rolls for up to 5 days.
- For longer storage, freeze baked rolls (wrapped well) for up to 3 months—thaw in fridge overnight and reheat at 350°F (175°C) for 15-20 minutes. You can also freeze unbaked shaped rolls and let them thaw/rise overnight on the counter before baking. Reheat any stored rolls briefly in the microwave or warm oven to restore softness.
Video

Notes
Other sweet bread recipes that’ll have you avoiding the scale for a while:
- Cinnamon Raisin Swirl Sourdough Bread Recipe (Pepperidge Farms Copycat)
- Cinnamon Swirl Sourdough Bread Recipe: No Stress, No Leaks
- The Best Lemon Blueberry Artisan Sourdough Bread Recipe
- The Best Sourdough Hot Cross Buns Recipe (So Soft!)
Conclusion
These are the gooey, fluffy, wildly soft sourdough cinnamon rolls I’ve been waiting for!! I’m so glad that many of you agree:
“I’ll definitely be making these again! Cinnamon rolls are a big favorite in our home, and this recipe has everything we love about them. They come out soft and chewy without being gummy, and the icing is sweet but not over the top—you just want to keep going back for another bite. There’s no sour tang from the sourdough, just that cozy, classic cinnamon roll flavor. You really nailed it—these beat every recipe I’ve tried and even the ones I’ve bought!” –Recipe tester from Kissimmee, FL

I’ve always wanted overnight sourdough cinnamon rolls that are bake-ready for breakfast, and I feel like we landed on an incredible staple recipe that I can’t wait to riff on.
Please let me know if you make these, and how it went, in the comments section below. Happy baking!


I am awaiting my oven to preheat…but, what size pan do you use? Mine have completely filled a 9×13 and have zero space between them. I’m hoping the overcrowding doesn’t affect the bake. They looks amazing so far! You have never shared a recipe that hasn’t turned out amazing, so I can’t wait to bake these!
I used a 10×16 pan and found that to be better. I posted a comparison between a 9×13 and the 10×16 in the blog post if you want to check that out!
Sitting in hospital with sister who is struggling to overcome some serious health problems. Just read this cinnamon roll recipe & they are a must bake soon.
Thank you for sharing!
I’m so sorry about your sister, sending her all the prayers!