
The Best Sourdough Hot Cross Buns Recipe (So Soft!)

Not gonna lie: before undertaking this recipe development, I’d never eaten a hot cross bun. Until now, I only knew how to play it on the recorder (flashback to 5th grade, anyone?).
Hot cross buns are traditionally eaten on Good Friday, and they seem to be most popular across the pond (hello friends in the British Commonwealth and Australia!).

Even though I’d never tasted one of these spiced, slightly sweet buns decorated with a cross, I kept seeing them everywhere.
Pinterest trends? Hot cross buns.
Google searches? Hot cross buns.
DMs from followers? Do you have a recipe for hot cross buns?
After a nudge from my sourdough-baking friend, Samantha, I decided to go for it.
The existing recipes online looked either unappetizing or dense. With enough recipe testing and brainpower, I knew I could solve both problems. And solve, we did.

Why You’ll Love These Sourdough Hot Cross Buns
- Not a hint of sourness thanks to the sweet stiff starter—you’d never know these are naturally leavened! Perfect for those who appreciate sourdough’s benefits but don’t want that tangy flavor in a sweet bun.
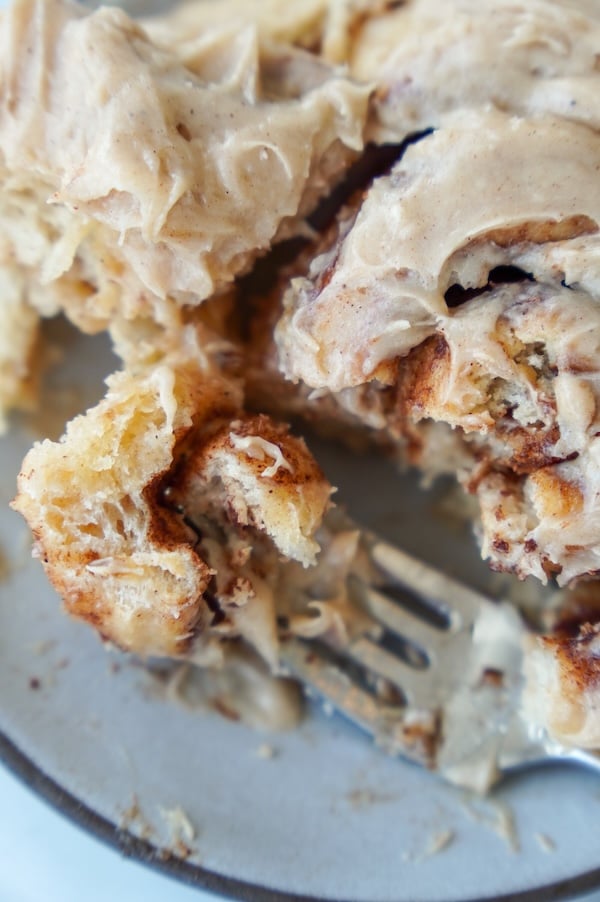
- Incredibly soft, fluffy texture that puts store-bought buns to shame. The tangzhong works its magic here, creating a super soft, moist interior. As one tester from Australia noted, “The buns were very fluffy!”
Learn more: Tangzhong: The 3-Minute Secret to Softer Sourdough
- Stay fresh longer than traditional buns—again, thanks to the tangzhong technique. The pre-gelatinized starches hold moisture beautifully, keeping these buns from going stale for days.
- Perfect spice balance that we meticulously tested and tweaked. One tester raved, “I especially loved the spices—the cardamom and cinnamon worked really well.” The warm blend of cinnamon, allspice, cardamom, and nutmeg creates depth without overwhelming.
- Zero waste recipe that uses the entire orange (both zest and juice) and even repurposes the raisin-soaking liquid for the glaze—a small but satisfying sustainability win!
- Overnight fermentation means most of the work happens while you sleep. The clear timeline lets you easily plan around your schedule, with the bulk of proofing happening overnight.
- Just the right sweetness as confirmed by multiple testers. One mentioned the glaze was “perfect; not overly sweet” while still adding that special hot cross bun flavor.
- Caramelized bottoms develop when the orange glaze seeps beneath the warm buns, creating an irresistible sticky, sweet foundation that elevates these buns to another level.

- Worth the effort, as one tester put it: “Although it was a lengthy process I think it was worth it. They’re delicious—even my raisin-hating daughter likes them!”
- Tested around the world by 18 bakers from Florida to Wisconsin to Western Australia, in all different kitchen environments. Their feedback has been invaluable in perfecting every aspect of these buns.
“I left them in the oven for about 3-4 mins longer which gave them a lovely crunchy crust but still super soft inside. The orange mix on top really gave them extra flavor you don’t normally get with hot cross buns.” — Amanda D., Recipe tester from Australia

Baker’s Timeline
| Day | Time | Step |
|---|---|---|
| Day 1 | Evening (8-9 PM) | Prepare sweet stiff starter and cross piping starter, set out butter |
| Day 2 | Morning (8-9 AM) | Soak raisins, prepare tangzhong, mix dough |
| Morning (9-10 AM) | First dough rest (around 30 minutes) | |
| Mid-Morning (10 AM) | Add raisins | |
| Morning to Afternoon (10 AM-3 PM) | First rise [approximately 4-6 hours at 78-80°F (25.5-26.6°C)] | |
| Afternoon (3 PM) | Shape buns, place in baking dish | |
| Afternoon to Evening | Refrigerate shaped buns (until bedtime) | |
| Evening (9-10 PM) | Remove from refrigerator | |
| Evening to Day 3 Morning | Second rise overnight at room temperature (12+ hours) | |
| Day 3 | Between 8 AM-12 PM | Apply egg wash and crosses, bake, glaze |
How long each step took me:
- Prepare the sweet starter: 3 minutes
- Prepare the tangzhong: 6 minutes
- Prepare the raisin soak: 3 minutes
- Make the dough (gathering ingredients and the long initial mix): 17 minutes
- Incorporate raisins: 3 minutes
- Shape the buns: 9 minutes
- Egg wash and cross piping: 4 minutes
- Add glaze: 1 minute
Total time you are actively needed (not including the rise times): 46 minutes
Step-by-Step Instructions with Process Photos
These fluffy, fragrant sourdough hot cross buns are worth every minute you’ll spend making them!

I’ve broken down the process into simple steps with all the tips and tricks I’ve learned from testing (and re-testing) this recipe with the help of 18 amazing recipe testers across different climates and skill levels.
“Wow!! These hot cross buns are honestly the best I’ve ever tried!” — Amanda D., Recipe tester from Australia
Day 1: Preparing Your Starters (Evening)
Step 1: Make the Sweet Stiff Starter


The stiff, sweet starter is the secret to these buns’ pillowy texture and most notably, the lack of sour flavor in the final product! You’d never know these were made with a sourdough starter (but your gut will).
Unlike a regular, 100% hydration starter, this one gets a boost of honey and has a much lower hydration. The texture is just like a stiff dough!
What you’ll need:
- 10g active sourdough starter
- 10g honey
- 40g water
- 80g flour
How to do it:
- Mix all ingredients in your jar until well combined. You’ll probably want to take it out of the jar at some point and knead it between your hands to fully incorporate everything. The mixture will be quite thick and stiff—that’s exactly what we want!
- Close the lid (or gently set it on top of the jar) and let it ferment overnight at room temperature.
Tip: Use a half-liter jar at minimum—this starter can triple in size overnight!


“I mixed in a glass 1 cup measuring cup and was just going to cover and leave overnight but I wasn’t sure how much rise I would get so I moved to a bigger jar. When I woke up it had easily tripled or more. So I would have had a mess if I left in the original container!” — Tracey A., Recipe tester
What to expect: By morning, your starter should be puffy, visibly increased in size, and domed on top. It might not look as bubbly as your regular starter, but that’s normal for a stiff starter.
Step 2: Prepare Cross Piping Starter (Optional)
Making a dedicated starter for your crosses ensures perfect piping consistency. If you already have thick discard in your fridge, you can use that instead.
What you’ll need:
- 10g sourdough starter
- 50g water
- 60g flour
- Small container with lid
How to do it:
- Mix all ingredients until smooth.
- Cover and let ferment overnight alongside your sweet stiff starter.
Tip: This mixture should be thicker than typical discard to hold its shape when piped. If your regular discard is runny, this is definitely worth making! If you forget this, you can always mix 60g flour with 50g water the day of baking (it just won’t be fermented).
Step 3: Set Out Butter
Don’t forget to take out your butter (55g, about half a stick) and leave it on the counter to soften overnight. Future you will thank you for this simple step!
You can always stick it in the microwave on the soften setting if you forget.
Day 2: Making and Proofing the Dough (Morning)
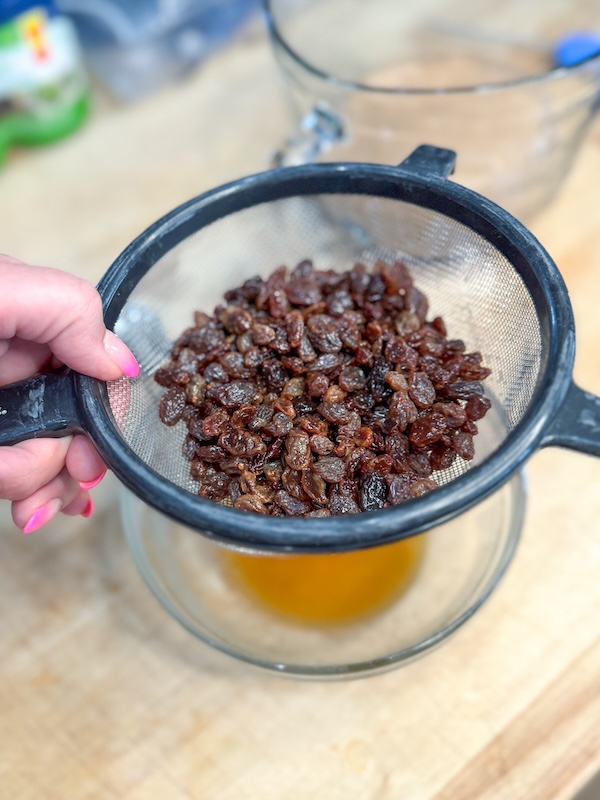
Step 4: Soak the Raisins
Soaking the raisins should happen first thing in the morning to ensure they plump up before adding them to your dough. You could also do this the night before if you prefer!
What you’ll need:
- 150g raisins
- 1 large orange
- 10g vanilla extract (about 2 tsp)
- 13g hot water (about 1 tbsp)
- Small bowl
How to do it:
- Zest your orange first and set the zest aside for the dough. (It’s a lot easier to zest a whole orange than one that’s already cut in half!)

- Juice the orange—you’ll need about 50g (3 tbsp) for the raisins.
- Combine raisins, orange juice, vanilla extract, and hot water in a bowl.
- Cover and let soak for at least an hour.

Tip: The raisins won’t be fully submerged—that’s normal! Just give them a stir occasionally to ensure they all get some soaking time.
Step 5: Prepare the Tangzhong
Tangzhong is a game-changer for achieving that perfect soft texture that stays fresh longer.
What you’ll need:
- 25g all-purpose flour
- 125g whole milk
- Small whisk
- Microwave-safe bowl
Microwave Method:
- Whisk flour and milk until no lumps remain.
- Microwave in 20-second intervals, stirring between each.
- After 4-5 intervals (total 80-100 seconds), the mixture will transform into a thick, pudding-like paste.
- It’s ready when it reaches about 150°F (65°C).
- Cool in refrigerator for 5-10 minutes until below 100°F (38°C).


Stovetop Alternative:
- Whisk flour and milk in a small saucepan.
- Heat over medium heat, stirring constantly.
- Cook until the mixture thickens and reaches 150°F (65°C) (about 3-5 minutes).
- Cool to below 100°F (38°C) before using.
Tip: You can make tangzhong up to 2 days ahead and store it in the fridge!
Step 6: Mix the Dough
Time to bring everything together! This enriched dough is a joy to work with once it develops properly.
What you’ll need:
- Stand mixer with dough hook (or strong arms for hand-kneading!)
- All your sweet stiff starter
- Cooled tangzhong
- 370g all-purpose flour
- 55g softened butter
- 65g sugar
- 1 egg
- 2 1/2 tsp cinnamon
- 1/2 tsp allspice
- 1/4 tsp cardamom
- 1/4 tsp nutmeg
- Pinch of clove (optional)
- 5g salt
- Orange zest from Step 4
- 100g whole milk
How to do it:
- Add all the ingredients to your stand mixer bowl.
- Mix on low speed (speed 2) for 2-3 minutes until combined.
- Increase to medium speed (speed 4) and knead for 6-8 minutes.
- (Optional) Transfer to a glass bowl with milliliter markings on the side. This allows you to easily track exactly how much your dough has risen without guessing.


What to expect: The dough will start quite sticky and might cling to the sides of the bowl. As you continue kneading, it will gradually pull away and become smooth, elastic, and glossy. Be patient—this transformation takes a while.
You’ll know the dough is fully developed when you can get a decent windowpane (or you can stretch the dough thinly enough to see light through it without tearing).

“The dough itself was quite thick, and since I had never used a stiff starter before, I was especially grateful to have my mixer rather than mixing by hand!” — Nicole K., Recipe tester
Hand-kneading instructions:
- Mix all ingredients in a large bowl until roughly combined.
- Turn onto a clean surface (minimal flour!) and knead for 8-10 minutes.
- Use the slap and fold technique: slap the dough onto the counter, fold it over itself, repeat!
“I mixed my dough and kneaded it by hand as I don’t have a stand mixer. I used some slap and folds which really helped get the dough nice and smooth. I kneaded it for around 8 mins.” — Amanda D., Recipe tester from Australia
Tip: Resist the urge to add more flour! The dough will come together with proper kneading. Too much added flour will cause the buns to be dense.
Step 7: First Rest
How to do it:
- Place the dough in a glass bowl (ideally one with measurement markings).
- Cover with plastic wrap or a damp towel.
- Let rest for 30 minutes in a warm spot (78-80°F is ideal).

Tip: If you don’t have any kind of warming device or proofing box, use the oven with the light on! If the light doesn’t contribute warmth, place a cup of boiling water in the oven instead.
“Rise times!! I do not have a proofing box and we are located in northern WI. My house stays at 68° regularly. I opted for proofing the dough in the oven with the light on and it worked wonderfully! After two hours in the oven with the light on, my dough temped at 80.6°. So, I turned the light off, checked the temperature occasionally, and turned the light on/off, based on those temperature checks.” — Kayley F., Recipe tester from Wisconsin
Step 8: Incorporate Raisins


This step requires a bit of elbow grease, but it’s worth it!
How to do it:
- Drain the soaked raisins, reserving the liquid for your glaze. Store liquid in the fridge.
- Pat raisins dry with paper towels or use cheesecloth to squeeze out excess moisture if desired.
- Add raisins to the dough and incorporate by hand using a stretch-and-fold technique. Then, switch to squeezing the raisins into the dough. Don’t be afraid to really work them in!
“Those raisins really didn’t want to get incorporated so that step really needed some time – but worth it in the end.” — Kristine G., Recipe tester
“I accidentally added my soaked raisins with the rest of my ingredients when I mixed the dough. Now I know that it creates a VERY sticky dough that will not hold its shape when you do that. So I had to work in some more flour by hand.” — Candice R., Recipe tester
Tip: I tried using the stand mixer for this step—it didn’t work well. The raisins just swirled around in the bottom of the bowl and stuck to the outside of the dough ball, never incorporating. Your hands are the best tools here!
About the raisin soak:
“Soaking the raisins in the orange mix really made them pop.” — Amanda D., Recipe tester from Australia
Step 9: First Rise
This dough will require a little trust and patience.
Why? The cinnamon in this recipe slows down fermentation. Cinnamaldehyde, the main flavor compound in cinnamon, has natural antifungal properties. Since sourdough relies on yeast (which is a fungus), the cinnamon actively inhibits its growth.
This is why these buns need more time to rise than your typical sourdough bread. Combined with the enrichments like butter and milk, which also slow fermentation, patience becomes essential when making these buns!

How to do it:
- Return the dough to your bowl and cover.
- Place in a warm spot (78-80°F or 25.5-26.6°C) for 4-6 hours.
- The dough should roughly double and be noticeably puffy.
Creating a warm spot:
- Proofing box: Set to 78-80°F (25.5-26.6°C).
- Oven with light: Turn the light on, monitor the temperature, and adjust by turning it on/off.
- Near a warm appliance: Place near a refrigerator exhaust or other warm (not hot) spot.
- Warm water method: Place bowl on a heating pad on low, or over a bowl of warm water that you refresh periodically.
Tip: The temperature really matters here! At 70°F (21°C) or lower, your rise will take approximately 7 business days. (Kidding, but it sure feels like it!) At 78-80°F (25.5-26.6°C), it should be done in 4-6 hours.
Day 2: Shaping and Final Rise
Step 10: Shape the Buns
After that dough has finished its first rise, it’s time to dump it out, shape it into balls, and let it do its final proof.


What you’ll need:
- Kitchen scale (ideally)
- Bench scraper
- 9×13-inch baking dish, greased
How to do it:
- Turn dough onto a clean work surface (minimal flour).
- Divide into 12 equal pieces (about 90g each).
- Shape each piece into a ball:
- Flatten slightly
- Pull edges into the center
- Flip over
- Cup your hand around the dough
- Rotate and drag in small circles to create tension
- Arrange in your greased baking dish with small gaps.

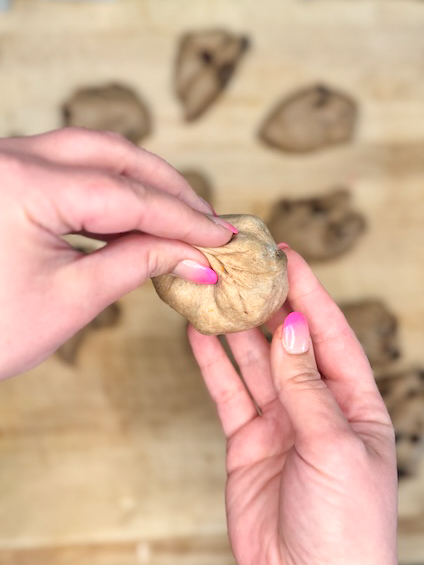
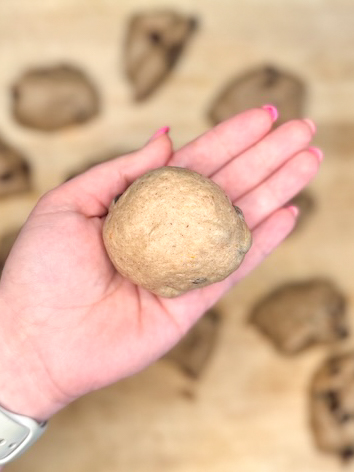
Tip: Resist using flour during shaping; if you must, do a very light dusting.
Step 11: Second Rise (Overnight with Refrigeration)


How to do it:
- Cover the shaped buns with plastic wrap or a damp towel.
- Refrigerate until bedtime. This is somewhat optional – if you have a cool home, it’s not necessary. I added this to ensure the buns don’t somehow overproof while you’re sleeping (which is unlikely, but still).

- Remove from refrigerator in the evening before you go to bed.
- Let rise on the counter, at room temperature, overnight (12+ hours).
- Bake in the morning or early afternoon (depending on when they puff up fully). If the buns aren’t puffy and inflated by morning, let them continue rising until they are – then bake!
Why this method works: The cold refrigerator slows fermentation, giving us flexibility with timing. The long, slow overnight rise at room temperature then develops amazing flavor while bringing the dough to perfect proofing.
How to tell when they’re ready: The buns should be puffy and touching each other. If you lightly poke the top, it should feel puffy and aerated.
Day 3: Baking Day
Step 12: Final Touches & Baking
What you’ll need:
- Preheated 375°F oven
- Egg wash (1 egg + 1 tsp water)
- Pastry brush
- Piping bag with small round tip (or plastic bag with tiny corner cut)
- Your cross piping starter
- 75g powdered sugar
- Reserved raisin liquid (or fresh orange juice + vanilla)
How to do it:
- Preheat oven to 375°F.
- Brush buns with egg wash.

- Pipe crosses using your sourdough starter in a piping bag.


- Bake for 25-31 minutes until golden brown (internal temp 190°F).
- While baking, prepare glaze by mixing powdered sugar with reserved raisin liquid.
- Brush warm buns with glaze immediately after baking.


- Cool in the pan for 10 minutes, then transfer to a wire rack.
“I struggled piping the crosses using a zip lock bag so they don’t look the best.” — Amanda D., Recipe tester from Australia
“For the discard crosses – I feel like mine came out skinny and kinda disappeared into the bread – so maybe piping a double line or just using a thicker starter would have helped. I did use fridge discard so it was on the runnier side.” — Recipe tester
💡 Tip: For the prettiest crosses, use a metal piping tip or make a very small cut in your plastic bag. The crosses will spread slightly during baking, so pipe them a bit thinner than you want them to end up.
“Applying the crosses to the buns was slightly challenging for me while using just a ziplock because the starter seemed to not want to stick to the buns, or let go from the tip of the bag. I would advise making the hole in the corner of the bag as little as possible to have better control. Second time, I used a piping bag with a metal tip and that worked just fine because I was able to have more control/release the starter from each bun more easily.” — Recipe tester

Hot Cross Buns FAQs
What if my dough isn’t rising?
- Check your temperature—below 75°F, this dough rises very slowly
- The enrichments (butter, spices) naturally slow fermentation—be patient!
“I wish I had extended the rise time for a better result.” — Nicole K., Recipe tester
What if the crosses disappear during baking?
- Your starter might have been too thin—try the thicker cross piping starter next time
- Try piping thicker lines or double-piping
“I liked using the discard for the crosses but that bright white color contrast just isn’t there; however, this may just be a personal preference!” — Kim M., Recipe tester
What if the buns are too dense?
- Increase proofing time
- Make sure you kneaded long enough initially
- Ensure your temperature stayed warm enough
“I’m not sure what the texture should be, but it’s almost like a sweet dinner roll, albeit a bit more doughy, which I attribute to the sourdough starter, I assume.” — Candice R., Recipe tester
What if I have glaze issues?
You can make a fresh glaze if you don’t want to use the raisin soaking liquid.
“Glaze – after soaking the raisins and reserving the liquid…. it looked brown and cloudy so I made fresh for the glaze. Maybe my raisins were just weird (they baked up well after soaking though) just couldn’t bear to use that reserved liquid. I made 2 Tbsp OJ + 1/4 tsp vanilla extract and mixed that with the powdered sugar – was perfect!” — Kristine G., Recipe tester
How to Store Hot Cross Buns
These buns are best the day they’re baked but will stay soft for 2-3 days in an airtight container at room temperature. They also freeze beautifully for up to 3 months!
To reheat: Warm in a 300°F oven for 5-7 minutes or microwave individual buns for 15-20 seconds.
Serving suggestions:
- Classic: Split and spread with salted butter
- Decadent: Spread with cream cheese
- Breakfast: Use for mini French toast
- Dessert: Split and fill with whipped cream and fresh berries

Soft Sourdough Hot Cross Buns
Equipment
- Oval metal piping tip (optional)
- Piping bags (can use zip-top bag instead)
- Proofing box (can use oven with light on)
Ingredients
Sweet Stiff Starter (Night Before)
- 10 g sourdough starter
- 10 g honey
- 40 g water
- 80 g flour
Cross Piping Starter (Night Before, Optional)
- 10 g sourdough starter
- 50 g water
- 60 g flour
Soaked Raisins
- 150 g raisins
- 50 g orange juice (freshly squeezed from 1 orange)
- 10 g vanilla extract
- 13 g hot water
Tangzhong
- 25 g all-purpose flour
- 125 g whole milk
Main Dough
- All of your sweet stiff starter
- All of the tangzhong (cooled below 100°F)
- 370 g all-purpose flour
- 55 g butter (unsalted, softened)
- 65 g sugar
- 1 egg
- 2 1/2 tsp cinnamon
- 1/2 tsp allspice
- 1/4 tsp cardamom
- 1/4 tsp nutmeg
- Pinch of clove (optional)
- 5 g salt
- 3 g orange zest
- 100 g whole milk
Finishing Touches
- 75 g powdered sugar (for glaze)
- Remaining liquid from draining the soaked raisins (for glaze)
- 1 egg (for egg wash)
- 4 g water (for egg wash)
Instructions
Day 1 (Evening)
- Make stiff, sweet starter: Mix 10 g sourdough starter, 10 g honey, 40 g water, and 80 g flour in a half-liter jar. Make cross piping starter: If desired, prepare cross piping starter by mixing 10 g sourdough starter, 50 g water, and 60 g flour in separate container.* Let both ferment overnight.

- Set out butter to soften overnight.
Day 2 (Morning)
- Prepare raisins: Zest orange and set zest aside. Juice orange and combine 50 g orange juice, 150 g raisins, 10 g vanilla extract, and 13 g hot water. Let soak (1+ hour).
- Make tangzhong: Whisk 25 g all-purpose flour and 125 g whole milk. Microwave* in 20-second intervals until thickened (150°F or 65°C). Cool in fridge for 5-10 minutes.
- Mix dough: In your stand mixer bowl, add All of your sweet stiff starter, All of the tangzhong, 370 g all-purpose flour, 55 g butter, 65 g sugar, 1 egg, 2 1/2 tsp cinnamon, 1/2 tsp allspice, 1/4 tsp cardamom, 1/4 tsp nutmeg, Pinch of clove, 5 g salt, 3 g orange zest (from prior step), and 100 g whole milk. Using the dough hook attachment, mix on low speed for 2-3 minutes; then increase to medium speed and knead for 6-8 minutes until dough passes the windowpane test.*
- Rest: Cover dough and rest 30 minutes.
- Add raisins: Drain raisins (reserve liquid for the glaze). Fold and squeeze raisins into dough by hand.
- First rise: Let dough rise at 78-80°F (25.5-26.6°C) for 4-6 hours until doubled.

- Note: If you've made the starter for piping the crosses, once it has peaked, feel free to put it in the refrigerator until it's time to bake.
Day 2 (Afternoon to Day 3)
- Shape: Divide dough into 12 equal pieces (90g each). Shape into balls and place in greased 9×13-inch dish. Cover with plastic wrap.

- Chill: Refrigerate shaped buns until bedtime.

- Second rise: Remove from refrigerator in the evening and let rise at room temperature overnight (12+ hours).

Day 3 (Baking Day)
- Preheat oven to 375°F (190°C).
- Egg wash: Mix 1 egg and 4 g water. Brush on top of buns.

- Pipe crosses onto buns with cross piping starter (or thick discard).

- Bake 25-31 minutes until golden [internal temp 190°F (88°C)].
- Make glaze with 75 g powdered sugar and Remaining liquid from draining the soaked raisins.
- Brush glaze on warm buns.
- Cool 10 minutes in pan, then transfer to rack.


Notes
- Starter Container: Use at least a half-liter jar as your starter will likely triple overnight.
- Cross Piping Starter: This is optional because you can also use sourdough discard if it’s thick enough. If your discard is runny, it’ll be a hot mess!
- Windowpane Test: After kneading, the dough should pass the windowpane test—take a small piece of dough and gently stretch it between your fingers. If it stretches thin enough to see light through without tearing, it’s developed enough gluten.
- Tangzhong: You can make the tangzhong up to 2 days in advance; keep in fridge. You can also make the tangzhong on the stovetop if you prefer. Heat over medium heat until the mixture reaches about 150°F and is thick like pudding.
- Temperature Matters: For best results, keep the dough around 78-80°F. Below 75°F, the dough will rise much more slowly. Your oven with just the light on works well as a proofing environment. If the light doesn’t provide enough warmth, place a cup of boiling water in the oven (refresh as needed).
- Cinnamon Effect: Cinnamon contains compounds that naturally slow down fermentation, which is why these buns need a lot more time to rise than regular bread.
- Raisin Incorporation: It’s best to mix raisins in by hand rather than with a stand mixer. Using cheesecloth to squeeze out excess moisture from the soaked raisins can make them easier to incorporate into the dough.
- Shaping Tips: When shaping the buns, use minimal flour (ideally none!) on your work surface. Too much added flour will cause the buns to be dense.
- Refrigeration: The refrigeration step isn’t just for convenience—it helps prevent overproofing and enhances flavor development. When removing from the refrigerator, the buns may appear to deflate slightly; this is normal, and they’ll rise again during the overnight proof.
- Cross Piping: For well-defined crosses, use a metal piping tip or make a very small hole in a zip-top bag.
- Glaze Options: If you don’t want to use the raisin soaking liquid for any reason, you can opt to make a fresh glaze with 2 Tbsp orange juice, 1/4 tsp vanilla, and powdered sugar.
- Storage & Reheating: Best on baking day; stays fresh 2-3 days in an airtight container. Freezes well for up to 3 months. To reheat, warm in a 300°F oven for 5-7 minutes or microwave individual buns for 15-20 seconds.
Substitutions
- All of the spices: you can use pumpkin pie spice instead of the custom spice blend. I almost went with this for the final recipe but really preferred this custom blend we created. I also didn’t want the ginger in this recipe, but it’s not that big of a deal!
- Raisins: you can leave the raisins out if you don’t like them. Some of the recipe testers also experimented with other dried fruit, like cranberries. The world is your oyster here!
- Stiff sweet starter: you can omit the honey from the stiff sweet starter if you like. I don’t advise using a regular liquid starter in this recipe because the buns will end up tasting sour.
- Fresh orange: you can use orange juice instead of a freshly juiced orange, but you would miss out on the orange zest, which I think is essential!
- Egg wash: you can omit the egg wash! It’s purely for aesthetics. I found it provided a slightly better contrast between the bun and the cross.

Conclusion
This sourdough hot cross bun recipe was tested by 18 wonderful bakers from around the world, from Florida to Wisconsin to Western Australia, in all different kitchen environments.
Their feedback has been invaluable in perfecting these buns. Thank you to all my amazing recipe testers!

If you make these buns, I’d love to see how they turn out! Tag me on Instagram @thatsourdoughgal or leave a comment below.
Happy baking!


Baked these this morning as a trial run for Easter. OH MY WORD, these are delicious! The spices are perfect! Thank you for the very well written recipe, they will be a special addition to the Easter table!
Yay, so glad you loved them!
Hello Rebekah!
I’ve had great success with your Wonder Bread knock off and would like to try these buns. Cinnamon in the dough while bulk fermenting is usually not advised because of potential negative interactions with the starter. I’m assuming you did not have issues as your buns look amazing 🙂 Do you think the sweet stiff starter competes better with cinnamon vs 100% non sweet starter? I’m relatively new to inclusions and would love to know what you think.
Thx,
Ana
The cinnamon does slow things down but it does not stop it. It is typically better to add cinnamon during shaping but I wanted cinnamon throughout the dough so we made it work! I don’t think the starter format has much impact on the interaction with cinnamon.
Made these for the second time. I think these were better than my first attempt but had issues with the piping. It would not come out of the icing bag nicely so I left it out. Maybe I made someone else’s recipe as I don’t remember using starter for the crosses. My starter tends to be thicker than what I see you use in your reels. Anyway they took almost 24 hours to proof as my house is usually under 20’. Taste is wonderful and the tang from the lemon is very nice. Didn’t use orange as my sister is allergic. Will make again for sure but would like a suggestion for the piping issue.
You can thin out the mixture with water
These are divine!! Made a practise batch, already half gone. Will definitely be making more again for Easter. Wouldn’t change a thing! Except I had to use my discard from the fridge as the one I made was too thick to pipe, maybe I needed to let it warm up? Either way, this recipe is a keeper, thank you!
Hello!
Would these buns work if they stayed in the fridge for 24 hours?
With my work schedule, I could make the sweet starter on thursday, mix the dough and pop the buns into the fridge on friday, and bake on Easter Sunday.
Do you think this would work?
Yes I do! They might have a slight sour tang to them due to the extra fridge time
Thank you so much for sharing recipes and such an amazingly detailed blog with step by step photos. So helpful!
I can’t wait to try this recipe. But can you let me know if there i can omit or substitute the egg with something else?
Thanks in advance!
I did not test any alternatives, I’m sorry!
I have been making these buns almost weekly and gifting them, since you posted the recipe last year(without the cross after Easter). An aluminum pan from Dollarama by Betty Crocker that has a domed lid left lots of room for the overnight rise (Cold Canadian winter-oven light on and door wedged open slightly with t-towel) without the need for plastic wrap and never sticking to the lid. It holds 6- the perfect gifting size! With Easter coming next week, I’m going to try making ahead and freezing the dough balls before baking for fresh gifts closer to Easter. Everyone loves this recipe! I also invested in a starter heater for more consistency in temperature for my sweet starter. Game changer! Thanks !
I am soooo excited 🍊to make these! 😋Your cinnamon raisin swirl recipe is always a favorite every time I make it. ❤️
Question though- you specify “all purpose flour” for the tangzhong and dough but not for either of the starters in this recipe.
Can I still use all purpose for those as well or should I use bread flour?
And thank you so much for all the amazing and hard work you do to share your recipes with us! 🥰
You can still use AP for those as well!
Just made these for test run for Easter, tuned out awesome!I did add left over orange zest to the glaze for grins and giggles, was very tasty. There used to be a full dz.
Decided to change gears though, found the Hawaiian roll recipe😂. Doing the test run for those tomorrow
Thanks for sharing!! Looks awesome!
These smell so good! I used 1/2 raisins and 1/2 mixed fruit. They are a lot of work, but I’m sure they will be amazing.
Looks incredible!!
I tested them this weekend for next weekend. They turned FABULOUSLY!!! A keeper recipe for sure. Thank you so much. I can’t wait to share this with family and friends over the holiday! Happy Easter!!!
Delicious! I used currants and glazed with a golden syrup. There was still plenty of orange flavor from the orange zest and the soaking of the currants. Will definitely make them again! This will be our new Good Friday tradition. Another wonderful recipe from That Sourdough Gal!
Looks amazing!!