
The Best Sourdough Gingerbread Artisan Bread Recipe
When I think of Christmas baking and the holidays, I think of gingerbread. And apparently, so do you! I got SO many requests for a good sourdough gingerbread recipe, and I was very much game to tackle this one.
My goal? Develop an artisan sourdough bread recipe that looks and feels like a classic loaf but with all the aromatics of gingerbread.
This recipe totally delivers. And once again, a massive thank you to 400 sourdough bakers from around the world who tested my recipe for me and provided their feedback. This recipe is full of tips and pointers based on their hard work, so again, thank you!
“This is most definitely the tastiest sourdough loaf I have ever made, and the cinnamon honey butter just complements it wonderfully. I wouldn’t want anything else on it.” –Recipe tester from Leeds, England
“This was hands down one of the most delicious breads ever! All thumbs up from my household!” –Recipe tester from Brookline, NH
“It reminds me of my childhood and Dutch grandfather baking speculaas. I had to bring a piece right over to my mother.” –Recipe tester from Ontario, Canada
Disclaimer: Some of the products I recommend in this post are affiliate links – if you choose to purchase after clicking one of my links, I may earn a small commission, which helps fund this website, recipe development, and monthly giveaways. I sincerely appreciate your support.
Why You’ll Love This Gingerbread Sourdough Recipe
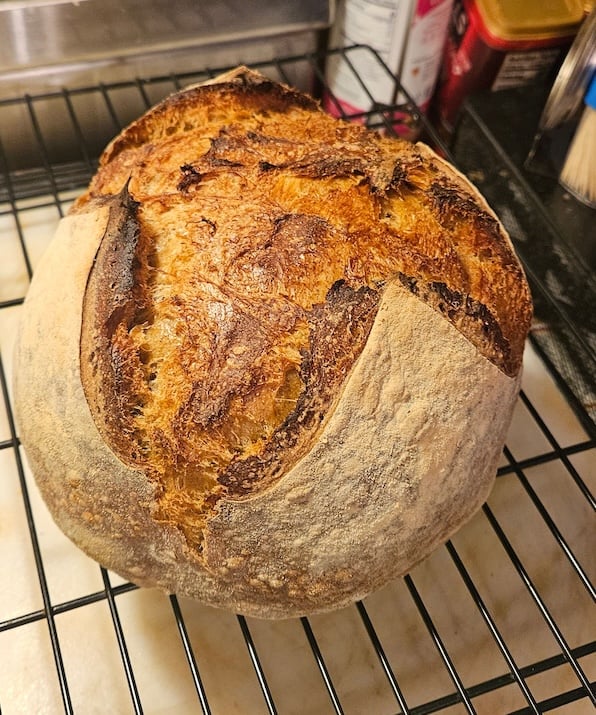
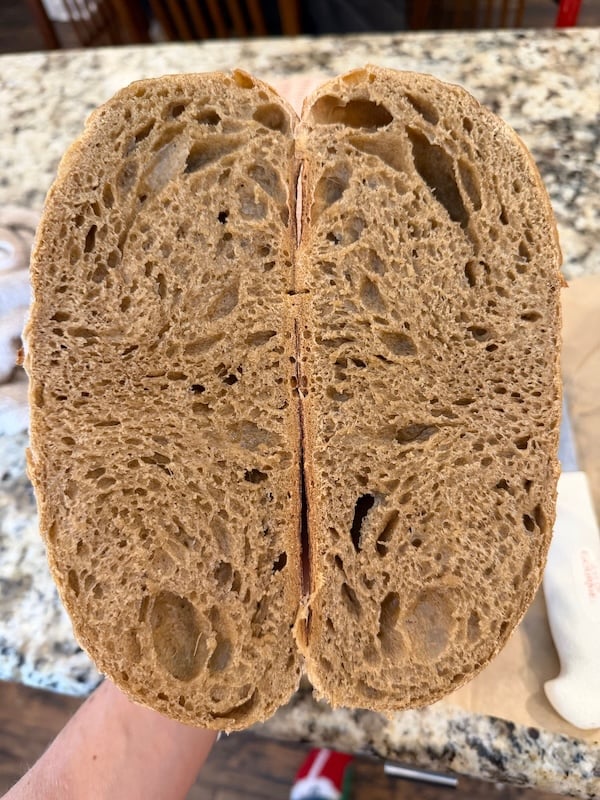
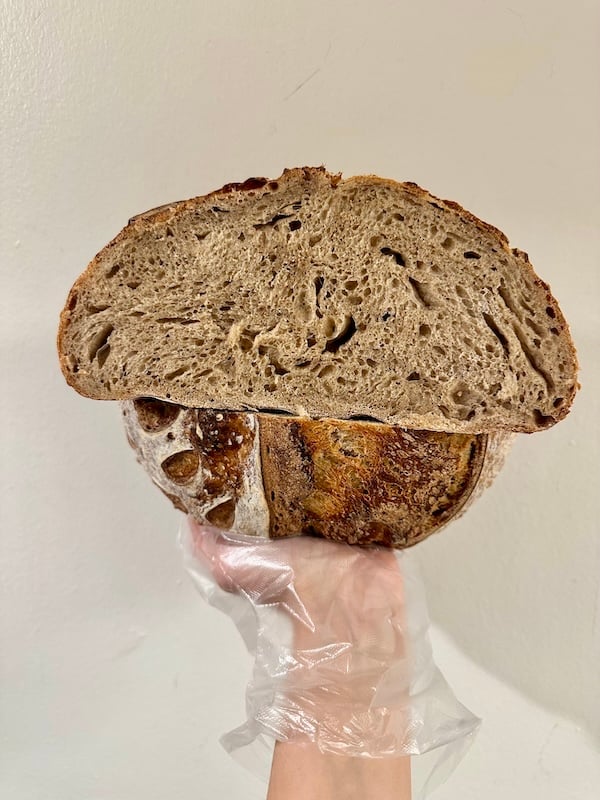
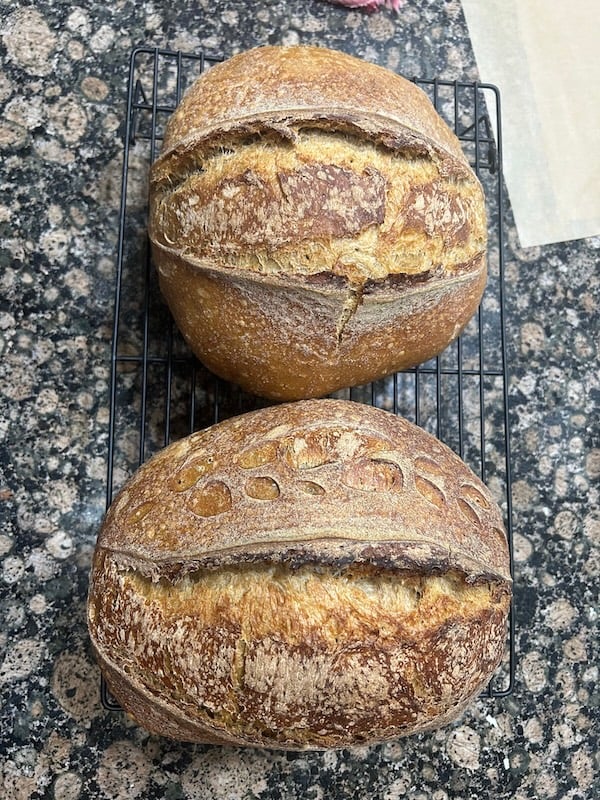
- Recipe tested by 400 home bakers: This gingerbread sourdough recipe was tested by 400 home bakers across 6 continents and 370 unique locations, earning a 4.47/5 star average rating with 90.5% of testers giving it 4 or 5 stars. From chilly Canadian winters to warm Southern kitchens, from Australia to the UAE, bakers everywhere achieved great results with this recipe!
- Perfect balance of warm spices: The combination of ginger, pumpkin pie spice, molasses, and brown sugar creates that classic gingerbread flavor you know and love. It’s warm, cozy, and just sweet enough without being dessert. Slather on lots of honey cinnamon butter to amp up the sweetness if you prefer!
“Another DELICIOUS recipe!” –Recipe tester from Cincinnati, Ohio
- The honey cinnamon butter is such a good addition: Nearly half of testers made the whipped honey cinnamon butter, and 90% of those who did absolutely loved it. It takes this bread from delicious to unforgettable.

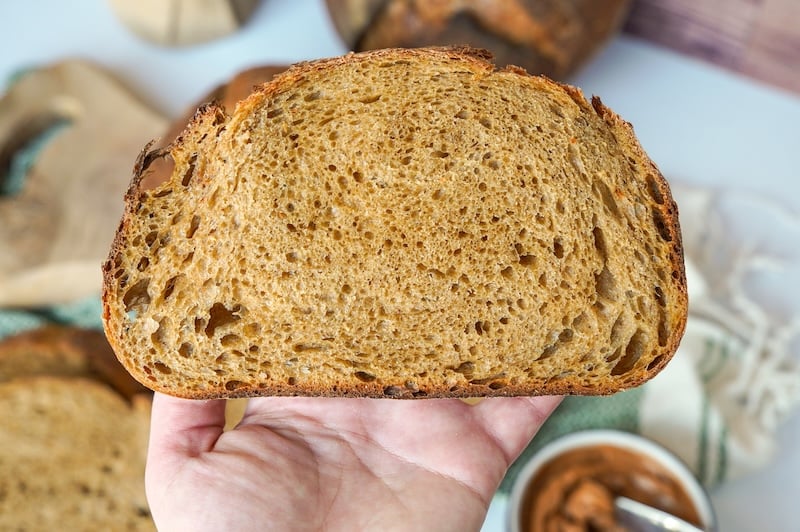
- Classic artisan loaf structure: Even with the sweetness and spices, this dough behaves and bakes up like a traditional artisan sourdough loaf.
“Dough was beautiful and easy to work. The proofing rise was great!” –Recipe tester from Columbia, SC
Other sweet artisan loaves you might want to bookmark for later:
- The Best Chocolate Chip Sourdough Bread Recipe
- Apple Crisp Sourdough Bread Recipe (with a Cinnamon Swirl)
- The Best Lemon Blueberry Artisan Sourdough Bread Recipe
Ingredients
- Stiff sweet levain: This sweetened starter is key to keeping the loaf from being too tangy. The brown sugar softens any sour notes and complements the warm spices beautifully. If you prefer a tangy result, use regular starter instead – check the FAQs for instructions (right before the recipe card) on how to modify the recipe.
- Water: Room-temperature water works best. Nothing too hot or cold that might shock your starter.
- Molasses: Adds that deep, rich gingerbread flavor and helps keep the bread moist. I use Grandma’s Original Molasses, Unsulphured. I do not recommend subbing for blackstrap molasses, which has a stronger, more bitter flavor.
- Brown sugar: Adds sweetness and moisture while enhancing the molasses flavor.
Note: 81% of testers found the sweetness level perfect. About 18% wanted it sweeter (many noted the honey cinnamon butter solved this!), and only 1% found it too sweet. Due to this feedback, I increased the brown sugar in the dough from 25g to 40g, and I think it’s perfect now. But just know: there is wiggle room in how much brown sugar you want to add!
- Bread flour: Provides structure and strength for a beautiful rise and chewy interior. I used Central Milling High Mountain flour in most of my recipe testing.
- Pumpkin pie spice: A blend of cinnamon, ginger, nutmeg, allspice, and cloves that brings warmth and complexity. You can buy it at the store or make it yourself! I have an easy recipe for it here.
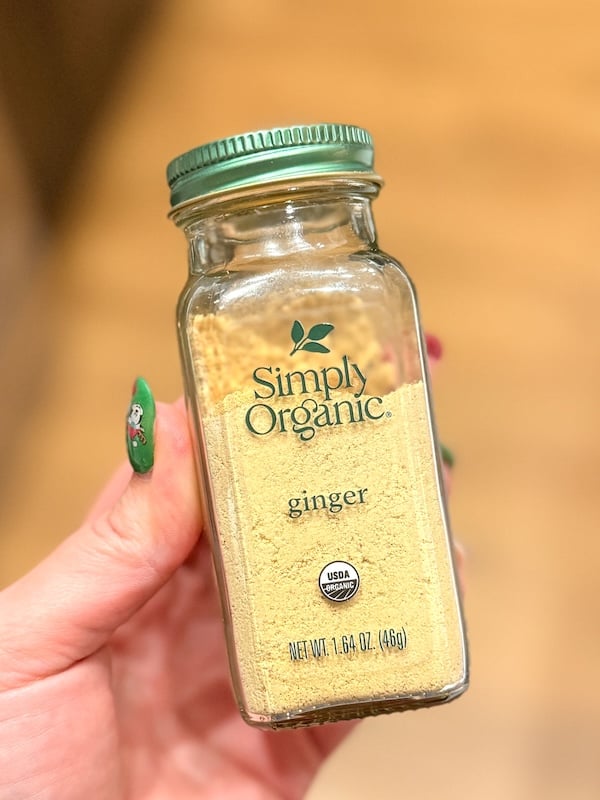
- Dried ginger: Use ground ginger powder (the spice you’d use in cookies), not ginger paste or fresh ginger. This is very important as fresh ginger will ruin your bulk fermentation and dough texture.
- Salt: Can’t forget the salt! I love Redmond’s Real Salt (15% off with code TSG15).
A Note on Spice Freshness
During testing, I got wildly conflicting feedback: some said “way too much ginger!” while others said “not nearly enough!” Of course, this may be personal preference, and you can tailor the amount of spice in the dough to suit you.
But after digging into it, I think the freshness of spices is something to consider.
Ground spices lose their volatile oils (flavor compounds) over time. Fresh ground ginger (bought within the last 3-6 months) is potent and zingy. Ginger that’s been sitting in your cabinet for a year or two? Much more muted.
How to tell if your spices are fresh: Open the container and give it a sniff. Fresh ginger should smell sharp and spicy, almost tingly in your nose. If it smells faint or dusty, it’s past its prime.
The same applies to your pumpkin pie spice blend – if it smells flat, it needs replacing.
What to do: Use the recipe amounts as written if your spices are fresh. If they’re older, feel free to increase the amounts by half, or even double, to compensate.
P.S. if you like ginger, you’ll love these Sourdough Discard Ginger Crisps!
Ingredient Substitutions
- Molasses: Multiple testers successfully used different types of molasses (including fancy/green molasses). One tester substituted dark Karo syrup (corn syrup) but noted the flavor was significantly different – I’d stick with actual molasses if possible.
- Brown sugar: Can be swapped for coconut sugar, regular sugar, or other brown sugar alternatives.
- Pumpkin pie spice: If you don’t have pumpkin pie spice, you can make your own blend or simply add the spices you like (clove, nutmeg, cinnamon, allspice, etc.) to taste.
- Regular liquid starter instead of stiff sweet starter: If you want to skip the sweet levain, you can use 120g of your active liquid starter. Heads up: it may be more tangy as a result. Adjust the main dough as follows:
- Reduce water to 280g (instead of 290g)
- Increase bread flour to 500g (instead of 490g)
- Increase brown sugar to 60g (instead of 40g)

Equipment You’ll Need
- Kitchen scale: Essential for accurate measurements, especially with sourdough baking.
- 3/4 L Weck jar: Perfect size for making your sweet levain.
- Mixing bowl or stand mixer: Either works great. If mixing by hand, I love my Anchor Hocking glass bowls.
- Bowl cover: I’m a huge fan of these bowl covers from Doe a Deer. Amazing quality and doesn’t dry out my dough. Get 15% off with code THATSOURDOUGHGAL.
- Danish dough whisk: Makes mixing so much easier when working by hand. The Brod & Taylor one is my favorite—dishwasher safe with a grippy handle.
- Bench scraper: Essential for shaping and handling the dough. I use the Brod & Taylor scraper.
- Banneton: Wood-pulp bannetons are my favorite. Flourside’s are great (code TSG5 gets you 5% off), or check out the new ones from Brod & Taylor – they’re also fantastic!
- Bread lame: For clean, confident scoring.
- Parchment paper or bread sling: To transfer your dough safely into the hot Dutch oven.
- Dutch oven: My preferred setup for consistent oven spring. Krustic’s Dutch ovens are fantastic (code REBEKAH15 saves you $15).
- Bread knife: A sharp serrated knife is essential. The Mercer budget knife is still my top pick.
- Sheet pan, baking stone, or foil: Critical for preventing burnt bottoms on this loaf! The molasses and sugar make it brown quickly.
Baker’s Timeline
| Day 1 | |
| 8 PM (or before bed) | Mix the stiff sweet levain |
| Day 2 | |
| 8-8:30 AM | Mix the dough |
| 8:45 AM | Stretch & fold #1 |
| 9:30 AM | Stretch & fold #2 |
| 10:30 AM | Stretch & fold #3 |
| 11 AM – 5:30 PM | Finish bulk fermentation (timing varies based on temperature) |
| 5:30 PM (when BF is done) | Shape, set in banneton, cold proof overnight |
| Day 3 | |
| Any time | Score, bake, and enjoy! |

Recipe Testing Process
This recipe development was a PROCESS. I’m talking months of testing and at least a dozen loaves before I even sent it to recipe testers.
The two main challenges:
- The burnt bottom issue: Sweet breads have a tendency to burn on the bottom due to the sugar content. I tried adjusting baking temperatures, times, and Dutch oven placement, but what finally worked was a combination of strategies: placing a baking sheet on the rack below, slightly lowering the oven temperature, and keeping the loaf covered for most of the bake time. You’ll see these tips throughout the recipe!
- Getting ginger flavor without killing fermentation: This was the trickiest part. Ginger is a natural antimicrobial, which means it can slow down the fermentation process by interfering with the microbes in your sourdough starter. I tested everything from fresh grated ginger to homemade ginger syrup, but what worked best was plain old dried ginger from the spice aisle.
Check out some of my recipe testing in this behind the scenes YouTube video:

Once I had a recipe draft I was confident in, I sent it off to hundreds of recipe testers across 6 continents, and the overwhelmingly positive feedback confirmed this recipe was ready for everyone!
Meet the Recipe Testers
This gingerbread sourdough recipe was put to the test by 400 home bakers from around the world, and I cannot thank them enough. These bakers are from all over the United States to Australia to England to Canada… warm climates and cold alike.
Here’s how they rated the recipe as a whole:
- Average rating: 4.47 out of 5 stars
- Satisfaction rate: 90.5% (4-5 star ratings)
- Recommendation score: 4.58/5
Only 9 out of 400 testers (2.2%) rated this recipe 1-2 stars. The #1 culprit? Weak starters. Several low-rated reviews had bulk fermentation times of 18-24 hours (double or triple the expected 8-10 hours), which resulted in dense, gummy, flavorless loaves.
If your bulk fermentation takes significantly longer than expected, my guess is your starter needs strengthening before you attempt this recipe.
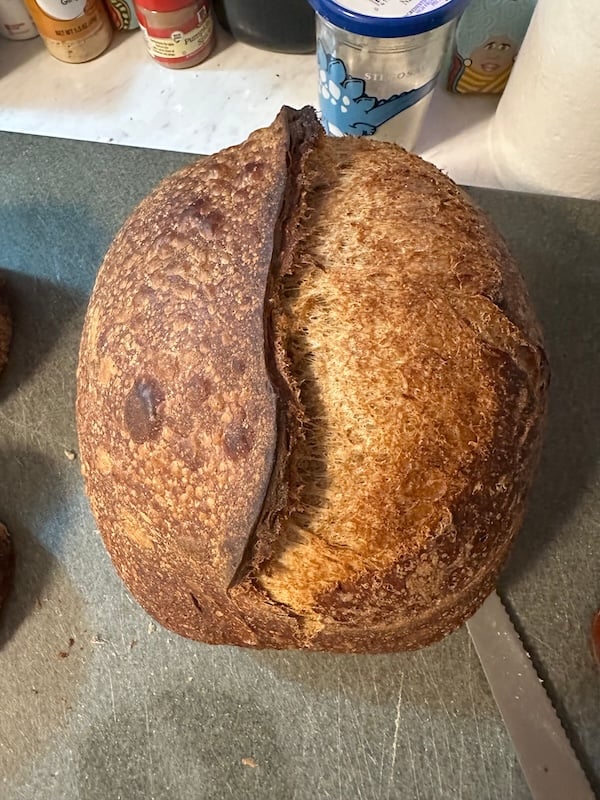
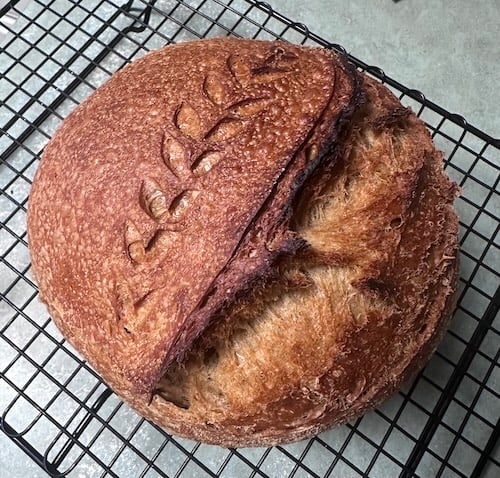
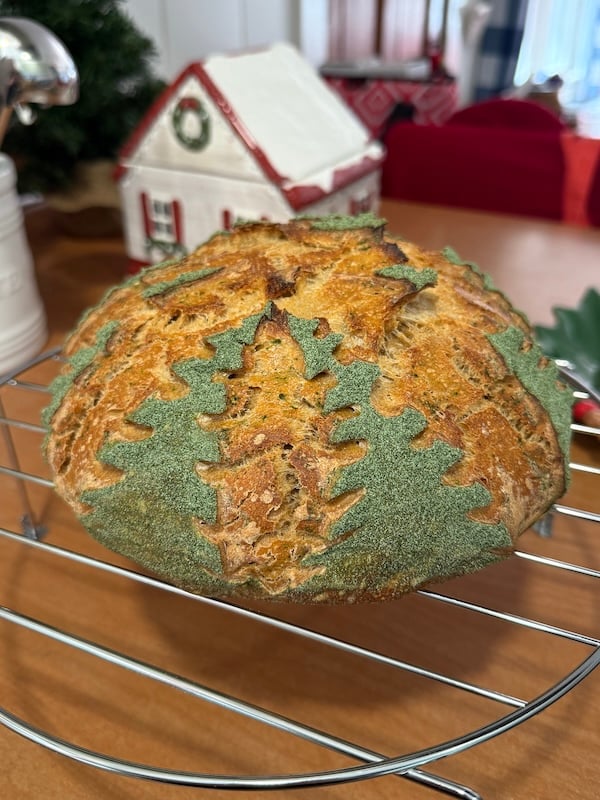
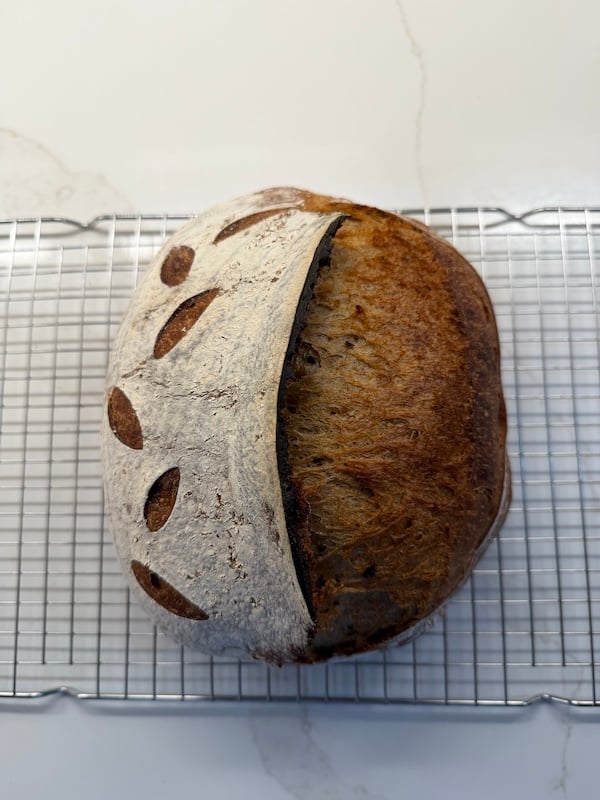
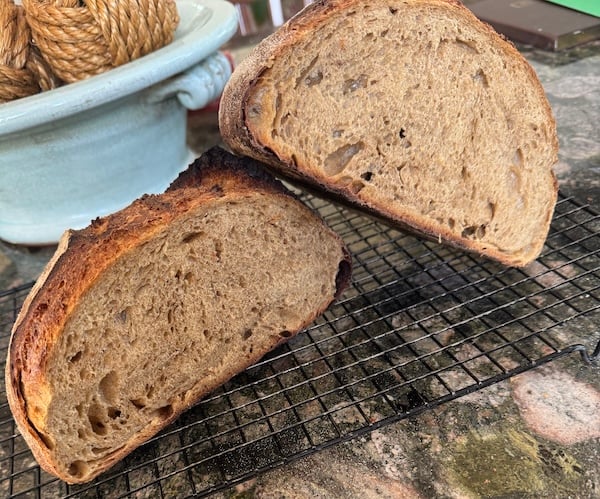
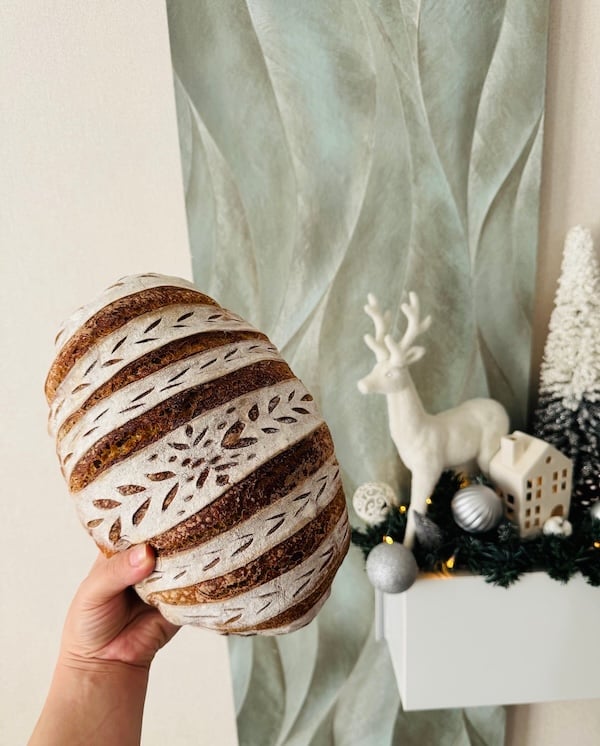
Here’s a look at some of the bakes from recipe testers!

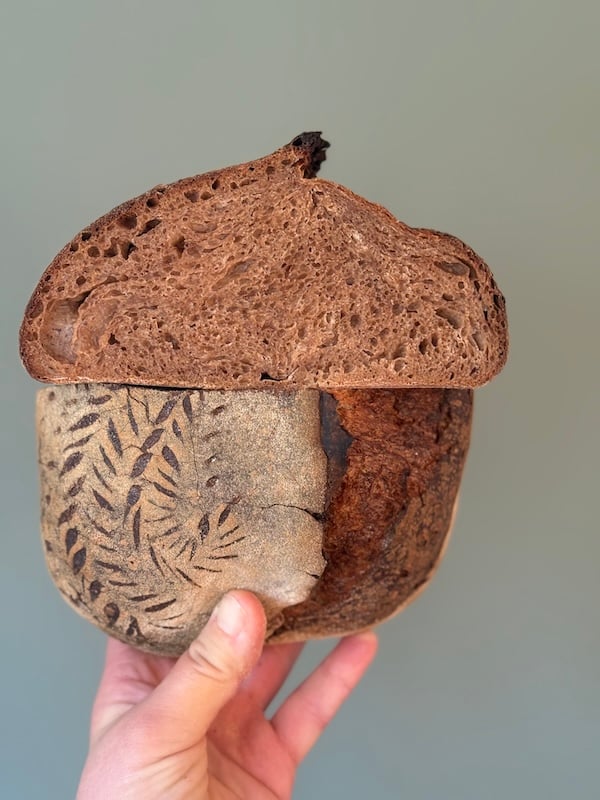


How to Make Gingerbread Sourdough Bread (Step-by-Step Instructions)
Let’s walk through how to make this loaf from start to finish. This is much more detailed than the recipe card at the end of this post, so if you want all the extra tips, you’re in the right spot!
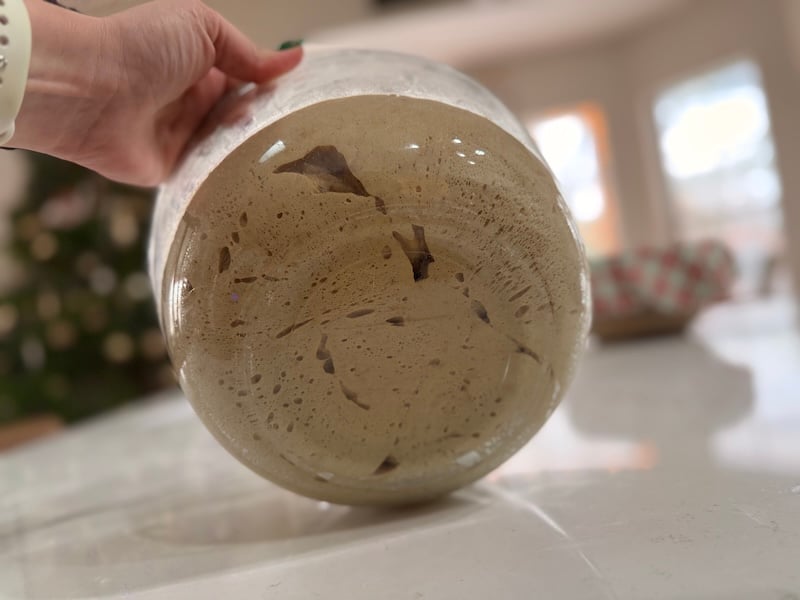
Step 1: Mix the Stiff Sweet Levain (Night Before)
Before bed, in a 3/4 L Weck jar (or similar), mix together 20g sourdough starter, 20g brown sugar, and 40g water. Stir until the sugar dissolves.
Note: The 20g of starter you use should be healthy, ideally fed within the last 24 hours. If you use weak or acidic starter from the back of your fridge, you probably won’t be happy with the final result.
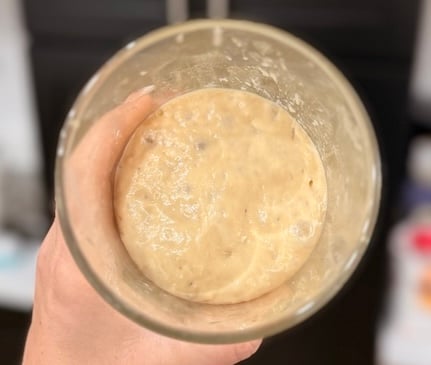
Add 60g bread flour and stir until smooth. Loosely cover and let ferment on the counter for 10-12 hours.
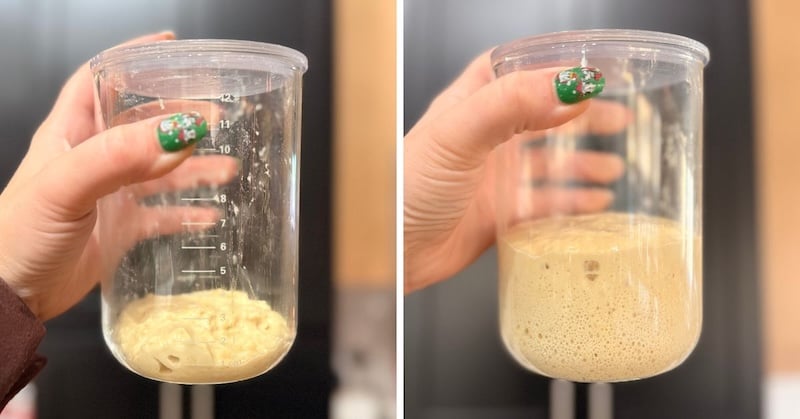
By morning, it should have doubled or tripled in size, smell sweet and yeasty, be slightly domed in shape at the top, and be full of bubbles.
The bubbles across the domed surface should have a gray or translucent quality to them, like this photo:
Step 2: Mix the Dough
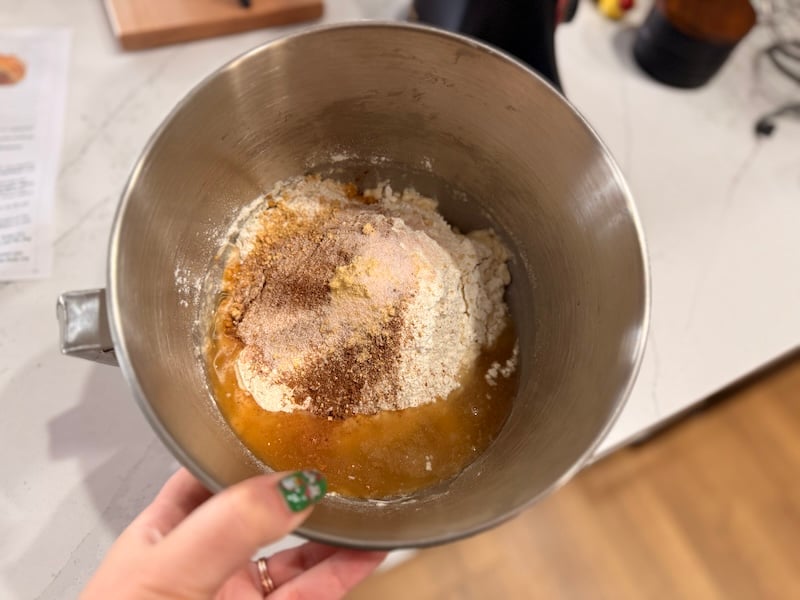
In a large glass bowl (or the bowl of your stand mixer), add:
- 290g water
- All of your sweet levain
- 50g molasses
- 40g brown sugar
- 490g bread flour
- 1 tbsp pumpkin pie spice
- 2 tsp dried ginger
- 10g salt
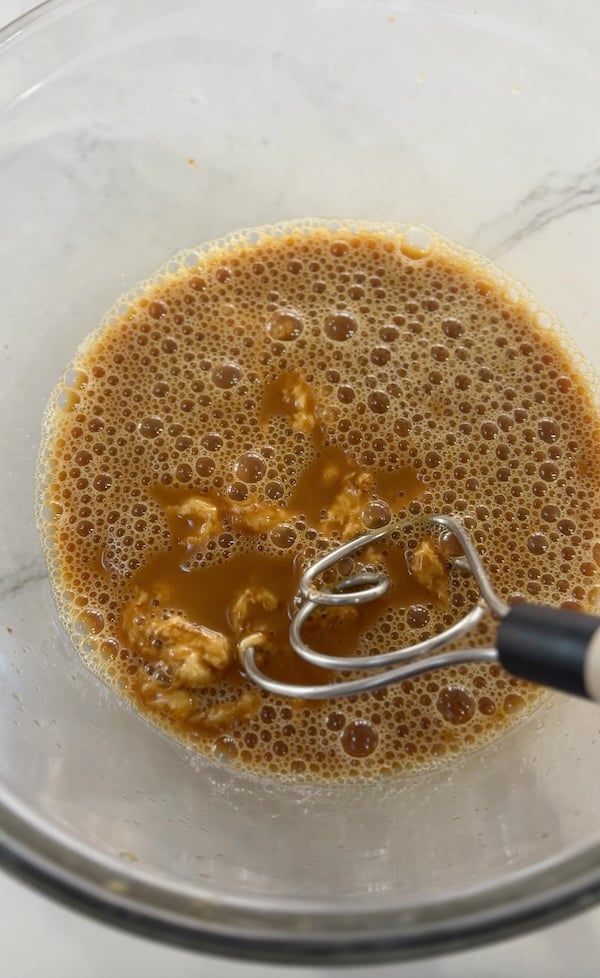
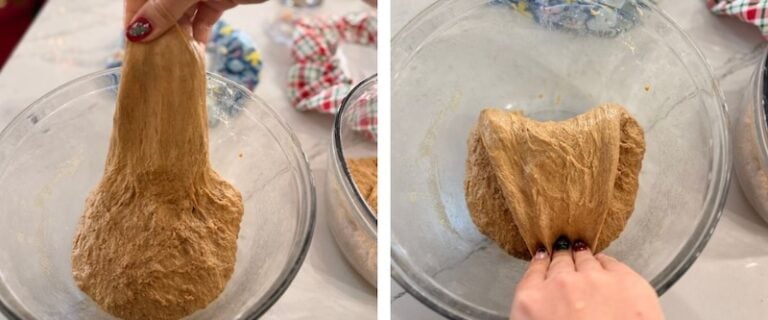
If mixing by hand, use a Danish whisk to stir the water, levain, molasses, and brown sugar together (the levain will not fully dissolve, and that is fine).
You can mix all the ingredients together at once, but I find it a little easier to start with the liquids and then add the dry ingredients.
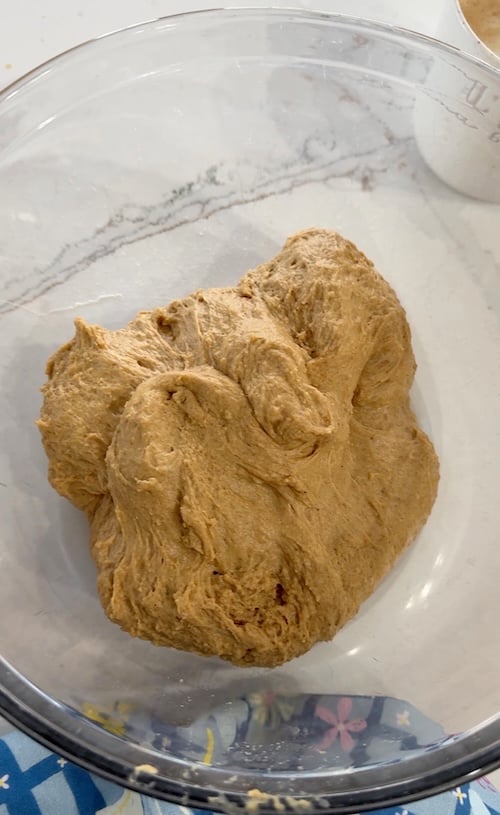
Then, add the flour, spices, and salt, and stir until everything comes together and no dry flour remains. I switch to my hands at some point and squeeze and slap the dough until it is fully mixed.

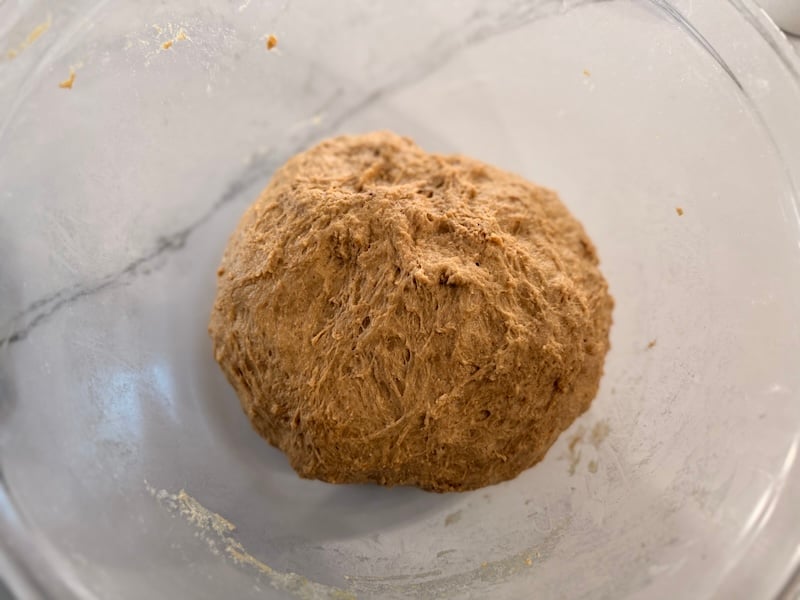
It will look quite shaggy. Cover and let rest for 30 minutes.
If using a stand mixer, mix on low speed for 3-4 minutes until fully combined, then transfer to a glass bowl, cover, and rest for 30 minutes.
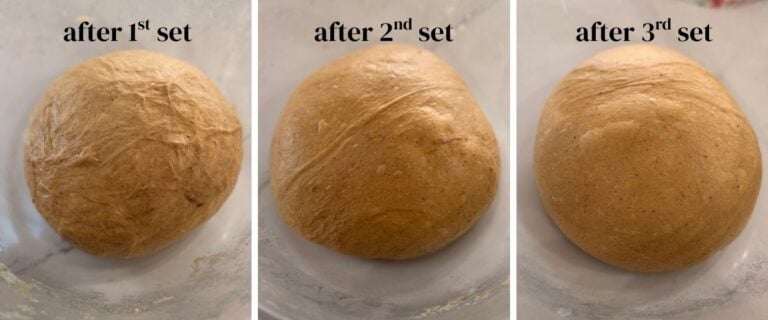
Step 3: Strengthen the Dough with Stretch and Folds
We’ll do about 3 sets of stretch and folds, spaced 30-60 minutes apart.
Uncover the dough and wet your hands. Stretch and fold (without tearing) all four corners of the dough. Continue stretching and folding around the bowl until the dough tightens up and doesn’t want to stretch anymore.
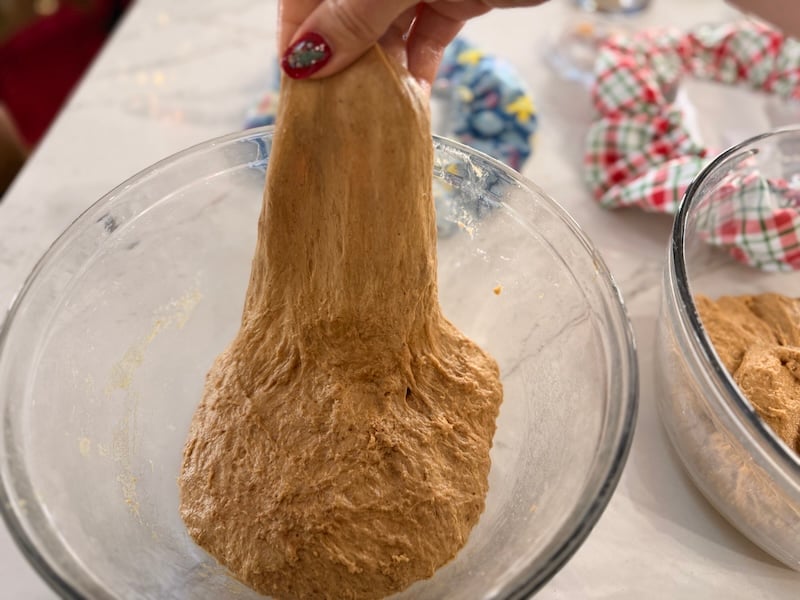
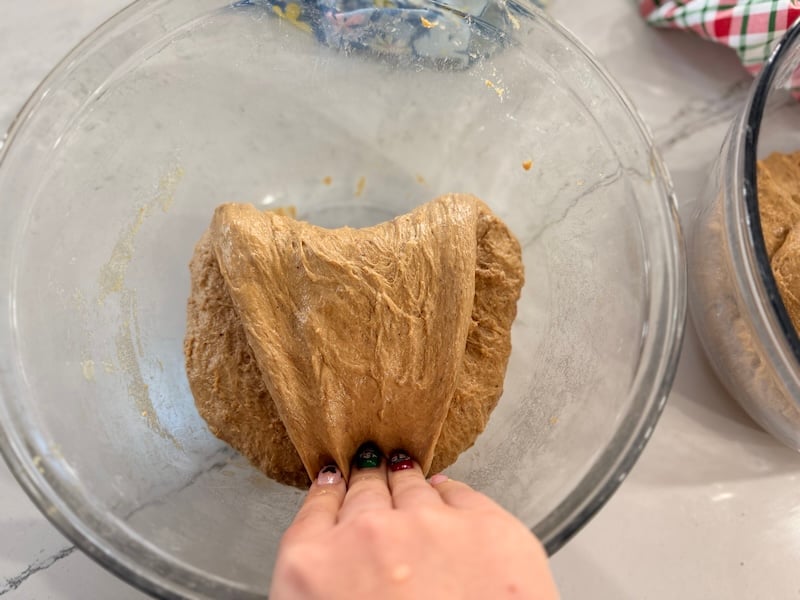
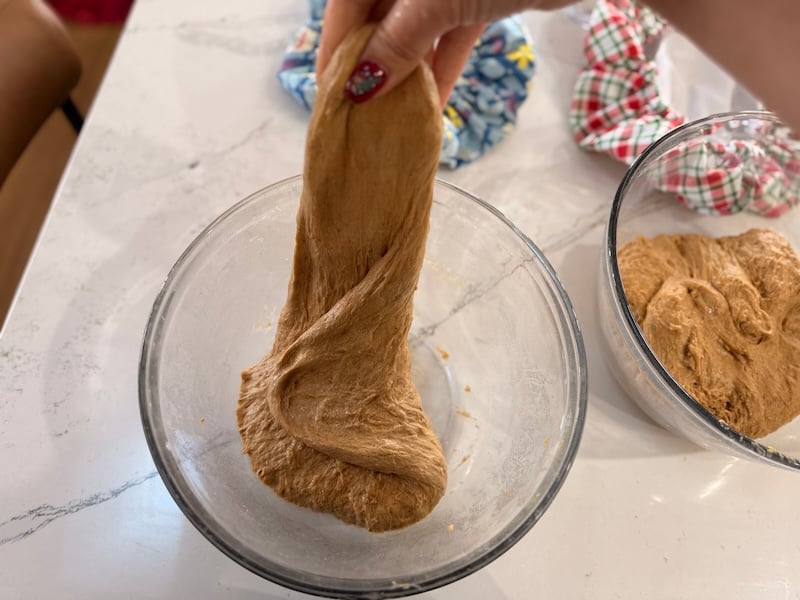
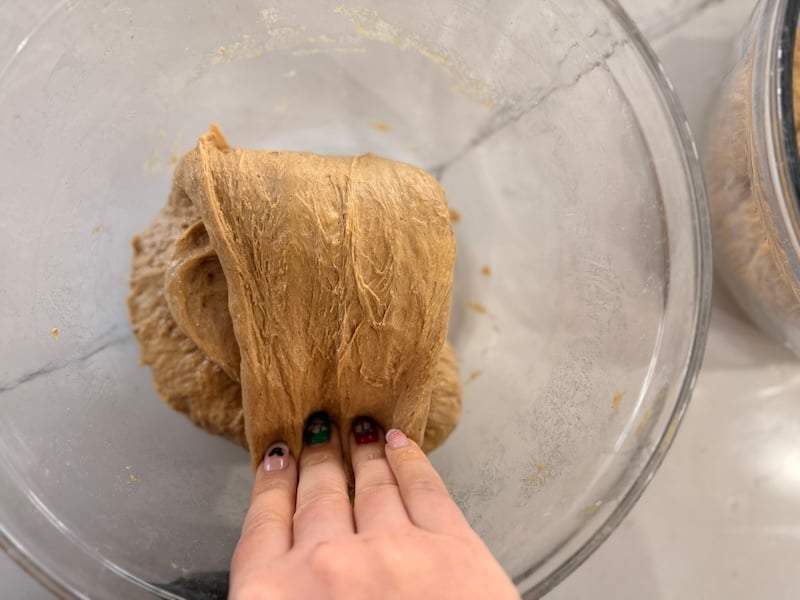
Cover and let rest for 30-60 minutes, then repeat two to three more times.
After the 3rd set, if your dough holds its shape and doesn’t “puddle” out, you’re done. If it’s still slack, do a 4th set followed by another rest.

Step 4: Finish Bulk Fermentation
Let the dough continue to bulk ferment until it shows these signs:
- Bubbly and domed on top
- Has risen in volume
- Feels light and aerated when you tap the surface
- Dough easily pulls away from the side of the bowl (this is less important, but still worth looking for)

For reference, this took about 9-10 hours for most testers at 70-72°F (21-22°C). If your kitchen is warmer, it may move faster; if it’s cooler, it may take longer.
Note: I put one loaf in a proofing box set to 80°F (26.5°C), and the bulk fermentation took a total of 6 hours. I left another loaf on my counter, which was 69-70°F (20.5-21°C), and bulk fermentation took 10 hours. I hope this helps you as a reference!
Fermentation data from 5-star reviews:
- Fastest: 6-8 hours (warmer kitchens at 75-80°F / 24-26.5°C)
- Most common: 9-10 hours (70-73°F / 21-23°C)
- Cooler kitchens: 11-12 hours (66-69°F / 19-20.5°C)
“The timeline worked perfectly. Really appreciated that you gave the example of BF taking 9.5 hours, as mine definitely took that long, plus some. I would have been confused if you had not stated that in the recipe.” –Recipe tester from Tallahassee, FL
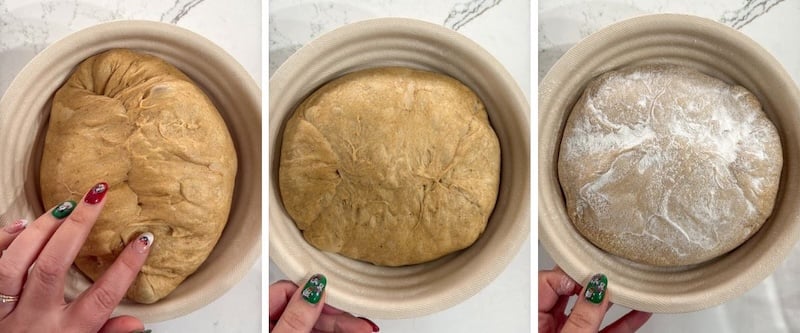
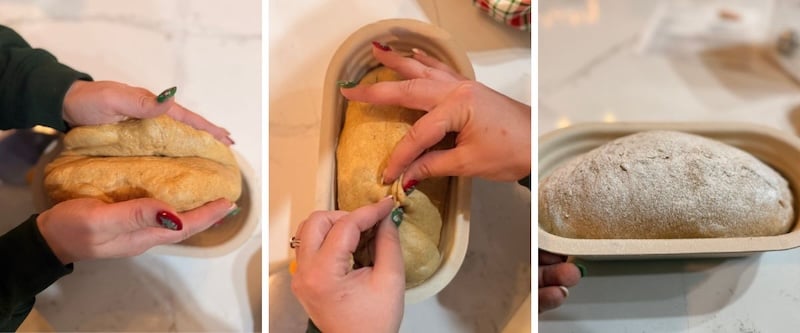
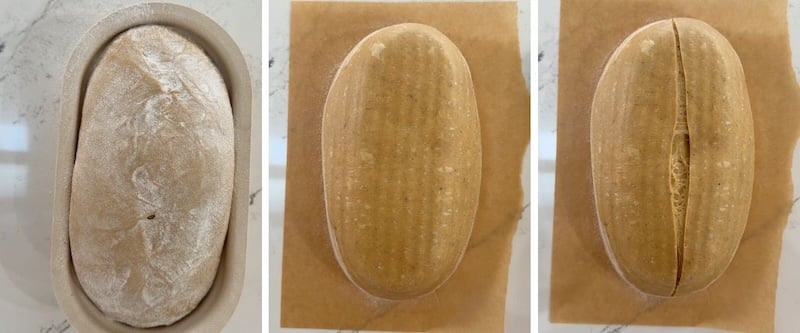
Step 5: Shaping & Cold Retard
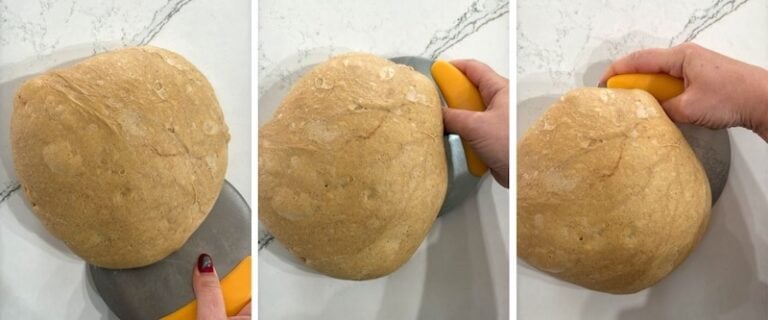
Turn the dough out onto your work surface. If needed, lightly mist with water or dust with flour to prevent sticking. I find with this recipe that I don’t need anything on my surface.
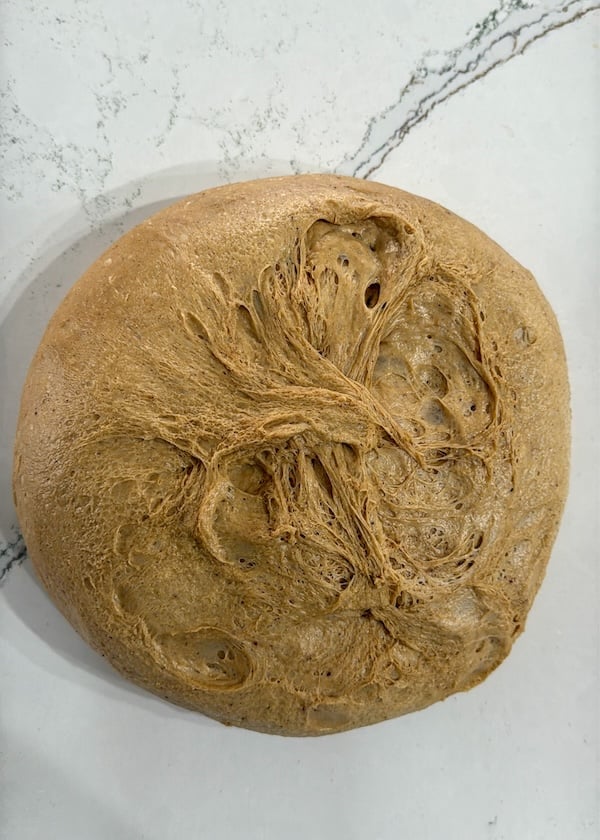
Using a bench scraper (or your hands), do a push-and-pull motion to coax the dough into a taut ball shape.

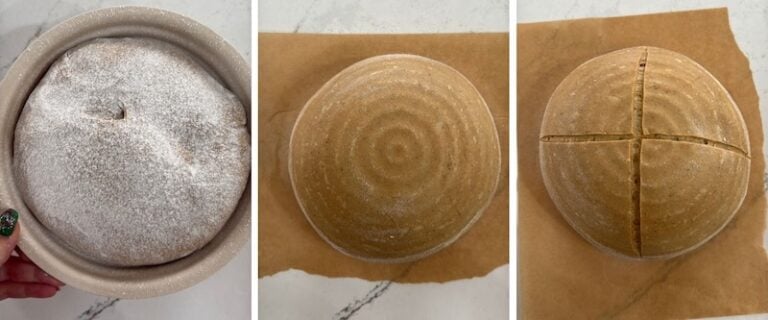
Dust your banneton with rice flour.
Flip the dough ball upside down and place it seam-side up in your floured banneton. Pinch the center seam closed, stitch the dough together, dust the top with rice flour, and cover.
Refrigerate overnight (or 8-24 hours).
Note: if you prefer to do a batard, perform a single caddy clasp and pinch the center seam closed.
Step 6: Preheat Your Oven and Dutch Oven
When you’re ready to bake, place your Dutch oven into your oven and preheat to 450°F (230°C) conventional.
Let the oven come all the way up to temperature, then give it an extra 10 minutes to make sure the Dutch oven is really hot.
Step 7: Score and Bake
Take your dough out of the fridge and dust with rice flour (this prevents the dough from sticking to the parchment, and I also find it can help prevent burnt bottoms). Then, flip it onto parchment paper or a bread sling.
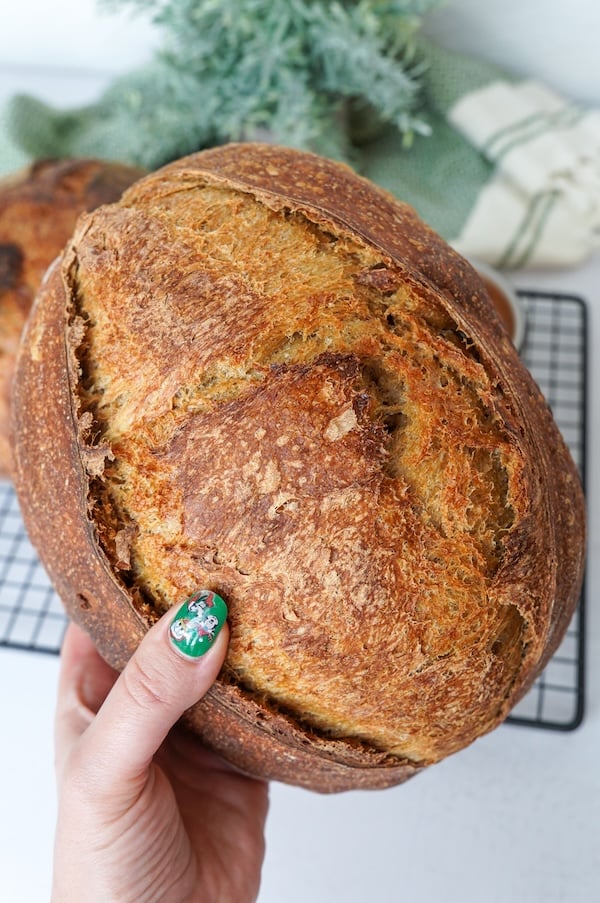
Score the top – a single slash down the center for a batard (oval) or a large “X” for a boule (round).

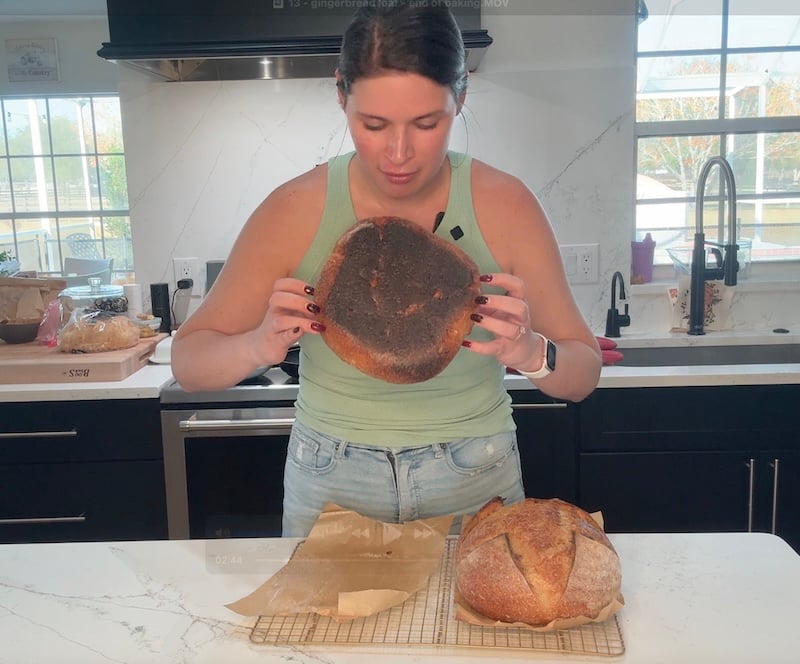
IMPORTANT: The bottom of this loaf has a tendency to burn because of the molasses and sugar. Please place a sheet pan or baking stone on the rack below your Dutch oven. You might also consider slipping a piece of foil, ceramic pie weights, or a trivet under your parchment paper or bread sling.
Carefully transfer the dough into the hot Dutch oven and put the lid on. Place a sheet tray on the rack below your Dutch oven to help deflect some heat.

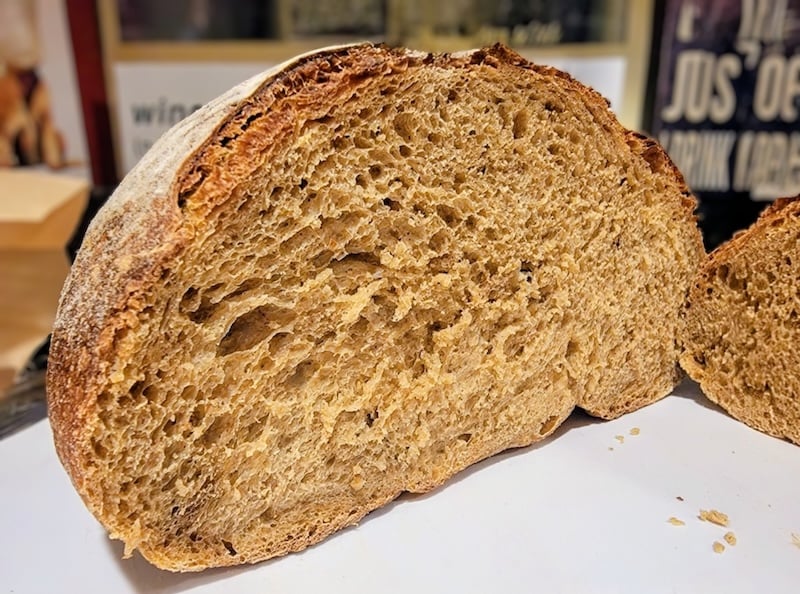
Bake covered for 40 minutes, then remove the lid and bake for 5 more minutes until nicely browned and the internal temperature reaches 205-210°F (96-99°C).
Let the loaf cool completely on a wire rack before slicing!

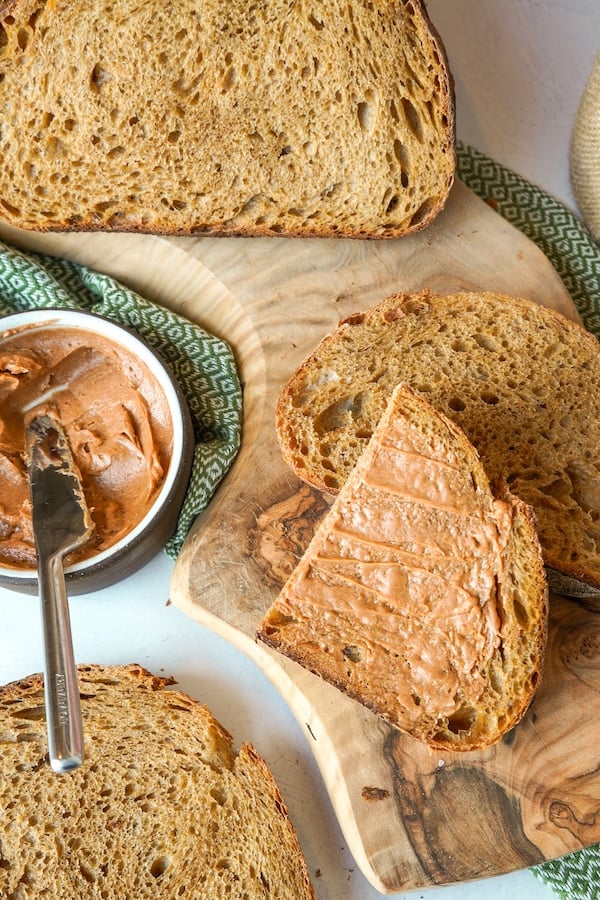
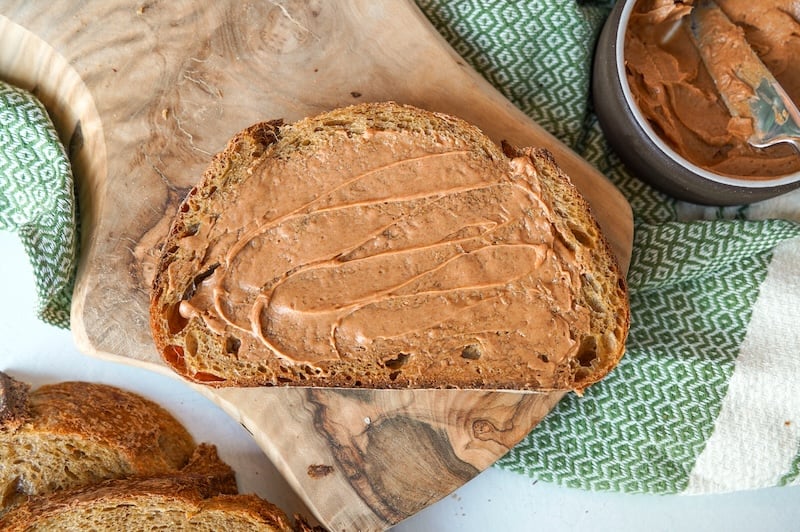
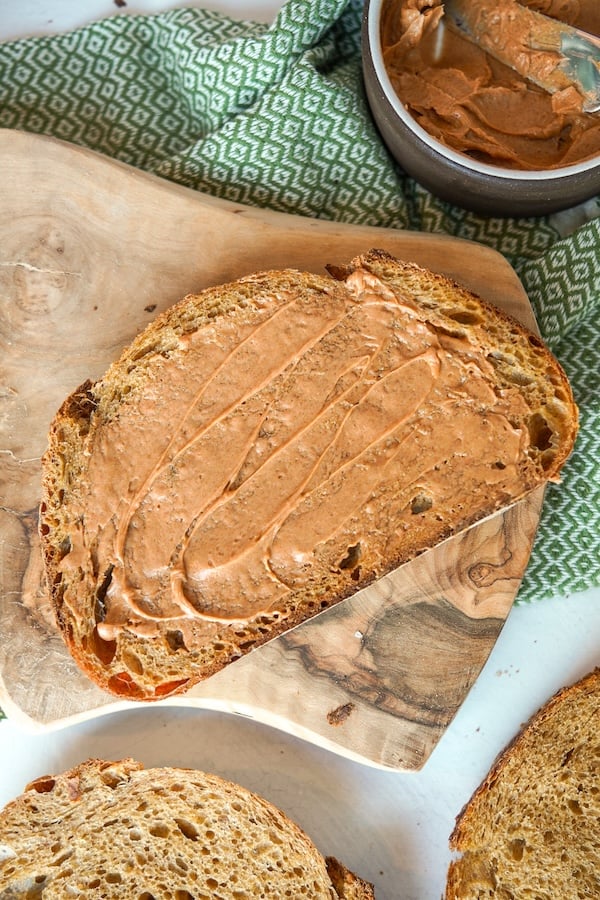
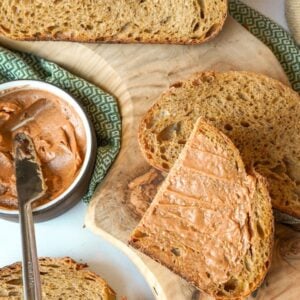
Step 8: Make the Whipped Honey Cinnamon Butter (Optional but Highly Recommended!)
Using a hand mixer, whip together 6 tbsp softened butter and 1 tbsp milk until light and fluffy.
Add 1 tbsp honey, 2 tsp Saigon/Vietnamese cinnamon, and ¼ tsp salt (omit salt if using salted butter). Mix until incorporated.
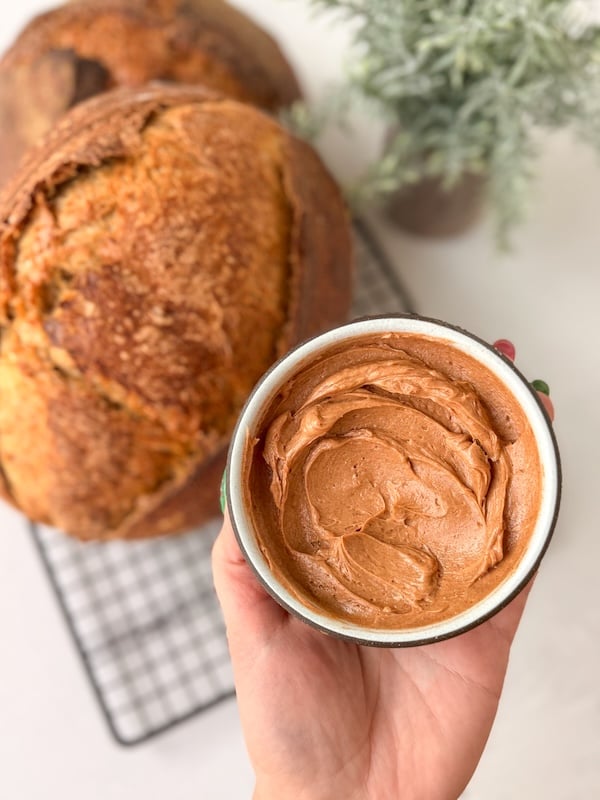
Top with flaky sea salt if desired. Spread on your gingerbread loaf slices and enjoy!
Storage & Reheating
Room-temperature storage: Keep the loaf in a bread bag or glass cake stand for 2-3 days.
Freeze for longer storage: Slice the loaf and place in a freezer-safe bag. It’ll keep well for up to 3 months.
Reheat from frozen: Toast slices straight from the freezer.
Revive the whole loaf: If the loaf feels dry, mist it with water and warm at 325°F (165°C) for about 10 minutes to soften it.
Troubleshooting Tips
Burnt bottom: This was the #1 issue reported by testers (27.3% experienced it). The molasses and sugar make this loaf brown quickly on the bottom. Solutions that worked:
- Place a sheet pan or baking stone on the rack below your Dutch oven (most common fix)
- Slip folded aluminum foil under your parchment paper
- Use rice scattered under the parchment
- Lower your oven temp by 15-25°F
- Use a silicone mat + parchment + foil layers
More ideas: How to Prevent Burnt Bottoms on Sourdough Bread (10 Simple Fixes)
“I put a cookie sheet on the rack below the bread and the bottom didn’t burn at all.” –Recipe tester from Williamsville, NY
Bulk fermentation taking too long (18-24 hours): This indicates your starter wasn’t active enough. If your BF is taking dramatically longer than 9-12 hours at normal temperatures, your starter likely needs strengthening with a few more feeds. Also, please confirm you are not using fresh ginger, as it will drastically slow down fermentation.
Dense or gummy texture: Usually means the loaf was underproofed. Trust the visual cues (puffy and jiggly) rather than the clock.
Bland flavor: Check your spice freshness! Old spices can make the flavor muted.
Dough too dry: Several testers noted the dough seemed very dry at first but came together beautifully. Trust the process and resist adding extra water unless it’s truly not coming together after mixing. Reference my photos to compare your dough’s texture after mixing to mine.
FAQs
Yes! Use 120g of active liquid starter and add the 20g of brown sugar directly to the main dough instead. Also, reduce 10g water from the main dough and add 10g extra bread flour. Note that your loaf may turn out more tangy!
Open your ginger container and smell it. Fresh ginger should smell sharp, spicy, and almost tingly. If it smells faint or dusty, it’s past its prime and you may want to add extra to the dough.
No, but 90% of testers who made it loved it! Many testers who found the bread not sweet enough said the honey butter made it absolutely perfect.
If your BF took 18-24 hours (double or triple the expected 9-10 hours), your starter likely wasn’t active enough. At normal room temperatures of 70-73°F (21-23°C), most successful bakes finished bulk fermentation in 9-10 hours.

Gingerbread Sourdough Artisan Loaf
Equipment
- 3/4 L Weck jar for your starter
- Tovolo spatula for mixing your starter
- Stand mixer with the dough hook; optional – you can mix by hand
- Danish dough whisk if mixing by hand
- Mixing bowl or rectangular tub
- Bowl cover 15% off with code THATSOURDOUGHGAL
- Round banneton or oval!
- Round Dutch oven $15 off with code REBEKAH15
- Brod & Taylor baking shell and steel alternative to Dutch oven
Ingredients
Stiff Sweet Levain
- 20 g sourdough starter
- 20 g brown sugar or regular sugar
- 40 g water
- 60 g bread flour
Main Dough
- 290 g water
- All of the sweet levain that you made, from above
- 50 g molasses
- 40 g brown sugar
- 490 g bread flour
- 1 tbsp pumpkin pie spice
- 2 tsp dried ginger
- 10 g salt
Whipped Cinnamon Honey Butter (Optional)
- 6 tbsp softened butter
- 1 tbsp milk optional, but it adds fluffiness
- 1 tbsp honey
- 2 tsp Saigon/Vietnamese cinnamon
- 1/4 tsp salt
Instructions
- Make the sweet levain: Before bed, in a 3/4 L Weck jar (or similar-sized glass jar), mix together 20 g sourdough starter, 20 g brown sugar, and 40 g water. Then, mix in 60 g bread flour until smooth. Loosely cover and let ferment on the counter overnight (10-12 hours).

- Initial dough mix: In a glass bowl with a Danish dough whisk OR a stand mixer fitted with the dough hook, add 290 g water, All of the sweet levain, 50 g molasses, 40 g brown sugar, 490 g bread flour, 1 tbsp pumpkin pie spice, 2 tsp dried ginger, and 10 g salt. Mix until all of the ingredients are fully incorporated and no dry flour bits remain (about 3-4 minutes). If you used a stand mixer, transfer the dough to a glass bowl. Cover for 30 minutes.

- Dough strengthening: We will now do about 3 sets of stretch and folds, spaced apart by 30-60 minutes.Uncover the dough and wet your hands. Stretch and fold (without tearing) all four corners of the dough. Continue stretching and folding your way around the bowl until the dough tightens up and doesn't want to stretch anymore.

- If your dough holds its shape and doesn't "puddle" out after the 3rd set of stretch and folds, you can be done. If it gets slack and doesn't hold its shape well, do a 4th set. Let the dough rest for the remainder of the bulk fermentation.
- Finish bulk fermentation: Let the dough finish bulk fermenting until it is bubbly, jiggly when you shake the bowl, and feels light and aerated when you tap the surface. For reference, this took me 9.5 hours when my dough was 72°F (22°C). At 80°F (26.5°C), it took 6 hours.
- Shaping: Turn out dough onto your work surface. Lightly mist with water or dust with flour to prevent sticking, if needed. Using a bench scraper (or your hands), do a push and pull motion to coax the dough into a taut ball shape.
- Flip the dough ball upside down and place it in a floured banneton. Pinch the center seam closed, dust with rice flour, and cover. Put in the fridge until tomorrow.
- Pre-heat oven: The next day, preheat your oven to 450°F (230°C) conventional with a Dutch oven inside. After it has preheated, give it 10 more minutes to ensure your Dutch oven is super hot.
- Score and bake: Turn your dough out of your banneton onto parchment paper or a bread sling. Score the top (a straight line down the center for batards or a large X for boules), and place in your hot Dutch oven.Note: the bottom of this loaf has a tendency to burn, so please place a sheet tray or baking stone on the rack below your Dutch oven.
- Bake covered for 40 minutes. Remove the lid and bake an additional 5 minutes, or until the loaf is nicely browned and the internal temperature is between 205-210°F (96-99°C). Let fully cool before slicing.
- Make the whipped honey cinnamon butter topping: Using a hand mixer, whip together 6 tbsp softened butter and 1 tbsp milk until light and fluffy. Then, add 1 tbsp honey, 2 tsp Saigon/Vietnamese cinnamon, and 1/4 tsp salt (omit the salt if using salted butter). Mix until incorporated. Top with flaky sea salt, if desired. Spread it your gingerbread loaf slices and enjoy!!


Video

Notes
Conclusion
I hope you love this gingerbread sourdough as much as I do! Don’t forget to make that honey cinnamon butter. It really does make this loaf unforgettable.
If you try this recipe, I’d love to see your loaves! Share them in the comments below and tag me on Instagram @thatsourdoughgal.
Other sourdough recipes perfect for holiday baking:


Dear Rebekah, I need help. I’ve baked several gingerbread loaves following your recipe. The first three were super in every aspect, good texture, good flavour and extremely tasty. However, the last three were a disaster. I couldn’t shape them, too wet and didn’t bake at all well. What do you think happened? I think I did it the same way every time, so I don’t understand what went wrong with the last three. Any help? Thank you 🌞
Sounds like a starter acidity issue. Feel free to email me photos and explanation of how you maintain your starter and I can help better troubleshoot.
This was amazing! Came out perfect!
So glad you enjoyed it!
I’m rating this Gingerbread Artisan Loaf based entirely on the way it looks and its delectable aroma. I just know its going to be delicious, because all your recipes that I’ve baked have been outstanding. I’m taking half a loaf (with cinnamon honey butter)to my volunteer post tomorrow and I expect everyone will love me.
WOW that is a gorgeous loaf!!
At what temperature did you ferment the levain? And can I ferment the dough overnight?
My home is typically around 72F. If you ferment overnight, be careful of overproofing.
Do I need to put the dough in fridge after shaping,or can I let it proof and bake it?
No, you can let it do its second proof and bake it same day
Made your Gingerbread Sourdough loaf 2 times. The first time I followed exactly, burned on bottom and top a bit, still tasted delicious though. Second time I baked it, I heated oven and Dutch oven to 450 as instructed, but dropped temp to 425 for the bake. Also put the cookie sheet under the Dutch oven. Same timing. Turned out PERFECT inside and out. Fav recipe! Thank you.
So glad you enjoyed it Sue!!
I absolutely loved this recipe. I baked it on a Friday and it was still good on Wednesday, 6 days later! Apparently the molasses are a natural preservative.
The bread was still soft too. I cooked them in a covered loaf pan on a steel
The bottom and sides was a little dark but did not taste burnt. Thank you for sharing your expertise with us ! I made 2 loaves and a small focaccia. So good. One of my and husband’s favorite
Yay, so glad you enjoyed them!
like to give this one extra stars .. my favorite by far although i might like a bit more ginger next time. My youngest usually carries off most the stuff I make … let her taste this but kept it for myself. The honey cinnamon butter was awesome addition. I see myself making this many more times
Looks so good!! Glad you like it!
One of my top favorite sweet loaves!! Heav en ly!!
Mine is hobbit-style – ear and second ear! LOL
Delicious! I love it fresh but also as FRENCH TOAST!!
French toast is such a great idea!!
My first boule style loaf but not my last!! Still need some perfection on my shaping but otherwise this was delicious, your instructions so clear and well written! My husband says it’s so lovely and tasty and came out so beautifully! And we haven’t even made the butter yet! Thanks!!
Woohoo so glad to hear that!!
I doubled the recipe, baked in two glass loaf pans in my convection oven at 350 for 60 minutes. Turned out great! Thank you!
I forgot, here’s the first time I made it at Christmas and I followed your recipe 🎄
OMG stunning!! I need to try that!