
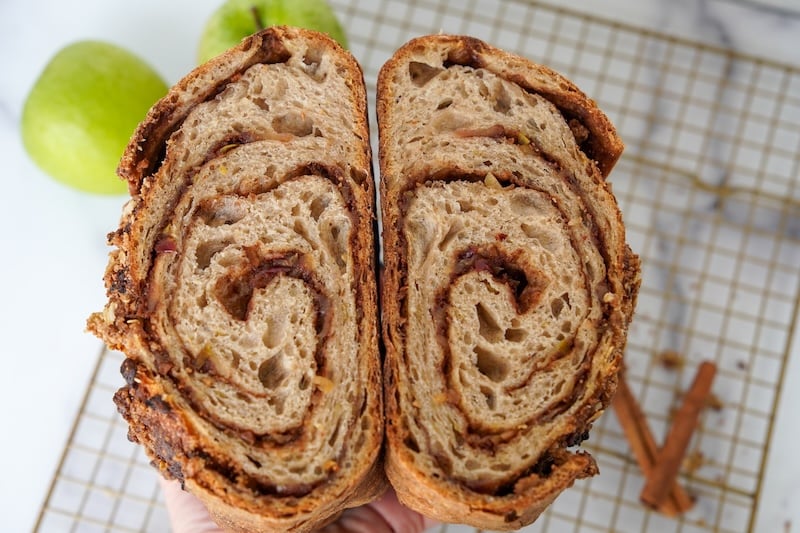
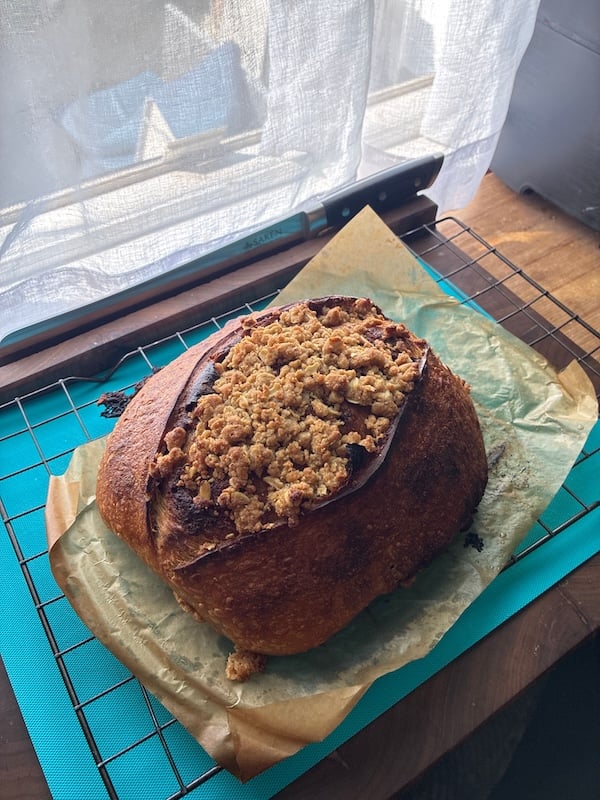
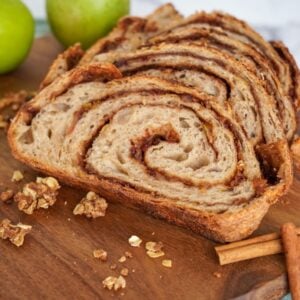
Apple Crisp Sourdough Bread Recipe (with a Cinnamon Swirl)
If you followed this journey, you know how this apple crisp sourdough loaf gave me a run for my money.
For context, when I first started this idea, all I wanted to do was swap the water in a standard loaf for apple cider.
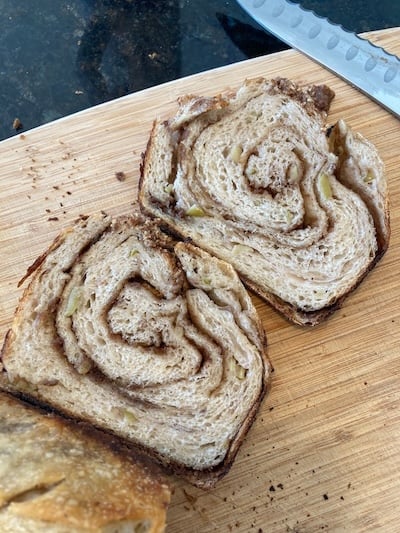
After many test loaves and revisions, we ended up with a loaf that contains boiled-down apple cider, shredded green apple, an array of apple pie spices, a cinnamon swirl with apple chips that soften during baking, an apple crisp topping…
Yeah… that escalated quickly.

This is a true showstopper loaf for apple lovers! Apple pie, apple crisp, apple cinnamon… whatever you wanna call it, this loaf is that.
“This was one of the tastiest breads I’ve ever tried!” –Recipe tester from Monterey, California
“It hits that sweet spot between cozy fall dessert and rustic artisan sourdough. The reduced cider + shredded apple give natural sweetness and moisture, the cinnamon-sugar swirl makes it feel indulgent, and the oat crumble is just fun. My kids are begging to make it again!” –Recipe tester from Downingtown, PA
Disclaimer: Some of the products I recommend in this post are affiliate links – if you choose to purchase after clicking one of my links, I may earn a small commission, which helps fund this website, recipe development, and monthly giveaways. I sincerely appreciate your support.
Why You’ll Love This Apple Crisp Sourdough Bread
- Layers and layers of flavor: this dough is packed full of flavor – apple cider, shredded green apple, cinnamon, nutmeg, ginger, allspice, cardamom, vanilla, freeze-dried apples… heaven!
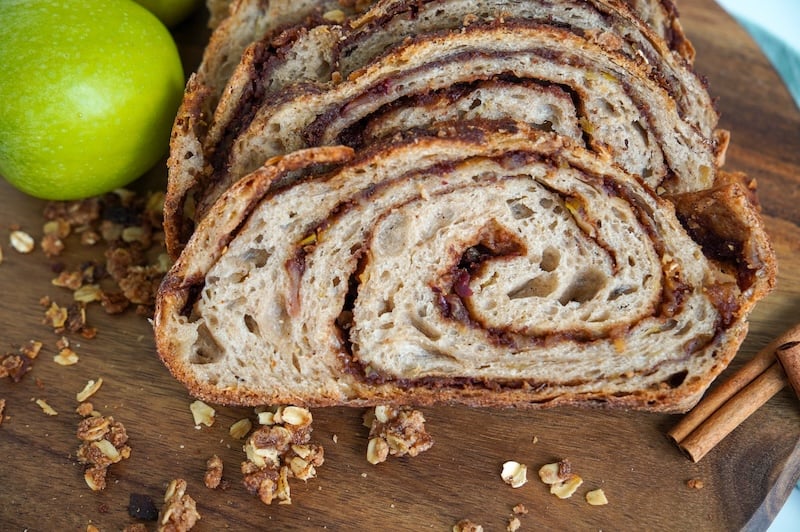
- Apple crisp meets sourdough: You get the chewy texture of artisan sourdough bread paired with tart apple, a cozy cinnamon swirl, and a crisp topping that makes your whole kitchen smell like autumn.
“It was fall in a sourdough loaf! My kids loved it too!” –Recipe tester from Brooklyn, NY
- No gummy apple chunks: I found that shredding the apple (versus dicing it) was key to injecting more apple flavor without getting gummy pockets in the loaf.
- Tons of fails and testing so you can avoid my mistakes: I tested and tweaked and re-tested and tweaked this loaf so many times… then sent it to a huge group of recipe testers to do the same. All of my tips and tricks are in this article to help you succeed!

- That crumble topping: It’s messy in the best way – that crunchy texture is absolutely divine. Fair warning: the crumble will… well, crumble when you slice the loaf. But we enjoy sprinkling those fallen crispy bits on our buttered slices!
“MAKE THE CRUMBLE TOPPING!! You won’t regret it!” –Recipe tester from Portland, OR
Recipe Difficulty Level
Most testers said this recipe is best suited for intermediate to advanced bakers.
My goal is to provide you with everything you need to succeed, regardless of experience. But it’s definitely more complex than a plain artisan loaf!

If you’re brand new to sourdough, I’d probably bookmark this one to try once you’re more comfortable with the basic steps.
“This might be a lot for a newer baker to take on. Inclusions can be tricky and the cinnamon filling adds another layer of complexity.” –Recipe tester from Exton, PA
Ingredients in Apple Crisp Sourdough Bread
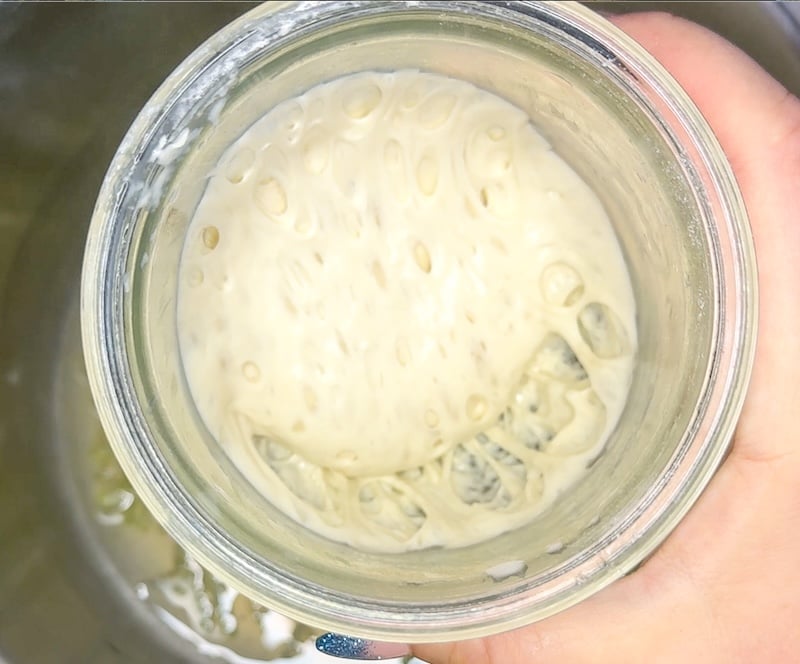
- Sourdough Starter: Needs to be active and bubbly so it gives your loaf strength and rise. If your starter smells acidic (like nail polish remover, acetone, or vinegar), please don’t use it for this loaf! This loaf cannot handle any excess acid due to the other ingredients, so an overly acidic starter is a sure path toward a bad result.
Does your starter smell acidic when it’s at peak? It’s an easy fix. This YouTube video I filmed covers starter health and how to get your acidic starter back on track. If you’ve struggled with unnaturally sticky dough or bread that comes out both flat and gummy, it might be your starter. A healthy one makes all the difference.
- Apple Cider: Adds that apple flavor right into the dough. Some testers used apple juice with success, but apple cider is definitely preferred! Apple cider is unfiltered and has more complex and earthy flavors (compared to apple juice) that I think are essential in this loaf.
- Green Apple: I first tested with Honeycrisp, but retesting with Granny Smith (a green apple) was so much better! The tartness really helps balance the loaf. We shred it so it blends right into the dough without leaving gummy apple pockets. No need to peel it, either!
- Water: I just use mine straight from the tap (we have a well). If your water has a high chlorine content (common in city water), spring or filtered water is a good alternative.
- Vanilla Extract: Since this is a sweeter loaf, vanilla helps round out the flavor, but one tester didn’t like it. It’s an optional ingredient.
- Cinnamon: The star of the filling. You’ll taste it in every bite. I also snuck some into the dough for a more thorough cinnamon flavor.
- Apple Pie Spices (Nutmeg, Ginger, Allspice, Cardamom): Adds layers of warm flavors! You can use apple pie spice, pumpkin pie spice, or the individual spices in this recipe. Whatever you prefer!
- Bread Flour: A strong bread flour gives the dough enough structure to hold the apples, swirl, and crumble topping. In my recipe testing, I primarily used Central Milling High Mountain bread flour (13.5% protein), and the last few recipe tests were with the same brand’s ABC bread flour (11.7% protein).
Flour protein content and hydration: In general, the higher your flour’s protein content, the more liquid it can absorb (and vice versa). If your flour has a lower protein content, you may need to add a small amount of extra flour (approximately 25 g) to achieve our desired texture. If you’re using a very high-protein flour (like Ballerina Farms’ farm flour, which has 14% protein), you’ll likely need an extra splash of water in the dough.
- Salt: I usually use Redmond’s sea salt (affiliate code TSG15 for a discount). Just try to avoid salt with anti-caking agents.
- Butter: Soften it for the filling, keep it cold for the crumble.
- Packed Brown Sugar: Sweetens the swirl and adds that caramel-like depth that pairs perfectly with apples and spice.
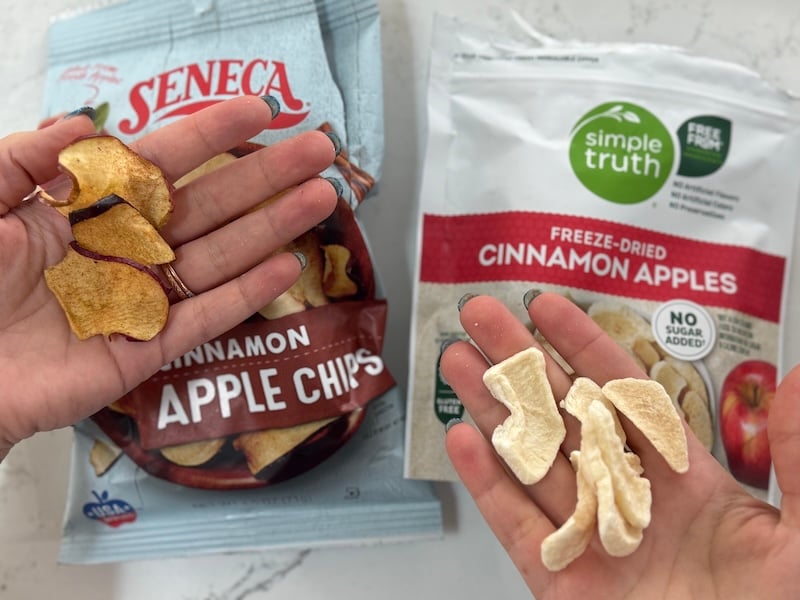
- Freeze-Dried Apples or Apple Chips: These are added to the cinnamon filling and soften during baking to create an incredible apple pie swirl. I tried both apple chips and freeze-dried apples in recipe testing, and both were great! I slightly preferred the apple chips, but either is perfect. You can use plain or cinnamon-flavored. Note: I did not try dried apples (the chewy, dried kind).
And if you’re going to make the crumble, you’ll also need:
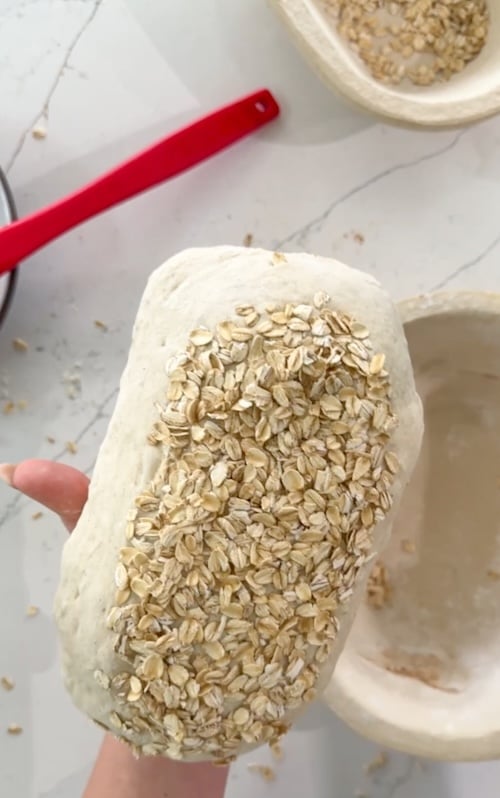
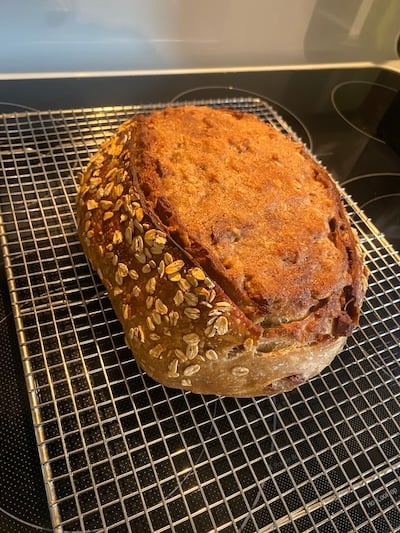
- Old-Fashioned Rolled Oats: Adds crunch and a little texture to the topping. It wouldn’t be an apple crisp loaf without the oats! P.S.: You can also roll your dough log in oats before you put it in the banneton – this is optional, but gives you a lovely oat crust!
Substitutions
- Filling alternative: You could swap the entire filling for apple butter (I did not test this, but have no reason to believe it wouldn’t work great). I’d advise stirring in a little bread flour so it’s not too runny (about 2 tablespoons for every 135 g of apple butter).
- Apple juice for apple cider: Apple juice can work if that’s what you have on hand (though I haven’t tested it myself). Several recipe testers used juice instead of cider with no reported issues. I imagine the flavor would be lighter and sweeter, and your dough may be a little looser, so consider adding a bit of extra flour.
- Different apples: A tart green apple (Granny Smith) keeps the loaf from being too sweet, but you could use a sweeter variety (like Honeycrisp, Pink Lady, or Fuji) if that’s what you have on hand.
- Spice swap: If you don’t have the individual spices like nutmeg, ginger, cardamom, and allspice, you can use apple pie spice or pumpkin pie spice instead! Don’t take away the cinnamon in the dough or the filling, though – keep that, and simply replace the other spices with apple or pumpkin pie spice blends.
“Absolutely love the apple flavor and the crumble. If more crumble would fit, I would do more. The swirl spices are so delicious.” –Recipe tester from Texas

Equipment I Used
- Tovolo spatula: My favorite for feeding and stirring starter because it’s flexible yet sturdy.
- 3/4 L Weck jar: The size I like best for my sourdough starter.
- Kitchen Scale: Accuracy is everything with sourdough. I tested 20 scales if you want to check out all of my top picks.
- Square baking dish: I tried a square dish instead of a regular mixing bowl and loved it! Doing stretch and folds was easier, but most importantly, it dumped out into a square instead of a circle. Much easier to stretch into a rectangle! You can absolutely use a mixing bowl instead.

- Danish dough whisk: Helps you mix the dough together initially if you’re mixing by hand! I hate most Danish dough whisks, but the one linked here is amazing.
- Box grater: For shredding the green apple.
- Oval banneton: I love my wood pulp bannetons—they hold their shape well, release the dough easily, provide a crispy crust, and the dough is easier to score. For this recipe, I prefer using a banneton lined with a flour sack towel, just in case there’s any leakage. I used the medium oval size from Flourside for this bake.
- Bread lame: A razor blade or sharp knife works too, but a lame gives you more control.
- Dutch oven: A good Dutch oven traps steam well, which helps the loaf rise tall and get that crisp crust. I use the Krustic brand of Dutch ovens religiously. You can get a discount when you purchase through my link.
- Thermometer: Sweet loaves like this can fool you—golden on the outside but undercooked in the middle. A quick temp check makes sure it’s fully baked. The Thermapen One is, in my opinion, the best thermometer on the market (extremely fast and accurate). If you’re looking for a budget option, this one from Atogou is also good, albeit much slower in its readings.
- Bread knife: My favorite Mercer bread knife is super sharp and lasts forever! Plus, it’s less than $20!
Helpful resource: Budget Sourdough: 20+ Tool Swaps for Amazing Bread
Baker’s Timeline
Here’s what my typical timeline for this bake looks like. My dough was 74-75°F (23°C) in most tests.
| DAY 1 | |
| 9 PM (or before bed) | Feed your starter |
| DAY 2 | |
| 9 AM | Mix the dough |
| 9:45 AM | Stretch and fold #1 |
| 10:15 AM | Stretch and fold #2 |
| 10:45 AM | Stretch and fold #3 |
| 11:15 AM | Coil fold (or stretch and folds) #4 |
| 2:30 PM | Make the filling and shape the dough (timing here differs based on your environment) |
| 2:45 PM | Pinch seam and refrigerate |
| DAY 3 (any time) | Bake |
Recipe Testing Process
Like many of my sourdough experiments, this one started as a simple concept and evolved into something more elaborate.
I recently posted that I think I’m trying to stuff too much stuff in my loaves these days, and a follower messaged back that it feels like a metaphor for her life. Me too, friend… me too.
Let me take you through where this recipe started and the tweaks made along the way to get to the winner.
Tests 1 & 2: Swap Water for Apple Cider
My first couple of tries were pretty simple—I just swapped the water for apple cider and added a cinnamon swirl.

The loaves baked up beautifully, but the dough handled very differently with the cider. The interior texture was a bit wet and gummy.
I needed to make some changes. Plus, I wanted to see if I could sneak some more apple flavor into the dough. The apple cider was delicious, but the apple flavor wasn’t as strong as I expected.
Test 3 Apple Chunks + Crumble Top
I kept the apple cider swap and decided to layer diced apples in during shaping (thanks to Allie from Village Bakehouse for convincing me raw apples work great).
I also sprinkled on a crumble topping (which tasted good, but refused to stay put).
The flavor was spot on, BUT the moisture from the chunky apple pieces made the crumb gummy, especially around the bottom and the swirl.

Test 4: Shredded Apple
I kept the same crumble topping (still wouldn’t stick), but this time I swapped the apple chunks for shredded green apple and mixed it right into the dough during the stretch and folds.
Total game changer.
The apple flavor carried through, but without the gummy pockets.
This is the recipe I sent off to recipe testers, but spoiler alert: the feedback came back mixed.
Some loved the recipe, but many bakers had major struggles. I decided to make some additional tweaks before sending a revised version back to the recipe tester group.
Test 5: Implementing Feedback From Testers
Testers said the shaping was hard because the dough was too sticky, the loaf burnt in the oven, and they wanted more apple flavor.
I lowered the dough hydration, tweaked the oven temps and times, and squeezed as much apple flavor into that dough as I could.
The problem? I could not shake a gummy line at the bottom of my loaf (and around parts of the swirl).
Test 6: Finally Nailing the Perfect Apple Crisp Loaf
“I thought the first test was amazing. You have perfected it! Hands down, new favorite sweet bread. Dough was easy to work with.” –Recipe tester from Eau Claire, WI
I made even more tweaks, keeping in mind the recipe tester feedback and trying to resolve the new issues from Test 5.
The ticket? Boiling down the apple cider to concentrate the flavor. That allowed me to use water as the main liquid in the dough, which fixed the gummy interior issue without sacrificing apple flavor.

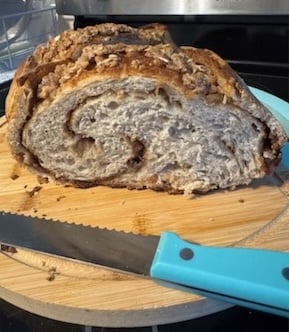
I also attempted coating the exterior of my dough in oats for an oat crust. The process was a disaster, but the result was surprisingly great.
I love the look, but I decided not to include it as an official recipe step. For one, this was the first time I’ve ever done it, so I don’t feel qualified to be posting a tutorial. Second, this recipe already has a lot going on, and I didn’t want to complicate it any further. But if you’re game, the oat crust is super fun!!
“The first round was so yummy to me and my husband that I didn’t totally believe it could get better, but it did! And the dough was easier to work with, the apple steps were so much easier and more streamlined, and somehow, even though I was sure I’d miss it, taking out the oil combined with tweaking the liquid ingredients made such a delicious finished product.” –Recipe tester from Texas
Meet the Recipe Testers
This recipe was tested by 68 dedicated home bakers from across the globe – from Florida all the way to Australia! They gave this recipe a 4.4/5 star average rating and a 4.6/5 recommendation score – a solid improvement from the 4.27/5 rating in my initial testing round with 273 bakers.
Many noted improvements in texture and flavor compared to the prior version, and several mentioned it has now become their go-to fall baking recipe.
This recipe may be more complex, but it’s such a fun loaf to make, and the final result is a showstopper!
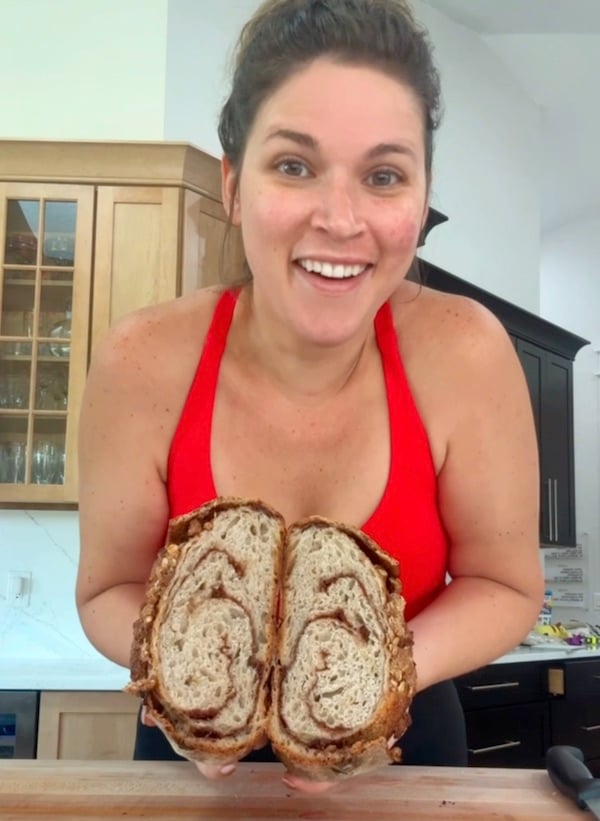
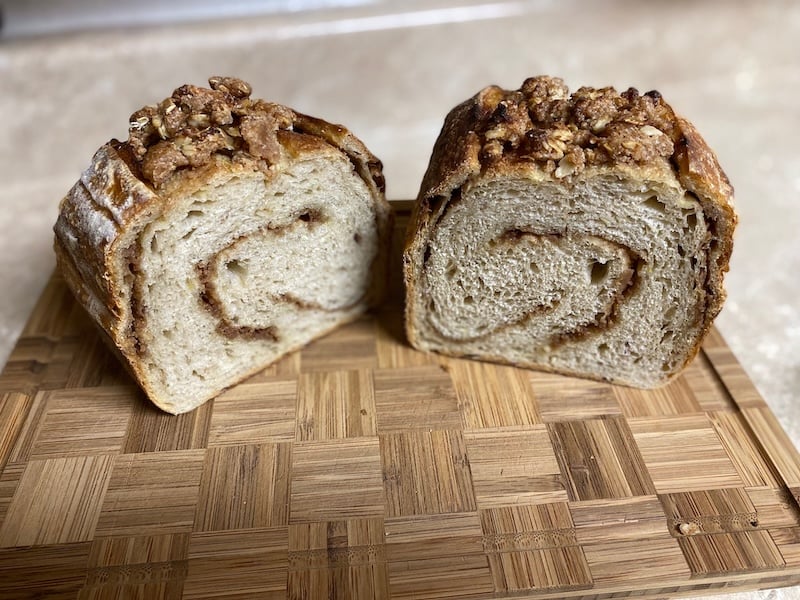
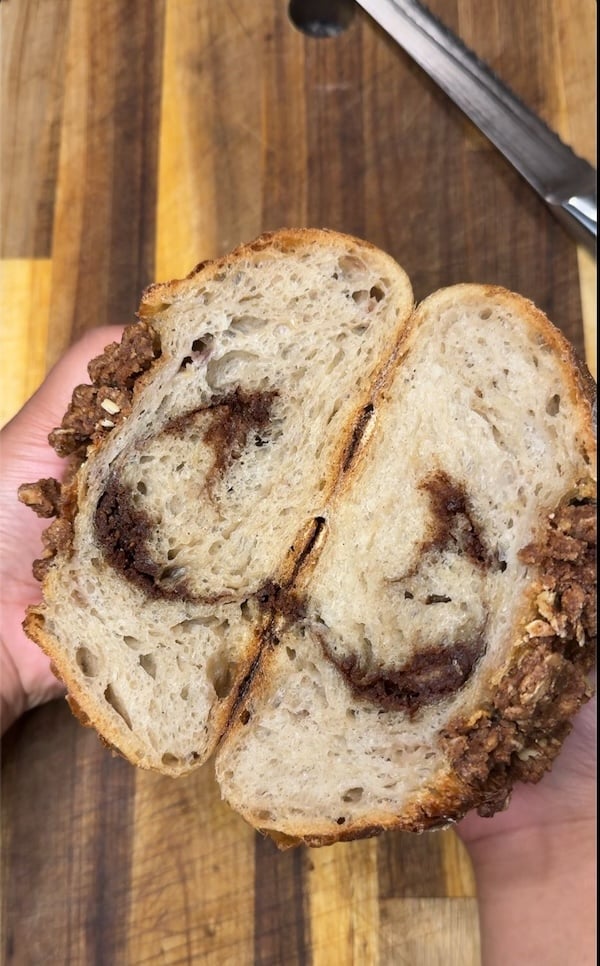
Take a look at some of the recipe testers’ bakes:


How to Make Apple Crisp Sourdough Bread (Step-by-Step Instructions)
Step 1: Feed Your Starter
Before going to bed the night before (or about 10–12 hours before you plan to mix the dough), feed your starter a 1:5:5 ratio—12 g starter mixed with 60 g water and 60 g bread flour.
This makes a little extra, so you won’t need to scrape the jar completely clean (just keep the leftovers for maintaining your starter).

Use my starter ratio calculator to adjust the feeding ratio if you want to start on a different timeline.
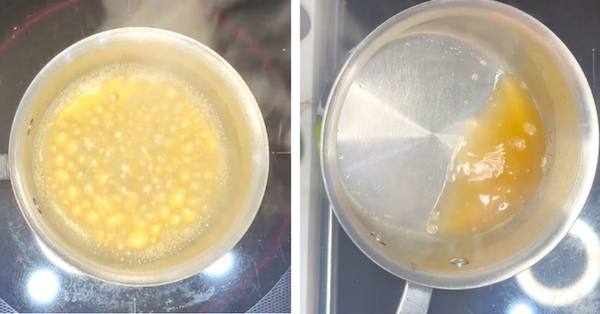
Step 2: Reduce Apple Cider & Prepare Apple
In the midst of my apple cider dilemma (how can I inject more apple flavor without increasing the apple cider, which led to a gummy interior?), the internet came to the rescue.
Dozens of bakers across all social media platforms suggested reducing the apple cider on the stovetop, and it turned out to be the winning solution.
And it’s so easy. In a small saucepan over high heat, bring 150 g apple cider to a rolling boil. Let boil for 4-5 minutes, or until reduced by about half.
Tip from a recipe tester: “When you’re reducing the apple cider, weigh it in your saucepan; that way, you can check the weight while you reduce it.”


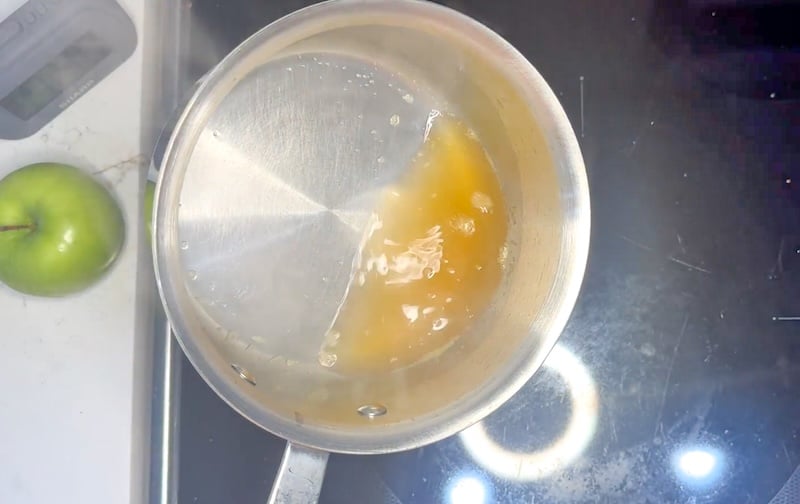
We need 60 g of our reduced apple cider for this recipe (for one loaf). Let cool to room temperature before proceeding.
Did you end up with more or less apple cider than needed? Compensate by adjusting the water in the dough. For example, you reduced too far and ended up with 50 g of apple cider. Simply add 10 g of additional water to your dough. Or perhaps you ended up with 70 g of apple cider and don’t want to waste that extra 10 g – just subtract 10 g of water from the dough.
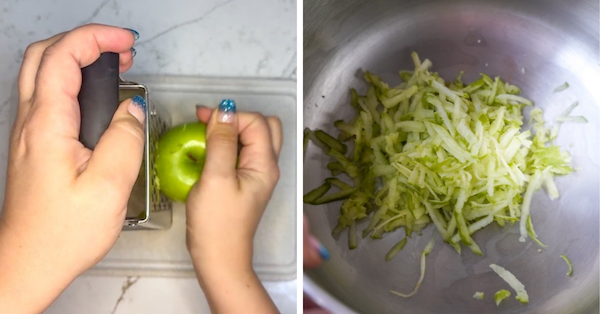
This is also the perfect time to shred our apple! I use a Granny Smith apple that’s medium-sized – it weighs about 140 g, for reference.
Using a box grater, coarsely shred your green apple (no need to peel it!). One apple should yield about 100 g of shreds.


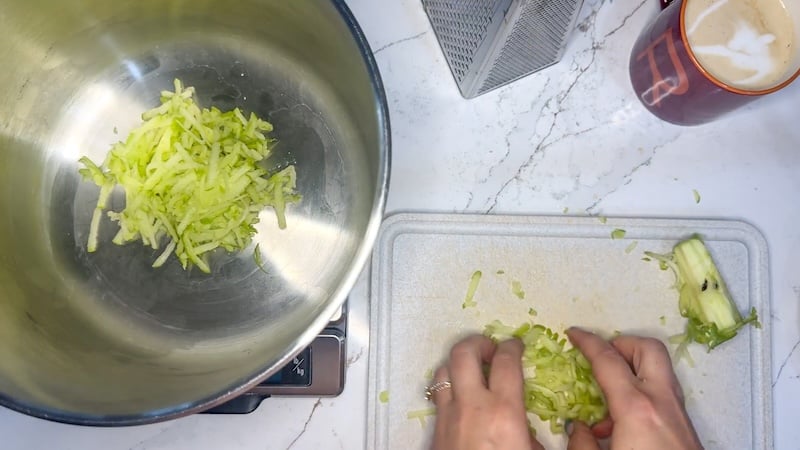

Tip: Don’t shred your apple too far in advance – it’ll turn brown. Also, if you end up with more than 100 g of shreds, do not add the excess to the dough. The shredded apple is at least half liquid (when I squeezed out as much liquid as possible during recipe testing, the weight reduced by half). If you add too much extra, you’ll end up with a much looser dough.
Step 3: Mix the Dough
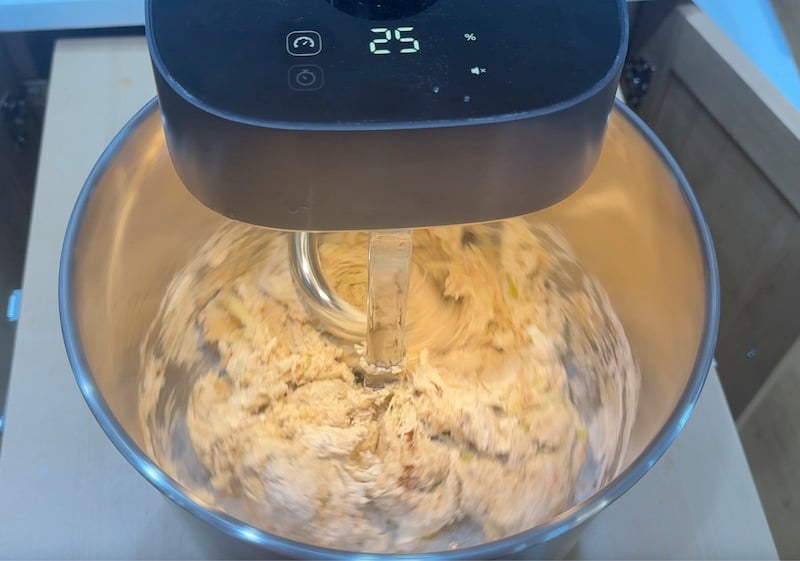
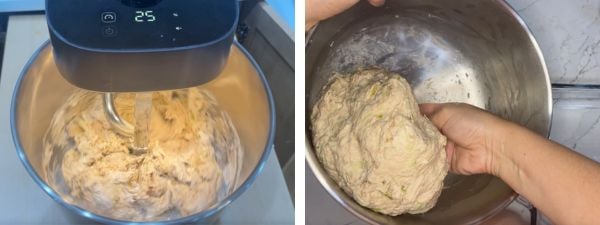
You can mix this dough by hand (I like using a Danish dough whisk to help) or in your stand mixer fitted with a dough hook.
We will still develop gluten and strengthen the dough by hand, but a stand mixer makes easy work of the initial mix.
Any stand mixer will do! If you use a stand mixer, literally any brand or power will work – all it’s doing is combining our ingredients for us. We aren’t mixing to a windowpane or full strength – just to a shaggy dough. Nothing fancy or complicated here!
When your starter is peaked and ready to go, grab a large mixing bowl or your stand mixer bowl and combine:
- Our reduced apple cider that’s cooled down (60 g for one loaf)
- The shredded apple (100 g total)
- 210 g water
- 120 g active sourdough starter
- 5 g (1 tsp) vanilla extract (optional)
- 1/2 tsp cinnamon
- 1/4 tsp each of nutmeg and ginger*
- 1/8 tsp each of allspice and cardamom*
- 500 g bread flour
- 10 g salt
If mixing by hand, mix the wet ingredients together first; then, add the spices, bread flour, and salt.
*You can substitute the nutmeg, ginger, allspice, and cardamom for an equal amount of apple pie spice or pumpkin pie spice, if you prefer. Keep the cinnamon, even though apple pie and pumpkin pie spice blends contain it!
Spice Blends vs Individual Spices: Recipe testing feedback was split on individual spices vs. spice blends, so use whatever you prefer! Feel free to adjust amounts to your taste, too – not a fan of ginger? Add less. Big fan of cloves and want that flavor in your bread? Add some! The spices in the dough are very flexible.
At this point, the dough will look a little shaggy. Don’t worry about making it smooth yet; you’re just making sure there are no dry bits of flour hiding.
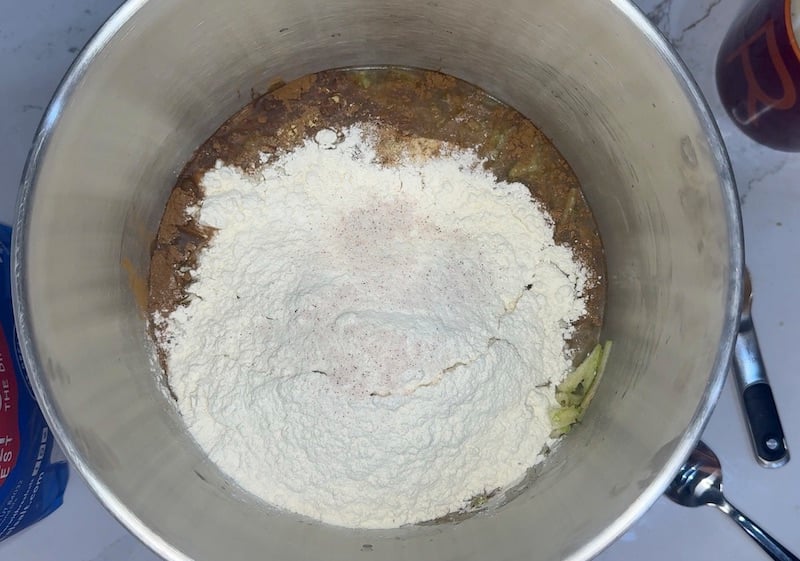
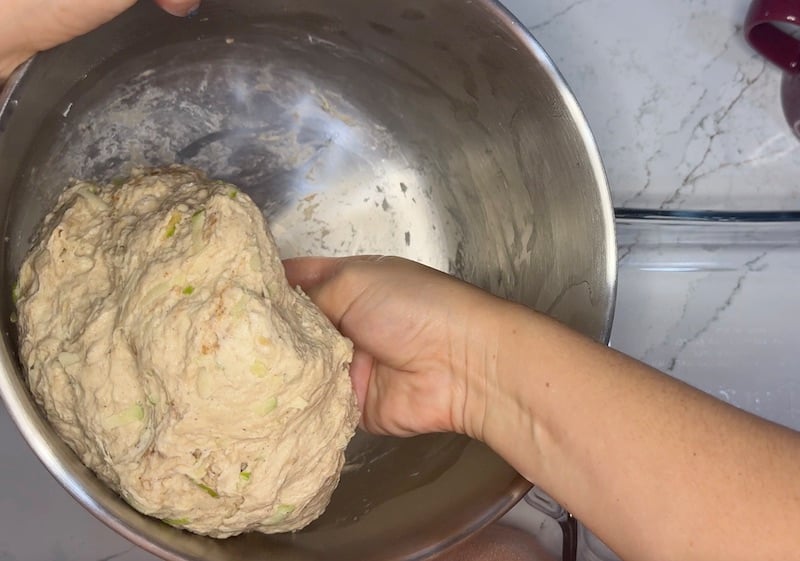
Cover the bowl with plastic wrap and let the dough rest for 30-60 minutes.
Texture check: Please refer to my photos and videos here and compare your dough to them. Some recipe testers said the dough was super wet and loose (needs more flour), and some said the dough was so stiff they couldn’t even do stretch and folds later on (needs more water). Little tweaks like this are expected in sourdough baking, so don’t panic if you need to make adjustments to achieve the proper texture.


Before you walk away, set out 58 g butter (4 tbsp, or half a stick) to soften for the filling later.
Note: this marks the start of bulk fermentation.
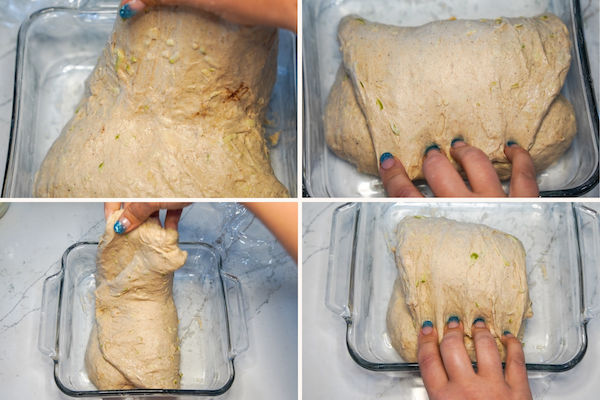
Step 4: Dough Strengthening (Four Rounds of Stretch and Folds/Coil Folds)
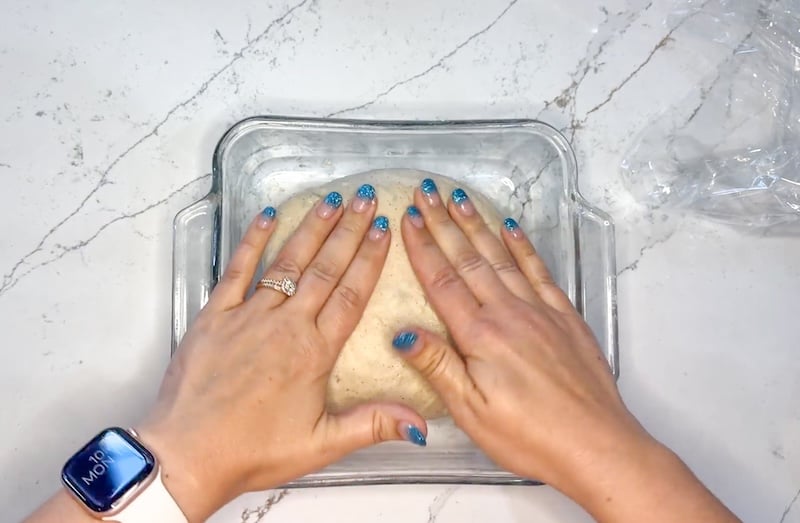
After the 30-60 minute rest, mist your hands with water to prevent the dough from sticking to them.
Then, grab the top edge of the dough. Gently stretch it upward (without tearing it) and fold it back down over itself.

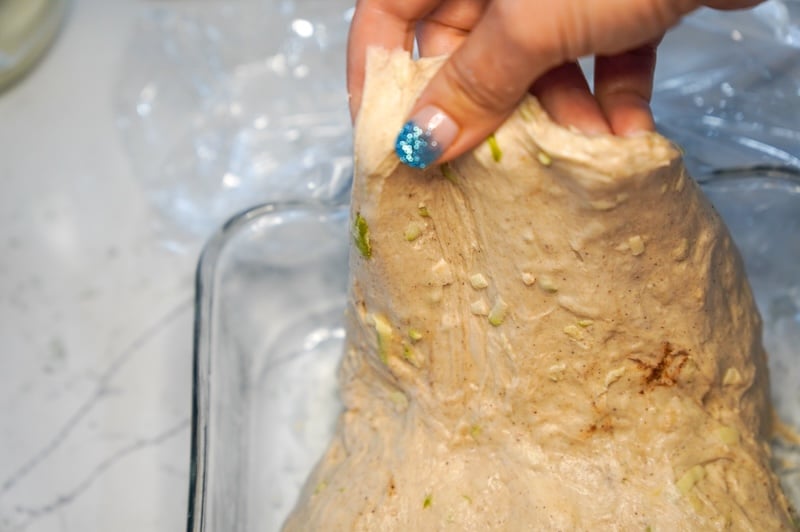


Rotate the bowl a quarter turn and repeat. Do the same for the right side, bottom, and left side until you’ve folded all four “edges” of the dough.
You can go back around the bowl again if your dough is slack and seems to need it. If the dough starts to resist and doesn’t want to stretch up anymore, that’s your cue to stop.
Cover the bowl again with plastic wrap or a lid and let the dough rest for another 30 minutes. Do two more rounds of stretch and folds, each separated by 30-60 minutes.
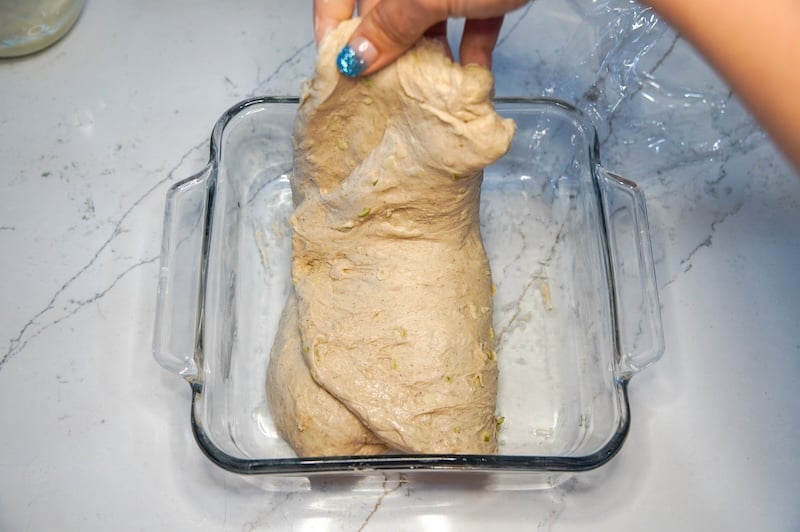
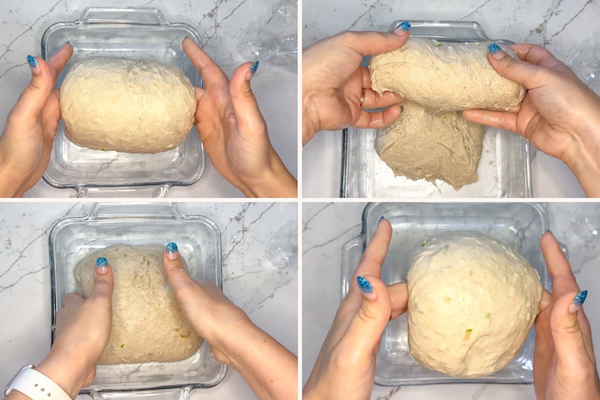
For our fourth and final dough strengthening round, I like to switch to coil folds. It’s a bit gentler on the dough. And it’s super simple – lift the dough from the center, let the edges drape down, and tuck them underneath as you set it back down. Rotate the bowl 180° and repeat for the other side. Done!


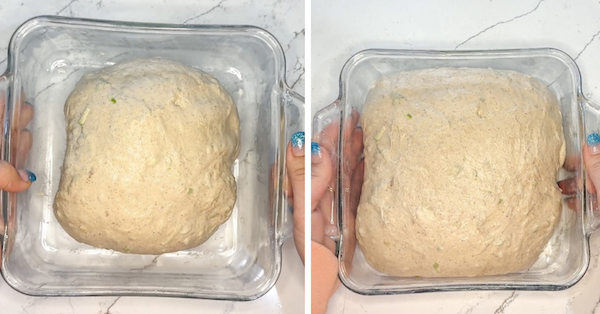
Step 5: Bulk Fermentation
Now, we wait for the bulk fermentation to finish before we shape the bread.
Look for visual clues that your dough is finished fermenting. When it’s ready to shape, it’ll be bubbly and jiggly when you shake the bowl, feel light and airy when you tap the surface, and if you pull at the edge of the dough, you’ll see some gluten strands.
For reference, this took 5.5 hours when my dough was 75°F (23.8°C), and in another test, it took just over 6 hours when my dough was 74°F (23.3°C).


Your timing may be shorter or longer depending on your kitchen temperature.
Tip: I do not recommend placing this dough in a proofing box or a warm location. We really want to favor the yeast (not the lactic acid bacteria), and if the temperatures are on the warmer side, the bacteria will multiply faster, leading to a more acidic dough. If you can, something around 68-76°F (20-24.5°C) is ideal.
Step 6: Prep the Apple Crumble & Cinnamon Swirl
When the dough is finished fermenting, mix up your swirl filling.
In a medium bowl, combine:
- 70 g packed brown sugar (5 tbsp)
- 20 g bread flour (2 tbsp)
- 1 tbsp cinnamon
- 1/2 tsp nutmeg*
- 1/4 tsp each of ginger and allspice*
*Sub apple pie or pumpkin pie spice if preferred (equal amounts); keep the 1 tbsp cinnamon!
Then, mix in 58 g (4 tbsp) butter (softened). If the mixture isn’t spreadable, warm it in the microwave for 5-10 seconds to soften it.

Step 7: Shape
“In love with this shaping technique. I’d seen it before but never used it. I thought for sure it couldn’t possibly make a gorgeous, non-leaking swirl. But it so does.” –Recipe tester from Texas
When I tested my cinnamon swirl sourdough bread loaf, I tried a bunch of different methods (6 to be exact) for layering the filling, and the one I’m about to show you gave the best swirl with the least amount of leakage.
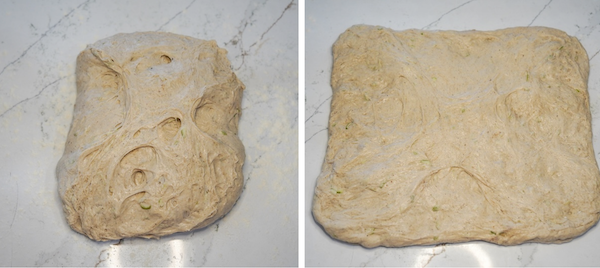
Lightly flour your counter (and your hands) to keep the dough from sticking.
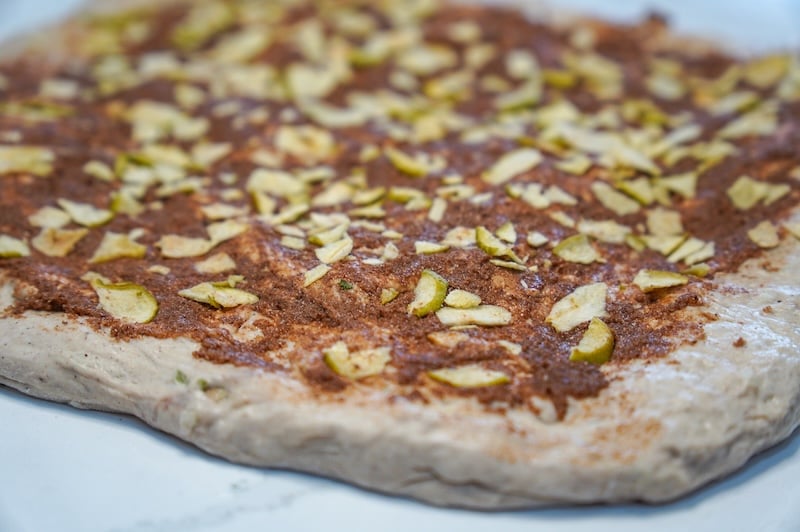
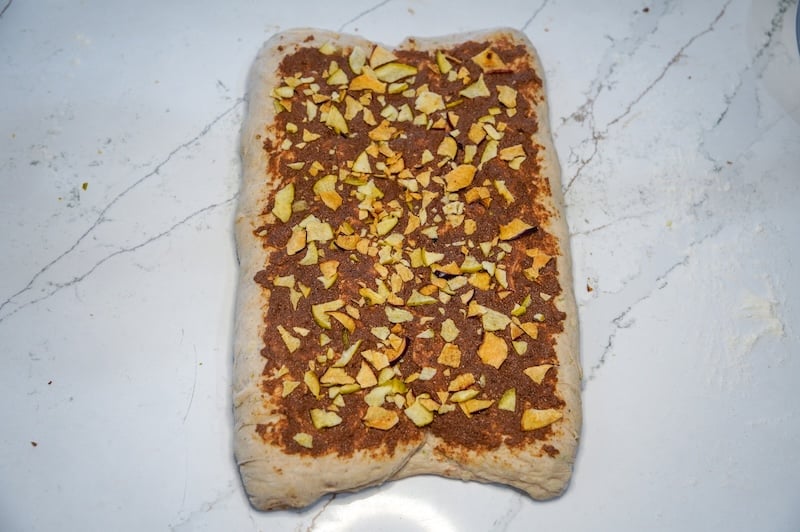
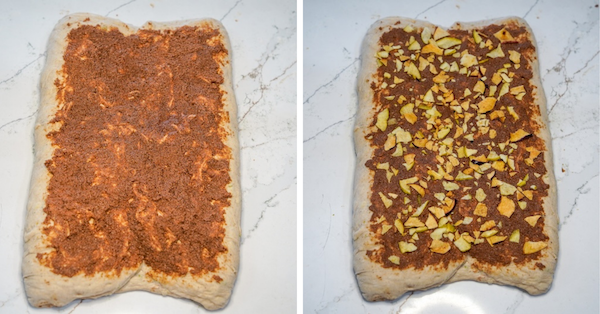
Gently turn the dough out and coax it into a rectangle. Try not to press too hard so you don’t de-gas it too much.


I never measure this rectangle, but I did this time around, just in case you need a more specific pointer. It was about 12 inches wide by 11 inches long.


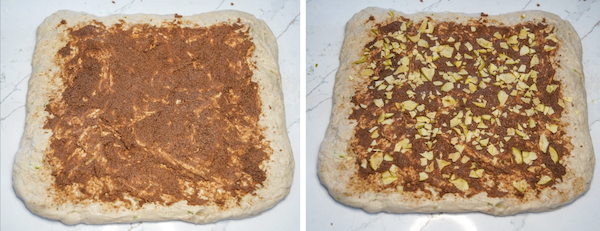
Spread half the cinnamon-sugar mixture evenly across the dough, leaving a gap on all edges. Crush up half of your apple chips or freeze-dried apples (about 20 g worth) and sprinkle them on top of your cinnamon spread.

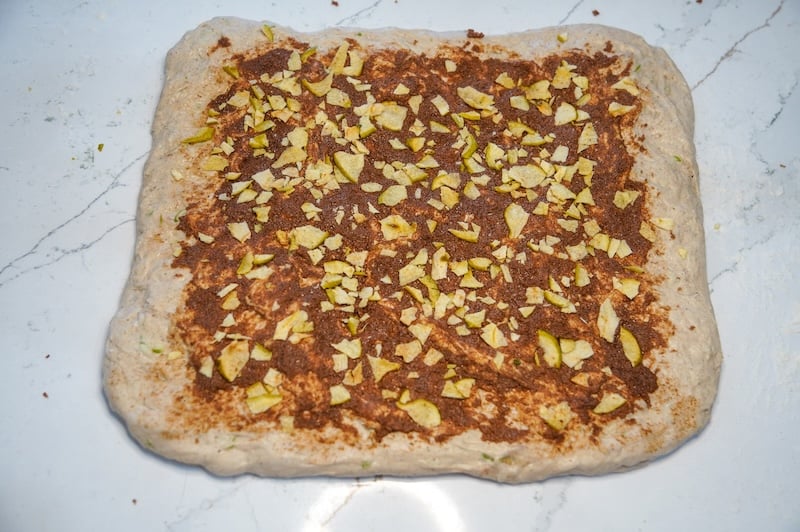
Can we just take a second to appreciate how stunning this little layer of awesomeness is?!
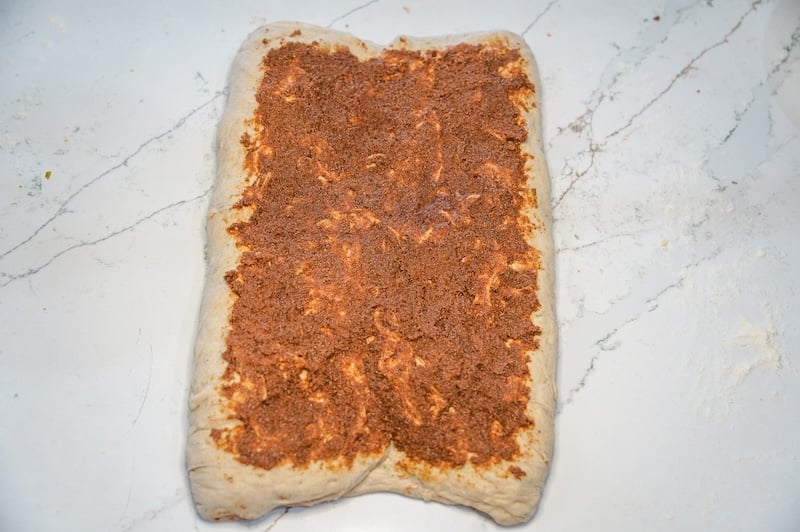
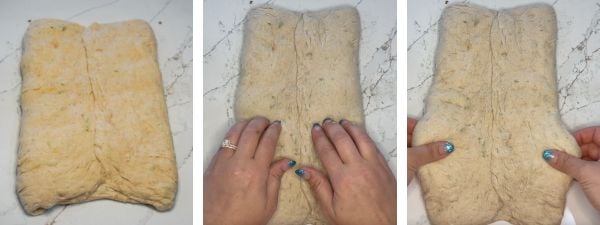
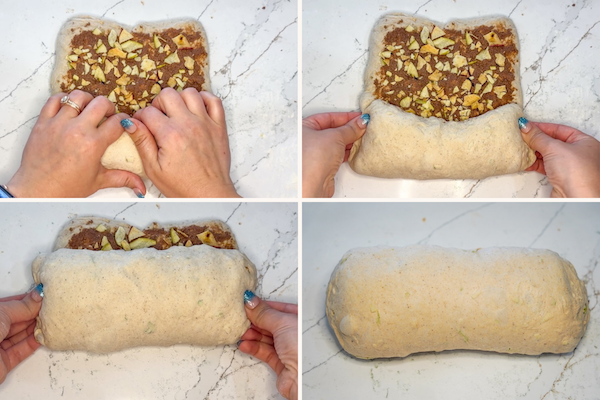
OK, back to shaping. Fold the sides of the dough in toward the center and pinch the center seam closed.

Optional: At this point, sometimes I like to do two little tricks. I will gently dimple the dough to redistribute any large gas bubbles. I will also gently stretch the rectangle to be slightly wider, if needed. You don’t have to do this, but I usually do!

Spread on the remaining filling, leaving a small border around the edges so it seals well without leaking. Sprinkle the rest of your crunched-up apple chips or freeze-dried apples (about 20 g) on top.
Now, roll the dough up tightly into a log, pinching the edges as you go to keep the filling from leaking out.


I tend to roll the dough away from me, but I think it’s actually better to roll it towards you for better control. I just don’t remember to do that. Forgive me.
Optional step (not photographed): For an oat-crusted exterior, mist the top of your shaped dough log with water and roll it in old-fashioned (rolled) oats before placing it in your banneton. I did this and thought the entire experience was a disaster (you can watch it in my Apple Crisp highlight on Instagram), but it turned out looking beautiful in the end.
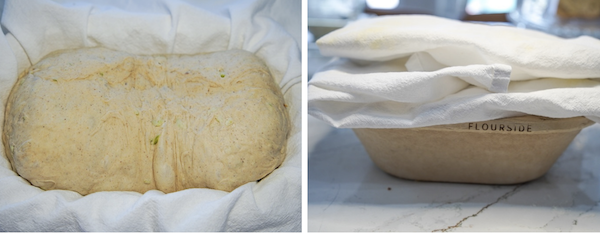
You can kind of see the oat crust in this photo of a test bake I did:

Place the log seam-side up into a towel-lined banneton (just in case it leaks).

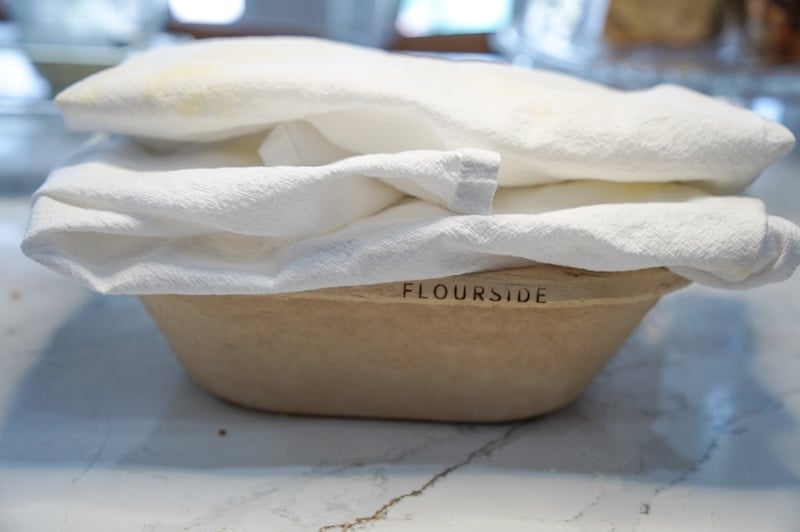
Let it relax for 15–30 minutes (or longer if you feel the dough needs to rise more); then, pinch the center seam closed.
Cover and refrigerate overnight.
Step 8: Score & Bake
The next day, preheat your oven to 450°F (230°C) convection or 475°F (250°C) conventional, with your Dutch oven inside.
Note: If your oven tends to run hot, reduce the temperature by 25°F. When in doubt, err on the side of a lower oven temperature, as this loaf is prone to burning on the outside before the interior is fully baked through.
After your oven has preheated, wait about 10-20 minutes before proceeding. We want the Dutch oven to fully heat up, too, and that takes a bit longer.
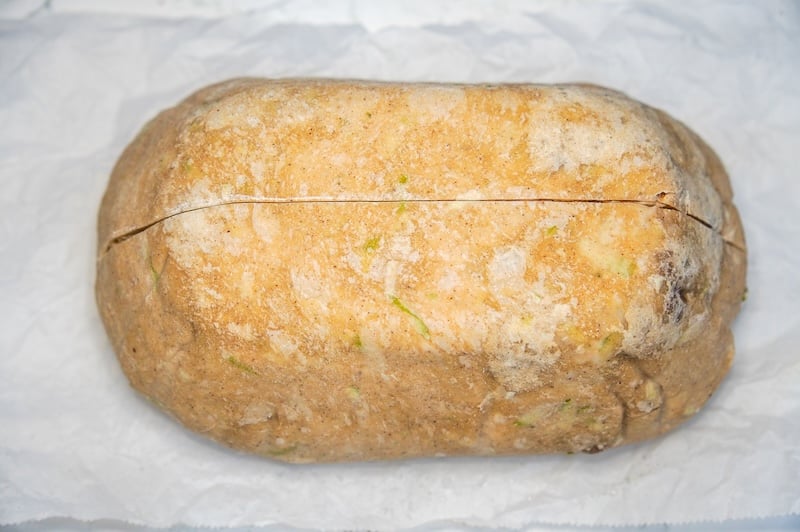
When your Dutch oven is nice and hot, turn your dough out onto a piece of parchment paper.
Pro tip: Crumple up your parchment paper and wet it under your faucet. This softens it (which prevents creases on your dough) and injects a little extra steam into your Dutch oven.
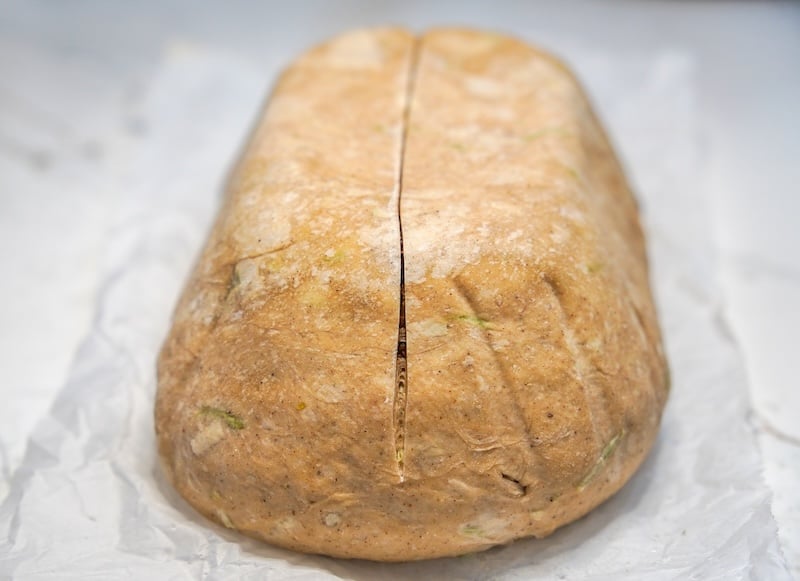
Using a sharp bread lame, score straight down the center of the loaf (not too deep—just enough to guide the rise).

Here’s a side view of the score – it’s super simple!
Tip: 26% of recipe testers reported a burnt bottom. Consider placing a sheet tray on the rack directly below your Dutch oven to deflect some of that heat. Other options include slipping a layer of foil or ceramic pie weights under the parchment paper (on the Dutch oven base, but not touching the dough).
Cover and bake for 40 minutes.
Step 9: Prepare the crumble (optional)
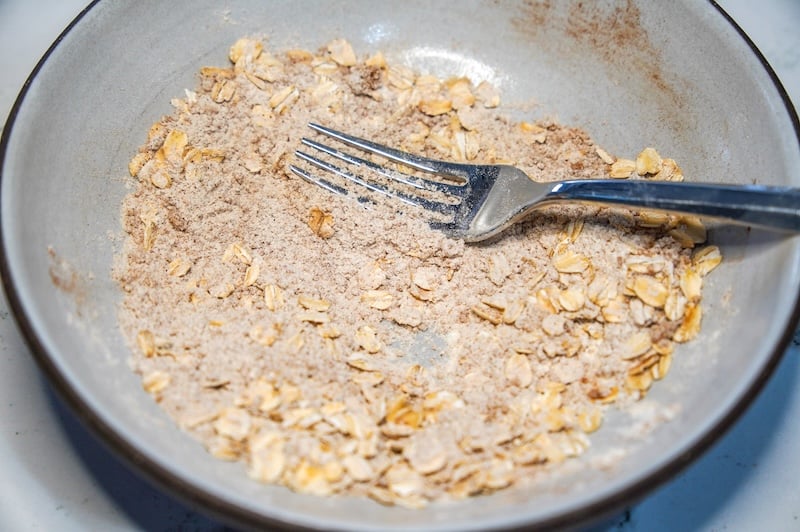
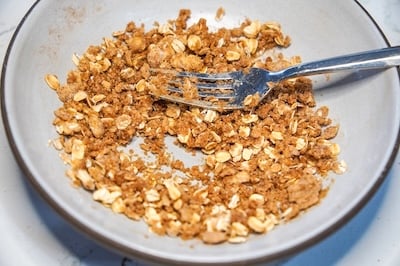
While the loaf is baking, mix up the crumble topping. In a small bowl, combine:
- 23 g bread flour
- 23 g brown sugar
- 12 g old-fashioned rolled oats
- 1/4 tsp cinnamon
- Pinch of nutmeg
- Pinch of salt
With a fork (or your fingers), mash in 17 g cold butter.
Add 2 tsp of apple cider to help the crumble come together a little bit more, and mix it together well.

Note: Most of the crumble will fall off when you slice the loaf – we like to butter our slice and sprinkle the fallen pieces on top! Skip the crumble if you prefer mess-free slicing.
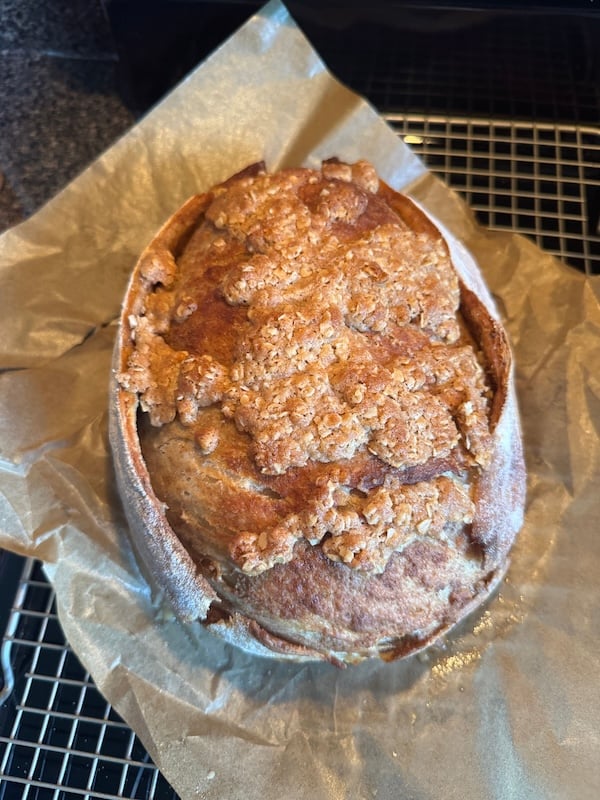
Step 10: Finish the Bake
After the first 40 minutes of covered baking, remove the lid from your Dutch oven.
Check the internal temperature. It should be between 190-200°F (88-93°C) – if not, cover and check again in 5 minutes. Then, press your prepared crumble in the center where your dough has expanded (optional).

Put it back in the oven, uncovered, for another 5–15 minutes. You’re looking for a golden brown topping and an internal temperature of 205–210°F (96–99°C).
Keep an eye on it and tent the loaf with foil (or put your Dutch oven lid back on) if it’s browning too quickly.
You can also drop the oven temp to 425°F (220°C) for the rest of the bake if the bread still needs more time inside (internal temp not there yet), but the top looks done.
When it’s done, move the loaf to a wire rack and let it cool all the way – about 1–2 hours – before slicing. I know it’s tempting, but cutting in too soon almost always means a gummy crumb.

Storage & Reheating
- Room temperature: Store the cooled loaf in a glass cake stand, bread bag (these are my favorites for storing and gifting), an airtight container, or wrapped in foil for up to 3 days.
- Freezer: For longer storage, slice the loaf and freeze the slices in a freezer bag. That way, you can pull out just what you need. Plus, freezing the bread has health benefits!
- Reheating: Warm slices in the toaster or oven at 350°F (175°C) for a few minutes!
FAQs
I threw all my tricks at making the crumble stick and finally just accepted that this topping is a little messy (in the best way). Press it on gently after the covered bake, and if a few pieces fall off when slicing, just sprinkle them on top of a buttered slice.
Sweet loaves are notoriously difficult to work with, particularly when it comes to baking all the way through without burning first. Sugar slows gluten development, binds up water (which interrupts the gluten-water network), and is more prone to browning early in baking (On Food and Cooking, page 546). While this loaf doesn’t contain sugar directly, the boiled-down apple cider creates a similar effect. So yes – this loaf will take longer to bake through than a regular artisan loaf, and you may need to take precautions to prevent burning (like tenting with foil or placing a sheet tray beneath the Dutch oven to help deflect some heat).
The total hydration of this loaf is about 69%. Let me break down how we get to this number.
Total liquid in this recipe:
210g water
60g apple cider (we reduced it down from 150g)
50g, effectively, from the 100g of apple (half is liquid)
5g vanilla extract
Total liquid: 325g
Recipe baker’s percentages:
500g flour: 100%
325g liquid: 65%
120g starter: 24%
10g salt: 2%
Therefore, the total dough hydration (when also factoring in the water from the starter): 69%
I think a recipe tester from Susanville, CA said it best: “As with any recipe, learn to go by feel. I should have added extra water when I was having a hard time hand-mixing.”
There are a lot of variables when it comes to sourdough, many of which I cannot account for when writing a recipe for everyone to follow. Please reference my photos and videos to compare your dough to mine – you may need a little extra flour or water depending on how your dough is behaving.
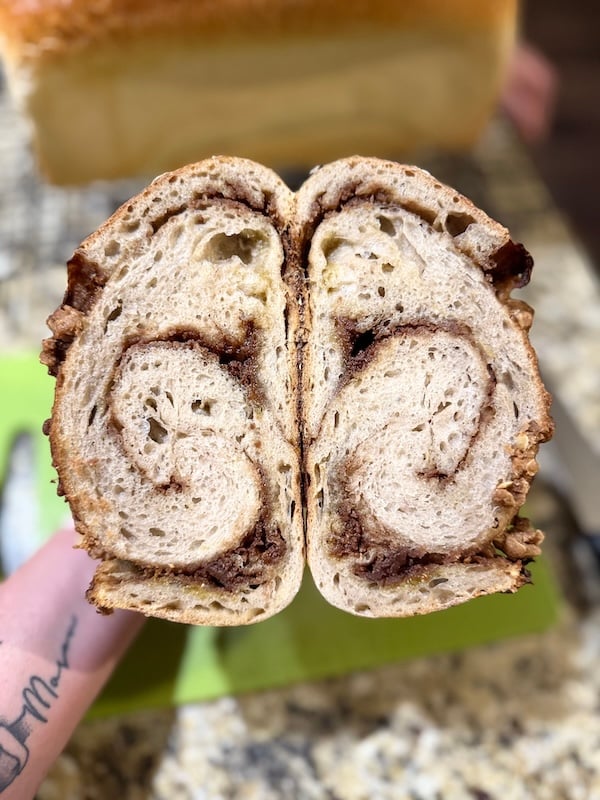
I included loaf pan baking instructions for the recipe testers, but found that those who baked in a loaf pan had significantly more issues with the baking process. On average, loaf pan bakers needed 25+ minutes longer than Dutch oven bakers. They also reported higher rates of burnt sides, tops, and bottoms. I want to do some extended testing on this before I include instructions for this recipe.
That said, these are the instructions I provided to the recipe testers: To prevent sticking, spritz your loaf pan with oil or line it with parchment paper. Place your shaped loaf seam-side down into the loaf pan. Cover and refrigerate overnight. The next day, preheat the oven with nothing inside. Do not bring your loaf pan to room temperature – you can bake it straight from the fridge.
Score the top and cover it with a second, inverted loaf pan. Follow the rest of the baking instructions. (Understand that it’s super important to temp the interior of this loaf to ensure it’s cooked through.)
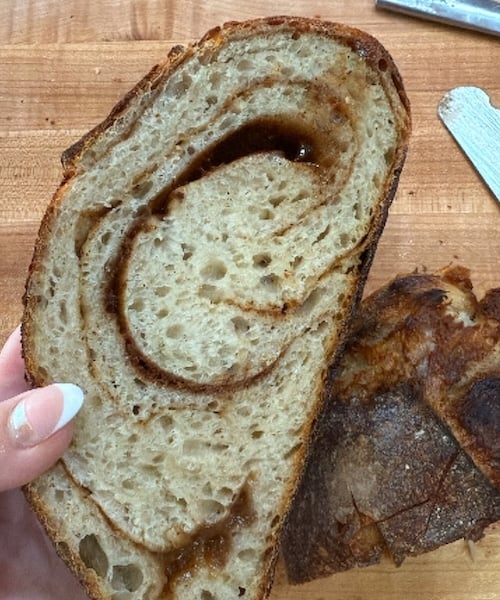
It’s normal for the loaf to separate naturally where the cinnamon swirl is. However, you can minimize the separation effect by ensuring your layer of filling is thin. The best way to do this is to gently stretch your dough into a slightly larger rectangle (more surface area for a thinner swirl layer). Also, take care when spreading the filling – ensure it’s even and there aren’t any big chunks of it (thicker areas of filling will create more gaps and separation in the baked loaf).

“Current new favorite. Easy to make and delicious.” –Recipe tester from Seattle, WA
Apple Crisp Artisan Sourdough Bread
Equipment
- Tovolo spatula (for feeding your starter)
- 3/4 L Weck jar (for your starter)
- Stand mixer (optional)
- Square dish (or a mixing bowl)
- Danish dough whisk (if hand mixing)
- Box grater (for shredding the apple)
- Oval banneton (medium oval from Flourside is my favorite)
- Flour sack towels (for lining your banneton, in case of leaks)
- Oval Dutch oven $15 off with code REBEKAH15
- My favorite bread bags (good for storing at home or gifting)
Ingredients
Starter
- 12 g sourdough starter
- 60 g water
- 60 g bread flour
Main Dough
- 150 g apple cider (we will reduce this on the stovetop)
- 1 medium green apple (1 apple is ~140g whole and 100g shredded)
- 210 g water
- 120 g active sourdough starter (from above)
- 5 g vanilla extract (optional)
- 1/2 tsp cinnamon
- 1/4 tsp each of nutmeg and ginger*
- 1/8 tsp each of allspice and cardamom*
- 500 g bread flour
- 10 g salt
Filling
- 70 g packed brown sugar
- 20 g bread flour
- 1 tbsp cinnamon
- 1/2 tsp nutmeg*
- 1/4 tsp each of ginger and allspice*
- 58 g butter (softened)
- 40 g freeze-dried apple or apple chips (optional)
Crumble (Optional)
- 23 g bread flour
- 23 g brown sugar
- 12 g old-fashioned rolled oats
- 1/4 tsp cinnamon
- Pinch of nutmeg
- Pinch of salt
- 17 g cold butter, cubed
- 2 tsp apple cider
Instructions
Feed Your Starter
- The night before making your dough, feed your starter a 1:5:5 feeding ratio by mixing 12 g sourdough starter, 60 g water, and 60 g bread flour. This gives you a few extra grams, so you don’t have to scrape the jar clean (use the leftovers to maintain your starter). At this ratio, your starter should peak in 10-12 hours. Starting in the morning? Use a 1:1:1 ratio for a faster peak time (4-6 hours): 45g starter, 45g water, 45g bread flour. Scale up for multiple loaves.
Reduce Apple Cider & Prepare Apple
- In a small saucepan over high heat, bring 150 g apple cider to a rolling boil. Let boil for 4-5 minutes, or until reduced by about half. We need 60 g of our reduced apple cider for this recipe (for one loaf). Let cool to room temperature before proceeding.

- Using a box grater, coarsely shred 1 medium green apple (unpeeled). One apple should yield about 100 g. Shred just before adding to dough – prepping ahead causes the apple to brown.
Mix
- You can mix this dough by hand with a Danish dough whisk or in your stand mixer fitted with a dough hook. We will still develop gluten and strengthen the dough by hand, but a stand mixer makes easy work of the initial mix.In a large glass bowl or a stand mixer bowl, combine our reduced apple cider (60 g for one loaf), the shredded apple, 210 g water, 120 g active sourdough starter, 5 g vanilla extract, 1/2 tsp cinnamon, 1/4 tsp each of nutmeg and ginger*, 1/8 tsp each of allspice and cardamom*, 500 g bread flour, and 10 g salt.
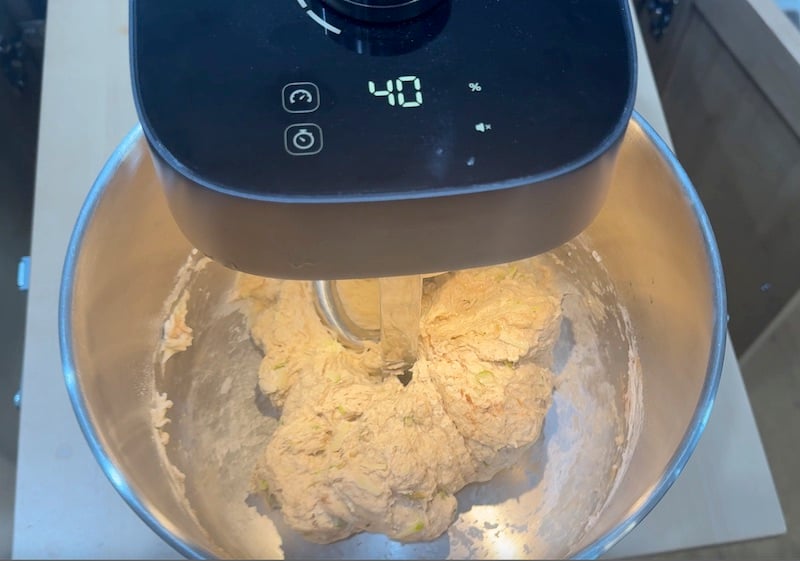
- If mixing by hand, use a Danish dough whisk to get the ingredients mostly incorporated. Then, switch to your hands, squeezing and kneading the dough until fully combined (3-4 minutes total).If using a stand mixer, mix for 3-4 minutes at a low speed, or until all ingredients are fully combined.

- Texture check! Please reference this video and add either additional flour or liquid, if needed, to achieve the desired dough texture.

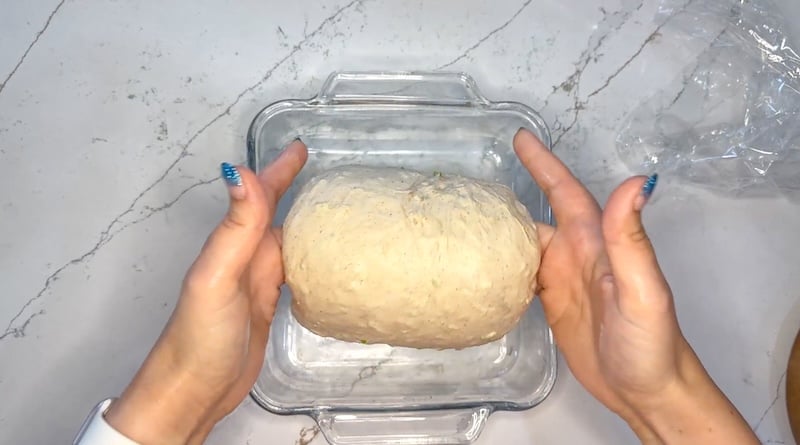
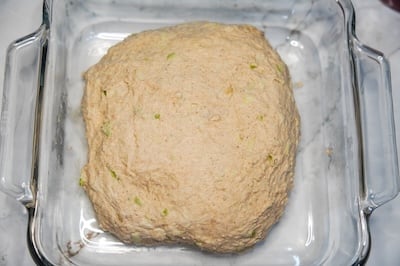
- Pro tip: Transfer your dough to a square or rectangular dish instead of a round bowl. This makes stretch and folds easier and sets you up for success when shaping the dough into a rectangle later!

- Cover with plastic wrap and let rest for 30-60 minutes. Set out 58 g butter to soften for the filling later.Note: this is the beginning of the bulk fermentation.
Strengthen
- We will do four rounds of dough strengthening, each separated by a 30-60 minute rest. For the first three rounds, I like doing stretch and folds. For the final round, I like switching to coil folds, which are gentler.How to do stretch and folds: Wet your hands, grab one side of the dough, stretch it up and fold it over to the opposite side. Rotate the bowl 90 degrees and repeat. Continue until you’ve folded all four sides. I will personally keep stretching and folding the dough until it resists.

- How to do coil folds: Lift the dough from the center, let the edges drape down, and tuck them underneath as you set it back down.
Bulk Ferment
- Let the dough finish bulk fermenting until it is bubbly, jiggly when you shake the bowl, feels light and aerated when you tap the surface, and if you pull at the edge of the dough, you see some gluten strands.For reference, this took 5.5 hours when my dough was 75°F (23.8°C), and in another test, it took just over 6 hours when my dough was 74°F (23.3°C). See Notes for a full timeline.
Shape
- Prepare the filling: In a medium-sized bowl, combine 70 g packed brown sugar, 20 g bread flour, 1 tbsp cinnamon, 1/2 tsp nutmeg*, and 1/4 tsp each of ginger and allspice*. Then, add 58 g butter (softened). If the mixture isn't spreadable, warm it in the microwave for 5-10 seconds.
- Lightly flour your work surface. Dump out your dough and gently stretch it into a rectangle, taking care not to de-gas the dough as much as possible.

- Spread half of the filling evenly across your dough rectangle, leaving a gap at the edges. Crunch up your 40 g freeze-dried apple or apple chips into smaller pieces and sprinkle half of them on top.

- Fold the dough’s sides to the center and pinch the seams closed. I like to gently dimple the dough the restribute any gas bubbles. I also will gently stretch the rectangle to be slightly wider, if needed.
- Spread the remaining filling along the new center, leaving a gap around the edges for sealing. Sprinkle on the remaining half of your freeze-dried apples or apple chips.
- Roll the dough tightly into a log, pinching the edges to seal as you roll.
- Optional step (not photographed): For an oat-crusted exterior, mist shaped dough with water and roll in old-fashioned oats before placing in banneton.
- Place seam-side up into a towel-lined banneton (take precautions as it could leak a little). Let relax for 15-30 minutes (you can let it rest longer if you feel it needs more fermentation time); then, pinch the center seam closed. Cover and refrigerate overnight.

Score & Bake
- Score & bake: The next day, preheat your oven to 450°F (230°C) convection (or 475°F/250°C conventional) with a Dutch oven inside.
- Flip the dough onto parchment paper and score the top straight down the center, taking care not to score too deep.
- Bake for 40 minutes, covered. Note: 26% of recipe testers reported a burnt bottom. Consider placing a sheet tray on the rack directly below your Dutch oven to deflect some of that heat.
- Prepare the crumble (optional): While the loaf is baking, in a small bowl, combine 23 g bread flour, 23 g brown sugar, 12 g old-fashioned rolled oats, 1/4 tsp cinnamon, Pinch of nutmeg, and a Pinch of salt. With a fork (or your fingers), mash in the 17 g cold butter, cubed. Add 2 tsp apple cider and mix together.Note: The crumble will fall off when you slice the loaf – we like to butter our slice and sprinkle the fallen pieces on top! Skip the crumble if you prefer mess-free slicing.
- After the 40-minute covered bake, remove the lid and check the internal temperature. It should be between 190-200°F (88-93°C) – if not, cover and check again in 5 minutes. Then, press on your prepared crumble (optional).
- Bake for 5-15 minutes more, uncovered, or until it's golden brown with an internal temperature of 205-210°F (96-99°C).Tent with foil or re-cover with your Dutch oven lid if it's getting too dark on top. If it's browning quickly but the internal temperature isn't getting close to done, lower the oven temperature to 425°F (220°C) for the remainder of the bake.
- Place baked loaf on a cooling rack and let it fully cool before slicing (about 1-2 hours). If you slice it warm, you may experience a gummy texture, and the loaf will become dry once cooled.


Video

Notes
- 9am: Mix dough (bulk fermentation begins)
- 9:45am: Stretch and fold
- 10:15am: Stretch and fold
- 10:45am: Stretch and fold
- 11:30am: Coil fold
- 2:30pm: Make filling and shape (bulk fermentation ends)
- 2:45pm: Pinch seam and refrigerate
- Next day: Bake
“The dough smells amazing! It’s the perfect combo of apple/spices/sweetness. The flavors are amazing and the bread turned out so light and fluffy.” –Recipe tester from Exton, PA

Conclusion
This loaf will have your whole house smelling like an apple orchard—warm, spiced, and impossible to resist once it comes out of the oven.
Please be sure to share your experience or tips in the comment section below – I LOVE reading them and seeing your bakes! If you need help with any major issues, please don’t hesitate to email me. I am always happy to help troubleshoot any of my recipes.
Happy baking, friends!!
Similar recipes to try out:


Have you ever baked this recipe in a loaf pan? If so, at what temperature and length of time, please?
One of the recipe testers reported baking at 400°F for 50–55 minutes, then lowering to 375°F for 10–15 minutes, noting that it required significantly more time than baking in a Dutch oven
Great, detailed instructions and a delicious outcome!
So yummy!! Going to attempt a few mini loaves of this soon to give as gifts. Thanks again for another winner recipe.
Love that idea!
I almost cried when I tasted this. It is so good.
Mine did take almost an hour and a half to bake. I’m assuming it’s the rice and sheet pan I used to prevent burning(which it did prevent it).
I truly appreciate how you take the time to test these things and collaborate with other bakers. I also appreciate how you write your recipes and include the weights throughout. I love watching your videos also. I have gotten a few friends into sourdough and you are always my first recommendation along with the sourdough journey. Thank you so much.
Aw thanks so much! So glad you enjoy all of the detail! Looks beautiful!
This has been my favorite specialty sourdough recipe to date! Worth all of the extra little steps!
So happy to hear it Carmen!
This has been my favorite specialty sourdough recipe to date! Worth all of the extra little steps! I opted for the oat crust and skipped the apple crumble. So delicious!
Amazing, thanks for sharing!
Can I use apple cider without reducing it?
SO yummy! My husband described it as a combination of bread pudding and apple pie. The flavor is delicious and the bread is super soft!
I seem to always get air pockets where the inclusions are. I’m sure this is due to my own shaping error. Any suggestions?
Absolutely stunning. My best suggestion is to make sure you roll as tightly as possible. Also consider an extra dusting of flour over the inclusions before you roll it up. That can help with adhering. I know it already calls for 20g but next time, try just dusting a light layer over the inclusions before rolling up and see if that helps.
I made a sugar free version and added sugarfree white chocolate chips. Maybe my starter was pasted its peak. And I bought the wrong apples too. I had dried apples. It did not have a good rise/spring to it. I’m still learning. I used my starter and just fed that before bed. It has a good taste for sugar free. But nextime I will stick to not making sugar free.
So what about adding caramel bits??? Thoughts am I crazy ?? So a caramel apple crisp bread …
You can try it! Caramel can get weird when baked at the high temps required for bread, so I haven’t tested it.
This was the BEST sourdough flavor I have tried omg .
Looks amazing!! Great job!!
The house smells amazing and the taste is delicious. I was a little concerned because the the was wetter than other recipes, but my worries were all in vain. It turned out great!
Looks awesome!!