
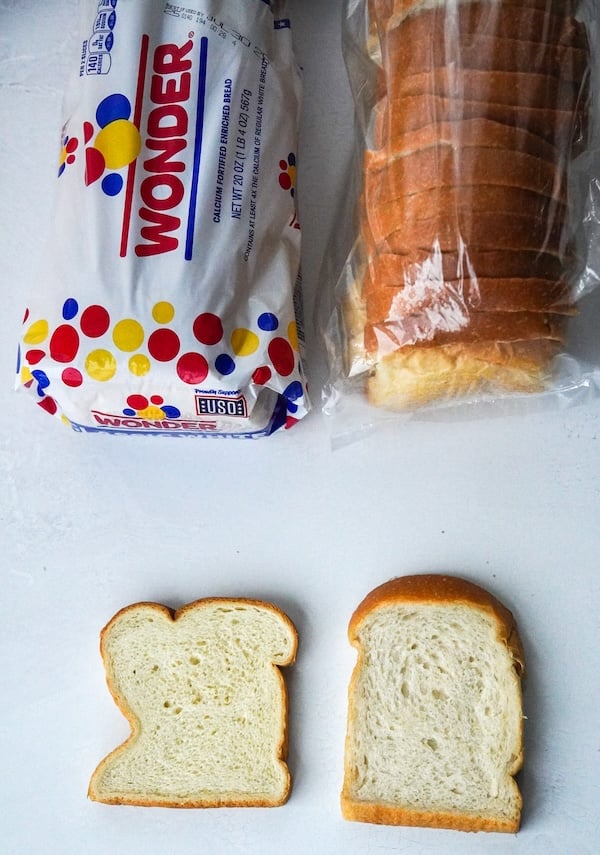
Same-Day Sourdough Wonder Bread Copycat Recipe (No Tang)
My sourdough Wonder Bread copycat recipe went viral, which totally blew me away, and I LOVE seeing the amazing reviews and photos! But I do hear the feedback…
The two-day process is a little much, and for many, the final loaf is still too sour for the pickiest eaters.
The solution to both of these problems is more starter (and keeping the dough very warm)! So, per usual, I got to recipe testing, and we have a winner!!!
(And sorry to my cringing English teachers from back in the day, but I need all the exclamation points, because my excitement is about this to jump off the page!)
“1000 times, yes! My kids rave, I can’t stop inhaling it, and it’s super easy to feel like a baking boss when a recipe like this makes it all so accessible and foolproof. Straight up amazing!” -Recipe tester from Grand Rapids, Michigan
“It is a wonderful, well thought out, tried and true recipe that not only myself, but so many people will use for the rest of their lives to feed their families with. Delicious, soft, homeade bread with no additives! Who could ask for anything better?!” –Recipe tester from Gardnerville, Nevada
I don’t usually include a Table of Contents, but there’s a lot in this recipe post, so feel free to jump ahead:
Why You’ll Love This Recipe
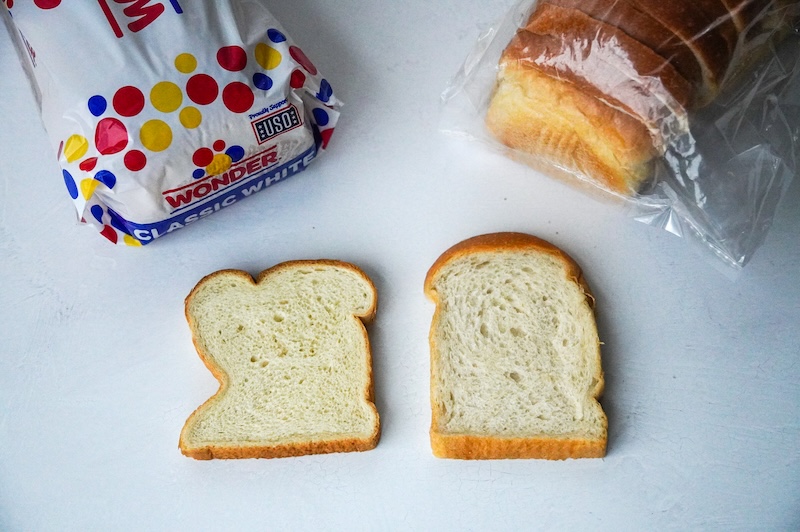
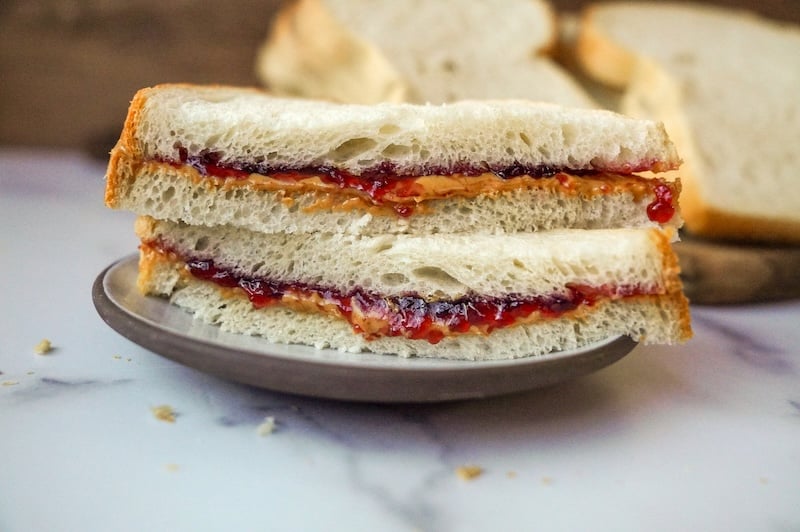
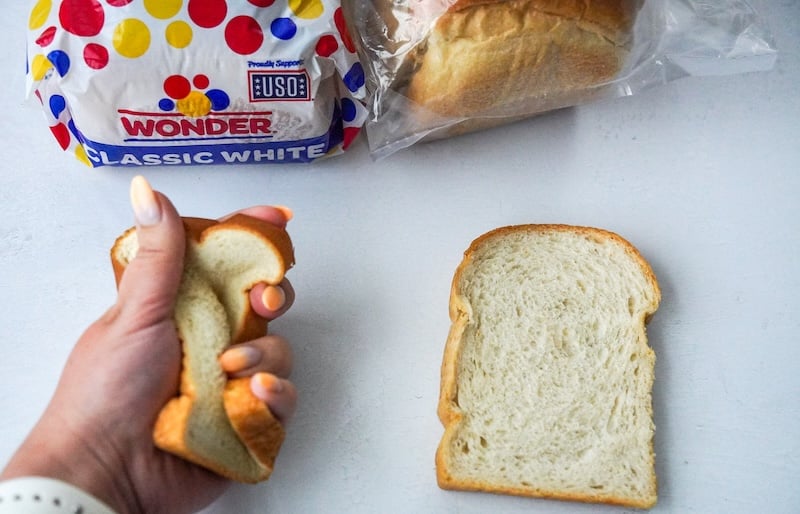
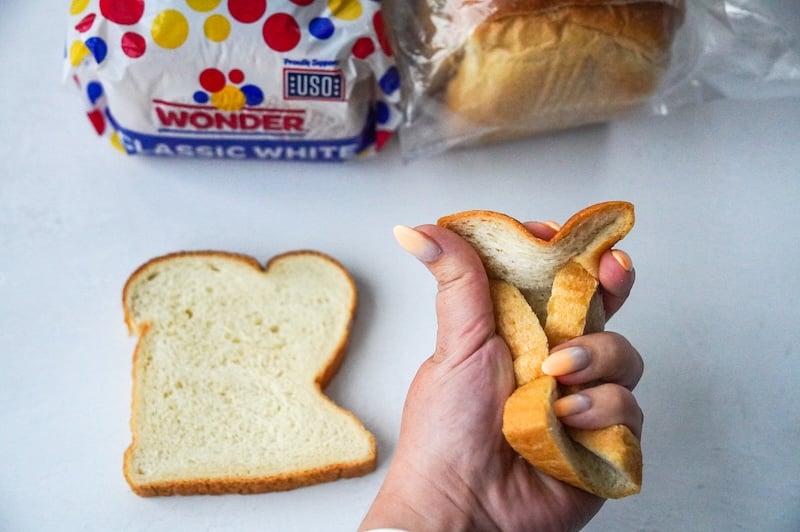
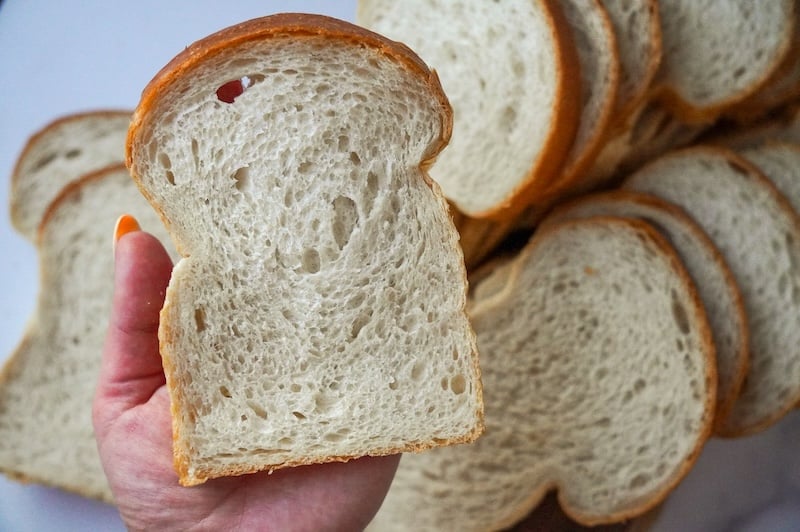
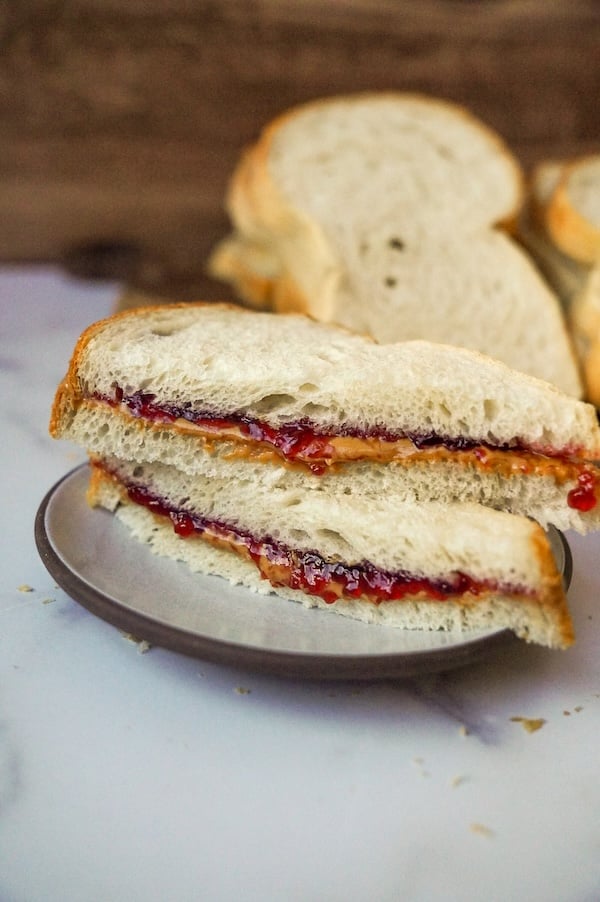
- The OG recipe, but better: Same squishy, soft interior of the regular Wonder Bread copycat recipe, but a faster timeline and even less tangy flavor.
- Done in one day: The proofing process has been cut down from two days to just one, thanks to the extra starter and keeping the dough extra warm. Mix the dough in the morning, shape midday, and bake by evening.
“The Same-Day timeline was easy to follow and was able to bake a fresh loaf for the evening. 🙌🏼” –Recipe tester from Vacaville, CA
- As low tang as possible: This version has almost no detectable tangy flavor. I’d rate it a 1.5-2 out of 10 on the tang scale. But that doesn’t mean it lacks flavor – it tastes incredible on its own, which I can’t really say for actual Wonder Bread.
- Recipe tested by over 230 sourdough bakers: this recipe got a 4.81/5 average rating. All of their feedback is in this post to ensure you have the best chance of success.
“Yes, yes and more yessssssss! My picky husband & kids loved it & asked if I could make it every week.” –Recipe tester from Scottsdale, AZ
Same-Day Wonder Bread Copycat vs the Original
I personally prefer the same-day version of this recipe, but a few of the recipe testers had the opposite opinion.
Here are some key differences between the two recipe variations:
- Sour level: the same-day variation is less sour than the original, since the proofing times are cut in half. Most testers liked this, but a few missed the slightly tangy flavor from the original recipe.
- Baking time: this same-day recipe is ready to bake in the evening. Some of the testers preferred the original recipe, which was bake-ready in the morning.
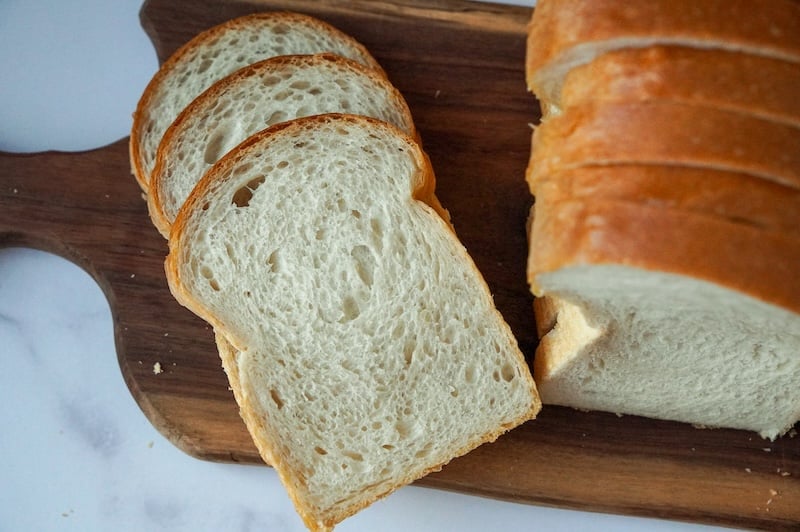
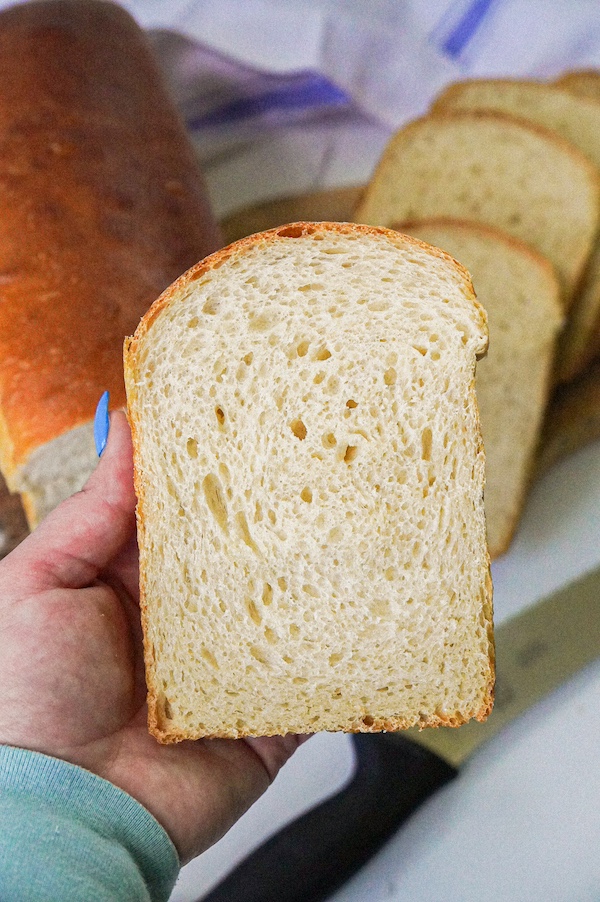
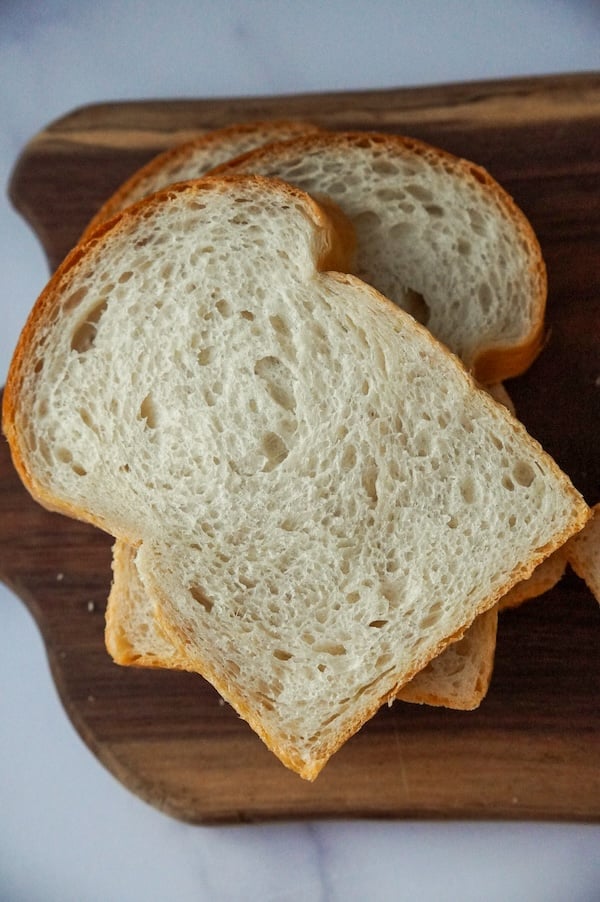
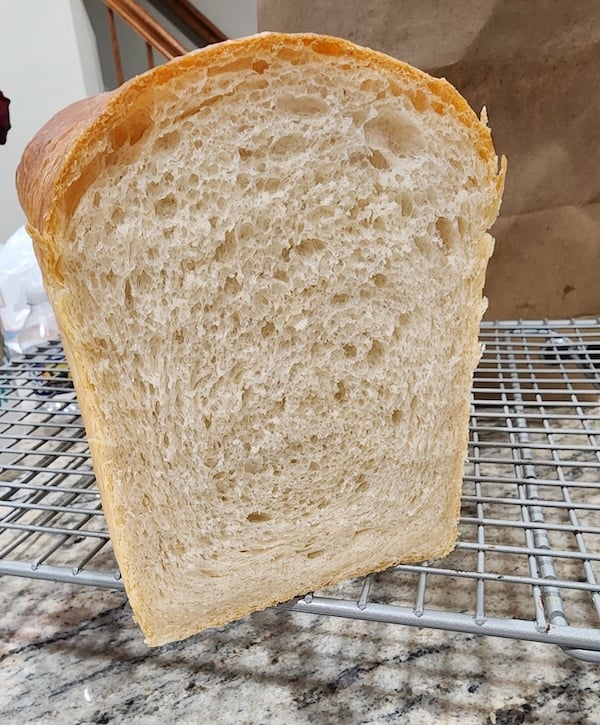
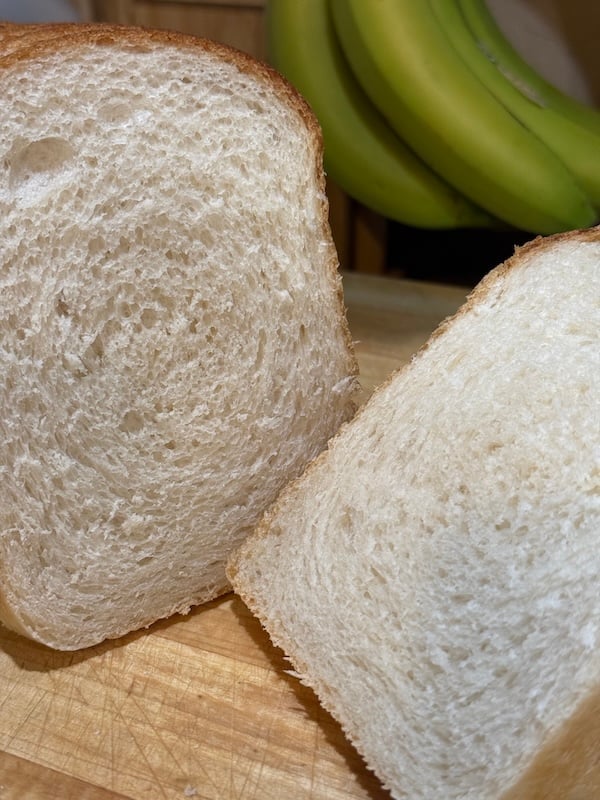
- Evenness of the crumb: the same-day version proofs so much faster that the crumb can be more unpredictable. It’s still pretty even with a tight, soft crumb perfect for sandwiches. But you’re more likely to have random holes or a lopsided top with the same-day version. The original recipe proofs slowly and evenly, giving you a uniform, gorgeous loaf every time.
- Speed of proofing: for some, working to keep the dough super warm to ensure the timeline stays on track is stressful. If you don’t have a proofing box, constantly monitoring the dough temperature can wreck your joy! One tester from Tennessee said she preferred the original, 2-day version for its lax timeline: “I plan on using the original. I felt stressed trying to time this in one day.”
Here’s the original recipe if you think you’d prefer it: Sourdough Wonder Bread Copycat Recipe – So Soft!
Recipe Testing Notes
I don’t have this massive journey to share for this recipe, because it’s a simple variation of a winning recipe I’ve already developed.
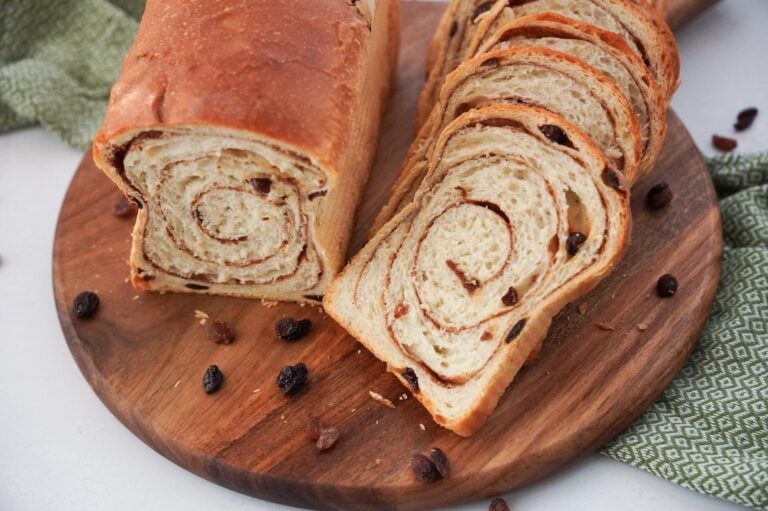
I’m eager to explore what else I can do with this dough, from cinnamon swirl to whole wheat options to even cinnamon rolls. Make sure you are signed up for my email newsletter so you get new recipes as soon as they drop.
Anyway, these are the adjustments I made to the Wonder Bread copycat recipe to make this variation work:
- Doubled the starter: I knew if I wanted to cut the proofing time in half, I’d need more rising power! I doubled the starter and found it was the perfect amount to get the job done.
- Adjusted the flour, water, and honey in the main dough: to account for the extra flour, water, and honey in the starter, I subtracted an equal amount from the main dough.
- Tried sugar instead of honey: I was running low on honey, so I decided to try sugar – it worked great! And to be honest, sugar is cheaper than honey, so I think I might stick with it for the time being.
- A touch more oil: Since I swapped the honey for sugar, I decided to add some extra oil to try to maintain the same hydration level. And it really softened the dough – I loved that adjustment. Totally keeping it!
“I believe it was my husband’s favorite bread that I have ever made.” –Recipe tester from Coeur d’alene, Idaho
Meet the Recipe Testers

This recipe was put to the ultimate test by 239 home bakers from 215 unique locations across 6 continents – and the results speak for themselves!
From the humid kitchens of Florida to the dry heat of Arizona, from sea-level coastal areas to high-altitude Colorado, bakers everywhere achieved incredible success with this same-day sourdough.

The Numbers:
- 96.2% satisfaction rate (96.2% of testers rated it 4-5 stars)
- Average rating: 4.81/5 stars
- 100% success rate on all documented ingredient substitutions
This incredible geographic diversity proves the recipe works across different climates, altitudes, flour brands, and kitchen conditions. I am so thankful for all of you who tested this and took the time to fill out the survey – again, you are the best!
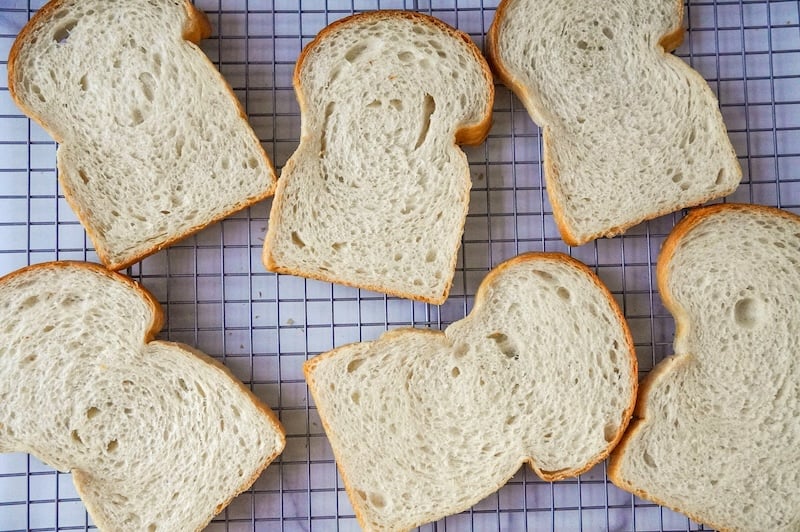
Here’s a look at just a few of the photos submitted by recipe testers:
“My sister hates sourdough and lived this!!! A weekly keeper for sure!!!” –Recipe tester from Odessa, TX
Baker’s Timeline
This timeline is so simple! But here’s a quick glance to help you schedule your bakes:
| The Night Before | Feed your starter |
| In the Morning (7-8am) | Make your tangzhong & mix your dough |
| Mid-day (12-1pm) | Shape your dough |
| Evening (6-7pm) | Bake your bread |
“Yesss! It is so tasty and fluffy” –Recipe tester from Kuwait
Ingredients
- Stiff Sweet Starter: Essential for cutting down the tangy flavor of the final loaf – you can use sugar or honey as the sweetener, though I find honey performs slightly better.
- Tangzhong: Keeps the bread incredibly soft and moist for days – do not skip or omit this or the recipe will fail!
- Cool water: Using cool water helps ensure the dough doesn’t overheat during the initial mixing period.
- Sugar: Adds sweetness and helps create the tender crumb. I found that I actually preferred sugar over honey in the main dough (the honey flavor was too strong for me), but you can use either one.
Note: Only 2.2% of recipe testers found this bread too sweet, with most of those comments coming from international bakers unfamiliar with Wonder Bread’s signature slightly-sweet flavor profile. If you prefer less sweetness in your bread, feel free to reduce the sugar in the main dough by half or to taste—the recipe will still work beautifully!
- Avocado oil: Adds moisture and contributes to the soft, pillowy texture. Any neutral oil works well here, including vegetable oil, sunflower oil, or grapeseed oil. Many testers successfully used olive oil, though it adds a subtle flavor that differs from traditional Wonder Bread.
- High-protein bread flour: Provides structure and strength for the perfect sandwich bread texture. I’ve successfully tested with King Arthur bread flour (12.7% protein), Ballerina Farms farm flour (14% protein), and Central Milling high mountain bread flour (13.5% protein). While I prefer bread flour, all-purpose flour works, too – just add an extra 25g if the dough seems too sticky, as lower-protein flours absorb less water.
- Salt: Enhances flavor, strengthens gluten, and controls fermentation speed. Try to use salt without anti-caking agents in the ingredient list.
- Butter: Brushed on the hot loaf for a golden, soft crust and extra richness.
“I’ll be making this weekly to replace store bought sandwich bread” –Recipe tester from Murrieta, CA
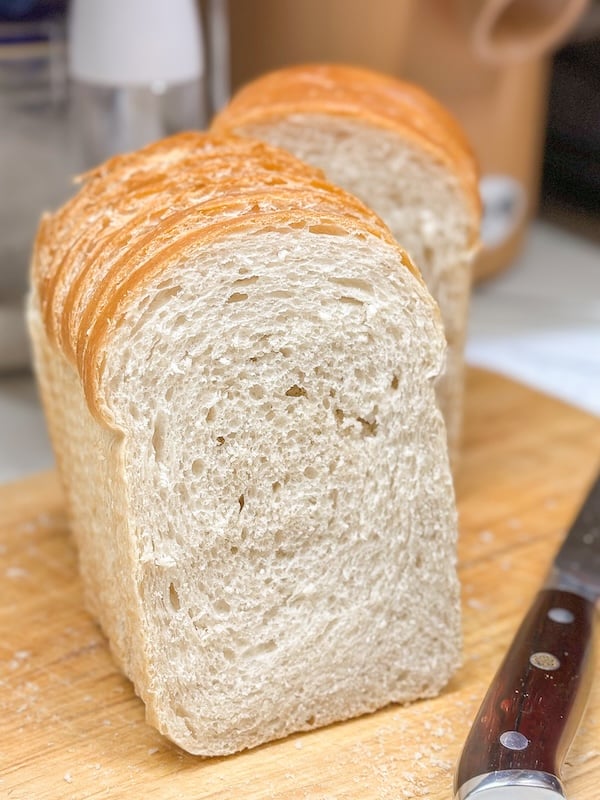
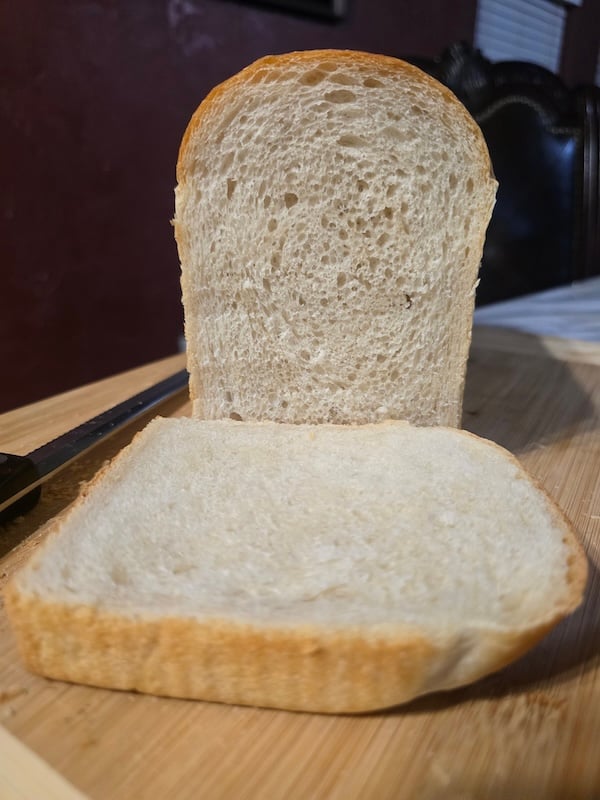
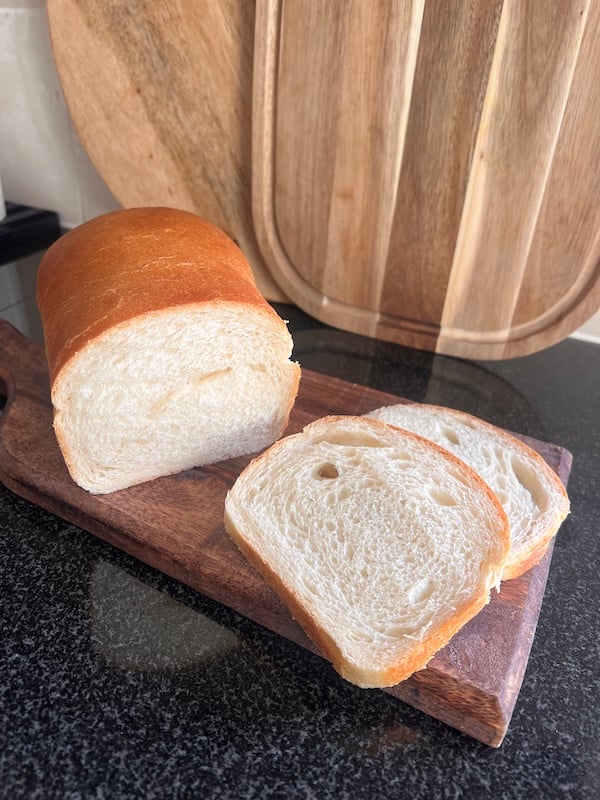
How to Make Same-Day Sourdough Wonder Bread (Step by Step)
If you’ve already made the original sourdough Wonder Bread recipe, the steps here are the same, except the timeline is cut in half.
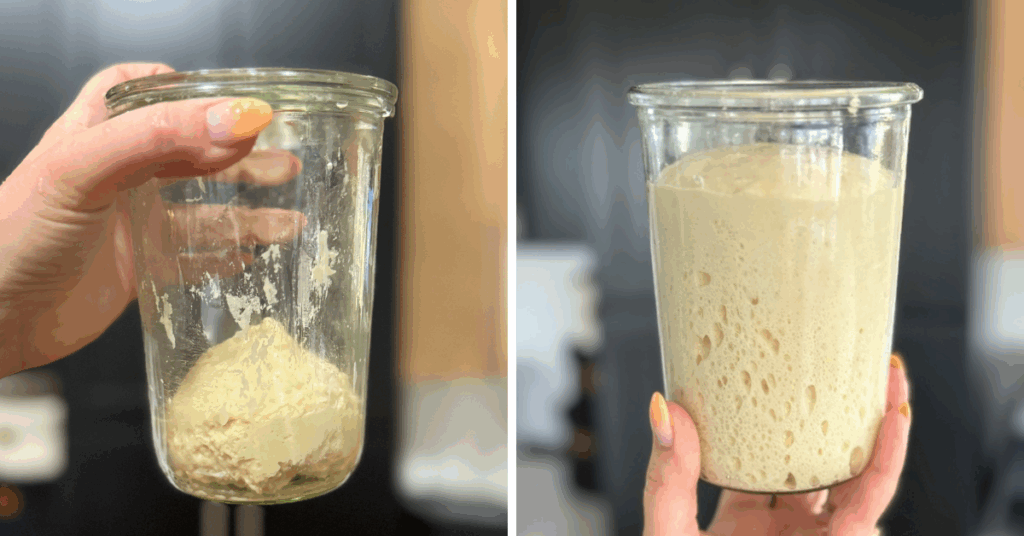
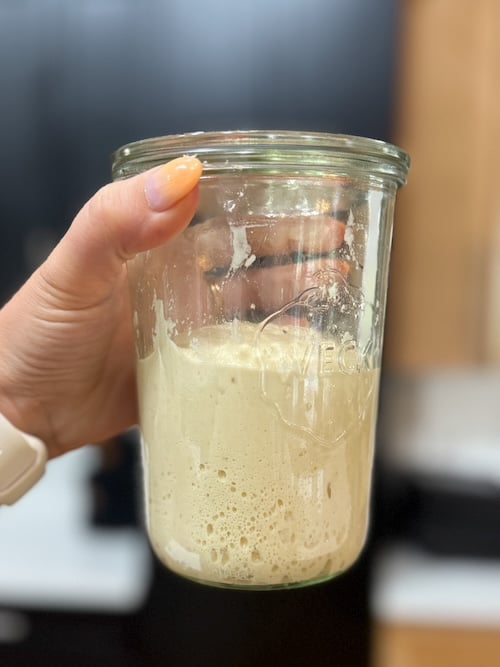
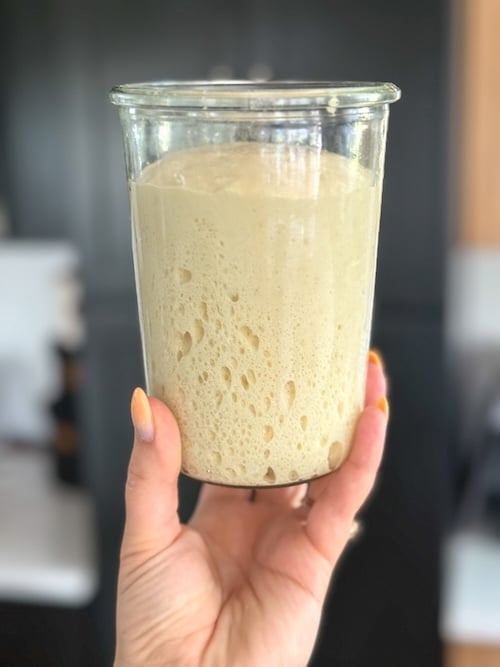
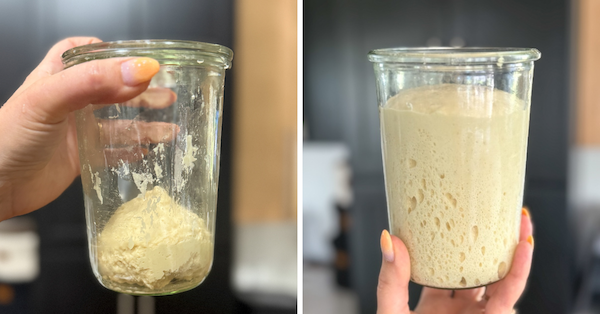
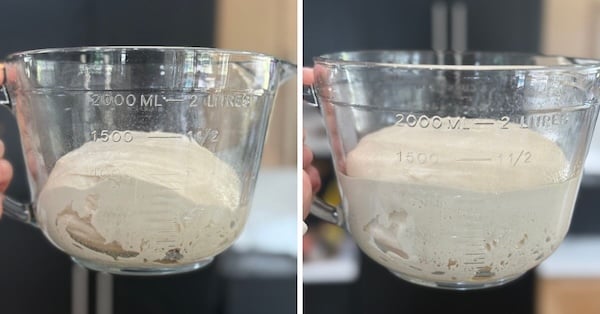
Step 1: Make the sweet starter.
The stiff sweet starter is the secret to reducing sourness.
In a small jar, combine 30g sourdough starter, 30g honey (or sugar), 60g water, and 120g bread flour.
Mix until it comes together, then turn it out and knead it briefly until it forms a smooth ball.
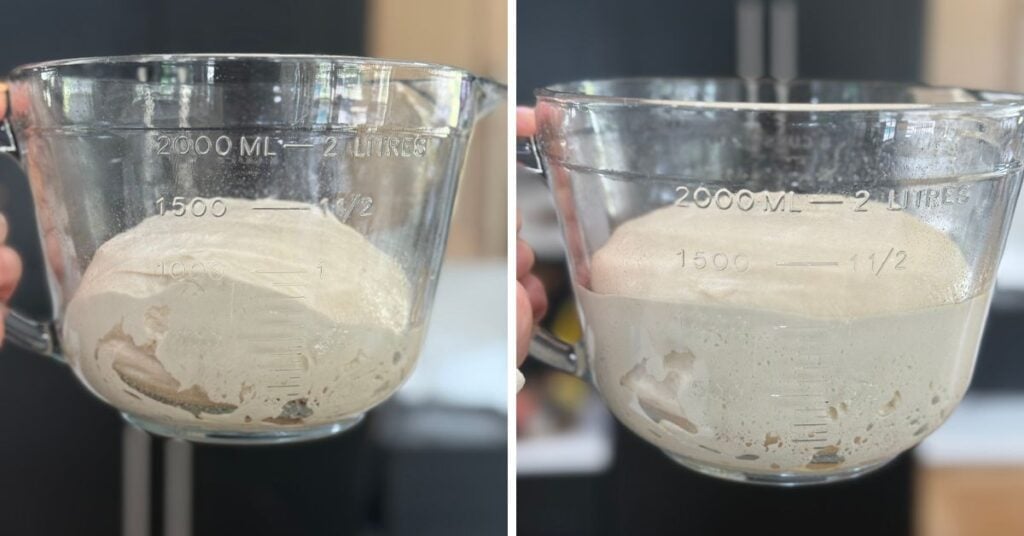
Place it back in the jar, cover loosely, and let it ferment at room temperature overnight. By morning, it should have doubled (or tripled) in size and smell sweet and yeasty.
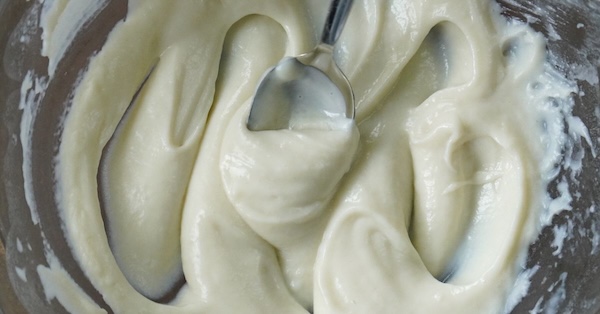
Step 2: Make the tangzhong.
The tangzhong is a cooked flour paste that is absolutely essential for this recipe. It’s what makes the bread so squishy and soft – and it stays that way for days.
In a microwave-safe bowl, whisk together 35g bread flour and 175g milk until completely smooth.
Microwave in 30-second intervals, stirring vigorously with a whisk between each round. For me, this usually takes 3-5 rounds.
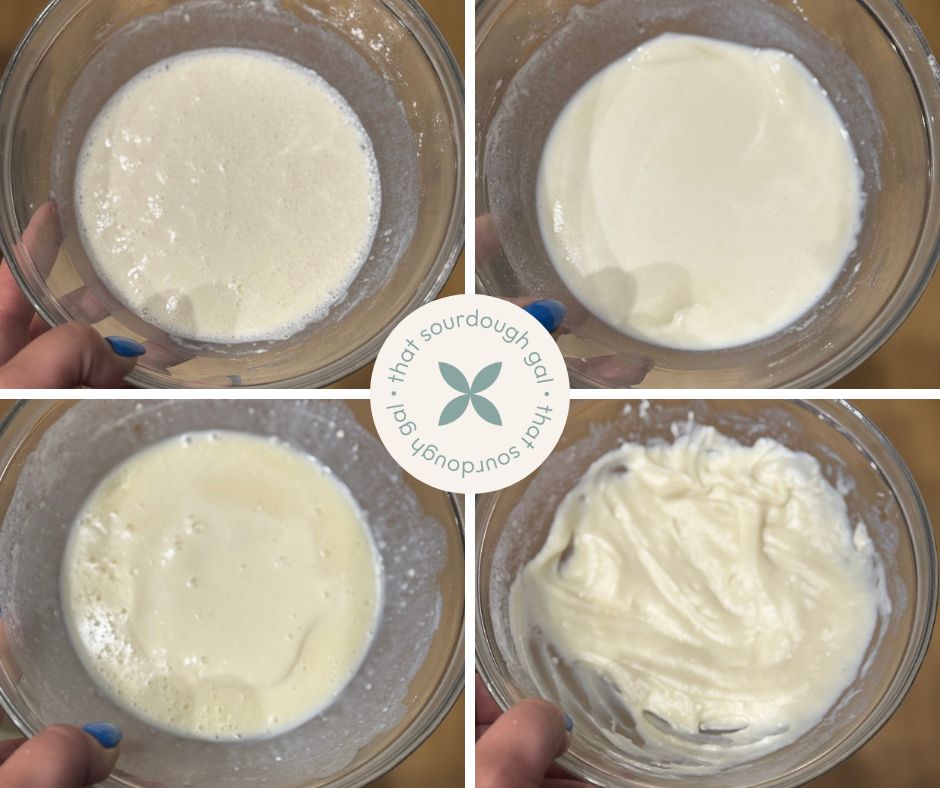
You’re looking for it to thicken to a gel-like consistency and reach 150°F (65°C).
If you prefer, you can make this on the stovetop over medium heat, whisking constantly. Don’t walk away or it will overcook!
The tangzhong can be made up to 2 days ahead. If you make it on the morning of, wait about 30 minutes for it to cool down. If it’s still hot, it could kill the microbes in your sourdough starter.
Read more about tangzhong: Tangzhong: The 3-Minute Secret to Softer Sourdough
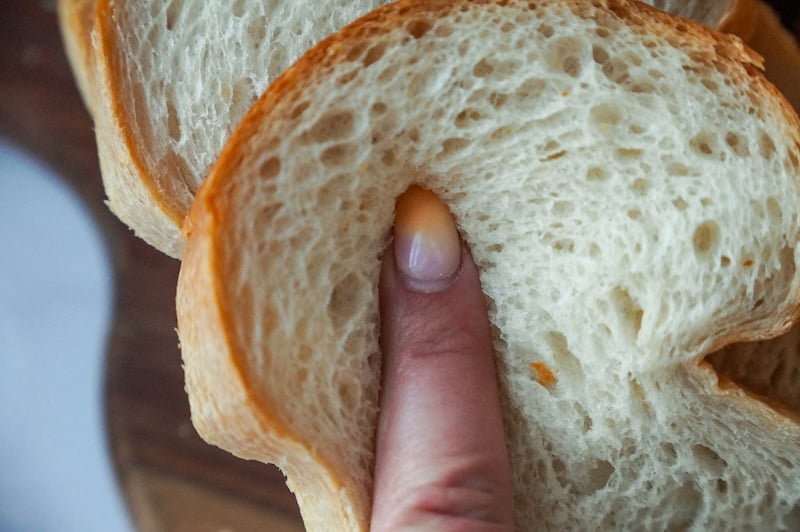
Step 3: Mix the dough.
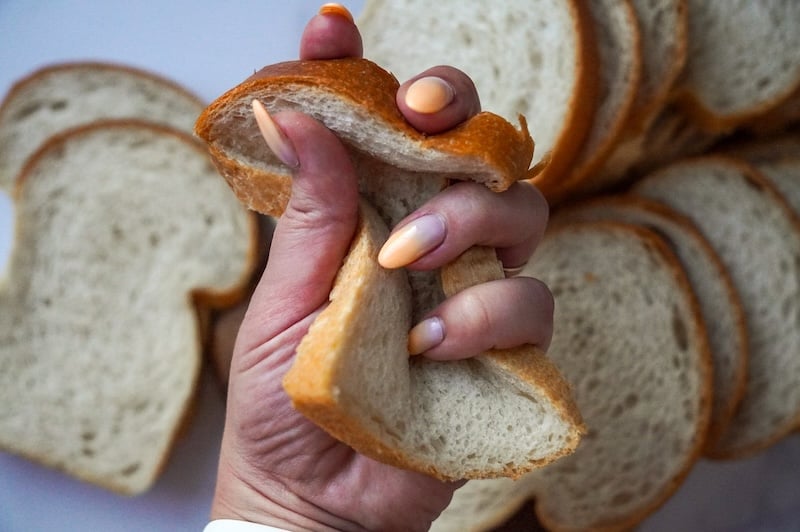
All of the mixing for this bread happens upfront – no stretch and folds or babying the dough. To ensure the dough gets enough strength, we want to mix it until it reaches at least a weak windowpane.
That means you can stretch the dough until it’s paper-thin (and you can see light through it) without it tearing, like this:

Note: If you are mixing by hand, here are detailed instructions: Same-Day Sourdough Wonder Bread Copycat Recipe By Hand (No Stand Mixer)
How long it takes varies depending on the mixer brand. Here’s what I’ve found:
- Ooni Halo Pro: 7-8 minutes
- Bosch: 10 minutes
- KitchenAid: 30 minutes (exact times were in this range for a variety of recipe testers, but it took me exactly 33 minutes)
Texture Tip: This dough will be sticky initially. Many successful bakers noted the dough starts very sticky but comes together with continued mixing. Don’t panic and add too much flour too quickly. KitchenAid stand mixers seem to pose the most issues for testers – if you have one, consider mixing the dough for a few minutes and switching to hand kneading. Or just trust that it’ll take a while – it took my mixer 33 minutes to reach a windowpane.

Step 4: First Rise
Transfer your dough to a lightly oiled glass bowl (I do a quick spritz of avocado oil). Put it in a very warm place – ideally, between 80-90°F (26.5-32°C) for about 3-5 hours.
Here are some options:
- Brod & Taylor proofing box (affiliate link) – I set mine to 85°F (30°C)
- Oven with the light on
- Oven with a cup of boiling water in the corner (if the light doesn’t produce any warmth)
- Preheat your oven for a couple of minutes; then, turn it off
- Warming mat
- A warm spot in your home – perhaps a sunny area, near a heater, or in an area that doesn’t get good A/C
- The garage
- Outside on a warm day (make sure to cover your bowl with plastic wrap so bugs don’t fly in)
The dough should rise by around 30% and have bubbles forming around the sides and bottom of the bowl. If you poke the surface, it should feel aerated and pillowy.
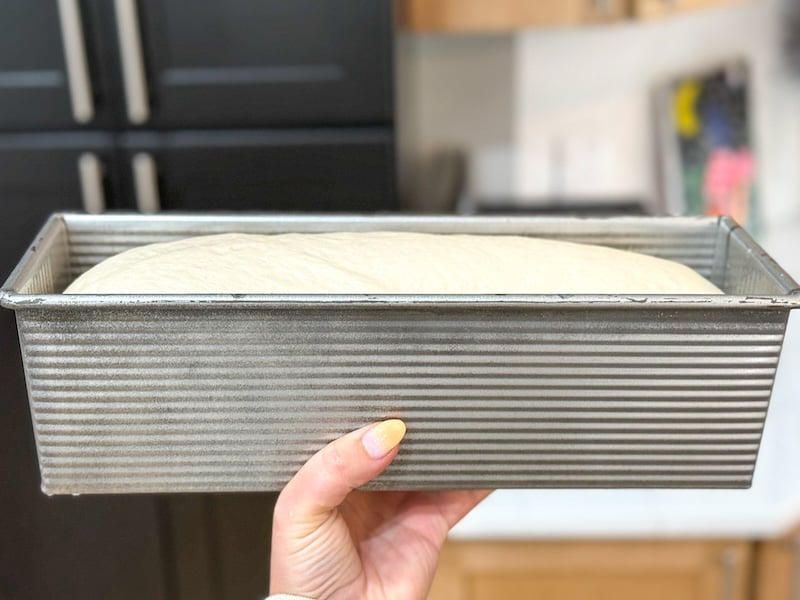
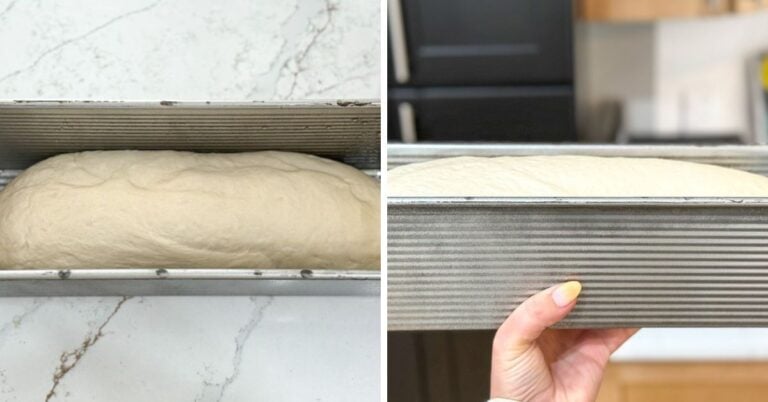
Step 5: Shape.
Once the dough has shown signs of fermentation, it’s time to shape it and place it in the loaf pan.
I like to lightly flour my surface with bread flour, but that’s optional.
Turn out your dough and stretch it into a rectangular shape, being careful not to tear the dough. Use a rolling pin to smooth out the dough, pop big bubbles, and stretch the dough into a long rectangle that’s slightly narrower than your loaf pan.
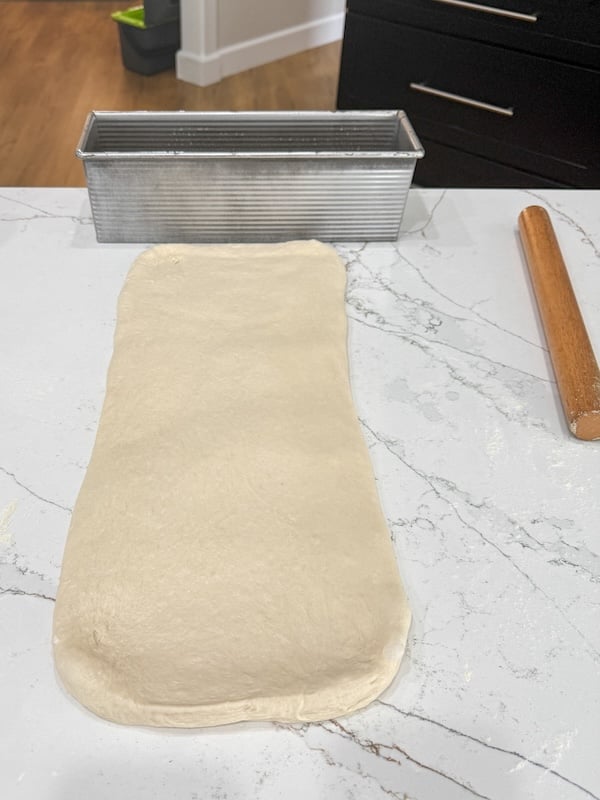
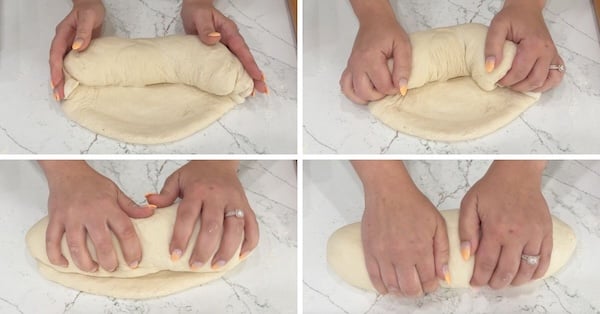
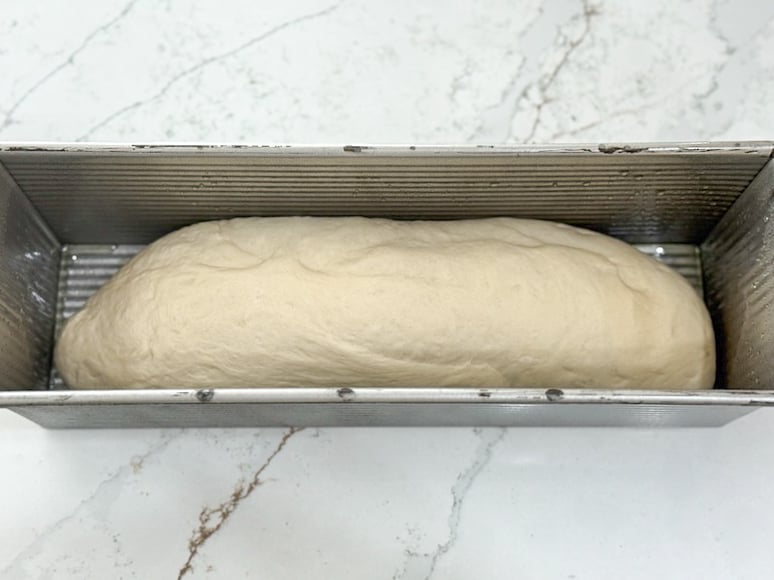
Then, roll up the dough into a log, doing it as tightly as you can to prevent any gaps. Pinch the seams on the edges and place in a lightly oiled loaf pan.
If your loaf pan is nonstick, you don’t need to oil it if you don’t want to.
Step 6: Second rise & bake!
Cover with plastic wrap and let the dough rise for another 3-5 hours in a warm spot, or until it is even with or slightly higher than the edge of the loaf pan.
Then, preheat your oven to 350°F (175°C).
Bake, uncovered, until the internal temperature reaches 200-205°F (93-96°C). If the top of the loaf is getting too dark, cover with foil.
Here are bake times for different-sized loaves:
- Mini loaf pan: 25-30 minutes
- Regular loaf pan (around 8.5×4.5): 30-35 minutes
- Sandwich bread loaf pan (around 13×4): 40-45 minutes
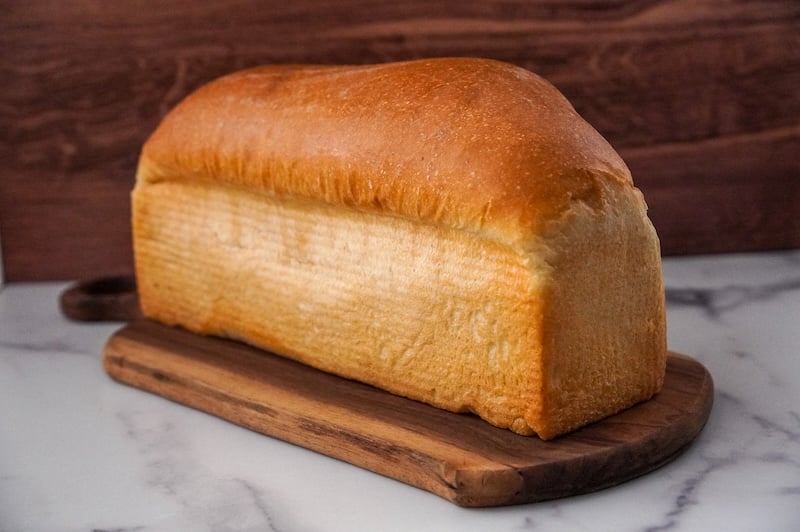
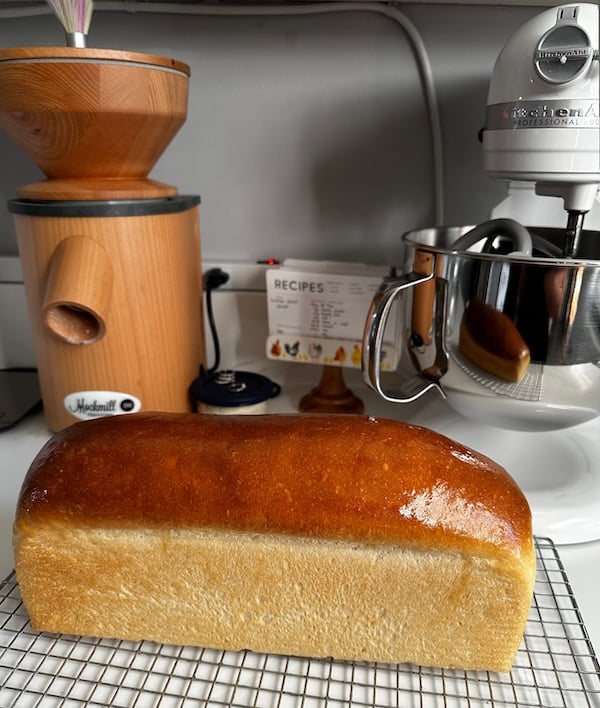
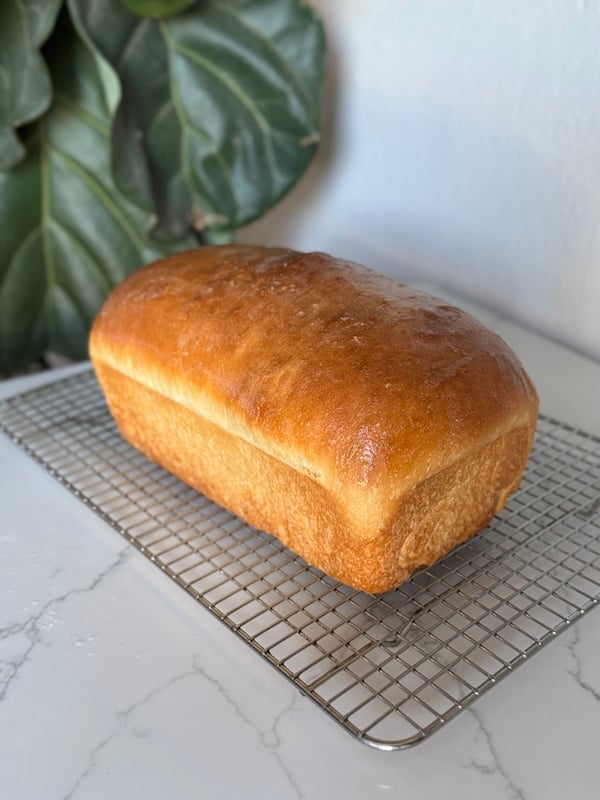
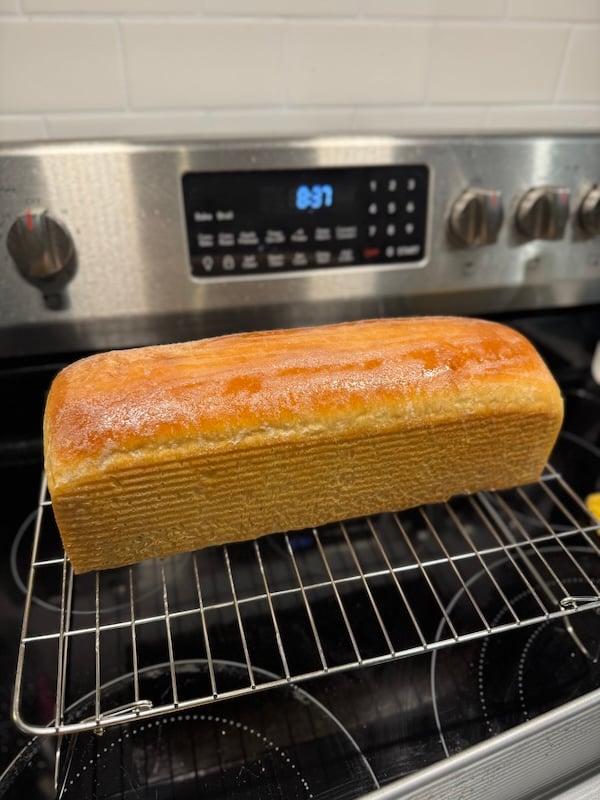
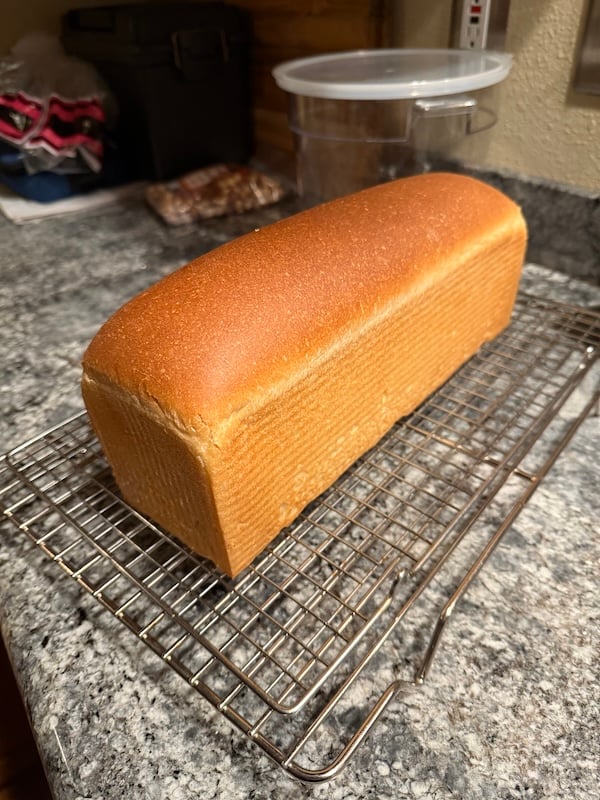
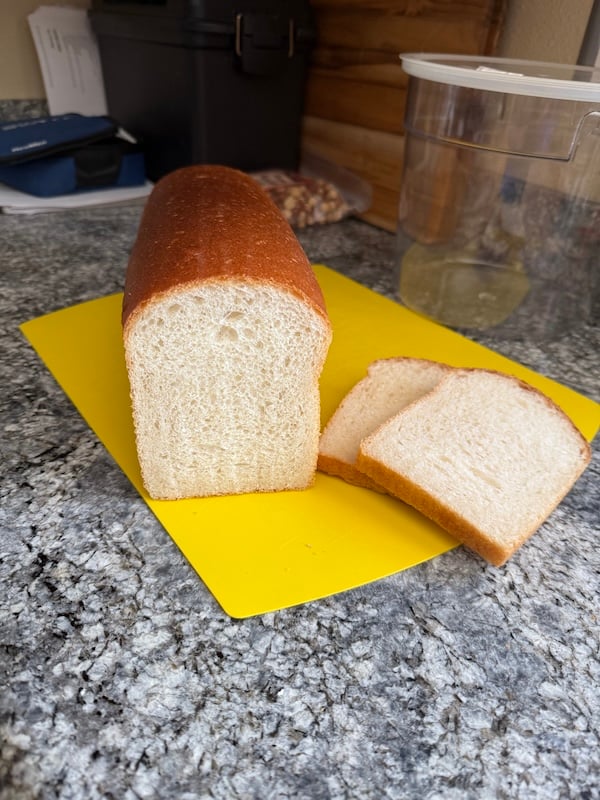
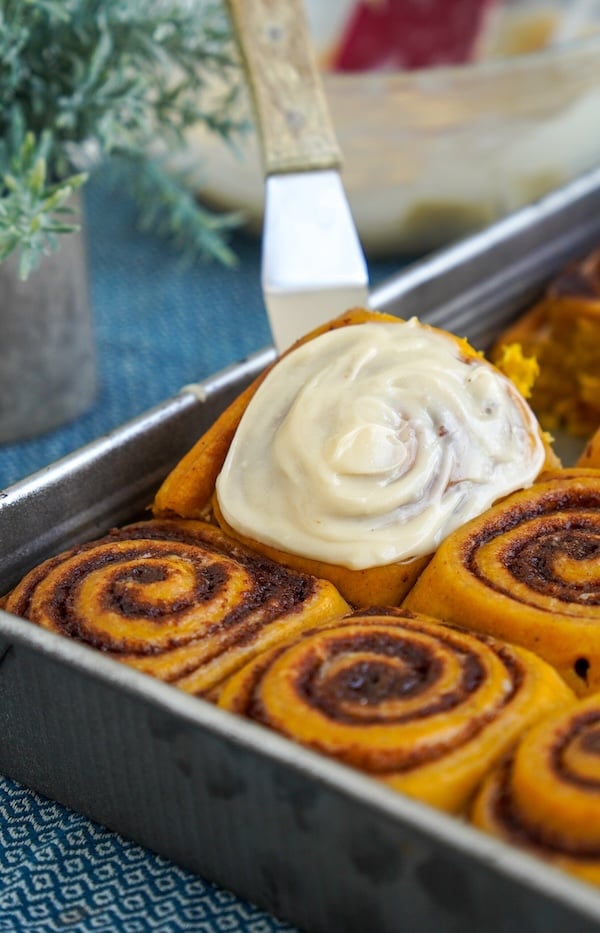
Once done, immediately brush the top of the loaf with butter. I take a stick of butter and just glide it across the top!
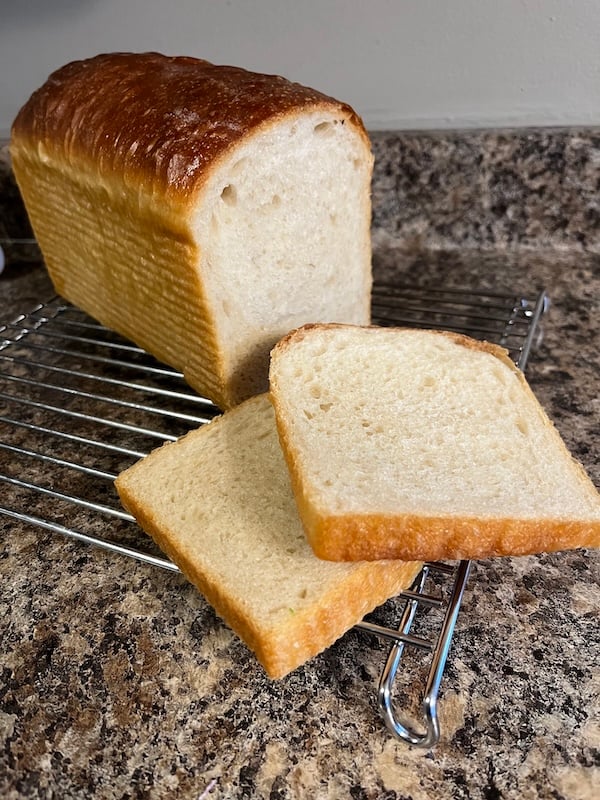
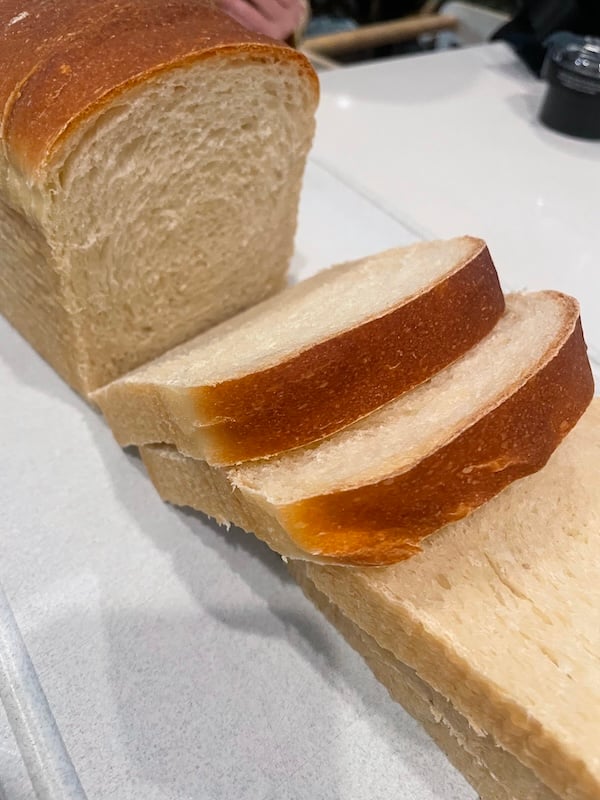
Let it cool for a few minutes; then, turn it out onto a cooling rack. Let it cool for about an hour before slicing!
Ingredient Substitutions
- Sugar: You can totally swap the sugar for another sweetener – the original Wonder Bread copycat recipe uses honey, which is fantastic, too. Recipe testers had great success using honey instead of sugar in the main dough, with one noting, “I switched it out for 40g of honey and it went great!” Another baker successfully used agave as a substitute. If using liquid sweeteners, reduce the water or oil slightly to compensate for the added moisture.
- Honey in the starter: You can swap sugar for the honey in the sweet starter if you prefer. Multiple testers made this change successfully. I do not recommend maple syrup, though one tester did successfully use it when baking for a baby under 1 year old.
- Whole milk in the tangzhong: You can use water or any nut milk to make the tangzhong. Recipe testers had fantastic results with a wide variety of substitutions, including almond milk, cashew milk, soy milk, 2% milk, a mixture of heavy cream + skim milk, and evaporated milk. One Canadian baker specifically mentioned preferring soy milk over regular milk for the improved flavor profile.
- Avocado oil: Any neutral oil should work just fine – grapeseed oil, vegetable oil, sunflower oil, or even melted butter would be a good replacement. Olive oil was extremely popular among testers, with multiple successful reports from bakers who noted “it worked out just fine!” and “went very well.” One baker used it specifically due to an avocado allergy with excellent results.
- Flour adjustments: If using all-purpose flour instead of bread flour, several testers had success without adding any extra flour during mixing, though others found the adjustment helpful. When using Costco/Kirkland AP flour, multiple bakers confirmed adding 25g extra worked perfectly. Some bakers successfully mixed flour types (white + rye + whole grain) for added flavor complexity.
- All-purpose flour instead of bread flour (did not add any extra)
- Peyton, CO (5/5 stars): “Turned out great!”
- All-purpose flour with extra flour added
- Hawaii (5/5 stars): “Added 30g additional Costco AP flour – worked well”
- Orlando, Florida (5/5 stars): “Added 25g extra flour when using Costco AP flour – perfect”
- Mixed flour types
- Bosnia and Herzegovina (5/5 stars): “White, semi-white, and whole grain rye flour mix – bread was phenomenal”
- Southern Portugal, Europe (5/5 stars): “Small amount of wholewheat flour – worked just fine”
- All-purpose flour instead of bread flour (did not add any extra)
- Butter: One tester used ghee instead of butter for brushing the baked loaf, which worked well.
Tips for Success
This same-day recipe is designed to be approachable for all skill levels, but here are the key insights from over 230 recipe testers to ensure your success:
- Temperature is everything for timing. The average successful kitchen temperature was 75°F (24°C), but testers worked in environments from 68°F to 85°F (20°C to 29°C). The key to this recipe’s same-day timeline is keeping your dough warm, ideally between 80-90°F (27-32°C). If your kitchen is cooler than 75°F (24°C), expect longer rise times or put your dough in a warm spot. One tester successfully used a bread warming mat to maintain a consistent temperature throughout the process. I personally used a proofing box (affiliate link) set to 85°F (30°C).
- KitchenAid mixers need extra time. Multiple testers noted that KitchenAid stand mixers required 15-20+ minutes of mixing to achieve proper dough development, compared to 7 minutes in an Ooni Halo Pro or 10 minutes in a Bosch. For me, it took 33 minutes. Don’t worry if it takes longer – keep mixing until you achieve at least a weak windowpane.
- You can add a touch more flour during mixing. Many successful bakers added 2-3 extra tablespoons of flour if their dough felt too sticky. The dough should feel tacky but hold its shape when removed from the mixer. If it’s super sticky to the touch, it needs a little more flour.
- Your starter should triple, not just double. Several testers noted better results when their stiff sweet starter tripled in size rather than just doubled. This indicates optimal fermentation activity for the same-day timeline. To give your sweet starter the best chance of success, ensure you’re using a well-maintained starter, ideally fed within the last 24 hours, to make it.

- The tangzhong should be thick like pudding. Multiple testers confirmed this visual cue – it should reach 150°F (65°C) and have a pudding-like consistency. Let it cool to below 100°F (38°C) before adding to your dough.
- Plan your timing. Even though it’s “same-day,” you still need about 10-11 hours total. Several testers noted needing to start much earlier than expected to have bread ready for dinner. The night-before starter preparation is crucial for success.
- Use a thermometer for doneness. Bake to an internal temperature of 200-205°F (93-96°C). Several testers found their ovens needed the full 45 minutes or even slightly longer to reach proper doneness.

FAQs
Survey data shows the average successful kitchen temperature was 75°F (24°C), but many bakers succeeded in cooler environments by using creative warming methods. Try a Brod & Taylor proofing box (affiliate link) set to 85°F (30°C), your oven with just the light on, or placing a cup of boiling water in the corner of your oven if the light doesn’t produce warmth. You can also preheat your oven for a couple of minutes, then turn it off. Use a warming mat, find a sunny spot in your home near a heater, or even proof outside on a warm day (just cover with plastic wrap to keep bugs out).
Preheat your oven to 350°F (175°C) and bake uncovered until the internal temperature reaches 200-205°F (93-96°C). If the top gets too dark, cover with foil. Bake times vary by pan size: mini loaf pans need 25-30 minutes, regular loaf pans (around 8.5×4 inches) need 30-35 minutes, and sandwich bread loaf pans (around 13×4 inches) need 40-45 minutes. Several recipe testers noted needing the full time or even a few extra minutes to reach proper doneness.
Absolutely! Recipe testers had fantastic success with many substitutions. Olive oil was extremely popular as a replacement for avocado oil, with multiple successful reports. For the tangzhong, testers used almond milk, cashew milk, soy milk, 2% milk, and even evaporated milk with great results. You can swap honey for sugar (or vice versa) in both the starter and main dough. Many bakers also successfully used all-purpose flour instead of bread flour, with some adding the recommended extra 25g and others finding it unnecessary.
Don’t worry – this is completely normal! Many successful recipe testers added 2-3 extra tablespoons of flour during mixing to achieve the right consistency. The dough should feel tacky but hold its shape when removed from the mixer. Add flour one tablespoon at a time until the dough starts to pull away from the bowl sides and forms a cohesive ball. Some dough may still stick to the bottom of the mixer, and that’s normal.
KitchenAid mixers consistently needed longer mixing times according to recipe testers – expect 15-20+ minutes total compared to 7 minutes in an Ooni Halo Pro or 10 minutes in a Bosch. My KitchenAid took 33 minutes! Keep mixing until you achieve at least a weak windowpane test. Don’t worry if it takes the full time; just watch for proper dough development rather than following strict timing.
Your starter should ideally triple in size rather than just double for best results with the same-day timeline. Several testers noted better outcomes when their starter achieved a full triple rise. If your starter isn’t rising well, check that it was fed within 24 hours before making the stiff sweet starter, and consider using sugar instead of honey if you’re having consistent issues.
Another same-day recipe you’ll love: Same-Day Sourdough Focaccia (Tested by 627 Bakers!)
Loaf Pan Size Calculator
Not using a 13×4 loaf pan like me? Use this calculator to get a revised ingredient list for different loaf pan sizes.
“Oh, this recipe is going to get a lot of use. Hubby’s exact words were … ‘it’s perfection’.” –Recipe tester from Hartford, SD

Same-Day Sourdough Wonder Bread Copycat Recipe
Equipment
- 3/4 L Weck jar (for the stiff sweet starter)
- 2-quart bowl (for first rise)
- 13×4 long loaf pan (USA Pan is my favorite)
- Long bread bag code THATSOURDOUGHGAL for 15% off
Ingredients
Stiff Sweet Starter
- 30 g sourdough starter (ideally, fed within the last 24 hours)
- 30 g sugar (or honey)
- 60 g water
- 120 g bread flour
Tangzhong
- 35 g bread flour
- 175 g whole milk
Main Dough
- All of the stiff sweet starter (from above)
- All of the tangzhong (from above)
- 195 g cool water
- 40 g sugar
- 45 g avocado oil
- 515 g high-protein bread flour (see Notes)
- 12 g salt
- 1 tbsp butter (for buttering the baked loaf)
Instructions
- Before you begin: This recipe is written for a 13×4 loaf pan. If you are using a different size, use the calculator above this recipe card for a revised ingredient list. Additionally, a ton of ingredient substitutions have been tested. Please see the substitutions section for tips. If you are mixing by hand (no stand mixer) I have a recipe post dedicated to those instructions. See the Notes section for the link!
The Night Before
- Make the stiff sweet starter: In a small jar, mix 30 g sourdough starter, 30 g sugar, 60 g water, and 120 g bread flour until it forms a ball. Knead outside of the jar to fully incorporate the ingredients. Cover loosely and let ferment at room temperature until morning.

Bake Day
- Make the tangzhong: Mix 35 g bread flour and 175 g whole milk in a microwave-safe bowl. Microwave in 20-30-second intervals, stirring between each, until thickened and reaches 150°F (65°C), or about 4-5 rounds total. Let rest on the counter for about 30 minutes, or until the mixture has cooled below 100°F (38°C). Note: you could make this the night before and refrigerate overnight.
- Mix the dough: In your stand mixer bowl, combine All of the stiff sweet starter, All of the tangzhong, 195 g cool water, 40 g sugar, 45 g avocado oil, 515 g high-protein bread flour, and 12 g salt. Mix on speed 1 (lowest speed) for 1-2 minutes until ingredients come together, then increase to speed 2 (a tiny bit faster) and mix for 10-15 minutes, or until dough reaches a weak windowpane. It takes about 7 minutes in the Ooni, 10 minutes in a Bosch, and upwards of 30 minutes in a KitchenAid, for reference.Hand mixing instructions are in the Recipe Notes.
- The dough will feel slightly sticky or tacky after mixing, but it should hold its shape. If the dough doesn't fully come together after a few minutes in the stand mixer, add additional flour in 1 tbsp increments. Resist adding too much, though, or the resulting loaf will be dense.
- Bulk fermentation: Let dough rise in a warm place (~85°F/29°C) until risen by about 30% and small bubbles appear around the sides of the bowl (about 3-5 hours).
- Shape the dough: Spritz your loaf pan with a nonstick oil spray. Dump dough onto work surface (use a light dusting of flour to prevent sticking, if needed). Using a rolling pin, roll dough into rectangle slightly narrower than pan width (about 10" wide by 14" long). Try to pop large bubbles as you roll. Roll up the dough tightly, turning the ends in slightly as you roll to minimize an end seam. Place your dough log seam-side down in loaf pan. Use a toothpick to pop any bubbles on the surface of the dough.
- Second rise: Cover with plastic wrap and let rise in your warm spot (~85°F/29°C) until very puffy and the dough is even with the height of the pan rim (approximately 3-5 hours).

- Bake: Preheat oven to 350°F (175°C). Bake uncovered 40-45 minutes until internal temperature reaches 200-205°F (93-96°C). (See Notes for different loaf pan size baking times.) If the top of the loaf is getting too dark, cover with foil.
- Finish: Once done, immediately brush hot loaf with 1 tbsp butter. Cool in pan 5-10 minutes, then turn out onto rack. Cool completely before slicing (1-2 hours).

Video

Notes
- Bread flour: Ballerina Farms (14% protein), Central Milling High Mountain (13.5% protein) or King Arthur unbleached (12.7% protein) – no adjustments needed
- All-purpose: Costco AP flour – add ~25g extra flour to main dough
- Canadian options: Arva Mills Daisy flour or Boreal Organic All Purpose (Costco) work perfectly (thanks to follower Amanda Steele for this tip)
- Mini loaf pan: 25-30 minutes
- Regular loaf pan (around 8.5×4.5): 30-35 minutes
- Sandwich bread loaf pan (around 13×4): 40-45 minutes
“1000 times YES it’s my favorite recipe to date of any and I’ve tried so many” -Recipe tester from Modesto, California
Conclusion
If you try this sped-up version of the sourdough Wonder Bread copycat recipe, please let me know how it went in the comment section!
I love seeing your photos and hearing about any changes you made.
Happy baking!
Other soft bread recipes you might like:


Wow! Best sourdough loaf EVER! Agree with sugar instead of honey, as the 2-day recipe I used honey and tasted like Kings Hawaiian Bread. So easy and not strapped to the house for stretch & folds! Didn’t have milk so had to make milk out of heavy cream & powdered milk, but still AMAZING bread! Thank you for sharing your recipes and expertise! Making this one once a week for sure! Note, USA Pan was a game changer.
So glad you enjoyed it!
Holy fast bread! I cannot wait to cut into this tomorrow. It was not a two day affair (but let’s be honest, I like those, too), and the dough was dreamy! Thanks for this! 👏🏻👏🏻
So glad to hear it!! Can’t wait to hear what you think of it!
Yes I have used this recipe
It is the only recipe I use now comes out so soft I love this recipe so much
Woohoo!
I agree with all the other comments. Excellent result – Recipe Description also excellent – you can see how much work you put into the development.
One Question: sometimes I would like to bake the bread the following morning. Have you tried slowing down the process (after the Bulk Fermentation into the fridge, or after shaping the dough? )
Thanks for the recipe.
Neil
If you want that timeline, you can use the original recipe! It’s built on a 2-day timeline: https://thatsourdoughgal.com/sourdough-wonderbread-copycat-recipe/
Have a fed starter, can I mix the stiff starter in the morning let it rise, and then follow the rest of the steps 4 to 6 hours later?
The starter won’t be ready in just 4-6 hours.