
Overnight Sourdough Artisan Bread Recipe

Overnight sourdough loaves will change your life if you work a 9-5 job but still want homemade, gut-healthy bread. Most of the prep fits right into your evening routine.
As you clean up dinner, you can mix your dough. While you’re winding down, sneak in a few sets of stretch and folds.
When you wake up, pre-shape the dough, give it a final shape, and pop it in the fridge before heading out the door.
And the timing is chef’s kiss—perfectly timed to give you fresh bread for dinner.

Video Tutorial
I’m a visual learner, so I created a step-by-step video tutorial for this recipe.
Feel free to print the recipe card and reference this video to help you along. I’ve included time stamps so you can easily jump ahead to the step you’re on.
In the video, I made one plain loaf and one cinnamon sugar loaf.

Note: the exact method I used in the cinnamon sugar loaf is not my winning method. It was still delicious, but I’ve improved upon it. The winning method is now published on my blog here!
Why You’ll Love This Overnight Sourdough Artisan Bread Recipe
- Perfect for anyone with a day job: This recipe fits right into your routine if you leave home during the day. Mix your dough after work or once the kids are in bed, let it ferment overnight, and wake up to dough that’s ready to shape and pop in the fridge. It’s bake-ready by dinnertime.
- 24-hour sourdough bread: from the initial dough mixing to the loaf coming out of the oven, your sourdough bread will be done within 24 hours.
- Less chance of under-fermenting: One of the most common beginner sourdough mistakes is under-fermenting, but since the dough is fermenting while you sleep, you won’t have the temptation to stop the bulk fermentation too soon.
- Beautiful crumb and texture: This loaf is consistently incredible—light, airy, slightly tangy, and with a crackly, blistered crust.
- Customizable: You can tweak the proofing time to fit your schedule and your kitchen’s temperature by adjusting the amount of starter you use in the recipe. It may take some trial and error to dial it in for your unique environment, but don’t worry: I’ll help you.
Another staple recipe you might like: 20% Whole Wheat Artisan Sourdough Bread Recipe
Overnight Sourdough Artisan Bread Timeline

Here’s a sample timeline to help you plan out your bake:
| Day 1 | |
| 8:00 AM | Feed your starter a 1:5:5 feeding ratio. |
| 8:00 PM | Mix the dough, cover, and let sit on the counter. |
| 8:30 PM | Stretch and fold #1. |
| 9:00 PM | Stretch and fold #2. |
| 9:30 PM | Stretch and fold #3. |
| 10:00 PM | Final stretch and fold; let the dough bulk ferment overnight on the counter. |
| Day 2 | |
| 7:30 AM | Pre-shape the dough and let it rest on the counter. |
| 8:00 AM | Final shape and put it in the fridge. |
| 5:00 PM | Preheat the oven to 450°F/230°C. |
| 5:40 PM | Bake at 450°F for 30 min covered, then 10-15 min uncovered. Let cool before enjoying! |
Ingredients in Overnight Sourdough Artisan Bread
- Active Starter: Make sure it’s active and bubbly, and right at its peak before you start. It should triple in size with a nice flat surface on top (not domed).

- Bread Flour: Bread flour gives the bread structure and strength for a nice chewy texture. I use King Arthur’s unbleached bread flour.
- Water: If your kitchen is cold, use warm water to help the dough along. If it’s hot, use ice-cold water to slow things down. When my kitchen is between 69-74°F (20.5-23°C), room-temperature tap water works well.
- Salt: I usually use Redmond’s sea salt for my loaves, but I was out of it when I baked this one, so I used pink Himalayan salt instead. Any sea salt will work, just try to avoid one with anti-caking agents if you can.
You’ll also need:
- Dutch Oven or Bread Dome: Both trap steam for a crackly crust, but a bread dome can take it up a notch. I used my Krustic bread dome (affiliate link; code REBEKAH15 for a discount) for this bake and loved the results. If you don’t have a Dutch oven or bread dome, don’t panic. I’ve made bread in a Crockpot insert and a Turkey roaster before – you can totally improvise!
- Parchment Paper or Bread Sling: I like using parchment paper with messier inclusion loaves, such as cinnamon sugar. I prefer reusable bread slings for plain loaves.
Step-by-Step Instructions for Overnight Sourdough Artisan Bread
Here are more detailed instructions for making the overnight sourdough bread. For a more condensed version, visit the recipe card.
Step 1: Feed Your Starter
Feed your starter and let it reach its peak.

A 1:5:5 ratio works well if you want to feed your starter in the morning before heading out of the house.
- For one loaf: mix 14g starter, 68g flour, 68g water.
- For two loaves: mix 25g starter, 123g flour, 123g water.
If you forget to feed your starter first thing in the morning, adjust your feeding ratio so it reaches peak a little sooner. As an example, you could feed your starter a 1:1:1 feeding ratio around 2pm and it should be ready to roll around 8pm.
In that case, here’s what you’d mix together:
- For one loaf: mix 50g starter, 50g flour, 50g water.
- For two loaves: mix 90g starter, 90g flour, 90g water.
No matter what feeding ratio you choose, I like to make 20-30g more than I need for the recipe. That leaves some starter in the jar to feed again to keep it alive.
Confused about feeding ratios? This video is a good visual aid:

Related: Sourdough Starter Feeding Ratio Calculator
Step 2: Mix the Dough
I like to make two loaves at a time. But for a single loaf, here is my favorite ingredient mix:
- 500g bread flour
- 325g water
- 120g active starter
- 10g sea salt
If you want 2 or 3 loaves, just double or triple these ingredients.
Note: The ideal starter amount for this recipe depends on your environment. I use 120g when my home is around 70°F (21°C). For colder homes, mix earlier or use more starter. For warmer homes, use less starter and ice-cold water. Adjust as needed to suit your conditions.
I like to mix the water and starter together first to dissolve it evenly, then add in the salt and give it a quick stir, and then mix in the bread flour.


If you wanted to, you could just dump all the ingredients in at once.
Cover the bowl (I used a plastic shower cap I picked up from our last hotel stay) and let the dough rest on the counter for 30 minutes.
Step 3: Stretch and Folds
After 30 minutes, do your first set of stretch and folds:
- With clean, damp hands, grab the dough, stretch it upward, and fold it over toward you.
- Rotate the bowl a quarter turn and repeat until the dough starts to resist. I typically find that 8-10 stretches is ideal.
Take a quick look at the volume of your dough (ideally you’re fermenting in a clear bowl with volume markers) so you know how much it rises during the fermentation—this dough is about 750ml in volume per loaf.
- This is the bowl I use (affiliate link) for a single loaf. It has ml markings on the side.
- This is the bowl I use (affiliate link) for 2-3 loaves. It does not have ml markings on the side, so it’s nice to also use a small shot glass (affiliate) to tell how much the dough has risen. Simply put 10ml of dough in the shot glass and nestle it into your big ball of dough. In the morning, you can see the percentage rise of your dough by looking at the shot glass. If it’s 20ml, your dough doubled! (This is called the aliquot method.)
Cover the dough with the shower cap again and let it rest for another 30 minutes. Try to get 3-4 rounds of these stretch and folds in, spaced 30 minutes apart.


Some people skip the stretch and folds altogether for their overnight bread recipes, and yes, you can still get a good loaf, but I wouldn’t recommend skipping them on purpose.
They smooth and strengthen the dough, regulate temperature, and make sure all the ingredients are fully mixed.
For the final round of folds, I did coil folds instead. It’s a similar technique but helps the dough retain the bubbles you’ve built up a bit better.
To do a coil fold:
- Slide your hands under the middle of the dough and gently lift it, letting the edges drape down like a hammock.
- Let the ends fold back into the bowl and gently lower the middle.
- Rotate the bowl a half turn and repeat.
Step 4: Overnight Bulk Fermentation
After your last fold, cover the dough again and let it continue fermenting on the counter overnight. By the time you wake up, your dough should be ready to shape!
I typically mix my dough (which starts the bulk fermentation) around 8 p.m., and by 7:30 a.m. or so, it has risen beautifully and is super bubbly. I’ve had dough that doubled, tripled, and even quadrupled in size, and all have turned out beautifully.


The overnight loaf I made for these photos quadrupled in size. It was 750ml at the start and higher than the bowl’s top in the morning.
The highest marking on the bowl is 2000ml, but that’s about an inch below the bowl’s surface. My best estimate is the dough was about 3000ml before shaping.

The more I experiment, the more I realize my dough can handle longer rises and still turn out amazing—recent bakes of this recipe are proof of that (pun intended).
Note: My starter is super healthy, fed 1-2 times daily, and consistently maintained at peak activity. It is not typically refrigerated. Also, lower hydration doughs, like this one, can withstand longer fermentation times without overproofing.
That said, you’ll need to find what works for your home. The temperature and humidity in your house play a big role.
I’ve tested this recipe in the temperature range of 69-74°F (20.5-23°C) and it has turned out well. Cooler than this may require more time to proof (or use more starter in your dough). Warmer than this will likely overproof by morning. I have lots of tips for you later in the article.
Note: This indoor thermometer with humidity reading (affiliate link) has been a huge help to me! I can see the ambient temperature in my kitchen, and I can better log my recipes so I know what worked at what temperature.
Step 5: Shape the Dough
When you’re ready to shape, give your counter a quick spray with water [this (affiliate link) is my favorite water mister] to keep the dough from sticking and dump out your dough.
Note: alternatively, you can use a dusting of flour, but I prefer a light misting of water.
Grab your bench scraper and carefully work your dough into a ball, pulling it toward you.


The goal here is to build some tension on the surface of the dough so it holds its shape. You’ll know you’re on the right track when you see those lovely bubbles (don’t pop them!).
Once shaped, let it sit uncovered on the counter for 30 minutes.
Step 6: Final Shaping
Use your bench scraper to pick up the dough and flip it over. Then, scoop it up with your hands and do a clasp fold, just like you’re closing a book. If you’re baking a batard, fold it once, for a boule, do two.
Set it in your proofing basket with the seam facing up, and pinch the seam together.

Step 7: Final Stitch
I just had a feeling this loaf needed one more stitch.
After the final shaping, I let it rest in the banneton on the counter for about 20 minutes and restitched the seam on top to increase surface tension.
“Stitching” the seam helps seal the dough together to hold its shape during proofing. It also provides a little extra tension on top to help it rise evenly while baking. But stitching is optional.
Step 8: Cold Retard
Pop the plastic cover back on your banneton and stick it in the fridge for a cold retard.
I cold-proofed this one for about 8-9 hours.

If you’re in a hurry and want to bake it sooner, you can skip the cold retard. Just leave the shaped dough in the banneton on the counter and let it rise for 1-5 more hours, depending on the temperature in your house, or until it’s nice and jiggly. Then, score and bake.
There are some perks to doing the cold retard, like better flavor and easier scoring. But most importantly, it just works with this schedule.
When you get home from work, preheat your oven, score and bake your loaf, and enjoy the bread for dinnertime.
Step 9: Score and Bake
After your cold proofing (or second rise if you skip the cold retard), you are ready to score and bake the loaf.
Quick note: Now’s the time to put your Dutch oven or bread dome in the oven on the center rack and preheat it to 450°F.
This is where your bread sling comes in handy if you’ve got one. Lay your bread sling facedown on top of the dough and flip the shaped dough over onto the counter, right on top of the sling. If you don’t have one, just turn it over onto the parchment paper.
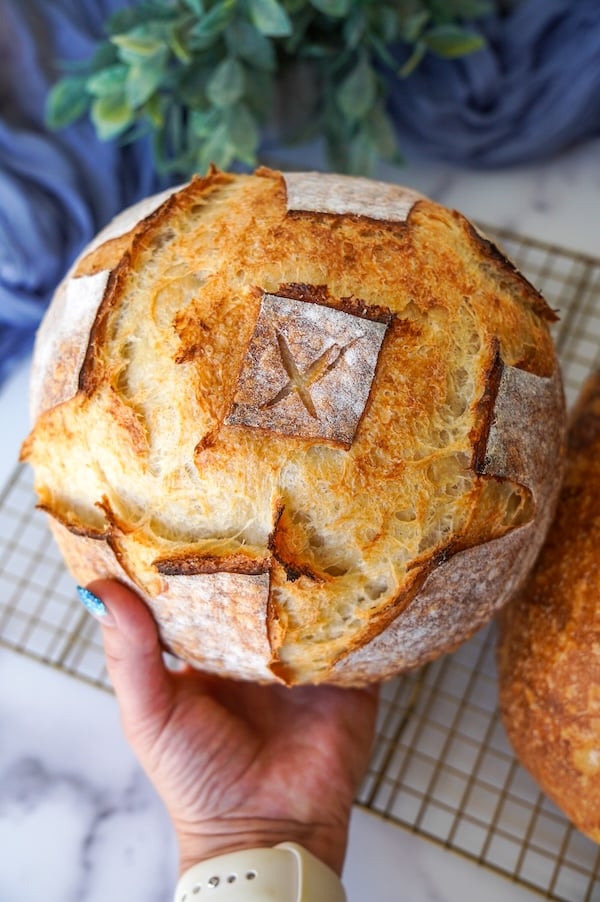
Now, score your dough however you like—you can find ideas here.


Optional: spray a little water over the top of your loaf before baking. That’ll provide some extra blistering. You could toss in an ice cube or two as well.
Pop the dough into the oven at 450°F/230°C. Bake it in the Dutch oven or bread dome with the lid on for 30 minutes, then take the lid off.

Bake for another 10-15 minutes until it’s golden brown. The internal temperature of the cooked loaf should read 205-210°F (96-99°C).
Step 10: Let Sit and Dig In!
I always try to wait about 2 hours before cutting into my bread, or at least until it’s cooled down to room temp.
When the bread’s hot out of the oven, it’s still steaming and cooking inside. Cutting it too soon will cause it to shrink and dry out.

That said, I don’t always follow this rule because warm bread is hard to resist.
Oftentimes, my 2-year-old smells the bread and pulls on my leg saying “bread, bread,” and I don’t have the heart to hold him off for long.
Tips for Adjusting the Recipe (Under or Overproofed)
I expect you to need at least one trial bake to see how this recipe works for you.
When we’re talking about such a long bulk fermentation time, three things are important:
- Temperature of your home
- Amount of starter in the recipe
- Health of your starter (is it acidic or not?)
Using the guidance I have in the recipe card, go ahead and do your first bake. Then, evaluate the crumb. We need to know if your loaf is underproofed, perfectly proofed, or overproofed.
Here are some examples underproofed and overproofed bread:


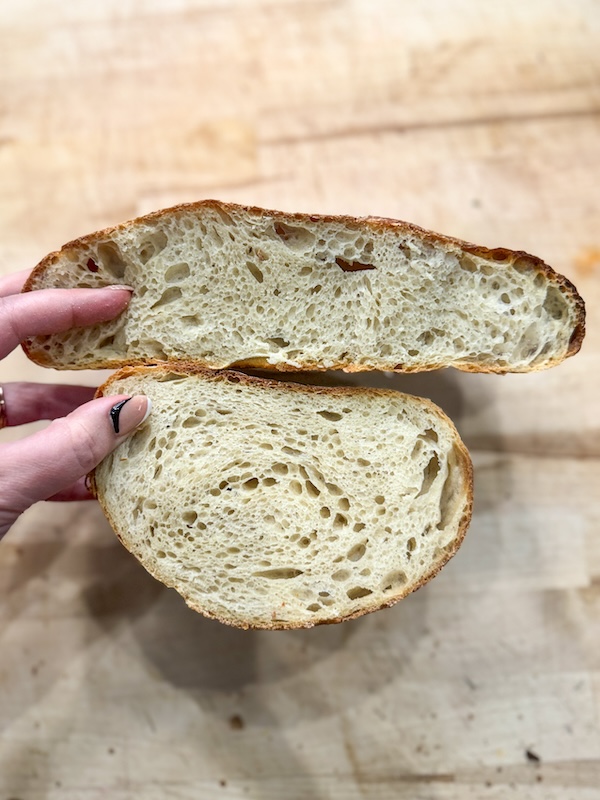
I’m a chronic underproofer, so I only have that one good example of overproofed bread. But hopefully, this gives you an idea.
If yours looks underproofed, add about 5% more starter to your dough next time, and ensure you use warmer water. You can also mix your dough earlier in the evening. Play around with these things until you nail it down.
If yours looks overproofed, do the opposite! Use about 5% less starter, use ice cold water, perhaps even put an ice pack under your bowl, and mix your dough later in the evening.
Once you nail down a process that works for your home’s temperature, write it down. The season will shift and you will have to make adjustments again. By writing down what worked, you won’t have to scratch your head as the season rolls back around.
A Healthy Starter Is Key
My dough can as much as quadruple in size without overproofing, and I believe my healthy starter has a lot to do with it.
When a starter isn’t well-maintained, it can become too acidic. Excess lactic acid bacteria weaken the gluten before the yeast has time to work, leaving you with a soupy, overproofed mess.
How to maintain balance: Feed your starter adequately so it’s not consistently starving.
My routine:
- Feeding ratio: 1:5:5, once or twice daily.
- Storage: Keep it on the counter, not in the fridge.
- If not baking: Tiny feed (e.g., 3g starter, 15g flour, 15g water).
- If baking: Feed as needed for the recipe, plus extra (e.g., 20g starter, 100g flour, 100g water).
I used to feed a 1:1:1 ratio once daily. This caused my starter to become overly acidic, peaking within 4-6 hours, deflating quickly, and starving for the rest of the day. No wonder lactic acid bacteria took over!
For the healthiest starter, feed it “peak to peak,” never letting it fully deflate. Is this required to make great sourdough bread? No. But your dough will be a lot more forgiving.
Related: Same Day Sourdough Bread (Quick, Easy Recipe)
Overnight Sourdough Artisan Bread Recipe Card

Overnight Sourdough Artisan Bread Recipe
Equipment
- 3/4 L Weck jar (for your starter)
- Oval banneton (5% off with code TSG5) | Size I'm Using: Oval – Spiral MD
- Oval Dutch oven ($15 off with code REBEKAH15)
Ingredients
Sourdough Starter
- 14 g sourdough starter (active or discard)
- 68 g water
- 68 g bread flour (unbleached, King Arthur)
Main Dough
- 325 g water
- 120 g active starter
- 500 g bread flour (unbleached, King Arthur)
- 10 g sea salt
Instructions
- Feed Starter: In the morning, feed your starter using a 1:5:5 ratio (14 g sourdough starter, 68 g bread flour, 68 g water). Let it peak before mixing the dough. It should take about 10-12 hours.
- Mix Dough: In the evening, mix together 325 g water* with 120 g active starter** Add 500 g bread flour and 10 g sea salt. Mix well for about 3-4 minutes. Let shaggy dough rest, covered, for about 30 minutes.*If your home is cooler than 69°F (20.5°C), use warm water (up to 100°F). If your home is warmer than 74°F (23°C), use ice cold water. If your home is in between, use room temp water.**If your home is cooler than 69°F (20.5°C), consider using more starter. I suggest trying the 120g on your first go; then, evaluate how the bread turned out and potentially add a little more next time. If your home is warmer than 74°F (23°C), I suggest starting with 75g starter; then, evaluate how the bread turned out and adjust up or down next time. Underproofed: needs more starter. Overproofed: needs less starter.

- Stretch & Fold: Do 3-5 rounds of stretch and folds, spaced 30 minutes apart. Feel free to switch to coil folds for the last couple rounds to be gentler with the dough.
- Bulk Fermentation: Cover the dough and let it ferment on the counter overnight (8-12 hours). It should at least double in size. I know most charts tell you to not let your dough double in size, but I have been getting the best results by pushing those boundaries. The dough photographed here quadrupled in size.

- Shape Dough: Mist your surface with water. Dump dough onto surface, gently coax it into a ball using your bench scraper, and let it rest for 30 minutes.
- Final Shaping: Flip the dough and use the caddy clasp final shaping technique to fold it into a boule or batard. Put it in your proofing basket with the seam facing up. (Reference the YouTube tutorial to see this shaping technique.)
- Optional Stitching: Let dough rest in the basket for 10 minutes and stitch the middle seam closed if needed.
- Cold Retard: Cover and refrigerate, ideally at least 8 hours. You can leave this dough in the fridge up to 4 days.
- Score & Bake: Preheat your oven to 450°F (230°C) with a Dutch oven or bread dome inside. Flip the dough onto a bread sling or parchment paper, score, and bake for 30 minutes covered, then 10-15 minutes uncovered until golden brown. The dough's internal temperature, when done, should be 205-210°F (96-99°C).
- Cool: Let bread cool for about 90 minutes before slicing into it. It's not the end of the world if you want to dig in while it's still warm, though!


Notes
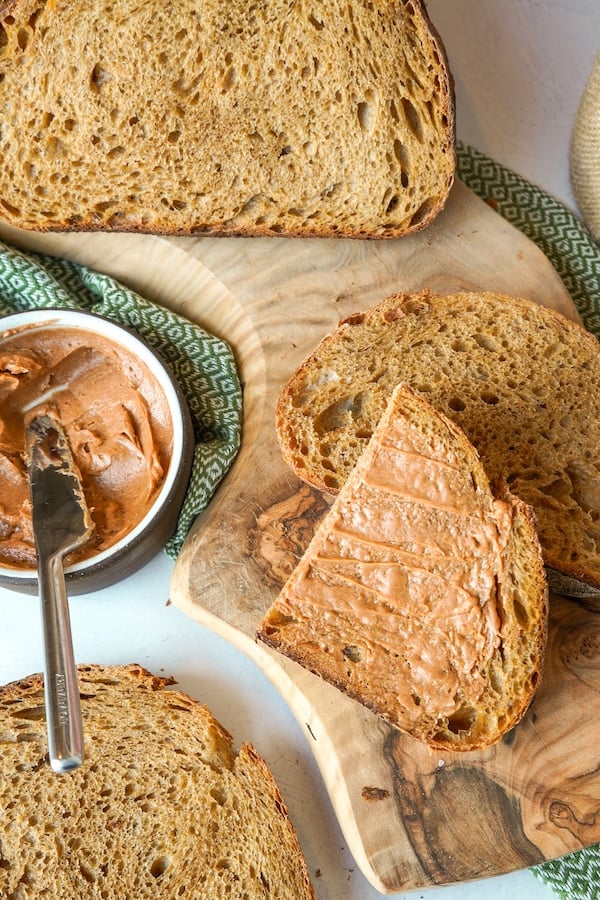
Not sure what to do with stale or leftover slices? Try this recipe: Italian-Style Sourdough Breadcrumbs
FAQs
What if my home is super warm, like 80°F? Can I still make this overnight bread recipe?
If your home is very warm, you’ll likely run into issues with overproofed bread when doing an overnight bulk fermentation. Before abandoning the method, though, I suggest trying a few things: 1) Use ice cold water when mixing your dough, 2) put an ice pack under your bowl, and 3) use a lot less starter in the recipe, such as 35g per loaf instead of the 120g called for. Experiment with this and see if you can come out with a decent loaf. I plan to run my own experiments once it warms up more outside (or when I can get my hands on a bread proofer).
This recipe worked great in winter, but now my loaves are overproofing in summer. What’s going on?
Sourdough recipes often need seasonal adjustments. Warmer temperatures speed up fermentation, so shorten bulk fermentation times or reduce the amount starter in your dough. In winter, do the opposite. Keeping a logbook (affiliate link) helps you track what works at different temperatures, making seasonal transitions easier to manage.
How do I know if my bread turned out under or overproofed?
Expect to tweak this recipe a few times to get it just right. In my 69-74°F (20.5-23°C) home, 120g starter works perfectly for overnight fermentation. Warmer homes may need less starter to avoid overproofing, and cooler ones may need more.
Can I bulk ferment sourdough overnight?
Yes, you can! It’s one of my favorite methods. To get it right, adjust your starter amount based on your home’s temperature. In colder homes, mix earlier, use warmer water, or add more starter. In warmer homes, use less starter and ice-cold water. Experiment until it works for you!
Do you have to put sourdough in the fridge overnight?
If you are doing your bulk fermentation overnight, leave your dough on the counter, not in the fridge. The fridge’s cool temperature will likely not raise your bread well, leaving you with underproofed dough.
Why didn’t my sourdough rise overnight?
If you put your dough together before bed and wake up to a ball of dough that didn’t rise, it’s likely one of two things: 1) there’s an issue with your sourdough starter, or 2) your home is exceedingly cold. Reference this article for help on perking up a sluggish starter, and if your home is very cold, find a warm place to put your dough, such as a makeshift proofing box or one that you purchase.
Another overnight recipe to try: Fluffy, Soft Sourdough Dinner Rolls Recipe
Conclusion
Overnight sourdough baking is a game-changer for anyone with a busy schedule.
With just a little prep in the evening, you can enjoy fresh, homemade artisan bread that’s ready in time for dinner the next day.

The flexibility of this recipe makes it perfect for tweaking to fit your routine and kitchen environment.
Give it a try, and don’t be afraid to experiment. It’s all part of the journey to delicious, gut-healthy bread!


I would like to bake this in a bread pan. Can you tell me what temperature to use and for how long covered/uncovered? Thank you!
You can reference this guide – https://thatsourdoughgal.com/easy-loaf-pan-sourdough-bread-recipe/
What did I do wrong! My bread didn’t rise up a lot 🥺😕
Do you have inclusions in these loaves?
I love the detailed instructions and have made this several times. I’m new to Sourdough. Would love your feedback: over/under proofed or “just right”? Thank you!!
It looks slightly underproofed to my eye, so you can experiment with extending fermentation a little longer, but this loaf is truly beautiful. Wonderful wonderful job!!
This is my go-to recipe now! Everyone at work raves about it and begs me to make more. I am a beginner when it comes to sourdough, but this recipe has helped me get consistent results. Thank you so much!!!
Super easy! I wanted to do something overnight since I have a baby now! I used only 40g starter since my climate is quite warm. Bulk fermented overnight for 10 hours at 72 degrees. Perfection! I think I’d push counter proofing (2 hours) a little further next time since I skipped the cold retard 🙂 Cheers!
I want to try your recipe next week, but I had a question. What do you do if your dough is tough and makes it hard to do the stretch and folds. Do you know what could be wrong?
You may need more water in your dough
Hey Rebecca, thanks for sharing such amazing recipes. I made this one and it turned out good, my kids loved it.
Beautiful!!
Best overnight sourdough recipe I’ve tried! Literally foolproof, because I have not always been successful in my sourdough journey but this loaf I made using this recipe is legit perfection! Thank you so much! I can’t wait to try all your recipes!!! 🫶🏻
P.S. Can this recipe be doubled to make two loaves?
Yay, so glad you enjoyed it! Yes, there’s an option to double the recipe on the recipe card to make it easy!
Excited to try this recipe. I am doubling and have read to double all the ingredients, my question is when do we split the loaves into 2? I think maybe after the 30 minutes from just mixing, but I am not certain.
Split the loaves into two during shaping!
First timer here on this recipe because I’ve been not doing great my last 5-6 loafs.
I’m mixed up on the recipe instructions where you leave it on the counter over night to BF, and then do you have to cold batard it for more hours? Or is it okay after counter BF of 8-12 hours already?
You don’t have to do the cold proof if you don’t want to. You have the option to do the second proof at room temp or in a warm spot – the dough will just need a few hours to puff up fully before you bake it!
Okay, I’m not one to leave comments, yet alone toot my own horn but I just added chorizo, jalapeno, and manchego cheese to this recipe and it quite possibly be the best loaf I’ve ever made. I expected myself to be grossed out or it to be gummy… but no… this was quite amazing. Thank you for the base of genius.
Such a fun combination!! Thanks for sharing!
I shaped, cold proofed, and baked in my cast iron pullman. I will probably drop 5 minutes off the open cook. Thank you so much for inspiring me yet again.
You’re welcome!! So happy you enjoyed it!
Hi! If I want to skip cold proof, do I just leave it in the banneton on the counter until its puff up before I bake? And how long could it be? Thanks
Yes! It depends but it’s usually 2-3 hours in a warm place (for me).
I made this and the bread was 205 degrees when I checked it, but after cutting it, it seems like it’s not done? It’s great toasted but it seems like it needs the extra toasting to finish baking it? What didn’t do wrong?
Based on what I can see in the crumb, it looks like an acidity issue – do you feel your starter could be leaning a bit acidic?
I have my own recipe I have been using and tried yours. (Learning different starter/water/flour ratios) (s 200, w400, fl 600 slt 12)
Recipe was delish and perfect. The crumb was beautiful! Would I need to alter ratios to make in bulk for family and friends? (10 loaves)
Ratios stay the same, just scale the recipe up! Gorgeous bread!!
Followed this recipe to a T, dumped it out to preshape and it just turns into a blob. I let it sit on the counter for 30 minutes, attempted to pick it up and it practically melted in my hands. This is my 5th attempt, same result. Talk about INSANITY!
This is overproofing! Because it’s summertime, it’s likely that you need a lot less starter in order for an overnight recipe to work. What’s the temp in your kitchen?