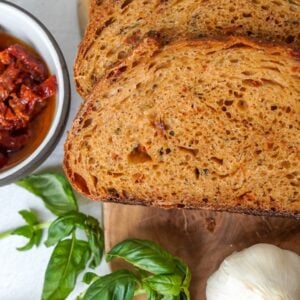
Tomato Basil Sourdough Bread
INGREDIENTS
Roasted Garlic
- 1 large head of garlic See Notes for quantity
- 2 tsp olive oil
- Pinch of salt and pepper
Main Dough
- 300 g warm water
- 120 g active sourdough starter
- 500 g bread flour
- 10 g tomato powder
- 10 g sea salt
- 10 g fresh basil See Notes for alternatives
- 75 g oil-packed sun-dried tomatoes
- All of the roasted garlic that you made, from above
Sweet Glaze Topping (Optional)
- 1 tbsp melted butter
- 1/4 tsp cinnamon
- 1 tbsp brown sugar
Before You Begin

This recipe is written for stand mixers, but you can also mix by hand.If mixing by hand, the oil from oil-packed sun-dried tomatoes can make the dough slippery and difficult to handle when folding in the inclusions. For easier hand mixing, use dry-packed sun-dried tomatoes and add 10-15g of olive oil during the initial dough mix instead. You'll get the same dough consistency without the slippery texture.Don't forget that you can switch from Metric to US Customary by clicking the toggle above the Ingredient List.
Equipment
- Aluminum foil for roasting the garlic
- Stand mixer with the dough hook; optional – you can mix by hand
- Bowl cover 15% off with code THATSOURDOUGHGAL
- Oval banneton 5% off with code TSG5 – the medium oval is my favorite
- Oval Dutch oven $15 off with code REBEKAH15
- Brod & Taylor baking shell and steel alternative to Dutch oven
Instructions
- Feed your starter: To make one loaf of this bread, you need 120g of active sourdough starter. If you want to make this dough in the morning, I suggest feeding your starter before bed: 12g starter, 60g bread flour, 60g water. This will give you a little more than you need. Note: scale the ingredients accordingly if you are doubling the recipe.
- Roast the garlic: Preheat your oven to 350°F (175°C). Slice off the top of 1 large head of garlic to expose the cloves. Place it on a square of aluminum foil, drizzle with 2 tsp olive oil, and sprinkle with a Pinch of salt and pepper. Wrap tightly in the foil, sealing completely.Note: I usually roast multiple heads of garlic at a time because I use it in all types of cooking, and it stores so well.
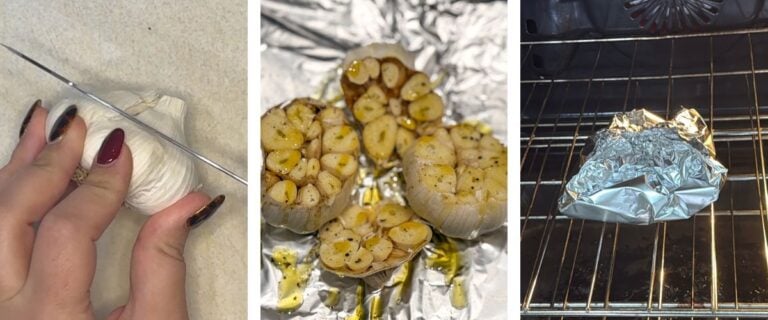
- Pop it directly on the middle oven rack and bake for 1 hour. Then, set aside so it can cool completely. Note: You can make it ahead and store in the fridge for up to 4 days or keep it in the freezer for months!
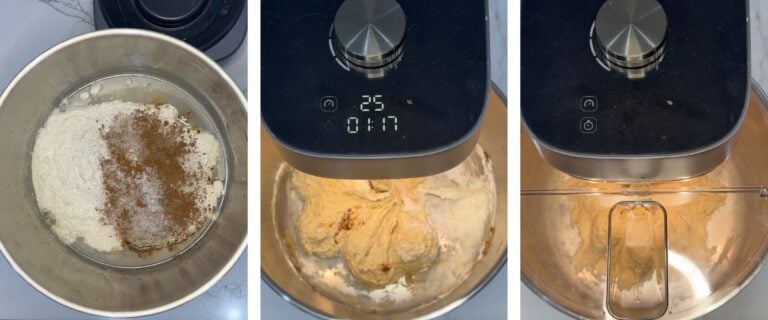
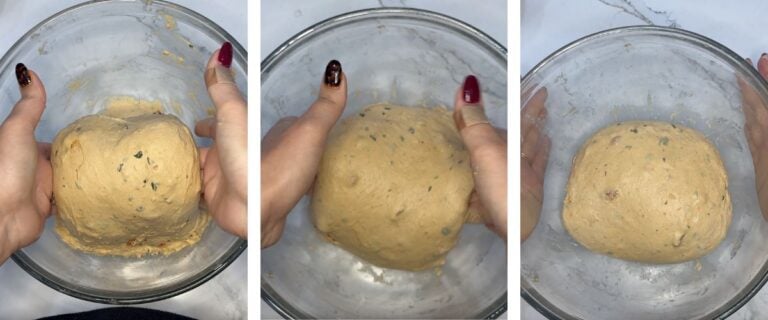
- If using a stand mixer: In a stand mixer bowl fitted with a dough hook, add 300 g warm water, 120 g active sourdough starter, 500 g bread flour, 10 g tomato powder, and 10 g sea salt. Mix on a moderately low speed until no dry flour bits remain (about 3 minutes). Cover with plastic wrap or a bowl cover and let rest for 45 minutes.If hand mixing: In a glass bowl, combine 300 g warm water with 120 g active sourdough starter, stirring gently to dissolve the starter. Add 500 g bread flour, 10 g tomato powder, and 10 g sea salt, and mix with a Danish dough whisk or your hands until no dry flour remains. The dough will be shaggy and sticky – that’s normal! Cover with plastic wrap or a bowl cover and let rest for 45 minutes.
- Note: The bulk fermentation has officially begun.
- Prep your inclusions: Chop up 10 g fresh basil and 75 g oil-packed sun-dried tomatoes. Don't bother patting the tomatoes dry – the oil that sticks to them is meant to be there! It replaces the oil we'd otherwise add to the dough. Squeeze All of the roasted garlic cloves out of their papery skins and mash with a fork until smooth.

- If using a stand mixer: Dump the basil, tomatoes, and garlic into your stand mixer bowl and mix on a moderately low speed until fully combined, about 3-4 minutes. The dough will still look rough, shaggy, and sticky – this is normal. Transfer dough to a lightly oiled glass bowl or dish. Cover and let rest 30 minutes.If hand mixing: Add one-quarter of the inclusions to the top of the dough. Stretch and fold one side of the dough up and over the inclusions. Repeat three more times until all four sides of the dough have been stretched and folded. Cover and let rest 30 minutes.

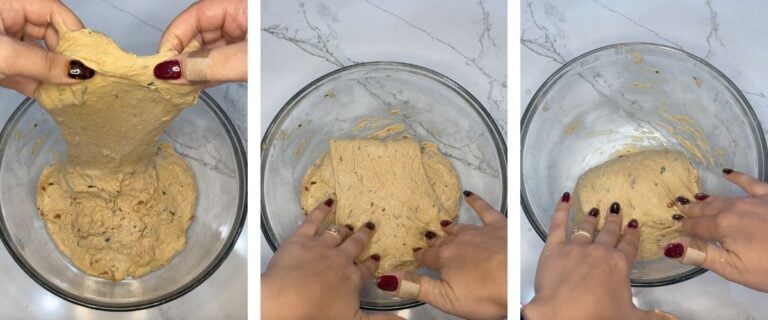
- Perform a set of stretch and folds: To do this, grab one side of the dough, stretch it upward, then fold it over itself. Rotate the bowl and repeat on all four sides. Keep going until the dough resists being stretched. Cover and let rest for 30 minutes.
- Final coil fold: Perform a final coil fold to build additional dough strength. To do this, lift the center of the dough, allowing the edges to drape down, then tuck them underneath as you set the dough back down. If you feel the dough is slack or not strong enough, you can do an additional coil fold after another 30-minute rest.
- Bulk ferment: Cover the dough and let it ferment until it is puffy, jiggly, and has visible bubbles on the surface and sides. When you tap the surface, it should feel light and aerated. When you tug at the edge, it should pull away easily from the bowl.The exact timing varies based on temperature—my dough took about 7.5 hours at 75°F (24°C). The timing began when we mixed our dough.
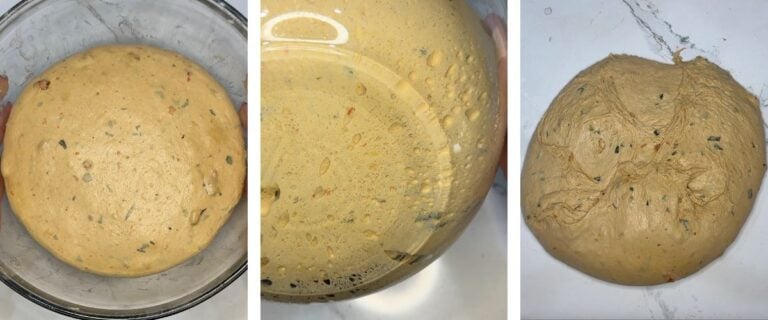
- Pre-shape the dough: Mist your work surface with water (or lightly flour it if you prefer). Gently turn the dough out of the bowl. Using a push and pull motion, shape the dough ball into a round shape. We want the surface to be taut. Let rest, uncovered, for about 20 minutes, or just until the dough relaxes a bit.

- Final shaping: Flip the dough and use the caddy clasp final shaping technique to fold it into a boule or batard. See the Notes section for video tutorials.
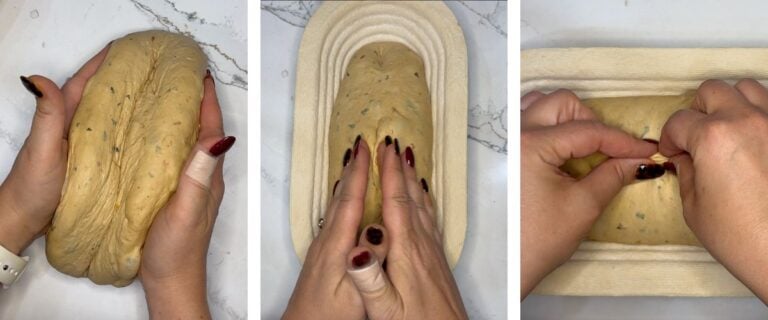
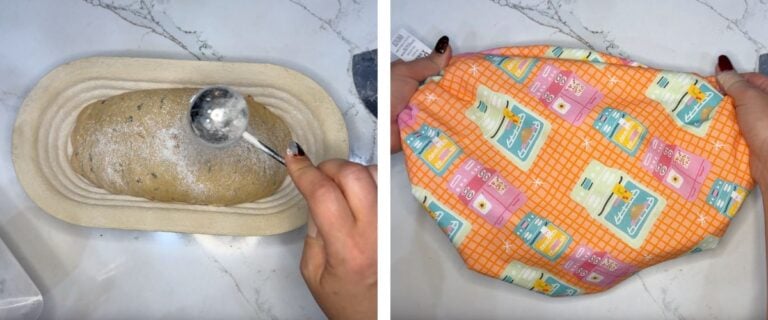
- Cold proof overnight: Place the shaped dough into a floured banneton, cover, and refrigerate overnight (8-24 hours). This enhances flavor, digestibility, and makes the dough easier to score before baking.
- Bake: Preheat your oven to 450°F (230°C) convection or 475°F (245°C) conventional with a Dutch oven inside for at least 30 minutes. I also enjoy Brod & Taylor's bread dome/bread steel set-up. If using that, preheat the bread steel for an hour before continuing.
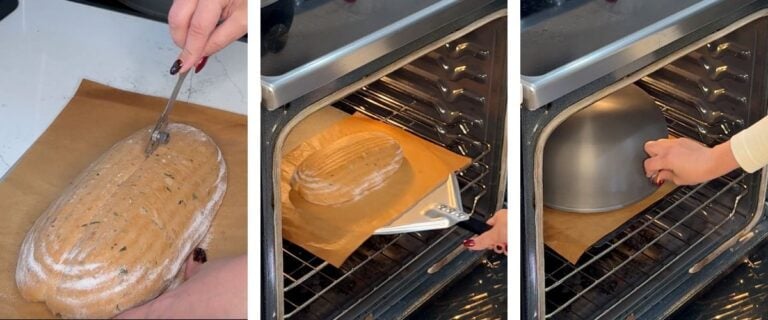
- When ready to bake, transfer the cold dough onto parchment paper, score the top with a bread lame (single slash down the center for a batard or a large X score for a boule), and place it into the preheated Dutch oven (or on the preheated bread steel). Cover and bake for 30 minutes.
- Make the sweet glaze (optional): While your bread is baking, in a small bowl, whisk together 1 tbsp melted butter, 1/4 tsp cinnamon, and 1 tbsp brown sugar. After your 30-minute covered bake, take off the lid and brush a thin layer across the entire surface of the loaf. Also, check the bottom of the loaf – this one has a tendency to burn. If it's pretty dark, slip some foil underneath your parchment paper to prevent burning.Prefer savory instead? One tester added freshly grated Parmesan cheese to the top and loved it!
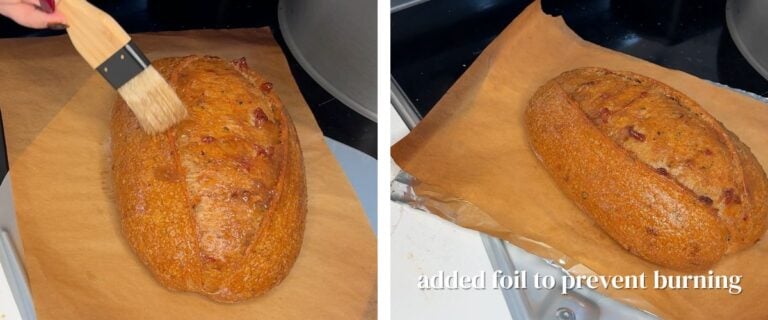
- Bake uncovered for another 7-12 minutes, or until the internal temperature reaches 205-210°F (96-99°C) and the loaf is golden brown.If your loaf is not up to the proper temperature at the end of baking, put the lid back on and continue baking.
- Cool: Let cool for at least 90 minutes, preferably a few hours, before cutting into it. Cutting it early releases steam that causes the loaf to become gummy and then very dry.
Video
Notes
Garlic: Garlic head sizes vary greatly. I recommend using either 1 large head (60-70g before roasting) or 2 small heads. After roasting and squeezing out the cloves, you should have approximately 35-40g of roasted garlic paste.
Basil: 10g of fresh basil is about 1/3 cup or an entire 0.5-ounce container. Feel free to add to taste. You can substitute 2 tbsp of freeze-dried basil. I do not recommend dried basil – it lacks flavor and almost has a minty component to it that does this loaf no favors.
Tomato powder: I use Burlap & Barrel's Sun-Dried Tomato Powder. You can make your own by drying out dry-packed sun-dried tomatoes in a low-heat oven and blending to a fine powder. Canned tomato products (diced, paste, crushed, etc.) are not a substitute –check out my recipe testing journey to read about why!
Baker's Timeline:
- Night Before: Feed starter and roast your garlic (you can roast anytime)
- Morning: Mix dough, bulk fermentation begins
- Throughout the Day: Stretch and folds, bulk fermentation continues
- Afternoon: Shaping, transfer to fridge for overnight cold proof
- Next Day: Score and bake when ready
Nutrition Facts
Tomato Basil Sourdough Bread
Serving Size
1 slice
Amount per Serving
Calories
204
% Daily Value*
Fat
3
g
5
%
Saturated Fat
1
g
6
%
Trans Fat
0.04
g
Polyunsaturated Fat
1
g
Monounsaturated Fat
1
g
Cholesterol
3
mg
1
%
Sodium
349
mg
15
%
Potassium
158
mg
5
%
Carbohydrates
37
g
12
%
Fiber
2
g
8
%
Sugar
1
g
1
%
Protein
6
g
12
%
Vitamin A
155
IU
3
%
Vitamin C
7
mg
8
%
Calcium
17
mg
2
%
Iron
1
mg
6
%
* Percent Daily Values are based on a 2000 calorie diet.
