
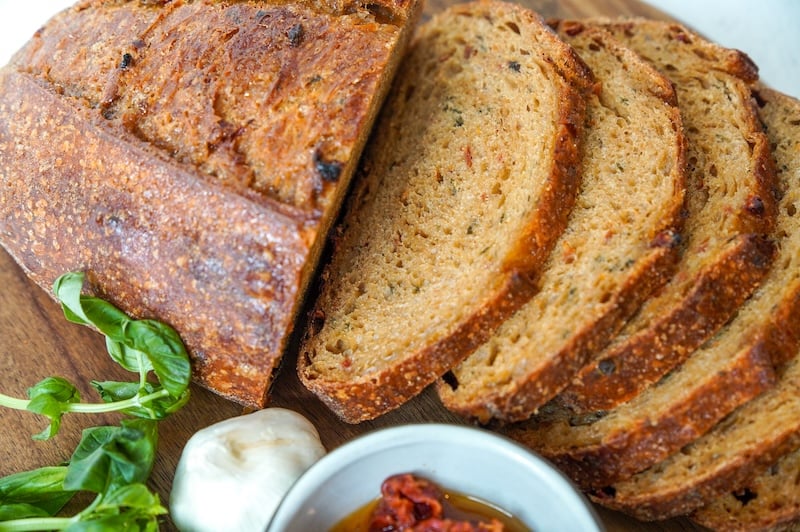
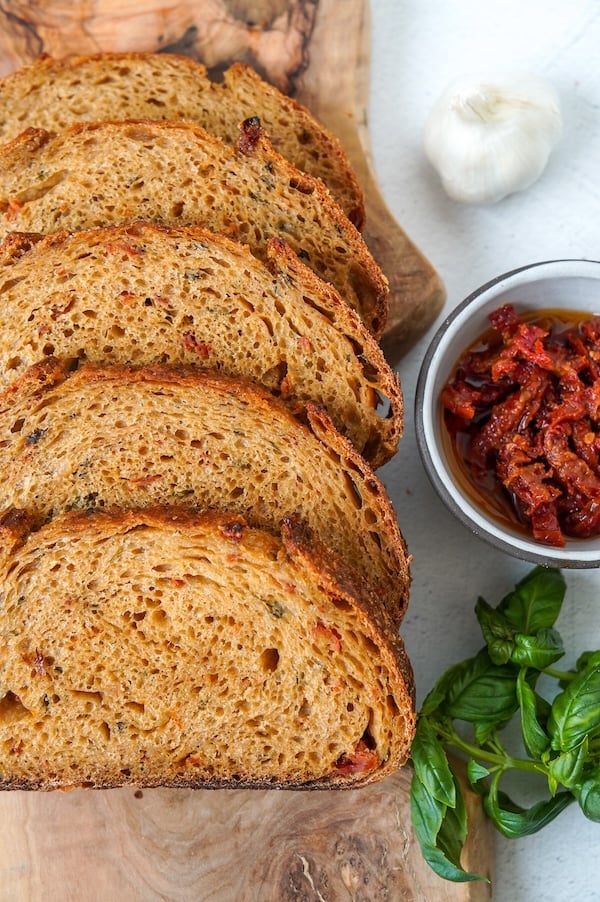
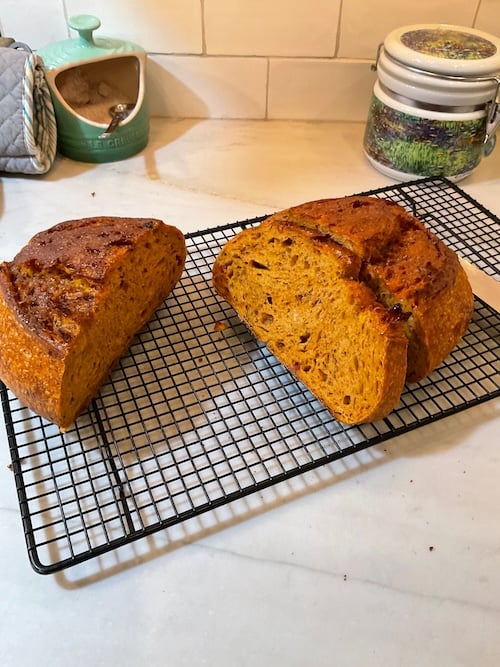
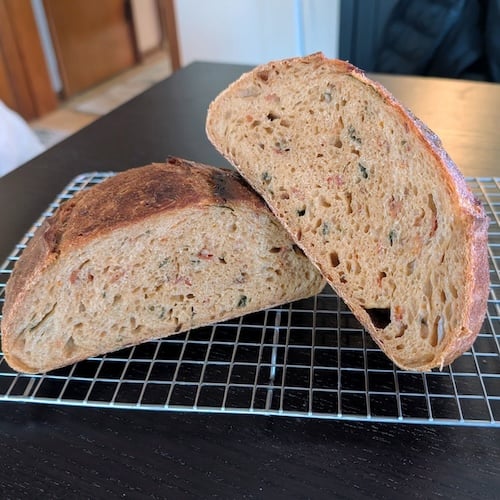
Better-Than-Panera’s Tomato Basil Sourdough Bread (with a Sweet Glaze)
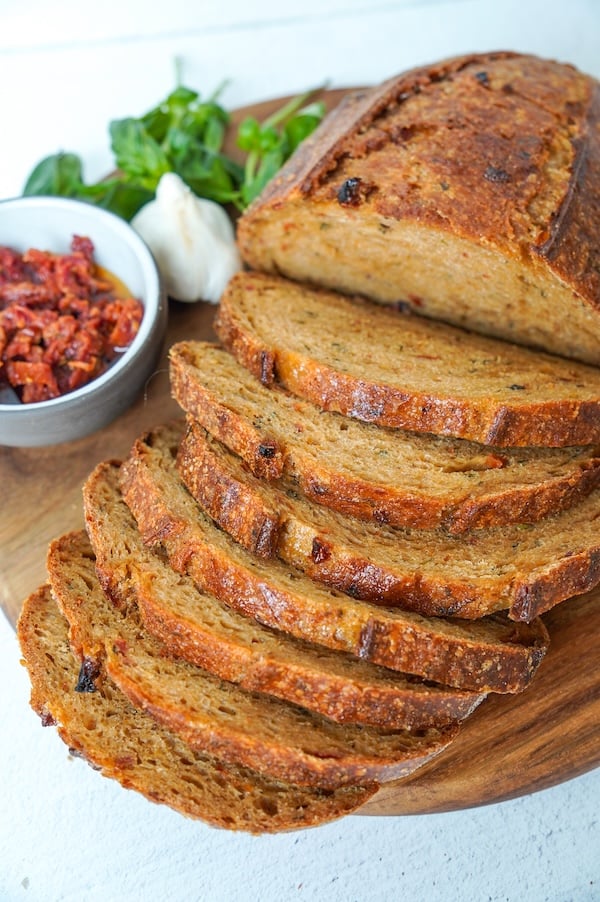
I love Panera’s Mediterranean Veggie sandwich, so I decided to recreate their tomato basil bread at home.
This ended up being the most challenging sourdough recipe I’ve ever developed—15 test loaves before we got it right.
“I’d put 100 stars on this one. PERFECTION.” –Recipe tester from Forsyth, GA
When I finally grabbed a loaf from Panera to compare, the difference felt criminal. Now, I’ve never thought their bread was bad—I’ve loved it for years! But putting it side-by-side with fresh-baked sourdough loaded with real sun-dried tomatoes, roasted garlic, and fresh basil?

There’s just no comparison.
“My DIL always gets this at Panera and said your recipe is better.” –Recipe tester from Ruther Glen, VA
Disclaimer: Some of the products I recommend in this post are affiliate links – if you choose to purchase after clicking one of my links, I may earn a small commission, which helps fund this website, recipe development, and monthly giveaways. I sincerely appreciate your support.
Why You’ll Love This Tomato Basil Sourdough Bread
- Recipe tested by hundreds of sourdough bakers: This recipe went through three rounds of recipe testing to reach this perfected version. I mean, I personally went through 12 tests before bringing in the recipe testers (watch the whole journey here), and together, we went through three revisions. All that to say – this is a recipe you can rely on.
- Highly rated: The final version of this recipe was tested by 57 home bakers from around the world—from Florida to Australia and from Malaysia to the UK. They gave it an average rating of 4.79 out of 5 stars, with 86% giving it a perfect 5-star rating.
- Very approachable process: During recipe testing, I added in some steps that lengthened the process and started to feel pretty complex. I took a step back, edited some steps out, and found that the final loaf is just as great with much less work.
“Easier without compromising taste and overall experience.” –Recipe tester from Florida
“Much simpler. First version would be an every once in while recipe. This is everyday!” –Recipe tester from Lake Elsinore, California
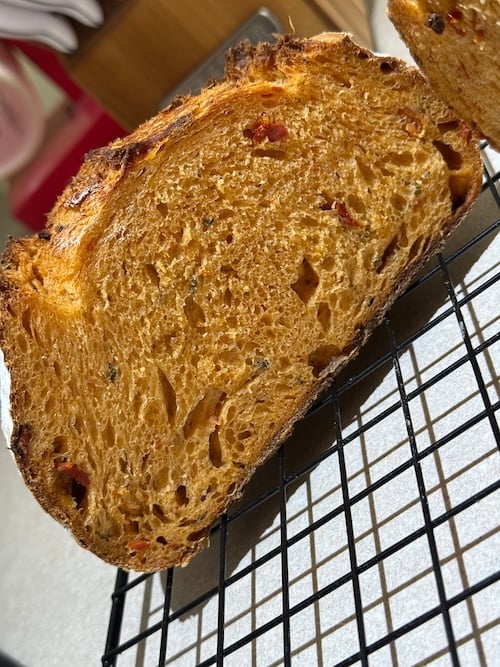
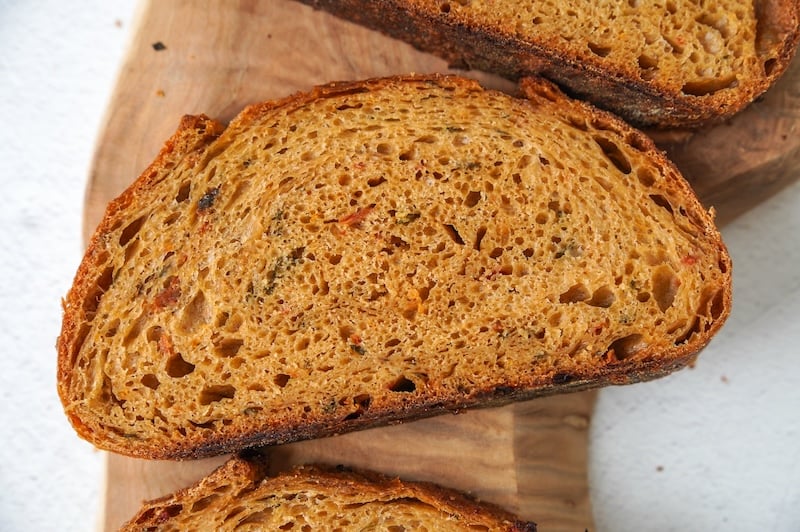
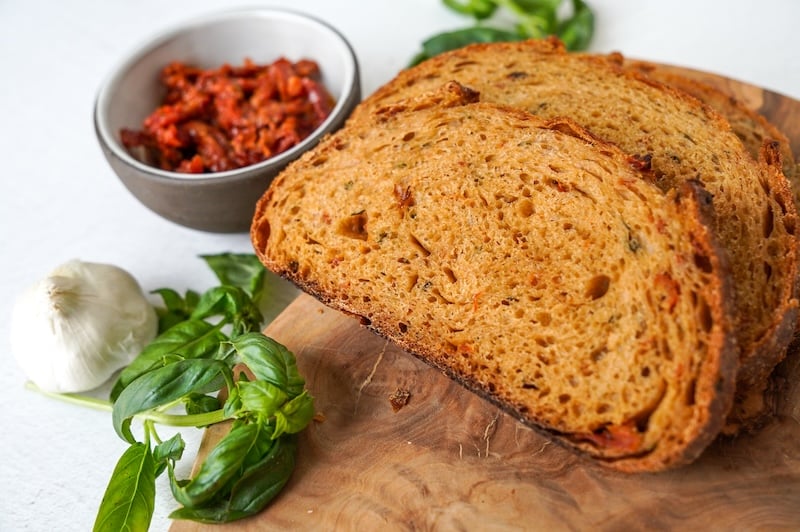
- Way better than Panera: This bread has SO much more flavor. The basil, tomato, and roasted garlic are absolutely incredible – I found those flavors were really lost in the Panera version.
- Sweet glossy glaze: The glaze bakes right into the crust, giving the loaf a little sheen and sweetness without flaking off when you slice up the loaf.
“Rebekah, the simplified process along with the thinner glaze made for perfection!” –Recipe tester from Hartford, SD
- Perfect for everything: Toast it, make sandwiches (may I suggest the Mediterranean Veggie sandwich), turn them into bread bowls and fill with tomato soup (or just dip it in some soup!), turn it into the best croutons you’ve ever had — even plain with butter, it’s delicious.
“I love this recipe and it makes amazing grilled cheese sandwiches!” –Recipe tester from Philadelphia, PA
Ingredients in Tomato Basil Sourdough Bread
- Active sourdough starter: Make sure it’s peaked and ready to go — this dough needs strong fermentation power.
- Water: I use water straight from my faucet. I live in the country and have well water; I’ve never had any issues. However, I’ve seen others recommend using filtered water, especially if they have city water with chlorine in it. You can buy filtered water from the store, or you can boil your own water and let it cool before using it.
- Bread flour: Bread flour gives this loaf its chew and structure. During recipe testing, I primarily used Central Milling ABC bread flour (11.7% protein), which is essentially the same flour as the Costco All-Purpose flour (green bag). However, any bread flour will work just fine – King Arthur, Ballerina Farms, Central Milling High Mountain, Bob’s Red Mill – all of these are great. You may need to make minor adjustments to the hydration, but I’ve included lots of photos to help you compare your dough’s consistency to mine.
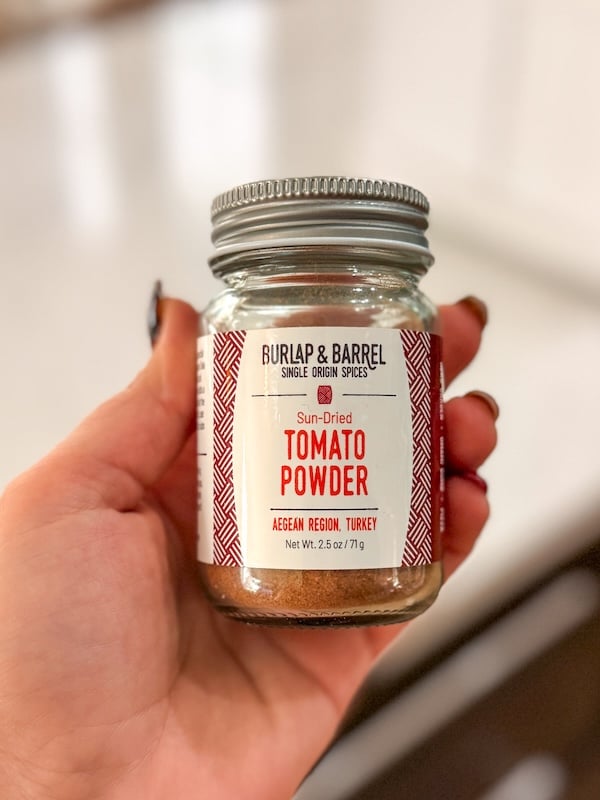
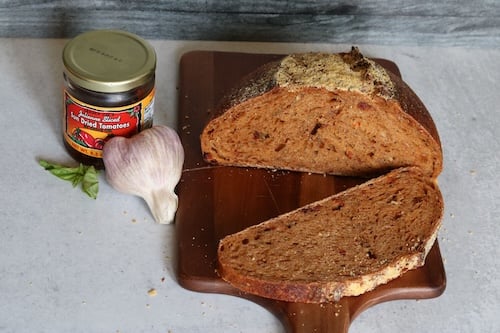
- Tomato powder: The Spice Way and Burlap & Barrel sell high-quality tomato powder on Amazon. You can also buy directly from Burlap & Barrel. You can also make tomato powder yourself. Here’s a video tutorial, but all you need is dry-packed sun-dried tomatoes, an oven, and a blender.
- Sea salt: Go for something fine-grained so it dissolves easily. I love Redmond’s Real Salt. You can get 15% off with code TSG15.
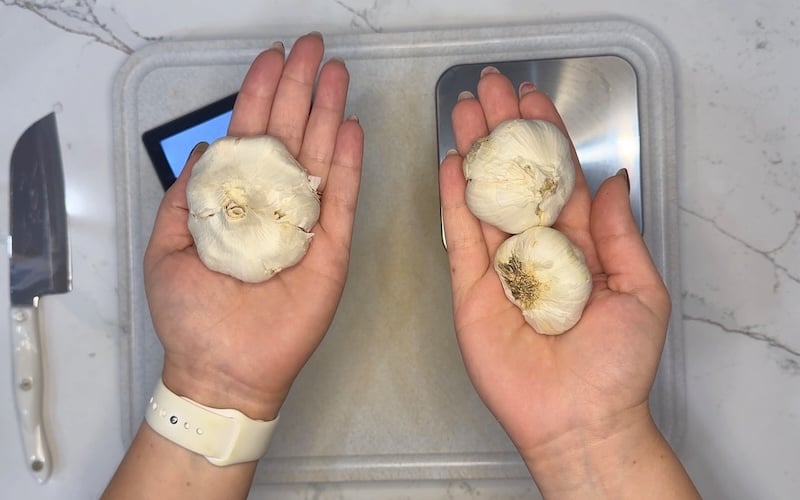
- Roasted garlic: Roasted until sweet and caramelized. Adds rich flavor and stays sourdough-friendly since roasted garlic won’t mess with fermentation.
Read more about that: Does Garlic Kill Sourdough? Testing Fresh, Roasted & Powder
- Fresh basil: Chop it fine so it blends evenly through the loaf. Add to taste. The 0.5-ounce package of basil is the perfect amount for this recipe.
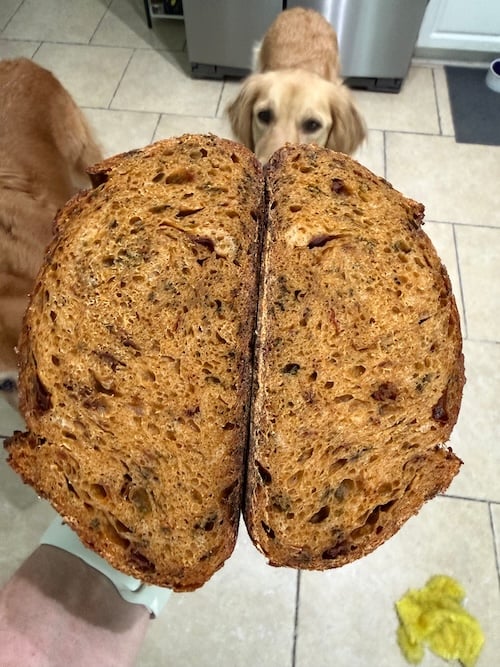
- Oil-packed sun-dried tomatoes: You’ll use both the tomatoes and the residual oil on them.
Ingredient Substitutions
- Basil: You can swap the fresh basil for freeze-dried if needed, but I’d skip regular dried basil. It’s dull in flavor, can sometimes have a minty note, and it dried out one of my test loaves.
- Oil-packed sun-dried tomatoes: Dry-packed will work in a pinch! Just add about 10g of olive oil to the dough during the initial dough mix to compensate for the lost oil. This is actually what I recommend doing if you plan to hand-mix the dough.
- Sweet glaze topping: Multiple testers preferred shredded parmesan cheese on top instead of the sweet glaze. One tester split their loaf—half with sweet glaze, half with parmesan—and found her husband strongly preferred the savory cheese option.

Equipment You’ll Need
- Aluminum foil: for roasting the garlic.
- Scale: Measuring by weight keeps everything consistent, and a good scale makes all the difference. I tested 20 scales if you want to read my review and top picks.
- Stand mixer: You can mix by hand, but a stand mixer with a dough hook makes it easier to incorporate the inclusions evenly.
Read my in-depth stand mixer review: Ooni vs Bosch vs KitchenAid vs Ankarsrum: Best Stand Mixer for Sourdough
- Mixing bowl: I love my Anchor Hocking glass bowl for bulk fermentation. This size is big enough for two loaves.
- Bowl cover: Massive fan of these bowl covers I found from Doe a Deer. Amazing quality and it doesn’t dry out my dough. I use it to cover my bowl and my banneton. Get 15% off with code THATSOURDOUGHGAL.

- Bench scraper: Makes dividing, shaping, and cleanup so much easier. The Brod & Taylor one is my personal favorite.
- Banneton: I’m partial to wood pulp bannetons as they wick away just enough moisture for a crisp crust. You can get 5% off Flourside bannetons with code TSG5 – the medium oval is my favorite, but you could also use a round if you prefer.

- Bread lame: For scoring clean, precise cuts before baking.
- Parchment paper: For lining your Dutch oven or baking surface so the dough doesn’t stick.
- Dutch oven: This is my go-to baking vessel – you can get $15 off my favorite ones from Krustic with code REBEKAH15.
- Brod & Taylor baking shell and steel: This is a great alternative to a Dutch oven if you prefer a lighter setup. I’ve been absolutely loving this setup lately.
- Basting brush: Handy for adding the glaze with a light touch. Really enjoying this one from Cuisinart for brushing on thin glazes.
- Bread knife: A good serrated knife makes slicing through that crackly crust a dream. This budget one from Mercer is my favorite of all time.
Baker’s Timeline
| DAY 1 | |
| 9:00 p.m. (or before you go to bed) | Feed your starter |
| Any time (it just needs time to cool fully before using it) | Roast your garlic |
| DAY 2 | |
| 8:00 a.m. | Initial dough mix (bulk fermentation begins) |
| 8:45 a.m. | Add inclusions |
| 9:15 a.m. | Stretch and folds |
| 9:45 a.m. | Coil folds (if you feel your dough needs it, you can do another set after another 30-min rest) |
| 9:45 a.m.–3:30 p.m. | Bulk fermentation continues (timing varies) |
| 3:30 p.m. | Pre-shape |
| 4:00 p.m. | Final shaping and refrigerate overnight for cold proof |
| DAY 3 | |
| Any time | Score, bake, brush on the glaze if desired, bake a little longer, and enjoy!! |
If your home is cold, your bulk fermentation timeline will be longer than what’s listed here (and vice versa).
- 65-68°F (18-21°C) kitchens: 44% of testers needed to extend bulk fermentation time (often by 1-2 hours). Many placed dough in the oven with the light on or used a slightly warmed oven to create a warmer environment. I’m actually surprised just 1-2 hours more got the job done at such a cool temperature, but watch your dough for signs of readiness!
- 69-72°F (20-23°C)kitchens: 69% found the timeline worked perfectly as written. Again, I’m a little surprised it didn’t take longer than my suggested timeline, but this is what they reported.
- 73-76°F (22–25°C) kitchens: 71% had no issues with the timing. A couple testers noted slightly faster fermentation.
- 77°F+ (25°C) kitchens: Watch your dough carefully! One tester in Malaysia (80°F) needed to make adjustments to avoid overproofing due to the faster fermentation.
Recipe Testing Journey
Wanna know why the recipe is the way it is? Let me take you through all the things I tested.
Over the course of my 15 test bakes, I tried four different forms of tomato:
- Fire-roasted tomatoes (from the can)
- Tomato paste (from a can)
- Fresh Roma tomatoes roasted in the oven
- Tomato powder
Here’s how it all unfolded.
Phase 1: Fire-Roasted Tomatoes
It started out so promising. I blended a can of fire-roasted tomatoes to mix into my dough, and the smell alone made my kitchen feel like a pizzeria. I also had a whole head of roasted garlic, some fresh basil and sun-dried tomatoes to add as inclusions — it had to be amazing, right?
Well, the taste was. But the hydration and dough texture was all over the place.
One loaf was gummy when I used only the tomato liquid. Another came out under-hydrated when I cut back too far and tried dried basil. I didn’t want to waste half a can of the tomatoes, so I kept trying to force the math to work with the whole can, but it didn’t.


Let’s just say this phase was humbling.
Phase 2: Tomato Paste
After multiple failed loaves with the fire-roasted tomatoes, I moved on to tomato paste, hoping its concentrated flavor would give me that deep tomato color and taste without wrecking hydration.
And at first, it looked promising. The dough was smoother, and the tomato flavor was still strong.
But the color was off (lighter than that rich red-orange I was chasing), and the oven spring wasn’t great either. I thought maybe I was overloading the dough with too many inclusions.
But the acidity was the silent saboteur. Tomato paste is very acidic, and it was literally breaking down my gluten network mid-ferment, which explained why the loaves kept coming out flat.


When I finally figured that out, I tried adding a bit of baking soda to balance the pH. It helped with structure, but something still wasn’t right.
Phase 3: Fresh Roma Tomatoes
After all of this testing using various canned tomato products, I got some feedback that I should try roasting fresh tomatoes. Canned tomato products contain citric acid, so maybe that was causing issues.
This method actually worked!

The loaf turned out much better than I expected, and it tasted great, too. The only drawback at this point is the effort required. Roasting tomatoes, blending them up, and waiting for them to cool made the recipe feel more like a project than a practical bake.
I also hadn’t yet tested out tomato powder, which a ton of followers had suggested I try from the start.
Phase 4: Tomato Powder
I resisted the tomato powder suggestion at first because I hate it when a recipe calls for something you have to buy just for that one bake.
But… y’all were right.
Tomato powder turned out to be the key to unlocking this recipe.


The first few tries with tomato powder were all about timing and texture.
I tested adding the powder and inclusions at different stages, laminating them in instead of mixing, testing different quantities…
At one point, I drove to Panera to grab a loaf just to compare. My test loaves were more fragrant, softer, and so much richer in flavor. That’s when I finally stopped trying to copy the Panera loaf and broke free to make this my own.
Eventually, I found that delaying the tomato powder and salt led to a taller, loftier loaf. (Full disclosure: I did end up cutting out this step to simplify the recipe after getting tester feedback that it was too complex. But you can add it back in if you want!)

To boost flavor and color, I swapped out the olive oil for the oil from a jar of sun-dried tomatoes. That little trick added the perfect orange hue and just enough extra depth.
The Sweet Glaze Saga
I’d been tinkering with the topping on this loaf since day one, trying to get that signature Panera crumble just right. I even pulled up their ingredient list, analyzed every line, and tested version after version, trying to nail the proportions.
But no matter what I did, mine kept falling off when sliced (flashbacks to my Apple Crisp Sourdough loaf), and I just wasn’t loving it.
I tried several things, including a pannetone-style glaze that included egg whites – I thought that’d be the winner, but recipe testers weren’t a fan.

In the final stages of testing, I tried two different glaze options. I was so relieved that the simple version with just butter, brown sugar, and a dash of cinnamon was the best.

Somewhere along the way – I think the 13th test – I added a swirl, which went great, but recipe testers were very divided on it, so I decided to omit it.

Ultimately, the winning recipe took everything that worked from testing and merged it with recipe testers’ feedback. The end result is a simplified process that still yields a loaf packed with flavor.
Meet the Recipe Testers
This tomato basil sourdough bread wasn’t just tested in my kitchen. Hundreds of bakers gave this a try and provided me with invaluable feedback.
- Version 1 brought in 250 brave testers who tried the initial recipe, giving it an average rating of 4.52 out of 5 stars.
- Version 2 refined the formula with a tomato paste swirl, and 112 bakers put it through its paces with an improved 4.62 average rating.
- Finally, 57 testers evaluated the streamlined final version you see here today, which earned the highest rating yet at 4.79 out of 5 stars.
Check out a few of their test bakes:


Across all three testing rounds, bakers from 338 unique locations made this bread, spanning 42 US states. International testers represented 5 countries, including Canada, Australia, the UK, Malaysia, and Greece.
Testers in Malaysia’s tropical heat (81°F) and New York’s chilly autumn kitchens (65°F) both achieved beautiful loaves, proving this recipe can work across a wide range of climates and conditions.
Of the 28 testers who had tried Panera’s version of this bread, 82% said this recipe is better than the original, with another 14% saying it’s equally as good. When asked if they’d recommend this recipe to a friend, 86% gave it the highest possible score.
The feedback was overwhelmingly positive about the simplified process compared to earlier versions, with 53% saying this final version is even better. Testers appreciated the reduced steps without sacrificing flavor, making this an approachable recipe—not a once-in-a-while labor of love.
A handful of testers missed the swirl and wanted it back in the recipe—since this was the minority, I chose to leave it out. BUT I’ve kept the instructions in the step-by-step section of this post so you can make it if you want.
How to Make Tomato Basil Sourdough Bread: Step-by-Step Instructions
Step 1: Feed Your Starter
To make this dough, you’ll need 120g of active sourdough starter. If you want to mix your dough first thing in the morning, feed your starter the night before: 12g starter, 60g bread flour, 60g water.
By morning, it should be bubbly, domed, and tripled in size. It should smell yeasty, maybe a little sweet, or perhaps earthy. This short video shows you what your starter should look like at peak:

What we don’t want is an acidic smell like vinegar or acetone. If your starter smells acidic when it’s at peak, that acidity will carry over into the dough, leading to texture and stickiness issues.
This video walks you through how to fix an acidic starter from 06:23-08:53.
For inclusion loaves like this with so many components, it’s really important to use a healthy starter.
I’m making such a point about this because almost all troubleshooting issues bakers come to me with are related to a weak or acidic starter. Fixing that will likely fix your sourdough woes!
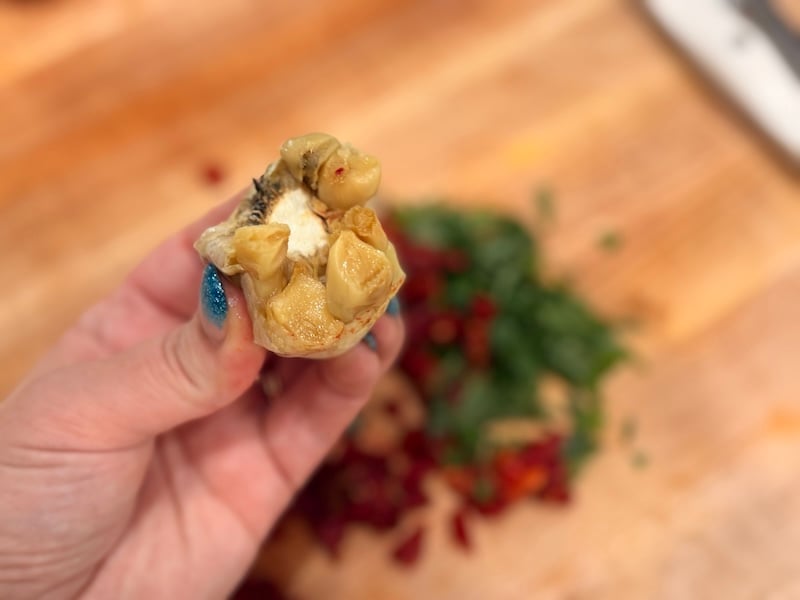
Step 2: Roast Your Garlic
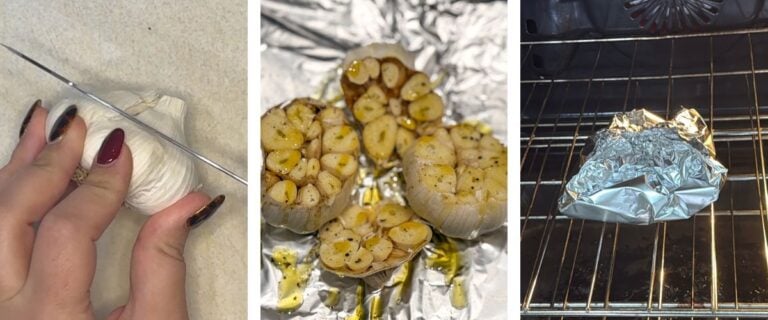
Preheat your oven to 350°F (175°C). Slice the top off 1 large head of garlic to expose the cloves. If your garlic heads are small, grab 2 smaller ones instead.
You can always roast extra — they store beautifully and taste amazing in just about everything. I usually roast a few at once and keep them on hand.
Place the garlic on a square of aluminum foil, drizzle with 2 tsp olive oil, and sprinkle with a pinch of salt and pepper. Wrap it tightly, making sure it’s completely sealed so the steam stays inside.

Roast for 1 hour on the middle rack. Your kitchen will smell incredible!
Let it cool completely before using. Here’s what it looks like (we’ll add it with the inclusions later):

Step 3: Initial Dough Mix
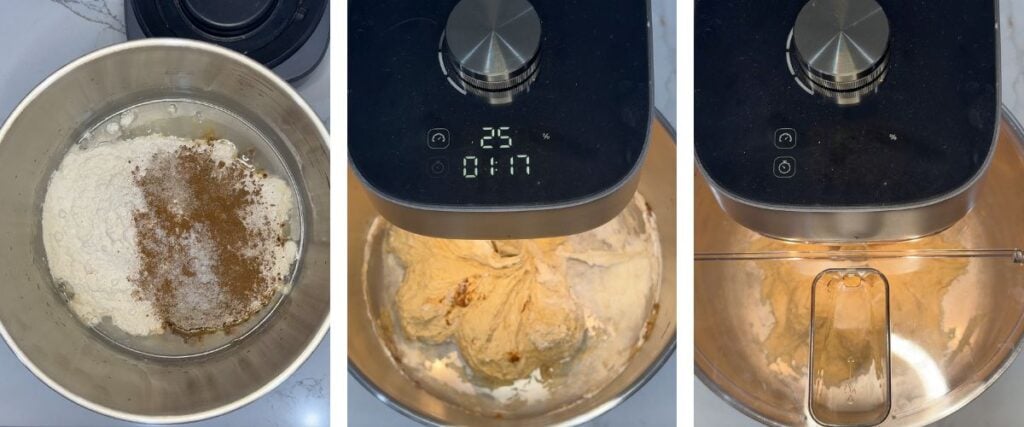
In the bowl of a stand mixer fitted with a dough hook, combine 300 g warm water, 120 g active sourdough starter, 500 g bread flour, 10 g tomato powder, and 10 g sea salt. Mix on low–medium speed until no dry bits remain.
Note: If mixing by hand, the oil from oil-packed sun-dried tomatoes can make the dough slippery and difficult to handle when folding in the inclusions later on. For easier hand mixing, use dry-packed sun-dried tomatoes and add 10-15g of olive oil during this initial dough mix instead. You’ll get the same dough consistency without the headache later on.
In my Ooni stand mixer, this is speed 25-35 for about 3 minutes.
If you’re mixing by hand, a Danish dough whisk works great.
Cover and rest for 45 minutes. I just use the cover that comes with my stand mixer for this part.
Note: In earlier recipe variations, I delayed adding the tomato powder and salt for 1 hour. This is called a fermentolyse. If you want to add this step back in, your final loaf will have a little more oven spring.
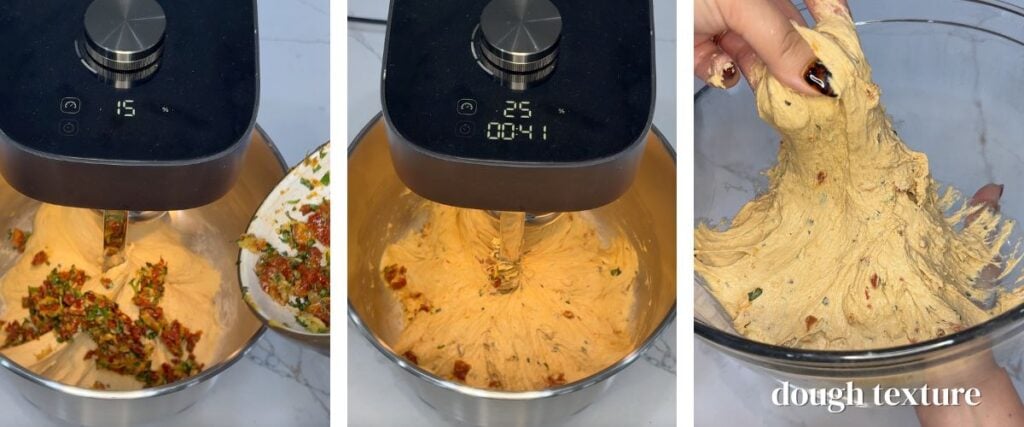
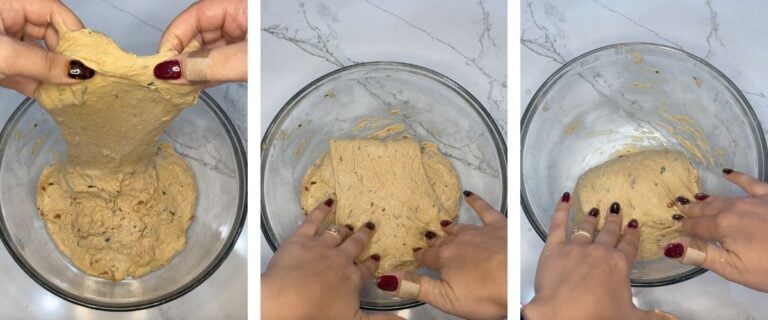
Step 4: Add the Inclusions
Chop 10g of fresh basil – this is about ⅓ cup or an entire 0.5-ounce fresh basil package. Make sure to take off the stems!

Squeeze all the roasted garlic cloves out of their skins into a bowl and mash them.
Finally, chop 75g oil-packed sun-dried tomatoes (about ⅔ cup). Don’t blot the tomatoes dry — that flavorful oil clinging to the tomatoes replaces the olive oil I’d normally add to the dough.

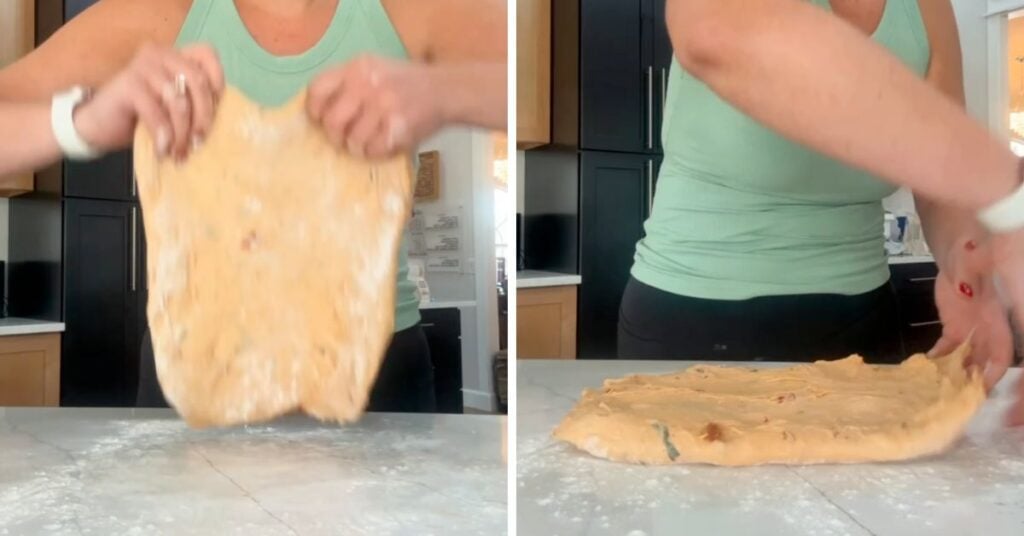
Add this mixture to your dough and mix on low speed for 3–4 minutes in your stand mixer, just until it’s evenly incorporated. The dough’s texture will be sticky and shaggy – this is normal!
I remember thinking this dough would never come together and smooth out, but it will as we do stretch and folds and coil folds later on.
If mixing by hand, fold the inclusions in with a set of stretch and folds:
- Add one-quarter of the inclusions mixture to the top of your dough.
- Grab the top of the dough, stretch it up (without tearing), and fold it over to cover the inclusions.
- Rotate the bowl a quarter turn, add another quarter of the inclusions mixture, and stretch and fold over it.
- Continue until you’ve added all four portions and the inclusions are evenly mixed throughout.
Note: If mixing by hand, the oil from oil-packed sun-dried tomatoes can make the dough slippery and difficult to handle when folding in the inclusions. For easier hand mixing, use dry-packed sun-dried tomatoes and add 10-15g of olive oil during the initial dough mix instead. You’ll get the same dough consistency without the slippery texture.
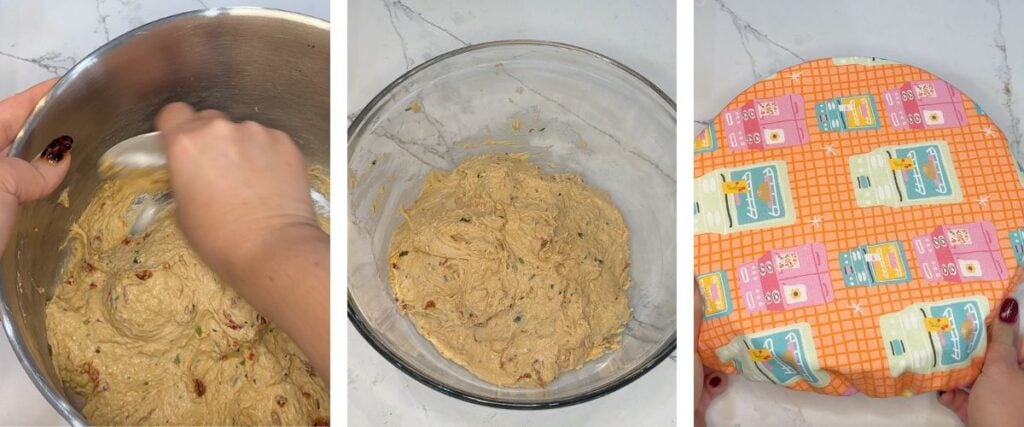
Transfer the dough to a glass bowl (if it is still in your stand mixer), cover, and rest for 30 minutes. If you want, you can lightly oil the bowl before dumping your dough inside. Again, this dough will still be shaggy and sticky at this stage – don’t panic!
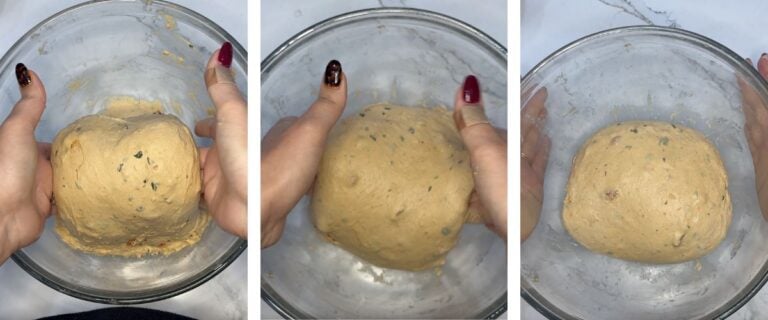
Step 5: Strengthen the Dough
Now it’s time to strengthen our dough through stretch and folds and coil folds. We’ll do two rounds spaced 30-60 minutes apart.
If you feel your dough needs more structure when we’re done, do additional rounds of coil folds! Don’t feel bound to the recipe – I often add more coil folds if my dough still feels too slack.
For our first round of dough strengthening, we’ll do stretch and folds. (If you added the inclusions by hand, I think it’s easier to do coil folds at this stage – instructions for that are right after this!)
Grab one side of the dough, stretch it upward, then fold it over itself. Rotate the bowl and repeat on all four sides. Keep going until the dough resists being stretched.

Cover and let rest for 30-60 minutes.
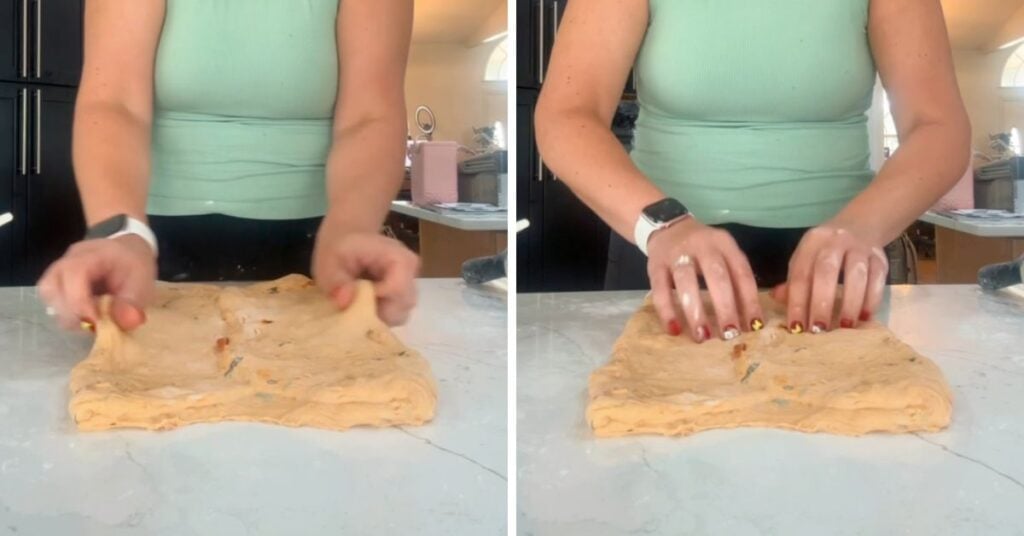
Finish with a coil fold, which is gentler and won’t disturb the bubbles forming in your dough. Scoop from underneath the center, lift until the dough folds under itself, rotate the bowl, and repeat a few times until the dough tightens up a bit.

If you feel the dough is still not quite strong enough, you can do an additional coil fold after another 30-minute rest.
Cover and let it rest for the remainder of the bulk fermentation.

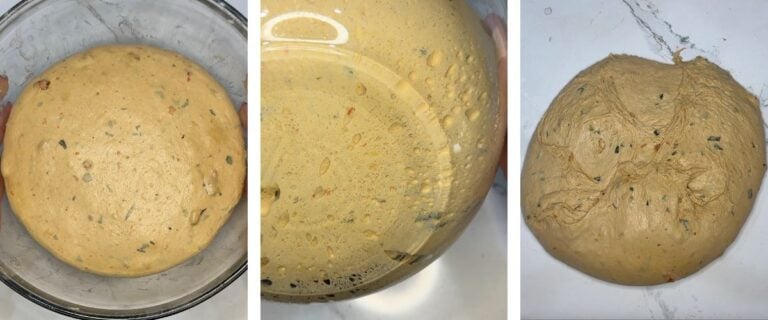
Step 6: Pre-Shape the Dough
Look for visual signs that bulk fermentation is complete and your dough is ready to shape: it should appear puffy and slightly domed, with bubbles visible along the sides and top.
When you gently tug at the edge, the dough should pull away easily from the bowl, feeling light and airy rather than dense or lifeless.
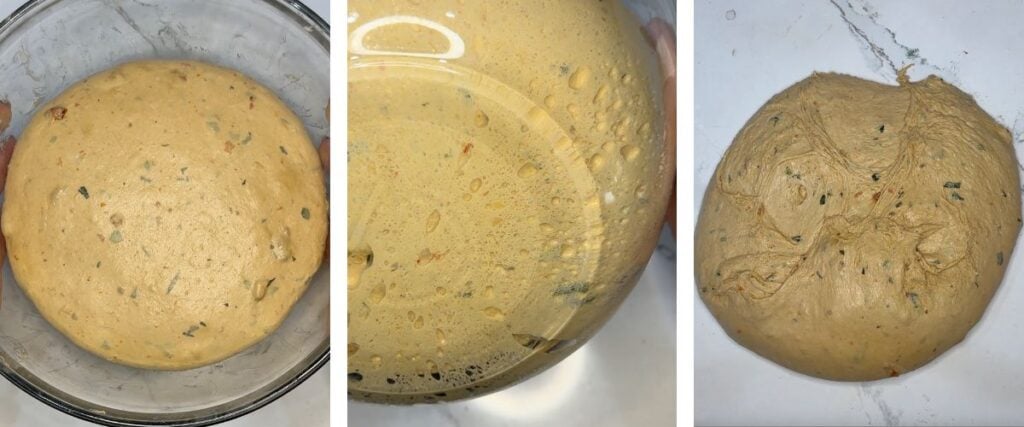
(For reference, mine took about 7½ hours at 75°F / 24°C, starting from when the dough was first mixed.)
Then, lightly mist your counter (or lightly flour it if you prefer) and gently turn the dough out.
Using your hands and a bench scraper, gently push and pull the dough to form a smooth, round ball. The goal is to build surface tension with each pull, creating a tight, even ball shape.

Let the dough rest uncovered for about 15-20 minutes, or until it relaxes slightly and has a light film on the exterior (this makes final shaping easier).
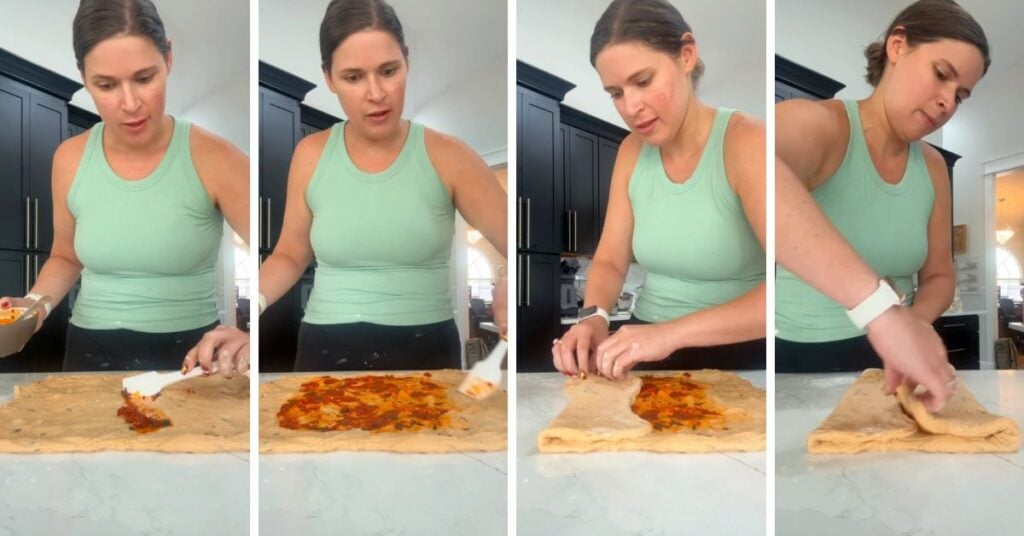
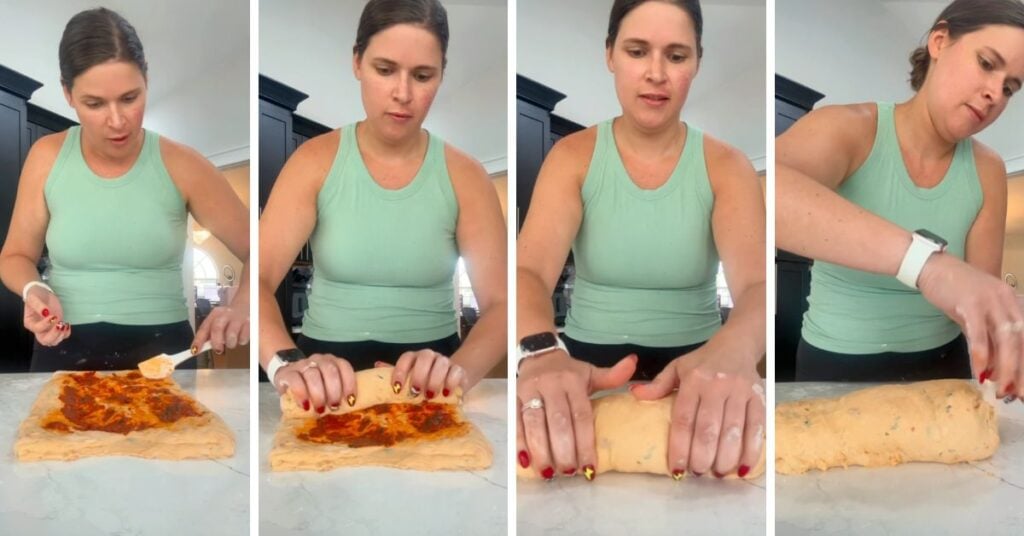
Want to add a tomato paste swirl? Here’s how.
If you add the swirl, you will skip the pre-shaping and final shaping steps in the recipe card and replace it with these instructions.
- 15g sun-dried tomato oil
- 2 garlic cloves
- 40g tomato paste
- 4g fresh basil (12 average leaves)
- Pinch of salt
Heat the oil in a saucepan over medium heat. Mince the garlic cloves and add to the hot oil. Let cook until fragrant and just starting to brown, about 30-60 seconds. Add the tomato paste, stirring in the oil mixture until the color turns a deeper rusty red, about 3-4 minutes. Remove from the heat and transfer to a bowl. Chop and fold in the basil and salt. Let cool completely.
During shaping, add the tomato swirl mixture using the technique outlined in my other swirl recipes (like the apple crisp or cinnamon sugar recipe). A photo collage of how to add the swirl is below.

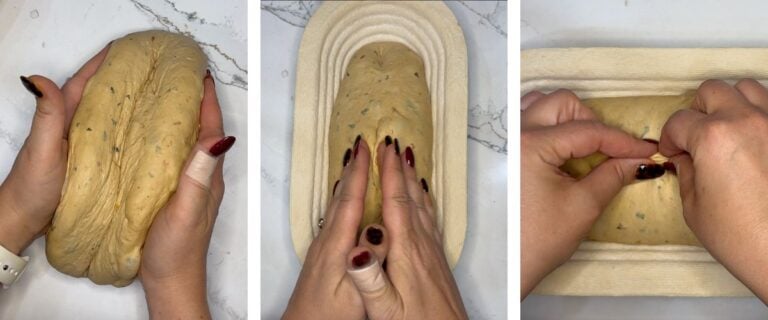
Step 7: Final Shaping
Use a bench scraper to gently flip the dough upside down. Then, use the caddy clasp technique to tighten and shape:
- For a batard (oval loaf): Fold the dough in your hands like a book
- For a boule (round loaf): Fold it twice — once like a book, then rotate the dough 90° and fold again like a book to create even tension all around.

Place the shaped dough seam-side up in a lightly floured banneton. Pinch the center seam closed to help it hold its shape.
If the dough feels loose or the seam isn’t sealing, let it relax for 15–30 minutes, then pinch it closed again before proofing.
Note: If you feel like your dough could have bulk fermented for longer, simply let your shaped dough rest on the counter for a while before putting it in the fridge.
Step 8: Cold Retard
To prevent any sticking, I like to lightly flour the dough surface with rice flour. Cover with a flour sack towel, a bowl cover, or plastic wrap, and refrigerate overnight (12–24 hours).

This cold retard improves the bread’s flavor, helps with digestibility, and makes the dough easier to score the next day.
Note: Want to skip the cold retard? Simply leave your banneton on the counter until the dough puffs up and passes the poke test. With a floured finger, make an indent in the dough. If the indent springs right back, it’s not ready. If the indent stays or springs back very slowly (but not all the way), it’s ready to bake.
Step 9: Preheat Your Oven
When you’re ready to bake, preheat your oven to 450°F convection (230°C) or 475°F conventional (245°C) with your Dutch oven inside for at least 30 minutes.
I also sometimes bake using the Brod & Taylor Baking Shell + Steel, so if you’re using something similar, preheat the steel for a full hour before baking.
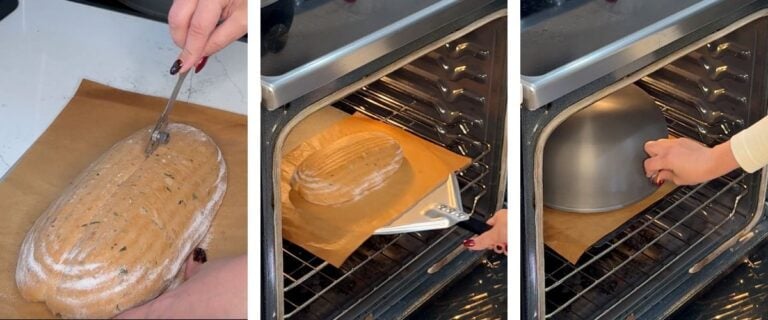
Step 10: Score & Bake
Remove your dough from the fridge and transfer it onto a piece of parchment.
Use a bread lame to score the top so the dough can expand evenly in the oven — make one clean slash down the center for a batard or a large “X” across the top for a boule.

Lift the parchment and transfer the dough into your preheated Dutch oven (or onto the hot baking steel).
Cover and bake for 30 minutes.
Step 11: Add the Sweet Glaze (Optional)
While the bread bakes, whisk together 1 tablespoon melted butter, ¼ teaspoon cinnamon, and 1 tablespoon brown sugar in a small bowl.
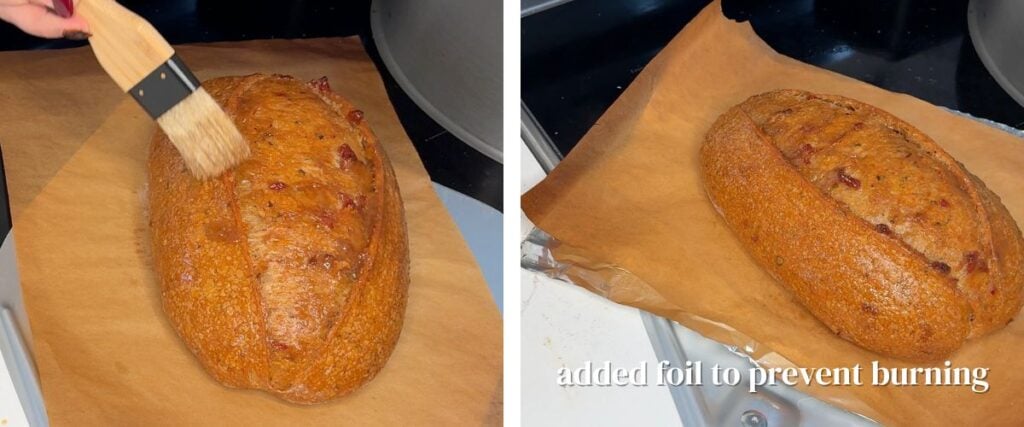
After the first 30 minutes of covered baking, remove the lid and lightly brush a thin, even layer of the glaze mixture over the loaf’s surface before continuing to bake.
Also, check the bottom of the loaf – this one has a tendency to burn. If it’s pretty dark, slip some foil underneath your parchment paper to prevent burning.
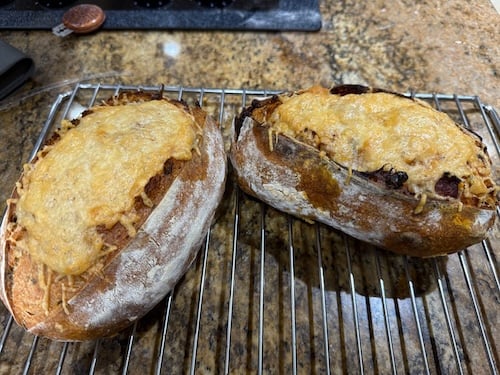
Prefer a savory twist? Skip the glaze and sprinkle the top with freshly grated Parmesan cheese or an Italian cheese blend before returning it to the oven — a few of my testers tried this variation and absolutely loved it.
Step 12: Finish the Bake & Cool
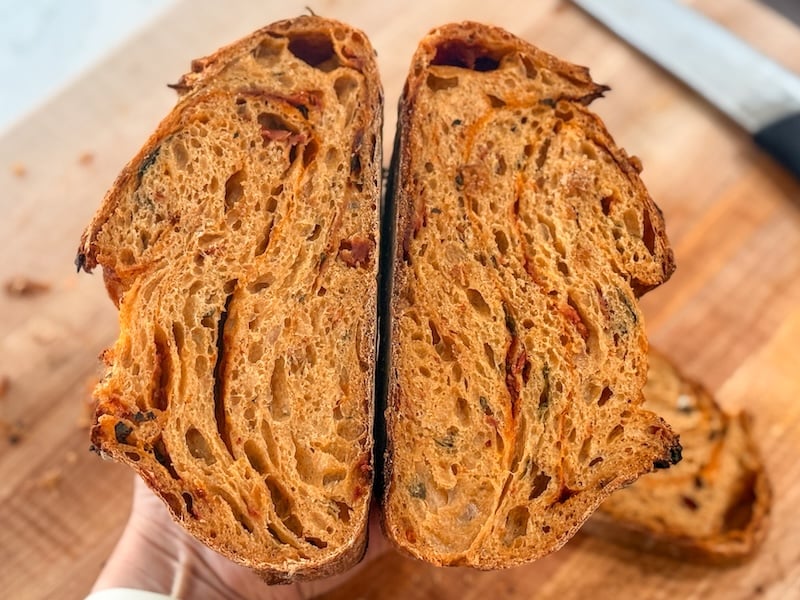
Continue baking with the lid off for about 10 minutes, or until the crust turns a deep golden brown and the internal temperature reaches 205–210°F (96–99°C).
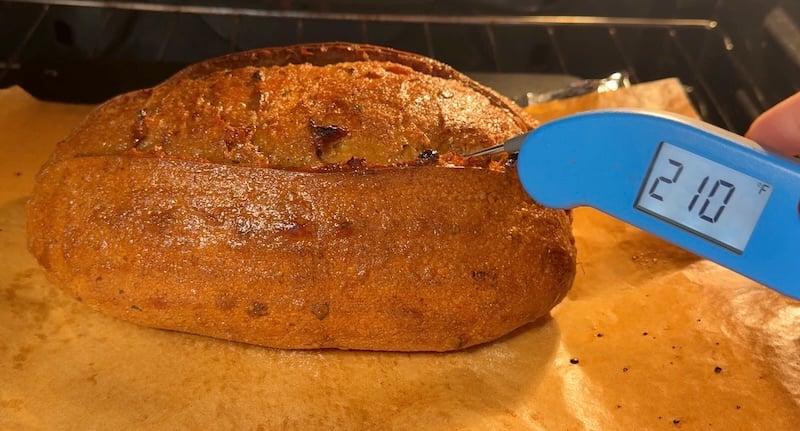
If your loaf hasn’t reached the right internal temperature, put the lid back on and keep baking until it does.
Transfer the loaf to a wire rack and let it cool for at least 90 minutes, ideally a few hours.
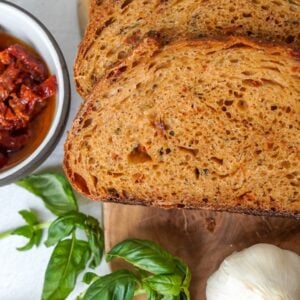
Though it’s tempting to slice right in, cutting too soon releases steam trapped inside, which can make the crumb gummy and cause the loaf to dry out faster once it’s cooled. Don’t forget to try the Mediterranean Veggie sandwich that inspired this recipe!

Storage & Reheating
Room temperature: Once completely cooled, store your loaf in a bread bag (these are my favorite for home use and for gifting) or a glass cake stand. It’ll stay fresh for about 2–3 days at room temp.
Freezer: For longer storage, slice the loaf and freeze it in freezer bags with parchment between slices. That way, you can grab just what you need.
To reheat: Toast slices straight from the freezer.
Read up on the health benefits of freezing and toasting sourdough in my post: Why Freezing Your Sourdough Bread Makes It Healthier.
FAQs
Panera says this loaf is made with sourdough starter, but I have my reservations about this claim. First, the ingredient list includes “Yeast,” which is commercial yeast. It is common for “sourdough” breads to be labeled as such, but they are not leavened exclusively by a sourdough starter.
Oftentimes, dried sourdough starter is added to these mass-produced doughs for flavor, but they’re actually quickly leavened with commercial yeast. If you have gluten sensitivities, making this loaf from scratch at home will, in my opinion, lead to a much more digestible result.
But mainly, Panera’s bread has zero flavor. This homemade version knocks it out of the park.
Yes, but add about 10-15g of olive oil to the dough (during the initial dough mix) to compensate. This is actually what I recommend if you plan to mix by hand – it’ll be a lot easier to fold in the inclusions without oil in the mix.
This dough is on the sticky side, especially before we do the dough strengthening steps. Reference my photos and compare your dough’s texture to mine. My dough is sticky and a bit slack, but it’s not soupy or puddly. If yours seems way looser than mine, add additional bread flour in 1 tbsp increments until it matches.
If your dough starts out OK but gets sticky and weird partway through fermentation, it is almost always due to an overly acidic starter. You need a healthy, strong starter to ensure your dough ferments properly. This video walks you through how to fix an acidic starter from 06:23-08:53.
A tomato basil swirl was part of the second official recipe test with the group of recipe testers. Many loved it, many hated it, and it seemed quite divisive. I ended up removing it from the recipe, but you can find the instructions and a photo tutorial in Step 6 of the step-by-step instructions earlier in this post. It has a brown background, so you can’t miss it.
No! Only use roasted garlic in this loaf. Raw garlic and garlic powder negatively affect fermentation—I do not advise using either in the dough. Read my experiment on this here.
My grocery store doesn’t carry tomato powder, so I ordered mine online. The Spice Way and Burlap & Barrel sell high-quality tomato powder on Amazon. You can also buy directly from Burlap & Barrel.
You can also make tomato powder yourself. Here’s a video tutorial, but all you need is dry-packed sun-dried tomatoes, an oven, and a blender.
“I was going to try to take a nice picture of the loaf after it cooled, but while I was out my husband and kids ate 2/3 of the loaf of bread. Just goes to show how delicious this recipe is!” –Recipe tester from Delaware
If you love sun-dried tomatoes, you might also enjoy:
- Sun-Dried Tomato and Goat Cheese Sourdough Bread Recipe
- Sun-Dried Tomatoes In Sourdough: Dry vs Oil-Packed
Tomato Basil Sourdough Bread
Equipment
- Aluminum foil for roasting the garlic
- Stand mixer with the dough hook; optional – you can mix by hand
- Bowl cover 15% off with code THATSOURDOUGHGAL
- Oval banneton 5% off with code TSG5 – the medium oval is my favorite
- Oval Dutch oven $15 off with code REBEKAH15
- Brod & Taylor baking shell and steel alternative to Dutch oven
Ingredients
Roasted Garlic
- 1 large head of garlic See Notes for quantity
- 2 tsp olive oil
- Pinch of salt and pepper
Main Dough
- 300 g warm water
- 120 g active sourdough starter
- 500 g bread flour
- 10 g tomato powder
- 10 g sea salt
- 10 g fresh basil See Notes for alternatives
- 75 g oil-packed sun-dried tomatoes
- All of the roasted garlic that you made, from above
Sweet Glaze Topping (Optional)
- 1 tbsp melted butter
- 1/4 tsp cinnamon
- 1 tbsp brown sugar
Before You Begin

Instructions
- Feed your starter: To make one loaf of this bread, you need 120g of active sourdough starter. If you want to make this dough in the morning, I suggest feeding your starter before bed: 12g starter, 60g bread flour, 60g water. This will give you a little more than you need. Note: scale the ingredients accordingly if you are doubling the recipe.
- Roast the garlic: Preheat your oven to 350°F (175°C). Slice off the top of 1 large head of garlic to expose the cloves. Place it on a square of aluminum foil, drizzle with 2 tsp olive oil, and sprinkle with a Pinch of salt and pepper. Wrap tightly in the foil, sealing completely.Note: I usually roast multiple heads of garlic at a time because I use it in all types of cooking, and it stores so well.

- Pop it directly on the middle oven rack and bake for 1 hour. Then, set aside so it can cool completely. Note: You can make it ahead and store in the fridge for up to 4 days or keep it in the freezer for months!
- If using a stand mixer: In a stand mixer bowl fitted with a dough hook, add 300 g warm water, 120 g active sourdough starter, 500 g bread flour, 10 g tomato powder, and 10 g sea salt. Mix on a moderately low speed until no dry flour bits remain (about 3 minutes). Cover with plastic wrap or a bowl cover and let rest for 45 minutes.If hand mixing: In a glass bowl, combine 300 g warm water with 120 g active sourdough starter, stirring gently to dissolve the starter. Add 500 g bread flour, 10 g tomato powder, and 10 g sea salt, and mix with a Danish dough whisk or your hands until no dry flour remains. The dough will be shaggy and sticky – that’s normal! Cover with plastic wrap or a bowl cover and let rest for 45 minutes.
- Note: The bulk fermentation has officially begun.
- Prep your inclusions: Chop up 10 g fresh basil and 75 g oil-packed sun-dried tomatoes. Don't bother patting the tomatoes dry – the oil that sticks to them is meant to be there! It replaces the oil we'd otherwise add to the dough. Squeeze All of the roasted garlic cloves out of their papery skins and mash with a fork until smooth.

- If using a stand mixer: Dump the basil, tomatoes, and garlic into your stand mixer bowl and mix on a moderately low speed until fully combined, about 3-4 minutes. The dough will still look rough, shaggy, and sticky – this is normal. Transfer dough to a lightly oiled glass bowl or dish. Cover and let rest 30 minutes.If hand mixing: Add one-quarter of the inclusions to the top of the dough. Stretch and fold one side of the dough up and over the inclusions. Repeat three more times until all four sides of the dough have been stretched and folded. Cover and let rest 30 minutes.
- Perform a set of stretch and folds: To do this, grab one side of the dough, stretch it upward, then fold it over itself. Rotate the bowl and repeat on all four sides. Keep going until the dough resists being stretched. Cover and let rest for 30 minutes.
- Final coil fold: Perform a final coil fold to build additional dough strength. To do this, lift the center of the dough, allowing the edges to drape down, then tuck them underneath as you set the dough back down. If you feel the dough is slack or not strong enough, you can do an additional coil fold after another 30-minute rest.
- Bulk ferment: Cover the dough and let it ferment until it is puffy, jiggly, and has visible bubbles on the surface and sides. When you tap the surface, it should feel light and aerated. When you tug at the edge, it should pull away easily from the bowl.The exact timing varies based on temperature—my dough took about 7.5 hours at 75°F (24°C). The timing began when we mixed our dough.
- Pre-shape the dough: Mist your work surface with water (or lightly flour it if you prefer). Gently turn the dough out of the bowl. Using a push and pull motion, shape the dough ball into a round shape. We want the surface to be taut. Let rest, uncovered, for about 20 minutes, or just until the dough relaxes a bit.
- Final shaping: Flip the dough and use the caddy clasp final shaping technique to fold it into a boule or batard. See the Notes section for video tutorials.
- Cold proof overnight: Place the shaped dough into a floured banneton, cover, and refrigerate overnight (8-24 hours). This enhances flavor, digestibility, and makes the dough easier to score before baking.
- Bake: Preheat your oven to 450°F (230°C) convection or 475°F (245°C) conventional with a Dutch oven inside for at least 30 minutes. I also enjoy Brod & Taylor's bread dome/bread steel set-up. If using that, preheat the bread steel for an hour before continuing.
- When ready to bake, transfer the cold dough onto parchment paper, score the top with a bread lame (single slash down the center for a batard or a large X score for a boule), and place it into the preheated Dutch oven (or on the preheated bread steel). Cover and bake for 30 minutes.
- Make the sweet glaze (optional): While your bread is baking, in a small bowl, whisk together 1 tbsp melted butter, 1/4 tsp cinnamon, and 1 tbsp brown sugar. After your 30-minute covered bake, take off the lid and brush a thin layer across the entire surface of the loaf. Also, check the bottom of the loaf – this one has a tendency to burn. If it's pretty dark, slip some foil underneath your parchment paper to prevent burning.Prefer savory instead? One tester added freshly grated Parmesan cheese to the top and loved it!
- Bake uncovered for another 7-12 minutes, or until the internal temperature reaches 205-210°F (96-99°C) and the loaf is golden brown.If your loaf is not up to the proper temperature at the end of baking, put the lid back on and continue baking.
- Cool: Let cool for at least 90 minutes, preferably a few hours, before cutting into it. Cutting it early releases steam that causes the loaf to become gummy and then very dry.


Video

Notes
- Night Before: Feed starter and roast your garlic (you can roast anytime)
- Morning: Mix dough, bulk fermentation begins
- Throughout the Day: Stretch and folds, bulk fermentation continues
- Afternoon: Shaping, transfer to fridge for overnight cold proof
- Next Day: Score and bake when ready
“Everyone who sampled this bread absolutely loved it.” –Recipe tester from Columbus, OH
Conclusion
Finally… after all those test bakes, many flat loaves, and over two months of tweaking, testing, and questioning my life choices — this tomato basil sourdough bread recipe is everything I hoped for.
Totally worth the journey.
If you make this recipe, please share it in the comments section below!
Other savory inclusion loaves to try:


I didn’t use a mixer because I don’t have one. I added inclusions during stretch and folds and it turned out awesome!
Looks so good!! Glad it turned out great for you, Nicole!