
I Froze Sourdough Bread Dough – And It Baked Beautifully

When I make a loaf of sourdough bread, it’s usually a 3-day process.
Day 1 evening, I feed my starter. Day 2, I make my dough and put it in the fridge overnight. Day 3, I bake it.
But sometimes, I don’t have 3 days. I need a loaf of bread stat for whatever reason.
Enter: frozen sourdough bread dough!
It would be awfully helpful if I could make the dough and freeze it. Then, it could be ready to bake at any time!
But can I freeze sourdough dough before baking? The answer appears to be yes!
Editorial Note: I have been asked for more information on freezing bread dough by hundreds of people, so I put this guide together based on the test I did. I will conduct more experiments and try sight variations, like freezing directly in the banneton. But at least for now, here’s a quick guide to what I did (which worked great!).
Freezing Sourdough Bread Dough: The Result
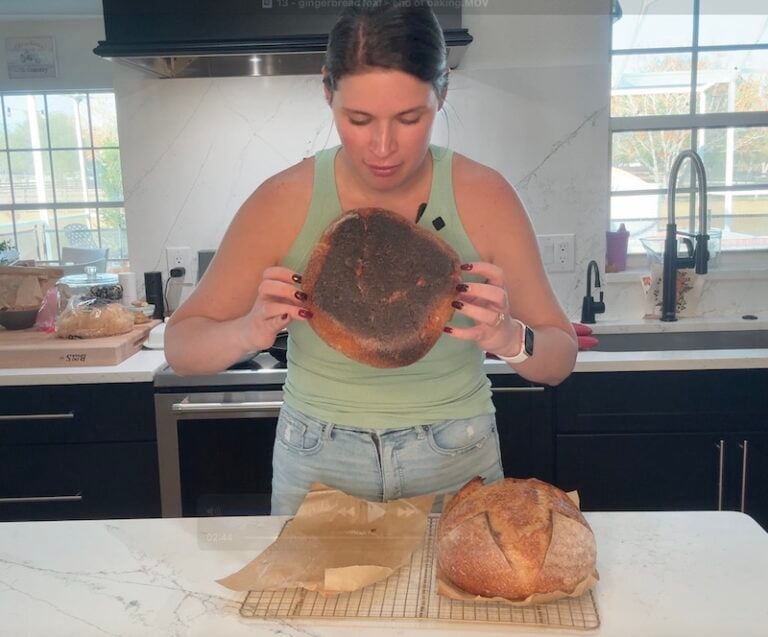
I’ll tell you how I prepared, froze, and baked my dough, but you have to see the result.
Like, WHAT?
I did not expect the loaf to turn out so beautiful, especially because I baked it straight from the freezer.
And apparently, there are some potential health benefits to freezing the dough before baking, which I’ll cover next.
A full tutorial showing what I did and thoughts on what I’d do differently next time will follow!
Note: you can watch the full journey in the “Frozen Bread” highlight on my Instagram profile. These clips take you through exactly what I did.
Here’s a short video recap of the whole frozen dough experiment:

Freezing Sourdough Bread Health Benefits
Sourdough already boasts impressive health advantages over commercial yeast breads and ultra-processed options.
But here’s something unexpected: freezing your sourdough might actually enhance these benefits further. The science supporting this is surprisingly robust and compelling.
TL;DR: Freezing bread can lower the glycemic index, helping you stay fuller longer and avoid big blood sugar spikes.
Studies have shown that freezing bread causes the starch molecules to reorganize—a process called starch retrogradation—which increases the amount of resistant starch in the bread.
Since resistant starch is harder for your body to digest, it has a lot of benefits:
- It feeds the good bacteria in your gut
- Keeps you feeling fuller longer
- Helps manage blood sugar by slowing down how glucose enters the bloodstream (which effectively lowers the bread’s glycaemic index)
Some studies have even found that thawing and toasting the bread after freezing can reduce the GI even further.
It’s worth mentioning that these studies were conducted on regular white bread, not sourdough specifically. They also tested already baked bread that was frozen and then thawed—not dough that was frozen before baking.
You can check out how I freeze my already-cooked loaves here.
So while the research looks promising, I would love to see more studies focused on sourdough and frozen dough. For now, take this information at face value—but if you’re already freezing your sourdough to keep it fresh, it’s nice to know there could be some added health benefits, too.
Step 1: Make your sourdough bread recipe through the final shaping.
I used my regular sourdough bread recipe.
Once the bulk fermentation was done, I did the pre-shaping and let the dough rest on the counter for about 30 minutes.
Then, it was time to get things ready for the freezer and move on to the final shaping.
Step 2: Shape your bread for freezer storage.
I’m not sure if my freezing method is the most optimal, but it did work.
I put parchment paper in a stainless steel 9×5 loaf pan. I dusted rice flour inside (figured it might help the dough release later on if it wasn’t stuck to the parchment).
Pro tip: If you don’t want parchment creases on your dough, crumple it up in your hands like you’re about to toss it, then smooth it out before lining the pan. One of my Instagram followers suggested doing this, and it really helped the paper mold to the shape of the pan without leaving marks, so thanks for that!
My final shaping method was a single caddy clasp (my fav), which I put in the loaf pan.

I pinched the seam shut, dusted more rice flour on top, and covered the whole thing with a shower cap-style bowl cover.

From there, I let it cold proof overnight in the fridge like usual.
In the morning, I transferred the whole setup—pan, dough, and cover—straight into the freezer.

My loaf was only in the freezer for 2 days, but if I was planning for longer, I’d probably opt for a better cover. I’m sure the top of the bread would start getting freezer burn.
Step 3: Bake from frozen.
When I was ready to bake, I preheated my oven to 450°F (230°C) with the Dutch oven inside.
I took the dough out of the freezer, and it was frozen solid. Getting it out of the bread pan was tricky. I had to let it sit on the counter just long enough to get it to slide out.


It took some coaxing, but I finally got it out by flipping the pan over and gently pulling on the extra parchment paper sticking out of the sides.
Once it was out, I peeled off the parchment and set the frozen loaf on my silicone bread sling (you can use parchment paper if you don’t have one).
Scoring it while frozen was a bit of a challenge—my little razor blade wasn’t going to cut it (literally!), so I grabbed a big serrated knife instead and that worked decently.


In hindsight, I probably should’ve scored it after the cold proof and before I stuck it in the freezer. Another option would be doing a delayed score after the loaf bakes for a little while, but I’m not sure about the timing of that.
I placed the loaf straight into the hot Dutch oven. Now, a huge word of caution here: ice cubes in a Dutch oven can potentially cause it to crack, and I’d argue that putting frozen dough in a Dutch oven is like ice cubes on steroids!
It didn’t crack my Martha Stewart Dutch oven, but it may be an issue for cheaper/less sturdy vessels. Open baking would be interesting but I think you’d need LOTS of steam.

I then baked it covered for 45 minutes, then uncovered it for 10 more minutes to brown the crust.

To make sure it was fully baked, I checked the internal temperature—210°F, so no frozen center.
Thoughts on the Baked-From-Frozen Loaf
When I cut my first frozen loaf open, I was honestly pretty impressed!

The crust was nice, the crumb looked good, and the bread had a definite sour kick.

The flavor was more acidic than usual—my husband said it was kind of vinegary, more sour than normal—but not in a bad way.
I liked it, and my husband had no complaints.
What I’d Do Differently Next Time
Here are a few things I’d do differently if I froze my dough again:
- I’d skip the overnight cold retard and put my loaf straight in the freezer after the final shaping. The loaf was quite sour to my taste, and I think this would tone it down.
- I’d score the loaf before freezing it. I had to hack at that frozen dough with a large serrated knife to score it. It felt dangerous.
- I’d like to try freezing it directly in a banneton – perhaps this is a good way to use those horrible silicone bannetons? I wouldn’t be able to score the dough (since the top would be at the bottom), but it would allow for different bread shapes versus the rectangular loaf pan.
I Also Tried Par-Baking and Freezing
In addition to the frozen dough method, I tried parbaking another loaf and freezing it after the covered portion of the bake.

The idea was that when I was ready to bake, I could just pull it out of the freezer and finish it off with 10–15 minutes in the oven to brown the crust.

Well, I can confirm that after 4 months in the freezer and finally getting it out and finishing up the bake, I’m not a fan. I need to test this out more, but the loaf had a really weird flavor and smell.


It’s almost like a freezer-burnt sensation… hard to describe. One follower suggested it could be the loaf soaking up different scents from the freezer. Although the loaf was wrapped up tightly, it seems like the most plausible explanation for the bizarre smell and taste.
At this point, I know frozen dough turns out well, so that’s the method I’d recommend until I can nail down the par-baking and freezing method.
FAQs
How long can the frozen dough stay in the freezer?
Mine stayed in the freezer for 2 days, but in theory, you should be able to freeze it for several weeks—up to 1 month is a safe bet for best results. Just make sure it’s wrapped well to prevent freezer burn.
Can you leave the dough in the loaf pan to bake?
Yes, you can! If you’re baking in the same loaf pan, just use another loaf pan inverted on top as a lid to trap steam, especially for the first part of the bake.
Does freezing affect the flavor or texture?
Freezing can slightly increase the sourness (mine had a tangier, more vinegary flavor), but the crust, crumb, and rise were still great. As long as your dough is well-fermented before freezing, it should bake up beautifully.
Conclusion
Turns out, you can freeze your dough and make it work when it works for you!
Let me know in the comments: have you tried freezing sourdough bread dough? Did it work?


I am actually baking a loaf right now that I had in the freezer for at least two months, wrapped up well. It was in a silicone banneton and was pretty easy to pop out. I am concerned it will taste weird and if it does…well here you go birds and all sorts of wildlife!
Great to know!!
I have frozen pizza dough balls, and that worked perfectly.
I normally cut my cooked bread and then freeze for up to a couple months. I have been doing this for several years. You can freeze the dough and then put in a seal a meal bag for much longer
I recently made your sourdough bread recipe, put it in a banneton lined with parchment paper, did the cold fermentation and then wrapped it in a large ziplock bag. I froze it immediately. I wanted to see how long I could freeze the bread for, so I left it in there for a week. After 1 week, I removed the bread from the freezer and let the bread thaw overnight in the refrigerator. The next morning I baked it, and did a 6 minute delay score. The loaf came out beautifully and it tasted delicious. Next time, I think I will leave it in the freezer longer to see how it affects the flavor and texture.
I’m going to try it this way!
Hi Rebeca I have not done the freezing dough, but few years ago I bough two small round sourdough frozen loaves that were partially cooked and just needed to be browned. So all you had to do was put them on a cookie sheet and run the tops of them with water then bake them till brown them. I think it was maybe 20 min. I can’t remember but had claim chowder with them little sourdough breads and they tasted great. I asked the bakery where I shopped if they could sell them to me like that and they did. The two little loafs were lightly brown, just required a few minuted in oven.
I just did this last week. I had a bread in a banneton in the fridge for 2 days that was starting to rise (too much opening and closing of the fridge now that my kids are home) and I didn’t have time to bake it, so I threw it in the freezer before it overproofed. It was in the freezer 2 days and I put it rock hard in a hot covered DO for 55 minutes. Took the temperature, and then baked uncovered for 10 minutes to brown. It came out great. I was shocked. I didn’t get the vinegar or sour taste at all.
Im glad you tried both ways. Curious if you’ve experimented with the par-baking any further. I’m starting up a little home bakery and wanting to save time and energy on bake days wondered about freezing dough or partially baked loaves. It makes sense this should work considering we have been able to buy frozen dough in grocery stores for years. I’ve never done it before either so I’m going yo experiment both ways myself. I would prefer par-baking, but which ever way works best is the way I’ll go. I have another business to run as well, so doing it this way will save so much time!!
I have not! I’m sorry!!
Yes, i have freeze my sourdough for more than 2 weeks and it turn out well when baking it. Taste as per normal sourdough bread after baking.
Have tried this freezing method accidentally when I was too busy to bake 2 sourdoughs somewhere early this year.
It a remarkable discovery!
I have frozen my sourdough in the silicon banneton and the cane one (both worked fine), then when frozen I’ve removed it and vacuum sealed it before returning to the freezer. I have baked either from frozen or let it thaw a little so I could score it and it turned out beautifully. I kept it frozen for about 6 – 8 weeks.
That’s awesome, thanks for sharing!!
Loved reading about the option of baking a frozen loaf! Thank you for sharing your experiment with us! I thoroughly enjoy all of your content! I was hacked on FB and am permanently removed due to someones lack of a better job other than to hack people. With that said I’m so happy I can still get your content in other places other than FB and instagram (as I’m banned from there too… thanks evil hacker)!
Love you and I look forward to your future content! <3
Oh no, that’s terrible. I’m so sorry that happened! I’m also on youtube too if that’s helpful!
WHEN you say it was a nice crust, can you explain? I am not a fan of the mouth-cutting crisp crusts. Maybe one of the other users feels the same?
I am qlooking for a way to freeze sourdough for longer than 2 or 3 months. I was wondering if I flash freeze it first for a couple of days then vacuseal it. Would it last a longer time in the freezer.
I usually bake in the morning and let them sit with a cloth covering until the following morning…then I wrap them in Saranwrap for a a day. The crust comes out quite nice.
Omg! I have to try this. How awesome to have a few in the freezer, and when you are having guests for dinner just pull one out and bake! Lovely fresh bread for dinner, lovely smell in the air from a fresh bake, and no stress from trying to make fresh and the timing is off! Cannot wait to try this!!
Yes, you have to give it a try! It’s such a game changer!