
I Tried the Viral Un-loaf Sourdough Bread Recipe
The viral “un-loaf” sourdough bread method contains a trio of supposed sourdough crimes:
- Use unfed starter: this refers to sourdough discard, or your starter after you’ve fed it and it has completely deflated. Typically kept in the fridge.
- Leave the dough completely untouched: beyond the initial mixing, you don’t do any slap and folds, stretch and folds, or coil folds during the bulk fermentation.
- Bake it in an “un-preheated” oven: this just means you put your loaf in a cold oven; I know un-preheated isn’t a word, but you’ll have to humor me to stick to the theme.
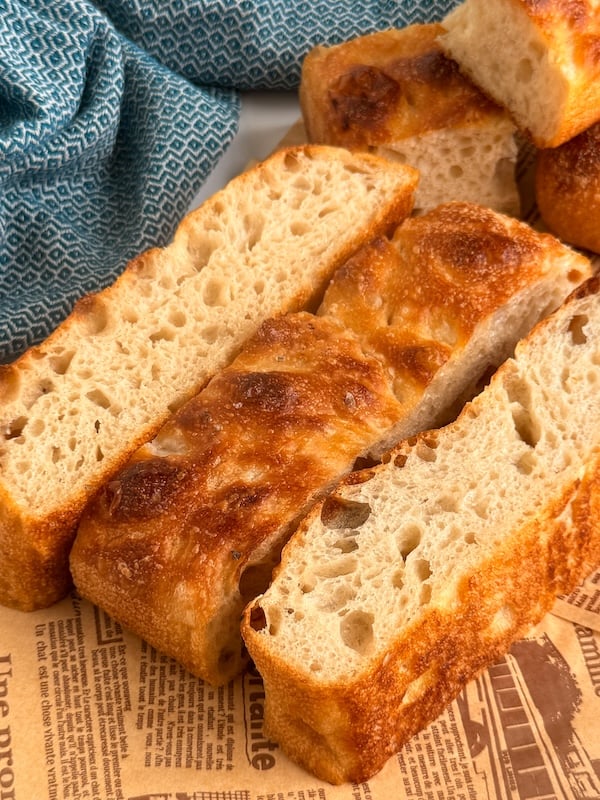
You can imagine my utter shock and surprise when this hands-off method produced an airy, delicious loaf of sourdough bread.


Was it picture-perfect? Not entirely. But was it good enough? Uhh, YES!
Let’s get into all the details: where this method came from, how to do it yourself, and a bit of the science behind how on earth this can work.
You may also like: Same Day Sourdough Bread (Quick, Easy Recipe)
TL;DR: My Opinion
TL;DR: means too long, didn’t read. This is my opinion and summary of this entire topic for those who don’t care to read the whole article.
You probably won’t catch me using the un-loaf method because my results are inconsistent, which is to be expected. After all, we’re essentially cutting out half of the steps you need to produce great sourdough bread.
Plus, I really missed some of the steps. I like handling the dough and doing stretch and folds; I find it therapeutic. Watching my dough just sit there kind of made me sad.
However, the unloaf method has merit for a particular group of people. While this method will likely never produce picture-perfect bread, there are a large swath of people who don’t care about that. They just want some decent, gut-healthy bread on the table without much effort or planning.
So, with that in mind, let’s talk about who this method is for.
If you don’t see yourself in any of these groups, click out of this article and watch my YouTube video: How to Make Fluffy Sourdough Bread: Step-by-Step Guide for Beginners
Who the Un-Loaf Sourdough Bread Method Is For
When I tried the un-loaf and started researching it more deeply, I realized this method is actually a godsend for a lot of people.
If you identify with any of these groups, you may give it a go for your next sourdough bread attempt.
You Have Physical Impairments
The un-loaf method is a fantastic one for those who physically cannot do a ton of dough manipulation.
I’ve seen people quit sourdough because they have rheumatoid arthritis, and they just physically couldn’t do it. With the un-loaf, they can!
You’re About to Quit Sourdough for Good
I cannot tell you how many comments I read on Facebook, Reddit, and YouTube of people saying they were about to throw out their starter and quit until they tried the un-loaf method.
This method is so simple.
- It doesn’t require you to have a strict sourdough starter feeding schedule,
- you don’t need to be available to tend to your dough, and
- you don’t have to know virtually any sourdough lingo.
If you feel like you’re lost in the world of sourdough and perhaps don’t belong after all, please try this recipe.
Read Also: A Love Letter to Discouraged Sourdough Bakers
You’re Extremely Busy
When I saw the un-loaf method for the first time, I immediately thought about how it could be a real solution for my sister-in-law.
She is quite possibly the busiest person I know. She runs a company in a very fast-paced industry and has three kids who all have tons of extracurriculars. She is constantly moving, yet she asked if she could have some sourdough starter.
She genuinely wants to make sourdough bread but her chaotic schedule hasn’t allowed her to get into it. The un-loaf method may be marketed to “lazy” people, but the reality is, it’s good for busy people!
If you work full-time, have kids, do extracurriculars, etc., this is a sourdough bread recipe that can fit into your schedule. It’s maybe 10-15 minutes of hands-on work – the rest is just the dough sitting on the counter.
You Just Want Decent Bread
If you’re after the open crumb you see on social media, you will not find it here.
But in reality, most home bakers could care less about that. In fact, I see a lot of people saying they try to avoid it since the big holes aren’t too compatible with butter, jam, or sandwich spreads.
In summary:
- If you don’t have a lot of time,
- you don’t really care about the science and complexity of sourdough, and
- you just want a decent loaf of sourdough bread,
- the un-loaf method could be the golden ticket.
You Say Things Like “It Wasn’t This Complicated When People Traveled In Wagons”
I’m not trying to polarize the sourdough community, but I have noticed sourdough bakers seem to be split into two different lines of thinking:
- Sourdough is not complicated. If people could do it when they used to travel in wagons, we can do it now. People are making it too difficult.
- Sourdough is deeply complex and the science behind each step is fascinating. I want to be precise in everything I do to make the best bread possible.
If you’re firmly in Camp 1, the un-loaf approach is the hands-off, uncomplicated recipe you’ve been looking for. In Gen Z slang, it’s very unserious.
Where the Un-Loaf Sourdough Bread Method Originated
In the words of Ecclesiastes 1:9: there is nothing new under the sun.
I can guarantee you the concept behind the un-loaf sourdough method has existed for centuries.
However, this specific term – “un-loaf” – became popular from a Facebook post.
Trevor-Rachel Beecher’s Un-Loaf Facebook Post
On March 26, 2024, Trevor-Rachel Beecher posted the un-loaf method in a Facebook group titled Sourdough Rebel Baking (an apt place for a method like this to be shared!).
This is the specific post that has been floating around all over the internet:

This post has been screenshotted (is that a word?) and shared in virtually every sourdough group, leading me to believe this is where many bakers first got the idea.
I talked to her about where she came up with this, and here’s what she had to say:
“So, inspiration is kind of just, life. I’m a busy mom of 5 young kids and my schedule is anything but predictable. I’ve just been using my starter when I’m ready vs. when it’s ‘ready.’
And… sometimes, I forget stretch and folds. When I was just starting out, I always tried to get at least one set in, but even that sometimes slipped. I found that my bread turned out, even with skipping so many steps.
I also have ADHD, so making a loaf of bread I could basically sleep through (mix before bed, bake in the morning) works sooo well for me. I’ve also felt like sourdough + the internet made it FAR too complicated and intimidating, so when I started, I intentionally did it differently each time to find what worked best for me. Turns out, it’s pretty forgiving!!
Now, I’m 100% an advocate for knowing the details and familiarizing yourself as to why things work and how to troubleshoot, so I do think it’s important to learn and not only do it this way. If I were baking for a living or selling it, I’d definitely do something with more consistency, but for home bakers baking for their families with busy lives, isn’t it so great to have such a simple loaf?“
Benn Starr’s Lazy Sourdough Method
The concept of using unfed starter and doing minimal hands-on work was really popularized by Ben Starr, with his lazy sourdough method.
I believe this video, posted on April 6, 2020, is his first on the topic; at the time of this writing, it has 1.3 million views.
The main difference between his method in this video and Beecher’s is the third and final “un”: putting the dough in a cold oven before turning it on. Starr’s original lazy sourdough method called for preheating the oven to 500°F. But aside from that, the method was pretty much the same.
Starr has since posted several more videos about his lazy sourdough method, with this one being the most recent as of the time of this writing. In the new version, he does do a cold start.
Aside from an absurd amount of salt in the recipe (not sure what that’s about) and not using a banneton for the second rise, it seems pretty much identical to the Beecher method.
Sidenote: Starr has my heart for this quote: “You can’t smear olive oil or butter or jam on a hole, right? What does a hole taste like? Nothing! I’d rather have a nice even crumb that I can toast beautifully and smear all sorts of deliciousness on top of.”
The Science Behind the Un-Loaf Method
I needed to dive a little deeper to understand how this un-loaf method gave me a decent loaf of bread.
Untouched Dough
First, we have the issue of doing zero dough handling. I assumed this would prevent the dough from having good gluten development.
Karyn Lynn Newman, PhD, explains in her book, Sourdough by Science, that with enough time and water, the proteins in your dough will arrange themselves into organized gluten (p. 26).
She continues, “In other words, they want to be organized, and given the opportunity, they will.”

The reason we do things like stretch and folds and coil folds is to help the gluten organize much faster without requiring as much water in the dough. (Stretch and folds also have other benefits, like equalizing the dough temperature and giving you a chance to check in on its progress.)
Newman compares this to putting a spoonful of salt in a glass of water. Eventually, the salt will dissolve. But if you mix it around, it’ll happen a lot faster.
Newman says it’s perfectly reasonable to get a great loaf of bread with no dough manipulation at all, but the caveat is you’ll need a lot of water in the dough.
Using Unfed Starter
Second, we have the issue of using unfed starter to raise a loaf of bread.
Chad Robertson says in his book, Tartine Bread, that you can use overly ripe and vinegary leaven, but the acid will overpower the other flavors we’re really after (p. 73).
His stance is that, yes, you can still make bread, but the quality won’t be quite as good as bread made with ripe, sweet-smelling starter.
I wanted a little more information than that, so I did a deep dive.
However, none of the sourdough books I own, aside from those two paragraphs in Tartine Bread, talk about using unfed starter to make bread. And to my shock, there’s not much scientific information on credible websites, either.
The one place where I actually found useful information? Reddit.
Now, before you gawk at me for using Reddit as a source, hear what these bakers had to say on the topic:
- Microbial Activity: When you use discard, the yeast and bacteria inside may not be as active as a freshly fed starter. This can result in slower fermentation, as the microbes need time to “wake up” and start consuming nutrients again. This lag phase could affect the texture and rise of the dough.
- Enzyme and Acid Build-up: Over time, in neglected or unfed starter, enzymes and acids accumulate. These can start breaking down the flour too much, potentially resulting in dough with a poor structure or a more sour taste.
- Yeast and LAB Balance: There’s a delicate balance between yeast and lactic acid bacteria (LAB) in sourdough starter. Cold temperatures (e.g., refrigerating discard) affect LAB more than yeast, leading to an imbalance. If discard is used without being re-fed, it might result in less flavor complexity in the bread because the LAB didn’t have a chance to contribute fully.
- Alcohol Byproducts: Discard tends to accumulate metabolic waste, like alcohol and ethanol from the yeast (hooch), which may give the bread… well, gross flavors. Refreshing the starter with a good feeding reduces this issue and provides nutrients for optimal microbial activity.
This all stacks up perfectly with the information I’ve gathered about sourdough starter. Plus 1 for Reddit.
Long story short: you can use discard to make bread, but it may not be quite as fast, predictable, or tasty as using a ripe, active starter.
Cold Oven
Lastly, we have the idea of a cold start.
I’ve researched this one to death, and all I can say is that it started in 2018 with Elaine Boddy (an established sourdough author) and a clay pot. She knew that to use the pot without the risk of it cracking, she needed to either:
- Soak it
- Start in a cold oven
She opted for the latter, and the rest is history.
My Un-Loaf Experiment Results
The first time I tried the un-loaf method, I followed the recipe posted by Trevor-Rachel Beecher.
I adjusted the bulk fermentation time and the bench rest time, but other than that, it was basically the same.
Note: you can follow my un-loaf attempts in video format by visiting my Instagram page and viewing my “UNLOAF” highlight.
However, after learning more about the science behind why this method works, I made a few tweaks to optimize it. Namely, I really increased the hydration to assist with the gluten development (per Newman’s scientific explanation).
Beecher’s recipe is a mere 66% hydration. While it did work, I wondered about increasing it to around 80%. Could it be even better?
The answer to that is no.
I’ve tested a higher-hydration un-loaf method a few times now, and each time, the dough is really difficult to handle and it overproofs in the blink of an eye.

Here is another attempt at a higher hydration un-loaf (80% hydration):

The two best results I’ve gotten are my first attempt using the original, viral Beecher recipe (7-hour bulk ferment on my counter) and my 5% starter, low-hydration version that accommodated a 14-hour, overnight fermentation on my counter.

I think the 5% starter version turned out a bit better, especially for accommodating an overnight fermentation.
That said, you may have to experiment with how much starter you add, based on how your bread turns out.
The Best Un-Loaf Sourdough Bread Recipe
Based on all of my experiments, here is what I believe to be the best un-loaf sourdough bread recipe. There are a lot of variables here, especially the quality of your sourdough discard, so I can’t make any promises.
I would really love feedback, either in the comments here or via DM on social media, letting me know how this recipe worked out for you. But I do believe this combination of ingredients will give you the best possible result.

Un-loaf Sourdough Bread Recipe
Difficulty: Easy1
loaf10
minutes1
hour15
minutes16
minutes16
hours10
minutesIngredients
500g bread flour
335g cold water
25g unfed starter (discard)
10g sea salt
Directions
- Mix: In the evening, mix all of the ingredients together well, ensuring no lumps of flour remain. It will be a shaggy dough. Cover (I like using a shower cap-style bowl cover).
- Bulk fermentation: Let the dough bulk ferment overnight. The amount of time this takes will vary, with the highest impact being the temperature of your dough and the quality of your unfed starter. Your dough will rise faster if your discard is a day or two old. It will take much longer if it is a month old. It will also rise faster if you use warm water, and slower if you use cold water.
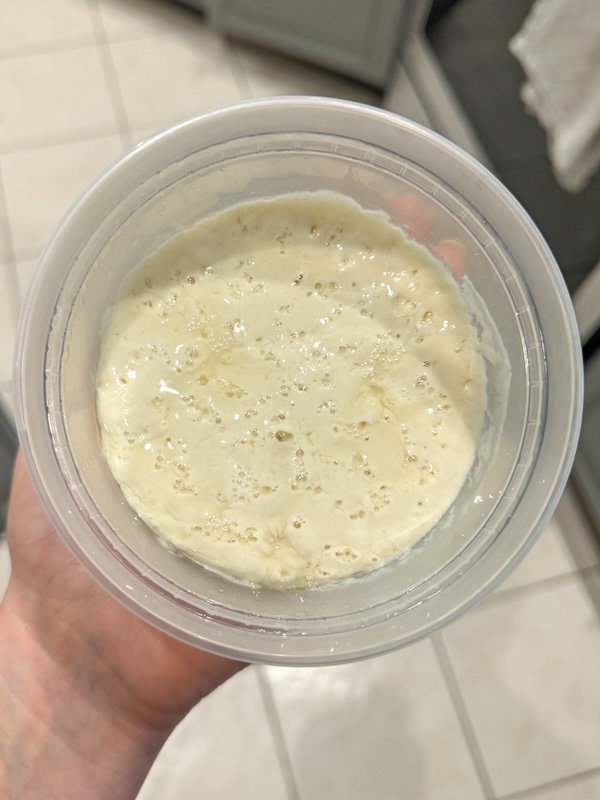
*My home is 75°F, and I let the dough ferment for 14 hours to achieve the result you see in the recipe photo.
Dough in the morning before shaping (woah, I know!):
- Shaping and Second Rise: In the morning, dump the dough onto your work surface. Using a bench scraper, coax your dough into a round shape. Use the single caddy clasp to shape it into a batard. If you prefer a boule, do a double caddy clasp and use your bench scraper to coax the dough into a round, even shape. Flip the dough into a floured banneton and cover. Let rest for 2 hours at 75°F. If your home is warmer or cooler, adjust the rise time accordingly. It should have noticeably puffed up and jiggle quite a bit when you tap the banneton. The dough may as much as double in size in the banneton. See Notes for doing a longer fermentation.
Dough shaped and put in bannetons:

- Score and Bake: Turn the loaf out onto parchment paper or a bread sling. Score and place in a Dutch oven or bread dome. Place in a cold oven. Turn the oven on to 450°F and set the timer for 1 hour. After 1 hour, take off the lid and bake another 5-10 minutes, or until the crust is golden brown. The internal dough temperature should be around 205°F. Cool and enjoy the easiest loaf you’ve ever made!


Notes
- If you prefer to do a longer fermentation, let the dough rest (covered) for 30-60 minutes after you shape it. Then, put in the fridge overnight, up to 4 days. When you’re ready to bake, bring the cold dough out of the fridge and move on to Step 4 (no need to let it come to room temp).
- You will get the best results if you use “fresher” discard, up to one week old. If you’re using discard from the back of your fridge with a thick layer of hooch on top, I wouldn’t expect your bread to rise predictably or to have good flavor.
- I find it difficult to gauge when the bulk fermentation is done using this method. Without doing any dough handling, the dough remains shaggy and I don’t see the typical signs of bulk fermentation being complete. Use my timing (14 hours at 75°F) as a baseline, and adjust accordingly. It may take a few tries to dial it in for your home. Also, note that you can let your dough continue rising in the banneton before you bake it until you feel the bulk fermentation has completed.
- If you have the time, throw in a stretch and fold or two before you go to bed. It will help quite a bit with dough strengthening and will give you a better final result.
Conclusion
The un-loaf sourdough bread method is a reminder that baking doesn’t have to be complicated to be rewarding.
It strips away the rigid steps we often associate with sourdough and proves that a decent, homemade loaf is still within reach – even for the busiest or most inexperienced bakers.
While it might not produce an Instagram-perfect crumb, it’s a practical solution for those who value simplicity over perfection.
Have you tried the un-loaf method? Share your thoughts in the comment section below.


Thank you SO much for this recipe! I halved it and kept the baking time and temp the same. This was such a great and rewarding recipe for me and made the perfect amount of bread for 1-4 people. Your tips and insight were extremely valuable!
I rarely comment on posts but as you are so kind to share your info expertise for free and I appreciate how real you are in all your posts, so I’m busting out my comfort zone to comment. My loaf turned out lovely. It was so pretty when i took the lid off, too bad i got distracted with time after that and my golden ended up a bit charred 🤦🏼♀️ It does taste delicious. Built up my confidence to give the cinnamon swirl loaf a go. Thanks again
Thank you so much for sharing!! My goodness, it turned out so good!!
This loaf turned out wonderfully! I had previously used the other unloaf recipe which called for a larger amount of starter. I liked this also but it was always a bit gummy and more sour tasting. This loaf has a perfect softness with the right amount of tang. Love it. Thank you!
You’re welcome! So glad you loved it!
I have tried the unloaf method multiple times and it always turns out great. I was excited to make your recipe bc the loaf was going to be a little smaller. However, my loaf turned out flatter. I was hoping for a thick loaf like you showed. I will try it again another time to see if it was an error on my part. Of course as always, the bread still tasted amazing.
I agree Ben Starr posted about “Simple Sourdough for Lazy People” earliest (2020) – and I bake consistent loaves of sourdough using 100% hydration cold unfed starter, using his cold oven start method (saves energy & money!) in loaf pans (one inverted over the other).
I’m like you though, I do like handling the dough (I use gloves though- not because of my nails but my rings- it’s a texture thing lol), and so sometimes I do some stretch and folds, sometimes not…. But if making a boule then I always incorporate S&F and CF since that helps create some holes (my boule customers like the holes! lol ~ my loaf customers do not🤣)
Happy following you and excited to try your cinnamon roll recipe! Thank you for all you share ♥️
From an old bread machine, to no-knead, to commercial yeast, to Wild Yeast Water {from fruits}, to Fresh Milled flour, to sourdough I’ve tried many methods and most produce good bread some not too consistently.
Since I read in a Brod & Taylor No-Knead recipe about 7% rye, my results have greatly improved.
Just did an Unloaf using Stiff/Sweet starter, using 7% Fresh milled rye in the main dough with a cold start and got the best SD bread FOR US. The butter and jam don’t leak out at it is so easy. Careful though with the Fresh Milled Rye, as it seems to put fermentation on steroids. Note, minimal sour notes are our preference so this may not be for everyone.
Thanks for sharing! Sounds delish!
Curious as to why you use such a small amount of starter
It’s all explained in the post! Lots of details under the My Un-Loaf Experiment Results section.
Hey would you mind letting me know which web host you’re using?
I’ve loaded your blog in 3 different browsers and I must say this blog loads a lot
quicker then most. Can you suggest a good hosting provider at a reasonable price?
Cheers, I appreciate it!
BigScoots all day long. This is my referral link – I think it gives you a discount. https://portal.bigscoots.com/?affid=2735 Whatever you do, skip the cheap hosts. As soon as I switched to BigScoots like… 4 years ago, I think? No issues. And if something comes up, they respond within 1 minute. Seriously.
I love the unloaf method and I initially started with Ben Starr’s method. I then ran the gamut of all types of methods until I landed on one that kind of combines a few (I like stretching and folding too). I too did some deep dives and most recently hacked the salt science. The reason he uses extra salt is explained in his newest video where he goes deep into the science. His method relies on lazy bakers who are using older starter (which will take longer to rise) as well as the added salt to allow more wiggle room time-wise to prevent overproofing.
Here is a summary of how he explains it “Wheat flours contain the two proteins glutenin and gliadin. These come together to form gluten. Salt neutralizes the negative charges on these proteins, allowing stronger bonds to form. Kneading dough helps to physically form these bonds. By increasing the amount of salt, you negate the need to physically knead the dough. IN ADDITION to the effect on gluten, salt also decreases the fermentation of yeast and bacteria. This can be desirable in order to prolong fermentation time and allow the formation of acid and the sourdough tang.”
He is very careful to emphasize that the forgiving nature of this method decreases if you use strong, more robust and regularly fed starter and if you decrease the salt.
Love that, thanks for sharing!
I want to try this method but we like sourdough rye bread. Do you have a recipe for that? I have a starter that I keep in the fridge and feed it once a week until I’m ready to bake. Then I get it out and feed it for 2 days before using. Would my starter work in this recipe?
I do not and I would not recommend this recipe if you want awesome bread! I’d reference this recipe instead and swap the whole wheat for rye: https://thatsourdoughgal.com/20-percent-whole-wheat-artisan-sourdough-bread-recipe/
Im going to try this. My house is around 68 degrees. I have a proofing box. Would you advise to set the box to 75 degrees and leave dough in overnight the 14 hours?
No I’d keep it right on your counter.
I tried this method of making sourdough bread just for fun. With that being said, I found it to be a more difficult way of making sourdough. My discard was 1-2 days old, yet, my dough took about 2 days to rise. The rise wasn’t as tall once it baked, but the color was the same throughout the dough. I’ll be back to making regular sourdough, I like the predictability of knowing when to shape and bake.
I totally agree
I just made this “un loaf” and got the best results ever! Wow.
Thank you for this recipe.
I was pleasantly surprised. Actually turned out quite tasty and it is perfect for those times when I want bread but really didn’t have time or forethought to plan ahead.
Glad you enjoyed it!!