
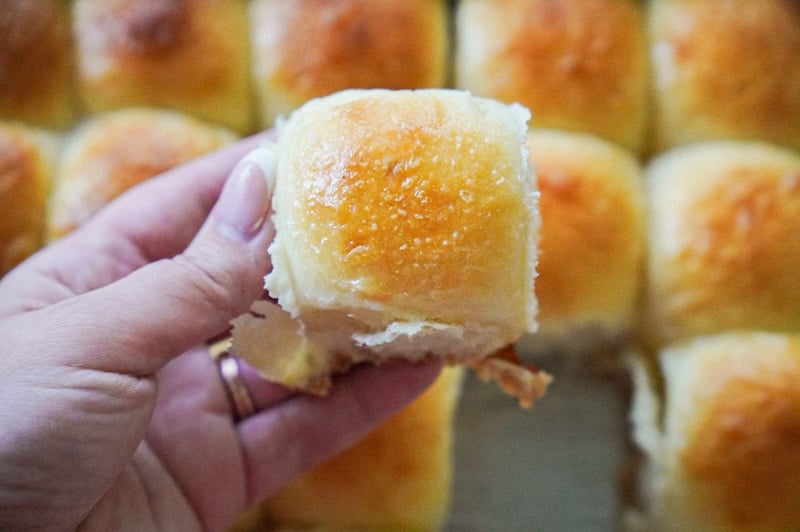
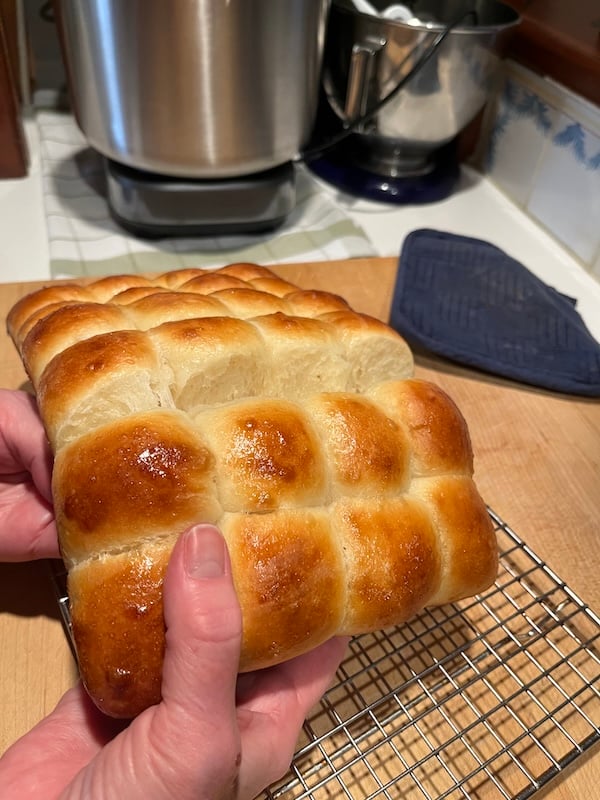
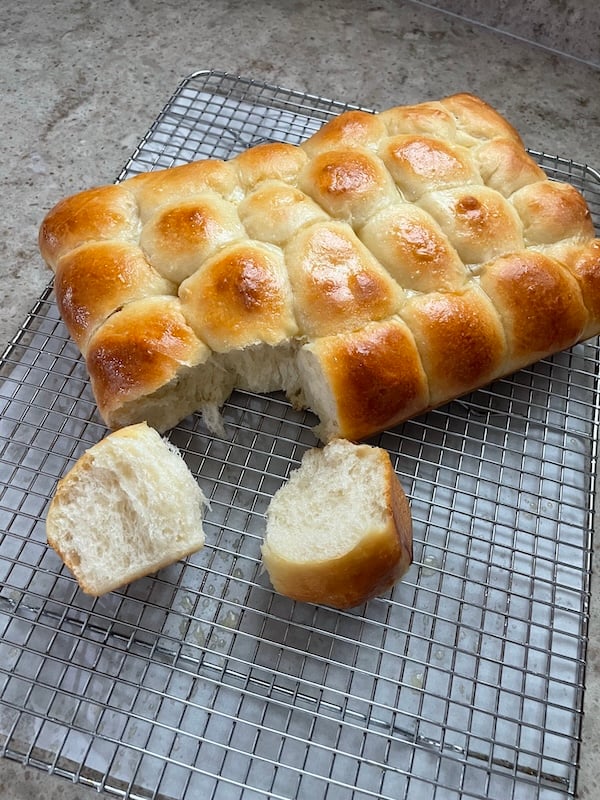
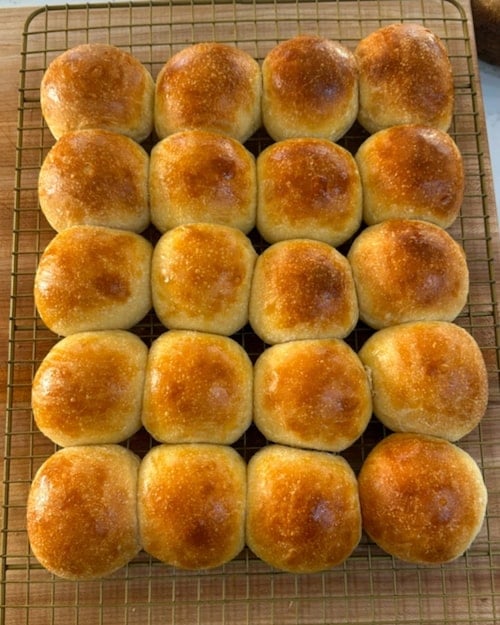
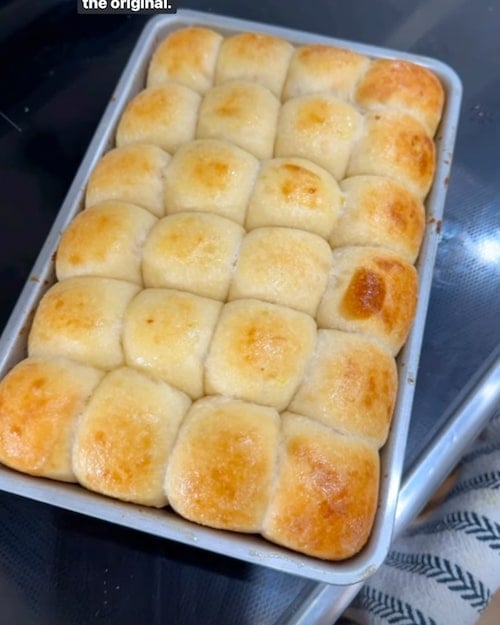
Sourdough Hawaiian Rolls (King’s Hawaiian Copycat)
Sourdough Hawaiian Rolls (King’s Hawaiian Copycat)
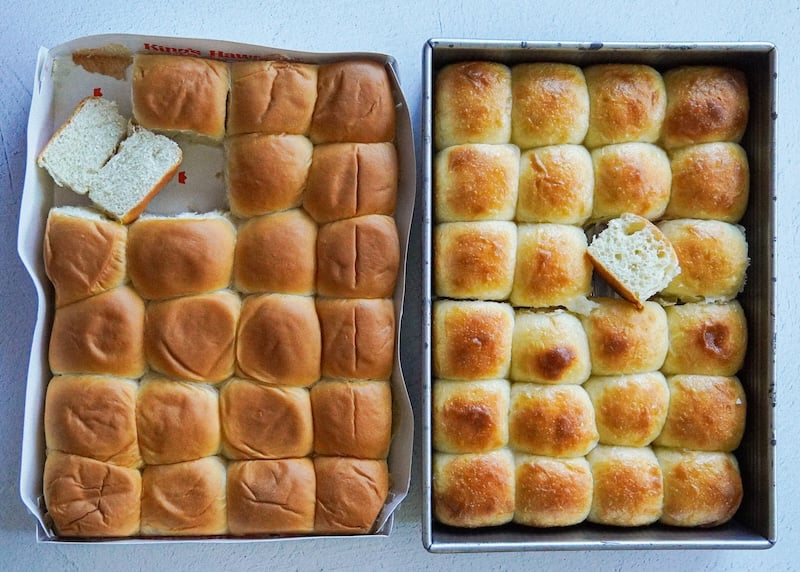
I’m a big fan of the King’s Hawaiian rolls, but not a fan of paying $8 for rolls that contain over 30 ingredients, many of which I can’t pronounce.
I’ve tried sourdough Hawaiian roll recipes in the past, but they were too dense and sour to mimic the storebought version.
With A TON (insert a million exclamation points here) of recipe testing, I finally nailed down these delicious Hawaiian rolls that rival the ones from the grocery store!
“This one is a winner! Taste just like store bought! Great job!” –Recipe tester from Santo, TX
Why You’ll Love These Sourdough Hawaiian Rolls
- Sweet but adaptable: These rolls are sweet, but not quite as much as King’s Hawaiian. If you prefer more sweetness, you can add 25g additional sugar in the dough (and vice versa).
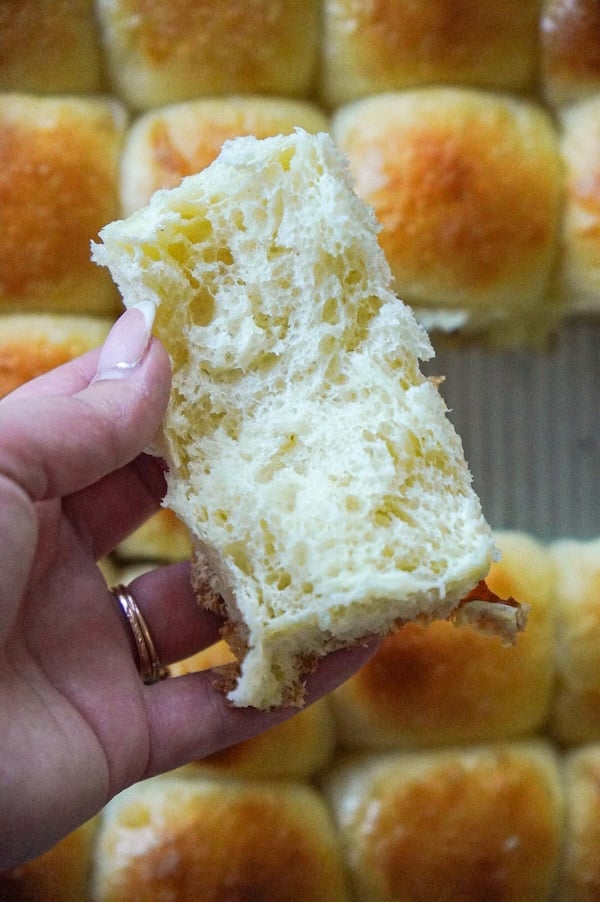
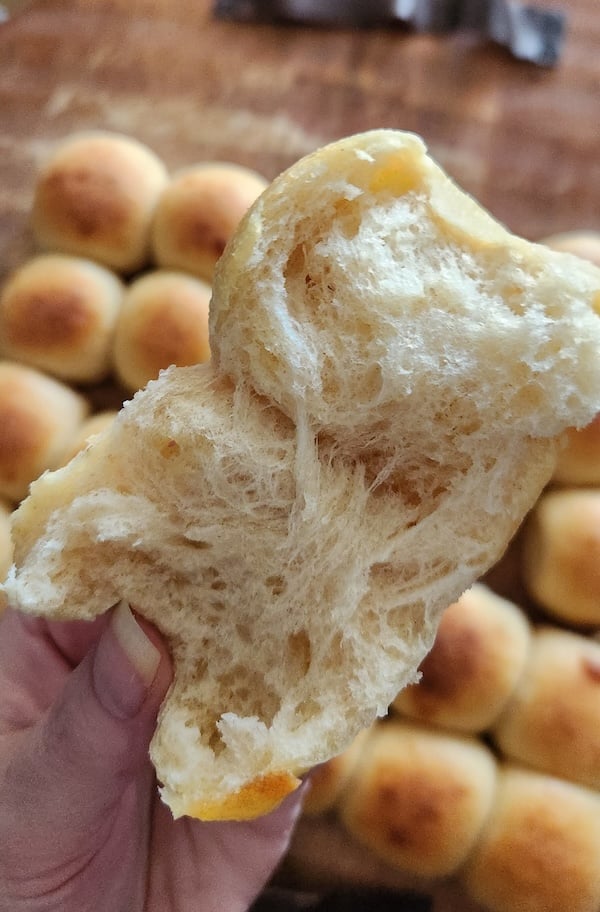
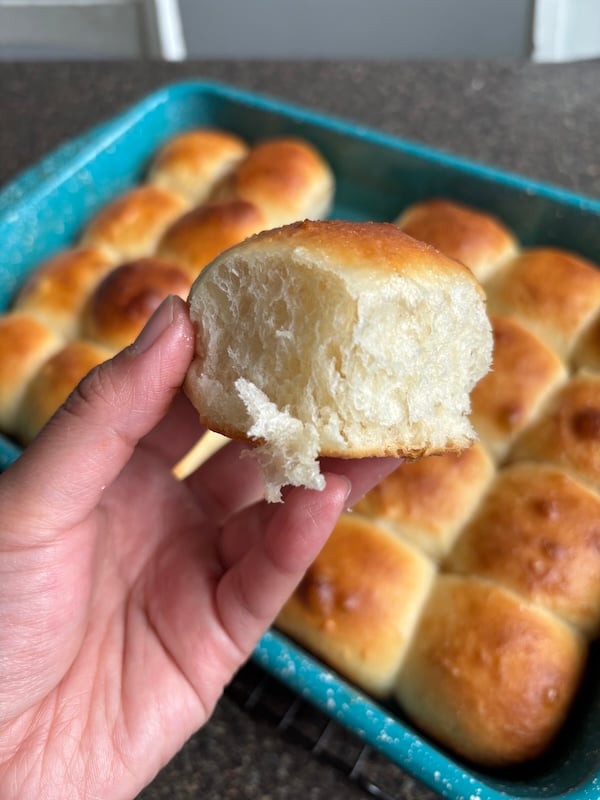
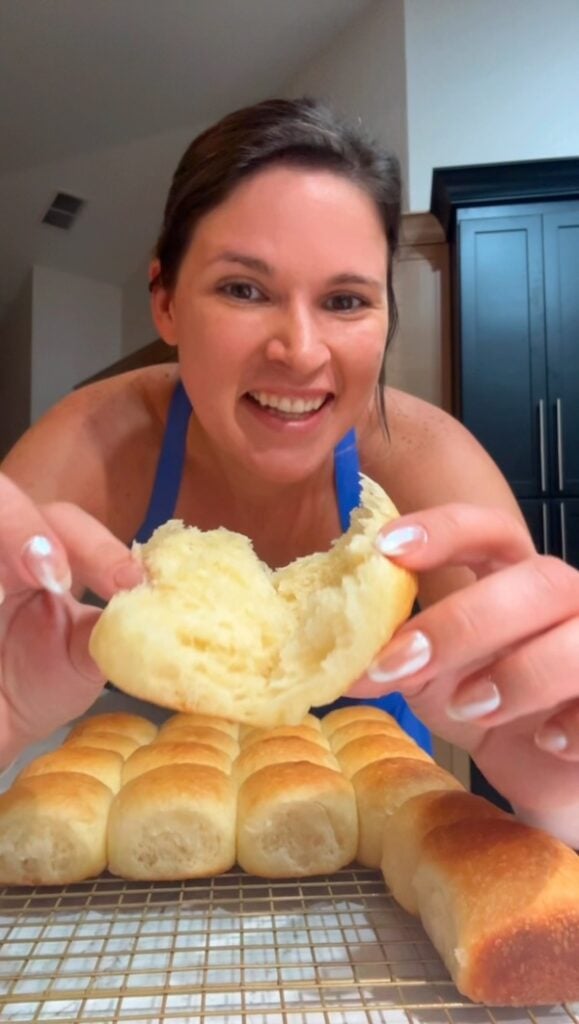
- Soft, squishy texture: Thanks to the tangzhong, these rolls are just as fluffy as the storebought kind. I love the pull-apart quality of these!
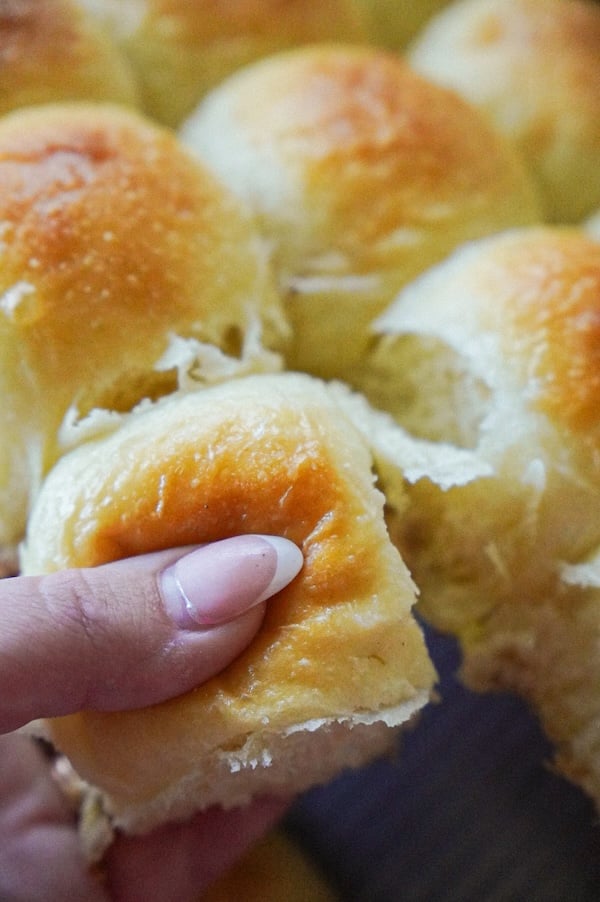
- Delayed staling: Also thanks to the tangzhong, these rolls stay fresh on your counter in a bag for days before staling.
- Plays well with sweet or savory: These are delicious as is, but are also great for sliders (ham + cheese, pulled pork), but I’ve also seen a Hawaiian roll French toast recipe—and now I can’t stop thinking about it!
- Recipe tested by real bakers like you: This recipe was tested by 194 home bakers across two recipe versions, with the final revised version earning an average satisfaction rating of 4.4/5 stars and 86% giving it 4-5 stars.
“So much better than store bought and I can control the ingredients.” –Recipe tester from Orlando, FL
Real Baker Testing Results
This sourdough Hawaiian rolls recipe was tested by 194 home bakers spanning from Florida all the way to Australia.
We actually did two rounds of testing, with improvements made based on initial feedback, resulting in the final version that earned a 4.4 out of 5-star average satisfaction rating.
The results from the final, revised recipe: 86% of testers rated it 4-5 stars, with many planning to make it their go-to recipe for everything from slider buns to sandwich bread. Woohoo!
The bakers who did not like this recipe felt that the dough was too sticky and unmanageable. I’ve added tons of photos and more tips in the recipe card and the step-by-step instructions to assist. I’ve also included a YouTube video tutorial at the end of the recipe card.
Here’s a peek at many amazing bakes from you all:

“Definitely. My kids devour store bought Hawaiian rolls and I taste tested side by side and those are such junk next to homemade” –Recipe tester from Fredericksburg, VA
Recipe Testing Journey
This recipe testing journey seriously humbled me. I thought a quick variation of my dinner rolls recipe would do the trick, but boy, was I wrong – I just ended up with pineapple-flavored dinner rolls.
I dove deep into research, breaking down King’s Hawaiian’s lengthy ingredient list, analyzing baker’s percentages from existing recipes, and determining what might be missing to make these absolutely perfect.
Test 1: Swapped pineapple juice for the water in my dinner roll recipe. No go. Good, but just not it.
Test 2: I went back to water and instead increased the egg, sugar, and butter to add more heft. Still not it. They tasted like slightly sweet dinner rolls—delicious, but the texture wasn’t right.
Test 3: Now we’re getting somewhere. I borrowed tips from Shokupan (Japanese milk bread), which has a closer texture to King’s Hawaiian rolls. I used milk as my liquid, added milk powder for softness, and tweaked my ratios.
While the dough was sticky during mixing, I stuck with it and ended up with what I thought would be the winning recipe.
Everyone loved these at my daughter’s birthday party, and my in-laws thought they were as close as I could get to the store-bought version (though they said the flavor was way better!).
I sent Test 3 to recipe testers, and as feedback started coming in, I realized we had a problem. That sticky dough, which eventually came together for me, was a major source of frustration for about half the bakers. When asked if they’d make this recipe again, a huge portion said no.
Test 4: Lower hydration for easier-to-handle dough. Added brown sugar for extra flavor. Changed baking times and temps. Added egg wash to achieve more even browning, since some bakers reported discolored or too-pale tops. Unfortunately… no go. While the dough was easy to handle, the rolls were way too dense.

Test 5: Increased hydration slightly but kept it below the original recipe I’d sent to testers. Still too dense! Back to the original recipe – but how could I fix it when about half the testers had struggled so much?
Test 6: I returned to the original dough but decided to mix by hand. Maybe the stand mixer was the issue. I was testing in the Ooni Halo Pro (a powerful $800 machine), while most home bakers use the tilt-head KitchenAid (a less powerful ~$300 machine). Could the stand mixer be causing texture issues?
I kept the ingredient list simple, tried different oven temps and timing, and we were off to the races. I documented the whole process, re-sent it to testers, and the feedback was SO much better.
This final recipe is the result of extensive trial and error and feedback from over 100 sourdough bakers.
While it’s not as foolproof as other recipes on my blog, it’s SO worth it for the result. These rolls are incredibly practical and unbelievably soft and fluffy. Dreamy!
Baker’s Timeline (Same-Day and Long-Fermented Option)
Here’s a same-day timeline:
| Night before (7pm) | Make the sweet stiff starter |
| Morning (9am) | Make the tangzhong; make the dough |
| Mid-day (1pm) | Shape the rolls |
| Evening (7pm) | Bake the rolls |
And here’s a long-fermented timeline:
| Day 1 | Night before (7pm) | Make the sweet stiff starter |
| Day 2 | Morning (9am) | Make the tangzhong; make the dough |
| Mid-day (1pm) | Shape the rolls; refrigerate the pan | |
| Day 3 | Next morning (8am) | Set out rolls on the counter |
| Afternoon (3pm) | Bake the rolls |
I have done both timelines and did not notice any major differences. I didn’t find the long-fermented rolls more sour, either.
Please note that these timelines are based on keeping the dough in a warm spot (about 77°F/25°C).
How to Make Sourdough Hawaiian Rolls (Step by Step)
Step 1: Make the Sweet Stiff Starter
In the early evening, mix together:
- 40 g water
- 20 g sourdough starter
- 20 g sugar
- 80 g bread flour
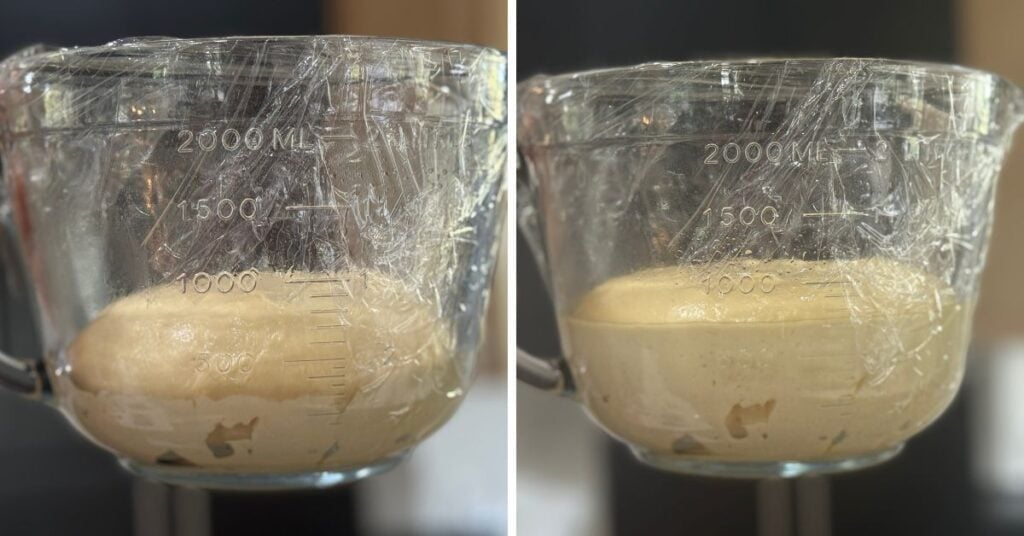
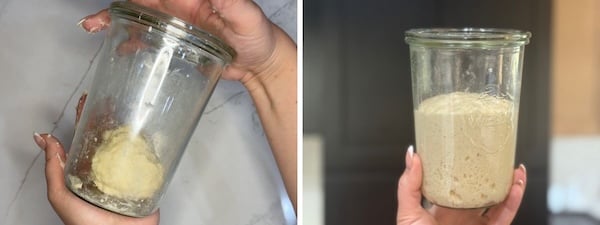
Stir until it comes together in a ball, then knead on the counter for 1–2 minutes until smooth. It should feel pretty firm – almost like playdough.
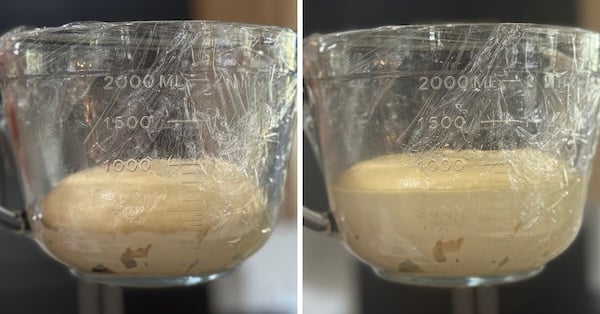
Put it in a jar, cover loosely with a lid or plastic wrap, and let it ferment at room temperature overnight.
It takes 10-16 hours to peak (less time if your home is warm, more time if your home is cool), so I suggest feeding your starter before or around dinnertime.

It’s better to use a past peak starter than one that’s still rising (been there, done that, and you’ll have a huge headache!). Before using your stiff sweet starter in this recipe, ensure it has tripled in size, smells sweet and yeasty, and has tons of bubbles all around the jar and on the surface.
If it isn’t there yet, put it in a warm place and give it a few more hours. Then, start the recipe.
Step 2: Make the Tangzhong
In the morning, set out your unsalted butter to soften while you prep the dough.
Next, make the tangzhong by mixing 18 g bread flour and 88 g cold milk (or water, or your favorite nut milk) together in a microwave-safe bowl.
Microwave in 20-second bursts, giving it a good stir between each round. You’re aiming for a thick, pudding-like paste that hits 150°F (65°C). It takes 2-3 rounds total.
Stovetop option: Whisk over medium heat until it thickens and reaches our target temperature.
Let it cool to below 80°F (26°C) before using in this recipe. It takes about 15-20 minutes at room temp and about 5-10 minutes in the fridge.
If you’re new to tangzhong, check out my full tangzhong post that breaks it all down.
Step 3: Mix the Dough
Once your tangzhong has cooled completely, you can mix your dough.
During recipe testing, different stand mixers caused major variations in dough texture and mixing times. Some bakers struggled to get their dough to come together—it is a sticky dough, but theirs ended up runny and almost batter-like. To eliminate this variable, I’ve written this recipe primarily for hand mixing, which gives you better control.
You can still use a stand mixer, but be warned that less powerful motors may cause frustration. I use my Ooni (650W motor) without issue, but a tilt-head KitchenAid won’t give the same result.
A few notes from testers:
“I’d encourage people with non professional mixers (specifically KitchenAid) to try this recipe by hand. I found it so much easier to do by hand and it didn’t take much more time than a normal loaf.” –Recipe tester
“I would add using the paddle attachment instead of hook attachment on KitchenAid users. I have the 7qt KitchenAid and this second attempt worked better with the paddle attachment. I got a window pane after 15min of mixing and also when shaping the balls I used butter instead of flour.” –Recipe tester
If mixing by hand, in a large glass bowl, mix together:
- All of the cooled tangzhong
- All of the sweet stiff starter
- 1 whole egg + 1 egg yolk (cool from the fridge)
- 84 g milk
- 270 g bread flour
- 50 g sugar (adjust to 75g if you want super sweet; 25g if you want less sweet)
- 11 g milk powder
- 7 g sea salt
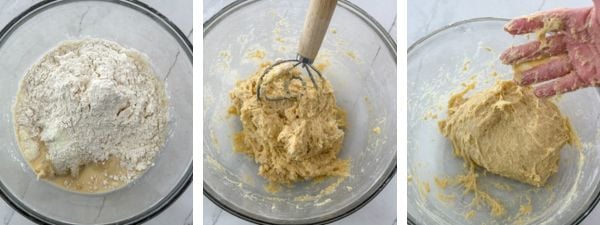
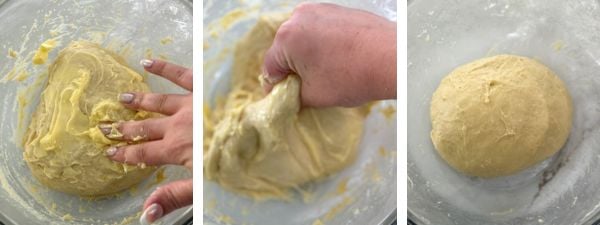
Incorporate all ingredients, then knead/slap the dough for 1-2 minutes more. It will be very sticky and shaggy—this is normal. I start with a Danish dough whisk, then switch to my hands.
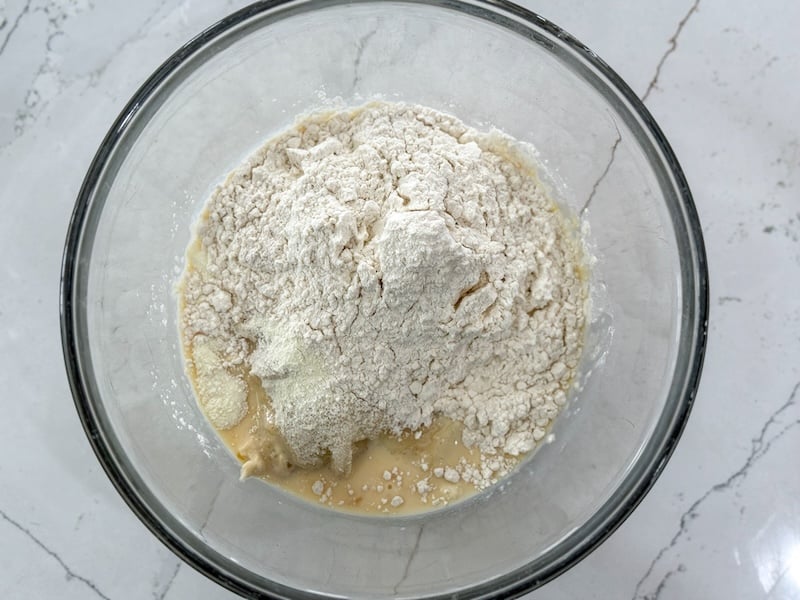

If your dough looks looser than the photo, add bread flour one tablespoon at a time. One tester needed 55g additional flour to achieve this consistency—not expected, but it can happen.
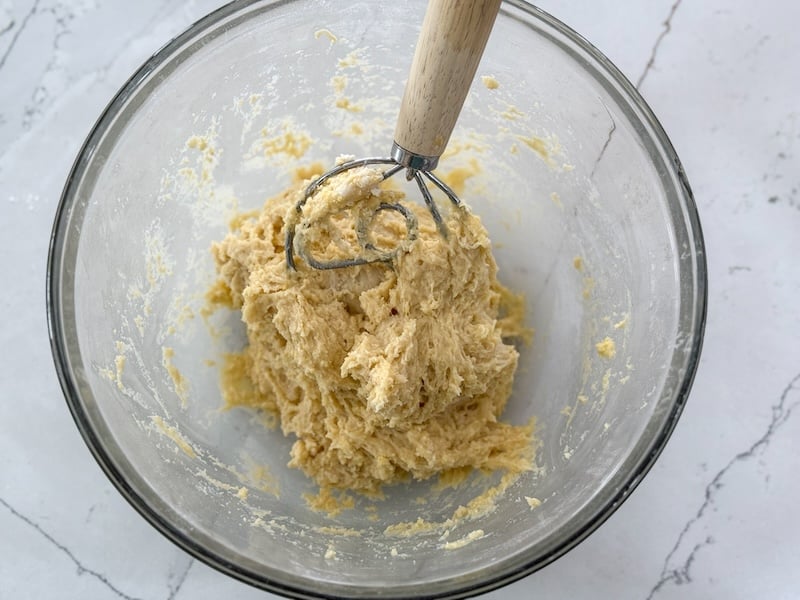
For those using a stand mixer, add all ingredients to your mixer bowl, except for the butter.
If you’re using a KitchenAid stand mixer, mix on low speed for about 10 minutes. Dough will be sticky and shaggy – it will not pull away from the sides of the bowl.
Here’s what the dough will look like at various stages:
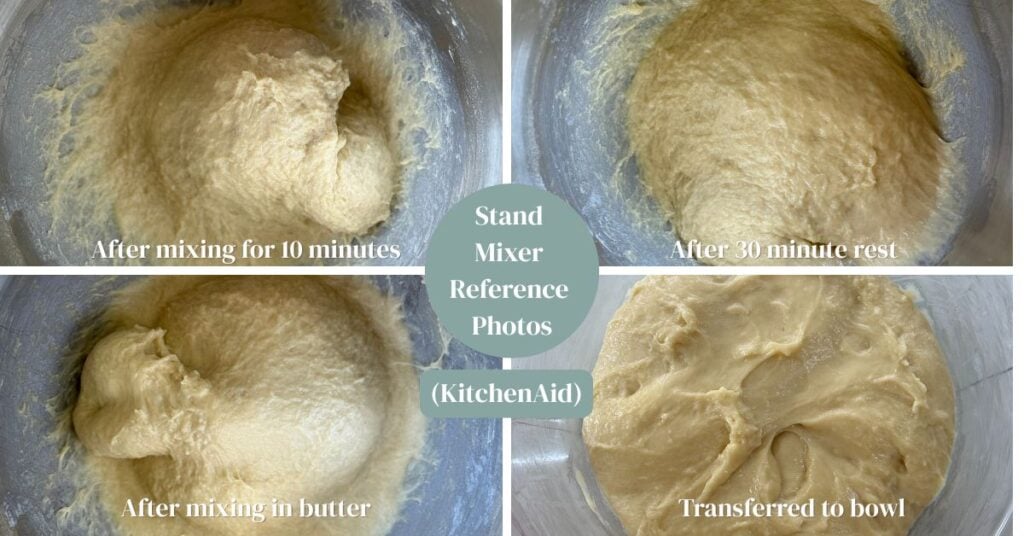
If you’re using a more powerful machine, such as the Ooni, here’s what the dough will look like at various stages:
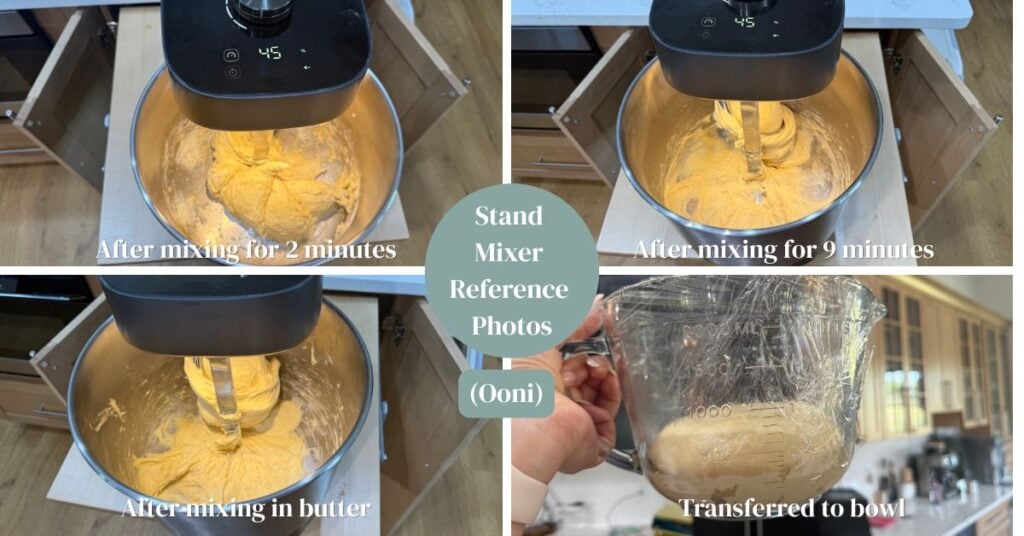
When I mix this dough in the Ooni, there is no need to do any stretch and folds afterward. I also don’t need any break between the initial mixing and adding the butter.
However, when I used the KitchenAid, I found I did need to add resting times and further strengthen by hand.
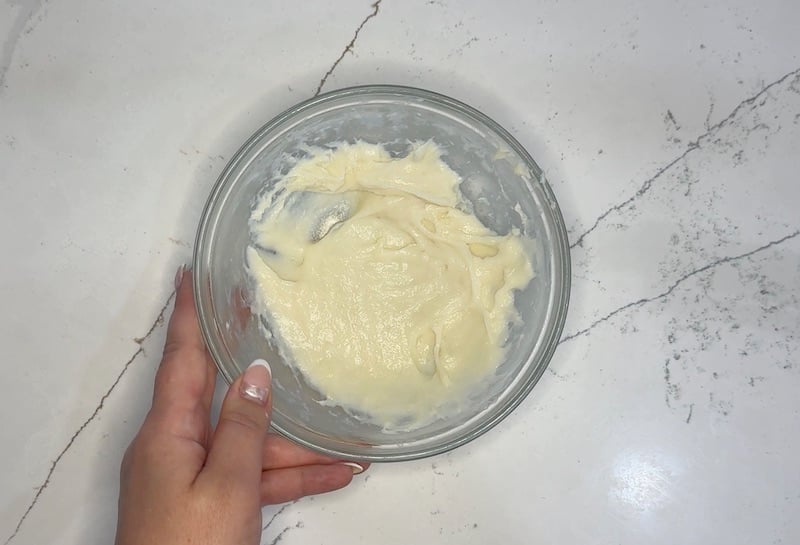
Step 4: Add the Butter
Butter brand matters here! Store brand butter does not give me great results in general – for any enriched dough, I recommend a European-style butter such as Kerrygold, Vital Farms, Plugra, Kirkland Signature, Land O’Lakes European Style, or Finlandia.
Spread your softened butter on top of the dough.
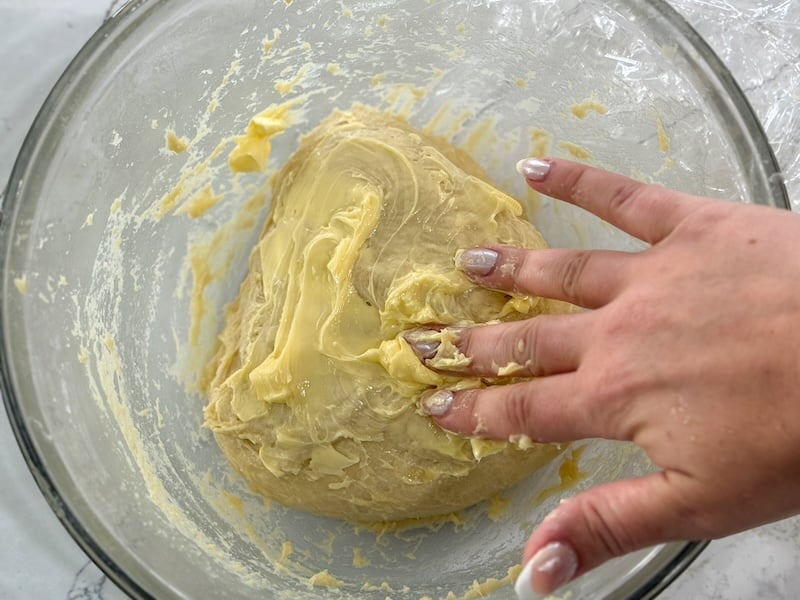
Pinch and squeeze the butter into the dough until it’s incorporated.
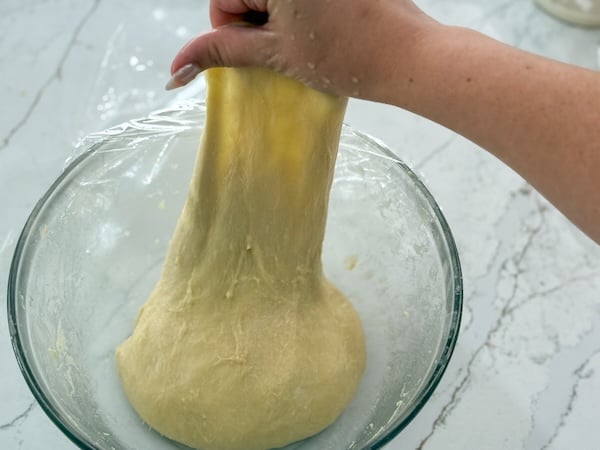
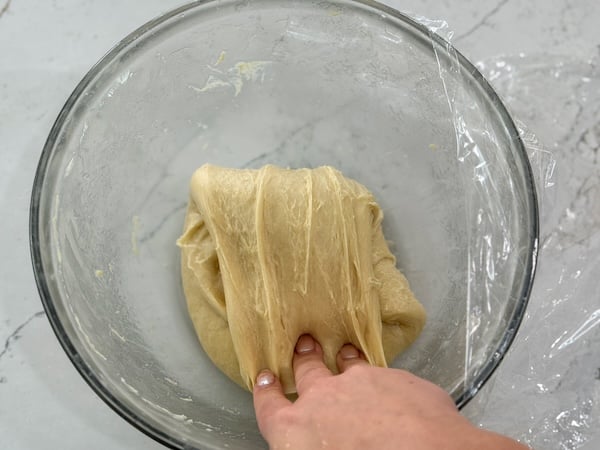
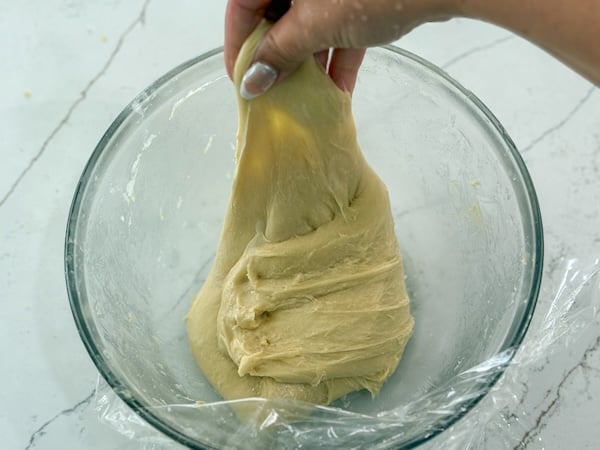
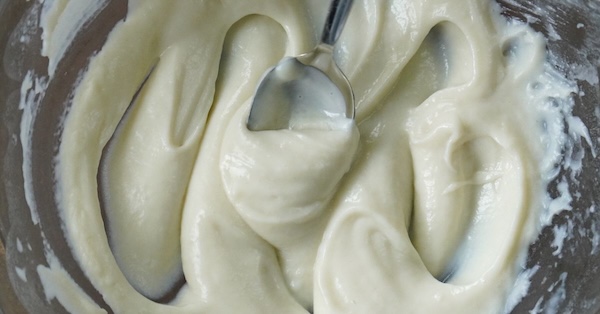
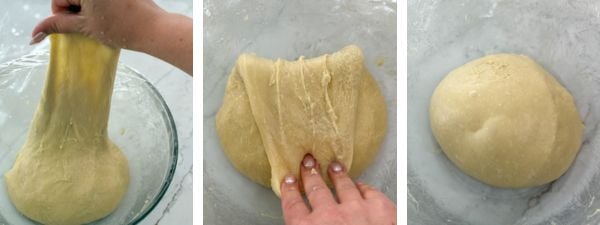
You can switch to slap and folds in your bowl or on your counter until the dough smooths out. This process takes a few minutes. Cover and let rest for 30 minutes.
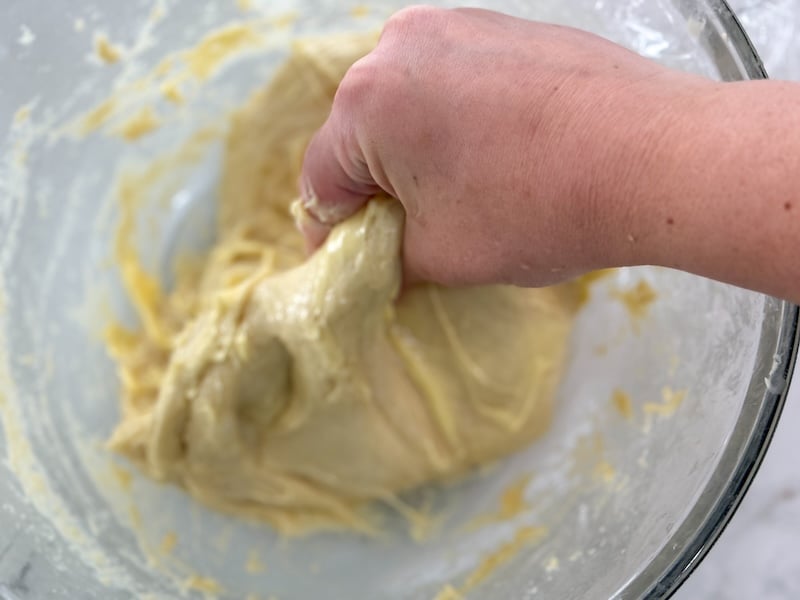
Step 5: Stretch and Fold
After a 30-minute rest, we’ll strengthen the dough one more time before leaving it alone for the first rise.
I stretch and fold my way around the bowl; then, I switch to slap and folds directly in my bowl for 1-2 minutes.


You can slap and fold on your counter, knead the dough, or continue doing stretch and folds – it’s totally up to you!
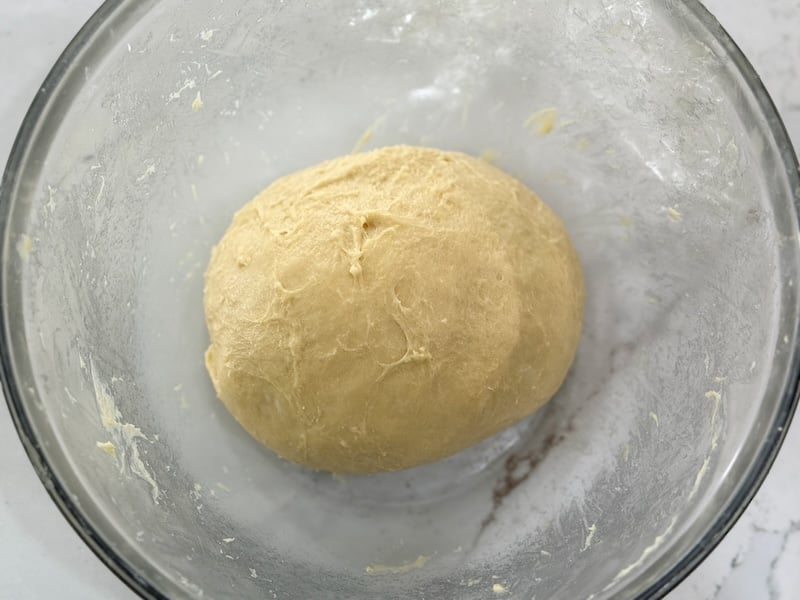
We just want to strengthen the dough so that it smooths out, like this:

Step 5: First Rise
Let it rest in a warm spot (about 77°F/25°C) for 3 to 5 hours.
You’re not looking for a full rise here—just a slight increase in volume. When you press your finger into it gently, it should feel more airy than when you started.
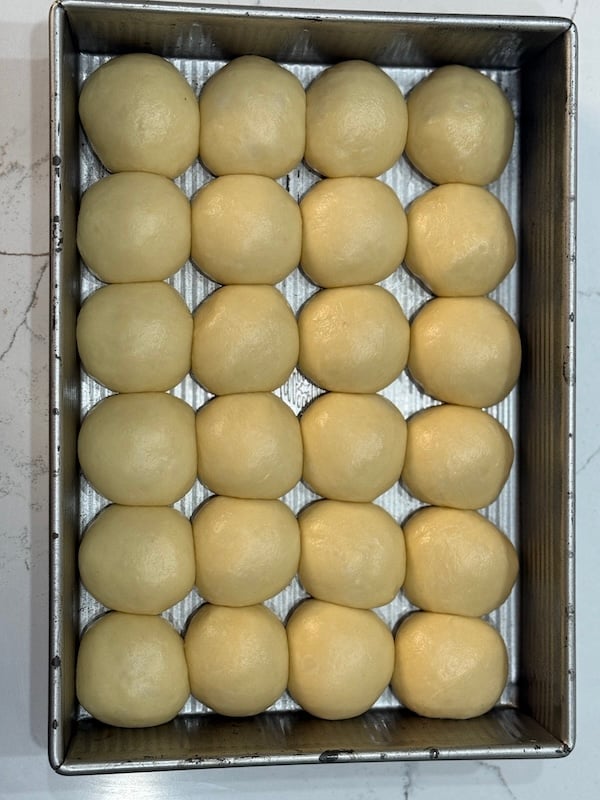
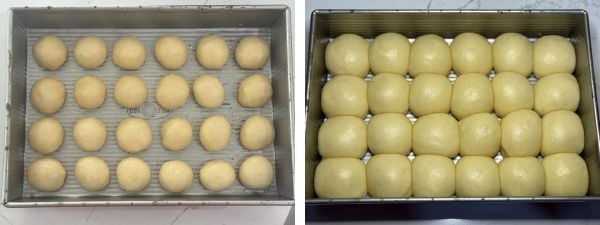
Step 6: Shape and Second Rise
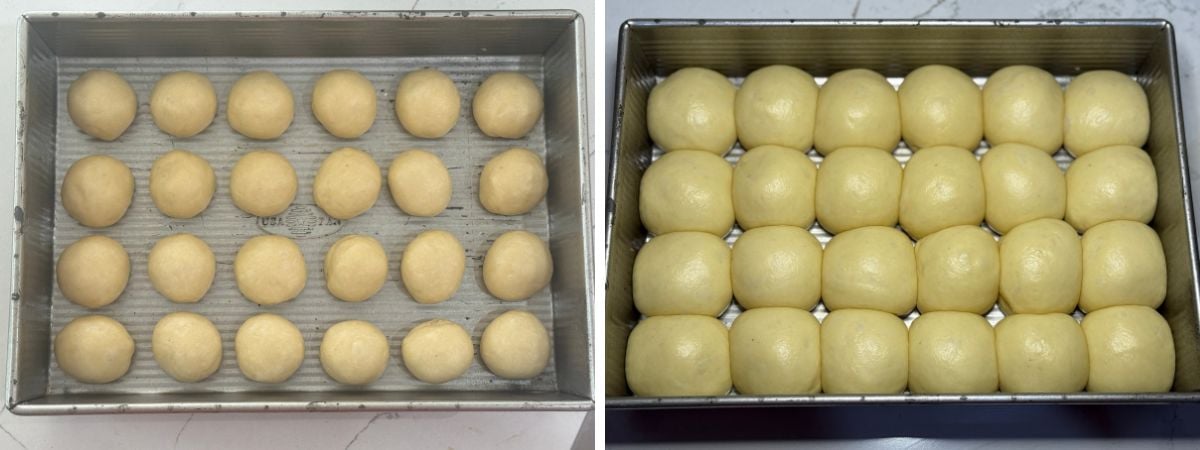
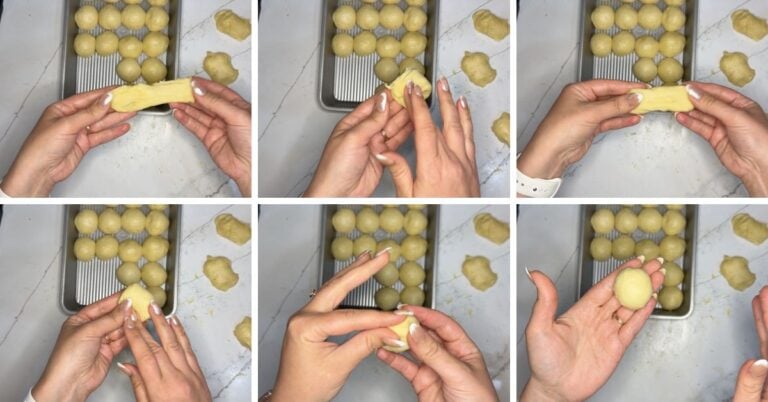
We want 24 equal dough balls, so we begin by weighing the dough. Two ways to do this:
- Set your dough on a scale. Divide that dough weight by 24.
- With the bowl still on the scale, zero it out. Then, remove the dough from the bowl. The weight of the dough will display as a negative number. Divide that dough weight by 24.
The rolls should be about 31-34 g each.
Shape each piece into a tight, smooth ball by stretching the dough out and folding it like a book. Repeat this until the dough ball has surface tension and a smooth top. Pinch the seam and roll the dough ball in your hands or on the counter to smooth it out.

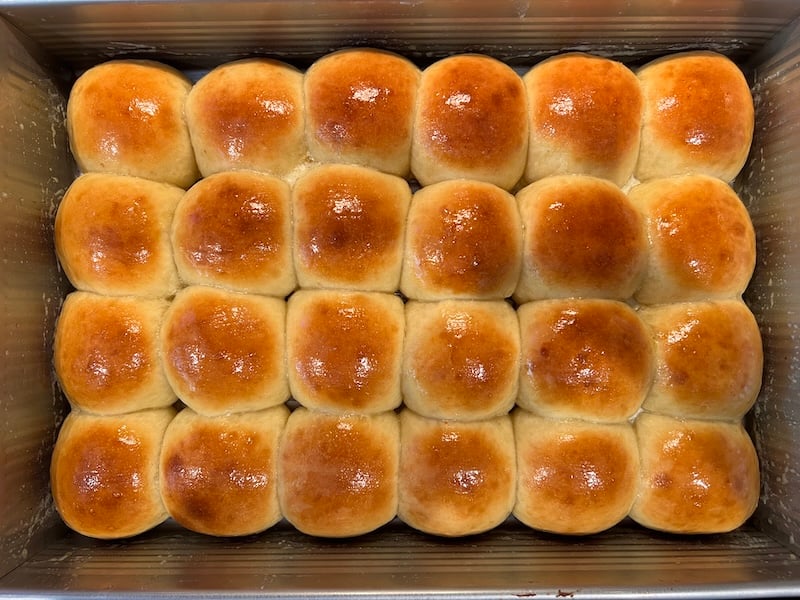
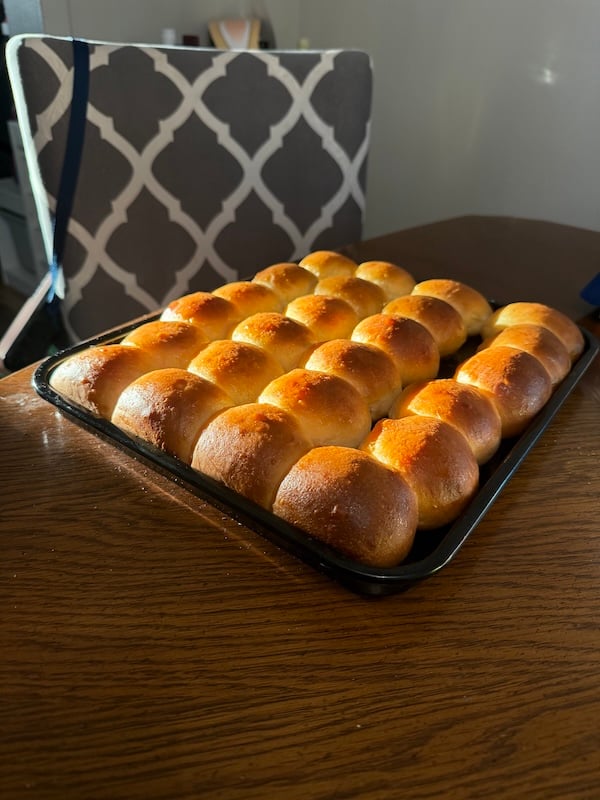
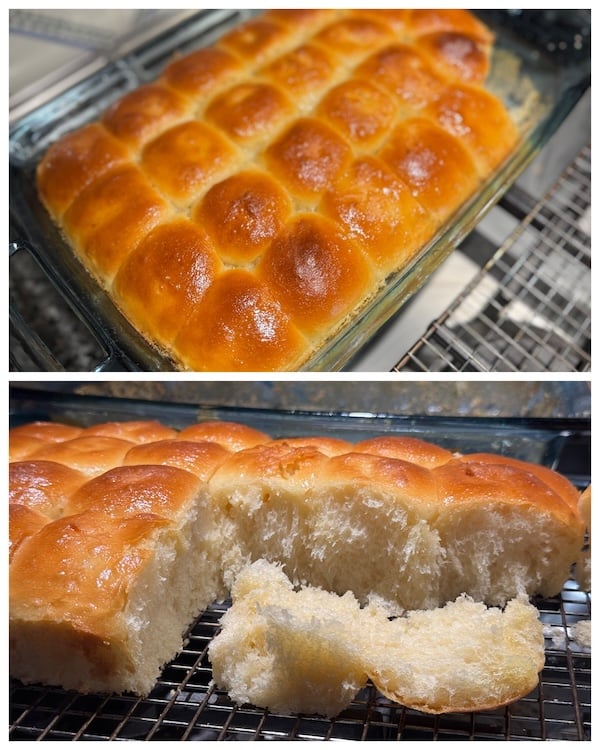
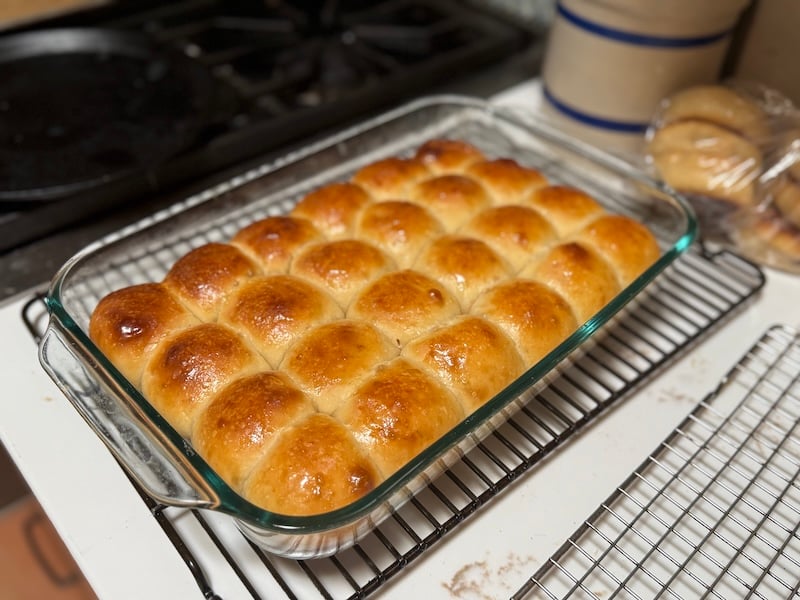
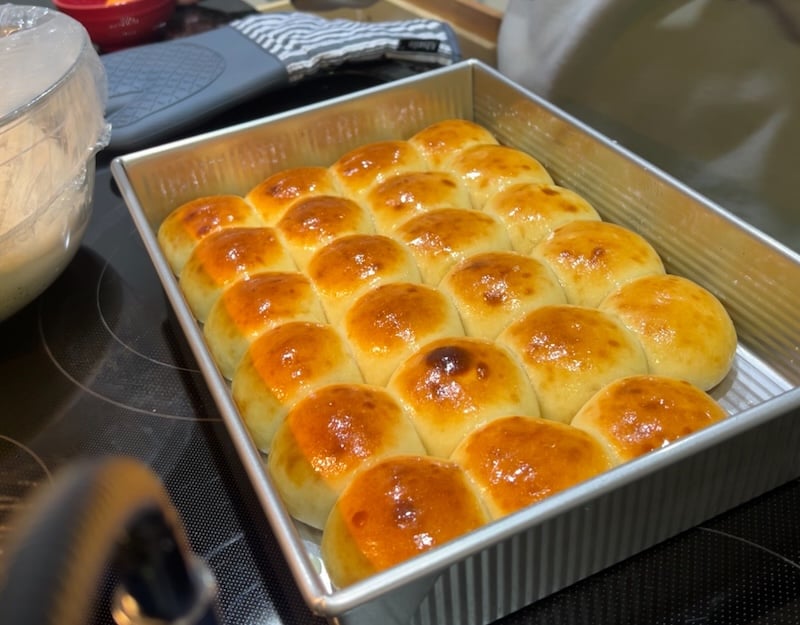
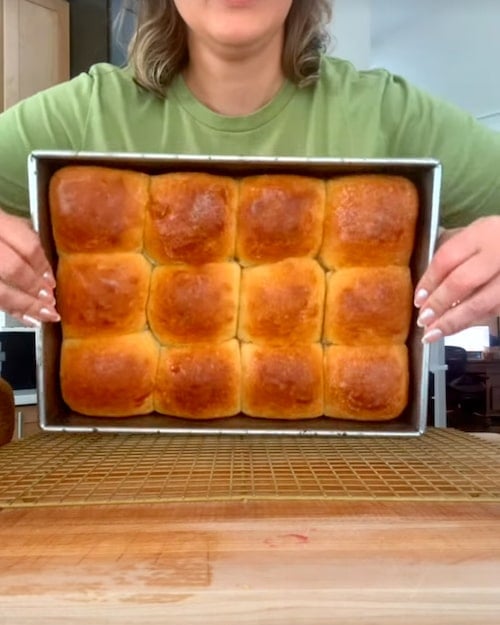
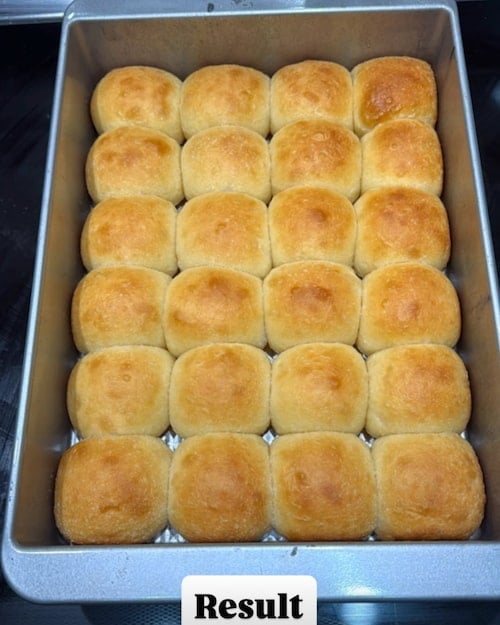
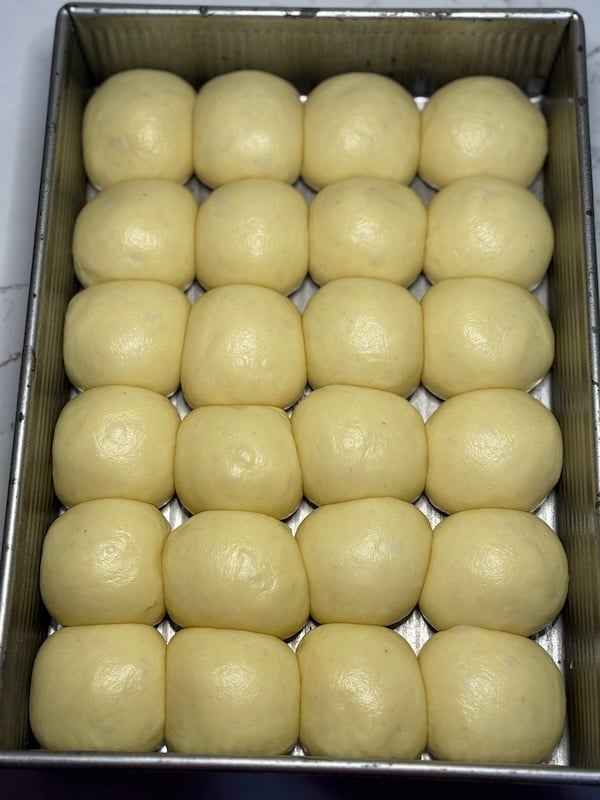
Arrange the balls evenly in a greased 9×13 baking dish.
Cover with plastic wrap and let them rise at room temp until they’re puffed up and touching.
In my 77°F (25°C) proofing box, this took about 6 hours.
Alternatively, you can stick them in the fridge and let them do an overnight cold retard, and let them finish rising on the counter the next day before baking.
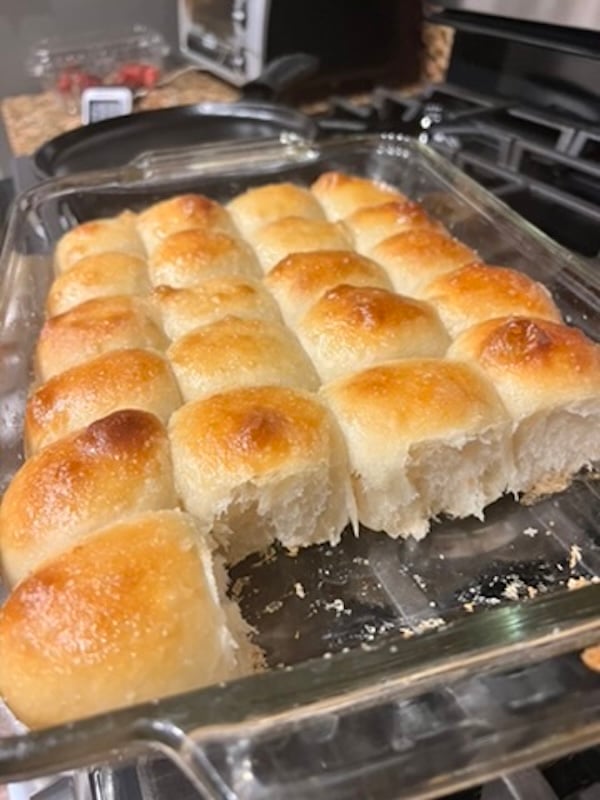
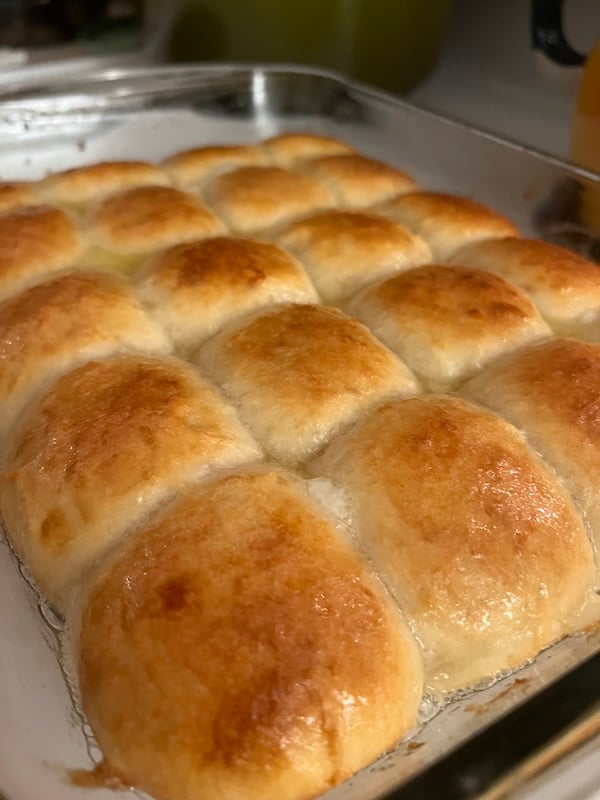
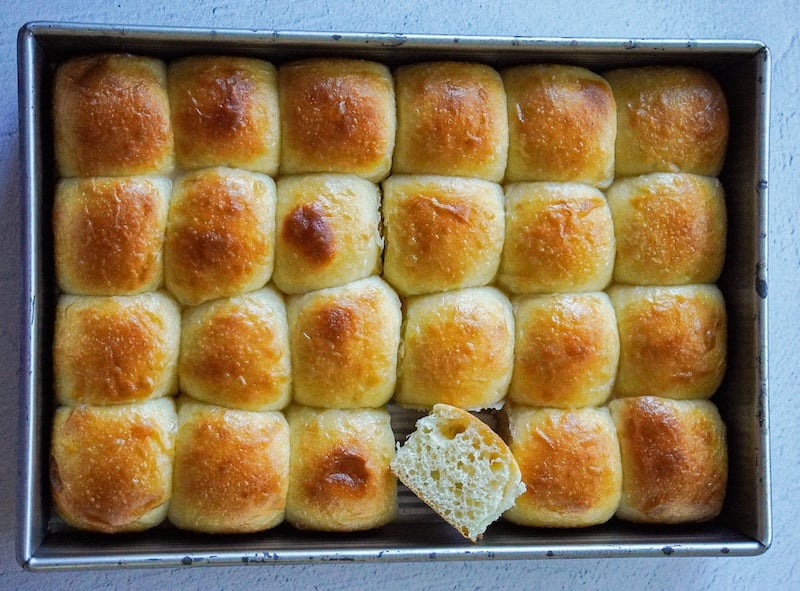
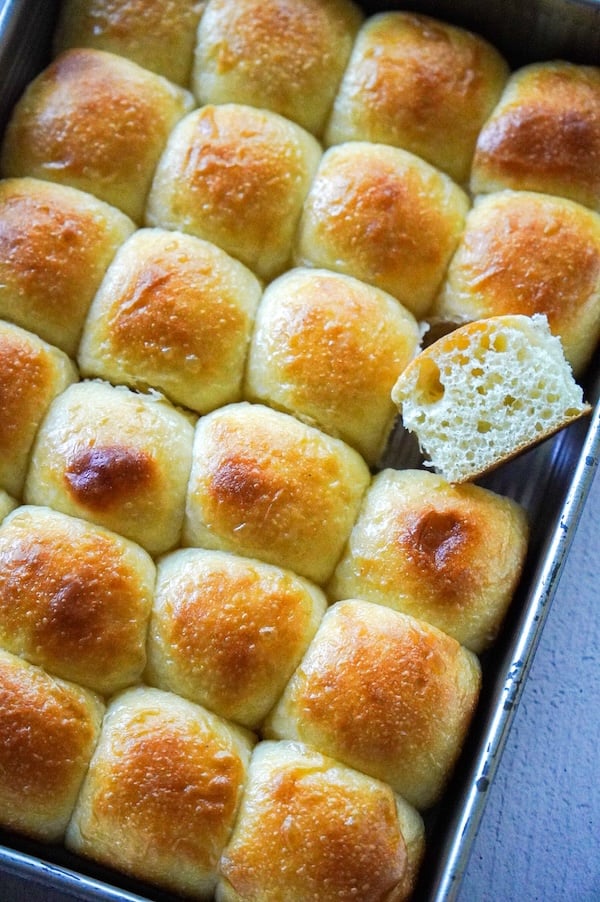
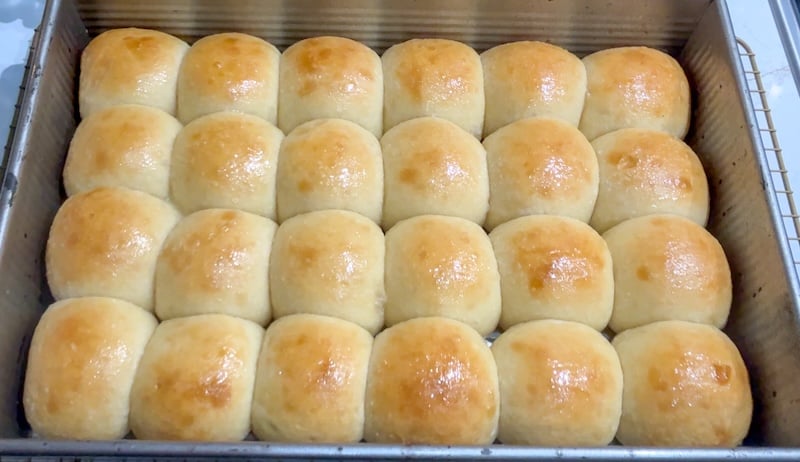
Step 7: Bake the Rolls
Preheat your oven to 400°F (205°C). Whisk one egg with 8g powdered sugar. Brush the egg wash on top of the rolls before baking.
Bake at 400°F (205°C) for 12 minutes, then lower the temp to 350°F (175°C) and bake another 5-15 minutes, rotating the pan halfway through. The tops should be golden brown, and the internal temp should hit around 195°F (90°C).
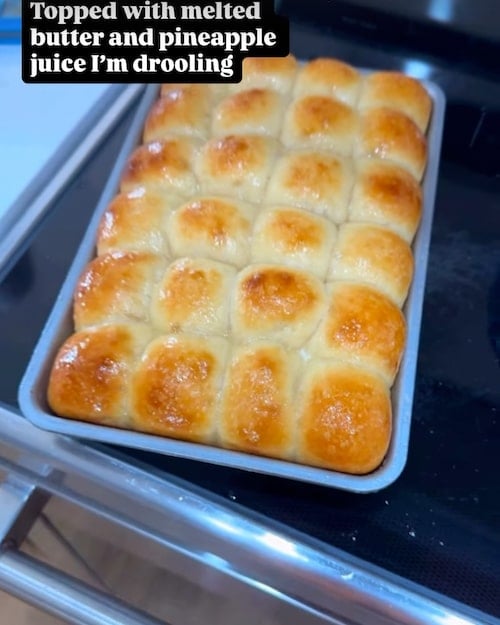
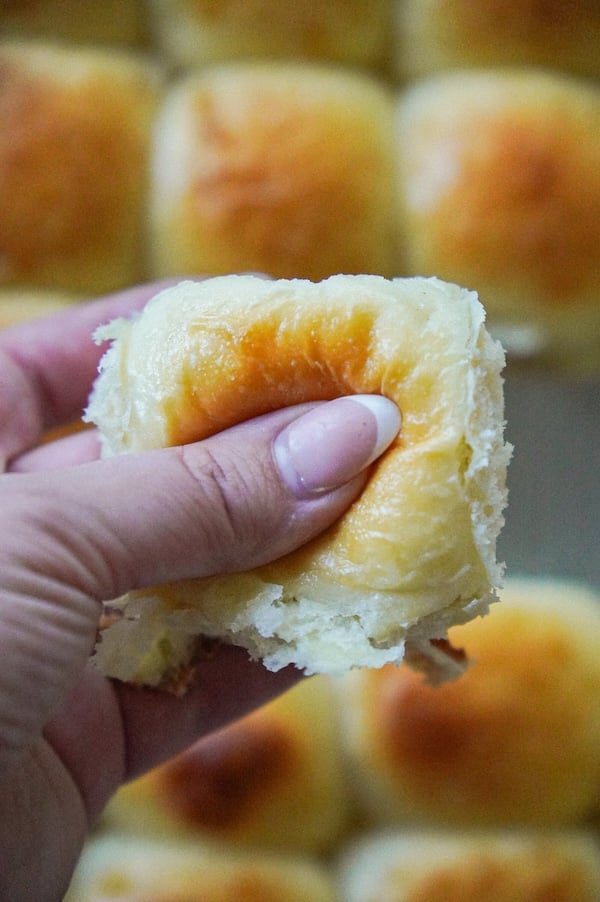
As soon as they come out of the oven, brush the tops with a little melted butter mixed with powdered sugar or pineapple juice.
How to Store Sourdough Hawaiian Rolls
These stay soft at room temperature for 3–4 days if you keep them sealed in a plastic bag or an airtight container. These bags fit this 24-pack of Hawaiian rolls perfectly.
Tangzhong also helps these stay fresh longer than most rolls.
To freeze, let them cool completely, then stash them in a freezer-safe bag with the air pressed out. They’ll keep for up to 3 months. Thaw at room temperature or microwave for 20–30 seconds.
If they start to dry out, just warm them in a 300°F (150°C) oven for 5–7 minutes or give them a 10-second microwave zap.
Troubleshooting Subpar Results
I have baked these Hawaiian rolls about 20 times, and a few times, my results left much to be desired.
In these cases, I know exactly what went wrong, so let me take you through how to fix it if you have similar results.
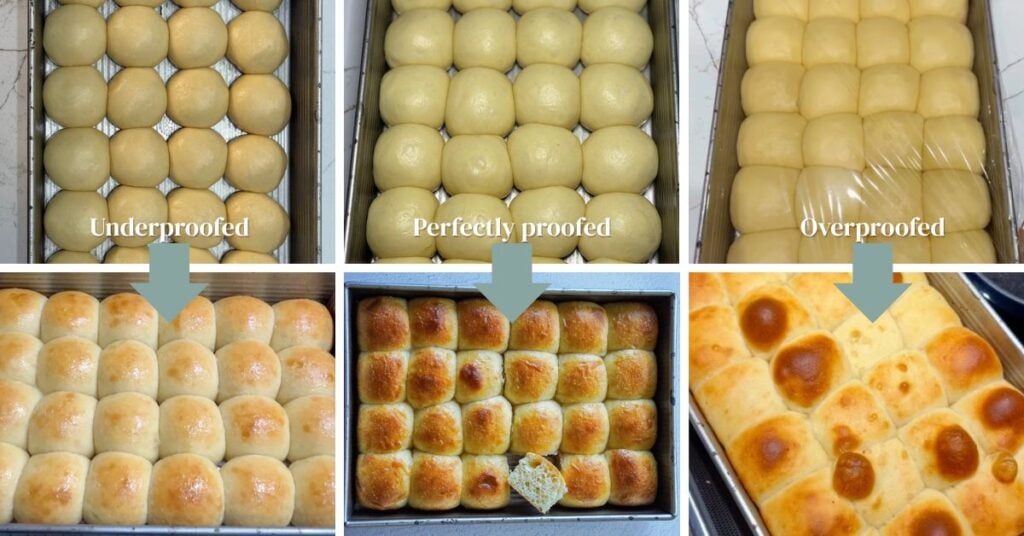
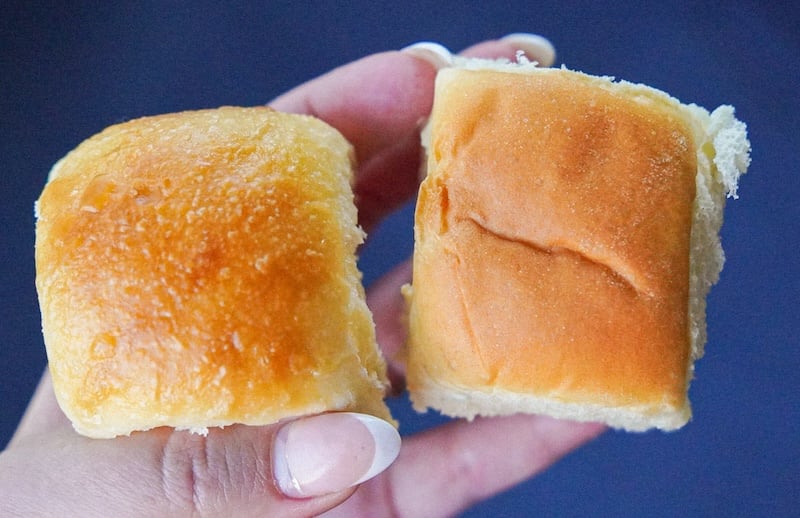
1. Overproofed rolls
For one bake, we had to leave the house, and I just left the rolls to finish their second rise, hoping for the best. Unfortunately, they were overproofed, collapsing during baking and appearing flat on the surface with some huge burnt bubbles.
Here is what they looked like before and after baking (in a 9×13 pan):

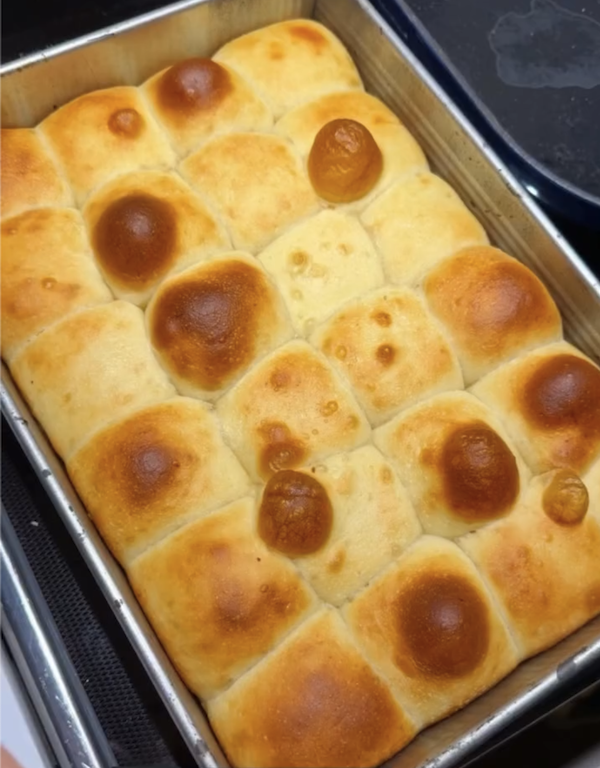
So, don’t let your rolls puff up quite this much! They should be touching each other, but not look overcrowded.
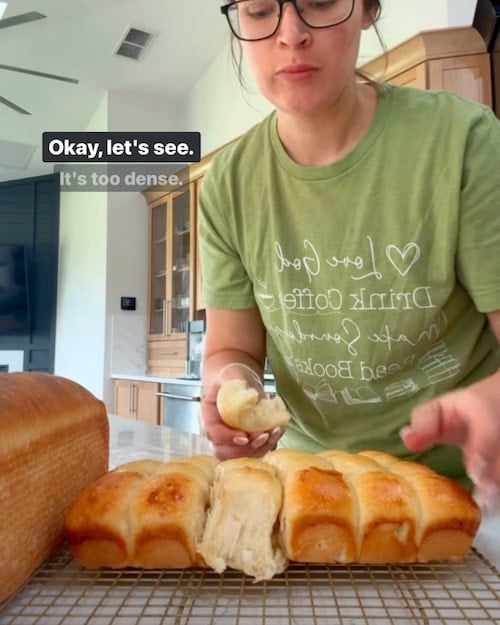
2. Underproofed rolls
I ran into the opposite problem when I was filming the end of my YouTube tutorial, but my kids were almost home. I decided to rush things, hoping I wasn’t cutting them too short. But I was wrong…
Here’s what the rolls looked like before baking:
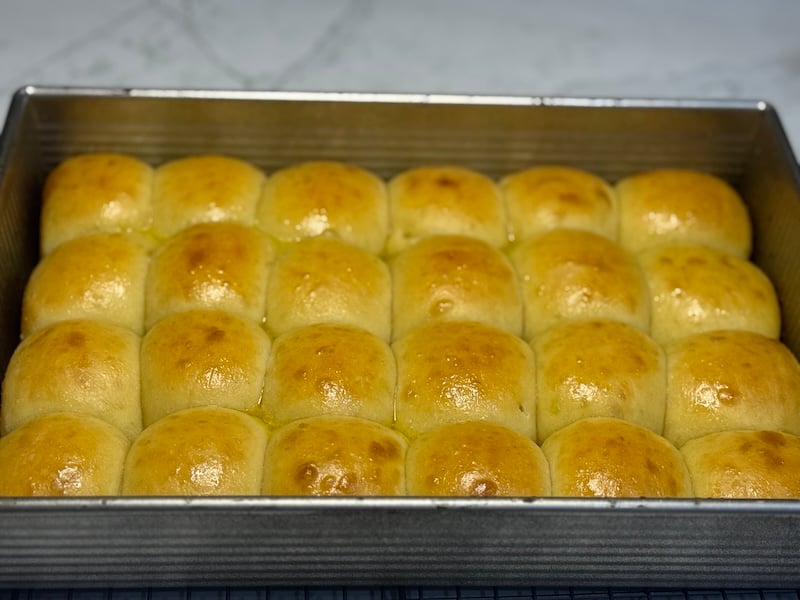
The rolls were underproofed, which led to a pale, dense result. They were still good – we ate them – but they weren’t as light and fluffy as they’re supposed to be.
Here’s what those looked like after baking (9×13 pan):
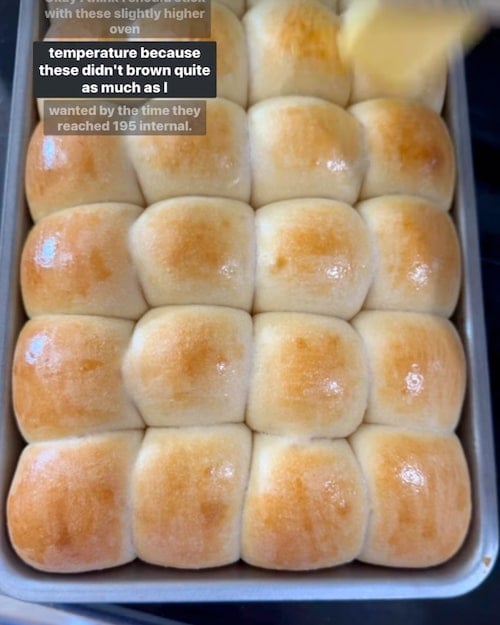
Again, they aren’t terrible. But with the baking temperature and times I’ve tested, these should have had a deep, golden brown top, and they just weren’t browning well.
They were also a little dense and didn’t stay soft after the first day.
3. Weak or premature stiff sweet starter
The last issue I ran into once was using a weak stiff sweet starter.
I accidentally used up all my sourdough starter, which I feed daily (oops), so I pulled some discard from the back of my fridge to revive. I gave it two feedings to perk it back up, but I could tell it still wasn’t back to normal.
I decided to go ahead and make my stiff sweet starter for this recipe, hoping this feed would bring her back. Well, it didn’t.
By morning, my stiff sweet starter had only doubled – I like to see tripled – so I placed it in my proofing box. After another 2 hours in there, nothing had changed. I went ahead with the recipe, and despite doing all of my normal steps, the rolls came out pale and dense.

While the rolls looked good to me prior to baking, they didn’t turn out quite right.
They didn’t get the deep golden brown I’m looking for, despite taking extra steps, including broiling the tops for 2 minutes and popping them back in the oven after brushing the baked rolls with butter.
Tips for Success
Moral of the story:
- Use a healthy starter to create your stiff sweet starter. Ideally, it has been maintained well and fed within the past 24 hours.
- Look for your stiff sweet starter to triple in volume before using it in this recipe.
- Look for your rolls to puff up and touch each other, but reference my underproofed and overproofed roll photos to ensure you catch them at just the right size.
Ingredient Substitutions
- Milk (for tangzhong): Any dairy or non-dairy milk works beautifully. Testers have had success with cashew milk, almond milk, and regular dairy milk. Just make sure it’s unsweetened and unflavored.
- Milk powder (optional): Can be completely omitted without any issues – this was the most successful substitution with 16 testers leaving it out and still getting 4-5 star results. If you want to add richness, buttermilk powder works (2 testers used this successfully).
- Whole milk: Easily swap with 2% milk (6 testers had great success), almond milk (3 successful testers), or lactose-free milk (1 successful tester). One creative baker used half heavy cream and half water with excellent results. The rolls turn out just as soft and delicious.
- Powdered sugar (for glaze): Honey works beautifully as a substitute (8 successful testers) – just mix it directly with the melted butter. Granulated sugar also works (13 testers used this successfully), though it may be slightly less smooth than powdered sugar. For a more authentic Hawaiian roll flavor, pineapple juice can replace the powdered sugar entirely – one tester even used pineapple preserves with great results. Mango juice also worked for one tester.
- Bread flour: All-purpose flour works fine with a small adjustment – add an extra 15-20g flour to the main dough for proper structure (3 testers confirmed this works). King Arthur, Caputo 00, and various store brands all performed well in testing. I primarily used Central Milling’s High Mountain bread flour (13.5% protein) in my testing.
- Sugar amount: Want less sweetness? Two testers successfully reduced the sugar and loved the results. As one Washington baker said: “I put a little less sugar in it and it was perfect! Exactly what I wanted.” And if you want more, you can also amp up the sugar.
- Butter type: Salted butter works fine – just reduce the added salt in the recipe by half. Multiple testers used regular grocery store butter instead of Kerrygold with no issues.
Note: The one substitution that consistently failed was using water instead of milk in the main dough – this created unworkable, sticky dough that multiple testers had to discard. Stick with some type of milk for the best results!
FAQs
I had full intentions of using pineapple juice as the liquid base in this recipe, but after testing it a few times, it just didn’t taste right. The King’s Hawaiian rolls from the store don’t have pineapple juice in them, and while the flavor is fun, my goal was to recreate those storebought rolls. Feel free to swap some of the milk in the main dough for pineapple juice if you want!
The milk powder adds softness to the rolls (a technique I borrowed from Japanese milk bread), but it isn’t absolutely essential. 16 recipe testers successfully omitted the milk powder and still got 4-5 star results. If you skip it, add an extra 11g of bread flour to compensate.
No, this was the #1 cause of recipe failure in testing. Multiple bakers who used water instead of milk ended up with sticky, unworkable dough that they had to throw away. Stick with some type of milk (dairy or non-dairy) for the best results.
Yes! Reduce the sugar to 25g in the main dough. As one Washington tester said: “I put a little less sugar in it and it was perfect! Exactly what I wanted.”
All-purpose flour works with a small adjustment—add an extra 15-20g flour to the main dough for proper structure. Three testers confirmed this works well.
Absolutely! You can refrigerate the unshaped dough after the first rise, or shape the rolls and refrigerate the pan overnight. Just let them finish rising at room temperature the next day before baking.
It should triple in size, smell sweet and yeasty, and have tons of bubbles all around the jar. This takes 10-16 hours, depending on your kitchen temperature. Better to use it past peak than still rising, so when in doubt, stick it in a warm spot and give it a little more time.
No! This recipe was actually developed for hand mixing after testers had issues with less powerful stand mixers. As one tester said: “I’d encourage people with non-professional mixers to try this recipe by hand. I found it so much easier.”
Try using the paddle attachment instead of the dough hook, and expect to mix longer. Many testers found hand mixing easier and less frustrating.
Yes! The dough will be sticky—this is what creates the soft, fluffy texture in the end. I experimented with adding more flour, and while the dough was easy to handle, the rolls baked up too dense. However, if your dough looks more like batter and is completely unworkable, add bread flour 1 tablespoon at a time. I’ve included photos of the dough after the initial mix to help you gauge this.
It’s probably the butter. Use European-style butter (not the cheap American stuff), or your dough will be very sticky and unmanageable. Kerrygold, Vital Farms, Plugra, Kirkland Signature, Land O’Lakes European Style, and Finlandia are all good options.
This usually happens when: 1) Your sweet stiff starter wasn’t fully active, 2) The rolls were underproofed, or 3) You reduced the hydration too much by adding too much initial flour during mixing. Make sure your starter has tripled and the rolls feel light and puffy before baking.
If they’re just slightly overproofed, bake them anyway—they’ll still taste good! For next time, they’re ready when they’re touching each other, but not looking overcrowded in the pan.
Absolutely! Several testers made them into slider buns and burger buns with great success. Just shape them larger (about 60-70g each instead of 30-35g).
Yes – one tester did just that and her result was gorgeous!

Soft Sourdough Hawaiian Rolls (King’s Hawaiian Copycat)
Ingredients
Stiff Sweet Sourdough Starter
- 40 g water
- 20 g sourdough starter
- 20 g sugar (or honey)
- 80 g bread flour
Tangzhong
- 18 g bread flour
- 88 g whole milk
Main Dough
- All of the stiff sweet starter
- All of the tangzhong (cooled)
- 85 g milk (warmed to 90°F/32°C)
- 1 egg (room temperature)
- 1 egg yolk (room temperature)
- 50 g sugar (See Notes for adjusting)
- 11 g milk powder (optional, but adds additional softness)
- 270 g bread flour (12.7-13.5% protein)
- 7 g sea salt
- 56 g unsalted butter (European-style)
Before Baking
- 1 egg
- 8 g powdered sugar
After Baking
- 8 g butter, melted
- 8 g powdered sugar (or canned pineapple juice or honey)
Instructions
- Before you begin: this recipe includes instructions for hand mixing or using a stand mixer.
Make the Stiff Sweet Starter (Evening Before)
- In the early evening, mix 40 g water, 20 g sourdough starter, 20 g sugar, and 80 g bread flour in a glass jar. Knead outside of the jar to fully incorporate the ingredients. Cover loosely and let ferment in a warm place until morning. See Notes for timing and tips.

Prepare Dough (The Next Morning)
- In the morning, set out 56 g unsalted butter to soften. Put your two eggs in a bowl of warm water to quickly bring them to room temperature.
- To make the tangzhong, whisk together 18 g bread flour and 88 g whole milk. Microwave in 20-second intervals until thickened and reaches 150°F (65°C), about 2-3 rounds total. Pop it in the fridge for 5-10 minutes, or until it has cooled down to room temperature.*See Notes for stovetop instructions.

- If mixing by hand: In a glass mixing bowl, warm 85 g milk to about 90°F/32°C (about 20 seconds in the microwave). Add 1 egg, 1 egg yolk, and 50 g sugar. Then, add All of the stiff sweet starter, All of the tangzhong, 270 g bread flour, 11 g milk powder (optional), and 7 g sea salt. If you aren't using the milk powder, add an equal amount of additional bread flour. Knead the dough, switching to slap and folds for faster incorporation if desired. Work the dough until the ingredients are fully combined, about 3 minutes. The dough will be sticky and shaggy. However, if it does not have the same texture as mine in the photo, please add additional flour in 1 tbsp increments. Cover and let rest for 30 minutes.If using a stand mixer: Add all ingredients to your stand mixer, except for the butter. Mix on low speed for about 10 minutes. Dough will be sticky and shaggy – it will not pull away from the sides of the bowl. Cover and let rest for 30 minutes.
- If mixing by hand: Spread all of your softened butter on top of the dough. Pinch and squeeze the butter into the dough (think of lobster hands!) until it's mostly incorporated. Switch to slap and folds on your counter until the dough smooths out. This process takes 4-5 minutes. Cover and let rest for 30 minutes.If using a stand mixer: Add half of the softened butter to the bowl and mix on low speed until combined. Add the remaining butter and mix until fully incorporated and the dough smooths out. Move dough to a greased glass bowl and cover for 30 minutes. Proceed with the rest of the recipe as written.
- Strengthen the dough for 2-3 minutes via stretch and folds, kneading, the Rubaud method, slap and folds – whatever floats your boat!
- First rise: Place your bowl in a warm spot (75-80°F/24-26.5°C is ideal) for 3-5 hours, or until the dough has relaxed, puffed up slightly, and is showing signs of fermentation. There should be small bubbles around the sides and under the surface of the dough.
Shape the Rolls (Mid-Day)
- Long fermentation option: You can refrigerate the unshaped dough after the first rise, or shape the rolls and refrigerate the pan overnight. Just let them finish rising at room temperature the next day before baking.
- Dump out the dough and weigh it. Divide the total weight by 24 (it should be about 31-34g per roll). Divide the dough into 24 equal pieces. Shape the pieces into taut balls, using bench flour to avoid sticking. Place shaped balls into a greased 9×13 baking dish.

- Cover with plastic wrap and let rise until the rolls are touching each other and feel light and pillowy when you gently tap the surface. In a 77°F (25°C) environment, this took 6 hours, but your timing may vary.
Bake the Rolls (Early Evening)
- Preheat oven to 400°F (205°C) conventional (not convection). Whisk together 1 egg with 8 g powdered sugar. Brush on top of the rolls and bake for 12 minutes. Then, lower the oven temperature to 350°F (175°C), and bake for an additional 5-15 minutes (rotate the pan partway through), or until golden brown on top with an internal temperature of about 195°F (90°C).
- In a small bowl, combine 8 g butter, melted with 8 g powdered sugar. Brush baked rolls with the mixture. Let cool for about 10 minutes; then, turn out onto a cooling rack.
Video

Notes
Conclusion
And that’s it! Soft, fluffy sourdough Hawaiian rolls that taste just like King’s Hawaiian.
Let me know in the comments if you try this recipe. I’d love to hear how they turned out!
Similar recipes to try:


I baked these for Christmas dinner. They were a big hit. There were none leftover. I baked them at 375/350 degrees as my test rolls browned too quickly at 400 degrees.
So glad you loved them Debbie!!
Absolutely delicious. I made some yesterday and they were such a hit that I’m attempting to make them larger for sandwiches tonight for New Year’s Eve.
Great idea! So glad you enjoyed them!
I am SO glad I tried these, even with a Kitchenaid mixer (thanks for the paddle recommendation!). It was a rainy day here in FL, so my dough was extra wet and I ended up adding about 100g of flour after my first attempt at shaping didn’t go very well due to the stickiness. Once it went back through the bulk ferment stage with the extra flour, we were in business! I made burger bun sized rolls for pulled pork sandwiches, and they are SO good. Husband confirms – better than store bought! Thank you for the hard work of recipe testing this one, it’s incredible!
They look great, so glad you loved them!