
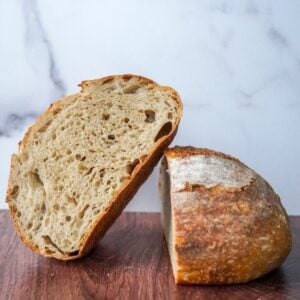
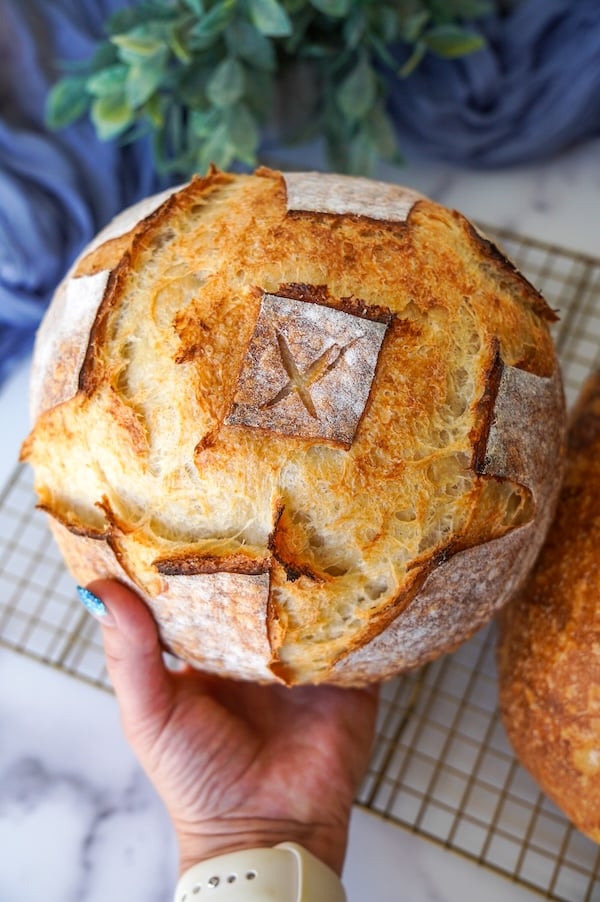
20% Whole Wheat Artisan Sourdough Bread Recipe
20% Whole Wheat Artisan Sourdough Bread Recipe
I love sourdough bread with a touch of whole wheat. It adds a lovely depth of flavor and additional nutrition that you don’t get from bread flour alone.
This recipe is super basic – we’ve cut out many of the fancy steps like autolyse, fermentolyse, and pre-shaping, and we’re mixing it all by hand.
I want this to be a quick, go-to artisan bread recipe that feels approachable and not like a big project that requires lots of time and attention.
Whole Wheat = Faster Proofing
When adding whole wheat to an artisan sourdough bread recipe, you do need to be more mindful of proofing times.
The nutrition in the whole wheat flour feeds the starter and speeds up fermentation. If you’re used to a specific timeline based on an all-bread-flour recipe, expect things to move a bit faster.
I probably wouldn’t do an overnight fermentation on a recipe like this – I’m fairly sure it’d be overproofed by morning unless kept in a very cool place.
Why You’ll Love This 20% Whole Wheat Artisan Sourdough Bread
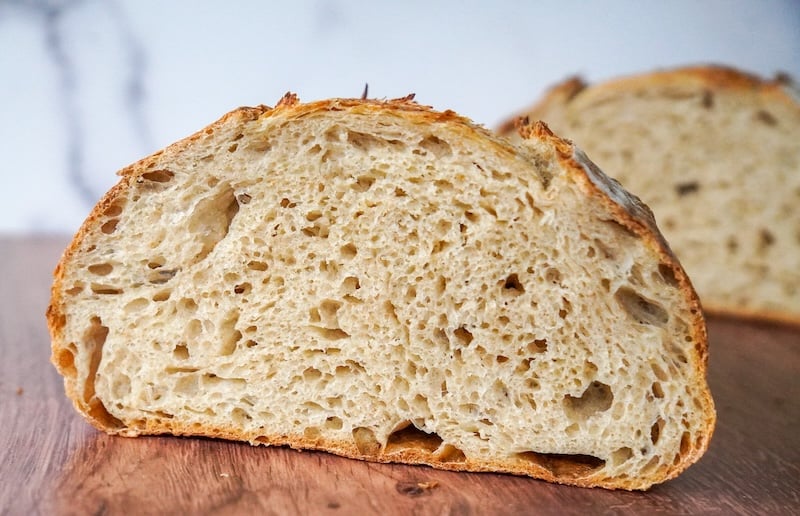
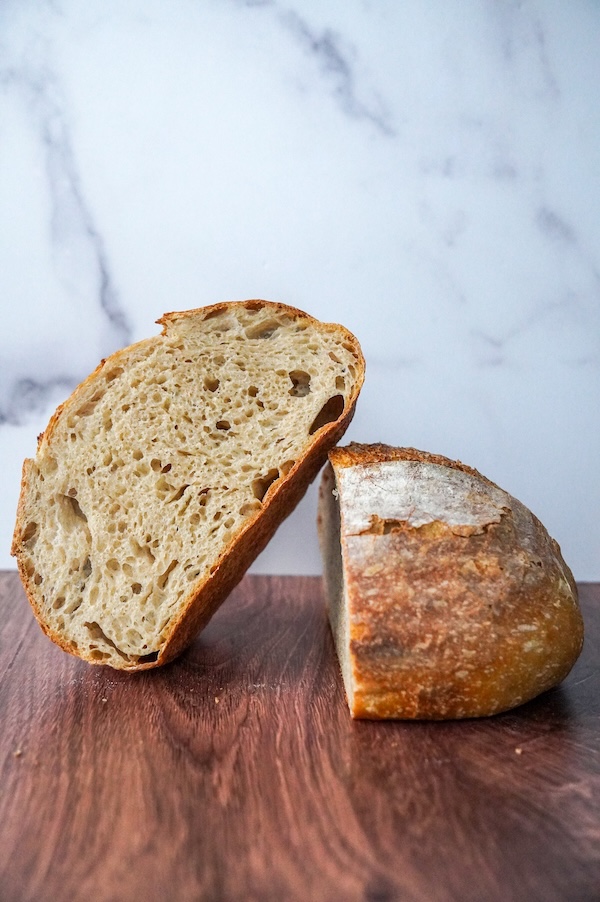
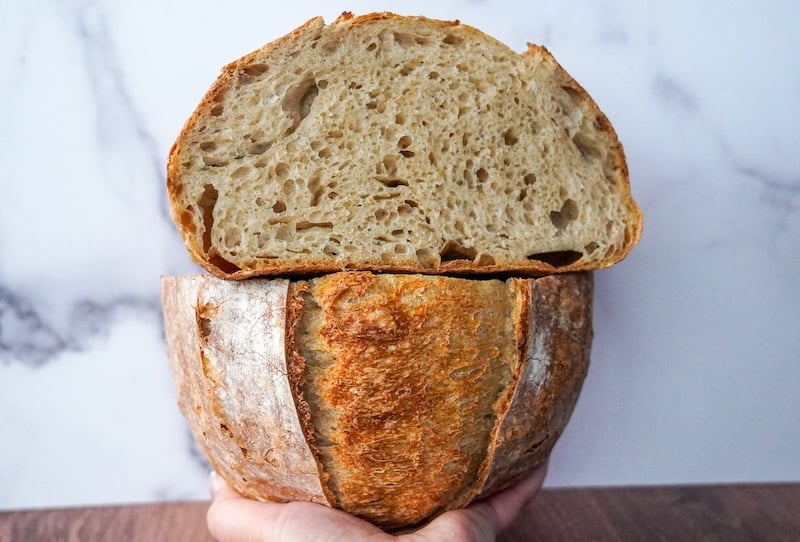
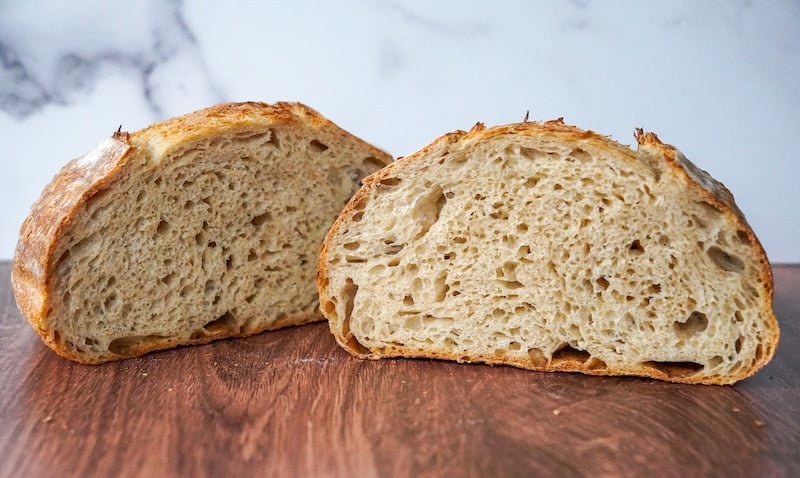
- Incredible flavor: Just enough whole wheat for a nutty, earthy, roasty flavor without losing that light, fluffy crumb I love in a classic artisan loaf.
- Better for you: Whole wheat brings extra fiber, minerals, and flavor – so it’s delicious and a little more wholesome.
- Easy recipe: I cut out some of the extra, optional steps to keep this recipe simple and easy.
- Perfect chance to try new flours: swapping 20% of the bread flour for whole wheat gives you the opportunity to test out new brands, options from local flour mills, or even some of your own freshly milled flour. You’ll get the lovely flavors and complexity without worrying that it’ll weigh down your loaf.
Baker’s Timeline
This is the exact timeline I used in my 74°F (23°C) kitchen. Timing will vary depending on your unique environment, starter strength, brand of flours, etc. But this is a general guideline to help you plan.
| Night before: 9pm | Feed starter |
| Morning: 8am | Mix dough/slap & fold |
| 9am | Stretch & fold/slap & fold |
| 10am | Stretch & fold |
| 10:30am | Stretch & fold |
| 1:30pm | Shape and refrigerate |
| Any time the next day | Score & bake |
Ingredients in 20% Whole Wheat Artisan Sourdough Bread
- Bread flour: The backbone of the loaf. High-protein bread flour gives your dough strength and helps create that light, open crumb. I’ve been loving Central Milling High Mountain bread flour (13.5% protein) and Ballerina Farms farm flour (affiliate link; 14% protein), but any high-protein bread flour will do!
- Whole wheat flour: Adds a nutty, earthy flavor, a richer color, and a little extra chew. The Organic Whole Grain Expresso Bread Flour from Cairnspring Mills (affiliate code TSG15 for a discount) is absolutely incredible. I’ve also made a loaf like this with the Heritage Whole Wheat Bread Blend from Sunrise Flour Mills (20% off when clicking my affiliate link) – so good!
- Water: I just use room temperature water from my tap. We have well water. If you have city water with chlorine added, use bottled spring water.
- Active sourdough starter: It should be bubbly and at its peak when you mix it in for the best rise and flavor.
- Sea salt: Brings out all the flavor in the dough and helps keep fermentation on track. Avoid salt with anti-caking agents on the ingredient list. Redmond’s salt is a great option – you can get 15% off on their site with affiliate code TSG15.
Step-by-Step Instructions for 20% Whole Wheat Artisan Sourdough Bread
Step 1: Feed Your Starter the Night Before
The night before, or about 10–12 hours before you plan to mix your dough, feed your starter at a 1:5:5 ratio.
Mix 13 g starter, 65 g room-temperature water, and 65 g flour together in a clean jar. This will leave you with 23 g of extra starter to keep your starter going after this bake.
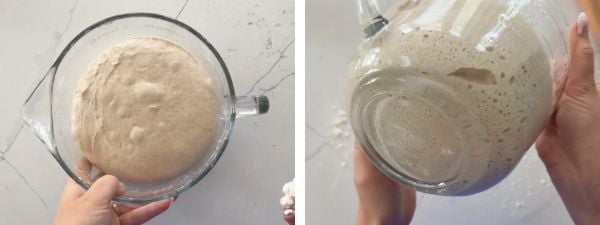
Lightly cover the jar and let it sit on the counter at room temperature overnight. By morning, it should be bubbly and at its peak.
If you need your starter ready faster, use a 1:1:1 ratio instead (45 g starter, 45 g water, 45 g flour). This usually peaks in 4–6 hours, depending on your kitchen temperature.
Check out my Sourdough Starter Feeding Ratio Calculators if you want to adjust your feeding schedules and nail your timelines every time.
Step 2: Mix the Dough
In a glass mixing bowl, stir together 350 g water and 120 g active sourdough starter with your hand or a Danish dough whisk until the starter looks mostly dissolved.

Add 400 g bread flour, 100 g whole wheat flour, and 10 g sea salt. Mix until all the flour is hydrated—about 3–4 minutes—and you’ve got a shaggy, sticky dough.

Step 3: Dough Strengthening
Now, it’s time to strengthen our dough!
I found that three rounds, each separated by a 30-minute rest, strengthened my dough sufficiently. If you feel you need to add an extra, definitely go ahead and do that! We are looking for a strong, smooth dough that holds its shape.
I did:
- Stretch and folds and slap and folds (rest 30 minutes)
- Stretch and folds (rest 30 minutes)
- Stretch and folds (cover and let finish bulk fermentation)
Start by wetting your hands so the dough doesn’t stick. Do one full set of stretch and folds: grab the top edge, stretch it up until you feel some resistance, and fold it down over itself.
Rotate the bowl a quarter turn and repeat, working your way around until all four corners have been folded in.
Next, turn the dough out onto the counter and give it a quick round of slap and folds—about 1–2 minutes.

Pick it up, slap the bottom half onto the counter, and fold the top over. Turn, repeat, and keep going until the surface looks smoother and the dough holds its shape a little better.
Technical note: The technical way to slap and fold is actually slap, stretch, and fold. But I find that stretching this dough before folding it over causes tearing. Reserve that extra step for a higher hydration dough!
Cover the bowl and let the dough rest at room temperature until bulk fermentation is complete.
Step 4: Monitor the Bulk Fermentation
In my 74°F (23°C) kitchen, bulk fermentation took about 5.5 hours total (it starts when you first mix the dough).

Here is what I look for before moving on to shaping:
- Bigger and puffier – risen in volume and looks puffy like a cloud
- Jiggly like Jell-O when you give the bowl a gentle shake
- Bubbles visible just under the surface and along the sides and bottom of the bowl
- Pillowy and airy when you gently tap the top
Once you see these signs, you’re ready to move on to shaping.
Step 5: Shape the Dough
Lightly flour your counter and gently turn the dough out, being careful not to deflate it too much or pop the bubbles.
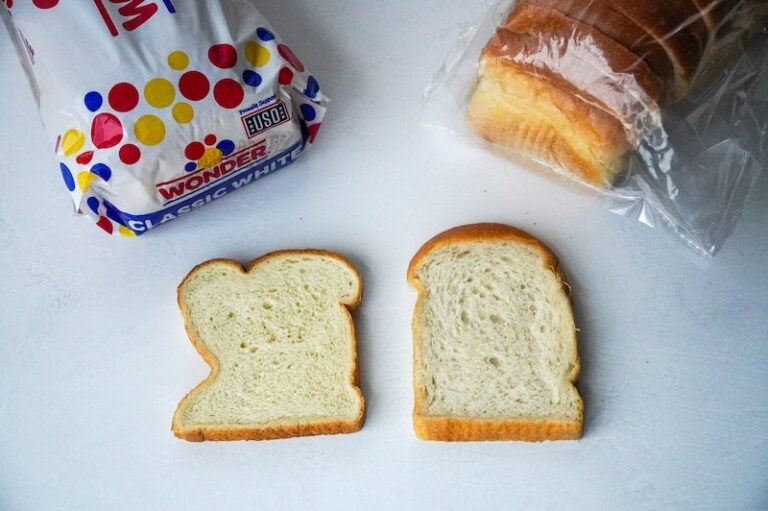
Sidebar: You might be wondering why I instruct you to roll out the bubbles in this sandwich loaf, but now I’m saying to be gentle with them here. We’re making two different types of bread with different goals. A sandwich loaf needs a tight, even crumb that can hold up to whatever you’re putting on it. But this artisan loaf? We want a more open crumb with a light, airy texture. Leaving the bubbles in the dough will also help achieve a taller loaf with better oven spring. Different bread, different approach.
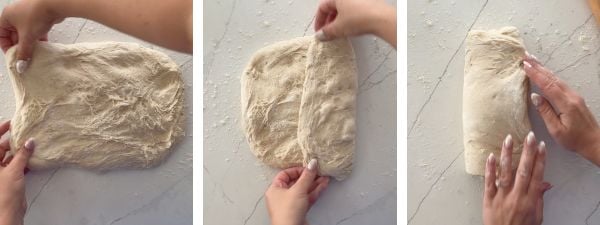
Stretch it out into a loose rectangle without pulling too hard.

Imagine it divided into three vertical sections, and fold the right third over the center third, then fold the left third over that.

Then, starting at the top, roll the dough down toward you into a log, keeping the roll snug.

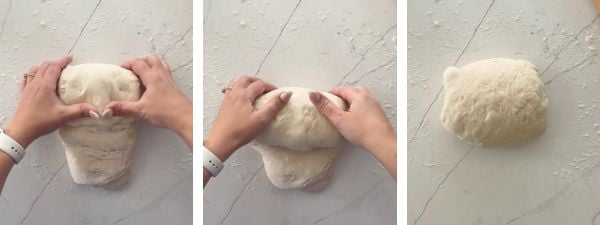
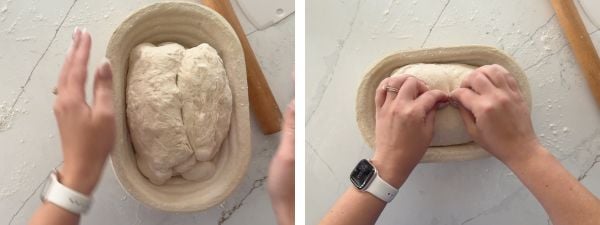
When you reach the end, pinch the ends closed with your fingers, and place the dough seam-side up in a well-floured banneton.

Stitch the seam together and lightly dust the top with rice flour (affiliate link), and cover.

Another sidebar: I typically do the caddy clasp shaping technique, popularized by Wayne Caddy. It’s very simple – just clasp the dough together like a book and stick it in the banneton! The reason I’m not doing that here is that this dough was on the looser side, so it needed a little more help to achieve good structure and surface tension. Don’t be afraid to switch up your final shaping technique to match what your dough needs.
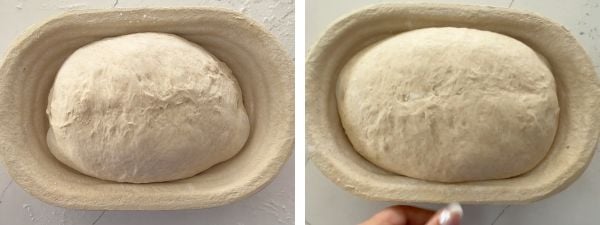
If your dough feels like it could use a little extra rise before the cold proof, let it sit on the counter for an extra 30–40 minutes (optional).

Then, place it in the fridge overnight for a cold proof.
Step 6: Bake the Bread
The next day, preheat your oven to 450°F (230°C) convection with your Dutch oven inside. You want the inside of that pot really hot for the best oven spring, so once the oven beeps, let it keep heating for another 10 minutes.
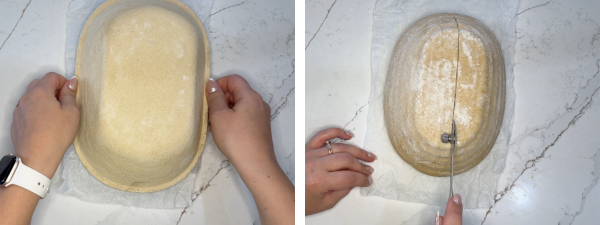
Turn your dough out of the banneton onto a piece of parchment paper or a silicone sling, seam-side down. Score the top with a bread lame or sharp razor.
Parchment paper tip: If you use parchment like I do here (instead of a bread sling), consider scrunching it up a few times! This softens the parchment and prevents it from digging into your dough, which can cause creasing during baking. You can also run the crumpled parchment under water and ring it out before using – this injects a little extra steam in the Dutch oven during baking, leading to more blisters on the crust.

Carefully lift the dough (parchment and all) into the hot Dutch oven, cover with the lid, and bake for 25 minutes.

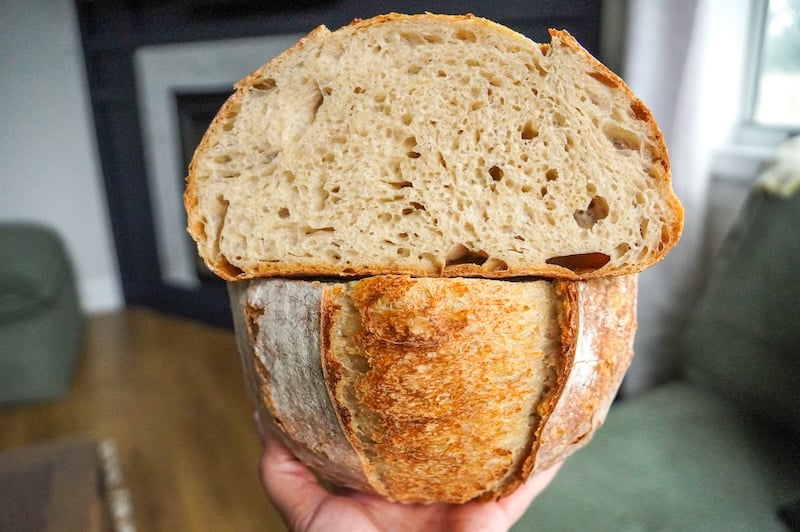
Remove the lid and bake uncovered for another 10 minutes, or until the crust is a deep golden brown and the internal temperature is 205–210°F (96–99°C).

Transfer the loaf to a wire rack and let it cool completely before slicing. (I know… it’s torture to wait, but cutting too soon will give you a gummy crumb, and we didn’t do all this work for gummy bread.)
FAQs
While whole wheat is excellent for adding flavor and nutrition, it weighs down the bread and can lead to more dense results. Swapping about a fifth of the bread flour for whole wheat strikes a good balance between the benefits of whole wheat and the soft, springy qualities of bread flour. When you start going above 20% whole wheat, you need to add in some extra steps and techniques to achieve a good result.
Yes, whole wheat ferments faster than bread flour. Whole wheat has more nutrients, which basically means more food for your starter’s yeast and bacteria. That can speed things up, so keep an eye on your dough!
I’ve made variations of this exact recipe dozens of times over the last year or two, and honestly, this is where you can have some fun experimenting! Since we’re only using 20% whole wheat, you’ve got room to play around without worrying about weighing down your loaf. I love trying flours from small mills in this dough – you get all that amazing flavor and character without sacrificing the light, airy texture we’re after.
The bottom line? Any brand of whole wheat will work beautifully. Just keep an eye on your dough consistency – some flours are more absorbent than others, so don’t hesitate to add a splash more water if needed to get that smooth, slightly tacky feel we’re looking for.
This dough has a total hydration of 73%. Check out my hydration calculator if you need help with this math! Feel free to adjust how much water you put in your dough as you mix – if your flours are more absorbent than mine, you may need a splash more.
20% Whole Wheat Artisan Sourdough Bread Recipe
Equipment
- 3/4 L Weck jar (for your starter)
- Tovolo spatula (for feeding your starter)
- 2-quart mixing bowl (fits 1 loaf perfectly)
- Rice flour (for dusting your banneton)
- Oval banneton (5% off with code TSG5) | Size I'm Using: Oval – Spiral MD
- Dutch oven ($15 off with code REBEKAH15)
Ingredients
- 350 g water
- 120 g active sourdough starter
- 400 g bread flour
- 100 g whole wheat flour
- 10 g sea salt
Instructions
- Before you begin: About 10-12 hours before you plan to make this recipe, feed your starter a 1:5:5 feeding ratio. I suggest 13g starter, 65 water, 65g flour. That'll give you a little more than you need for this recipe. If you need your starter ready to bake with sooner, consider a 1:1:1 feeding ratio, or about 45g starter, 45g water, 45g flour, which should peak within 4-6 hours.
Mix Dough
- In a glass mixing bowl, combine 350 g water with 120 g active sourdough starter. Then, add 400 g bread flour, 100 g whole wheat flour, and 10 g sea salt. Mix with your hands or a Danish dough whisk until you reach a shaggy dough (3-4 minutes). Cover with plastic wrap or a bowl cover and rest for 30-60 minutes.Note: the bulk fermentation has begun.


Strengthen Dough / Bulk Fermentation
- Wet hands to prevent sticking. Stretch and fold all four corners of the dough. Turn out dough and slap and fold until the top is smooth and the dough has strengthened (1-2 minutes). Cover and let rest for 30-60 minutes.
- Wet hands. Stretch and fold all four corners of the dough. Cover and let rest for 30 minutes. Do one more round of stretch and folds; then, let the dough rest (covered) until the bulk fermentation is done.
- Bulk fermentation is done when: the dough has increased in volume, it jiggles when you shake the bowl, there are bubbles under the surface and all around the sides and bottom of the bowl, and when you tap the surface of the dough, it feels very pillowy and aerated. In my 74°F (23°C) kitchen, this took a total of 5.5 hours.

Shape Dough
- Gently turn out dough onto a floured surface. Gently stretch into a rectangular shape. Imagine the dough being divided into three equal vertical portions. Lift the right portion over to the center of the dough. Repeat with the left portion.
- Starting at the top of your dough, roll it down towards you like a log, being very gentle as you roll.
- Pinch the seams on the ends and place into a floured banneton. Stitch the seam closed, dust with rice flour, and cover.
- Feeling like your dough needs more rise? You can let it rise a little longer before refrigerating. I felt this way and let the dough rest on the counter for an additional 40 minutes before refrigerating.
Bake Bread
- The next day, preheat your oven to 450°F (230°C) convection (or 475°F/250°C conventional) with a Dutch oven inside. After it has preheated, give it 10 more minutes to ensure your Dutch oven is super hot.
- Turn your dough out of your banneton onto parchment paper. Score the top and place in your hot Dutch oven.
- Bake covered for 25 minutes. Remove the lid and bake an additional 10 minutes, or until the top is nicely browned and the internal temperature is between 205-210°F (96-99°C). Let fully cool before slicing.
Video

Notes
Conclusion
Simple and packed with wheaty flavor, this 20% whole wheat sourdough bread is the kind that earns a permanent spot in your baking rotation.
If you give it a try, let me know how it turned out in the comments! I’d also love to hear what flour brands and types you used.
Other staple sourdough bread recipes to have on hand:


Excellent recipe…a joy to work with this dough. I used Bob’s Red Mill Artisinal Bread Flour and KA whole wheat. I also added 50g more of water when I added the salt. As with all your recipes it turned out great!
So happy to hear that, thanks Rhonda!
This is my go to recipe! I use KA bread flour and FMF hard white wheat. I have made it by hand and now with my new Ooni. Perfection, everytime. Thanks Rebeca!
Looks amazing!! Look at that belly!