
The Best Sourdough Buttermilk Biscuit Recipe
My husband asked me to make sourdough biscuits and gravy, so like most people, I started pulling up recipes online. He stopped me and said, “No – I want you to do your magic and make your own recipe.”
I turned to him and said, “What do I know about making biscuits?!”
But he knows me… as soon as I said that out loud, that little lightbulb went off and my brain started churning. The research, testing, and tweaking soon commenced, and I landed on a method that produces the most tender, flaky biscuits my husband and I have ever had.
“If heaven were a food, it would be these biscuits!” –Recipe tester from Ohio
These biscuits start with a simple overnight pre-ferment – you only need 25g of starter (discard works too!) – and use a cut-and-stack lamination that creates tall, pull-apart layers.
They freeze beautifully, pair perfectly with sausage gravy (recipe included in this post!) or just butter and honey, and 365 recipe testers gave them an average rating of 4.78 out of 5.
“These aren’t your grandma’s biscuits – they’re BETTER! Must make!” –Recipe tester from Casper, Wyoming
Disclaimer: Some of the products I recommend in this post are affiliate links – if you choose to purchase after clicking one of my links, I may earn a small commission, which helps fund this website, recipe development, and monthly giveaways. I sincerely appreciate your support.
Why You’ll Love These Sourdough Buttermilk Biscuits
- Simple overnight pre-ferment: Mix together just 25g of sourdough starter (or even discard!), buttermilk, and self-rising flour before bed. Wake up to a puffy, flavorful pre-ferment that adds incredible flavor and tenderness.
“I am 57 years old and have NEVER been able to make a biscuit. These have worked every single time.” –Recipe tester from Atlanta, Georgia
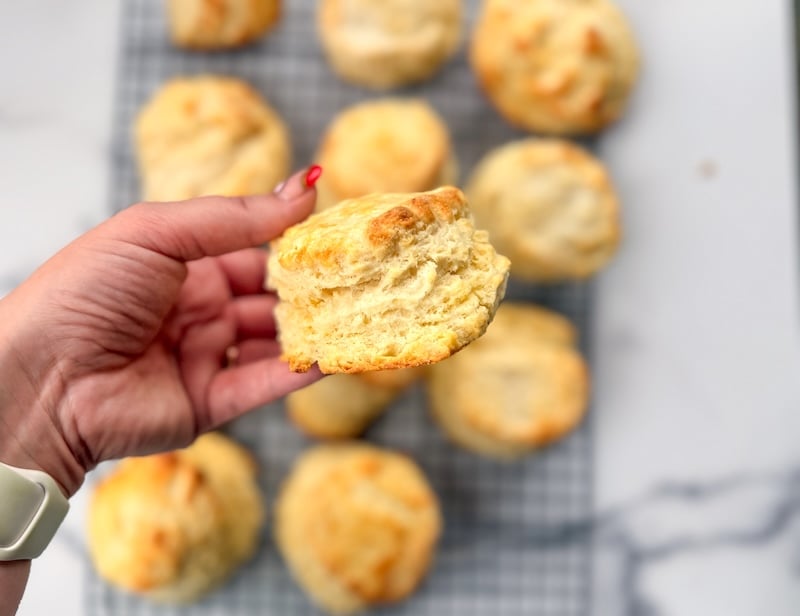
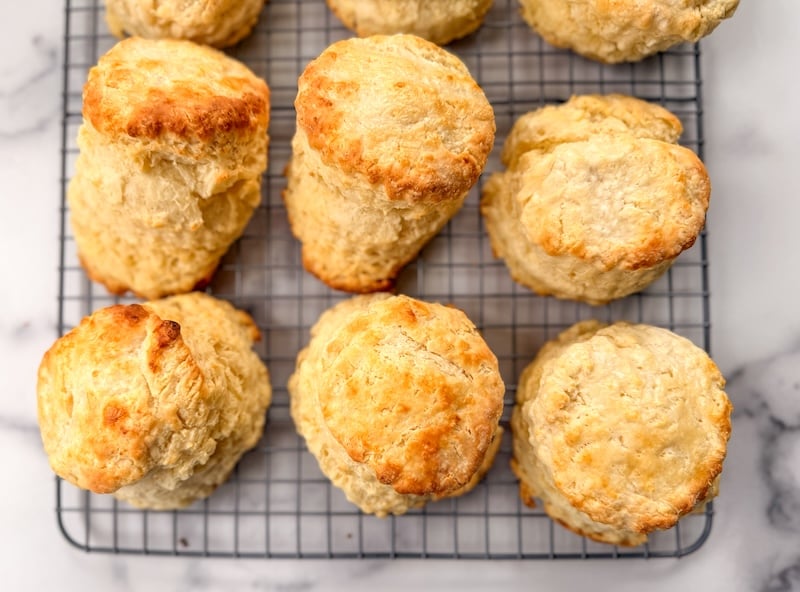
- Unbelievably flaky layers: The lamination technique – cutting the dough with a bench scraper and stacking the layers – creates those tall, pull-apart layers you see in the photos. It’s faster and easier than folding, and it works the dough less, resulting in more flakiness.
“A professional level recipe made for beginners!” –Recipe tester from McHenry, Illinois

- Tender and buttery: European-style butter (like Kerrygold, the tester favorite by a landslide) makes a real difference here. The higher butterfat means a richer flavor and a more tender biscuit.
- Freezer-friendly: Multiple testers confirmed that these biscuits freeze beautifully. Cut them, freeze them on a sheet pan, and transfer to a freezer bag. Then, bake straight from frozen with just a few extra minutes. Several testers said they’ll never be without a stash of frozen biscuits again.
“If you are looking for a flaky, buttery biscuit recipe, your search is over!” –Recipe tester from Prescott Valley, Arizona
- Recipe tested to perfection: 365 bakers tested this recipe and gave it an average rating of 4.78 out of 5, with 96% saying they’d recommend it to a friend. And that’s BEFORE I made improvements to the recipe based on all their feedback. This recipe has been through the wringer.

“My husband had to nap after breakfast because he ate so many biscuits.” –Recipe tester from Smyrna, Tennessee
The Recipe Testing Journey
I’ll be honest… I was nervous about sharing a sourdough biscuit recipe.
People get heated about biscuits. Everyone has their own sense of nostalgia, whether it’s how their grandmother did it or even just popping that Pillsbury can (no judgment!).
But after several rounds of my own testing, and then 365 testers confirming that these biscuits are the real deal, I’m confident this recipe earns its place in your rotation.
“I have tried to make my grandmother’s biscuits for years. She threw in a bit of this and that and they came out perfect. This I can follow and they taste a lot like hers.” –Recipe tester from Gastonia, North Carolina
“I love biscuits but rarely have them because it’s hard to find a good biscuit. I hate to say it, but these taste as good or better than my mom’s biscuits.” –Recipe tester from Chesapeake, Virginia
“Pillsbury who!?!” –Recipe tester from San Diego, California
6 key lessons I learned to make better biscuits
Here are the 6 main things I discovered along the way.
- Cut and stack instead of fold. This was my biggest aha moment.
In my early tests, I was folding the dough over itself like a traditional lamination. Then I switched to cutting the dough with a bench scraper and stacking the pieces – and it was SO much better.


It’s faster, it’s easier, it works the dough less, and it creates even flakier layers. I’ll never go back.
- Salt adjustment for self-rising flour. Several testers who used self-rising flour found the biscuits a bit too salty.
If you’re using self-rising flour and salted butter together, omit the added salt entirely. If you’re using self-rising flour with unsalted butter, you only need about 2g of salt. This made a noticeable difference.
- European-style butter is worth it. Kerrygold was the most popular butter brand among testers (by far), and for good reason. I also tested Plugra and really enjoyed it.
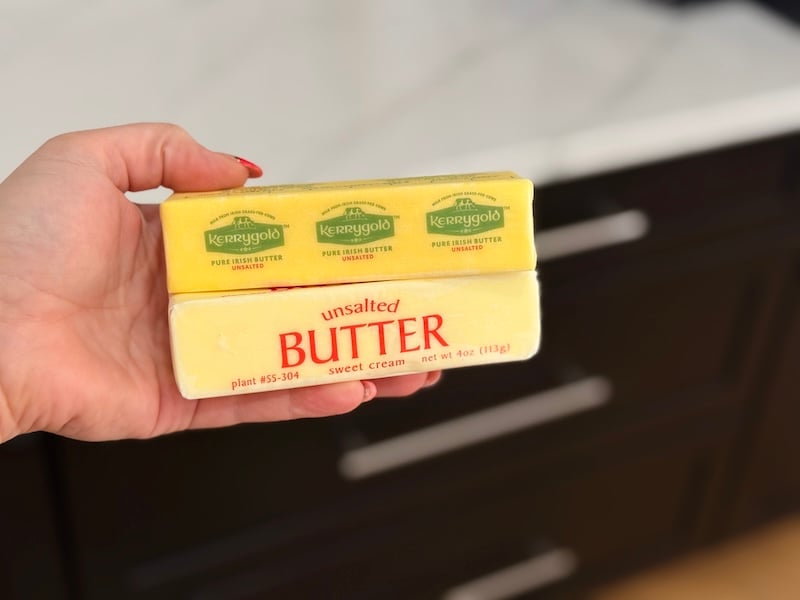
European-style butters with 82%+ butterfat produce taller, flakier biscuits. American butter (80% butterfat) still works, but testers consistently reported flatter results.
One tester mentioned mixing Kerrygold with a cheaper butter to offset the cost – she said it still turned out great, but you could see and taste the difference where the Kerrygold was.
- Self-rising flour vs. all-purpose. About 46% of testers used White Lily self-rising flour, 23% used all-purpose, and 31% used another brand of self-rising flour.
White Lily produced the best results overall (it’s a softer wheat flour that’s practically made for biscuits), but testers had great success with other brands, too – King Arthur, Gold Medal, and several regional brands all worked well.
I’ve included a full all-purpose flour substitution in the recipe notes, and make sure to reference it, as the ingredient amounts differ quite a bit.
- The pre-ferment is forgiving. This was the area where testers had the most questions. 40% mentioned something about the pre-ferment in their survey responses.
The good news: it’s very forgiving! It doesn’t need to double or triple. It just needs to be puffy and aerated. You’ll also see bubbles all around the sides and bottom of your bowl.


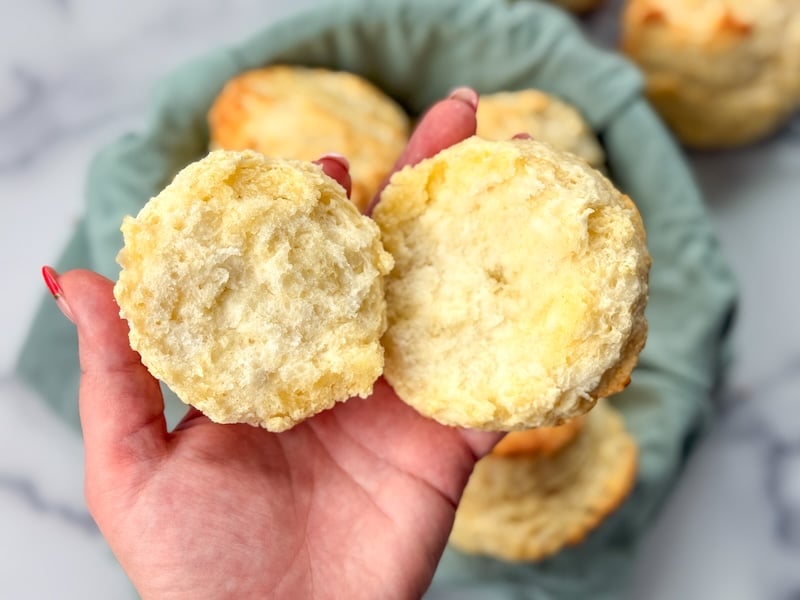
- Same-day bake vs. long ferment. The best biscuits – tallest rise, most impressive layers – come from baking right away. The downside? Part of the flour isn’t fermented. While the pre-ferment obviously is, the added flour is not.
You absolutely have the option to do a long ferment, either at room temperature or in the fridge overnight.
The baking powder loses most of its power over time, so long-fermented biscuits won’t rise quite as tall. They’ll be a bit flatter, but the flavor is incredible, and you get all those gut health benefits of a fully fermented dough.
In the following photos, the biscuit with more flaky layers was baked right away. The second biscuit, which is flatter, was left to ferment at room temperature for about 11 hours.


Meet the Recipe Testers
This recipe was tested by 365 home bakers, and they did not hold back. 😂
Testers used:
- White Lily, King Arthur, Gold Medal, and regional self-rising flours
- All-purpose flour (with the adjusted ingredient list in the Notes)
- Hand mixing, stand mixers, and food processors
- Sheet pans, cast iron skillets, and different biscuit cutter sizes
- Cold kitchens, hot kitchens, and everything in between
The final result: an average rating of 4.78/5, with 96% saying they’d recommend these to a friend.
Which, as the person who was nervous to post a biscuit recipe at all… is very comforting.
“Well butter my biscuit and call me Sally – these are incredible!” –Recipe tester from Germantown, Tennessee

Baker’s Timeline
These times are flexible. There is little concern about the pre-ferment overproofing while you sleep.
| 8 PM (before bed) | Mix pre-ferment. Cover and leave on counter overnight (8–12 hours). |
| 7 AM (when you wake up) | Pop pre-ferment in the fridge to chill. Grate butter onto a parchment-lined sheet pan and freeze (at least 45 minutes). |
| Preheat oven to 475°F (250°C) conventional. | |
| 8 AM | Make the dough, laminate, cut, and place on tray. |
| Optional: Refrigerate cut biscuits up to 24 hours or let ferment at room temperature for 8-12 hours. Biscuits will be flatter, but they will be fully fermented. | |
| 8:15 AM | Bake. |
Tip: You can make the pre-ferment and freeze the grated butter the night before, so everything is ready to go in the morning. One tester even prepped her dry ingredients the night before, which made the morning assembly super quick.
Equipment Variations & Adjustments
Food processor vs. by hand
Both work great – the goal is to keep visible butter pieces in the dough. The food processor is faster, but it’s so easy to overmix. Pulse only for a few seconds and check on the mixture – you want to see little butter pieces.
Mixing by hand tends to leave slightly larger butter flakes, which can mean slightly flakier layers.
Round cutter vs. squares
A round cutter gives you the classic biscuit look with beautiful layers, but you’ll have more scraps to re-roll.


Cutting into squares is faster and leaves almost no waste, but be sure to use a very sharp knife or bench scraper and cut straight down. It’s easier to accidentally seal the edges when cutting this way, which will prevent flaky layers.
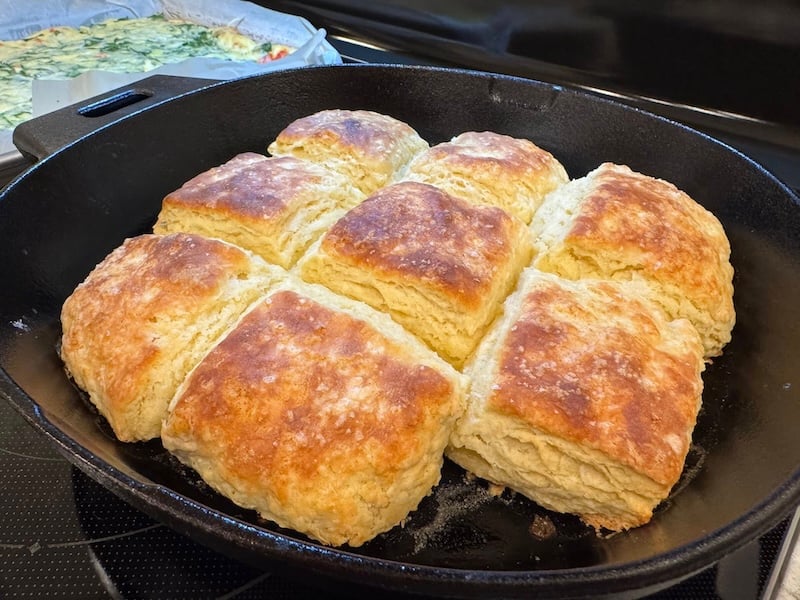
Sheet pan vs. cast iron skillet
A sheet pan gives you flakier edges all the way around (my preference).
Cast iron is great for extra-tall biscuits, because the close sides help them rise up instead of tipping over.
Sourdough Buttermilk Biscuit Ingredients
For the pre-ferment:
- Active sourdough starter (25g): This is a tiny amount – and discard works too! While I always prefer to use a healthy, peaked starter, it’s not as critical in this particular recipe. As long as it has been fed somewhat recently, you’re good.
- Buttermilk (250g): Cold from the fridge is fine. Full-fat buttermilk is ideal, but several testers used low-fat with great results. If you don’t have buttermilk, you can make a quick substitute: add 1 tablespoon of white vinegar or lemon juice to 250g whole milk. Let it sit for 5 minutes before using.
- Self-rising flour (325g): White Lily is my top pick (it’s a softer wheat flour that’s practically made for biscuits), but other brands work well, too. See the Substitutions section if you want to use all-purpose flour – the amounts change quite a bit. Also, my local grocery store doesn’t carry it, but White Lily does make an unbleached version.
For the main dough:
- Unsalted European-style butter (227g / 2 sticks): This is a very important ingredient! European-style butters with 82%+ butterfat (like Kerrygold, Plugra, or Vital Farms) produce taller, flakier biscuits than standard American butter at 80%. Kerrygold was the tester favorite by a landslide. If you use salted butter, omit the added salt entirely.
- Self-rising flour (275g): Same as above – White Lily is my preference, but other brands work. Just note that self-rising flour already contains salt and leavening, which is why the added amounts of baking powder and salt in this recipe are relatively small.
- Baking powder (13g): This gives the biscuits their big, tall rise. Combined with the leavening already in self-rising flour, it’s what makes these biscuits puff up beautifully in the oven.
- Sugar (15g): Just a touch – adds a hint of sweetness and helps with browning.
- Salt (2g): Because self-rising flour already has salt in it, we only need a small amount here. If you’re using salted butter AND self-rising flour, skip the added salt completely. I use Redmond’s Real Salt (15% off with code TSG15), but any salt works fine.
- Buttermilk (180g): Cold from the fridge. Cold ingredients = cold butter = flaky biscuits.
- Bench flour: You’ll need extra self-rising flour for dusting your work surface during lamination. Don’t be shy with it – this dough can be sticky!
“My biggest critics (my teenagers) both said it’s the best biscuit they have ever had.” –Recipe tester from Gainesville, Florida
Ingredient Substitutions
- All-purpose flour: You can absolutely use all-purpose flour, but the recipe changes significantly. Don’t just swap it 1:1 – check the Recipe Notes for the full revised ingredient list. About 23% of testers used AP flour and had great results with the adjusted amounts. King Arthur, Gold Medal, and Kirkland/Costco AP flour were all popular choices.
- Other self-rising flour brands: White Lily produced the best results overall, but testers had success with King Arthur, Gold Medal, and several regional brands. About 31% of testers used a self-rising flour other than White Lily and still loved their biscuits.
- Freshly milled flour: A few testers used freshly milled flour with the all-purpose substitution and were happy with the results. Heritage flours also work well here. I’ve personally made the all-purpose version and used Sunrise Flour Mills’ all-purpose heritage flour (get 20% off when using my link), and it came out amazing.
- American butter: Standard 80% butterfat butter will work, but testers consistently reported flatter results compared to European-style butter. One clever tester mixed Kerrygold with a cheaper butter to offset the cost – she said it still turned out great, but you could see and taste the difference where the Kerrygold was.
- Buttermilk substitute: If you don’t have buttermilk, add 1 tablespoon of white vinegar or lemon juice to 250g whole milk, and let sit for 5 minutes. It won’t be exactly the same, but it works in a pinch.
- Salted butter: You can use it! Just omit the 2g of added salt in the main dough. Several testers used salted butter and just skipped the salt.
How to Make Sourdough Buttermilk Biscuits (Step by Step)
Step 1: Make the pre-ferment
Before bed, mix 25g active sourdough starter (or even discard!), 250g buttermilk (cold from the fridge), and 325g self-rising flour (White Lily brand is my top pick) in a stand mixer fitted with the paddle attachment – or in a mixing bowl with a Danish dough whisk.
We don’t want to develop gluten, so only mix until just combined. It won’t be smooth, and that’s fine.
Cover and let ferment overnight on the counter (8–12 hours).
In the morning, your pre-ferment should look puffy and aerated with bubbles all around the sides and bottom of the bowl. It doesn’t need to have doubled or tripled – just visibly puffed up with some bubbles.
Don’t worry about overproofing; this pre-ferment is very forgiving. Pop it in the fridge to chill while you prep the butter.
Step 2: Prep the butter
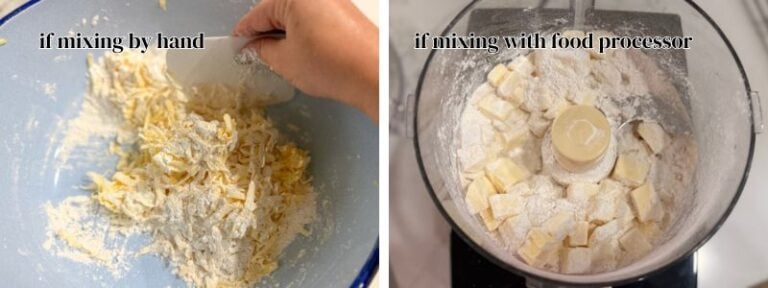
How you prep the butter depends on how you plan to mix the dough.
If mixing by hand: Grate 227g (2 sticks, or 16 tbsp) unsalted European-style butter onto a parchment-lined half sheet tray and freeze for at least 45 minutes. Grating before freezing gives you thin shreds that coat easily in flour and stay cold while you work. You can also grate the butter the night before and freeze it overnight – one less thing to do in the morning.
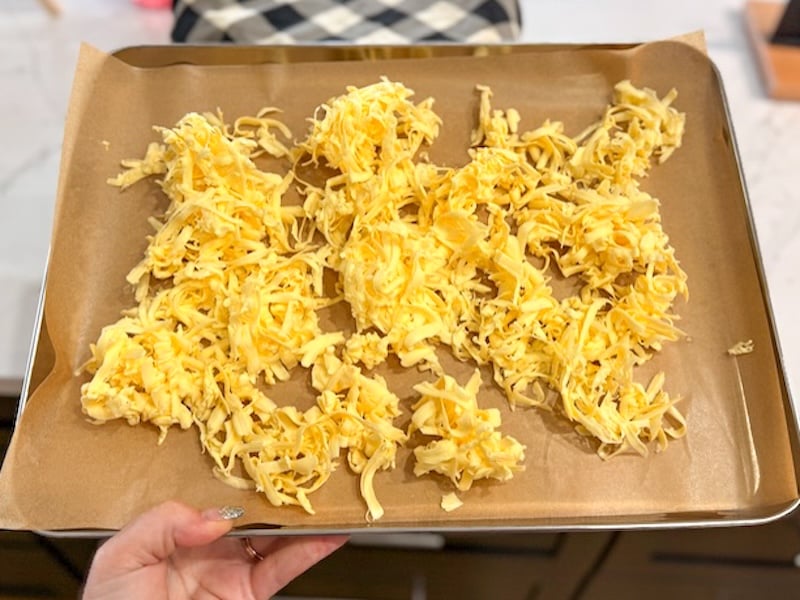
If using a food processor: Cut 227g (2 sticks, or 16 tbsp) unsalted European-style butter into 1/2-inch cubes and freeze for at least 45 minutes. The food processor will do the shredding for you – no need to grate by hand.


Step 3: Mix the dough
If mixing by hand: Whisk together 275g self-rising flour, 13g baking powder, 15g sugar, and 2g salt in a large bowl. Add the frozen shredded butter and mix with a bowl scraper (or your hands) until all the butter is coated in flour. You want to work quickly so the butter stays cold.
If using a food processor: Add 275g self-rising flour, 13g baking powder, 15g sugar, 2g salt, and the frozen butter cubes to the food processor.
- Pulse for a few seconds, or until the butter is broken into pea-sized pieces.

- Do not overmix! You should still clearly see butter pieces throughout. If you can’t see butter, you’ve gone too far, and your biscuits won’t be as flaky (ask me how I know!).
- Transfer the mixture to a large bowl before adding the wet ingredients.


Add 180g buttermilk (cold from the fridge) and all of the chilled pre-ferment. Chop and mix by hand with a bowl scraper until just combined, about 45–60 seconds.


You should still see many butter pieces throughout, and there may be small flour bits that aren’t fully mixed in. This super shaggy mess is exactly what we want.
As one tester, Jordan, put it:
“The messier they look going in, the better they are coming out of the oven for sure!”

Step 4: Laminate
Generously flour your work surface and dump out the dough. Flour the top, too; this dough may be sticky in areas, so don’t be shy with bench flour.
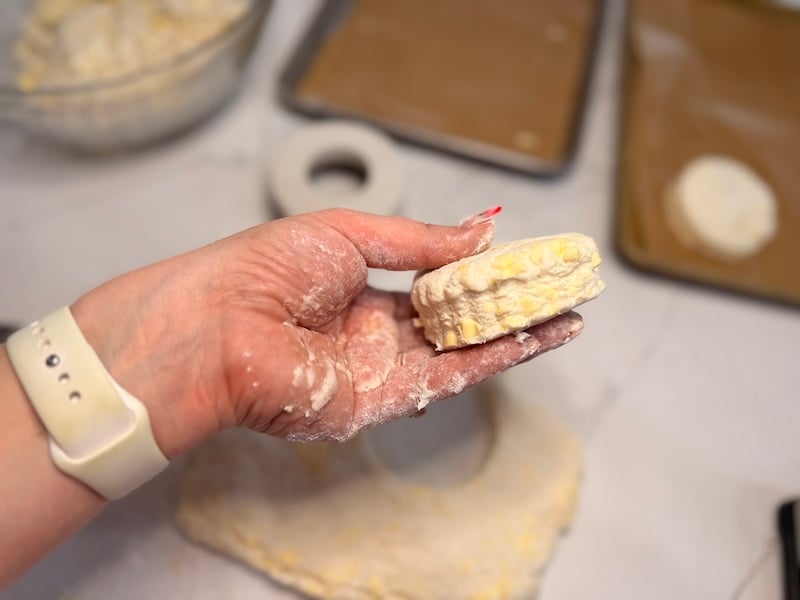
Pat into a rectangle about 1-1.5″ thick. Using a bench scraper, cut the rectangle into 4 pieces and stack them on top of each other. Pat down slightly.
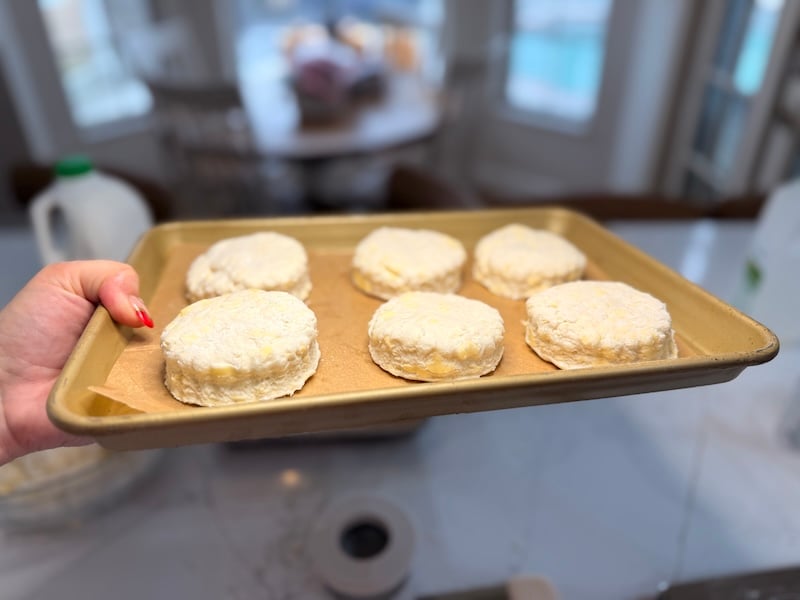
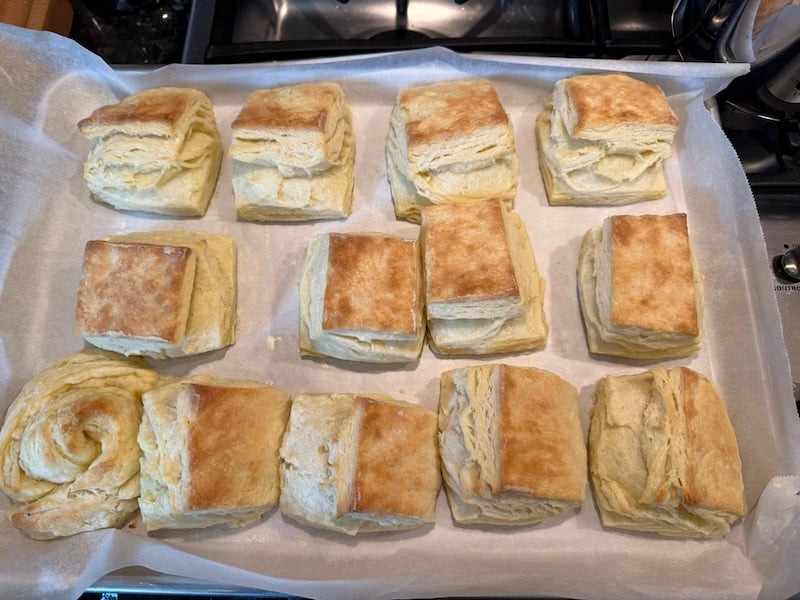
Note: the following photos are from a half-batch (6 biscuits), so the size may appear smaller than yours if you are making a full batch (12 biscuits).


Now, I cut the dough into two equal pieces and stack them again. Sprinkle more bench flour as needed, and pat down (or roll with a rolling pin), until the dough is 1-1.5″ thick.


Be warned: The thicker your dough, the taller your biscuits will be, which isn’t always ideal, as some can topple or bake weirdly.


Don’t press the dough thinner than 1 inch during lamination. If you go too thin, you’ll compress the layers and end up with stout biscuits.
Add more bench flour as needed. If the dough starts sticking to the counter, use your bench scraper to push more flour underneath. Several testers found that a silicone baking mat also works great for reducing sticking.
Step 5: Cut and arrange
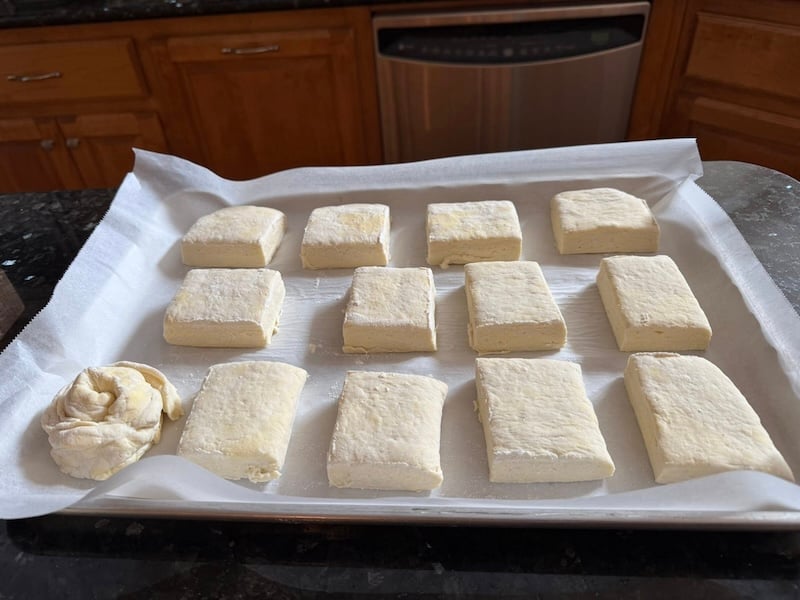
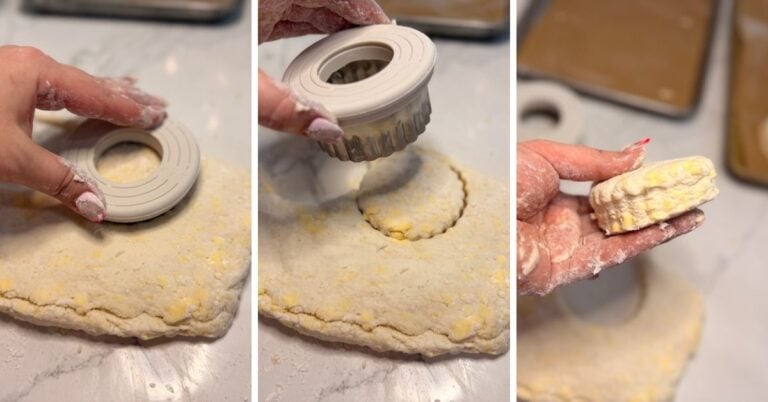
Round biscuits: Dip a 3–3.5 inch round biscuit cutter in flour and press straight down – don’t twist! Twisting seals the edges and prevents the biscuits from rising as tall. Gently re-roll scraps to cut the remaining biscuits. You should get about 12 from a single batch.

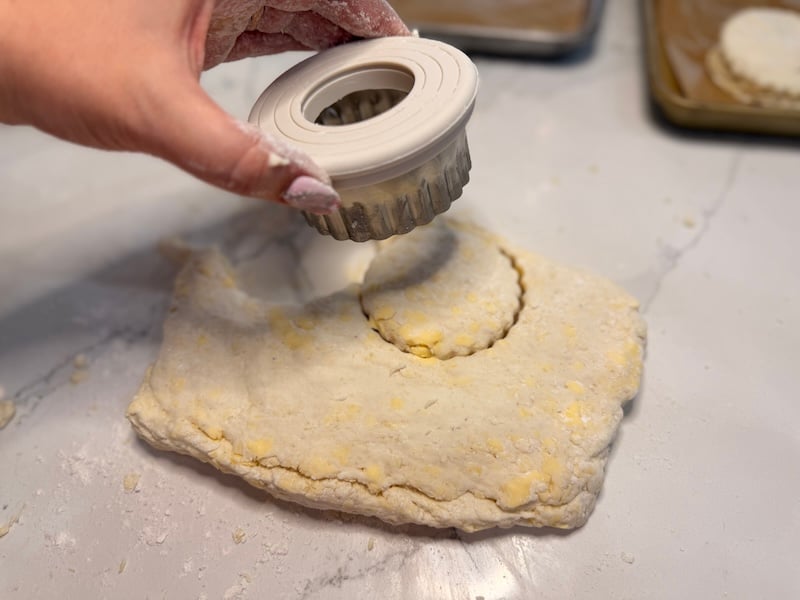
Square biscuits: Many testers cut their biscuits into squares with a bench scraper instead of using a round cutter and had fantastic results. This is faster, and there are virtually no scraps to re-roll. However, you need to make sure to cut sharply and straight down, or you risk losing the flaky edges.
Heck, you can even cut your biscuits into hearts if you want, like recipe tester Jodi H. did!
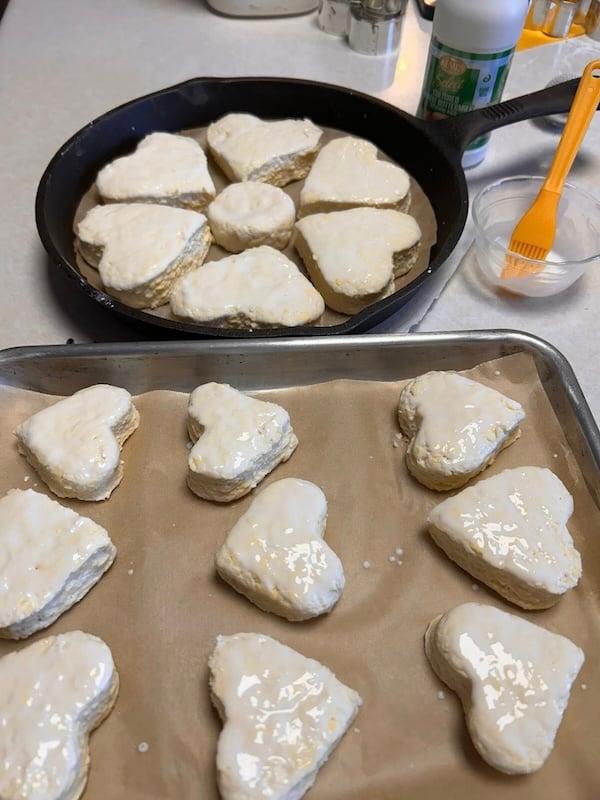
Place biscuits next to each other on your parchment-lined sheet tray.
I personally like a little space between each biscuit, because if they touch each other during baking, it seals off the edge, and you don’t get those super flaky layers all the way around the biscuit.
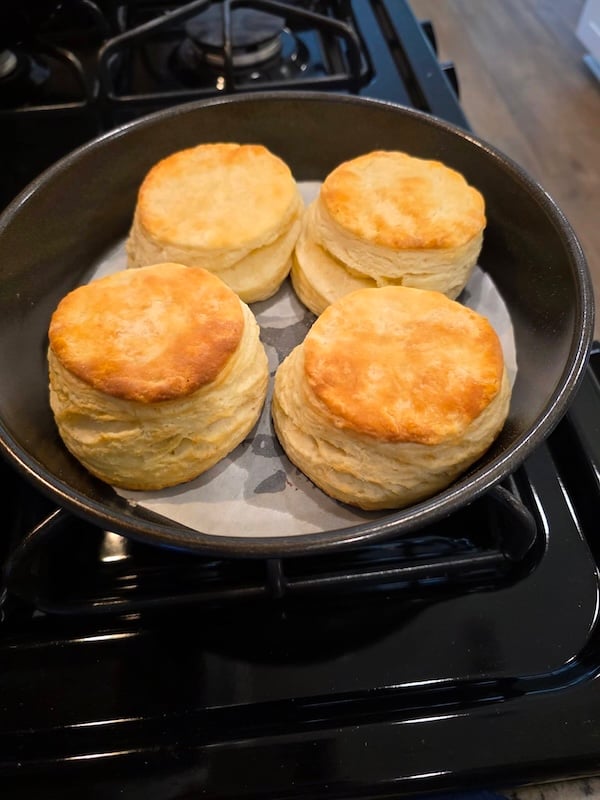
However, if you have super-thick biscuits, baking them closer together helps them rise up instead of toppling over during baking. A cast-iron skillet can also work great for this. Many testers preferred this to the sheet tray.
Gently re-roll scraps to cut the remaining biscuits. The re-rolled ones will look funky, but they’ll still taste delicious!
You could also do what recipe tester Lynn W. did: “I cut mine in squares, and with the scraps from straightening the edges, I rolled a rose.”
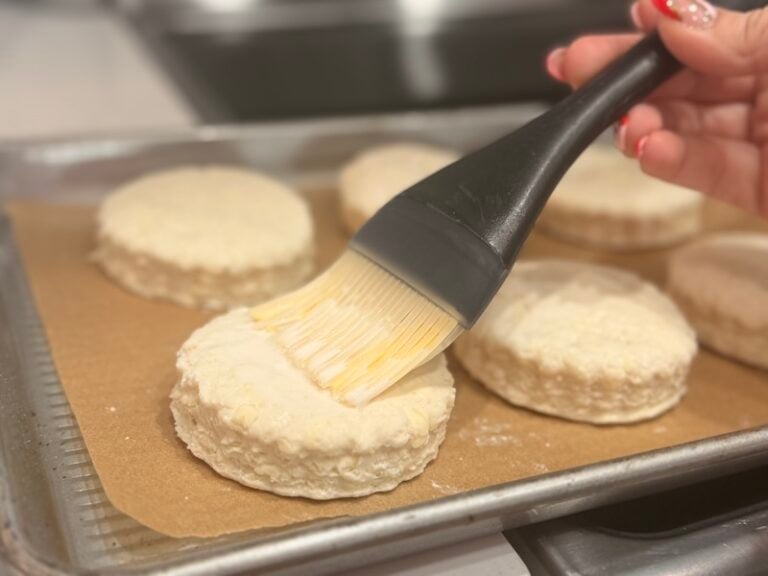
Optional: Brush the tops with buttermilk or melted butter before baking for a more golden, shiny finish. ONLY brush the tops – don’t let it run down the sides, or it’ll seal your edges, reducing the flaky layers.
Tip: If you feel like you didn’t work quickly enough and your dough has warmed up, pop the cut biscuits in the fridge or even the freezer for 5–10 minutes before baking. If butter leaks out during baking, that’s a sign the dough got too warm. A quick chill fixes this.
At this point, you also have the option of doing a long fermentation.
Optional: Long Ferment
After cutting and arranging your biscuits, you can cover and refrigerate them for up to 24 hours or you can leave them on the counter (at room temperature) for 8-12 hours before baking.
What to expect: The baking powder loses most of its leavening power during the long ferment, so these biscuits won’t rise quite as tall. They’ll be a bit flatter, but the flavor is deeper and more complex, and you get the full gut health benefits of a fully fermented sourdough dough.
Don’t panic about grey specks! After a long ferment, you may notice small grey specks on your dough. This is just oxidized flour – not mold! It’s completely harmless and nothing to worry about.
I tested both room temperature and refrigerator long ferments. Both versions are delicious and produce similar results.
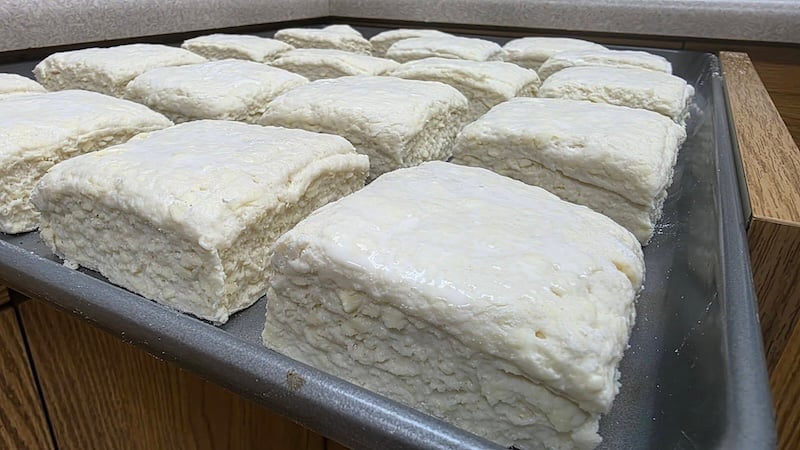
Step 6: Bake
Bake at 475°F (250°C) conventional for 14–18 minutes, or until lightly golden brown on top with an internal temperature of 200–205°F (93-96°C).
Tip: I found that baking my biscuits until the tops were a deep golden brown led to a dry interior. For the most moist, tender biscuit, pull them when they’re lightly golden brown.
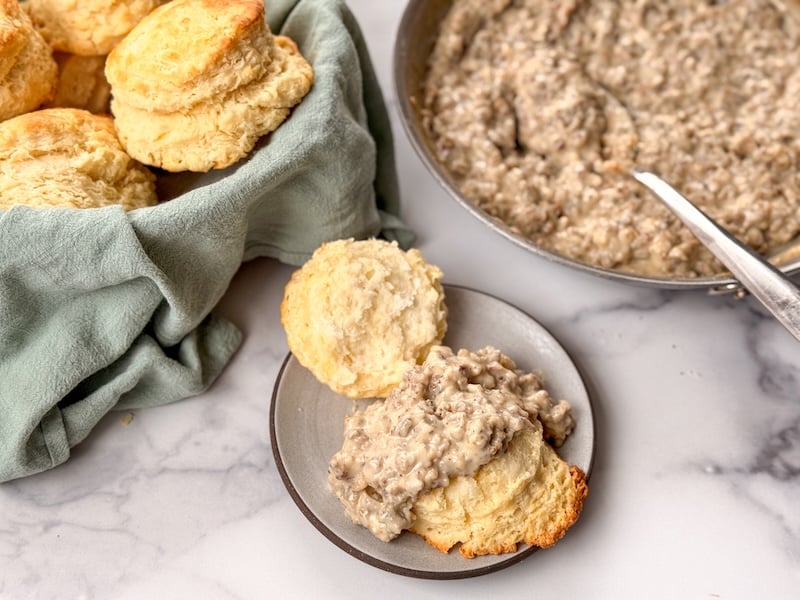
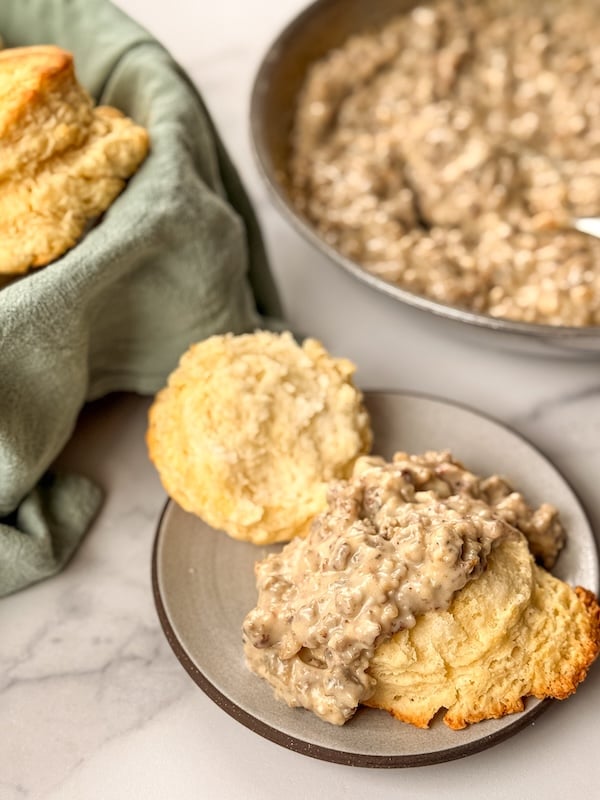
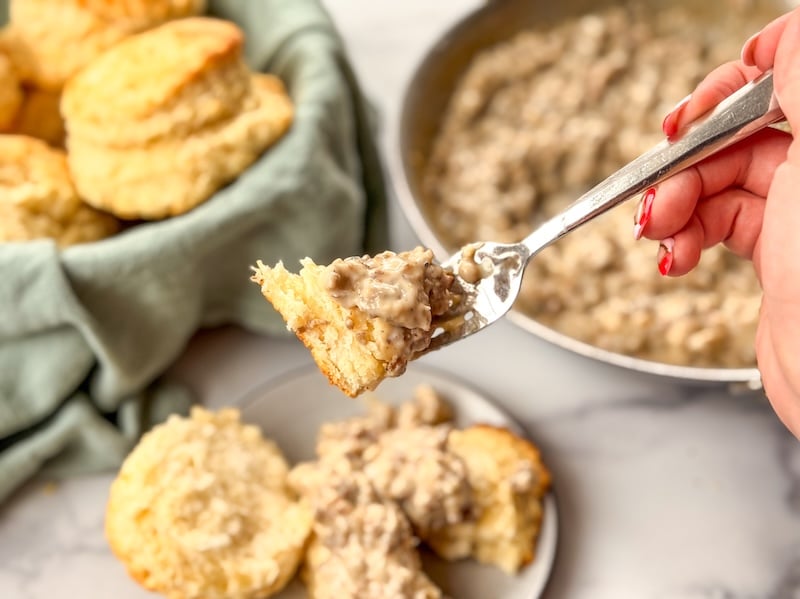
These biscuits are absolutely incredible straight out of the oven – with butter, jam, honey, or smothered in sausage gravy (my husband’s favorite).
How to Store and Freeze Sourdough Buttermilk Biscuits
Room temperature: Store baked biscuits in a bread bag or an airtight container on the counter for 2–3 days. To refresh, warm in a 300°F (150°C) oven for about 5 minutes.
Freezing unbaked biscuits (recommended!): This was a fan-favorite discovery among testers. Shape and cut your biscuits, then place them on a parchment-lined sheet pan and freeze until solid. Transfer to a freezer-safe bag. When you’re ready, bake straight from frozen for about 5–10 minutes longer than fresh. (Keep an eye on them to ensure they don’t burn.) Don’t thaw them first – you want the butter to stay cold.
One tester said: “I will now always have batches of frozen biscuits at the ready!”
Freezing baked biscuits: Let cool completely, then freeze in a sealed bag. Reheat in a 300°F (150°C) oven for 5–7 minutes or microwave for 30-60 seconds, or until thawed. Note: testers who froze unbaked biscuits generally preferred the result over freezing baked ones.
Common Biscuit Problems (And How to Fix Them)
My biscuits didn’t rise much
This usually comes down to warm butter, dough pressed too thin, or a long ferment (which is expected to rise less).
If the dough feels warm at any point, chill the cut biscuits 5–10 minutes before baking.
Also, make sure you’re keeping the laminated dough at least 1 inch thick. And if you choose the long ferment, expect a flatter biscuit (the tradeoff is deeper flavor + full fermentation).
My biscuits toppled over
This usually happens when the biscuits are cut extra tall.
To prevent toppling, bake them closer together so they support each other. A cast iron skillet was a tester favorite. You can also cut the dough a touch thinner (aim for about 1 inch thick).
My biscuits weren’t flaky
The #1 culprit is over-mixing the butter, especially with a food processor.
Stop processing while butter pieces are still clearly visible (pea-sized). Once you add liquids, don’t knead – mix just until you have a shaggy dough. The messier, the better.
Use plenty of bench flour during lamination so you’re not fighting sticking (which leads to overworking the dough).
My biscuits were dry
Most often, they were simply baked too long or too dark.
Pull them when they’re lightly golden, not deep brown. For the most reliable result, use internal temp: 200–205°F (93–96°C).
My biscuits spread instead of rising tall
This usually means the butter warmed up too much. If needed, pop the dough/biscuits in the fridge or freezer briefly to re-chill before baking.
Frequently Asked Questions
Yes! Active starter or discard both work. The pre-ferment has plenty of time to develop flavor overnight, regardless of how active your starter is.
Absolutely. Grate it onto parchment, freeze it, and it’s ready to go in the morning. Multiple testers did this and loved having one less step in the morning.
Yes! Cut your butter into cubes (instead of grating) and freeze. Add the dry ingredients and frozen butter cubes to the food processor and pulse until the butter is in pea-sized pieces – but do not overmix. If you can’t see butter pieces anymore, you’ve gone too far, and your biscuits won’t be as flaky. Transfer the mixture to a bowl and add the wet ingredients by hand.
Any self-rising flour will work. Testers had great results with King Arthur, Gold Medal, and several regional and store brands. You can also use all-purpose flour with the adjustments listed in the Recipe Notes – it’s a different ingredient list, but it’s been tested and comes out amazing.
Yes! Use a smaller cutter and reduce your bake time by a few minutes. Watch them closely the first time and use an internal temp of 200–205°F (93-96°C) as your guide.
Biscuits that topple over during baking are generally too thick – patting or rolling your dough to 1″ thick produces biscuits that rise up but don’t topple. However, if you prefer a thicker biscuit, bake them closer together so they support each other as they rise. A cast-iron skillet is great for this, too.
Yes! This was one of the most asked questions, and multiple testers confirmed it works perfectly. Freeze your shaped biscuits on a sheet pan, transfer to a bag, and bake from frozen for about 5–10 minutes longer than fresh. Keep an eye on them during baking to ensure they don’t burn. Don’t thaw first.
Absolutely! Many testers did this with great results. Use a bench scraper to cut squares – it’s faster and leaves virtually no scraps to re-roll.
Do you really want to know? Just kidding. One recipe tester reported 14 points per biscuit on WW.
I’m afraid you’ll have to sit this one out. The buttermilk and butter are essential for this recipe.
5 Tips for Making the Best Sourdough Buttermilk Biscuits
- Keep everything cold. Cold butter, cold buttermilk, chilled pre-ferment. If the dough feels warm at any point, pop it (or the cut biscuits) in the fridge or freezer for 5–10 minutes before baking. If you see butter leaking out during baking, the dough got too warm.
- Don’t overmix – especially with a food processor. Whether you’re mixing by hand or pulsing in a food processor, you should still see visible butter pieces throughout the dough. If you can’t see butter, you’ve gone too far. The messier the dough looks going in, the better it comes out.
- Cut and stack, don’t fold. This was my biggest breakthrough. Cutting the dough with a bench scraper and stacking the pieces creates flakier layers than traditional folding, works the dough less, and is honestly faster and easier.
- Flour generously during lamination. This dough is sticky. Don’t be shy with bench flour — on top, underneath, everywhere. If the dough starts sticking to the counter, use your bench scraper to push more flour underneath. A silicone baking mat can also help.
- Pull them early – lightly golden, not deep brown. Multiple testers (and I!) found that baking until deep golden brown led to a dry interior. For the most tender, moist biscuit, pull them when the tops are lightly golden, and the internal temp hits 200–205°F (93–96°C).
Easy Sausage Gravy Recipe (The Perfect Pairing)
My husband’s whole reason for requesting these biscuits was biscuits and gravy, so it only feels right to include the gravy recipe here.
This is a simple, classic sausage gravy that comes together in about 10-15 minutes while your biscuits bake.
Ingredients:
- 1 lb breakfast sausage (we love sage-flavored)
- 1/4 cup all-purpose flour
- 2 cups whole milk (plus more to thin if needed)
- 2 tsp sugar (optional)
- Salt and pepper to taste
Instructions:
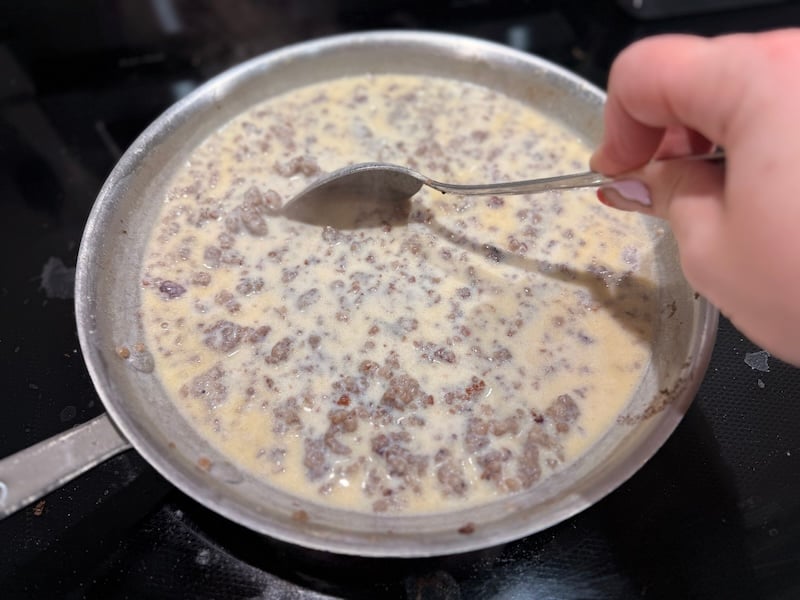
- Cook the sausage in a large skillet over medium heat, breaking it into crumbles, until browned and cooked through. Don’t drain the fat.
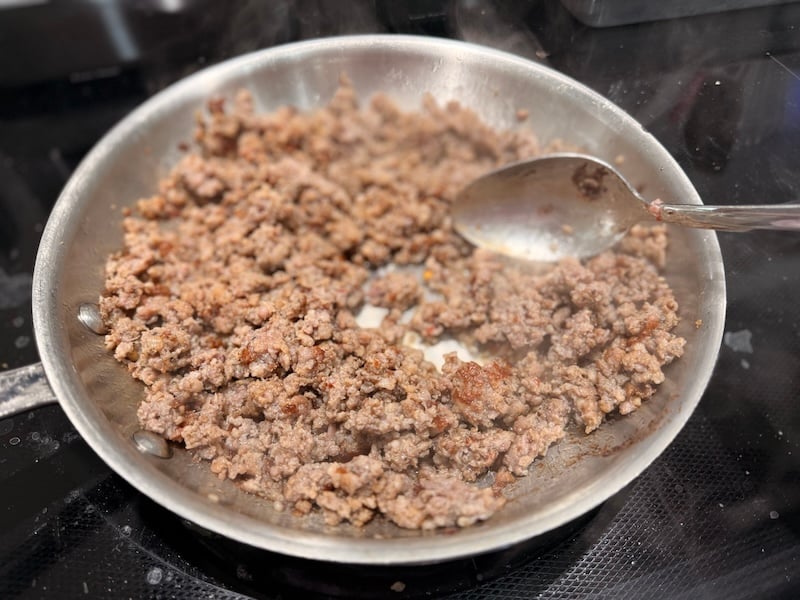
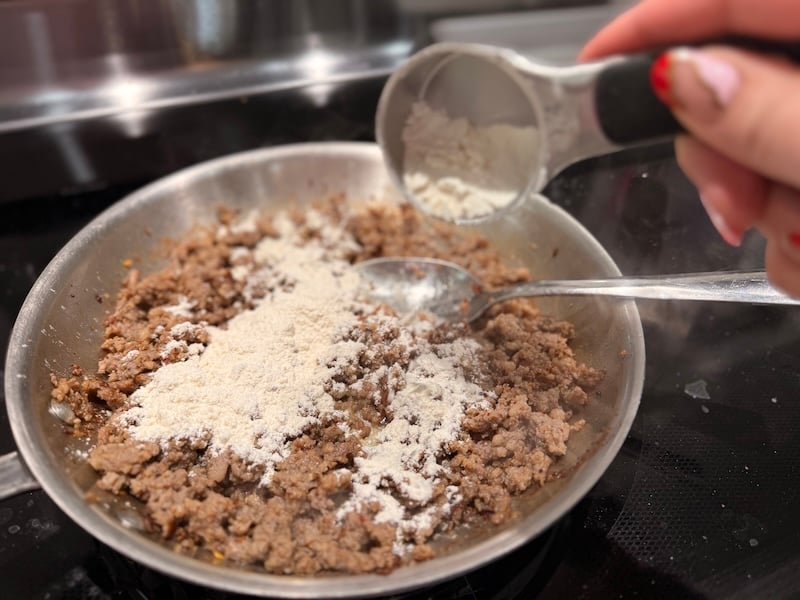
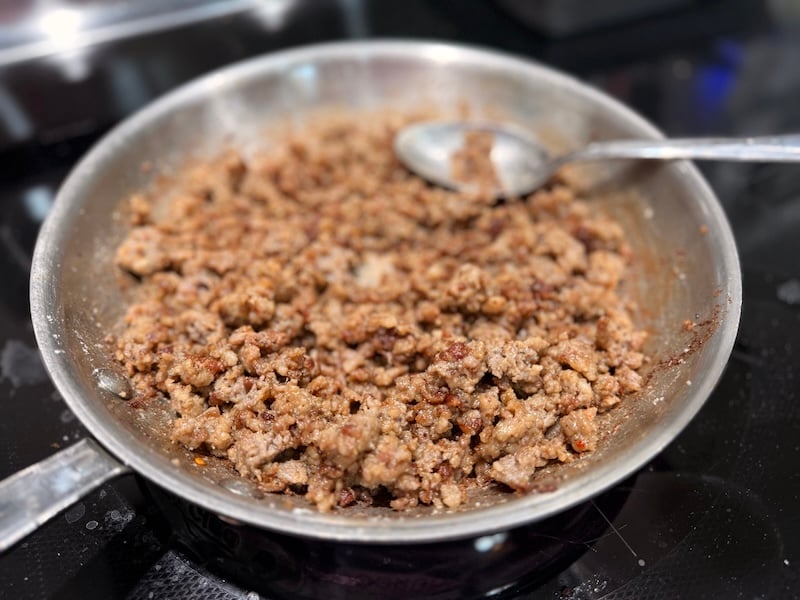
- Sprinkle the flour over the sausage and stir constantly for about 1–2 minutes to cook out the raw flour taste. (Some bakers substitute sourdough discard for the flour here to make their roux – I haven’t personally tested it, but a lot of bakers swear by it!)
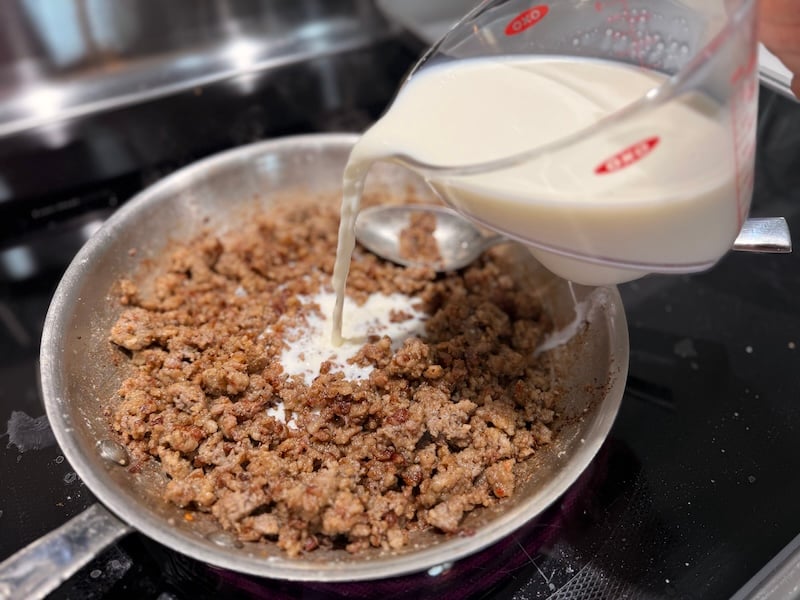
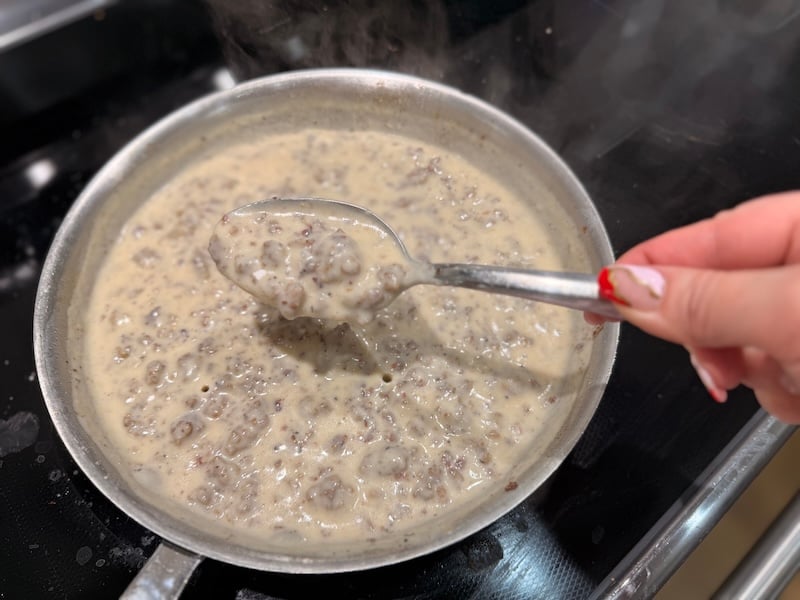
- Slowly pour in the milk while stirring, a little at a time, to prevent lumps. Stir in the sugar (optional), then let the gravy simmer until it thickens to your liking – usually about 5 minutes. If it gets too thick, add a splash more milk to thin it out.
- Season with salt and pepper to taste. Spoon generously over split biscuits and try not to eat the whole batch. Best of luck 🤣
“This is probably my favorite recipe of yours to date, and that’s saying a lot since all your recipes are so great!” –Recipe tester from Astoria, Oregon

Sourdough Buttermilk Biscuits
Equipment
- Food processor optional; can mix by hand!
- Round biscuit cutter 3-3 1/2" round
Ingredients
Pre-ferment
- 25 g active sourdough starter or discard
- 250 g buttermilk
- 325 g self-rising flour or all-purpose flour, but see Notes
Main dough
- 227 g unsalted European-style butter See Notes
- 275 g self-rising flour or all-purpose flour, but see Notes
- 13 g baking powder
- 15 g sugar
- 2 g salt
- 180 g buttermilk
Before You Begin

Instructions
Make the pre-ferment
- Before bed: Mix 25 g active sourdough starter, 250 g buttermilk, and 325 g self-rising flour. Cover and let ferment overnight (8-12 hours) on the counter.

- In the morning, the pre-ferment should look puffy and have lots of bubbles. Refrigerate while you prep the butter.
Pre-heat oven & prep butter
- Preheat oven to 475°F (250°C) conventional. Line a half-sheet tray or two quarter-sheet trays with parchment.
- If you'll mix the dough by hand: Grate 227 g unsalted European-style butter onto parchment and freeze at least 45 minutes.If you'll mix the dough with a food processor: Cut 227 g unsalted European-style butter into ½-inch cubes and freeze at least 45 minutes.


Make the dough
- If mixing by hand: whisk together 275 g self-rising flour, 13 g baking powder, 15 g sugar, and 2 g salt. Add frozen shredded butter and toss until evenly coated.If using a food processor: add 275 g self-rising flour, 13 g baking powder, 15 g sugar, 2 g salt, and the frozen cubed butter to the processor. Pulse until butter is pea-sized. Do not overmix! Transfer to bowl.
- Add 180 g buttermilk and all of the chilled pre-ferment. Chop and mix 45–60 seconds until just combined. Dough should look shaggy with visible butter pieces. Turn out onto a well-floured surface.
- Laminate: Pat into a 1-inch thick rectangle. Cut into 4 pieces and stack. Pat down, cut in half, and stack again. Dust with flour as needed.

- Cut: Pat dough to 1-inch thickness. Using a floured 3–3½" cutter, press straight down (don’t twist). Place on tray. Re-roll scraps as needed. (You may also cut into squares.)
- Optional long ferment: Refrigerate cut biscuits up to 24 hours or leave at room temperature 10–12 hours for deeper flavor and full fermentation. Baking right away leaves about 45% of the flour unfermented but produces taller, flakier biscuits.


Bake
- Optional: Brush tops with buttermilk or melted butter (don't brush the sides!). Bake 14-18 minutes or until lightly golden and internal temp reaches 200-205°F (93-96°C). Enjoy warm!
Video

Notes
- Pre-ferment:
- 25g active sourdough starter
- 250g all-purpose flour
- 250g buttermilk
- Main dough:
- 227g unsalted European-style butter (that you shred and freeze)
- 250g all-purpose flour
- 35g baking powder
- 15g sugar
- 8g salt
- 235g buttermilk
“I ended up cutting them into 1-inch biscuit bites and am selling them to a local restaurant. People can’t get enough of them! THANK YOU!!” –Recipe tester from Atlanta, GA
Conclusion
These sourdough buttermilk biscuits are flaky, tender, buttery, and easier than you think.
The overnight pre-ferment does its thing while you sleep, and the cut-and-stack lamination method makes the morning assembly straightforward and quick.
“This is literally the best biscuit recipe I’ve ever made and I consider myself a Southern Biscuit Connoisseur. I am concerned about my waistline now that I know this recipe.” –Recipe tester from Spring, Texas
I’d love to hear how these turn out in your kitchen.
If your family inhales them as fast as mine does, consider doubling the batch and freezing half. You’ll thank yourself later!!
Other quick sourdough breakfast recipes:


These are the best biscuits I’ve ever had. Just wow!!! They are so flaky and perfect! I baked 6 and put 6 in the freezer for another day!
Wow you did an amazing job!!
Wow! Tender, flaky, delicious biscuits. These were amazing. I got carried away and cut the too big so had to cook the full 18 minutes and the bottoms browned more than I’d have liked but this is absolutely my new biscuit recipe (I’ll just make them an appropriate size moving forward) what a great recipe!
So glad to hear it!!
These biscuits should literally be against the law!!!!!!!!!!!!!!!!!!!!!!!! I have made many different sourdough biscuits over the years but THIS, THIS is the ONE!!!!!!!!!!!!!!!!!!! It the best thing I have ever put in my mouth. I used my Texas shaped cookie cutter to have a bit more fun. Wish I had taken a pic. Next time I will, they’re so cute. Thank you so much for this recipe, I think! LOL
Aw wow thanks for the review Pam!!
I made these for the first time as a recipe tester, it was my first time making biscuits, and I’ll never have to look for another recipe! They turned out flaky, crispy and buttery even with my inexperience! Love the included timeline and pictures, makes the recipe feel foolproof.
So thankful for your review and kind words!
These are the best biscuits I’ve ever made! They freeze wonderfully!
Yay, so glad you enjoyed them!
Best sourdough biscuits ever. My husband couldn’t believe how good it was. He said WOW!!!! Thanks for sharing your recipes.
So glad to hear it!!
These are amazing!! Will definitely make them again!!! I’ve never had biscuits come out like this!
Yay, so glad you enjoyed them!
Thanks a lot Rebekah! Because of your WONDERFUL, EASY recipe, my hubby now knows I can make biscuits and wants them nonstop! I have never made biscuits before thinking I couldn’t but your recipes, all that I have tried, are so helpful and detailed to follow it’s hard to mess up! Thanks again!
Yay, so glad you and your hubby are enjoying the biscuits so much!
Oh my goodness!! These are absolutely delicious biscuits!! Thank you for sharing your wonderful recipes!
Holy Sausage Gravy!
These biscuits are so delicious and flaky.
I’ve made biscuits and gravy for decades and the switch to these sourdough biscuits have enhanced the entire dish. Soft, flaky and tender, mixes well with the gravy. Who says biscuits are just for breakfast?
These are the best biscuits I have ever had let alone made. While my hips may not thank you, I certainly do. Tell your husband he is doing the lords work suggesting these for you to make.
Aw it looks amazing!!!
Amazing 😍 kids love them and adults super easy
Looks awesome!! Thanks for sharing!
These are the absolute best biscuits I have ever made or had. People have shared them with said they’re also the best biscuits they ever had. I used white lily, King Arthur self risingflour and all-purpose flour when I made these different times. The all-purpose flour is the softest they were OK. The white lily is very good and so is the King Arthur self rising flour. I have used European butter and just regular American butter. I didn’t notice any difference in my results. Also, I tried the stacking method you have in the recipe. I prefer doing the three letter fold. I do mine five or six times and they get the most flaky layers. I also topped mine with melted butter and flaky sea salt.
Love it, thanks for sharing!! So glad you enjoyed the recipe!
Grandkids loved these for Easter dinner!
So sweet!! So glad you all loved them!
Oh my goodness! I was unable to get the Lily’s flour in time to recipe test and when it arrived the testing was done and I forgot. I made these this morning and they were the best biscuits I’ve ever had. Fluffy, tasty soft and so delicious. Thank you Rebekah for sharing 💕
Yay, so glad you loved them so much Linda!
Love these. Made these twice and they’re perfect. 3rd time I tried the all purpose flour route and I used homemade buttermilk( I made butter) and still great however the butter in them oozed out on the pan so more greasy. Do you think it’s from the alternative flour recipe and/or homemade buttermilk that would leak the butter out like that?
My first guess would be temperature – oozing butter and greasiness is almost always due to the biscuits getting too warm prior to baking. I would suggest chilling the biscuits in the fridge for a bit before baking the next time you do it this way to see if that solves the issue!
These were amazing!! Apparently I didn’t scroll down far enough to see the revised recipe for non self-rising flour, etc so make it with my unbleached flour and used the same quantities as if it was self-rising and they turned out really well.
Will try with the other quantities next go around and let you know..
Yay, so glad they still turned out!