
Easy, Soft Sourdough Sandwich Bread Recipe (1 Day)

Update: I’ve developed a new-and-improved sandwich bread recipe! With the help of over 65 recipe testers from around the world, I created what I’m calling “sourdough wonderbread” – a recipe that perfectly mimics store-bought white bread texture and flavor. I also developed a same-day variation if you want an even faster timeline.
I’d highly recommend trying the new sourdough wonderbread recipe instead of this one. It resolves the main issues readers have mentioned about this recipe: too sour, stales too quickly, and inconsistent second rise results.
That said, I’m keeping this original recipe available since many of you have shared how much you love it. But if you’re looking for the softest, most foolproof sourdough sandwich bread, definitely check out the wonderbread copycat first!
This soft sandwich loaf made with sourdough starter is the easiest sourdough bread recipe I’ve ever made.
It ferments on the counter overnight and can be baked before lunchtime. The mixing happens in the stand mixer, and your hands-on time is literally less than 15 minutes.
If you thought an incredible loaf of sourdough that’s kid-friendly, perfect for sandwiches, and ideal for DIY Uncrustables would be hard and time-consuming, think again!

Developing This Recipe
I adapted the bread portion of The Clever Carrot’s cinnamon raisin bread recipe, but I’ve made so many changes at this point, that I feel bad pointing people to it. I have about 50 footnotes! 😂
That said, bookmark that recipe, because the cinnamon swirl version is to die for!
After making all of my tweaks to the bread portion of that recipe – and slowly cutting out steps to see how much I could simplify it – I’ve nailed it!

Why You’ll Love This Recipe
You’ll love how easy this recipe is; it’s honestly the perfect beginner sourdough loaf. My kids say it’s their favorite bread I make.

- Low-stress bulk fermentation: this sourdough loaf recipe is so forgiving when it comes to the fermentation. You don’t have to nail it like you do with traditional artisan bread. Because you shape the proofed dough into a log – and it bakes in a loaf pan – it could be over-proofed, and you would not be able to tell in the final result.
- Overnight recipe: you mix this dough before bed and bake it around lunchtime. It’s the fastest sourdough bread recipe I’ve ever made.
- EASY: this recipe is incredibly easy. No stretch and folds, no autolyse, no pre-shaping. It’s as easy as a commercial yeast loaf but with all the added health benefits (and flavor) of sourdough starter.
- Perfect for DIY Uncrustables: this bread is soft yet strong; it holds up beautifully under a sandwich sealer!


Baker’s Timeline
| Day 1 | |
| Morning | Feed your starter (1:5:5 ratio is best to have it peaking by nighttime) |
| Before bed (9pm) | Mix dough ingredients together in stand mixer; cover and rest (And refresh your main starter with a feeding!) |
| 9:30 pm | Knead dough in stand mixer for 5-10 minutes more. Cover and rest overnight |
| Day 2 | |
| 8 am | Dump out dough and shape into log; place in loaf pan for a second rise |
| 11 am | Preheat oven |
| 11:30 am | Bake |
| 2:15 pm | Enjoy! |
Suggested Supplies
This recipe is so simple that you don’t need hardly any specialized equipment. However, since posting this on my Instagram stories, I got a lot of messages asking me about the loaf pans I use, so here’s a quick list of my supplies (these are affiliate links):
- 7-Quart KitchenAid Stand Mixer: You can do up to 3 loaves at a time in a 7-quart KitchenAid stand mixer. The stand mixer is optional but a massive relief for your arms. I’ve kneaded by hand and gotten the same result. I’ll include more tips in the FAQ section.
- 9×5 Stainless Steel Loaf Pans: I’m doing my best to remove all Teflon-coated products from my home, which is why I bought these pans. A big bonus is they’re extremely durable. We’ll have these for generations. Be sure to spray with oil or line with parchment, though – dough will stick.
Update: I’m a die-hard fan now of USA Pan items. Their 1 lb. loaf pans are incredible. They are nonstick but do not use Teflon – it’s a silicone coating that works like magic.
- OXO scale: I finally got rid of my sad scale from college, and this is my new favorite sourdough tool. I use it daily, and all of its bells and whistles make my life so much easier.
- Shower cap bowl covers: These are the least expensive bowl covers I could find and they’re perfect. They’re very stretchy and fit all of my bowls and bannetons. You can also pinch them up so the dough has plenty of room to rise in the loaf pans without touching the cover.

- Rolling pin: The rolling pin is entirely optional, but you will get a more evenly-shaped loaf if you use it during the shaping process.
That’s really it! You probably have these items – or close-enough variations of them – in your home. It’s just one more thing I love about this simple bread recipe.
FAQs
Here are the most popular questions I get about this recipe. If you have any of your own, please leave them in the comments and I will add them here with an answer!
Can I make this recipe without a stand mixer?
Yes, you can make this sandwich bread recipe without a stand mixer, but it’ll also double as your arm workout for the day. When you mix the ingredients, knead the dough for 5 full minutes. It should be soft and pliable when you’re done. Let it rest for 30 minutes, and knead again for 2 full minutes (more if you can do it).
What do you grease your loaf pans with?
I use an avocado oil spray to grease any loaf pans that aren’t nonstick. I’ve also used Pam because it’s so darn effective, but I am working hard to choose healthier ingredients. If you don’t want to use any oil, I’ve lined the pan with parchment paper, and that worked wonderfully.
Is there a cold proof?
This recipe doesn’t call for a cold proof. Instead, we do a second rise before baking. As the recipe is written, this bread does have a slightly sour flavor. If you want an even more sour flavor, you can incorporate a cold-proof. After you shape your dough and put it in the loaf pan, cover it with plastic wrap and pop it in the fridge. Let it rest in the fridge for 12-18 hours (I don’t advise going more than 3 days). At that point, pull it out of the fridge and let it finish rising on the counter until the dough is about an inch higher than the loaf pan. Then, bake.
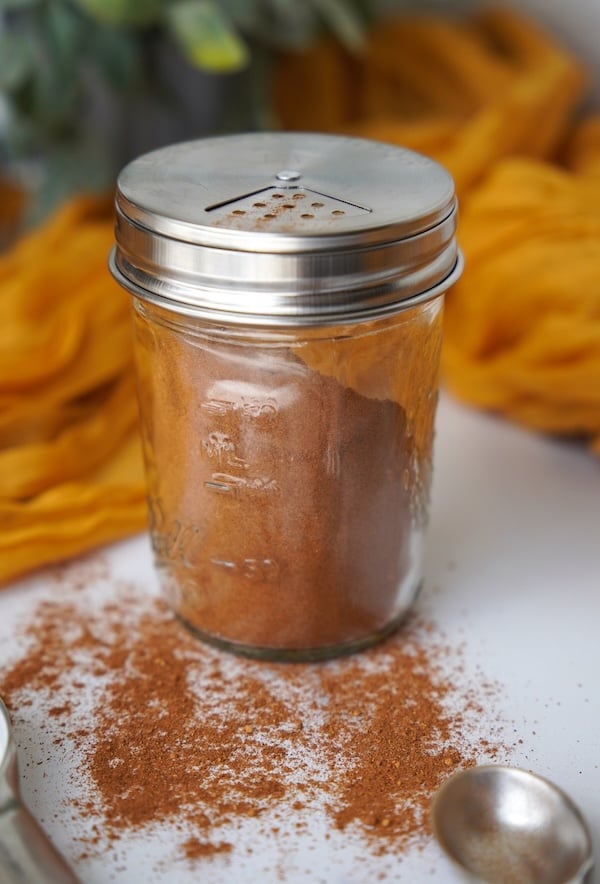
How much does the bread rise in the oven?
This bread doesn’t rise much in the oven, so make sure you let it rise sufficiently before you bake it. You want the dough to be higher than the top of the loaf pan, like so:

Why don’t you cover the loaf pan in the oven?
I’ve tested covering the loaf pan in the oven for the first 20 minutes of the bake. I hoped it would give the loaf a little more rise. However, that wasn’t the case. The only result was the top of the loaf had a much lighter color. So, if you prefer a very light-colored crust, you might consider covering your loaf pan with a second loaf pan for the first 20 minutes.
Why don’t you score this loaf?
I don’t see a need to score this particular sourdough bread. My goal is to have a sandwich-style loaf that I can use primarily in my kid’s lunches. I want uniform slices that come together well. A scored loaf would give a more irregular shape to the bread, which I want to avoid. This bread also doesn’t expand or rise much more in the oven, so it’s not necessary.
How do I make this bread less sour?
For a sourdough sandwich bread that isn’t sour, use a stiff, sweet starter instead of your regular sourdough starter. The account Healing Slice on Instagram has a fabulous tutorial that I followed. It’s so easy, too. Here’s my post explaining the tweaks I made to her recipe, plus what I found interesting about this sweet starter versus a regular one.


Easy, Soft Sourdough Sandwich Bread Recipe (1 Day)
Equipment
- Loaf pan, 1 lb. (8.5 x 4.5)
Ingredients
- 240 g room temperature water
- 100 g active sourdough starter 100% hydration
- 10 g honey can substitute sugar or maple syrup; this is also optional
- 450 g King Arthur all-purpose flour 11.7% protein*
- 50 g King Arthur whole wheat flour 13.2% protein
- 6 tbsp unsalted butter, softened
- 10 g sea salt
Instructions
- Combine Ingredients: Add 240 g room temperature water, 100 g active sourdough starter, 10 g honey, 450 g King Arthur all-purpose flour, 50 g King Arthur whole wheat flour, 6 tbsp unsalted butter, softened, and 10 g sea salt to your stand mixer bowl. Mix on low speed for about 3 minutes until everything is combined.Note: You can do this without a stand mixer. See the FAQs section for tips.

- Knead the Dough: Increase the speed to 2-3 and let the dough hook knead the dough for 5-10 minutes.
- Rest the Dough: Cover the bowl and let the dough rest for 30-60 minutes.
- Second Kneading: Turn the stand mixer back on to speed 2-3 and knead the dough for another 5-10 minutes. Alternatively, you can do stretch and folds until the dough resists being stretched any longer. When finished, the dough should be soft, supple, and not sticky at all.
- Overnight Rise:** Cover the bowl again and let the dough rest overnight on the counter. It should double or more in size. **DO NOT PUT IN THE FRIDGE.**
- Shape the Dough: In the morning, grease or line a 1 lb. loaf pan with parchment paper. Dump the dough onto a clean surface. The dough should be puffy and not sticky. Pat or roll your dough into a long rectangle, about 6"x12", ensuring the width is a little smaller than your loaf pan. Roll the dough up tightly and place it into the loaf pan.

- Second Rise: Cover the loaf pan with plastic wrap or a shower cap bowl cover and let it rise in a warm place. This can take 2-6 hours depending on the temperature in your home. Don’t go off time, though – look at the height of the dough. Ensure it’s super puffy when you gently poke it, and it’s 1-2 inches higher than the loaf pan.Note: This sandwich bread doesn’t rise much in the oven. Make sure you get all the height you want in the bread BEFORE baking. Baking too early will result in a dense, short loaf.

- Bake: Toward the end of the second rise, preheat your oven to 375°F (190°C). Bake the loaf for 45 minutes. Your final dough temperature should be between 204-206°F (95-96°C). If it’s low, pop it back in the oven until you reach the desired temperature.
- Cool and Enjoy: When finished, let the loaf cool in the pan for 10 minutes before turning it out onto a cooling rack. Let the loaf cool for about 1 hour before slicing.Note: I also like to turn these upside down to let them dry out a bit. If you oiled the pan to keep the dough from sticking, the bottoms of the loaves can be a little moist and soggy. A quick air dry will fix that within about 30 minutes.


Video

Notes
- There is wiggle room in this recipe for substituting flours. Feel free to substitute bread flour for the all-purpose flour. I like having a little whole wheat flour in the recipe to give more nutrition to the sourdough starter, but you could omit that and add more bread or all-purpose flour in its place.
- My home is typically 70-75°F, and the overnight proof (about 10 hours) works perfectly every time. The way this dough is shaped also makes it very forgiving – you don’t have to nail the bulk fermentation timing as much as you do with artisan bread. That said, please experiment! If your house is warmer than mine, try to put the bowl in a cool area, or consider mixing the dough with cold water. If your house is cooler than mine, you may need to let it proof for longer, or mix the dough with even warmer water (not to exceed 110°F).
- You can follow the process and see tutorials of this recipe in video format by visiting my sandwich loaf Instagram Highlight. I also filmed a YouTube tutorial (I messed it up but redeemed myself in the end – watch that to avoid my mistake!).
Conclusion
This simple sourdough sandwich bread recipe is so easy. And it’s so much faster than artisan sourdough.

My family loves it and it makes the best sandwiches. It’s even soft enough to make homemade Uncrustables!

Let me know if you try this recipe in the comment section below.
More recipes:


So if I want to choose putting it in the fridge overnight, do I still do the second rise and then into the fridge the next morning? It is worded that you can put it in the fridge after you do the shaping and the shaping comes after the second overnight rise. I am a bit confused as the steps.
Thanks, Stephanie
If you want to do an overnight retard in the fridge, I’d suggest shaping the dough and putting it in the loaf pan. Then, cover it with a bowl cover and put in the fridge overnight. The next day, bring it back on the counter. If the dough didn’t rise any more in the fridge and the dough isn’t about an inch higher than the loaf pan, let it sit on the counter until it finishes rising the rest of the way. Proceed with baking!
Holy cow, I made started this last night before bed and baked after noon the next day. The result was outstanding! It’s the best recipe for sourdough sandwich bread that I’ve tried, and better than the loaves I buy at the store. Thank you for terrific instructions, and great photos of each step along the way.
So happy to hear it turned out well!!
Have you tried adding inclusions to this style of loaf? I love cinnamon raisin toast, and was curious if it would turn out well!
I haven’t yet but adding inclusions would be no problem! Add savory ones during the second or third set of stretch and folds. If you’re doing sweet inclusions (like brown sugar or honey or anything that will be sticky), add during the shaping!
The link for you scale takes you to link for your bread pans. . . .could you check it and provide link to the scale you use. Thank you. I need a new scale!
Yes I’m so sorry! I’ve just fixed that. Here’s the link to my scale: https://www.amazon.com/dp/B079D9B82W?asc_item-id=amzn1.ideas.1ZFFHE7A2HZWU&linkCode=ll1&tag=rebekahparr-20&linkId=01604e09a785795d8c7bc26ed8607171&language=en_US&ref_=as_li_ss_tl
I can’t find anything about doing this without a mixer if like to do it by hand?
The instructions are in the FAQ section!
You can make this sandwich bread recipe without a stand mixer, but it’ll also double as your arm workout for the day. When you mix the ingredients, knead the dough for 5 full minutes. It should be soft and pliable when you’re done. Let it rest for 30 minutes, and knead again for 2 full minutes (more if you can do it). You can be done with it as soon as the dough passes the windowpane test.
I’m currently making this dough doing the non stand mixer method, I’m on the second knead and I’ve been going for about 10 minutes and it still isn’t passing the window pane test. What am I doing wrong? Or maybe I’m misunderstanding the windowpane test?
You aren’t doing anything wrong – it takes a lot of elbow grease! You can always let the dough rest so the gluten relaxes and come back again. Ultimately, the bread will still turn out great. You could also consider doing an autolyse with the flour and water first (let that sit together for about an hour) and then proceed with the rest of the recipe. That’ll get you a guaranteed windowpane with much less effort.
This is hands down my best sourdough ever. Thank you!! I found it forgiving because I decided to try on a whim and was not fully patient for the prep- I started midday with a fresh from the fridge starter (it had been fed and put away several days before). I ended up doing a mid second proof overnight in the fridge because I lacked all planning skills, and it came out beautifully. I smothered butter on the top of half of the loaf while it was still hot to see it it would make a difference, and there wasn’t a noticeable difference between sides.
Can’t wait to plan ahead and buy a metal loaf pan instead of stone (fyi for anyone using stone, baking at 350 helps it bake through without making the outside burn)
This made my day! I also love how forgiving it is.
The bowl rise was about 11 hours. 72° house. Looked great, definitely doubled but was a little dry on the top. Been setting in the loaf pans for 4 hours now and almost no rise. Still going to bake it.
Interesting that there was almost no rise in the loaf pans. When you say the dough was a little dry on top – did you cover the bowl with plastic wrap or a shower cap cover?
I have wondered this exact question? Which should I do? I have both. I also have the shower cap cover and the surgical hair net cover? Which should I use for the long rise?
I think both would provide the same result – use either!
I had to put my pans with the rolled dough in the iven with the light on and it took almost all day for them to rise above the pan.
Hey, Tracy! Did they eventually meet the height you were after? Sometimes how slow a dough rises is due to many factors, including temperature, the strength of the starter when the dough was mixed, etc. I’m sorry the timing wasn’t ideal.
Hey Rebekah- I am extremely new too sourdough.
Can I use all white flour for this recipe?
And I’m thinking I’d have to cut back on water?
I have bookmarked your site, for its the way you’ve simplified everything……some things I haven’t understood (yet).
Thank you.
Van
Yes you can use all white flour. I’d keep the water basically the same since there’s not that much whole wheat flour.
Can I substitute the butter for olive oil?
I wouldn’t since olive oil has a flavor that may overpower the bread
Is there any substitute since we are dairy free? Maybe a dairy free butter?
I would think dairy free butter would sub in just fine!
Do you have any ideas of what I can substitute with the butter, since I am dairy free? Maybe a dairy free butter?
Avocado oil is what I use and you can’t taste it at all
Would avocado possibly work as a butter replacement? I need a nondairy sandwich bread and I don’t like using margarine.
Thanks!
Avocado oil? Definitely worth a shot!
I want to bake more than one loaf. Do I just double or triple the ingredient measurements?
Thanks
Yes!
Hey, why don’t you do the folding? What are you doing instead of that method? Thanks 🙂
I am using the stand mixer instead in this recipe. You can do stretch and folds if you prefer to do it all by hand.
Just made this the first time. I tripled the dough because I had so much starter. The starter was a bit beyond its peak but the loaves came out great! They rose more than I expected. I started at 9 am and pulled them out of the of at 8:30 pm. I could smell the butter when they started baking. Great recipe and great instructions!!
Yay so glad to hear it went well!! I usually double this because our kids fly through!
Love this one! I have been doing the overnight with no issues but went wild and started it this morning on a time crunch for the upcoming holiday.. would I be able to let it finish the 2nd rise and then place in the fridge over night? If not, no big deal, I guess I’m just staying up late and baking! 😆
Yeah for sure! That would work totally fine. You’ll get a more sour flavor in the loaf if that’s OK!
What do you do if the dough doesn’t pass the window pane test after the second mix? I did 10 minutes each time and my dough just tears apart. This is my second attempt and I don’t know what I’m doing wrong.
Go ahead and move forward and see how it bakes up. It’s possible that you need a touch more water if you live in a dry environment.
Hi, newly into sourdough and this caught my eye. My some is a type 1 diabetic that’s insulin dependent. Wanting to get better nutrition for him. How do I find the carb count for this bread???
I’ve shied away from including nutrition information because I’m not an expert in that area and am not yet big enough to hire an expert to provide that analysis. However, I input the ingredients into a nutrition calculator and the entire loaf is around 2643 calories with 428g carbs. So just count how many slices you have and divide. When I cut it, it makes 18 slices. So one slice would be 146 calories and 24g carbs.
Confused…
Does this sandwich recipe make 1 loaf???
Confused with the photos of 3 loafs pictured in recipe. Help if in the beginning you could add how many loafs your posted recipe will make. Thank you
Hi! This is my 1st comment here so I just wanted to give a quick shout out and tell you I really enjoy reading your blog posts. Can you recommend any other blogs/websites/forums that cover the same topics? Appreciate it!
Happy to hear that! My favorite blogs and sourdough accounts are listed at the bottom of my home page.
mine is rising in the pan right now (with parchment) in the oven with the light on, it’s been 3 hours and the one side has risen but the other side only about half and it looks like it’s tearing open but i put the seam on the bottom! I just took off the plastic wrap that was on it loosely, not sure if that’s hindering it? i don’t have a shower cap style. not sure what I did wrong but I might not roll it next time, was it too tight and that’s what’s making it tear on top? it was doubled at least with first rise, soft/pliable and passed the window pane test before rolling. I used a mixer and bread flour.
Sometimes tearing like this during this stage can be a sign of a weak flour – other bakers have been posting in the last few weeks on Facebook about this exact issue and there have been confirmations of flour issues at the mills.
I am confused on one thing, everywhere I read it says metal disrupts the sourdough, but the mixer is metal, and your pans are metal….so does that only apply to the starter phase?
I hear that a lot too but have never found that to be the case, at least with stainless steel.
Are you baking with a tray of ice in the bottom or doing anything else for steam with this bread?
No! I’ve tried steam-producing methods but never noticed a difference in the result, so I just keep it simple.
I was wondering if you could make this in the Pullman style pan w/ lid? And if you can would you make a double batch for the large pan? It is the size of a store-bought loaf of sandwich bread.
Oooh, OK, so I just got a Pullman loaf pan, and it’s large like you are describing. I haven’t tried it yet, but I am going to soon. This recipe doesn’t make enough dough for the large pan I have, in my opinion, so I was going to increase the ingredients by maybe 50% and see how it goes. If you give it a try, let us know how it turns out!
Can you use rye flour, in place of the whole wheat?
I haven’t tried it but it sounds like it would be delish! If you give it a go, let us know how it comes out.