
Same-Day Sourdough Wonder Bread Copycat Recipe By Hand (No Stand Mixer)
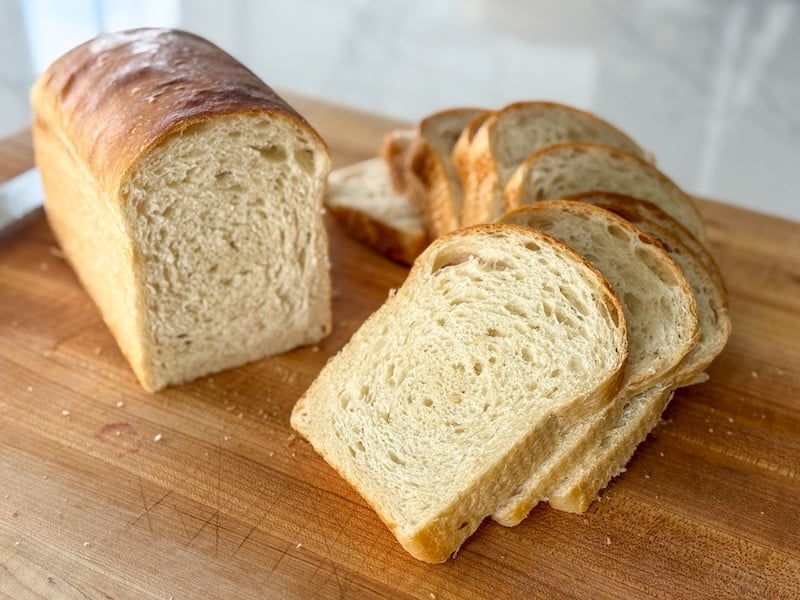
Want to make the super soft sourdough sandwich bread, but you don’t have a stand mixer? Or perhaps you’ve tried to make it in yours and the texture never seemed right.
You can totally make this recipe by hand, and you won’t break your back (or arms) doing it – promise. In fact, if you’ve made artisan sourdough bread, the process is pretty much the same! A little upfront kneading followed by spaced-out stretch and folds.
Note: This article is dedicated to walking you through the hand mixing instructions in detail. So, I’ve spared you all the additional details, including FAQs, substitutions, etc. To get that information, please reference the original recipe post, which is filled to the brim with that info! If you prefer the original, 2-day recipe and want to mix by hand, use the same exact method explained here.
Disclaimer: Some of the products I recommend in this post are affiliate links – if you choose to purchase after clicking one of my links, I may earn a small commission, which helps fund this website, recipe development, and monthly giveaways. I sincerely appreciate your support.
Baker’s Timeline
This timeline is so simple! But here’s a quick glance to help you schedule your bakes:
| The Evening Before (7-8pm) | Feed your starter |
| In the Morning (8am) | Make your tangzhong & mix your dough |
| 8:45am | Stretch & fold |
| 9:15am | Stretch & fold |
| 9:45am | Stretch & fold |
| Mid-day (12-1pm) | Shape your dough |
| Evening (6-7pm) | Bake your bread |
How to Make Same-Day Sourdough Wonder Bread by Hand
Step 1: Make the sweet starter.
The stiff sweet starter is the secret to reducing sourness.
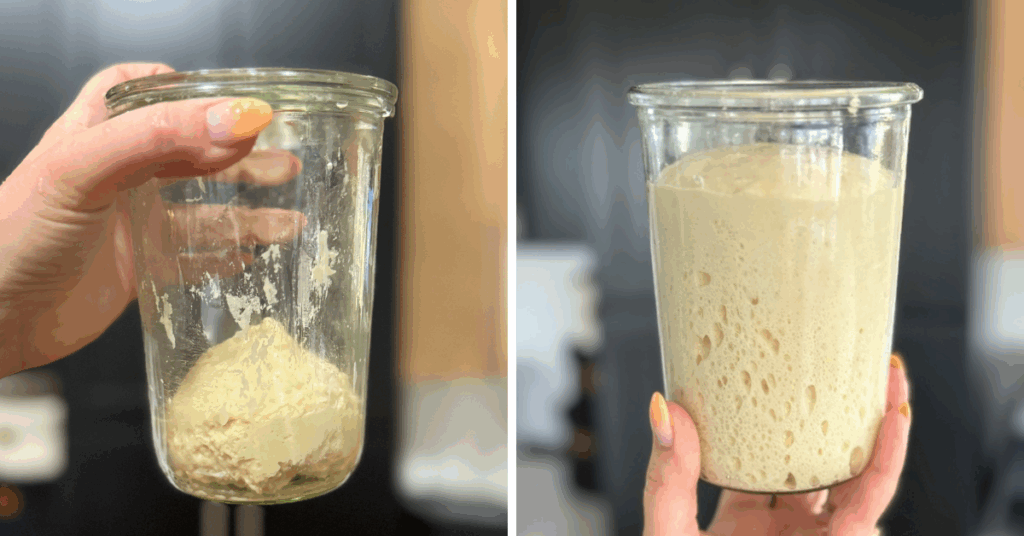
In a small jar, combine 30g sourdough starter, 30g sugar (or honey), 60g water, and 120g bread flour.
Mix until it comes together, then turn it out and knead it briefly until it forms a smooth ball.
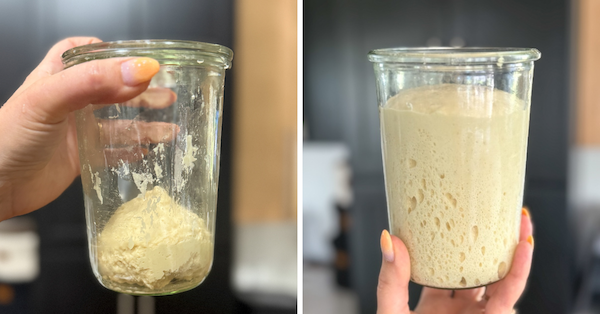
Place it back in the jar, cover loosely, and let it ferment at room temperature overnight. By morning, it should have tripled in size and smell sweet and yeasty. If it hasn’t, put it in a warm place to speed things along.
Step 2: Make the tangzhong.
In a microwave-safe bowl, whisk together 35g bread flour and 175g milk until completely smooth.
Microwave in 30-second intervals, stirring vigorously with a whisk between each round. For me, this usually takes 3-5 rounds.
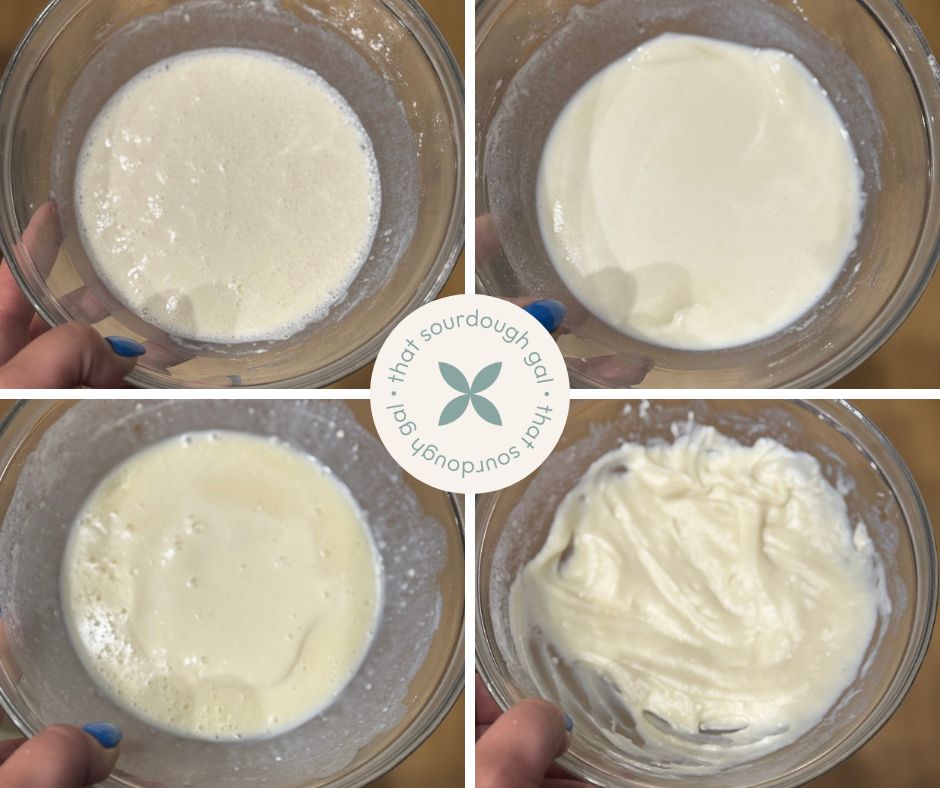
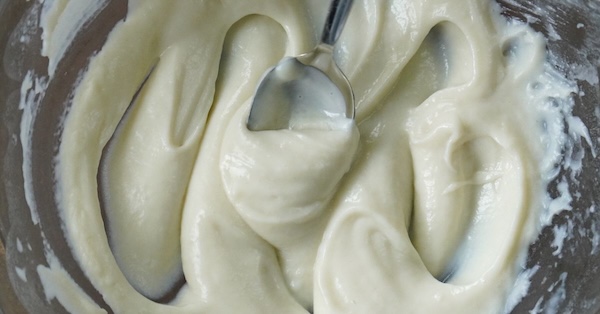
You’re looking for it to thicken to a gel-like consistency and reach 150°F (65°C).
If you prefer, you can make this on the stovetop over medium heat, whisking constantly. Don’t walk away, or it will overcook!
The tangzhong can be made up to 2 days ahead. If you make it on the morning of, wait about 30 minutes for it to cool down. If it’s still hot, it could kill the microbes in your sourdough starter.
Read more about tangzhong: Tangzhong: The 3-Minute Secret to Softer Sourdough
Step 3: Mix the dough.
Once the tangzhong has cooled down, add all of the dough ingredients into a large glass mixing bowl:
- All of the stiff sweet starter
- All of the tangzhong, cooled down
- 195 g cool water
- 40 g sugar
- 45 g avocado oil
- 515 g high-protein bread flour
- 12 g salt
Mix them together with a Danish dough whisk (if you have one); then, switch to your hands. Squeeze and knead the dough to incorporate all the ingredients.

I like switching to slap and folds as it’s less of an arm workout and brings the dough together much more quickly.
After a couple of minutes, put the dough back in the bowl and cover for 30 minutes.
Step 4: Stretch and Folds
After the 30-minute rest, it’s time to strengthen the dough with stretch and folds. You’ll do several rounds, each spaced about 30 minutes apart.
How to do stretch and folds: Wet your hands, grab one side of the dough, stretch it up and fold it over to the opposite side. Rotate the bowl 90 degrees and repeat. Continue until you’ve folded all four sides. You can also tack on some extra kneading or slap and folds! The dough should feel noticeably stronger after each round.
First round: Your dough will be shaggy. Do your stretch and folds, cover, and rest for 30 minutes.
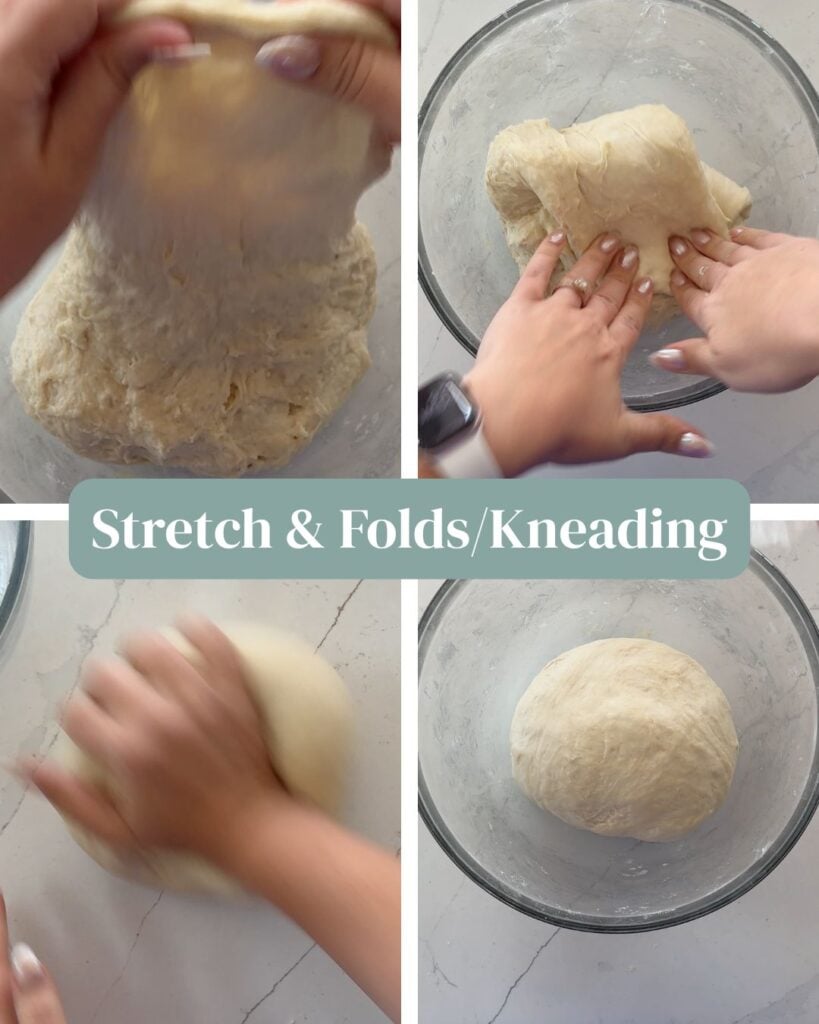
Second round: The dough should already feel more cohesive. Stretch and fold again, cover, and rest for 30 minutes.

Third round: The dough should be getting quite smooth and strong. After this round, test for a windowpane – stretch a small piece of dough thin enough to see light pass through it without tearing.
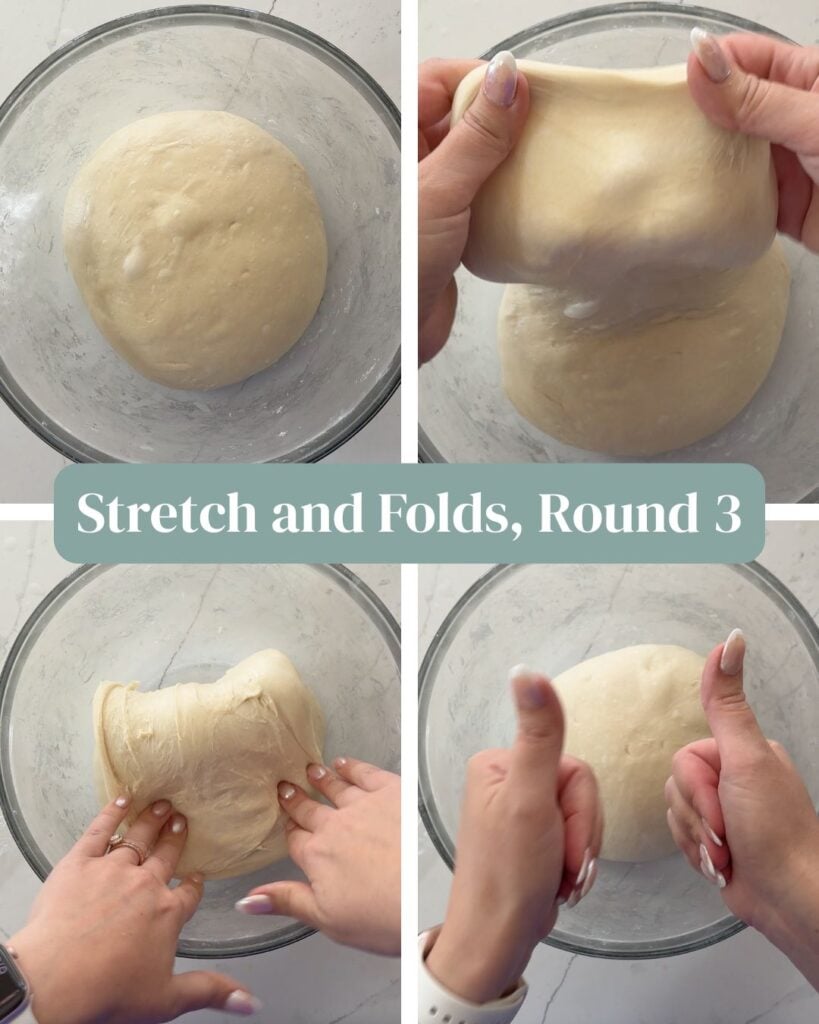
When to stop: Most doughs will be ready after 3 rounds, but some may need a 4th. You’re done when the dough passes the windowpane test and feels smooth and elastic. If your dough still feels weak or shaggy, do one more round and test again.
Step 5: First Rise
Put your dough in a very warm place – ideally, between 80-90°F (26.5-32°C) for about 3-5 hours.
Here are some options:
- Brod & Taylor proofing box (affiliate link) – I set mine to 85°F (30°C)
- Oven with the light on
- Oven with a cup of boiling water in the corner (if the light doesn’t produce any warmth)
- Preheat your oven for a couple of minutes; then, turn it off
- Warming mat
- A warm spot in your home – perhaps a sunny area, near a heater, or in an area that doesn’t get good A/C
- The garage
- Outside on a warm day (make sure to cover your bowl with plastic wrap so bugs don’t fly in)
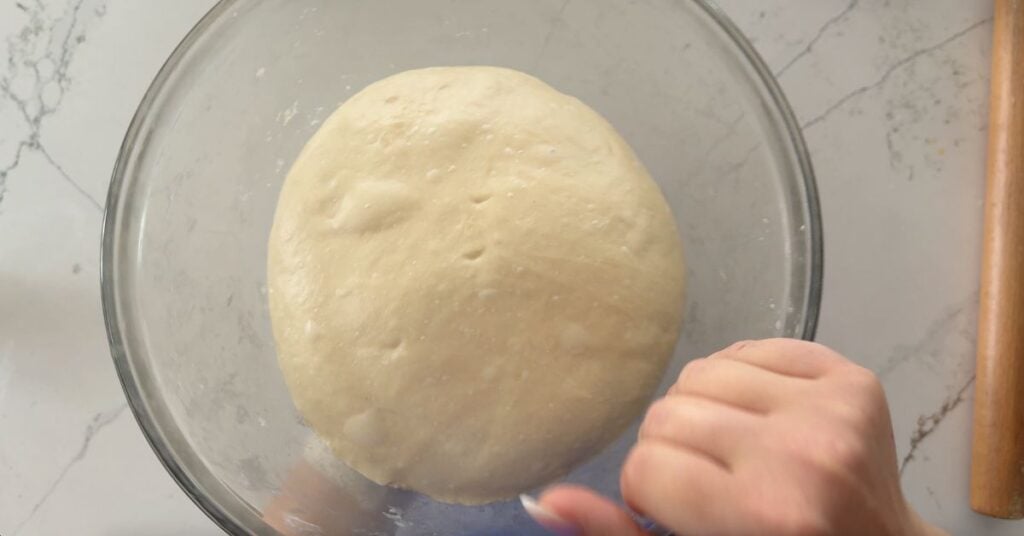
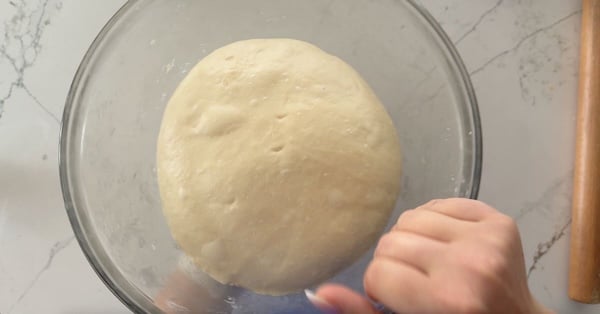
The dough should rise by around 30% and have bubbles forming around the sides and bottom of the bowl. If you poke the surface, it should feel aerated and pillowy.
Step 6: Shape.
Once the dough has shown signs of fermentation, it’s time to shape it and place it in the loaf pan.
I like to lightly flour my surface with bread flour, but that’s optional.
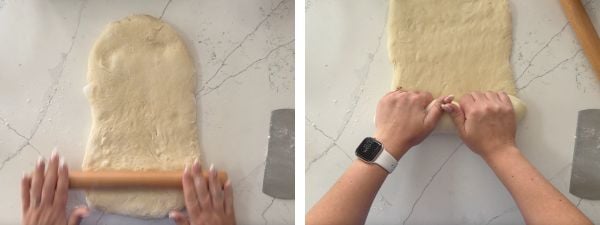
Turn out your dough and stretch it into a rectangular shape, being careful not to tear the dough. Use a rolling pin to smooth out the dough, pop big bubbles, and stretch the dough into a long rectangle that’s slightly narrower than your loaf pan.
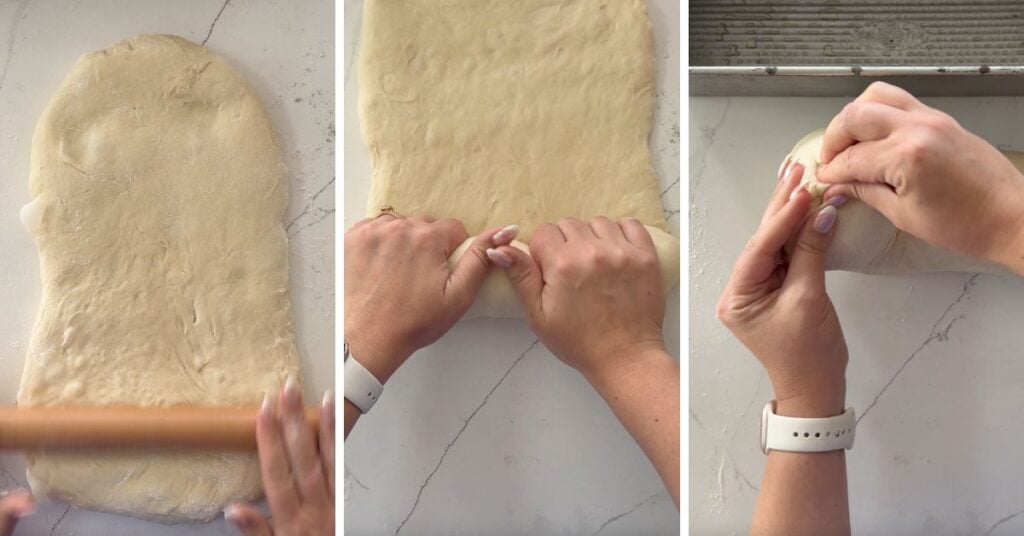
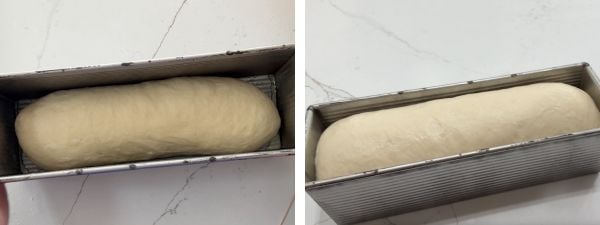
Then, roll up the dough into a log, doing it as tightly as you can to prevent any gaps. Pinch the seams on the edges and place in a lightly oiled loaf pan.
If you notice any bubbles on the surface, pop them with a toothpick! If you don’t, they will continue growing and may potentially burn in the oven later on.
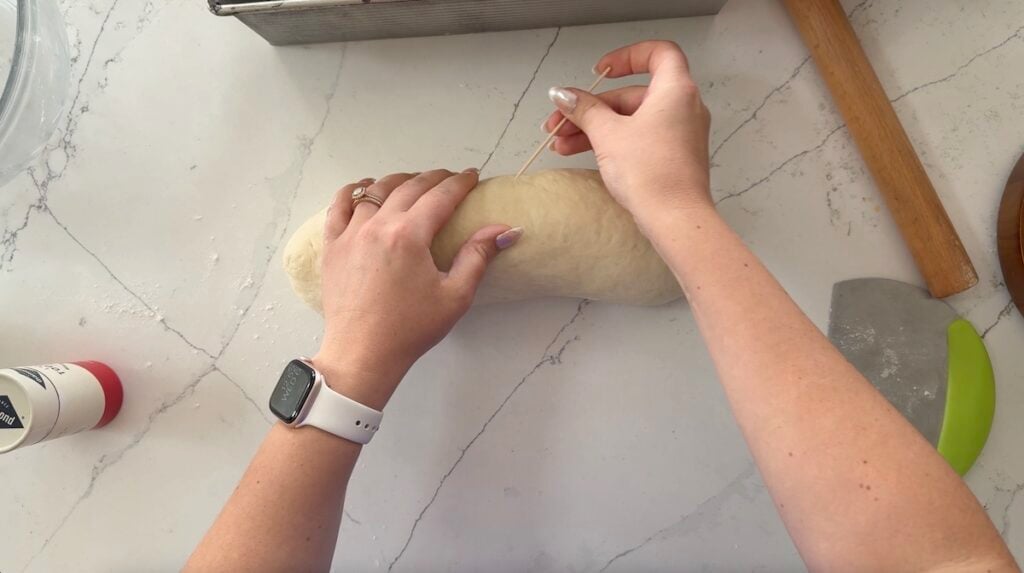
If your loaf pan is nonstick, you don’t need to oil it if you don’t want to.
Step 7: Second rise & bake!
Cover with plastic wrap and let the dough rise for another 3-5 hours in a warm spot, or until it is even with or slightly higher than the edge of the loaf pan.
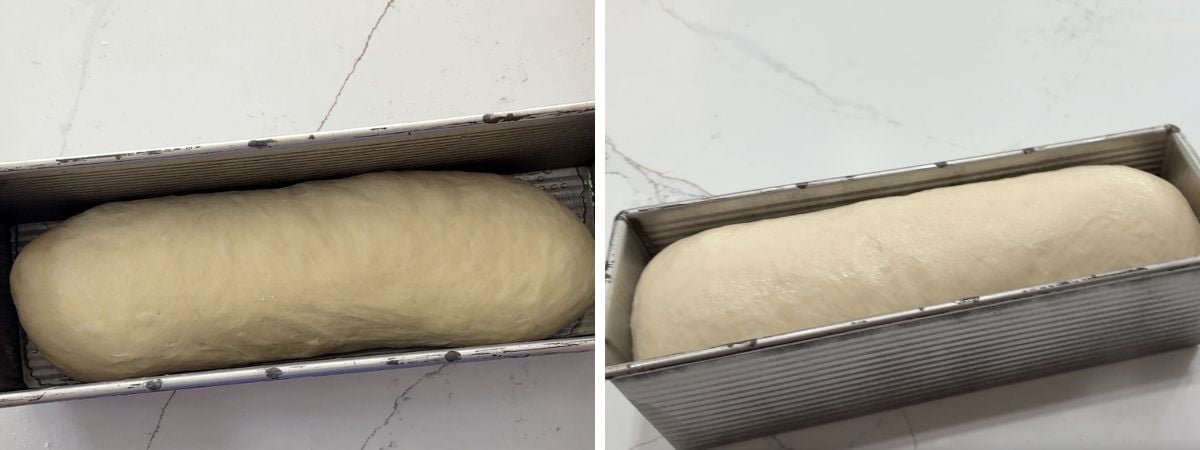
Then, preheat your oven to 350°F (175°C).
Bake, uncovered, until the internal temperature reaches 200-205°F (93-96°C). If the top of the loaf is getting too dark, cover with foil.
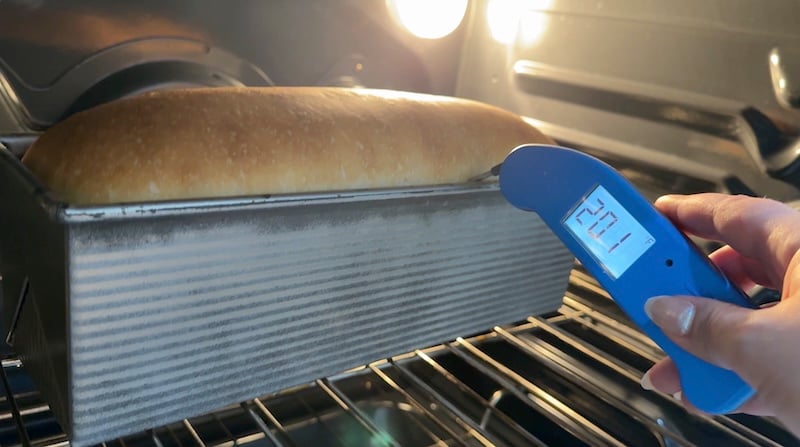
Here are bake times for different-sized loaves:
- Mini loaf pan: 25-30 minutes
- Regular loaf pan (around 8.5×4.5): 30-35 minutes
- Sandwich bread loaf pan (around 13×4): 40-45 minutes
Once done, immediately brush the top of the loaf with butter. I take a stick of butter and just glide it across the top!
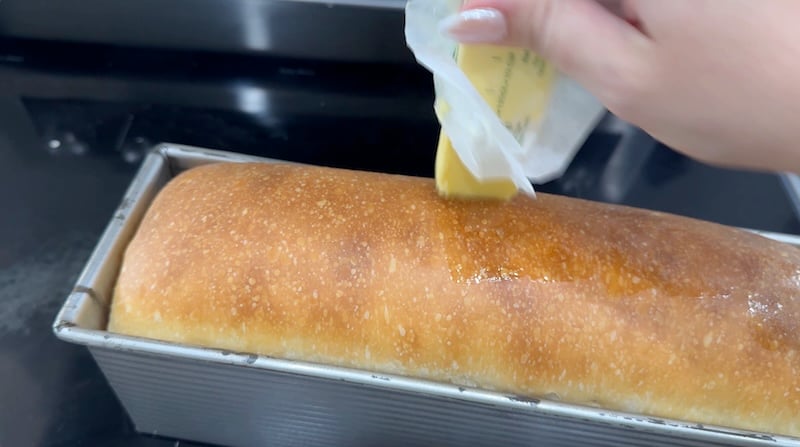
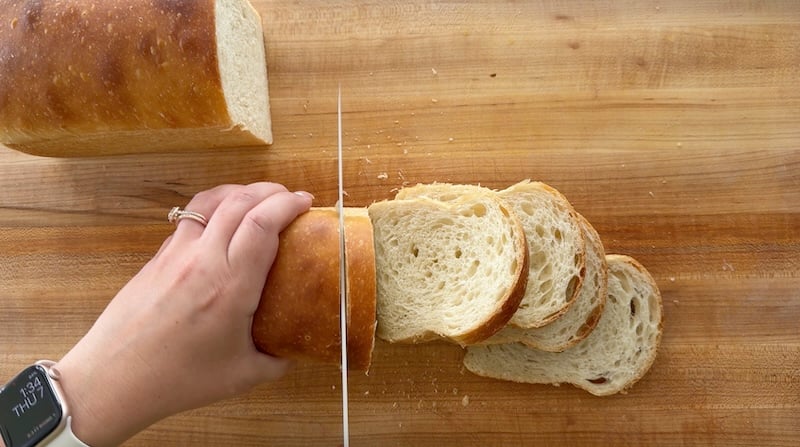
Let it cool for a few minutes; then, turn it out onto a cooling rack. Let it cool for about an hour before slicing!
Loaf Pan Size Calculator
Not using a 13×4 loaf pan like me? Use this calculator to get a revised ingredient list for different loaf pan sizes.
Same-Day Sourdough Wonder Bread Copycat Recipe by Hand
Equipment
- 3/4 L Weck jar for the stiff sweet starter
- Tovolo spatula for mixing your starter
- 2-quart bowl for first rise
- 13×4 long loaf pan USA Pan is my favorite
- Long bread bag code THATSOURDOUGHGAL for 15% off
Ingredients
Stiff Sweet Starter
- 30 g sourdough starter (ideally, fed within the last 24 hours)
- 30 g sugar (or honey)
- 60 g water
- 120 g bread flour
Tangzhong
- 35 g bread flour
- 175 g whole milk
Main Dough
- All of the stiff sweet starter (from above)
- All of the tangzhong (from above)
- 195 g cool water
- 40 g sugar
- 45 g avocado oil
- 515 g high-protein bread flour (see Notes)
- 12 g salt
- 1 tbsp butter (for buttering the baked loaf)
Instructions
- Before you begin: This recipe is written for a 13×4 loaf pan. If you are using a different size, use the calculator above this recipe card for a revised ingredient list. Additionally, a ton of ingredient substitutions have been tested. Please see the substitutions section in the original Wonder Bread post for tips!
The Night Before
- Make the stiff sweet starter: In a small jar, mix 30 g sourdough starter, 30 g sugar, 60 g water, and 120 g bread flour until it forms a ball. Knead outside of the jar to fully incorporate the ingredients. Cover loosely and let ferment at room temperature until morning.

Bake Day
- Make the tangzhong: Mix 35 g bread flour and 175 g whole milk in a microwave-safe bowl. Microwave in 20-30-second intervals, stirring between each, until thickened and reaches 150°F (65°C), or about 4-5 rounds total. Let rest on the counter for about 30 minutes, or until the mixture has cooled below 100°F (38°C). Note: you could make this the night before and refrigerate overnight.
- Mix the dough: In a large glass mixing bowl, combine All of the stiff sweet starter, All of the tangzhong, 195 g cool water, 40 g sugar, 45 g avocado oil, 515 g high-protein bread flour, and 12 g salt. Mix with a Danish dough whisk (if you have one); then, switch to your hands. Squeeze and knead the dough to incorporate all ingredients. Switch to slap and folds for a couple of minutes to bring the dough together more quickly. Put the dough back in the bowl and cover for 30 minutes.

- Strengthen the dough: Do 3-4 rounds of stretch and folds, each spaced 30 minutes apart, until the dough is smooth and has a strong windowpane (you can stretch it thin enough to see light through without tearing).
- Bulk fermentation: Let dough rise in a warm place (~85°F/29°C) until risen by about 30% and small bubbles appear around the sides of the bowl (about 3-5 hours total – bulk fermentation began when we first mixed our dough!).
- Shape the dough: Spritz your loaf pan with a nonstick oil spray. Dump dough onto work surface (use a light dusting of flour to prevent sticking, if needed). Using a rolling pin, roll dough into rectangle slightly narrower than pan width (about 10" wide by 14" long). Try to pop large bubbles as you roll. Roll up the dough tightly, turning the ends in slightly as you roll to minimize an end seam. Place your dough log seam-side down in loaf pan. Use a toothpick to pop any bubbles on the surface of the dough.
- Second rise: Cover with plastic wrap and let rise in your warm spot (~85°F/29°C) until very puffy and the dough is even with the height of the pan rim (approximately 3-5 hours).
- Bake: Preheat oven to 350°F (175°C). Bake uncovered 40-45 minutes until internal temperature reaches 200-205°F (93-96°C). (See Notes for different loaf pan size baking times.) If the top of the loaf is getting too dark, cover with foil.
- Finish: Once done, immediately brush hot loaf with 1 tbsp butter. Cool in pan 5-10 minutes, then turn out onto rack. Cool completely before slicing (1-2 hours).


Video

Notes
- Bread flour: Ballerina Farms (14% protein), Central Milling High Mountain (13.5% protein) or King Arthur unbleached (12.7% protein) – no adjustments needed
- All-purpose: Costco AP flour – add ~25g extra flour to main dough
- Canadian options: Arva Mills Daisy flour or Boreal Organic All Purpose (Costco) work perfectly (thanks to follower Amanda Steele for this tip)
- Mini loaf pan: 25-30 minutes
- Regular loaf pan (around 8.5×4.5): 30-35 minutes
- Sandwich bread loaf pan (around 13×4): 40-45 minutes
Conclusion
If you try this hand-mixed version of the sourdough Wonder Bread copycat recipe, please let me know how it went in the comment section! I’d especially love to hear if you found the hand mixing easier or harder than expected.
I love seeing your photos and hearing about any changes you made.
Happy baking!
Other soft bread recipes you might like:




Help!!!! I cant seem to get it to rise all the way to the top of the loafpan. I came really close thisd time but it FELL while baking.
What am I doing wrong?
BTW It tastes fabulous!!!
Oh interesting – it isn’t rising to the top of the loaf pan but is then deflating during baking? That sounds under and overproofed at the same time. That would be related to a starter issue or possibly lack of dough strength. Do you have a photo of the interior? Feel free to email me more information for better troubleshooting.
Hi Rebekah, thanks so much for a wonderful recipe! It turns out beautiful loves that taste amazing. My loaves do have a tendency to cave in at the sides. I have tried baking with regular oven and convection baking with the same results. Do you think this is because they are rising too fast? I’m using King Arthur flour. Thanks so much!!
The caving in on the sides is likely due to the loaf becoming top heavy and the weight of the top somewhat “crushing” the middle, causing it to cave in a little. This happened to me once, and I noticed it was when my loaf really rose up high in the oven. Perhaps shortening the second rise and baking it just a smidge sooner can prevent that.
This recipe taught me what the sourdough should look like with slap and folds! My artisan loaves have been flat and not right, the dough sticky. Could not figure out if it was over-proofed, under- proofed, but just wrong! Ive been baking yeast bread for 40 years and the sourdough has just been a nemesis. I can see what slap and folds actually do to the dough and now I understand how it’s supposed to behave. I haven’t cut into this yet, but I’m sure it’s gonna be awesome. Can’t wait to try the artisan boule now.
So glad to hear it!!!
Can you use olive oil in place for the avocado oil?
Yes
Second attempt making this loaf, and it turned out absolutely perfect! Thank you Rebekah for your incredible step-by-step instructions, the extra notes and tips and photos! You make baking easy!
Such a nice flavour, definitely better than WonderBread! I can’t wait to make my son his lunch for school today!
Yay, I’m so glad you enjoyed it!! Looks beautiful!
I just did my first stretch and fold and the dough won’t stretch very much. Any tips on how to rescue this? I’ve made sourdough and focaccia many times and never had this issue. Maybe I measured something incorrectly??
If it won’t stretch at all and seems firm, your flour may just be higher protein (or it needs more water). Try to compare your dough’s texture to mine at this stage (the YouTube video may be the best place to check that). If yours is more stiff, you can add splashes of water, squeezing the water in, until it feels right.
Thank you! It still came out great!😊
Hey, I really wanted to try this recipe because my current sourdough sandwich loaf just isn’t quite what I want. However, I dont have a microwave. Could it be done without or on the stove? If so, any suggestions to get it right?
You can make the tangzhong on the stove too! Just cook over medium heat, whisking constantly. Don’t walk away or it will overcook!
This is our favorite bread! My son and a neighbor said it’s the best bread they’ve ever eaten!!
Yesterday I used same recipe and added cheddar and Parmesan cheese with Italian seasonings. I must say it’s the best bread I’VE ever eaten!! Savory yet a little sweet but ohhhh so soft!! Gotta go, my toast just popped up😘
Yum!!! That sounds like such a great addition! So glad you are enjoying the recipe!
I don’t understand why there are 2 recipes for the same bread. One being with a mixer, the other no mixer. Why would this matter? I have never seen 2 different recipes for different methods. Just curious.
I had tons of requests from people that didn’t have a stand mixer but still wanted to make this recipe. Adding all of these hand mixing instructions to the original recipe would have made it way too long so I just added them here. Sorry for any confusion!
I’ve never seen this before either, but I really appreciate that you took the time to make a no mixer recipe, even though it’s the same recipe and just different steps along the way! It was a lot less confusing to use this with my younger daughters rather than having it all on one recipe card or having to alter it as we went along. It’s the little things that can make a big difference
So glad it was helpful!!
Thank you so much for doing this hand mixed recipe! It is so yummy and soft! I was wondering how I could I approve my dough. When I mix my dough it is not as smooth and elastic as shown or I’ve seen in your video. Is there something that I could be doing wrong? It’s typically pretty stiff and not stretchy at all. It still has come out delicious I was just curious how I can improve. Thank you again!!!
Add a little more water – your environment or specific flour may need it! That’s literally it!
Thank you so much! I will do that!!!
I followed your recipe to a T. This was my very first ever sourdough bake after a months long effort to craft my own very active, bubbly starter from akscratch. It turned out perfectly! My family absolutely loves the bread, and it’s a gorgeous loaf. I am blown away by the taste and texture of the bread. I will be baking this exact bread at least weekly from now on for my family. Great to know I can bake extra loaves and freeze for later. Thank you for such thorough, great instructions. I used honey for the levain and sugar for the dough. 10 out 10 would recommend!!
It was easy and it came out great! Kids loved it. Can I place the sweet starter in the refrigerator overnight after it triples in size; and can I use plant based milk ?
Yes and yes!
I tried this recipe for the first time and my wife and I agree that this is the best loaf of bread we have ever experienced. Neither of us can think of a better bread, store bought or homemade.
Awesome, I’m so happy to hear that Brett!!
I can’t seem to get my loaf to rise above the pan. It goes about 3/4 the way up after 5.5 hour proof. I kept my dough outside at 85-88 degrees today, and still not enough rise.
My stiff starter tripled in size, my tangzhong was perfect. I bulk fermented 4.5 hours, it rose 40% and had bubbles. This is my 2nd try and I can’t seem to find where I messed up. Help!
How is the baked loaf coming out?
Have made this recipe a couple of times & am using a smaller loaf pan with the calculator tool. It tastes delicious & is nice & soft but I’m finding it feels heavy when you pick it up & feels a bit dense. Is there something I’m not doing right that would cause this?
That’s usually related to underproofing – try extending the fermentation time and let it puff up more before baking and compare that result!
I can not get over how soft and delicious this bread is!!!! Thank you 😊
Stunning! Thanks for sharing!!
When making the sweet starter – does the starter need to be active?
Ideally the starter should be fed within the last 24 hours!
Ok. I purchased the USA pan specifically for this recipe because I just knew how remarkable this loaf would be…and the results did not disappoint! I’m so used to artisanal loaves that I couldn’t even comprehend how incredibly soft and fluffy this bread turned out. It’s now highly requested by everyone who’s seen it and will be a staple in our home forever! THANK YOU! ive got to go take a batch of your sourdough hamburger buns out of the oven now! 😆
Stunning!!
This is by far….. my most favorite recipe- thank you, thank you, thank you ! I’ve had 3 neck surgeries, so my upper back muscles are bad, I bought the Artiste mixer, and feel like it’s a hassle- this is way easy and I’ll be using this recipe and technique forever!!!!!
Yay, I’m so glad this was helpful!!
How long would I refrigerate my loaves for easy scoring before baking?
At least 2 hours but I prefer overnight (12-18 hours)
Hello. I have a question. Can I use my stand mixer instead of doing stretch and folds? I have issues with my shoulders and elbows and mixing by hand and doing stretch and folds can be very difficult for me?
Thanks in advance.
Yes, you want the regular recipe instead of this by-hand variation. Here you go: https://thatsourdoughgal.com/same-day-sourdough-wonder-bread-copycat-recipe-no-tang/