
Cinnamon Swirl Sourdough Bread Recipe: No Stress, No Leaks

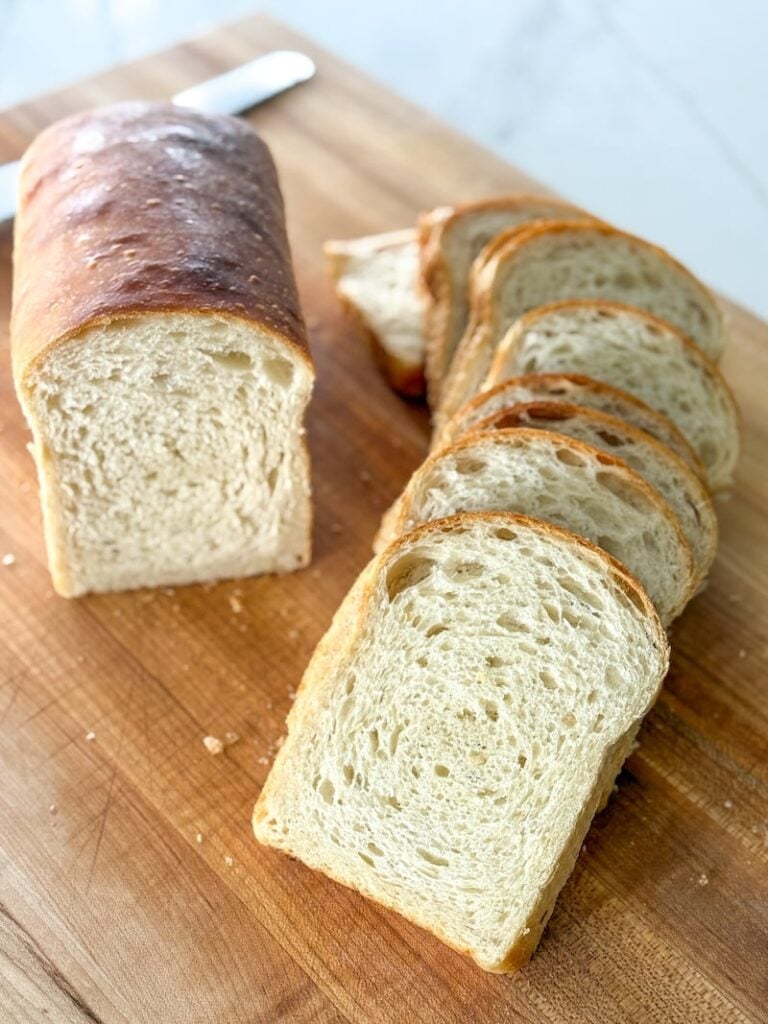
Cutting into a loaf of cinnamon swirl sourdough bread has the same energy as a gender reveal: it’s beyond exciting to see a perfect spiral of brown sugar and cinnamon peeking back at you.
But getting to that moment is NOT easy. After six attempts (yes, six), I finally cracked the code for a zero-stress, zero-leakage cinnamon sugar sourdough loaf that also delivers a dreamy swirl.
If you follow me on my Instagram stories, you know how much effort went into this experiment.
Catch a recap of this entire journey here:

After over 5 weeks of testing, I finally landed on a recipe that truly checks all the boxes:
- No stress during the shaping
- A perfect swirl in every loaf
- No leaking sugar that’s messy and ends up burning in the oven
- No separation of the layers inside
I gave up on cinnamon sugar sourdough bread for months because I loathed the entire process. Not anymore!
If you’ve been dreaming of a cinnamon swirl sourdough that feels artisan-level but approachable, this recipe is for you.

If you prefer a soft bread, like the Pepperidge Farms cinnamon swirl bread, try this recipe: Cinnamon Raisin Swirl Sourdough Bread Recipe (Pepperidge Farms Copycat)
Disclaimer: Some of the products I recommend in this post are affiliate links – if you choose to purchase after clicking one of my links, I may earn a small commission, which helps fund this website, recipe development, and monthly giveaways. I sincerely appreciate your support.
YouTube Step-by-Step Tutorial
If you’re a visual person, or just want to pick up on those details you can only see on film, here is a YouTube tutorial.
It has timestamps in the description so you can jump ahead to whichever step you need.

Baker’s Timeline
| Day 1 | |
| 9:00 PM | Feed your starter a 1:5:5 feeding ratio. |
| Day 2 | |
| 8:00 AM | Mix the dough, cover, rest for 30 minutes. |
| 8:30 AM | Stretch and fold #1. |
| 9:00 AM | Stretch and fold #2. |
| 9:30 AM | Stretch and fold or coil fold #3. |
| 10:00 AM | Stretch and fold or coil fold #4; let the dough finish bulk fermentation. Timing varies. |
| 4:00 PM | Stretch the dough and add cinnamon sugar mixture. Flip into lined banneton and refrigerate overnight. |
| Day 3 | |
| Anytime | Score and bake at 450°F (230°C) for 30 minutes covered, 10-15 minutes uncovered. |
Ingredients for Cinnamon Swirl Sourdough Bread
For the Dough:
- Water: I use water straight from my faucet. I live in the country and have well water; I’ve never had any issues. However, I’ve seen others recommend using spring water.
- Active Sourdough Starter: Bubbly and at its peak for baking. Related: Is My Sourdough Starter Ready to Bake With? How I Can Tell
- Sea Salt: I use sea salt. I love Redmond’s Real Salt (15% off with code TSG15). Just try to avoid salt with anti-caking agents.
- Bread Flour: I used King Arthur’s unbleached bread flour (12.7% protein) for all of the testing on this loaf. Other great options include Central Milling High Mountain (13.5% protein), Ballerina Farms Farm Flour (14% protein), and Bob’s Red Mills bread flour (12.5-13.5% protein). You can use Central Milling ABC flour (11.5% protein) – this is almost identical to Costco’s All-Purpose flour – but know that it can’t absorb quite as much water, so reduce the water by 20-30g and add back gradually until the texture matches mine!
- Whole Wheat Flour: I used Sunrise Flour Mills for this one. Adds a nutty flavor and speeds up fermentation, but if whole wheat is not your thing, you can use all bread flour.
For the Filling:
- Softened Butter: Set it out beforehand so your cinnamon sugar mixture is spreadable without tearing the dough.
- Cinnamon: The star of this recipe! Ceylon cinnamon seems to be everyone’s favorite. Saigon cinnamon packs a spicy punch.
- Brown Sugar: Cinnamon’s wingman; adds that irresistible sweetness. If you don’t have any on hand, you can mix white sugar with molasses to make your own.
- Bread Flour: A bit of bread flour in the cinnamon sugar mixture helps absorb some of the moisture so it’s not too runny. It also helps everything stay in place when you roll it up — one of the secrets to getting that perfect swirl! Substitute all-purpose flour if you need to.
Another sweet loaf to try: The Best Chocolate Chip Sourdough Bread Recipe
How to Make Cinnamon Swirl Sourdough Bread (Step-by-Step)
Step 1: Feed Your Starter
Getting your starter ready at the perfect time is all about the feeding ratio. This recipe uses 120g of active starter. If you want it ready by morning, feed it right before bed using a 1:5:5 ratio. This slows things down so it peaks in 10-12 hours.
Mix 15g starter + 75g water + 75g bread flour; you’ll have 45g extra to maintain your starter.
Alternatively, if you’re starting in the morning and want it ready around noon, go with a 1:1:1 ratio, which speeds things up so it peaks in 4-6 hours. For that, mix 50g starter + 50g water + 50g bread flour. This ratio leaves you 30g extra.
Either way, you’ll know it’s ready when it’s bubbly, flat on top, and ideally, tripled in size.

Not sure if your starter has peaked? Check out: Is My Sourdough Starter Ready to Bake With? How I Can Tell
Step 2: Mix the Dough
When your starter has peaked, mix everything for the dough in a bowl: 325g water + 120g active sourdough starter + 10g sea salt + 400g bread flour + 100g whole wheat flour.
If you’d rather skip the whole wheat, you can use 500g of bread flour instead—no other changes needed. You could reduce the water by 10-20g if you want the same texture, but I say keep it simple!
Mix until fully combined. The dough may look shaggy and feel sticky at this stage—that’s normal! It may not be smooth or even yet, but as long as everything is mixed, you’re good to go. I kneaded by hand for 4-5 minutes.

Cover your bowl with plastic wrap, a shower cap, or a dish towel, and let it rest for 30 minutes—this kicks off bulk fermentation.
This is when you should set out 4 tablespoons of butter to soften for later.

Step 3: Stretch and Folds
After 30 minutes, start your first set of stretch and folds.
With the dough still in the bowl, grab one side, stretch it upward, and fold it over itself. Rotate the bowl and repeat this on all four sides. I typically do 8-10 stretches, or until the dough tightens up and resists me.


Do this every 30 minutes for 3–5 rounds, until the dough becomes smoother, holds its shape better, and stretches with a little resistance instead of feeling loose.
If you’re not sure, it’s always safe to aim for 4 rounds.
For the last couple of rounds, you can switch it up and try a coil fold. Lift the dough from the center, let the edges drape down, and tuck them underneath as you set it back down. Coil folds are gentler on the dough and don’t pop as many bubbles, which start forming as the bulk fermentation goes on.
After all your folds, cover the dough and let it rest until it’s finished fermenting.
Step 4: Bulk Fermentation
Remember, the fermentation clock started as soon as you mixed all the ingredients.
I’ve always followed charts in the past to know when to cut off bulk fermentation, but lately, I’ve been pushing those limits and learned that how the dough looks and feels matters more. Learning to read the dough has been a massive help for me.
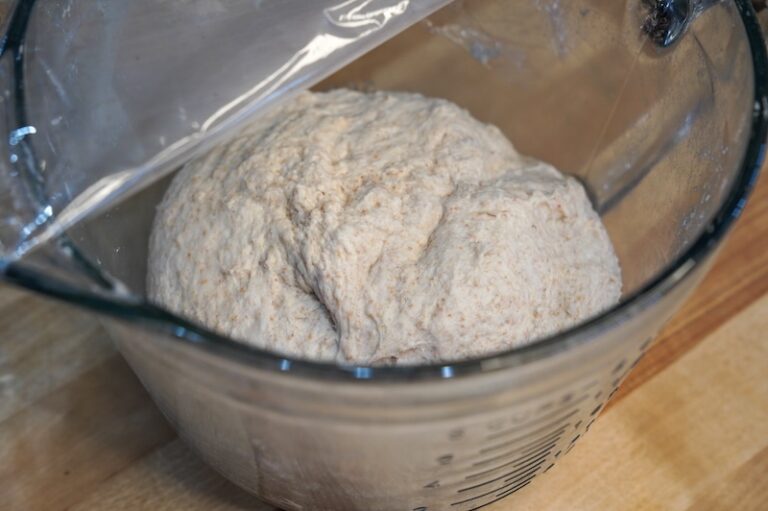
You want to see a dough that’s airy, puffy, and slightly domed with tons of bubbles all around the sides of the bowl. It should jiggle like jello when you shake the bowl and feel soft and pillowy when poked.

Don’t be afraid to push the limits a bit. Slightly overproofed dough tends to bake up better than underproofed dough, so when in doubt, just let it sit a little longer.
For me, this takes about 8 hours at a 70°F (21°C) temperature, but every kitchen is a little different, so just keep an eye on it. The dough will tell you when it’s ready.
Step 5: Stretch Dough Into a Rectangle
Now that bulk fermentation is done, it’s time to shape your dough for the cinnamon filling.
If you were making a regular sourdough loaf, this is when you’d pre-shape. But for a cinnamon swirl loaf, skipping pre-shaping makes it easier to stretch into a rectangle since there’s less tension on the dough.
Mist your counter with a little water to prevent sticking (optional, but helpful) and turn the dough out.
Stretch the dough into a 13×16 inch rectangle for the filling, with the long side at the bottom. You don’t necessarily need a measuring tape, but if you’re not sure how far to stretch, this is about the size my dough was during recipe testing.

If you see any thin areas or holes, just stretch some extra dough over it to patch them up to avoid any big holes in the crumb.
Step 6: Add the Filling
In a small bowl, mix:
- 57 g softened butter (4 tbsp)
- 8 g cinnamon (1 tbsp)
- 65 g brown sugar (5 tbsp packed)
- 16 g bread flour (2 tbsp)

Tip: Your butter needs to be soft to get the right consistency. If you forgot to set it out, pop it in the microwave on the “soften” setting until the center is soft and the edges are slightly melted. If the mixture still feels too dry, add an extra tablespoon of butter or pop it in the microwave for 10 seconds or so.
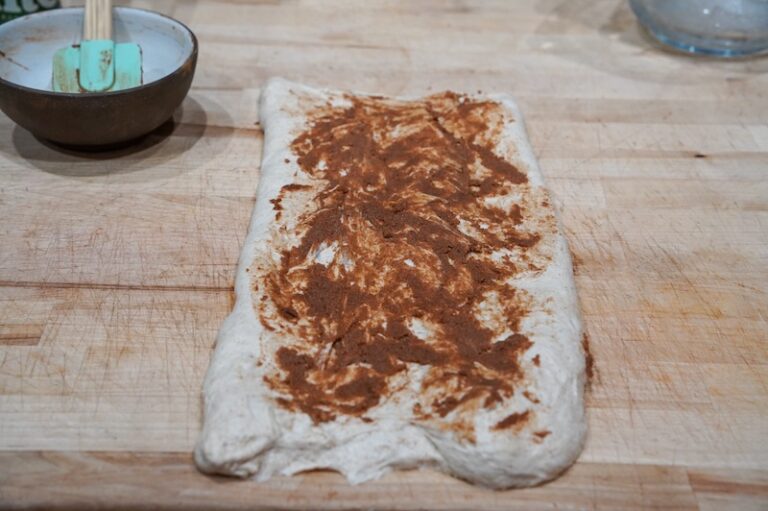
Using a silicone spatula, spread half the cinnamon sugar mixture evenly down the center of the dough, leaving about 4 inches clear along each short side.

Grab the left edge of the dough and fold it toward the middle. Repeat with the right edge so you have one long seam down the center. Pinch the top and bottom closed to seal in the cinnamon filling so none leaks out.


Spread the rest of the cinnamon sugar filling evenly over the top, leaving about an inch on each side. This will help create a clean seal so it doesn’t leak out.

Step 7: Roll It Up
Grab the bottom edge of your dough (a bench scraper helps if it’s sticking) and start rolling it up toward the top. Try to keep cinnamon sugar off the edges so the seam seals properly.

When you get to the end, gently pinch the seam to close it up. If you can see the swirls at the ends, push them to the inside with your fingers and pinch the ends shut. You want a good seal, but don’t squeeze too hard—you don’t want to tear the dough.
Step 8: Cold Proof
Pick up your dough log and plop it into the banneton, seam-side up.

A silicone batard-shaped banneton would be ideal if you’re worried about any cinnamon sugar leaking during the cold proof. Since I didn’t have one, I used my wood pulp banneton lined with a thin towel, and it worked out well.
You can flour the dish towel if you want, but you don’t have to. The dough peels off easily without it.
Try not to mess with the dough too much here. Just make sure the seams are sealed. If there’s a spot that isn’t, gently pinch it shut, being careful not to mess up that swirl!
Cover it with an extra dish towel and put it in the fridge overnight. Anywhere from 8 hours to 4 days works, but overnight is best.
Step 9: Score and Bake
The next day (or after at least 8 hours in the fridge), preheat your oven to 450°F (230°C) with your Dutch oven or bread dome inside.

Flip the dough onto a piece of parchment paper. I’d normally use a bread sling, but on cinnamon swirl loaves, I stick with parchment paper for easier cleanup in case any filling leaks out.
Even after baking this recipe successfully a few times, I still reach for parchment here, and I especially recommend it if this is your first go. Better safe than sorry!

Score the top of your dough on a diagonal using a curved razor blade. The curve helps the blade glide through the dough at an angle, which helps it expand beautifully in the oven. You can also score straight down to prevent an ear from forming if you prefer.
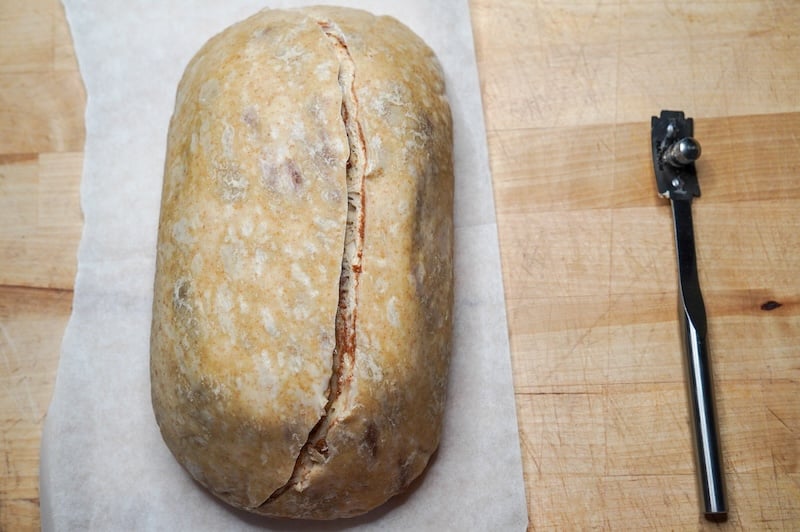
If you want a more dramatic ear (the raised edge), you can go back over the score and lightly skim just under the surface along the full length.
Bake your loaf for 30 minutes with the lid on.

Remove the lid and bake for another 10-15 minutes uncovered until it’s golden brown. Keep an eye on it so it doesn’t burn. Every oven is a little different.

The bread is done when it reaches an internal temperature of 205-210°F (96-99°C).

Another cinnamon sourdough recipe you might like: Sourdough Cinnamon Crunch Bagels (Panera Copycat)
FAQs
You can add raisins during the lamination process to make a cinnamon raisin sourdough loaf. Soak 85g of raisins in vanilla extract (or water) for 30 minutes, then drain, saving the vanilla for later use in something like sourdough discard waffles. After spreading the cinnamon sugar mixture on the dough, sprinkle the soaked raisins on top, repeating this step each time you add the cinnamon mixture to ensure even distribution.
Definitely! My mom loves to drizzle hers with a little icing. Just mix together 2 tablespoons of softened butter, 2-3 tablespoons of softened cream cheese, about 3/4 cup of powdered sugar, and a splash of vanilla. If you like your icing thicker, you can add more powdered sugar. Spread it on top of each slice like you would butter.
Some bakers have mentioned that their butter mixture turned out more crumbly than mine. The likely culprit? Butter consistency. I tend to forget to set mine out to soften, so I use the microwave’s soften function, which leaves it soft in the center with slightly melted edges. If your mixture is too dry, simply mix in another tablespoon of softened or melted butter to make it more spreadable.
I’ve perfected the swirl shaping for a batard, but I’m still refining it for a boule. For now, I suggest stretching the dough into a square rather than a rectangle—this creates shorter sides, making it easier to roll up and pinch the seams into a rounder shape. I’m still testing, but this should help achieve a more even boule!
Absolutely! You can roll it up and bake it in a loaf pan for an easier approach. I just wanted to perfect this method for an artisan-style loaf. If you use a loaf pan, consider reducing the temperature by 25°F and double-check the internal loaf temperature before taking it out – it may need a few more minutes to bake through.
Yes, if you have a favorite sourdough bread recipe, you can use that for the main dough.
Yes, you can use all bread flour in the main dough if you prefer. No other changes to the recipe are needed.
Other inclusion breads to try:
- Italian Herbs & Cheese Artisan Sourdough Bread Recipe
- Olive Parmesan Artisan Sourdough Bread Recipe
- Sun-Dried Tomato and Goat Cheese Sourdough Bread Recipe

Cinnamon Swirl Sourdough Bread Recipe
Equipment
- Oval Dutch oven ($15 off with code REBEKAH15)
- Oval banneton (5% off with code TSG5) | Size I'm Using: Oval – Spiral MD
Ingredients
Sourdough Starter
- 15 g sourdough starter
- 75 g water
- 75 g bread flour
Main Dough
- 325 g water
- 120 g active starter that you made, from above
- 10 g sea salt
- 400 g bread flour See Recipe Notes
- 100 g whole wheat flour
Filling
- 57 g softened butter
- 8 g cinnamon
- 65 g brown sugar
- 16 g bread flour
Instructions
Feed Your Starter
- The night before making your dough, feed your starter a 1:5:5 feeding ratio by mixing 15 g sourdough starter, 75 g water, and 75 g bread flour. This gives you a little extra, so you don’t have to scrape the jar clean (use the leftovers to maintain your starter). At this ratio, your starter should peak in 10-12 hours.Starting in the morning instead? Use a 1:1:1 ratio for a faster peak (4-6 hours). Combine 50 g starter, 50 g water, and 50 g bread flour for one loaf.
Make the Dough
- In the morning, when your starter has peaked (see Recipe Notes for help), mix 325 g water, 120 g active starter, 10 g sea salt, 400 g bread flour, and 100 g whole wheat flour in a bowl. Mix until the ingredients are fully combined and the dough is shaggy. Cover the bowl with plastic wrap, a shower cap, or a cloth, and let it rest for 30 minutes. (This is the beginning of the bulk fermentation.)

- Set your butter on the counter to soften for later.
- After 30 minutes, perform your first set of stretch and folds (or coil folds). Repeat this every 30 minutes for a total of 3-5 rounds, until the dough becomes smoother, holds its shape better, and stretches with a little resistance instead of feeling loose. If you’re unsure, aim for 4 rounds to be safe. Once finished, cover the dough and let it rest until bulk fermentation is complete.

- Bulk fermentation is done when the dough is visibly larger (the exact percentage rise is not as important as the other visual signs), with bubbles all around the sides and underneath the surface. The dough should jiggle like jello when you shake the bowl and feel light, airy, and puffy to the touch. It should be domed on the edges where the dough meets the bowl. Don’t worry about exact timing; trust these visual and tactile cues to guide you. Warmer dough ferments faster, colder dough takes longer, but slightly overproofed dough often makes better bread than underproofed. Don't be afraid to push the limits. For this recipe, my bulk fermentation took 8 hours at a 70°F (21°C) average temperature. Another test at 75°F (24°C) took just under 6 hours.
- When the bulk fermentation is done, lightly mist your work surface with water and dump out the dough. Gently stretch it into a 13" x 16" rectangle with the long side at the bottom.
Add the Filling, Shape, & Cold Retard
- In a small bowl, mix 57 g softened butter, 8 g cinnamon, 65 g brown sugar, and 16 g bread flour.
- Using a silicone spatula, spread half the cinnamon sugar mixture evenly down the center of the dough, leaving about 4 inches clear along each short side.
- Fold the dough’s sides to the center and pinch all the seams closed.

- Spread the rest of the cinnamon sugar filling evenly over the top, leaving about an inch on each side for sealing.
- Roll the dough tightly into a log, pinching the edges to seal as you roll. When you get to the end, gently pinch the seam to close it up.
- Place seam-side up into a floured, towel-lined banneton. Cover and refrigerate overnight (8 hours up to 4 days; overnight is best).


Score & Bake
- The next day (or after at least 8 hours in the fridge), preheat your oven to 450°F (230°C) with a Dutch oven or bread dome inside.
- Flip the dough onto parchment paper, score the top, and bake for 30 minutes covered and 10–15 minutes uncovered (watch closely to prevent burning).
- The bread is done when it reaches an internal temperature of 205–210°F (96–99°C).


Video
Notes
Conclusion
It took me quite a few tries (and almost happy tears when I finally nailed it), but I finally got that perfect cinnamon swirl!

Now, you can skip the trial and error and dive right into baking a perfectly swirled cinnamon sugar loaf.
Have you tried it? Let me know how it went in the comments below!
A good loaf to try next: The Best Lemon Blueberry Artisan Sourdough Bread Recipe


This came out wonderful! Your pictures and videos are a great help.
Will definitely make this bread again, thanks so much.
So glad you enjoyed the recipe Debi!
A beautiful and delicious loaf of bread! I love you recipes. They always turn out great. Thanks for helping me gain sourdough skills 💗
Beautiful, thanks for sharing!
I feared the worst as my douch was very wet. Probably because I used only white breadflour and same amount of water. It was a bit more difficult to shape, but it came out of the oven very very beautiful and I just had a slice still slighly warm with Some fresh farm butter….. oh my….to good! Thank you for you recipes and effort.
Great job!!
Can you do this in a loaf pan. My banner on is for a round loaf.
Yes you can use a loaf pan!
If you use a loaf pan is the temp and time the same? Do you need to cover the loaf pan? Do you have to score it?
I would keep the same time and temp but double check the internal loaf temperature to ensure it has fully baked through at the end. Covering the loaf pan with an inverted second loaf pan for the covered part of the bake is a good idea. I would score it.
Can you do this in a loaf pan. My banneton is for a round loaf.
yes you can!
I made this in a loaf pan and everyone went wild for it!! That makes my heart happy, and it eas darn good! I’m using my Dutch oven this time, should I use the round or loaf banneton, to hold the shape and structure? It’s a snow day here in Virginia, perfect for baking! 💓 thanks for another awesome recipe!
I used my oval banneton with this one!
First time making the cinnamon bread. I think it turn out pretty good. I haven’t been doing sourdough very long. I haven’t made very many loafs. May be about 5 loafs counting this one. I have watched your videos over and over to learn. Thank you for helping me. God bless you.
Looks great!
I have made this recipe 2 times. It is delicious! And so happy to have a swirl. However, both times it took significant longer to bake and reach 200 F internal temp. Around 15 min.
Both times I baked in a preheated cast iron Kook loaf pan with lid. At the recipe time the internal temp was 145 F both times. My oven temp is correct. I basically live at sea level. Any ideas?
I find that with basically every inclusion-style recipe I post, those who bake in a loaf pan report longer bake times than those of us using a Dutch oven. I really don’t know why that is, but it’s typical. Just check that internal temperature like you’ve been doing and extend the bake time until it reaches 205-210F. You can lower the oven temp by 25F if the top is browning too quickly.
Salt?
I’m not sure what your question is?
Started my sourdough journey at the end of September and love watching you. I tried there recipe three times and each loaf came out great tasting. I don’t use as much butter and the last loaf didn’t even have butter but it sjways tasted great! The bread flour in the sugar mixture is the trick to keep it from leaking out I think. Never had any problem. I only make boules instead of loafs because I like shaping them 😊. The swirls is not like your but it’s still three. Here’s my picture of the last two loafs.
Amazing, thanks for sharing!
Is this bread and the blueberry/lemon bread good for freezing?
Yes any sourdough bread freezes great. Just slice the loaf and freeze in a freezer-safe bag!
Do you have to use wheat and bread flour? Can you only use bread flour?
Yes you can use just bread flour if you prefer!
Do we need to adjust any of the other measurements if we’re using only bread flour?
No!
Light brown or dark brown sugar or does it matter?
Either one works!
I NEVER have commented on any internet post. This is the best bread I have ever made.
Thank you!
Thanks for commenting on this one!! Looks amazing!
The BEST recipe. I was so sick and tired of the sugar bleeding everywhere and making it a burnt, sticky mess. This recipe is not just pretty, and functional.. it’s DELICIOUS! A house favorite!
Yay love to hear it!! Swirl is looking great
Made this weekend, everybody loved it, thanks for sharing!
Beautiful!
Hi there! I’m planning on making this recipe this week and wondering if I can substitute bread flour with all purpose flour as I haven’t been able to find bread flour near me. Love your videos and explanations!
Yes you can but use a little less water and adjust your expectations for the texture of the bread! Shouldn’t make a huge difference though!
Oh so delicious!!! Thank you for all the guidance. Will make again and again!
Beautiful swirl!
This was delicious! First time making a loaf with these inclusions. Thank you for the tip with the flour! I was just going to wing it but glad I didn’t! Will be making again
Yay, so glad you enjoyed the recipe!
Can I make this in a circle instead of loaf size? I don’t have anything tnag big
Yes you can but the swirl won’t be as perfect!