
Sourdough Hawaiian Hot Dog Buns (Same-Day or Long-Fermented)

I’m in love with Hawaiian rolls, so when I got some requests to turn them into hot dog buns… immediate yes. These sourdough Hawaiian hot dog buns are perfectly soft, squishy, and sweet.
To my European friends, I can already hear you saying, “Why do Americans have to make their bread so sweet?” And I hear you, but please make an exception for this one.
Most hot dog buns taste like nothing. They’re just a necessary vessel for the hot dog. But these? Oh no. They’re the main event. The hot dog is lucky to even be here. Let me teach you how to make ’em.

Disclosure: Some of the links to products I recommend in this post are affiliate links — if you choose to purchase through one of my links, I may earn a small commission, which helps fund this website, recipe development, and monthly giveaways. I sincerely appreciate your support.
Why You’ll Love These Hawaiian Hot Dog Buns
- A proven dough: This is the same dough from my Hawaiian rolls recipe, tested by 194 home bakers. We only changed a few minor steps to turn that dough into hot dog buns.
- Perfectly sweet: These sourdough hot dog buns have a sweet edge, but they’re not as punch-you-in-the-face sweet as the King’s Hawaiian brand.
- So soft inside: It’s hard to recreate the squishiness of store-bought hot dog buns at home. But with the help of a tangzhong (a simple cooked milk-and-flour paste), we’ve done it. They’re softest warm; the butter firms them up in storage, but reheating brings the squish right back.

- Two timeline options: Same-day baking (with a starter prepared the night before) or long-fermented over three days — choose whichever fits into your life.
Recipe Testing
I usually send my recipes to a dedicated group of home bakers to test before publishing. I didn’t do that here because this dough has already gone through that process!
Almost 200 bakers tested my Hawaiian rolls recipe, so borrowing that dough and reshaping it into hot dog buns only made sense. Amanda, my baking assistant, did a few test runs before I did a confirmation bake, and yep — these are delicious.

I do want to mention that Amanda found a shortcut during testing that knocks out two steps at once.
Instead of waiting for the tangzhong to cool and warming the milk separately, mix the cold ingredients right into the hot tangzhong. This brings the entire mixture to around 85–90°F (29–32°C) — exactly where we want it.
Baker’s Timeline
The same-day timeline works best in a warm kitchen (or in a proofing box, if you have one). Mix the dough in the morning to have fresh hot dog buns around dinnertime. Because there’s no cold proof, these buns will also have a milder flavor.
| Same-Day Timeline | |
|---|---|
| Stage | Step |
| Night before (around 7 PM) | Make the sweet stiff starter |
| The next morning (around 9 AM) | Make the tangzhong and mix the dough |
| After a 30-minute rest (around 9:45 AM) | Mix butter into the dough |
| Mid-day (around 1 PM, but proofing times can vary) | Shape the buns |
| Evening (around 7 PM, but proofing times can vary) | Bake the buns |
The long-fermented timeline adds a cold proof, which can make scheduling a little easier. It can also produce a slightly tangier result, and some people with gluten sensitivity report that an added cold proof helps with digestibility.
| Long-Fermented Timeline | |
|---|---|
| Stage | Step |
| DAY 1: Night before (around 7 PM) | Make the sweet stiff starter |
| DAY 2: The next morning (around 9 AM) | Make the tangzhong and mix the dough |
| DAY 2: After a 30-minute rest (around 9:45 AM) | Mix butter into the dough |
| DAY 2: Mid-day (around 1 PM, but proofing times can vary) | Shape the buns and refrigerate the pan, or refrigerate the dough and shape the buns the next morning |
| DAY 3: The next morning (around 8 AM) | Set the shaped buns out on the counter, or shape the refrigerated dough and place the buns in the pan |
| DAY 3: Afternoon (around 3 PM, but proofing times can vary) | Bake the buns once fully proofed |

Equipment You’ll Need
I’m a big fan of the USA Pan hot dog bun pan. I know it’s a single-purpose item, and I’m generally against those, but this is an exception in our house.

It fits 10 hot dog buns and allows them to proof right into each other, keeping that classic hot dog bun shape. You end up with buns that look just like store-bought.
That said, you can absolutely proof these on a baking sheet. Just place the buns really close together so they rise into each other.
Aside from the special pan, this recipe uses basic equipment that you likely already have at home:
- Scale: The OXO 11-lb scale is my personal favorite.
- Bowl: A large glass mixing bowl lets you make the tangzhong and mix the dough in one bowl — fewer dishes, and you can see the fermentation activity through the sides. If you’re using a stand mixer, its bowl can work just fine for the first rise instead.
- Danish dough whisk: If you’re mixing by hand, a tool like this makes the initial mixing a lot easier.
- Bench scraper: I use it to divide the dough and tidy up my work surface while shaping. It’s also a big help when the dough sticks — slide the scraper underneath to release it, then dust your work surface with a little flour before continuing.
- Small rolling pin: This is a handy tool for rolling each piece of dough into a rectangle before rolling it into a log. You can absolutely use floured hands to push and press the dough into this shape, but a rolling pin makes it easier.

- Pastry brush: To brush on the heavy cream before baking. If you don’t have one, you can use a torn-off piece of paper towel. You can watch my friend Noelle doing this trick in her hamburger bun reel!
- Bowl cover and plastic wrap: I use a bowl cover (15% off with code THATSOURDOUGHGAL) to, well, cover my bowl… but I use plastic wrap to cover the hot dog bun pan. Use whatever you have on hand to cover, but be sure it doesn’t let too much air in or the surface will dry out.
- Thermometer: Used to check the temperature of the tangzhong and also the buns at the end of baking.
Ingredient Substitutions
- Dairy-free: You can replace the cow’s milk with an unsweetened, unflavored non-dairy milk. Testers had success with cashew milk and almond milk. You can also replace the butter with vegan butter.
- Other types of milk: I always use whole milk, but testers had success with 2% and lactose-free milk. One creative baker used half heavy cream and half water with excellent results.
- All-purpose flour: You can use all-purpose in place of the bread flour, but add an extra 15–20g to the main dough.
- Less sugar: This is intentionally a sweet dough, so if you’re looking for a less-sweet bun, you may prefer my regular hot dog bun recipe. That said, a few testers cut the sugar in half and reported good results, so that’s an option, too.

Troubleshooting Tips

FAQs
When I developed the Hawaiian roll recipe, I fully intended to use pineapple juice as the liquid base. But after testing it several times, it just didn’t taste right.
The King’s Hawaiian rolls from the store don’t have pineapple juice in them, and while the flavor is fun, my goal was to recreate those store-bought rolls. Feel free to swap some of the milk in the main dough for pineapple juice if you want! It won’t negatively impact fermentation. You can watch a time-lapse of pineapple juice fermenting here.
The milk powder adds softness to the buns (a technique I borrowed from Japanese milk bread), but it isn’t absolutely essential. Sixteen recipe testers for the original roll recipe omitted the milk powder and still gave the recipe 4–5 stars. If you skip it, add an extra 11g of bread flour to compensate.
No, don’t swap the milk for water. This was the #1 cause of failure during testing. Multiple bakers who used water instead of milk ended up with sticky, unworkable dough that they had to throw away. Stick with some type of milk (dairy or non-dairy) for the best results.
Yes! Reduce the sugar to 25g in the main dough. As one Washington tester said: “I put a little less sugar in it, and it was perfect! Exactly what I wanted.”
This is very specific, but I originally tested this recipe in my Ooni stand mixer. I kept those notes and thought they were worth including in case they help someone!
• Mix all of the main dough ingredients except the butter at speed 25 until incorporated (2–3 minutes).
• Increase speed to 45–50 for about 7 minutes, or until the dough is smooth in appearance (no longer shaggy or textured).
• You can cover the bowl and wait 30 minutes or take a shortcut and add the butter now (either is fine!).
• Add half of the softened butter to the bowl and mix on speed 30 until combined.
• Add the remaining butter and mix until fully incorporated, increasing to speed 45 and using a spatula to assist, if needed.
• This is a small batch of dough, so it tends to climb the dough hook toward the end of mixing and may need a little help. Cover the bowl, then continue with the first rise.
Storing and Reheating
Let the buns cool completely before you store them — if you bag them warm, the trapped steam will create condensation.
Room temperature: Store in a sealed plastic bag or an airtight container for 3–4 days.
Freezer: Once fully cooled, place the buns in a freezer-safe bag, press out as much air as possible, and freeze for up to 3 months. Thaw at room temperature, or microwave straight from frozen in 20-second bursts.
Reheating: This is the step I don’t want you to skip. The butter in this dough firms up as the buns sit, so a day-old bun will feel denser than it did fresh out of the oven. Warm them for about 10–20 seconds in the microwave or for 5–7 minutes, wrapped in foil, in a 300°F (150°C) oven, and that soft, squishy texture comes right back.


Sourdough Hawaiian Hot Dog Buns
Equipment
- Large mixing bowl or stand mixer fitted with the dough hook
- Danish dough whisk if mixing by hand
- Bowl cover 15% off with code THATSOURDOUGHGAL
- USA Pan hot dog bun pan or baking sheet
Ingredients
Sweet Stiff Sourdough Starter
- 40 g water
- 20 g sourdough starter
- 20 g sugar or honey
- 80 g bread flour
Tangzhong
- 18 g bread flour
- 88 g whole milk
Main Dough
- all of the tangzhong
- 85 g cold whole milk See Notes for substitutions
- 1 cold egg
- 1 cold egg yolk
- 50 g sugar
- 11 g milk powder optional, but adds softness
- 270 g bread flour 12.7–13.5% protein
- all of the sweet stiff starter
- 7 g sea salt
- 56 g (4 tbsp) unsalted butter I recommend European-style
Before Baking
- 1 tbsp heavy cream
Before You Begin

Instructions
Make the Sweet Stiff Starter (Evening Before)
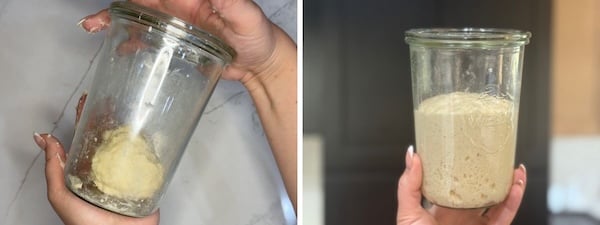
- Make the sweet stiff starter: In the early evening, mix 40 g water, 20 g sourdough starter, 20 g sugar, and 80 g bread flour in a glass jar. Remove the mixture from the jar and knead until the ingredients are fully incorporated, then return it to the jar. Cover loosely and let ferment in a warm place until morning. See Notes for timing and tips.

Prepare Dough (The Next Morning)
- Set out butter: In the morning, set out 56 g (4 tbsp) unsalted butter to soften.
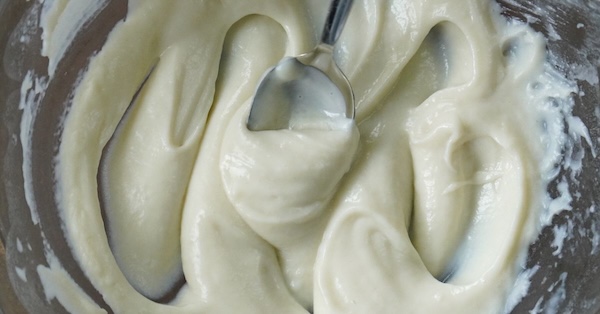
- Make tangzhong: In a glass mixing bowl, whisk together 18 g bread flour and 88 g whole milk. Microwave in 20-second intervals until it thickens and reaches 150°F (65°C), about 2–3 rounds total. See Notes for stovetop instructions.

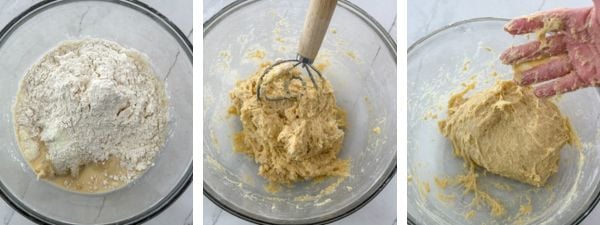
- Mix the dough: • If mixing by hand: To your bowl with all of the tangzhong, whisk in 85 g cold whole milk first to cool the mixture. Then add 1 cold egg, 1 cold egg yolk, 50 g sugar, and 11 g milk powder, whisking constantly so the eggs don't scramble. Then, add 270 g bread flour, all of the sweet stiff starter, and 7 g sea salt. Use a Danish dough whisk or your hands to incorporate all of the ingredients. • If using a stand mixer: Transfer all of the tangzhong to the bowl of a stand mixer fitted with the dough hook. Add 85 g cold whole milk first and mix briefly to cool the tangzhong. Then add 1 cold egg, 1 cold egg yolk, 50 g sugar, and 11 g milk powder. Mix on low speed until incorporated (help it along with a spatula or whisk if needed). Then, add 270 g bread flour, all of the sweet stiff starter, and 7 g sea salt. Knead on low speed for about 10 minutes. This dough will not pull away from the sides of the bowl.
- Texture check: The dough will be sticky and shaggy. But let's make sure it's not too sticky — compare your dough to mine and add flour in 1 tbsp increments until the consistency matches. If your dough is stiffer, add milk in 1 tbsp increments. Then, cover the bowl and let rest for 30 minutes.

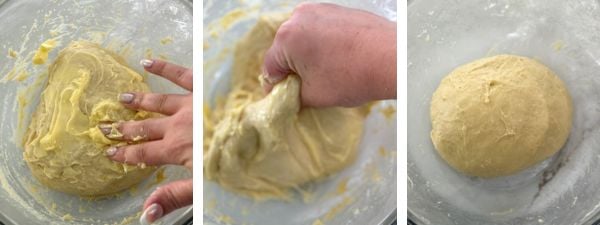
- Add the butter: • If mixing by hand: Spread 56 g (4 tbsp) unsalted butter (softened) on top of the dough. Pinch and squeeze it into the dough (think lobster claws) until it's mostly incorporated. Switch to slap-and-folds on your counter until the dough smooths out. This process takes 4–5 minutes. Cover and let rest for 30 minutes. • If using a stand mixer: Add half of the softened butter (28 g / 2 tbsp) to the bowl and mix on low speed until combined. Add the remaining (28 g / 2 tbsp) butter and mix until fully incorporated and the dough smooths out. Optionally, transfer dough to a greased glass bowl (makes it easier to dump out later). Cover and let rest for 30 minutes.
- First rise: Place your bowl in a warm spot (75–80°F/24–27°C is ideal) for 3–5 hours, or until the dough has relaxed, puffed up slightly, and is showing signs of fermentation. There should be small bubbles around the sides and under the surface of the dough.



Shape the Buns (Mid-Day)
- Long fermentation option: You can refrigerate the unshaped dough after the first rise, or shape the buns and refrigerate the pan overnight. If you refrigerate the dough unshaped, shape the buns the next morning. Either way, let the shaped buns finish rising at room temperature before baking. See the Baker's Timeline section in the full blog post for more information.
- Divide: Dust your work surface with bench flour. Dump out the dough and weigh it. Divide the total weight by 10 (it should be about 80 g per bun). Divide the dough into 10 equal pieces.Note: if you're struggling with stickiness, use bench flour to help. You can also refrigerate the dough for 15–20 minutes — cold dough is easier to handle.
- Shape: Roll each piece into a rectangle with a rolling pin, using bench flour to prevent sticking. Thin the bottom edge with your thumb, then roll the dough from the top toward you.

- Seal: Pinch the sides and center seam closed. Using your palms, gently roll the bun until it’s an even thickness and about 6 inches long. Place seam-side down in your baking pan.
- Second rise: Cover with plastic wrap and let rise until the buns have puffed up and are crowding into each other. If you poke the dough with a floured finger, it'll leave an indentation. In a 77°F (25°C) environment, this took 6 hours, but your timing may vary.


Bake the Buns
- Bake: If you're baking the buns the same day, preheat the oven once they're nearly finished with the second rise. If you did the optional cold proof, let the buns finish rising at room temperature before you preheat.Preheat the oven to 400°F (205°C), conventional — not convection.Brush the tops of the buns with 1 tbsp heavy cream and bake for 12 minutes. Lower the oven to 350°F (175°C) and bake for another 5–15 minutes, rotating the pan partway through, until the tops are golden brown and the internal temperature reads about 195°F (90°C).Optional: broil for about 2 minutes at the end for a deeper color. Watch them the whole time — broilers vary, and these go from golden to too dark fast.
- Let the buns cool in the pan for about 10 minutes, then turn them out onto a cooling rack. Enjoy warm!

Notes
Conclusion
If you love King’s Hawaiian rolls, I hope you try these hot dog buns! They elevate the whole hot dog-eating experience.
Remember to warm them before serving — the butter firms up during storage, but reheating brings that soft, squishy texture right back. And be sure to leave a rating and share a photo of your bake in the comment section below!
Other recipes you might want to try:




I have not made these yet but looking forward to it. Could these also be made into hamburger rolls? We don’t eat hot dogs very often anymore but do occasionally eat a burger. Thanks!
Yes definitely!
I am eager to make these! I am curious about what this statement means:
“the tangzhong helps slow down staling” was written on the recipe card.
I googled the word, and it means making bread stale. I figured that wasn’t what you meant!
I’m not sure what you mean! The tangzhong in this recipe helps the bread last longer (it won’t stale as quickly).
I’m pretty sure I’ve never had a sourdough hot dog bun! Cool!
I don’t think I can ever go back to a store bought bun. These are so fluffy and soft. It’s hard to save them for dinner! My shaping needs a little work but I doubt anyone will care once they taste them 😊
Love it!! It really does ruin storebought forever
These are the best hotdog rolls!! Thank you! They even pulled apart so easy.
So glad to hear it!!
Another winning recipe. Thanks, Rebekah! Haven’t tasted them yet, but they look great (except for the one in the right hand corner that got a little well done)! Decided to make half hotdog buns and half hamburger buns. I do have one of the hotdog bun pans, but I found that it made them very narrow. I still used the same hotdog bun pan, but skipped every other slot to make them a little wider. I did find that the dough was very sticky, but I knew that coming in so I was prepared for that!
Looks so yummy!!
I am wondering if I could use two glass baking dishes with inner measurements of 6″x10″? I figure that I could bake five in each one.
Yeah I’m sure that’d work!
These were delicious! Super fluffy and just like Hawaiian rolls. My husband likes these even more than your other hot dog buns (and that’s saying something)
Since my house runs cooler at night, I let them bulk ferment on the counter overnight and shaped them in the morning. I also replaced some of the bread flour with freshly milled hard white flour.
Thank you so much for sharing! I am so glad these turned out great for you!