
The Best Sourdough Brown Bread Recipe (Tested By 340+ Bakers)

If you love the soft, slightly sweet brown bread from Cheesecake Factory or Outback, this sourdough brown bread is for you.
Over 340 home bakers around the world tested this recipe for me, and when their feedback came in… all I can say is wow!
“This may be the best loaf of bread I have ever made. I can’t stop eating it!” —Recipe tester from Kinnelon, New Jersey
The recipe earned an average rating of 4.8 out of 5 stars — the best survey feedback I’ve ever received.
“The flavor of this bread is incredible. It’s soft and not dense like some whole wheat breads can be, and it has that perfect Cheesecake Factory flavor but you also know it’s sourdough.” —Recipe tester from Round Lake Beach, Illinois

Despite being 50% whole wheat, this loaf isn’t dense — my kids said it’s some of the best bread I’ve ever made. Plus, the recipe is so flexible that you can make it work around any schedule. If you work a 9–5 and struggle to fit sourdough into your day, this is a staple recipe for you.
Let me show you how to make it!
Disclosure: Some of the links to products I recommend in this post are affiliate links — if you choose to purchase through one of my links, I may earn a small commission, which helps fund this website, recipe development, and monthly giveaways. I sincerely appreciate your support.
Why You’ll Love This Sourdough Brown Bread
- Better than restaurant brown bread: Testers said it reminded them of the brown bread served at Cheesecake Factory, Outback, LongHorn, and Saltgrass Steakhouse, and plenty of them even said it was better.
“This brown bread tastes even better than the Cheesecake Factory — perfect amount of sweetness and so soft.” —Recipe tester from Kinnelon, New Jersey
- 50% whole wheat, yet still soft and fluffy: Usually, doughs made with 50% whole wheat are on the denser side, but this one surprised me — in the best way. It’s truly light, fluffy, and delicious.
“The flavor was absolutely delicious. We aren’t a whole wheat family, but the molasses and tiny hint of cocoa balanced out the whole wheat flavor.” —Recipe tester from Orange County, California

- Perfect timeline if you work 9-5: Bulk fermentation takes about 8–10 hours for this loaf (the sugar slows things down quite a bit). It’s perfect to mix before bed and shape in the morning. Or, you can mix it before leaving the house and shape it when you get home.
“This loaf takes longer than most to proof, but that’s one of the best things about this recipe — it gives you so much freedom, and the results do not disappoint!” —Recipe tester from Camden, Arkansas
- The dough is a dream: After mixing, this dough needs just two sets of stretch and folds, plus an optional coil fold. Even bakers who’ve struggled with whole wheat loaves before said it was “silky,” “soft,” and “easy” to work with.
- Super versatile and kid-approved: While I made this brown bread to satisfy my husband’s Thanksgiving stuffing request, it’s also amazing for sandwiches, toasted with butter, or eaten on its own. My kids LOVE this bread, and for my pickiest eater, that is saying something!
Also, I don’t usually mention this, but if you run a microbakery, this might be a good recipe to throw into your rotation. The ingredients are simple, and the recipe is easy to scale up — use the 0.5x, 1x, or 2x buttons on the recipe card, or adjust the number of slices to scale it even further.
“My customers LOVE it. Sold out at market.” —Recipe tester from Southwest Louisiana
The Recipe Testing Journey
For Thanksgiving in 2025, my husband begged me to make some sourdough brown bread. I told him, “But I don’t have a recipe for that yet!”
His response? “Make one! That’s what you do!”
Challenge accepted.
I drafted a test recipe — just a simple modification of my typical sourdough bread — and my only note? Needs more molasses.
I probably should’ve kept testing, but Thanksgiving was over, and I forgot about the brown bread.
When I came back to the recipe later, I retested it with more molasses, and it was perfect.

I sent it off to my amazing group of recipe testers, and the feedback is the best I’ve ever gotten. I received 343 survey responses, and the recipe earned an overall rating of 4.8 out of 5 stars!
“This bread has the greatest flavor and softest texture of any wheat bread I’ve ever made. The oven spring was spectacular!” —Recipe tester from Atlanta, Georgia
Here’s a look at some of their amazing bakes!


Bulk Fermentation Timing
This recipe takes quite a bit longer to ferment than a regular loaf of sourdough bread, so you’re going to want to plan ahead.
Why is fermentation so long? The molasses and brown sugar added to this loaf slow down fermentation significantly. In general, sugar attracts water, leaving less water available to the yeast, which slows down its gas production. That’s why fermentation seems to lag with this loaf.
Here’s a look at how long bulk fermentation took, on average, for recipe testers:
| Dough/Room Temp | Average Bulk Fermentation Time |
|---|---|
| 68–73°F (20–23°C) | 9–10 hrs |
| 74–76°F (23–24°C) | 8–9 hrs |
| 77–80°F (25–27°C) | 7–8 hrs |
Baker’s Timeline
There are two ways you can approach your timeline:
- Daytime fermentation: If you bulk ferment during the day, you’ll want to mix the dough in the early morning so it has enough time to ferment throughout the day. Perfect if you work 9–5.
- Overnight fermentation: Mix the dough in the evening, do a set or two of stretch and folds before bed, and let it finish fermenting overnight. To avoid overproofing, this timeline works best for homes on the cooler side — under 74°F (23°C) is ideal. By the time you wake up, it should be ready to shape.
Here’s what the daytime fermentation would look like:
| Daytime Fermentation Timeline | |
|---|---|
| Stage | Step |
| DAY 1: Evening (9 PM) | Feed your starter |
| DAY 2: Morning (8 AM) | Mix the dough |
| 9 AM | Stretch and fold |
| 10 AM | Stretch and fold |
| 11 AM | Optional coil fold |
| Late afternoon (around 5 PM, but proofing times can vary) | Pre-shape |
| 5:10 PM | Shape and cold proof overnight |
| DAY 3: After at least 12 hours | Preheat the oven, score, and bake |

And here is the overnight bulk fermentation timeline:
| Overnight Fermentation Timeline | |
|---|---|
| Stage | Step |
| DAY 1: Morning (9 AM) | Feed your sourdough starter |
| Evening (9 PM) | Mix the dough (use cold ingredients for a longer fermentation window) |
| 10 PM | Stretch and fold (don’t worry about doing the second set) |
| DAY 2: Morning (around 7 AM) | Pre-shape |
| 7:10 AM | Shape and refrigerate |
| Evening (around 6 PM) or Any time the next day | Preheat the oven, score, and bake |
You can also skip the cold proof entirely with either timeline.
I’ll spare you from additional tables to scroll through, but instead of refrigerating your shaped dough? Just stick it in a warm spot until it passes the poke test. Then it’s ready to bake!
Equipment You’ll Need
Here’s the basic equipment I use to make this loaf (and any artisan sourdough bread, for that matter):
- Scale: I love the OXO 11-lb scale because it gives a fast and accurate reading.
- Bowl: A large mixing bowl for mixing, bulk fermenting, and doing your stretch and folds. If you’re using a stand mixer, you can let the dough bulk ferment right in the mixer bowl. The fancy blue bowl you’ll see in my recipe card photos is a 3.1-quart Le Creuset bowl (I love it, but it’s not necessary!).
- Bowl cover: I love these Doe A Deer bowl covers (15% off with code THATSOURDOUGHGAL), but you can also use plastic wrap or a plate to cover your bowl.
- Danish dough whisk: For easier hand mixing.
- Bench scraper: For shaping the dough.
- Banneton: An oval banneton for a batard, or a round one for a boule (5% off with code TSG5).
Related: The Best Sourdough Bannetons (And What to Skip)
- Parchment paper or bread sling: To transfer the dough into the hot Dutch oven.
- Bread lame: For scoring.
- Dutch oven: An oval Dutch oven for a batard, or a round one for a boule ($15 off with code REBEKAH15).
- Half sheet pan: Place it on the rack directly below your Dutch oven to help prevent a burnt bottom.
- Thermometer: To confirm doneness.
- Cooling rack: Let the loaf cool at least 90 minutes before slicing.
- Bread knife: A serrated knife makes clean slices without squishing the soft crumb.
- Bread bag: For storing the loaf at room temperature for up to 3 days (15% off with code THATSOURDOUGHGAL). A glass cake stand also works great.
Loaf Pan vs. Banneton and a Dutch Oven
You can absolutely use a loaf pan instead of a banneton and Dutch oven — it gives a softer crust and a sandwich-friendly shape.

To bake in a loaf pan instead of a Dutch oven:
- Shape the dough and place it directly in the loaf pan, seam-side down (no banneton needed).
- When it’s time to bake, use the double loaf pan method (a second pan inverted on top) using the same time and temperature as the recipe.
- Check the internal temperature before removing the top pan — loaf pans usually need a few extra minutes covered (more on that in the FAQs section).
My favorite loaf pans are these 1 lb USA Loaf Pans. They’re Teflon-free, and the nonstick coating makes the bread easy to release. If your pan tends to stick, grease it well or line it with parchment.
Tips for Making Amazing Sourdough Brown Bread
These tips are courtesy of the recipe testers. Many of them made this recipe multiple times with tiny tweaks each time to get better results.
- Have fun with shaping and scoring: Dust the surface with a little rice flour to make your scoring designs pop, or try shaping the dough into mini loaves or baguettes to make them look more like Cheesecake Factory’s brown bread. Just keep an eye on smaller loaves and shapes so they don’t burn.

- Prevent a burnt bottom: If you’re having trouble with the bottom burning (even with the sheet pan underneath your Dutch oven), put a small cooling rack, trivet, or foil underneath the parchment paper inside your Dutch oven.
- Don’t burn the top either: This dough is dark, so it’s hard to judge when it’s done baking by the color of the crust. Check the internal temperature after the covered part of the bake — if it’s below 190°F (88°C), keep the lid on for another 5 minutes. Otherwise, continue with the uncovered bake for the remaining 3–8 minutes, until the center reaches 200–210°F (93–99°C) and the crust sets. You can also add a foil dome while baking uncovered if you notice it browning too fast.
- Mix the cocoa powder with the flour first: A few testers found small pockets of dry cocoa powder in their baked loaf. To prevent this, you can whisk the cocoa powder into the flour before adding it to the wet ingredients. I don’t do this, and it’s not part of the official recipe, but I think it’s worth mentioning, especially if your cocoa powder is clumpy.

Ingredient Substitutions and Variations
- Freshly milled flour: About 30 testers used fresh-milled flour for the whole wheat portion (and a few for the whole loaf). Nearly all rated it 5 stars, and a few warned that bulk fermentation can move faster. Hydration adjustments depend on the type of wheat berry used, though most needed no adjustment at all. A few bakers using hard white wheat (most common), hard red wheat, or spelt reported needing about 25g more water. And those who used soft white wheat or Red Fife reported adding 1/4–1/2 cup additional flour.


- More sweetness or less tang: I think this bread has just the right amount of sweetness, but if you want it a little closer to your restaurant favorite, you can add more brown sugar or honey. If you prefer less sourdough tang, skip the cold proof and do a short second proof in a warm spot before baking.
- Less cocoa: The cocoa adds color and depth without making the bread taste chocolatey. If you find the chocolate flavor to be too strong or bitter (6 of the recipe testers did), you can cut the amount in half.
- Date syrup for molasses: One tester made this swap because molasses isn’t commonly available where she lives. Her loaf turned out great, although she did mention that the dough was noticeably stickier.

How to Serve Sourdough Brown Bread
Like I mentioned in the recipe testing section, I made this recipe intending to slice it into cubes for stuffing. But recipe testers really opened my eyes to all the possibilities.

For starters, they found that toasting this bread really brings out its flavor, so that’s my top tip. But beyond that, here are some of their serving suggestions:
- Toasted with honey butter: Make your own honey butter using one stick (1/2 cup or 113 g) of butter and 1/3 cup (113 g) of honey. Add a little cinnamon for a Texas Roadhouse-style honey butter or swap the honey for maple syrup and brown sugar instead.
- With your favorite spread: Get fancy with whipped cream cheese or a flavored one like honey pecan or pumpkin. Sweet spreads like apple or pear compote and orange marmalade also pair really well with this bread’s subtle sweetness.
- For sandwiches: Someone mentioned they were going to make a “Thanksgiving sandwich” with turkey, stuffing, cranberry sauce, and mayo, and I cannot get that thought out of my head!
“The taste was a surprise! It was killer! So soft, but substantial enough for a sandwich bread.” —Recipe tester from Cleo Springs, Oklahoma
- For breakfast: Top a toasted slice with a fried egg and avocado, or try it with sliced banana and a drizzle of honey. It would also be really good as French toast.
- Alongside soups and stews: Fall is the time for soup… and this bread. It’s perfect for dipping into any fall or winter soup or stew, like loaded baked potato soup, corn chowder, butternut squash soup, chili, or beef stew.
“I baked Saturday evening and this morning (2 1/2 days after baking) I took a couple of slices to my son and it was still so soft!” —Recipe tester from Circleville, Ohio

FAQs
That’s normal! The molasses smell can be quite strong during fermentation, but it mellows during baking.
Yes! A loaf pan gives you a softer crust and is great for sandwiches. Of the 17 testers who baked in a loaf pan, over half reported needing a longer baking time. When it’s time to remove the top pan, check the internal temperature. If it’s below 190°F (88°C), cover it again and give it 5 more minutes before rechecking the temperature. It’s better to extend the covered bake time, because a longer uncovered bake time can cause burning.
Yes! For that classic Cheesecake Factory look, spritz the shaped dough with water to help the oats stick, then sprinkle them on top (or roll the shaped dough in oats — either way). Then, bake as directed.
Based on their locations, at least 16 testers appear to have baked at elevations around 4,000–6,000+ ft (Colorado, Utah, Wyoming, New Mexico, northern Nevada) with no altitude-specific adjustments. All rated the recipe 4–5 stars. I personally live at about 70 ft (Florida gal), so it’s really encouraging to see the recipe work as written for testers at much higher elevations, too! knowing this recipe works as written for both my elevation and super high elevations is a huge win!
Yes! About 30 recipe testers used fresh-milled flour for the whole wheat portion, and nearly all of them rated it 5 stars. (Their hydration notes are in the Ingredient Substitutions and Variations section.)
After the recipe went live, a reader named Brianna emailed me her method. She milled 250 g of hard white wheat berries, sifted out about 40 g of bran, and scalded the bran with about 50 g of boiling water taken from the recipe’s 280 g. While the bran cooled, she mixed the fresh-milled flour with the remaining water first so it could absorb as much water as possible. Then she added the rest of the ingredients and mixed by hand for about 10 minutes.
She finished with 4 sets of coil folds, 20 minutes apart, until the dough passed the windowpane test. Her family devoured the loaf in less than 24 hours, leaving her just enough for one lunch sandwich!
“[…] The brown bread tasted delicious: lightly sweet, buttery flavor, just a hint of molasses! I loved everything about this recipe!” —Recipe tester from Chippewa Falls, Wisconsin

Sourdough Brown Bread
Equipment
- Bowl cover Use code THATSOURDOUGHGAL for 15% off
- Danish dough whisk if mixing by hand
- Banneton Use code TSG5 for 5% off
- Dutch oven Use code REBEKAH15 for $15 off
- Parchment paper or bread sling
- Bread bag Use code THATSOURDOUGHGAL for 15% off
Ingredients
Feed Your Starter
- 12 g sourdough starter
- 60 g water
- 60 g bread flour
Main Dough
- 280 g water
- 120 g active sourdough starter prepared above
- 60 g regular molasses do not use blackstrap
- 40 g brown sugar light or dark
- 30 g olive oil
- 10 g cocoa powder
- 250 g bread flour
- 250 g whole wheat flour
- 10 g salt
Before You Begin

Instructions
- Feed your starter: About 10–12 hours before you plan to mix the dough, in a medium glass jar, stir together 12 g sourdough starter and 60 g water. Mix in 60 g bread flour until smooth. Loosely cover and let it ferment for 10–12 hours at 68–75°F (20–24°C). This recipe uses 120 g, so you'll have 12 g left to maintain your starter.
- Mix the dough: When your starter is active and ready, combine 280 g water, 120 g active sourdough starter, 60 g regular molasses, 40 g brown sugar, 30 g olive oil, 10 g cocoa powder, 250 g bread flour, 250 g whole wheat flour, and 10 g salt in a large mixing bowl or stand mixer bowl. Knead until smooth — about 5 minutes by hand or 3–5 minutes on low speed in a stand mixer. If you want to skip the stretch and folds, mix in the stand mixer for about 10 minutes instead. (Bulk fermentation begins now.)

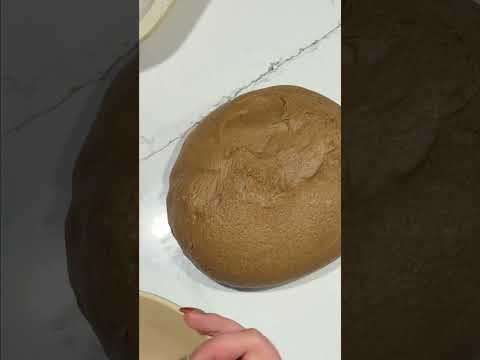
- Texture check: Compare your dough to the video below — if it's stiffer than mine, add water 1 tbsp at a time; if it's looser, add bread flour 1 tbsp at a time. Small adjustments are normal given all the variables in sourdough baking.

- Cover the bowl and let the dough rest for 1 hour.
- Dough strengthening: Perform a set of stretch and folds. Cover and rest 1 hour, then perform a second set. Cover and rest another hour, then optionally perform a set of coil folds. Cover and let the dough finish bulk fermentation undisturbed.
- Finish bulk fermentation: Bulk fermentation began when you first mixed the dough. For me, it took 9 hours in a 74°F (23°C) kitchen. Recipe testers reported a similar range: about 8–9 hours at 74–76°F (23–24°C), 9–10 hours in cooler kitchens around 68–73°F (20–23°C), and 7–8 hours at 77–80°F (25–27°C). Timing varies, so trust the visual cues over the clock.
- Know when it’s ready: Bulk fermentation is done when the dough has increased in volume by about 75% and is covered in bubbles. If you press a finger into the surface, it should feel aerated and springy. Watch the video below to see what my dough looked like at the end of bulk fermentation.
- Pre-shaping: If your dough feels tacky, lightly flour your work surface. Turn out your dough and flip it so the smoothest side is facing up. Use your bench scraper to push the mass of dough up, around, and back toward you (like a candy cane motion). Continue doing this motion gently until you've coaxed the mass of dough into a round. Let rest 10 minutes, uncovered.
- Final shaping:For a boule (round): Repeat the pre-shaping motion to create more surface tension, then flip the dough into a floured banneton, smooth side down. Pinch the seams. Cover and refrigerate overnight, 12–36 hours.For a batard (oval): Use the caddy clasp technique — fold the dough together like closing a book and place it into a floured banneton. Pinch the center seam closed. Cover and refrigerate overnight, 8–36 hours.Optional: If you feel like the dough needs a little more rise before going in the fridge, let it rest on the counter for 30–60 minutes first.
- Preheat: When you're ready to bake, preheat the oven to 425°F (220°C) conventional with a Dutch oven inside.
- Score: Transfer dough to parchment paper or a bread sling; score a shallow line straight down the middle.
- Bake: Place a sheet tray underneath the Dutch oven to prevent a burnt bottom. Bake for 40 minutes, covered. Remove the lid. If the internal temperature is below 190°F (88°C), re-cover and give it 5 more minutes. Otherwise bake 3–8 minutes uncovered, until the crust is set and the center reaches 200–210°F (93–99°C).
- Cool: Cool on a wire rack for at least 90 minutes before slicing.
- Storage: Store in a bread bag or airtight container at room temperature for up to 3 days. For longer storage, slice and freeze in a zip-top bag for up to 3 months. Toast straight from frozen.




Video

Notes

“The taste was very close to Cheesecake Factory. In fact my adult son said, ‘Is this the brown bread from Cheesecake Factory?'” —Recipe tester from Redding, California
Conclusion
I can’t wait for you to try this sourdough brown bread!
If you make it, let me know how you served it and tag me on Instagram. I’d love to hear if you come up with another way to enjoy it that I haven’t thought of yet.
Happy baking!!
Similar recipes:


Hi can’t locate video you referred to for end of bulk fermentation ?
I apologize! That video must’ve gotten removed by accident! It has been added back.
This recipe is delicious! Seriously so yummy. I mill my own flour, so I actually made it with 100% whole wheat. I increased the hydration to make up for this, and it still worked! Thank you so much, so fun to have a new sourdough recipe.
Can’t find video of end of bulk fermentation?
I apologize! That video must’ve gotten removed by accident! It has been added back.
Hello.. where can I find the full video I would Ike to see the steps. Thanks you
Refresh the page, and it’ll show up on the recipe card!
Turned out amazing!!!
Yay! So glad to hear!
I made this and was spectacular! Thank you! Question, can I leave out the brown sugar for a less sweet loaf?
You can try it, but we did not test that! The amount of molasses and brown sugar is integral to this loaf’s style, so drastically reducing or omitting it wouldn’t really fit the brown bread recipe as a whole. If you wanted less sugar/no sugar, I’d probably steer you to a different recipe altogether.
This was a hit at our house. Im pretty new on the sourdough journey. Followed the recipe exactly. Did the overnight BF. Videos were a blessing. Was so excited my finger poke looked like yours! Keeper recipe. THANK YOU!
YAY! This makes me so happy to hear, glad this one worked out great for you!
Already had to make it twice. Accidentally printed the 2x version, so the first time i ended up with two large loaves. The second time I thought I’d try more of a baguette size, since I was bringing them to a potluck. I ended up with 5 very thick demi baguette-sized loaves. All of them absolutely delicious.
WOW! These look incredible! Thank you for sharing!
I’ve baked this 3x already, soo yummy!
YAY! I am so happy to hear this recipe turned out great for you! I am obsessed!
Can I use your sweet stiff starter? If so, what are the adjustments to flour and H2O? Planning on baking this loaf this weekend. Thanks!
Sure! You’ll want to make an equal-and-opposite adjustment to the dough. If you tell me your ingredient amounts for your sweet stiff starter, I can give you those numbers.
I sent you some DM’s Rebekah! The first time I tried to make this loaf, it would not rise…I figured it was because my house was cold. So the second time I left it in the oven with the light on all day and NOTHING. No rise. I baked them both. Both were heavy and horribly dense but the flavor was delicious. I researched what it could possibly be and figured I would post it here in case someone is having the same issue. Its called osmotic shock. Something to do with the high sugar content etc. I decided to use your sweet stiff starter from your wonderbread recipe and cut it in half. Apparently this trains the yeast to work through high sugar faster than a regular starter. Omg it worked. Finally had rise and beautiful bubbles. The baked result was light and fluffy and I feel like I could have pushed the first rise even longer. Thank you so much for the recipe! It is perfection! I am attaching some pics of the risen loaf next to the non risen loaf. The height difference is crazy!
Ahh amazing! I am so glad this worked for you, and these look amazing!!
I just baked this loaf and it is delicious! Thank you so much for this amazing recipe!
Wow these look amazing! Thank you so much for sharing!
Followed recipe as written and was so surprised at how beautiful and soft this loaf was! Will for sure make again. Next time will try loaf pan and slice for sandwiches. Excited to see how it toasts also. Thank you!
Yay! Thank you!
I made a different brown bread for Thanksgiving last year. While it turned out fine, I haven’t made it since. This one is delicious! Great flavor and texture! I’m going to make soup for lunch to serve with this amazing bread. It will be one part of my regular rotation.
Yay! Looks gorgeous!
This bread was out of this world good! I’ve made a ton of loaves and my son said this was the best one yet. It tastes even better than the brown bread at the restaurants. Thank you for all the time and work you put into your craft. We are so lucky to reap the benefits! 😊
Aww thank you so much! It looks incredible, thank you for sharing!
Omg…another outstanding recipe. So easy to follow. Came out perfect on the first try. You never disappoint this sourdough baker. Ever! Thanks, so much.
Aww you are so kind, Pat! Thank you, this loaf looks incredible!
OMG so good! I have been working with fresh milled flour for several months and haven’t had much luck with anything over 30% fresh milled. This load turned out amazing, and was a pretty low maintenance loaf. All I did was sift out about 1/3 of the bran. I tried really hard to wait the 90 minutes to let it cool but had to cut into it at 70. Can’t wait to make it again.
Ah yay! I love to hear this, Dana. Thank you so much for sharing your experience with FMF, this is so helpful! Glad you loved this loaf!
The best recipe ever, soft, flavorful, I never heard of this bread until you introduced me to it.
Me and my husband are addicted to this bread now.
Just the best recipe ever!!! You are the best Rebekah, thank you so much for your sharing recipes and techniques making us better sourdough bakers, you are loved and so APPREICATED! Blessings to you and your family!
Aww wow, this truly means so much to me! Thank you for being here and for making my recipes. This loaf looks gorgeous!